
When you're implementing UITableView, it's good to be aware of the fact that you're actually working with a fairly complex component. This is why we didn't pick a UITableViewController at the beginning of this chapter. UITableViewController does a pretty good job of hiding the complexities of UITableView from the developers.
The point of this chapter isn't just to display a list of contacts; it's purpose is also to introduce some advanced concepts about a construct that you might have seen before, but have never been aware of.
Throughout the iOS SDK and the Foundation framework the delegate design pattern is used. Delegation provides a way for objects to have some other object handle tasks on their behalf. This allows great decoupling of certain tasks and provides a powerful way to allow communication between objects. The following image visualizes the delegation pattern for a UITableView component and its UITableViewDataSource:
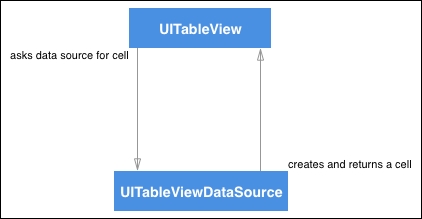
The UITableView uses two objects that help in the process of rendering a list. One is called the delegate, the other is called the data source. When you use a UITableView, you need to explicitly configure the data source and delegate properties. At runtime, the UITableView will call methods on its delegate and data source in order to obtain information about cells, handle interactions and more.
If you look at the documentation for the UITableView delegate property it will tell you that its type is UITableViewDelegate?. This means that the delegate's type is UITableViewDelegate. The question mark indicates that this value could be nil; we call this an Optional. The reason for the delegate to be Optional is that it might not ever be set at all. Diving deeper into what this UITableViewDelegate is exactly, you'll learn that it's actually a protocol and not a class or struct.
A protocol provides a set of properties and/or methods that any object that conforms to (or adopts) this protocol must implement. Sometimes a protocol will provide optional methods, as the UITableViewDelegate does. If this is the case, we can choose which delegate methods we want to implement and which method we want to omit. Other protocols have mandatory methods. The UITableViewDataSource has a couple of mandatory methods to ensure that a data source is able to provide UITableView with the minimum amount of information needed in order to render the cells you want to display.
If you've never heard of delegation and protocols before, you might feel like this is all a bit foreign and complex. That's okay; throughout this book you'll gain a deeper understanding of protocols and how they work. In particular, the next section, where we'll cover swift and protocol-oriented programming, should provide you with a very thorough overview of what protocols are and how they work. For now, it's important to be aware that a UITableView always asks another object for data through the UITableViewDataSource protocol and their interactions are handled though the UITableViewDelegate. If you were to look at what UITableView does when it's rendering contents it could be dissected as follows:
UITableViewneeds to reload the data.UITableViewchecks whether it has a delegate; it asks thedataSourcefor the number of sections in this table.- Once the delegate responds with the number of sections, the table view will figure out how many cells are required for each section. This is done by asking the
dataSourcefor the number of cells in each section. - Now that the cell knows the amount of content it needs to render, it will ask its data source for the cells that it should display.
- Once the data source provides the required cells based on the number of contacts, the
UITableViewwill request that it display the cells one by one.
This process is a good example of how UITableView uses other objects to provide data on its behalf. Now that you know how the delegation works for UITableView, it's about time you start implementing this in your own app.
In order to specify the UITableView's delegate and data source, the first thing you need to do is to create an @IBOutlet for your UITableView and connect it to ViewController.swift. Add the following line to your ViewController, above the viewDidLoad method:
@IBOutlet var tableView: UITableView!
Now, using the same technique as before when designing UITableViewCell, select the UITableView in your Main.storyboard file and use the Connections Inspector to drag a new outlet reference to the UITableView. Make sure you select the tableView property and that's it. You've now hooked up your UITableView to the ViewController code.
To make the ViewController code both the data source and the delegate for UITableView, it will have to conform to the UITableViewDataSource and UITableViewDelegate protocols. To do this, you have to add the protocols you want to conform to your class definition. The protocols are added, separated by commas, after the superclass. When you add the protocols to the ViewController, it should look like the following:
class ViewController: UIViewController, UITableViewDataSource,
  UITableViewDelegate {
    // class body

}
Once you have done this, you will have an error in your code. That's because even though your class definition claims to implement these protocols, you haven't actually implemented the required functionality yet. If you look at the errors Xcode is giving you, it becomes clear that there's two methods you must implement. These methods are tableView(_:numberOfRowsInSection:) and tableView(_:cellForRowAt:).
So let's fix the errors by adjusting our code a little bit in order to conform to the protocols. This is also a great time to refactor the contacts fetching a little bit. You'll want to access the contacts in multiple places so that the list should become an instance variable. Also, if you're going to create cells anyway, you might as well configure them to display the correct information right away. To do so, perform the following code:
var contacts = [CNContact]()

// ... viewDidLoad
// ... retrieveContacts

func tableView(_ tableView: UITableView, numberOfRowsInSection section: Int) ->
  Int {
    return contacts.count
}

func tableView(_ tableView: UITableView, cellForRowAt indexPath: IndexPath) ->
  UITableViewCell {
    let cell = tableView.dequeueReusableCell(withIdentifier: "contactCell") as!
      ContactTableViewCell
    let contact = contacts[indexPath.row]

    cell.nameLabel.text = "(contact.givenName) (contact.familyName)"
    if let imageData = contact.imageData where contact.imageDataAvailable {
        cell.contactImage.image = UIImage(data: imageData)
    }

    return cell
}
The preceding code is what's needed to conform to the UITableViewDataSource protocol. Right below the @IBOutlet of your UITableView, a variable is declared that will hold the list of contacts. The following code snippet was also added to the ViewController:
func tableView(_ tableView: UITableView, numberOfRowsInSection section: Int) ->
  Int {
    return contacts.count
}
This method is called by the UITableView to determine how many cells it will have to render. This method just returns the total number of contacts that's in the contacts list. You'll notice that there's a section parameter passed to this method. That's because a UITableView can contain multiple sections. The contacts list only has a single section; if you have data that contains multiple sections, you should also implement the numberOfSections(in:) method.
The second method we added was as follows:
func tableView(_ tableView: UITableView, cellForRowAt indexPath: IndexPath) ->
  UITableViewCell {
    let cell = tableView.dequeueReusableCell(withIdentifier: "contactCell") as!
      ContactTableViewCell
    let contact = contacts[indexPath.row]

    cell.nameLabel.text = "(contact.givenName) (contact.familyName)"
    if let imageData = contact.imageData where contact.imageDataAvailable {
        cell.contactImage.image = UIImage(data: imageData)
    }

    return cell
}
This method is used to get an appropriate cell for our UITableView to display. This is done by calling dequeueReusableCell(withIdentifier:) on the UITableView instance that's passed to this method. This is because UITableView can reuse cells that are currently off screen. This is a performance optimization that allows UITableView to display vast amounts of data without becoming slow or consuming big chunks of memory. The return type of dequeueReusableCell(withIdentifier:) is UITableViewCell, and our custom outlets are not available on this class. This is why we force cast the result from that method to ContactTableViewCell. Force casting to your own subclass will make sure that the rest of your code has access to your nameLabel and contactImage.
Casting objects will convert an object from one class or struct to another. This usually only works correctly when you're casting from a superclass to a subclass like we're doing in our example. Casting can fail, so force casting is dangerous and should only be done if you want your app to crash or consider it a programming error in case the cast fails.
We also grab a contact from the contacts array that corresponds to the current row of indexPath. This contact is then used to assign all the correct values to the cell and then the cell is returned. This is all the setup needed to make your UITableView display the cells. Yet, if we build and run our app, it doesn't work! A few more changes will have to be made for it to do so.
Currently, the retrieveContacts method does fetch the contacts for your user, but it doesn't update the contacts variable in ViewController. Also, the UITableView won't know that it needs to reload its data unless it's told to. Currently, the last few lines of retrieveContacts will look like the following:
let contacts = try! store.unifiedContacts(matching: predicate, keysToFetch:
  keysToFetch)
print(contacts)
Let's update these lines to the following code:
contacts = try! store.unifiedContacts(matching: predicate, keysToFetch:
  keysToFetch)
tableView.reloadData()
Now, the result of fetching contacts is assigned to the instance variable that's declared at the top of your ViewController. After doing that, we tell the tableView to reload its data, so it will go through the delegate methods that provide the cell count and cells again.
Lastly, the UITableView doesn't know that the ViewControler instance will act as both the dataSource and the delegate. So, you should update the viewDidLoad method to assign the UITableView's delegate and dataSource properties. Add the following lines to the end of the viewDidLoad method:
tableView.dataSource = self
tableView.delegate = self
If you build and run it now, your app works! If you're running it in the simulator or you haven't assigned images to your contacts, you won't see any images. If you'd like to assign some images to the contacts in the simulator, you can drag your images into the simulator to add them to the simulator's photo library. From there, you can add pictures to contacts just as you would on a real device. However, if you have assigned images to some of your contacts you will see their images appear. You can now scroll through all of your contacts, but there seems to be an issue. When you're scrolling down your contacts list, you might suddenly see somebody else's photo next to the name of a contact that has no picture! This is actually a performance optimization. Let's have a look at what's going on and how you can fix this.