
Chapter 7: Authentication and Authorization in Strapi
In this chapter, we will explore the topic of authentication and authorization in Strapi. We will start the chapter by explaining the difference between admin users and API users. Then, we will see how to work with login and sign-up functionality. Afterward, we will explain how to protect and secure certain API routes from unauthorized access.
The topics we will cover in this chapter are as follows:
- The difference between admin users and API users
- Login and sign-up in Strapi
- Securing API routes
- Roles and permissions
- Working with Strapi policies
- Overview of OAuth providers
By the end of this chapter, you will be able to implement authentication in the API, as well as adding a layer of authorization to prevent unauthorized users from accessing certain areas of the API.
Understanding the difference between admin users and API users
There are two types of users in Strapi: administrator panel users and API users. Mostly, we will be working with API users, but still, it is a good idea to know the difference between them.
Admin users are those who can log in to the Strapi admin panel. When we set up and installed Strapi in Chapter 1, An Introduction to Strapi, we created our first admin user, and we have been using that user ever since to interact and work with the admin panel. Additional admin users can be added from the Settings panel.

Figure 7.1: Admin user settings locations
The first admin users we create will have the role of Super Admin; they have access to manage all features and settings in the Strapi admin panel, but you cannot use them to interact with the API contents via the API endpoints.
API users, on the other hand, are considered another content-type in the API. Unlike the classroom and tutorial content-types, the user content-type is created automatically when we set up Strapi. The user content-type is managed via the core users-permissions plugin. We can use API users to interact with the API contents via the API endpoint; however, we cannot use an API user to log in to the Strapi admin panel.

Figure 7.2: API users content-types
Now that we know and understand the difference between admin users and API users, let's see how can we log in and sign up to our API in the next section.
API login and sign-up
As mentioned in the previous section, users are managed via the users-permissions plugin. This plugin is not just there to manage users; it also adds an access layer to the API using a JSON Web Token (JWT) to authenticate users. Each time a request is made to a secure endpoint, a JWT must be present in the Authorization header. Additionally, the plugin exposes two API endpoints for sign-up and login. To better demonstrate this, let's consider the following requirement:
As an API user
I want to be able to register a new account with the following properties so that I can use the system using my identity:
- Username: educator1
- Email: [email protected]
- Password: password
To satisfy this requirement, we can simply use the /api/auth/local/register endpoint to create a new user account. In Postman, issue a POST request to /api/auth/local/register with the following as a JSON payload:
{
"username": "educator1",
"email": "[email protected]",
"password": "password"
}
Strapi will create the user account and return a JWT as well as the user object details in the response. You can also see the user details from the Strapi admin panel under Users collection type.
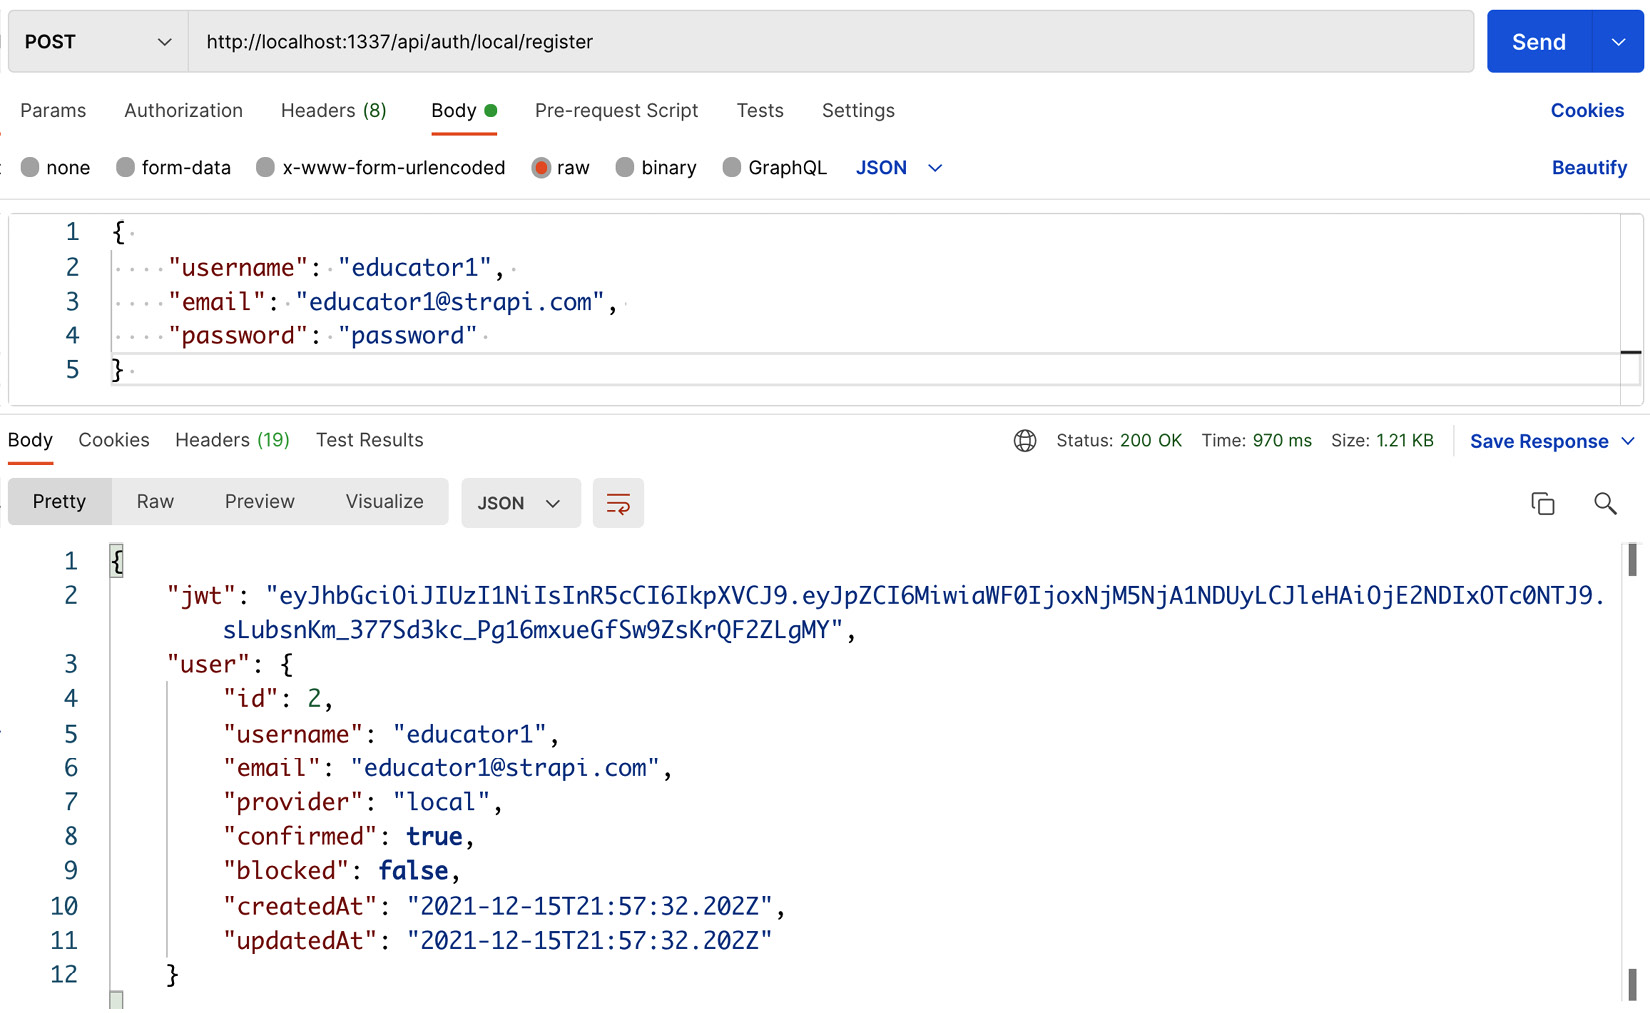
Figure 7.3: Registering a new user
Once the account has been created, the user can use it to authenticate themselves against the API. To illustrate this, let's consider this simple requirement:
As an API user
I want to be able to log in to my account
So that the system knows my identity
To satisfy this requirement, we can simply use the POST /api/auth/local endpoint to log in. This endpoint requires two parameters to be passed in the request body, identifier and password. The identifier can be either email or username. In Postman, issue a POST request to /api/auth/local. We will use email as an identifier but feel free to use username as well if you want to test it.

Figure 7.4: API login
If you pass the correct credentials, then you will get a JWT as well as the user object in the response body. If you examine the token using the https://jwt.io/ website, you can see that the token includes the user ID in the payload and the token will expire in 30 days:

Figure 7.5: Decoded JWT
What if I want to change the JWT expiration time?
The 30-day token validity might not be suitable for all use cases; we might have a requirement that a token should be valid for 1 hour or 1 day. Generally speaking, as a best practice, a JWT should be short-lived. This is to ensure that even if a JWT were stolen or leaked, the impact would be minimal as the token would cease to be valid fairly quickly. To follow this best practice and reduce the security risk of exposing a JWT, we will change the JWT configuration. Strapi uses the popular jsonwebtoken module under the hood to manage and generate the JWT, and we can use the expiresIn option to adjust the token validity.
To better illustrate this, let's assume the following requirement:
As a security-concerned API user
I want my token to expire after 7 days
So that the security risk of exposing the token is reduced
To satisfy this requirement, we will need to create a new file called plugins.json in the config folder. The file's full path is config/plugins.js; we can then set the expiresIn option. The value of this option is either numeric, which will be assumed to be in seconds, or a string describing a time span. The time span string is parsed using the vercel/ms library (https://github.com/vercel/ms) where we can find the full documentation for expressing a time span (that is, 7d means 7 days):
Module.exports = env => ({
"users-permissions": {
"config": {
"jwt": {
"expiresIn": "7d"
}
}
}
});
The following screenshot shows the newly created plugins.js file and its contents:
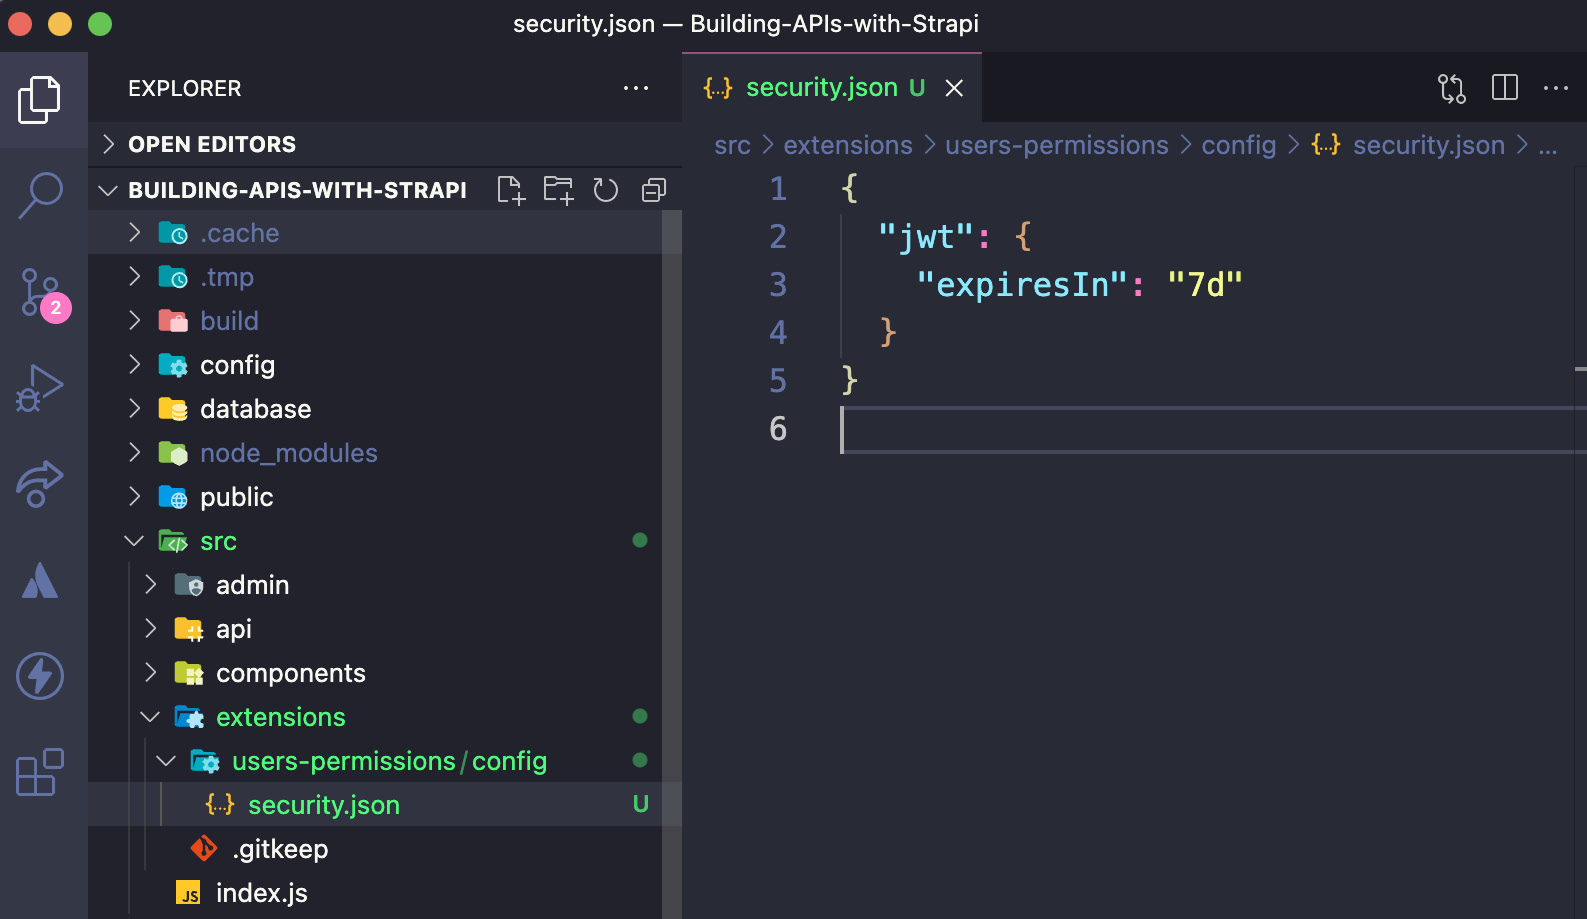
Figure 7.6: JWT expiration settings
Once you have created the file and saved the changes, you will need to start the development server again as it might have crashed while we were modifying the JWT settings.
Note
Unfortunately, Strapi might crash when updating certain settings. This will probably be fixed in upcoming versions but for now, the solution is to restart the server.
Once the server is up and running, you can issue a new JWT by logging in again using the /api/auth/local endpoint. Examine the JWT one more time; this time, you will see that it expires in 7 days rather than 30 days.
What if I want to change the JWT secret?
A JWT secret can be used to verify the token. By default, Strapi generates a token secret value and stores it in the src/extensions/users-permissions/config/jwt.js file. A new secret value can be provided using the JWT_SECRET environment variable. It is also possible to use different environment variable names by adjusting the value in the src/extensions/users-permissions/config/jwt.js file.
Updating JWT_SECRET
Using the auto-generated secret value is fine while we are working on the development environment; however, we should set a custom value using JWT_SECRET when deploying the API to a production environment. Otherwise, a malicious user with access to the secret would be able to create a token that impersonates a user and have the same access and permissions level as the impersonated user. We will cover this is in more detail in Chapter 9, Production-Ready Applications.
Having the login functionality and the ability to obtain a JWT will allow us to protect and secure some of our API endpoints. Let's discuss next how can we do that.
Securing API routes
All the API endpoints we have so far are publicly accessible. We will need to add a layer of security to our API so that only authorized users can perform certain actions, such as creating, editing, and deleting content.
Strapi makes it easier for us developers to add security to our API. By default, there are two roles in Strapi that we can use to manage permission and access. Those roles are as follows:
- Public role: This role is intended to be used by everyone to access the public endpoint of the system, for example, the get all classrooms or get tutorials endpoints.
- Authenticated role: This is the default role for all authenticated users. It is intended to manage access to protected areas of the API.
As we have seen so far, Strapi is very flexible and easily customized. We can alter those roles as we see fit, and we will do so later on in this chapter. But first, let's see how we can use the Authenticated role and protect certain API endpoints.
To better illustrate this, let's consider the following requirement:
As an owner of the API
I want only authenticated users to be able to create a new tutorial
So that the database is not filled with spam tutorials
If you remember, in Chapter 3, Strapi Content-Types, we made the create tutorial endpoint public. Let's revert that first. From the Strapi admin panel, do the following:
- Click on Settings from the left-hand side menu.
- Click Roles under USERS & PERMISSIONS PLUGIN.
- Click Public to modify the permissions for the Public role.
- Under Tutorial permissions, uncheck the permission for create.

Figure 7.7: Updating the create tutorial permission for the Public role
- Save the changes and wait for the server to restart.
- Open Postman and try to send a POST request to the /api/tutorials endpoint.

Figure 7.8: Access denied for creating tutorial
- You will see a Forbidden 403 response from the server.
Next, we will need to allow the Authenticated role to access the create tutorial endpoint:
- Click on Settings from the left-hand side menu.
- Click Roles under USERS & PERMISSIONS PLUGIN.
- Click Authenticated to modify the permissions for the Authenticated role.
- Under Permissions, check the permission for create.

Figure 7.9: Authenticated role permission
- Click the Save button to save the changes. Make sure to wait for the server to restart.
The create tutorial endpoint is now secure and only users with the Authenticated role can access it. To confirm this, let's try accessing the endpoint using the user we created earlier in this chapter:
- If you do not have a JWT, log in to the API by sending POST /api/auth/local with the user information we created earlier.
- Make note of the jwt value in the response.
- Send a request again to the POST /api/tutorials endpoint but this time set the JWT in the Authorization header as Bearer Token.

Figure 7.10: Accessing a protected API endpoint
- Since we have a JWT in the Authorization header, the server will acknowledge the request and we will be allowed to access the create tutorial endpoint.
Under the hood – how it works
Each time a request is sent to the API, the server checks whether the Authorization header is present. If the header is not present, then permissions for the Public role will be used to verify whether access should be granted or not.
If there is an Authorization header, then the user ID will be extracted from the JWT, and access to the route will be granted or denied based on the user role.
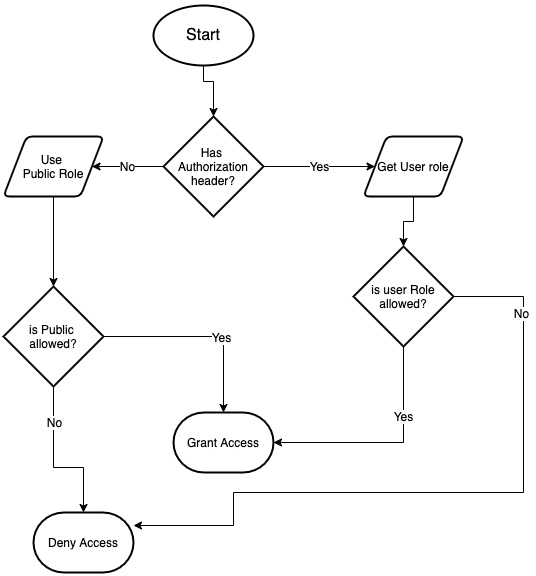
Figure 7.11: Authorization flow
Now that we understand how to secure our API endpoint, let's see how can we use the roles and permissions functionality in Strapi to grant users access to a specific resource in the API.
Using Strapi roles and permissions
Going back to the main actor use case diagram in Chapter 2, Building Our First API, the main actors in the API are Students, Teachers, and Admins.

Figure 7.12: Use case diagram for main actors and functionalities of the system
As illustrated in the diagram, each user (role) should have certain permissions to interact with the API entities. For example, Teachers can create tutorials and edit their own tutorials but not others, and they cannot create classrooms. Students can view a tutorial but cannot create one, while Admins can perform all CRUD (short for Create, Read, Update, and Delete) operations. The following table puts all those permissions into perspective with the tutorial and classroom content-types:

Based on this table, it is clear that we need to define three roles in our API. Let's do that now.
Creating the Student role
The first role we will create is the Student role with simple permissions to view classroom and tutorial content-type:
- From the Strapi admin panel, click Settings and then Roles under USERS & PERMISSIONS PLUGIN.
- Click the Add new role button to create a new role.
- Enter Student for the Name field and any description in the Description field.
- In the Permissions section, tick find, findOne, and findTutorials for the Classroom content-type and find and findOne for the Tutorial content-type.

Figure 7.13: Creating the Student role
- Click the Save button to save the changes.
We should have a new Student role added to the system. Next, let's create the Teacher role.
Creating the Teacher role
The Teacher role should have similar permissions to the Student role but with one extra permission for the create tutorial:
- From the Strapi admin panel, click Settings and then Roles under USERS & PERMISSIONS PLUGIN.
- Click the Add new role button to create a new role.
- Enter Teacher for the Name field and any description in the Description field.
- In the Permissions section, tick find, findOne, and findTutorials for the Classroom content-type and findOne and create for the Tutorial content-type.

Figure 7.14: Creating the Teacher role
- Click the Save button to save the changes.
We should have a new Teacher role added to the system. The final role we need to add is the Admin role. Let's do that next.
Creating the Admin role
Unlike the previous two roles we created, we will grant the Admin role access to everything:
- From the Strapi admin panel, click Settings and then Roles under USERS & PERMISSIONS PLUGIN.
- Click the Add new role button to create a new role.
- Enter Admin for the Name field and any description in the Description field.
- In the Permissions section, tick all permissions for both the Classroom content-type and the Tutorial content-type.
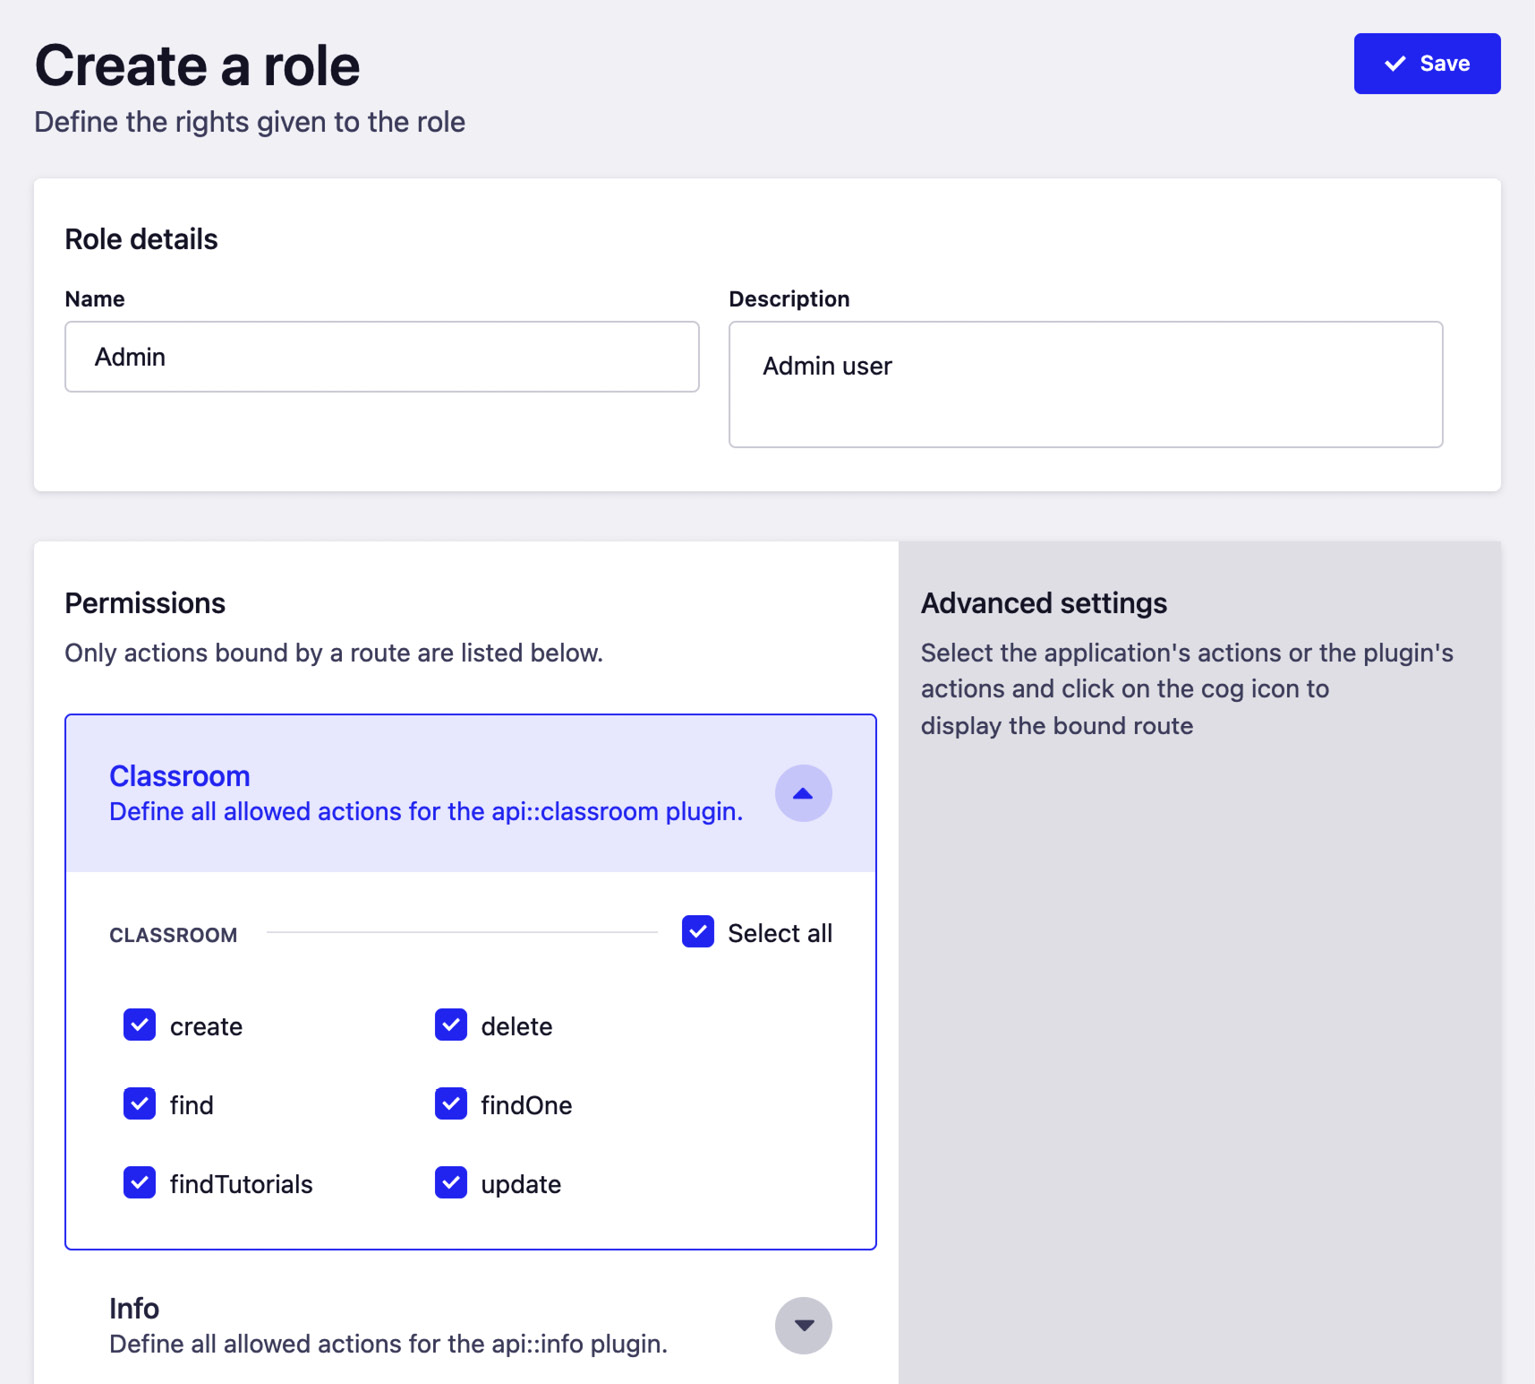
Figure 7.15: Creating the Admin role
- Click the Save button to save the changes.
At this stage, we should have three new roles added to our API. The Roles main screen should display 0 users next to the new roles we created.
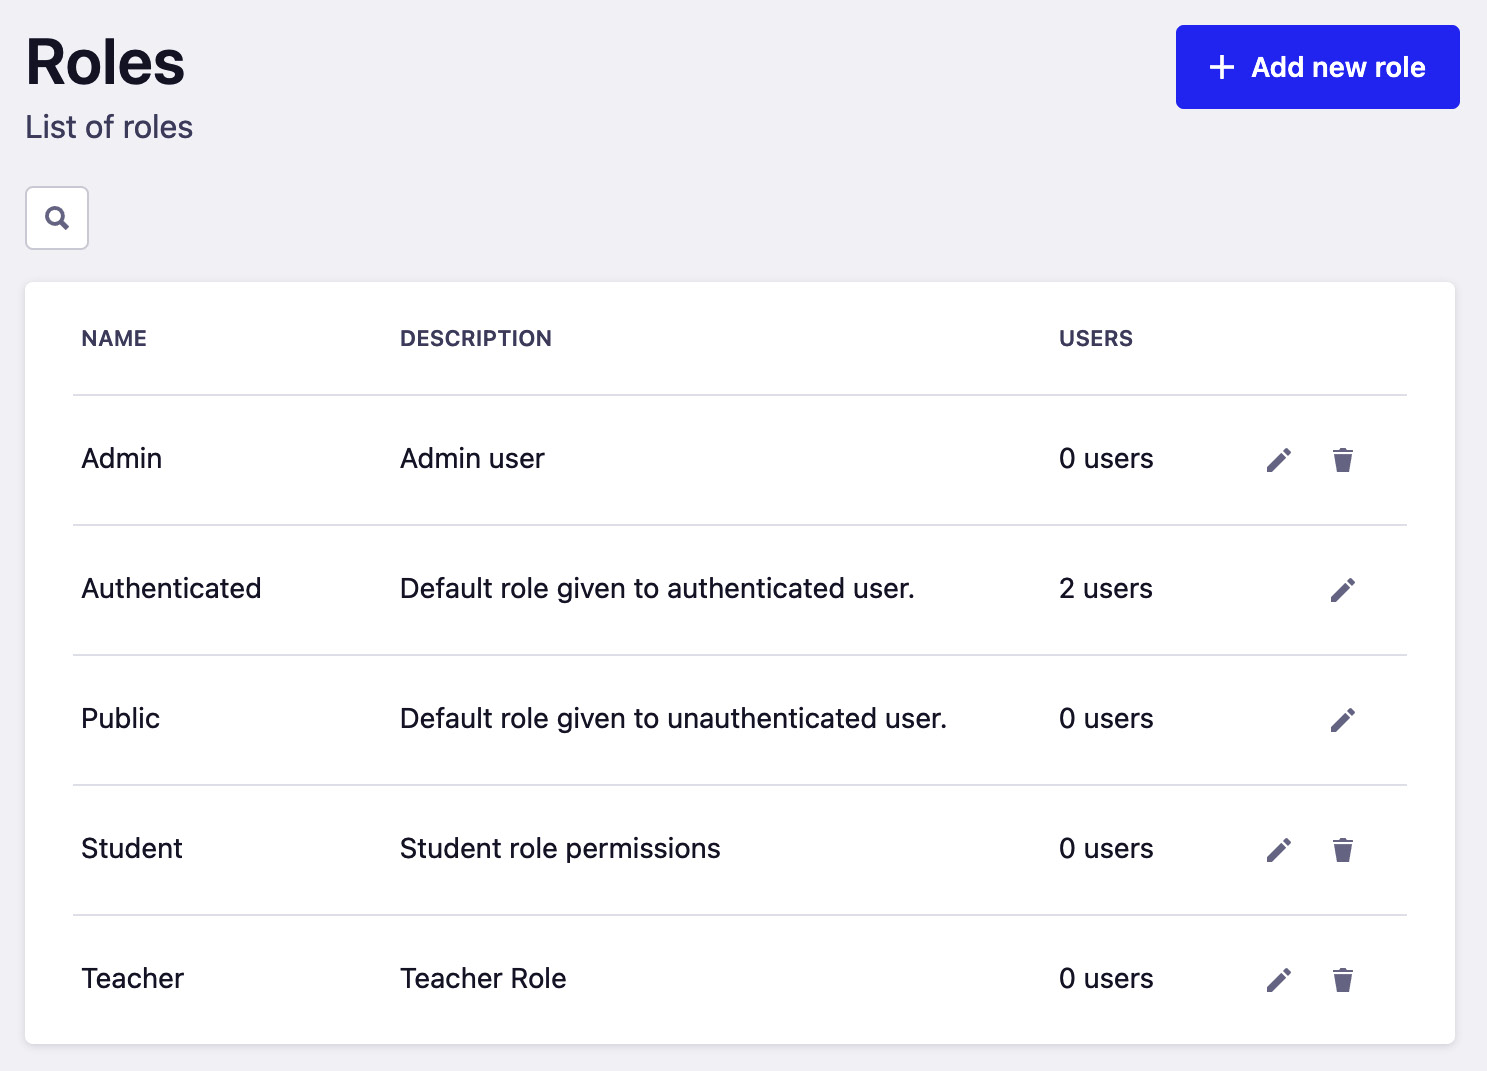
Figure 7.16: All roles in the API
If you recall earlier in this chapter, we created an educator1 user. This user was assigned the Authenticated role as this is the default behavior for Strapi – which we will fix soon – when creating a new user. For now, let's manually change that user role from Authenticated to Teacher:
- Click on Users under Collection Types.
- Select the educator1 user from the users list.
- In the Role drop-down menu, change the role to Teacher.

Figure 7.17: Changing the user role
- Click the Save button to save the changes.
To confirm that our new permission system is working as expected, try logging in with the educator1 user and creating a new classroom by sending a request to POST /api/classrooms. Since the Teacher role is not authorized to create a classroom, we should see a Forbidden 403 response.
What if I want to change the default role for a new user?
In the previous example, we had to change the user role manually since the default behavior for Strapi is to set the Authenticated role as the default user role. Let's change this behavior to set the default role to Student instead of Authenticated:
- Click on the Settings menu.
- Click on Advanced Settings under USERS & PERMISSIONS PLUGIN.
- Under Default role for authenticated users, select Student from the drop-down menu.
- Click the Save button to save the changes.
Now let's test this change by creating a new user account. Similar to what we did before with the educator1 user, let's use Postman and send a POST request to /auth/local/register with the following as the JSON payload:
{
"username": "student1",
"email": "[email protected]",
"password": "password"
}
Notice the user role in the response. It should be set as Student.

Figure 7.18: Created Student account
We have successfully implemented role-based authentication in our API with simple tweaks to the roles and permissions in Strapi. However, you might have noticed there is something missing with the Teacher role. A Teacher can create a tutorial but they cannot edit or delete it. If we granted a teacher edit and delete permissions, then basically they will be like an admin and they can edit or delete any tutorial. We do not want this, of course, and we want a teacher to be able to modify their own tutorial only.
This problem can be solved by the use of policies in Strapi. Let's discuss Strapi policies in the next section to understand what they are and how can we use them to assist us with improving the authorization flow in our API.
Working with policies
A common use case in API development is to allow users to manage their own information and contents. While the Users & Permissions plugin works great for providing us with role-based authentication, it does not provide an out-of-the-box strategy for allowing users to manage their own content. Instead, the decision is left to developers to handle this case according to the business requirements. Luckily, we do not need to reinvent the wheel to implement such logic in the API authentication flow. We can use Strapi's policies to customize the authentication and authorization flow.
A policy in Strapi is a function that can be executed before a request reaches a controller. Policies are mostly used for securing business logic easily. Policies are applied to a route using the policies array in the {content-type}/routes/{content-type}.js router file or the {content-type}/routes/{custom-file}.js custom router file:
// Example of policy in Core Router file
module.exports = createCoreRouter('api::tutorial.tutorial, {
config: {
find: {
policies: ['is-manager', 'global::is-admin'],
},
},
});
// Example of policy in Custom Router file
{
"method": "GET",
"path": "/classrooms/:id/tutorials",
"handler": "classroom.findTutorials",
"config": {
"policies": ["is-manager", "global::is-admin"]
}
},
There are two types of policies in Strapi: a global policy or an API policy. A global policy, as the name suggests, is intended to be used with multiple API routes. For example, a policy that checks whether a user is logged in can be used by both the classrooms routes and the tutorials routes. Global policies are created in the /src/policies folder. In the previous code snippet, is-admin is an example of a global policy. Notice we used the global:: prefix before the policy name.
An API policy is a policy that is intended to be used within specific API routes. For example, we might have a policy that checks whether a user is allowed to edit a classroom. Such a policy will only be used within the classroom API routes; therefore, it can be created as an API policy. The API policies are stored in the /src/api/[api-name]/policies folder. In the previous code snippet, is-manager is an example of an API policy.
Creating a policy
Going back to our problem of allowing editing and deleting, let's assume we have the following requirements:
As a classroom manager
I want to be able to edit or delete tutorials I created for my classroom
So that I can manage my classroom effectively
To solve this problem, we are going to create a policy called is-manager that will allow a user to delete or edit tutorials if they are the classroom manager.
There are two ways to create a policy in Strapi. The first method is to use the Strapi CLI and the generate:policy command. The second method is by manually creating a policy file, so for this example, we would create an is-manager.js file in the policies folder. Note that the policy name must match the filename. We are going to use the CLI to generate the policy.
The policy is going to be used within the tutorials routes only, so we are going to create an API policy. Let's get started:
- From the command line, issue the yarn strapi generate policy command and follow the onscreen prompt to generate the policy.
- Enter is-manager for the policy name.
- Select Add policy to an existing API when asked where you want to add the policy to.
- Select the tutorial API.

Figure 7.19: Generating the is-manager policy
Once you are done, a new src/api/tutorials/policies/is-manager.js file will be generated. Let's examine this file:
'use strict';
/**
* `is-manager` policy.
*/
module.exports = (policyCtx, config, { strapi }) => {
// Add your own logic here.
strapi.log.info('In is-manager policy.');
const canDoSomething = true;
if (canDoSomething) {
return true;
}
return false;
};
The file exports a default function that accepts three parameters. The first parameter, policyCtx, is the most interesting parameter to us. This is a wrapper around the controller context.
Remember
Every controller action receives a context object as a parameter. This object contains the request context and the response context. It also holds the state object where useful information, such as the current user, is kept.
The function body itself contains a simple log and a dummy implementation to help us get started. Generally speaking, a policy should return either true or false. If the policy function returns true, then the request will be passed to the next policy, if any, or reach the controller action. If the policy function returns false, then the request will not reach the controller action and will be rejected.
- This policy is not used with any controller actions, so let's update the tutorial router file to apply the policy. Edit the /src/api/tutorials/routes/tutorial.js file by adding the is-manager policy, as shown:

Figure 7.20: Applying a policy to a route
- Before we test it out, make sure to update the permissions for the Teacher role, allowing update and delete on the /api/tutorials/:id endpoint.
- We do not want to delete anything yet; we just want to test that the policy is configured properly. Let's use a random ID that does not exist at the tutorials DELETE endpoint. In Postman, issue a DELETE request to the /api/tutorials/:id endpoint: DELETE /api/tutorials/1000.
- Check the Strapi console logs. You should see the In is-manager policy message printed before the request debug message.

Figure 7.21: Policy debug message
Note
The API should return 404 as the 1000 tutorial ID does not exist in the system. The purpose here was to ensure the policy is configured correctly and to demonstrate that it will be executed before the request.
- Next, let's edit the is-manager file, adding our business logic:
"use strict";
/**
* `is-manager` policy.
*/
module.exports = async (policyCtx, config, { strapi }) => {
try {
// Get id from request
const { id } = policyCtx.params;
// Get the tutorial by id
const tutorial = await strapi.service('api::tutorial. tutorial').findOne(id, { populate: ['classroom. manager']});
// current logged in user
const { user } = policyCtx.state;
// check if classroom manager is logged in user
const { classroom: { manager } } = tutorial;
if (manager&& manager.id === user.id) return true;
return false
} catch (e) {
strapi.log.error("Error in is-manager policy", e);
return false;
}
};
The policy works by getting the tutorial from the database and the currently logged-in user from the context state object. If the current user is the classroom manager, the request will be passed to the controller; otherwise, the request will be denied and an unauthorized error will be returned to the user.
- Make sure you are logged in with the educator1 user we created at the beginning of this chapter and let's try deleting the first tutorial we created in the previous chapters. From Postman, send a request to delete the tutorial with an ID of 1.

Figure 7.22: Unauthorized action error message
Now, let's change the classroom manager to allow deleting the contents:
- From the Strapi admin panel, find the Strapi 101 classroom and change the manager from testuser to educator1.

Figure 7.23: Changing classroom manager
- Save the changes, wait for the server to restart, and try deleting the same tutorial again.
- This time, you will be allowed to delete the tutorial.
Policies in Strapi are a great mechanism to enhance the authorization flow. They can be applied to single or multiple routes, which helps in enforcing the DRY (short for Do Not Repeat Yourself) principle.
Honorable mention – OAuth providers
As we have seen so far in this chapter, it is quite easy to set up an authentication system in Strapi just by using the Users & Permissions plugin. It is also worth mentioning that Strapi allows OAuth providers to integrate authentication in the API easily.
The configurations for the OAuth providers can be found on the Settings page under the USERS & PERMISSIONS PLUGIN section.

Figure 7.24: OAuth providers list
The configuration is straightforward; in most cases, you will need to obtain a client ID and a client secret from the provider you want to use to apply it in the admin panel. The Strapi documentation provides an example for each of the providers and how to obtain the required secrets. We feel there is nothing more we can add to it.
Summary
We started this chapter by explaining the difference between Strapi admin users and API users. Afterward, we explored how API users can sign up and log in to the API using the routes exposed by the users-permissions plugins. We also discussed JWTs and saw how we can edit their configurations.
After that, we started working on securing and protecting the API routes. We changed the create tutorial's endpoint, making it accessible by logged-in users only, and explained how the authorization flow works in Strapi.
Then, we took a deep dive into the roles and permissions. We revisited the main actors diagram for our API and used it to create the required roles by our API.
Finally, we introduced the concept of policies in Strapi and saw how can we use them to further enhance the API authorization flow by allowing users to edit and delete their own content only.
In the next chapter, we will explore the Strapi plugin system. We will understand the Strapi plugin ecosystem and how we can enable, disable, and configure plugins.