
Chapter 9: Production-Ready Applications
In this chapter, we will discuss some of the best practices, tips, and tricks, as well as strategies that we can use to run a Strapi application in a production environment. First, we will learn how to use the Strapi bootstrap function to seed the database. Then, we will see how to keep permissions in sync between multiple environments. Afterward, we will explain how to use Simple Storage Service (S3) to host our media files and assets. Finally, we will explain the required changes to use a database other than SQLite.
Here are the topics we will cover in this chapter:
- Create a seeder function to populate the database with required data for the API.
- Sync permissions between multiple environments.
- How to set up Strapi to save media in an S3 bucket.
- How to configure Strapi to use a Postgres database.
As we have seen so far, most of the settings and configurations such as routes, policies, and plugin settings live in code, which makes it easy to work with Strapi in different environments. However, there are a couple of things that live in the database—namely, the roles' and permissions' configurations. This means if we moved our Strapi application to a new environment or we dropped or changed the database, we would have to recreate all the roles and set up the permissions again.
Luckily, we do not need to do this manually—we can create a script that takes care of seeding the database with the initial data required by the application we are developing. Let's see how we can accomplish this task in the next section.
Seeding the database
Database seeding refers to the process of populating the database with data—this can be data required for the initial application setup or just sample data for demonstration purposes. This process is usually done when the application starts for the first time. Luckily for us, Strapi comes with a bootstrap lifecycle function that is executed every time the server starts. This function is located in the src/index.js file. Let's open this file and, for now, just print a simple hello world message, as follows:
Bootstrap(/*{strapi}*/){
strapi.log.info("Hello World");
};
Once you have saved this simple change, the server will restart, and you should see a simple Hello World message printed on the screen, as follows:

Figure 9.1: Hello World from bootstrap function
In Chapter 7, Authentication and Authorization in Strapi, we created three roles for our API (short for application programming interface): Teacher, Student, and Admin. Let's use the bootstrap function to ensure that these roles are persisted in the database all the time, regardless of which database we are using or the environment we are on. In the src/index.js file, let's create a new createRoleIfnotExists function, as follows:
/**
* Create role if it does not exist in the system
* @param {*} name The role name
* @param {*} type The role type
* @param {*} description The role description
*/
const createRoleIfNotExist = async (name, type, description = "") => {
const role = await strapi.db.query("plugin::users- w permissions .role").findOne({ where: { type }});
if (!role) {
await strapi
.db.query("plugin::users-permissions .role").create({ name, type, description });
strapi.log.debug('Created role ${name}');
}
};
The createRoleIfnotExists function takes three parameters: role name, role type, and—optionally—description. To avoid having duplicate roles, we start by making sure that the role does not exist in the system.
Note
Since we are running the query against the user-permissions plugin, we prefixed the model name with plugin:: rather than api::, and then we specified the plugin name and the model name.
After we have ensured that the role does not exist in the database, we simply call the create method to create the role and print our success message to the console. Let's use this method to create the three roles needed for our API. We can remove the Hello World message from the bootstrap function and replace it with the following code:
async bootstrap(/*{strapi}*/){
await createRoleIfNotExist("Student", "student", "Student
role");
await createRoleIfNotExist("Teacher", "teacher", "Teacher
role");
await createRoleIfNotExist("Admin", "admin", "App admin
role");
};
Make sure to add the async keyword to the bootstrap function signature.
To see the seeding function in action, let's delete one of the roles we have already created previously, as follows:
- Click Settings in Strapi's left sidebar menu.
- Select Roles under the User & Permissions Plugin section.
- Click the Delete button next to the Admin role and confirm you want to delete the role.
Now that we have a role missing, let's restart the server to confirm the data will be seeded. From the active terminal window, hit Ctrl + C to stop the server, then issue the yarn develop command. Notice in the following screenshot that as the server starts, we can see a Created role Admin message:

Figure 9.2: Admin role created on startup
If you refresh the Role page, you should see the Admin role is back in the role list.
Now that we can seed roles and make sure they are always in the database, let's see how we can persist the permissions of each role in the next section.
Keeping permissions in sync
The permissions associated with each role are persisted in the database. This means we will need to make sure that the permissions we created while developing the application are kept in sync when we move to a new environment or when we seed the database with a new role. For example, in the previous section, we dropped and recreated the Admin role; by doing so, we lost all the previous permissions we configured for this role.
To keep the permissions in sync, we will again make use of the bootstrap function. We can add a new function that will enable permissions for a specific role when the server starts up. Let's get coding, as follows:
- In the src/index.js file, let's create a new enablePermission function that accepts three parameters, as follows: the roleType parameter for the role for which we want to enable the permission, the controller parameter, and the action parameter for the action we want to enable. The code is illustrated in the following snippet:
/**
* Enable action on a controller for a specific role
* @param {*} type The role type
* @param {*} apiName The name of the api where the controller lives
* @param {*} controller The controller where the action lives
* @param {*} action The action itself
*/
const enablePermission = async (type, apiName, controller, action) => {
};
- First, we will get the role from the database and check the permissions associated with the role, as follows:
…
try {
const actionId = 'api::${apiName}.${controller}.${action}'
// Get the permissions associated with the role
const rolePermission = role.permissions.find(permission => permission.action === actionId);
} catch (e) {
strapi.log.error(
'Bootstrap script: Could not update settings.
${controller} - ${action}'
);
}
- Then, we will check if there are permissions associated with the role. If there are no permissions, it means this is the first time we are running the server, so we create those permissions, as follows:
...
if (!rolePermission) {
// Permission not created yet (first time starting
// the server)
strapi.db.query("plugin::users-
permissions.permission").create({
data : {
action: actionId,
role: role.id
}
});
}
...
Here is the full code for the enablePermission function:
/**
* Enable action on a controller for a specific role
* @param {*} type The role type
* @param {*} apiName The name of the api where the controller lives
* @param {*} controller The controller where the action lives
* @param {*} action The action itself
*/
const enablePermission = async (type, apiName, controller, action) => {
try {
// Get the role entity
const role = await strapi.db.query("plugin::users-
permissions.role")
.findOne({
where: { type },
populate: ["permissions"]
});
const actionId = 'api::${apiName}.${controller}.${action}'
// Get the permissions associated with the role
const rolePermission = role.permissions.find(permission => permission.action === actionId);
if (!rolePermission) {
// Permission not created yet (first time starting
// the server)
strapi.db.query("plugin::users-
permissions.permission").create({
data : {
action: actionId,
role: role.id
}
});
}
} catch (e) {
strapi.log.error(
'Bootstrap script: Could not update settings.
${controller} - ${action}'
);
}
};
- To test this new function, let's update the bootstrap function as follows to enable all actions on the Classroom controller:
async bootstrap(/*{strapi}*/){
await createRoleIfNotExist("Student", "student",
"Student role");
await createRoleIfNotExist("Teacher", "teacher",
"Teacher role");
await createRoleIfNotExist("Admin", "admin", "App
admin role");
// Admin Role Classroom permissions
await enablePermission("admin",
"classroom","classroom", "create");
await enablePermission("admin",
"classroom","classroom", "find");
await enablePermission("admin",
"classroom","classroom", "findOne");
await enablePermission("admin",
"classroom","classroom", "findTutorials");
await enablePermission("admin",
"classroom","classroom", "create");
await enablePermission("admin",
"classroom","classroom", "update");
await enablePermission("admin",
"classroom","classroom", "delete");
};
- Save the changes to restart the server. Once the server restarts, examine the Admin role permissions. You should see that all classroom permissions are enabled, as illustrated in the following screenshot:
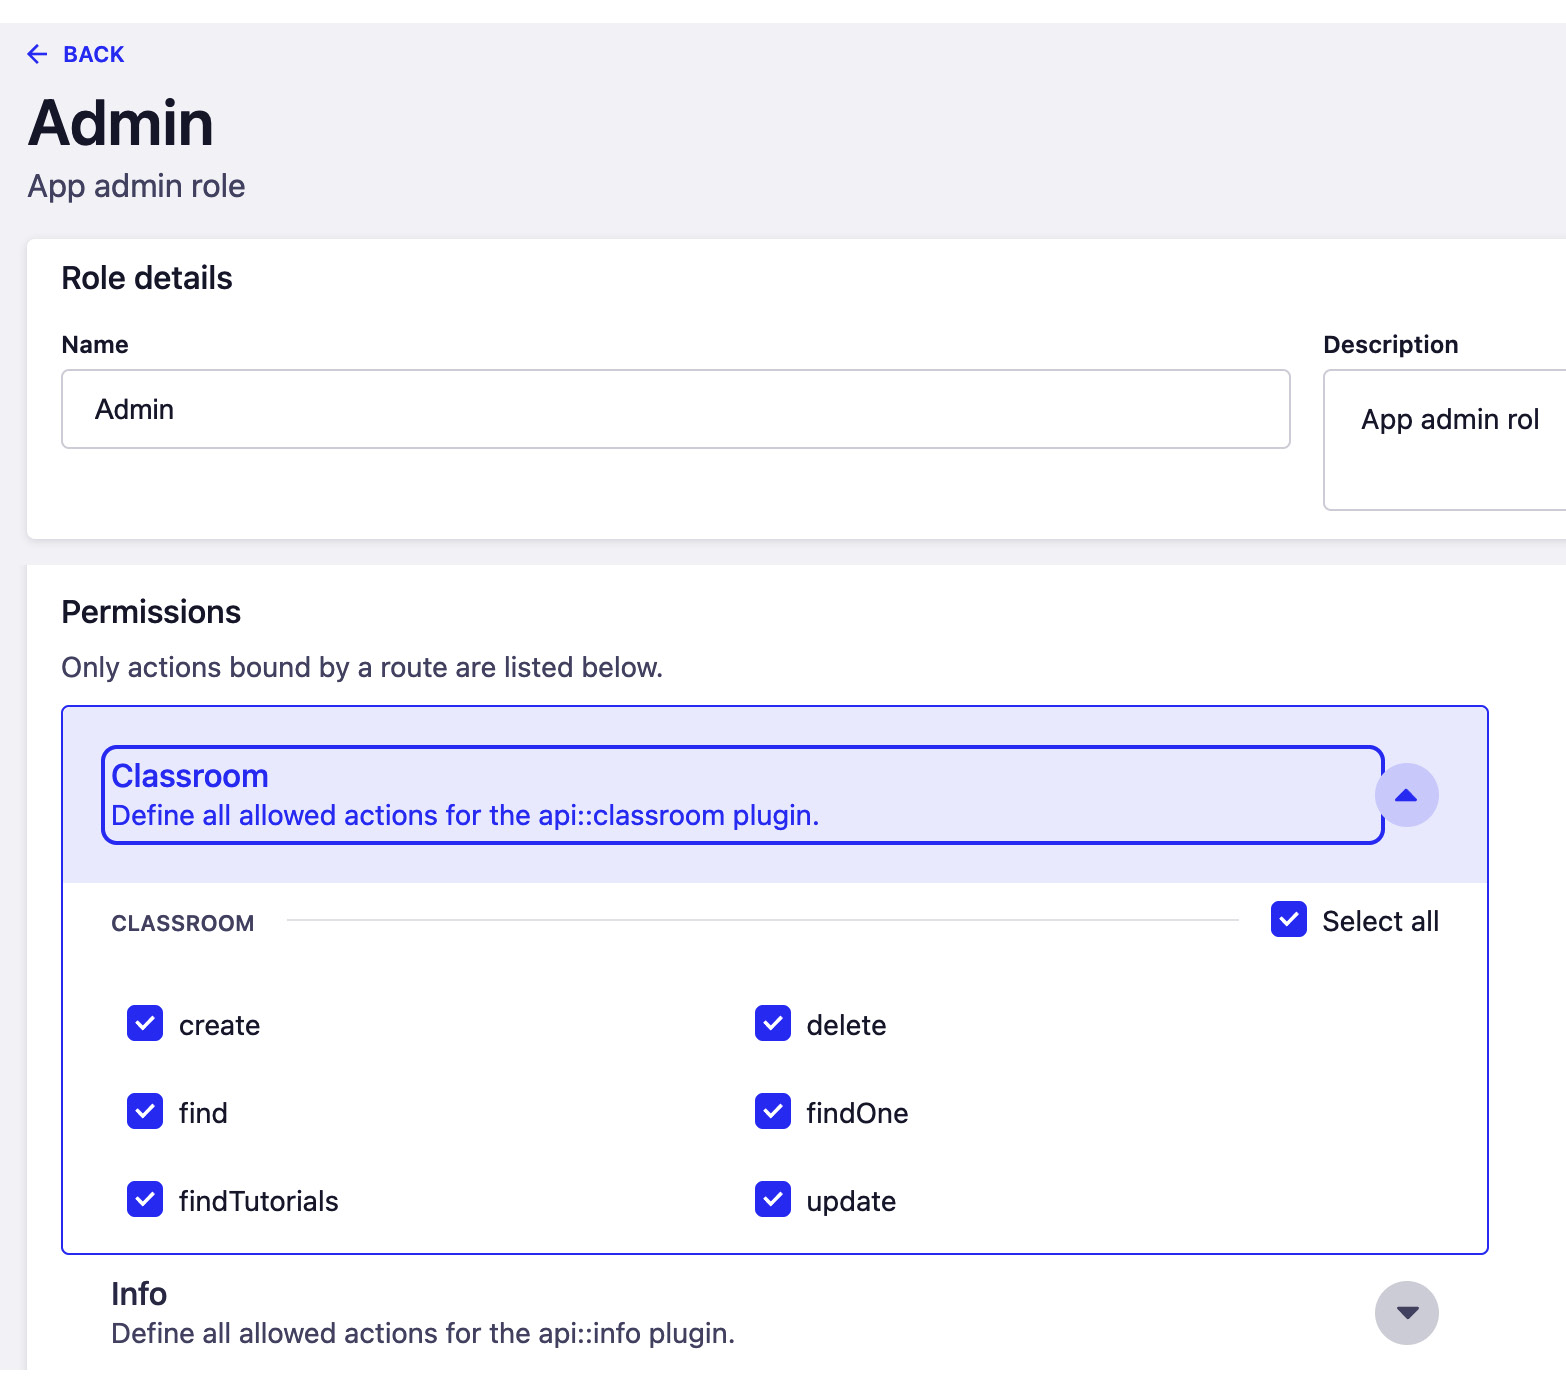
Figure 9.3: Admin role permissions enabled
This example enables all the permissions for the Admin role on the Classroom content-type. We can do the same for the other content-types as well as other roles. However, we have left out this part for you to do as an exercise.
So far, we have seen how to seed our database as well as keep permissions in sync. Both are important steps when we are preparing our application for production deployment. Another important step is to make sure we are serving media files and assets from a reliable source. In the next section, we will discuss how to use Amazon S3 to serve our images and media files.
Serving media from an S3 bucket
Amazon S3 is a reliable and secure cloud-based storage service offered by Amazon Web Services (AWS). We are going to configure our API to use S3 to store media files rather than maintaining them on a server physical disk.
Because S3 is a cloud-based solution there are a few advantages of using it over the local hard disk, one of which is having high scalability, as we are not going to be limited by the physical disk space. Another advantage is having better disaster recovery (DR) capability and availability. For example, with local disk storage, if the hard disk crashes, then our API users will not be able to access their files. However, the risk is much lower with Amazon S3.
Note
Creating an AWS account is beyond the scope of this book. We are going to assume that you already have your account up and ready. If you do not have an account, head to https://aws.amazon.com/free and create an account. AWS offers a free 1-year trial when you sign up.
Before we configure Strapi to use S3, we will need to create an S3 bucket first, so let's do that now. Proceed as follows:
- In the AWS console, navigate to Amazon S3.
- Click the Create bucket button.
- Enter a bucket name and choose the region closest to you.
- In the Access section, uncheck Block all public access.
A warning box might appear, to confirm that the bucket will be publicly accessible. Check this to make it accessible to the public.
- We can leave the remaining settings as they are. Scroll down and click the Create bucket button, as illustrated in the following screenshot:

Figure 9.4: Creating an S3 bucket
The next step is to install a plugin that allows us to upload media to S3. Let's go ahead and install the plugin with the yarn add @strapi/provider-upload-aws-s3 command.
Once the plugin is installed, we can configure Strapi to use it as the default provider when uploading images and media files. Similar to what we did in Chapter 8, Using and Building Plugins, with the Email plugin, we will configure the upload provider to be used in a production environment only. Open the config/env/production/plugins.js file and add the following code to it:
upload: {
config: {
provider: 'aws-s3',
providerOptions: {
accessKeyId: env('AWS_ACCESS_KEY_ID'),
secretAccessKey: env('AWS_ACCESS_SECRET'),
region: env('AWS_REGION'),
params: {
Bucket: env('AWS_BUCKET'),
},
},
},
},
There are four environment variables needed. AWS_ACCESS_KEY_ID and AWS_ACCESS_SECRET can be obtained from your AWS account, AWS_REGION is the region where we created the bucket, and AWS_BUCKET is the name of the bucket we created earlier. The .env file should look similar to this:
AWS_ACCESS_KEY_ID=ADD_AWS_KEY_HERE
AWS_ACCESS_SECRET=ADD_AWS_SECRET_HERE
AWS_REGION=ap-southeast-2
AWS_BUCKET=building-api-with-strapi-data
To test out the plugin, let's start the server with the NODE_ENV flag set to production and then proceed as follows:
- Make sure the development server is not running.
- Issue the NODE_ENV=production yarn develop command to start the server.
- In the Strapi admin panel, click the Media Library menu item from the left-side panel.
- Click the Upload assets button to upload a new image.
- Once the image is uploaded, click on it, then click the Copy link button.
- Paste the link into a new tab—notice that the link is an AWS link. You can also check the bucket we created earlier, and you will see the image file there. In the following screenshot, you can see an example of an S3 bucket after uploading media:

Figure 9.5: Example of an S3 bucket after uploading media
Troubleshooting
If you are having issues with the upload, make sure you are using the correct access key identifier (ID) and secret, and also ensure that these permissions are granted to the user in the AWS Identity and Access Management (IAM) policy settings: "s3:PutObject", "s3:GetObject", "s3:ListBucket", "s3:DeleteObject", "s3:PutObjectAcl".
Now that we have set up the upload function, let's shift our attention to the next item in preparing our application for production—the database. So far, we have been using an SQLite database, which is fine for development environments or low web traffic systems. However, when we are working in a production environment with a large volume of traffic, we will probably want to use a different database system. In the next section, we will discuss how can we set up Strapi with PostgreSQL.
Using PostgreSQL
You might recall from Chapter 1, An Introduction to Strapi, that Strapi is database-agnostic, meaning that it can work with different database systems. We will configure Strapi to use a PostgreSQL database in production and keep SQLite for development. Let's get started, as follows:
- The first thing to do is to install the PostgreSQL client.
- From the terminal, navigate to the project root and run the yarn add pg command. This will install the PostgreSQL Node.js client to the project.
- Create a config/env/production/database.js file. This file will be used to configure the database in the production environment.
Remember
Strapi uses the config/database.js file to load the database configurations. However, since we want to use PostgreSQL in the production environment only, we used the config/env/production/database.js file instead.
- Add the following content:
module.exports = ({ env }) => ({
connection: {
client: 'postgres',
connection: {
host: env('DATABASE_HOST', 'localhost'),
port: env.int('DATABASE_PORT', 5432),
database: env('DATABASE_NAME', 'strapi'),
user: env('DATABASE_USERNAME', 'strapi'),
password: env('DATABASE_PASSWORD', 'password'),
ssl: env.bool('DATABASE_SSL', false),
},
},
});
The following table explains each of the preceding configurations used:

Our API is now ready to work with PostgreSQL when we deploy it to production. However, it is always good to test settings and configuration first to avoid any surprises later on.
Testing PostgreSQL locally
To test the database configurations locally, we will need to have PostgreSQL installed. We will be using Docker to run PostgreSQL. Let's get started with the following steps:
- At the root of the project, let's create a new file called docker-compose-dev.yml. This file will hold the database configuration.
- Open the file and add the following code to it:
version: "3.1"
services:
database:
container_name: strapi_api
image: postgres
ports:
- 5432:5432
environment:
POSTGRES_DB: strapi
POSTGRES_USER: strapi
POSTGRES_PASSWORD: password
volumes:
- strapi_db:/var/lib/postgresql/data
volumes:
strapi_db: {}
- Save the changes to the file. This docker–compose-dev.yml file will create a service called database to run the postgres database. It will create a database called strapi with a username of strapi and a password of password.
- Next, let's add helper scripts to our project to allow us to start and stop the database. Open the package.json file and locate the scripts section.
- Add the following scripts at the end of the scripts section:
"db:start": "docker compose -f docker-compose-dev.yml up -d",
"db:stop": "docker compose -f docker-compose-dev.yml down",
"db:logs": "docker logs -f strapi_api"
- Save the changes and let's test out our scripts.
- Run the db:start command as follows: yarn db:start. If the command is executed successfully, you will see a message on the console indicating that a container named strapi_api has started.
Note
Running this command for the first time might take a minute or so as Docker will pull the Postgres database image.
Once we have our PostgreSQL database up and running, let's start the server with the NODE_ENV flag set to production. Issue the NODE_ENV=production yarn develop command to start the server.
Since this is a new database, we will be asked to create a super admin user. Create an admin account and log in to the dashboard. Everything should be exactly the same; also, the database should have been seeded with the roles.
You can shut down the server now, and make sure to stop the database by running the yarn db:stop command.
Our API is now ready for production deployment. This will be the topic of our next chapter.
Summary
In this chapter, we explored best practices and strategies we can use to prepare and run our application in a production environment. We started with database seeding and saw how we can seed the database to have the data required for the initial application setup. The database seeder we created always initializes the database with the required user roles for the API.
Next, we discussed how can we keep permissions in sync across multiple environments, and we created a helper function that will do this job for us. After that, we moved on to media and assets and configured Strapi to use Amazon S3 to save media files instead of saving them on the local hard drive.
Finally, we prepared our API to use the PostgreSQL database in production, and we also tested it out locally with the help of Docker.
In the next chapter, we will explore how to deploy our API to a production environment and we will discuss two deployment strategies: deployment to a software-as-a-service (SaaS) provider and deployment as a Docker container.