Chapter 8: Using and Building Plugins
In this chapter, we will explore Strapi plugins. Plugins open unlimited possibilities for Strapi—they allow us to expand Strapi with new capabilities and functionality in a way that is reusable to avoid reinventing the wheel, and they also allow us to tap into the experiences of the larger Strapi open-source community. This functionality ranges from the basics of maintaining content, augmenting it with comments, to advanced use cases such as migrating data or syncing roles and permissions between environments. We will solve two common requirements that can be tackled using plugins. The first is enabling GraphQL for our API (short for application programming interface), which is becoming an increasingly popular alternative to REpresentational State Transfer (REST) APIs. The second is sending emails from Strapi.
Here are the topics that we will cover in this chapter:
- Strapi plugin ecosystem
- Installing and using plugins from the Marketplace
- Use case—Enabling GraphQL for our API
- Use case—Sending an email from Strapi
- Creating our own plugins
Exploring the Strapi plugin ecosystem
Strapi aims to be easy to use and flexible to extend. As we saw repeatedly in the previous chapters, it's very easy to build an API for the default create, read, update, and delete (CRUD) operations, but we are not locked into the default behavior—it's always possible to extend the default behavior for our API in any way we want. That philosophy goes beyond building and coding APIs and their interactions, to almost every aspect of Strapi and its admin panel.
To achieve such flexibility, Strapi builds heavily on a plugin's architecture to open possibilities for infinite use cases beyond the core functionality.
What is a plugin in Strapi?
In the admin panel, if we navigate to Plugins under General in the main menu, we will see that there are a few plugins already installed. We have already interacted with most of these, and more detail on these is provided here:
- Content Manager: This is where we edit our classroom, tutorial, and other entities.
- Content Type Builder: This is where we define our content-types.
- Roles & Permissions: This is where we define roles and permissions associated with our API endpoints.
- Media Library: This is where we attach media to our content.
- Internationalization: This is where we are able to define different locales for our content.
- Email: This is the only plugin in the list we haven't used, but we are going to do so in this chapter.
- The aforementioned plugins are shown in the following screenshot:

Figure 8.1: List of installed plugins
It might be a bit paradoxical that the Content Manager and Content Type Builder are in the plugins list. After all, they are not optional—they are at the core of what Strapi (or any content management system (CMS)) does. What's left in a CMS if it can't manage content?
From a system design and architecture point of view, though, it is important to understand—and appreciate—the decision of Strapi's creators to have this functionality developed as a plugin. This opens the door for the open-source community and everyone else to extend Strapi and for their extensions to be treated the same way as other plugins (including default core ones) by Strapi.
Before getting into the details of how plugins work in Strapi, let's explore some of the plugins that are provided by Strapi and learn how to install and use them.
Installing and using plugins from the Marketplace
Strapi has a Marketplace that curates some of the official Strapi plugins to install directly from the admin panel. At the time of writing this book, the Marketplace is undergoing major changes and upgrades. The following screenshot shows version 3 of the Strapi Marketplace:

Figure 8.2: Strapi Marketplace version 3
The Marketplace will host a couple of official Strapi plugins that are not installed by default, as well as community-developed plugins. One of the official Strapi plugins that are not installed by default when creating a new Strapi project is the API Documentation plugin. This plugin allows us to create an OpenAPI document and visualize our API with the Swagger UI. OpenAPI is a standard for describing REST APIs that helps when documenting APIs, visualizing them with tools such as Swagger UI, automating them, and more.
While we can directly install a plugin from the Marketplace by clicking the Download button, since the Marketplace is not available yet at the time of writing this book, we are going instead to use the Strapi command-line interface (CLI) to install the documentation plugin.
Installing the API Documentation plugin from the CLI
Follow these steps to install the API Documentation plugin:
- To install the Documentation plugin, all we need is to run the following command at the root of our project:
yarn strapi install documentation
You can see the output of the command in the following screenshot:

Figure 8.3: We can install plugins from the CLI
- Once the installation is complete and our server restarted, we will get a new entry for our Documentation plugin in the menu under Plugins. Click on the Documentation plugin. This will open the settings of our plugin and will show an Open documentation button, as illustrated in the following screenshot:

Figure 8.4: The settings page for the Documentation plugin we installed
Note
The Documentation menu item should appear in the main menu once the installation is complete and the server restarts. However, if you do not see the Documentation menu item, try restarting the server manually.
- By clicking the Open documentation button on the top right of the page, we will be taken to Swagger UI where we can read the documentation for our API and interact with it, as illustrated in the following screenshot:

Figure 8.5: Using the Documentation plugin, we can visualize our API using Swagger UI
- If we would like to delete the plugin, then we can run the following command in the CLI:
yarn strapi uninstall documentation --delete-files
Cleaning Up Generated Documentation
Note that this plugin generates the documentation in the filesystem, which is great as we can add it to our source control and share it with our team. When we uninstall the plugin, these files are still there, though. If we want to get rid of them, then we will have to do this manually. The files will be in a documentation folder for all the APIs we have—for example, the documentation for our classroom endpoint will be under src/api/classroom/documentation/1.0.0/classroom.json.
We'll see how to find more plugins on the Marketplace in the next section.
Finding more plugins
Marketplace is likely to mature and grow to become the de facto place for finding and installing plugins once its development is complete. The documentation page listing the available plugins is also still a work in progress. There are a couple of other places where we can find and explore more plugins, though.
Awesome Strapi is a semi-official list of curated plugins on GitHub: https://github.com/strapi/awesome-strapi. The list is not limited only to plugins, but also includes links to tutorials and other useful resources.
Another place to look for plugins is the Node Package Manager (npm) package registry. Strapi plugins are named following a certain format. They have to be prefixed with strapi-plugin-* (that is, strapi-plugin-documentation), so if we want to browse all Strapi plugins, we can search for packages starting with that prefix or go directly to https://www.npmjs.com/search?q=strapi-plugin, and we will see a list of all the plugins developed for Strapi.
As with any open-source project, some of the plugins might be unmaintained or outdated, so make sure to check the repository's stars, activity, and documentation to get a good indication of the quality of plugins before adding them to your project.
Now that we have explored how to find and install plugins, let's spend some time exploring two popular plugins: the GraphQL and Email plugins.
Use case – Enabling GraphQL for our API
So far, we've been consuming our API through a RESTful interface. We've added support for generating documentation in the previous section through the Documentation plugin. GraphQL is becoming an increasingly popular alternative to REST, and one of its many benefits is that generates schemas for our types that serve as documentation that is always up to date and reflects the current state of our content-types.
To support GraphQL in our Strapi API, we can simply install a plugin that enables a GraphQL endpoint to interact with our content and automatically generates all the GraphQL schema for our content-types.
Let's go ahead and install the plugin with the following command:
yarn strapi install graphql
Now, if we start our Strapi instance with yarn develop and open our browser at http://localhost:1337/graphql, we should see GraphQL Playground in the browser. GraphQL Playground is a visual interface that allows us to write GraphQL queries and mutations to interact with our content. You can see an illustration of this interface in the following screenshot:

Figure 8.6: The GraphQL Playground
In GraphQL Playground, we can—for example—query all tutorials with their classrooms and the managers of these classrooms by sending a GraphQL query such as this:
query{
tutorials{
data{
id
attributes{
title
type
classroom{
data{
attributes{
name
}
}
}
}
}
}
}
Using the REST API, this would require sending a second query or building a custom route to retrieve the manager information, as Strapi defaults to generating one level of relationships by default (that is, it will generate the classroom related to the tutorials but not the manager related to the classroom). With GraphQL, we have total control over which fields we want to query and which entities to populate.
For each model, the plugin autogenerates queries and mutations that are ready to use on our content-types. We can search the documentation from GraphQL Playground to find all possible interactions and the expected schema—there is no need for the Documentation plugin, with the risk of the documentation going stale. For example, if we click on Docs on GraphQL Playground and search for createTutorial, we can see the documentation for the mutation, as illustrated in the following screenshot:
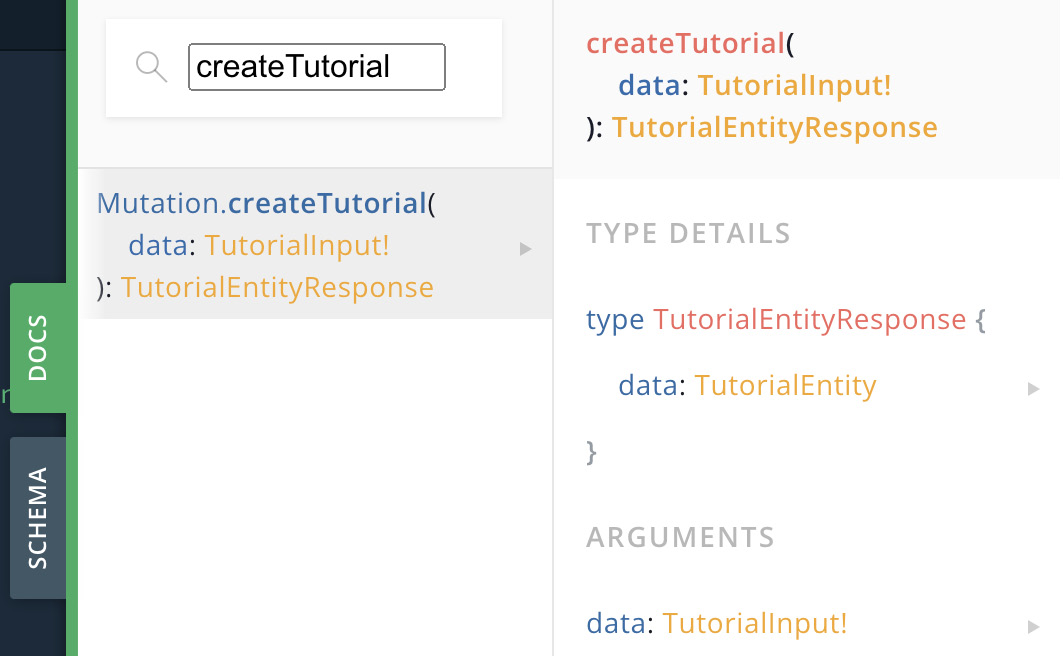
Figure 8.7: Exploring the documentation from GraphQL Playground
Now, let's try to create a tutorial from the GraphQL endpoint sending the mutation, as follows:
mutation createTutorial {
createTutorial (data: { title: "GraphQL in Strapi",
slug:"graphql-in-strapi", type:"text", classroom: 1 }) {
data {
id
attributes {
title
}
}
}
}
We will get a 404 Forbidden response because this is an unauthenticated request.
To authenticate with GraphQL, we can send a mutation passing our identifier (ID) and password, as follows:
mutation login{
login(input: { identifier: "[email protected]",
password: "password" }) {
jwt
}
}
Note
Make sure to use valid user information and that the user has the correct permissions to create a tutorial. Refer to Chapter 7, Authentication and Authorization in Strapi, for more details.
This will return a JavaScript Object Notation (JSON) Web Token (JWT) token. Then, we can use the token as part of an Authorization header (in the HyperText Transfer Protocol (HTTP) headers section of GraphQL Playground). The header will look like this: { "Authorization": "Bearer JWT_TOKEN" }. Here, JWT_TOKEN is the token returned by the login mutation. Once we add the header, we can rerun the createTutorial mutation, and the classroom will be created successfully. The following screenshot illustrates the process:

Figure 8.8: Adding an Authorization header to our GraphQL mutation
The autogenerated schema is likely to cover most of our use cases, especially given the inherent flexibility of GraphQL. As with everything in Strapi, though, if we want to change the behavior, then we are not stuck. The GraphQL plugin provides the ability to customize the schema by defining new types, custom resolvers, disabling certain mutations or queries, and more. Strapi's documentation for the GraphQL plugin is excellent in case you need to extend the default behavior.
Now that we have explored using the GraphQL plugin, let's move on to another popular use case that we can solve with a plugin: sending emails from Strapi.
Use case – Sending an email from Strapi
One plugin installed by default that we haven't used so far is the Email plugin. This is a plugin that allows us to send emails from Strapi. It exposes a service that can be used from our API. Let's imagine a scenario where we have a requirement such as this:
As a class admin,
I want to be notified by email when a new tutorial is created
So that I can keep track of the activities in our system.
Before hooking our email notification to tutorial creation, let's first see how we can send an email from Strapi.
Sending an email using the Email plugin
The Email plugin provides a service that we can use to send emails. We created our own service before in Chapter 5, Customizing Our API, to encapsulate logic for generating a summary. Similarly, plugins can expose services that allow us to use their functionality from other layers in the API. Plugins, as with API endpoints, make use of the same building blocks: controllers, routes, models, and all other concepts we've used so far.
To send an email, we can write a code snippet similar to this:
await strapi.plugins['email'].services.email.send({
to: '[email protected]',
from: '[email protected]',
subject: 'Sending an email with Strapi ',
text: 'Hello!',
html: '<h1>Hello!</h1>',
});
To explore the settings of the plugin, we can navigate to Email Settings under Settings. The page also includes a direct link to the documentation of the plugin, where we can see a full list of options we can pass to the send method, as illustrated in the following screenshot:

Figure 8.9: Email plugin settings
One setting is the email provider, which is set to sendmail right now. The Email plugin uses a sendmail local email system by default. We can instruct it to use a different provider, as we will see in the next section.
Plugins and providers
Related to the concept of plugins in Strapi is the concept of providers. Providers are further configuration points for plugins.
Some examples of providers we encountered before are the Open Authorization (OAuth) providers used by the Users & Permissions plugin in the previous chapter. The Upload plugin (which is used internally to upload images and assets in the Media Library), can also be configured to use a different provider to upload assets to Amazon Simple Storage Service (Amazon S3) or another storage service.
For the Email plugin, we can configure it to use providers for external email services such as SendGrid or Amazon Simple Email Service (Amazon SES).
To find providers available for the Email plugin, we can check the documentation or search for npm packages starting with strapi-provider-email-*. By default, providers will follow the strapi-provider-[pluginName] naming convention. You can see a list of available email providers here:

Figure 8.10: List of available email providers on npmjs.com
As we can see, there are packages for a variety of email providers. To explore how we can set one up, let's install the provider to enable the Mailgun service. Installing and configuring any provider will likely consist of the same steps, as outlined here:
- Install the package for the email provider.
- Configure the provider in the config section for the plugin.
So, let's install the Mailgun plugin and configure it for our API.
- We install the Mailgun plugin with the following command:
yarn add @strapi/provider-email-mailgun
- Then, we can update the configuration of the plugin to use our newly installed provider. To do so, create a new config/plugins.js file, but in our case, let's make the configuration specific to one environment (similar to what we learned in Chapter 2, Building Our First API) by adding it to config/env/production/plugins.js, as follows:
// ./config/env/production/plugins.js
module.exports = ({ env }) => ({
email: {
config: {
provider: 'mailgun',
providerOptions: {
apiKey: env('MAILGUN_API_KEY'),
domain: env('MAILGUN_DOMAIN'),
host: env('MAILGUN_HOST', 'api.mailgun.net'),
//Optional. If domain region is Europe use
'api.eu.mailgun.net'
},
settings: {
defaultFrom: '[email protected]',
defaultReplyTo: '[email protected]',
},
},
},
});
By adding this config file under config/env/production, we instructed our API to use mailgun in production and use the default sendmail in development mode. The provider settings themselves are available in the documentation for the @strapi/provider-email-mailgun package.
- To test our new provider (provided you have created an account with mailgun, which is out of the scope of our book), we will have to run our API in production mode with the following command:
NODE_ENV=production yarn develop
We should get an error from the mailgun provider that we did not provide an API key and domain. The code we added to plugins.js refers to env("MAILGUN_API_KEY") and env("MAILGUN_DOMAIN"), which are the environment variables that we need to provide.
- To create these environment variables, use the .env file in the root of the project (which is in the .gitignore list by default so that our secrets are not exposed). The code is illustrated in the following snippet:
# .env file
MAILGUN_API_KEY=xxxx # The key from your mailgun account
MAILGUN_DOMAIN=xxxx # The domain value from your mailgun account
Now, if we rerun our API in production mode, then it should run without errors, and we are ready to use our new provider to send an email. Now, let's go back to our original requirement to send an email when a new tutorial is created.
Hooking our API to send an email
The route for creating a tutorial is POST /tutorials. There are several points where we could extend the logic for this route to send an email. We can implement a custom controller for the route, but we also want to make sure that an email is sent whether the tutorial is created from the API or the admin panel. To achieve that, we can make use of the model lifecycle methods and send an email after the tutorial is created in the database in the afterCreate hook.
We can extend the tutorial model like this:
// api/tutorial/models/tutorial.js
"use strict";
/**
* Read the documentation (https://strapi.io/documentation/developer-docs/latest/development/backend-customization.html#lifecycle-hooks)
* to customize this model
*/
module.exports = {
lifecycles: {
// ... other lifecycle methods
async afterCreate(event) {
try {
const { result } = event;
const classManager = result.classroom &&
result.classroom.manager;
if (!classManager || !classManager.email) {
strapi.log.info(
"No manager set for this classroom, so not
sending an email."
);
return;
}
const { firstname } = result.createdBy;
const subject = `A new tutorial was created by
${firstname}`;
const text = `A new tutorial titled
"${result.title}" was created by ${firstname}`;
const email = {
to: classManager.email,
subject,
text,
};
strapi.log.info(
"An email will be sent with the following
options:",
);
await strapi.plugins["email"]
.services.email.send(email);
} catch (err) {
strapi.log.error("Failed to send an email on
tutorial creation");
strapi.log.error(err);
}
},
};
In the afterCreate hook here, we are extracting information from the event parameter to construct an email to send to the class manager. All of the information needed already exists in the result parameter of the event parameter passed to the lifecycle hook. We first check if there is a class manager and that the class manager has an email defined. Then, we define the email subject and text values based on the tutorial title and the user who created that tutorial.
Once we have the email information (the to, subject, and text fields), we can send the email. Sending the email itself is very simple—it's a one-liner using our Email plugin, as follows:
await strapi.plugins["email"].services.email.send(email);
We also wrapped our hook in a try/catch statement to make sure that failing to send the email doesn't throw an error to the user, as it's not a core operation. In larger production systems, we're likely to want to make this operation more robust by decoupling sending the email in a more resilient way, using a message broker or another solution.
So far, we have used readily available plugins to generate documentation, create a GraphQL endpoint, and send emails. Next, we will learn the fundamentals of building our own plugins so that we can enrich Strapi even further, and potentially even contribute back our amazing plugins to the Strapi community.
Creating our own plugins
So far, we've been installing external plugins that live in our node_modules folder. Strapi also provides us with a way to build local plugins. Functionality-wise, these are similar to external ones, except that they're part of our project and can't be readily reused in other projects.
So, let's create our first plugin, as follows:
- If you are following along from the previous section, then stop the server to make sure that NODE_ENV is not set to production, then start the server using the yarn develop command.
- To create a new plugin, we can use the CLI to generate its skeleton. Let's run the following command:
yarn strapi generate plugin lms
Running the preceding command will generate a plugin skeleton for us.
- Next, we will need to enable the plugin by adding it to the config/plugins.js file. Create this file and add the following code to it:
module.exports = {
// ...
'lms': {
enabled: true,
resolve: './src/plugins/lms'
},
// ...
}
Remember
In the previous section when we configured the Email plugin, we created a config/env/production/plugin.js config file because we wanted that plugin to be used in production only. However, for this plugin we just created, we added the config to config/plugins.js, which means it will be included in all environments.
- Let's now restart our project, run it with --watch-admin to ensure the rebuilding of the admin panel as we extend it with our plugin. In the terminal, run the following command:
yarn develop --watch-admin
What Is the --watch-admin Flag?
The --watch-admin flag is intended to be used when customizing the admin panel. If you recall, the admin panel is built using React.js. The --watch-admin flag runs a webpack server with hot reloading enabled to help while developing the admin panel. The dev server can be accessed using port 8080.
- Now, if we log in again to the admin panel (it will be running in a different port since it's in watch mode, likely http://localhost:8080), then we will see our plugin showing in a list of plugins in the menu, as illustrated in the following screenshot:

Figure 8.11: Our local plugin now appears on the navigation menu in the admin panel
- Edit the name of the plugin from package.json in the plugin folder and change the name and description, as illustrated in the following screenshot. Those values are shown in the admin panel in the Plugins menu item:
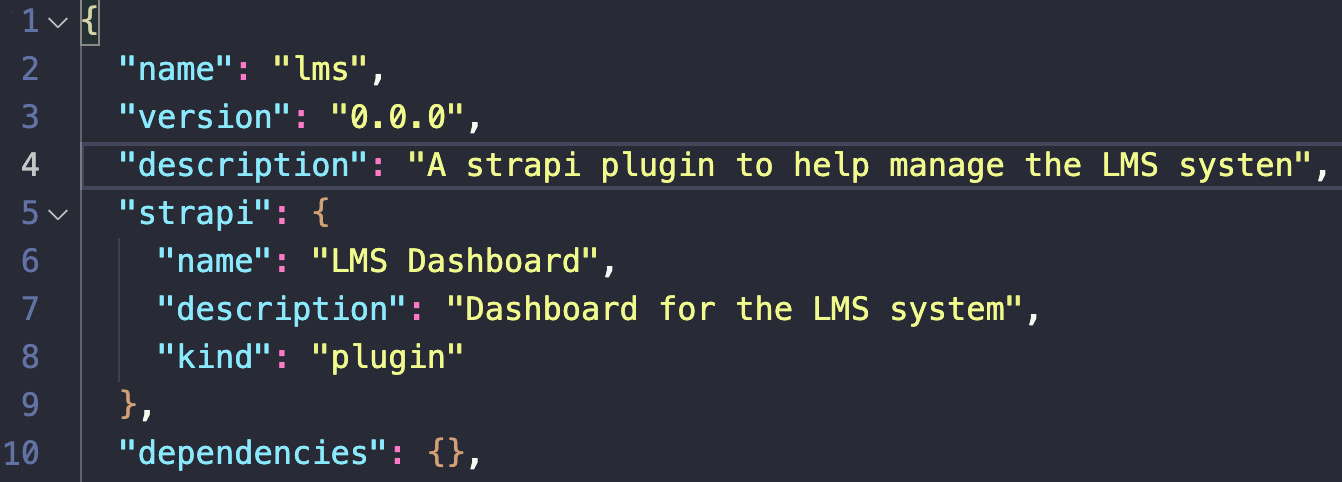
Figure 8.12: We can update the plugin metadata from the package.json strapi section
Now, after updating the package.json file, we will see the entry on our menu updating to the new name, and the plugin description appearing in the list of plugins, as illustrated in the following screenshot:

Figure 8.13: The custom name for our plugin is reflected in the admin panel menu
Before starting to build our plugin, let's have an overview of which files were generated by the CLI and briefly discuss their role.
Plugin development – frontend versus development
Looking at the files that were generated when we created our new plugin with the CLI, we can see there are some familiar folders and files. Generally speaking, a plugin development process is divided into two parts: the backend and the frontend. In the following screenshot, you can see the folder structure of the plugin code:
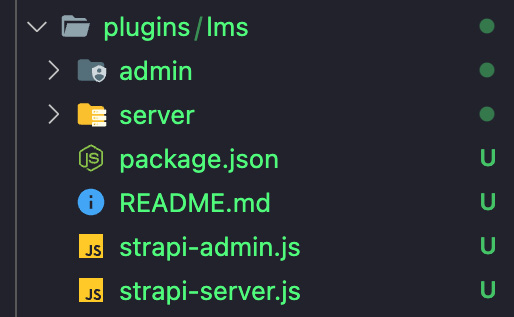
Figure 8.14: The folder structure of the plugin code
The backend components of our plugin live inside the server folder, which uses the same concepts we've been using with building APIs so far: routes defined under the config section, controllers to handle these routes, and services to encapsulate reusable logic. Additionally, we can create models if our plugin API needs to interact with the database. All these concepts are identical to what we have used before to build APIs. After all, the content-types that we have been using to define and create our entities are themselves part of a plugin built the same way.
The frontend components of our plugin live inside the admin folder and they are built using the React library.
The admin folder contains the entry point for our plugin (admin/src/index.js) that is responsible for showing our plugin in the navigation menu and registering it for use. We're unlikely to change that file much, but one common scenario to update it would be to set the permission required to view the plugin in the menu. For our scenario, the plugin will be visible to anyone with access to the admin panel.
The entry point for the actual frontend (what the user sees when they click on our plugin) lives under admin/src/pages/App/index.js. This module defines the frontend routes for the plugin (it uses the React Router v5 library). Initially, it only contains one route and a fallback 404 page if we hit an unknown page. The one route points to a HomePage component (under src/plugins/lms/admin/src/pages/HomePage/index.js). Let's update this component so that it contains the following code:
/*
* HomePage (plugins/lms/admin/src/pages/HomePage/index.js)
*/
import React, { memo } from "react";
import pluginPkg from "../../../../package.json";
const HomePage = () => {
return (
<div>
<h1>{pluginPkg.strapi.name}</h1>
<h2>{pluginPkg.strapi.description}</h2>
<p>This is where our plugin will live...</p>
</div>
);
};
export default memo(HomePage);
We just updated the component to get the component information from the package.json Strapi section (not the most elegant way, but this seems to be the standard in other plugins). Once we save the file, the admin panel should be refreshed automatically and our changes should be reflected when we click on our plugin link, as depicted in the following screenshot:

Figure 8.15: The plugin component shows in the dashboard
Note
You might have to refresh the page manually and log in again to the admin panel every time you do a change. The Strapi team is aware of this issue, and they are working on resolving it.
So far, so good. We have an entry to our plugin in the menu, and it points to our component. Now, let's start building our plugin functionality.
Building our plugin
Let's imagine we have a user requirement as follows:
As an Admin,
I want to see a list of all classes with people enrolled in them
So that I can easily have an overview of the school.
While we can get this information by navigating through each classroom, it is nice to have an overview page to see all of it at once. So, let's build a plugin to show this information.
Updating the model
First things first—let's add the relationship between the classroom and students, as we don't have this yet. This is similar to what we've done in the past, as outlined here:
- We go to Content-Type Builder and add a one-to-many relationship between users and the classroom.
- Click Finish then Save and wait for the admin panel to restart. The process is illustrated in the following screenshot:
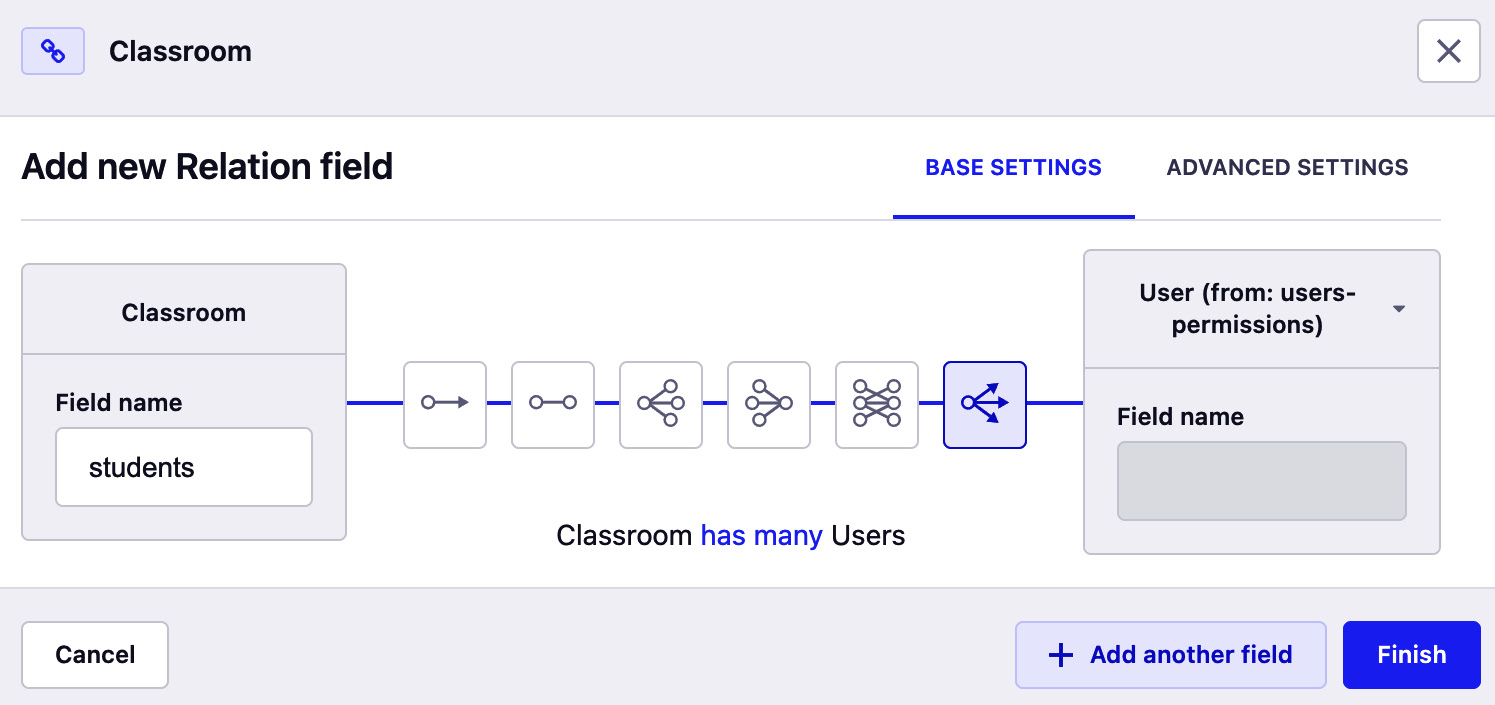
Figure 8.16: Setting up the relationship between classrooms and users
- Now, if we go to a classroom entity in the Content Manager plugin, we will see that we can assign students to that classroom. Go ahead and create some users entities and assign them to classrooms, as illustrated in the following screenshot:

Figure 8.17: Assigning some students to classrooms
Now, let's build our plugin functionality to show all classrooms with their enrolled students in one view.
Building the Enrollments component
Now that we have a model that reflects the relationship between a classroom and its students, we will start building the user interface (UI) components to show this information, as follows:
- Create a placeholder component to show our classroom enrollments, as follows:
/*
* Enrollments (plugins/lms/admin/src/pages/Enrollments/index.js)
*/
import React, { memo } from "react";
const Enrollments = () => {
return (
<div>
<p>List of classes with enrollments</p>
</div>
);
};
export default memo(Enrollments);
- Now, go ahead and add a route for it under the plugins/lms/admin/src/pages/App/index.js file. The updated module will look like this:
// import the module in top of the file
import Enrollments from "../Enrollments";
….
const App = () => {
return (
<div>
<Switch>
<Route path={`/plugins/${pluginId}`}
component={HomePage} exact />
<Route
path={`/plugins/${pluginId}/enrollments`}
component={Enrollments}
exact
/>
<Route component={NotFound} />
</Switch>
</div>
);
};
- Now, we add a link in our plugin Home page to the Enrollments page, as follows:
/*
* HomePage (plugins/lms/admin/src/page/HomePage/index.js)
*/
import React, { memo } from "react";
import { Link } from "react-router-dom";
import pluginId from "../../pluginId";
import pluginPkg from "../../../../package.json";
const HomePage = () => {
return (
<div>
<h1>{pluginPkg.strapi.name}</h1>
<div>
<Link to={`/plugins/${pluginId}/enrollments`}>
Show all Enrollments
</Link>
</div>
</div>
);
};
export default memo(HomePage);
We use the Link component from the react-router-dom package to navigate to our new component's route. Once the admin refreshes, then we can see a link, and when this is clicked on, the placeholder for our Enrollments page will show.
Creating an API token
To communicate with the API from the admin panel, we will use the axios library to send HTTP requests. Those requests will be treated as public requests, which means the Public role permissions will be applied to those requests. If we want to get a list of students in the classroom, we will have to make sure that the role has access to all the content-types.
Luckily, we do not need to make all our endpoint public; instead, we can make use of a Strapi API token. This token allows us to issue requests against the API endpoint as the Authenticated role. Let's create a token, as follows:
- Go to the Settings menu item, then click API Tokens.
- Click the Add Entry button to create a new token.
- Enter a name and a description for the token. Make sure to set the Token type value to Read-only, as illustrated in the following screenshot:

Figure 8.18: Creating an API token
- Click the Save button to create the token.
- Once you click the Save button, a token will be generated. Make sure to make note of the token as this is the only time you will be able to retrieve the token.
- Define a new API_TOKEN variable in the .env file, as follows:
# API Token
API_TOKEN=ADD_TOKEN_HERE
We now have an API token and we have added it to our environment variables. However, the environment variables defined in the .env file are only available for the backend, not the frontend. This means our plugin will not be able to access the process.env.API_TOKEN variable out of the box.
- We can use webpack to pass the variable to the frontend. The webpack configurations can be found in the src/admin/webpack.config.js file. Let's update this file, as follows:
'use strict';
/* eslint-disable no-unused-vars */
module.exports = (config, webpack) => {
// Note: we provide webpack above so you should not
`require` it
// Perform customizations to webpack config
// Important: return the modified config
config.plugins.push(
new webpack.DefinePlugin({
ENV: {
API_TOKEN: JSON.stringify(process.env.API_TOKEN),
},
})
);
return config;
};
The preceding code will make the API_TOKEN variable available in the frontend using the ENV.API_TOKEN variable.
Now that we have the API_TOKEN variable available in the frontend and by extension to our plugin, let's next see how we can display a list of students on the Enrollments page.
Displaying enrollments in the plugin
Now, we can update our Enrollments component to show the classrooms and the students assigned to them in one view. Here is the code for the component:
/*
* Enrollments (plugins/lms/admin/src/pages/Enrollments/index.js)
*/
import React, { memo, useEffect, useState } from "react";
import axios from "axios";
const Enrollments = () => {
const [classes, setClasses] = useState([]);
useEffect(() => {
const fetch = async () => {
const axiosConfig = {
headers: { authorization: `Bearer ${ENV.API_TOKEN}`
},
};
const { data } = await axios.get(`${strapi.backendURL}/api/classrooms?populate=*`, axiosConfig);
setClasses(data);
};
fetch();
}, []);
return (
<div>
<h1>List of classes with enrollments</h1>
{classes.map((classroom) => {
const { id, attributes } = item;
const students = attributes.students.data;
return (
<React.Fragment key={id}>
<div key={classroom.id}>
<h2>{attributes.name}</h2>
<p>{attributes.description}</p>
<br />
<table>
<thead>
<tr>
<th>#</th>
<th>name</th>
<th>email</th>
</tr>
</thead>
{students.map((student, i) => {
return (
<tr key={student.id}>
<td>{i + 1}</td>
<td>{student.attributes.username}</td>
<td>{student.attributes.email}</td>
</tr>
);
})}
</table>
</div>
<hr />
</React.Fragment>
);
})}
</div>
);
};
export default memo(Enrollments);
The preceding code is standard React code, which should be familiar to people with exposure to React. We used the existing GET /api/classrooms API to get the information we want then display it in a custom format. We could have also used a route specific to the plugin that internally gets that data. Routes created within the plugin will be prefixed by the plugin ID. We used the axios library to make the API calls since it's included as a peer dependency for the strapi package, but we could have also used fetch or installed a custom dependency.
We have access to a global strapi object that gives us access to properties such as strapi.backendURL to get the Uniform Resource Locator (URL) of the backend so that we can call the API in our component.
Now, if we head to our plugin home page and click the Enrollments link, we should see the results displayed in a tabular format, with all the classes and students enrolled in them in a single view, as illustrated in the following screenshot. We can add more data and see it reflected in the report:

Figure 8.19: Our plugin now displays all classrooms with their students in a custom view
Using Strapi Design System
The plugin we have built is functioning correctly. However, the look and feel of it are pretty basic and dull, and it does not match the rest of the admin panel. This is where Strapi Design System and UI Kit come into play. The official page of the design system can be found here: https://design-system.strapi.io.
Strapi Design System is an open-source design system for Strapi plugins, as well as products and apps. It consists of pre-built reusable components that allow the user to build a consistent UI faster. The components can be found at this Storybook link: https://design-system-git-develop-strapijs.vercel.app/.
To start using it in our project, we first need to install it using the following command:
yarn add @strapi/design-system
Once we have installed it, we can then use the pre-built components to style the UI as we feel fit. We will leave this part to you to implement. The following screenshot shows an example of how the design system can be used to style the plugin interface:
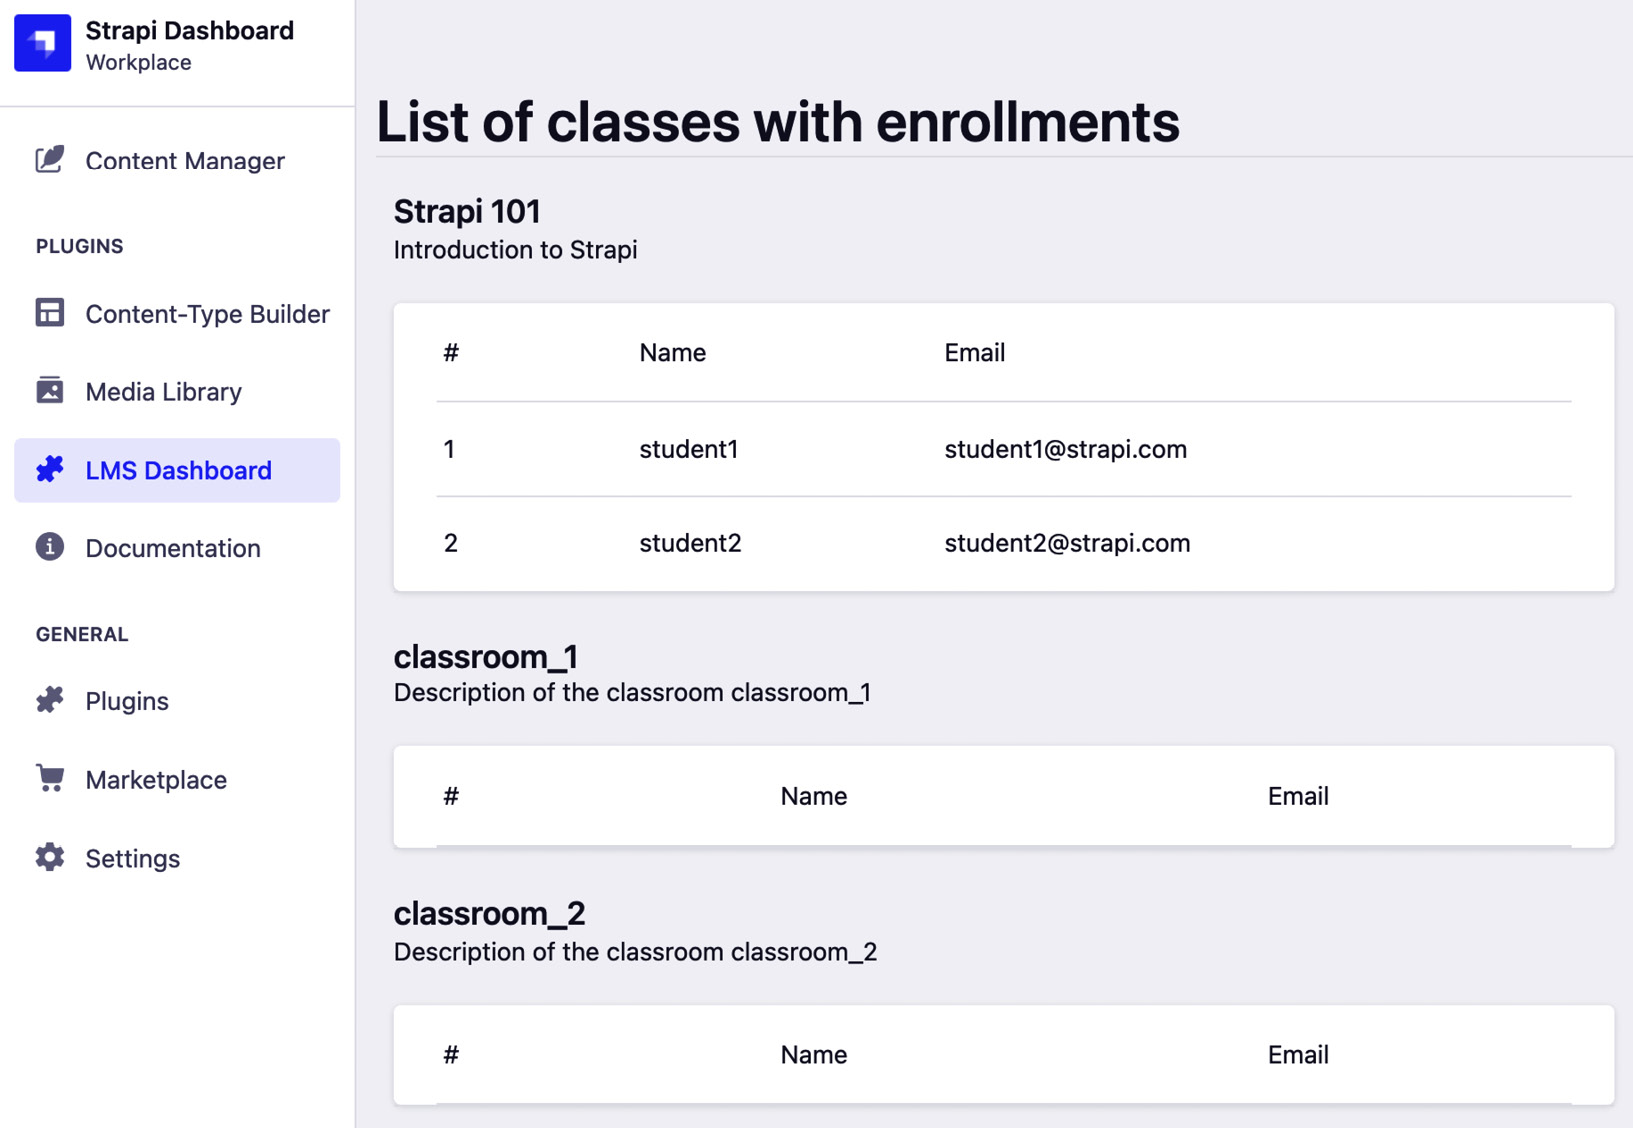
Figure 8.20: Example of using Strapi Design System
The source code in the preceding screenshot can be found in the book's GitHub repository.
Finally, before going back to running Strapi with yarn develop, we should run yarn build to rebuild the admin panel so that the admin panel is served with our new plugin.
Summary
In this chapter, we explored the Strapi plugin ecosystem. We started by explaining the concept of a plugin in Strapi and how to install and configure a plugin from the Marketplace. We gave an example of using the API Documentation plugin and saw how can it be used to generate OpenAPI specifications for our API. Then, we explained how we can find more community-based plugins from GitHub or via npm.
We then explored two popular plugins and use cases. First, we learned how to enable GraphQL for our API and how to use GraphQL Playground to test it and explore the generated schema. Next, we learned how to send emails from Strapi by using the Email plugin. While configuring the Email plugin, we also explored the concept of a provider, setting up a custom email provider for us to use in production.
Afterward, we dug deeper into the plugin architecture and created our own custom local plugin with a frontend component to show in the admin panel. This opens up endless capabilities for us to customize Strapi and its admin panel to our requirements. Finally, we had a brief introduction to Strapi Design System and UI Kit.
This is the end of the second part of the book, where we took a deeper dive into Strapi's concepts. In the next part of the book, we will be moving on to discuss Strapi in production, starting with how we can deploy our API to the cloud.