Chapter 3: Event-Based Programming
In this chapter, we will learn about a specific way of programming, called event-based programming. Event-based programming allows us to write more optimized code. That is because our code will only run when a particular event happens. If this event does not happen, our code will not run. We will start by looking at functions that we can execute on instances instead of within scripts. After that, we will start listening to events. Once we know how to do this, we will make our own events. Then, we will learn how to use bindable events and bindable functions to do this. Finally, we will compare these custom events to modules, and we will even learn how to combine them.
The following topics will be covered in this chapter:
- Introduction to events
- Creating custom events
- Exercise 3.1 – event-based game
By the end of this chapter, you will understand the fundamentals of event-based programming. You will be able to use functions in instances, listen to events, create custom events, and combine custom events with modules. You will even be able to make a simple event-based game.
Technical requirements
To start programming with Luau, you need access to a device with internet access. This can either be a Windows device or a Mac device.
Additionally, you will need to download the following software:
- Roblox Player
- Roblox Studio
All the code examples for this chapter can be found on GitHub at https://github.com/PacktPublishing/Mastering-Roblox-Coding.
The CiA video for this chapter can be found at https://bit.ly/3PDyUwp.
Introduction to events
Sometimes, you want something to happen when a particular action is performed. This action can be anything. Let us make an application with one of these actions. Throughout the following sections, we will make a system that changes the color of our character once we jump. But this raises a problem: how do we detect whether someone is jumping?
First things first, we need a reference to a Player instance. But how do we know which players are in-game? Of course, we can make the system for our character. After all, we know our username. But what if someone else is in the game? We somehow need to detect whether someone joins our game because then, we know who is in our game.
In the following section, we will learn how to use functions on instances. After that, we will learn what events are and what they are used for. Additionally, we will learn how to listen to them. Finally, we will learn what to do when we need an event that does not exist.
Functions on instances
Let us start by solving our first problem. We somehow need to find out who is in our game. Previously, we have worked with Services such as the Workspace, ServerScriptService, and ServerStorage services. But as you can see in the Explorer frame, there are many more services. There are even services that do not show up in Explorer. For now, that is not important. The service that we need to make our application is called Players. This service knows everything about the players in our game. But how do we detect whether someone joins?
A Player instance for each player is made when they join our game. This Player instance can be found inside the Players service. Previously, we learned that parts inside a model, or anything else, are considered Children. If a part is directly inside the Workspace service, the part is a child of the Workspace service. Therefore, the Workspace service is the parent of this part. So, the :FindFirstChild() function is called on the Parent instance and looks for a Child instance with a particular name. If it can find the instance we are looking for, a reference to this instance is returned.
We know the Player instance is inside the Players service. Therefore, we can assume that the Player instance is a child of the Players service. Because of this, we can use the :FindFirstChild() function in the Players service to find the Player instance. Take a look at the following:
local Players = game:GetService("Players")function findPlayer(username)
local player = Players:FindFirstChild(username)
if player ~= nil then
print(player.Name .. " found!")
else
print(username .. " is not in-game.")
end
end
task.wait(1)
findPlayer("YourUsername")The preceding code works. It finds the Player instance based on their username. But we do not know everyone their username. What should we do when we do not know the player’s username?
Note
In the preceding code example, we stored the result of our :FindFirstChild() function in a variable. We do this because the :FindFirstChild() function can return nil. In this case, nil is returned if we try to find something that it cannot find. Because nil could be returned, we check whether the variable is not nil on the following line.
The :FindFirstChild() function looks for children that have a specific name. Sometimes, you are not sure what the child’s name is, but you do know what type of instance you are looking for. As you might have seen in the properties window, there is a property called ClassName. This class name determines what type your instance is. The class name can be Part, MeshPart, Decal, Player, or anything else.
Previously, we used the :FindFirstChild() function to find our player. We could’ve used the :FindFirstChildOfClass() function, too. What this :FindFirstChildOfClass() function does is that, instead of looking for a child with a particular name, the function looks for a child with a specific class name. Take a look at the following:
local Players = game:GetService("Players")function findPlayer()
local player = Players:FindFirstChildOfClass("Player")if player ~= nil then
print(player.Name .. " found!")
end
end
task.wait(1)
findPlayer()
With the preceding code, we have solved the problem of not knowing someone’s username. However, we do have another problem. Both :FindFirstChild() and :FindFirstChildOfClass() only find the first item that matches your description. If there is another child that matches the description, it gets ignored.
These functions are essential. Almost all instances feature these functions. It does not matter if you execute this function on a Service instance, a Part instance, a Model instance, or any other instance; it works. There are also instance-specific functions. For example, the Players service has a function called :GetPlayers(). This function loops through all the children of the service and checks whether the children have the Player class name. Then, all the instances matching this description are inserted into a table. Take a look at the :GetPlayers() function:
local Players = game:GetService("Players")function printPlayers()
-- Getting a table containing all players in our game.
local players = Players:GetPlayers()
-- Printing all players
print("Current players in our game:")for _, player in pairs(players) do
print("- " .. player.Name)end
end
task.wait(1)
printPlayers()
If we execute the preceding code snippet, we get a list of all of the players in our game. Because our game runs in Roblox Studio, only your username shows up. You can see the code in action in Figure 3.1. This new function works much better than the :FindFirstChild() function. It solves two problems: not knowing someone’s username and getting more than one player. Nevertheless, we still have issues to address. What if someone joins after 10 minutes? The function only gets executed once. So, how do we solve this? Take a look at the following screenshot:
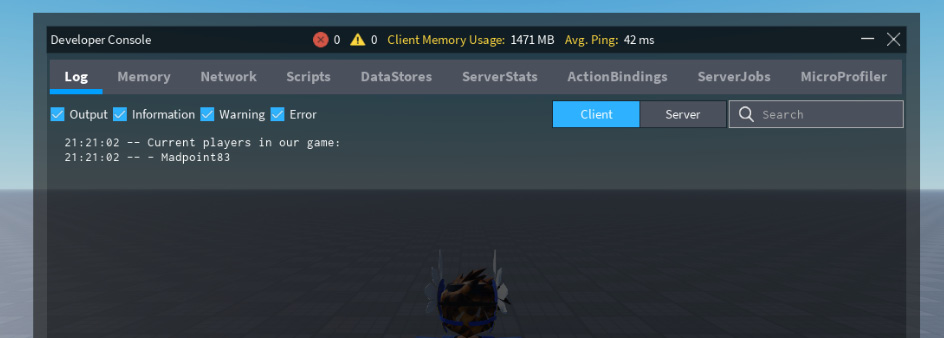
Figure 3.1 – Developer Console containing the player list
Developer Console
The Developer Console is the same thing as the Output frame. The difference is that the Output frame is only for Roblox Studio, whereas the Developer Console can also be accessed in Roblox Player.
To open the Developer Console, press the F9 key on your keyboard. If you ever play your game on a mobile device, you can also type /console into the chat.
Now that we know how to use functions on instances, we can move on to events. In the following section, we will learn what events are and how to use them. Besides that, we will use events to solve the previously described problem.
Listening to events
In the Programming loops section of Chapter 2, Writing Better Code, we learned about loops. Loops allow us to execute specific code multiple times. One solution to our earlier problem could be to loop over our function constantly. Then, we need a global variable that stores the old player list. If the function detects someone who is not in the global variable, we know that person joined.
You can probably already guess this is a horrible solution. Not only do we have a loop that runs forever, but most importantly, most of the time, it runs for nothing. If no one joins, there is no reason for the function to run. This unnecessary looping is a waste of computer processing power.
Luckily, Roblox implemented a solution for this: Events. You can see these events as alarms. For example, when the fire alarm goes off, your action is to evacuate. This alarm is a trigger to do something. This is the same in programming. If something happens, such as a user joining the game, we can start a particular action. There are many of these events. Throughout the book, you will see the most important ones.
Let us take a look at one of those events:
local Players = game:GetService("Players")function playerJoined(player)
print(player.Name .. " joined the game!")
end
Players.PlayerAdded:Connect(playerJoined)
In the preceding code snippet, we can see a .PlayerAdded event. This event gets triggered when someone joins our game. Waiting for this event to get triggered is often referred to as a Listener. Using listeners is much better and far easier than the idea we came up with before. In this scenario, events reduce the number of lines we have to code. But most importantly, it also prevents us from looping unnecessarily.
Let us continue with the system we previously described. Our first problem is solved. Now we know what players are in our game. Next, we need to find the character of this player somehow. Luckily, the player parameter we get in our playerJoined() function has a property called Character, which references the character. Let us try to see what happens if we try to print the value of this property:
local Players = game:GetService("Players")function playerJoined(player)
print(player.Character)
end
Players.PlayerAdded:Connect(playerJoined)
Unfortunately, if we run the preceding code, nil appears in our Output frame. It prints nil because the character of the player does not always exist. The character constantly changes. If the player respawns, a new reference to the character is required. Luckily, there is another event in the Player instance. This event is called .CharacterAdded. This event solves our current problem. Let us take a look at the following code:
local Players = game:GetService("Players")function playerJoined(player)
local function characterAdded(character)
print(character.Name)
end
player.CharacterAdded:Connect(characterAdded)
end
Players.PlayerAdded:Connect(playerJoined)
Notice how we have a nested function? In the Nested functions section of Chapter 2, Writing Better Code, we learned all about this. We mentioned that, in most scenarios, it is good to avoid this. However, there were a few exceptions. Our current scenario is one of those exceptions. Because we use events that have parameters, we face an issue. For example, the .CharacterAdded event has a parameter referencing the user’s character. We cannot add an extra parameter because those parameters are fixed for the event. Calling another function would lose the player variable from the playerJoined() function. Because we use a nested function, we can keep both the character and the player as parameters.
Note
In the Nested functions section of Chapter 2, Writing Better Code, we learned that we are only allowed to use nested functions if we can be sure that no other function will ever need to call the characterAdded() function. In our current scenario, that is the case. Therefore, we are allowed to use a nested function here.
If we run the preceding code, our name gets printed into the Output frame. If we reset, the name gets printed again. As previously explained, every time the character respawns, a new character is made. Because we listen to the .CharacterAdded event, our function gets executed again every time we reset our character.
Now, we have almost finished our original system. The only thing left to detect is the character jumping. We already have the character. Is there an event on this character that fires when we jump? Unfortunately, there is not. If you are familiar with building basic things in Roblox, you probably know about Models. Models group parts together. A character consists of multiple parts grouped by a model. Not all models are characters. Therefore, there is no .Jump event on a model. However, there is something inside of this model that makes it unique. It is called a humanoid.
Humanoids bring models to models to life. All characters and Non-Playable Characters (NPCs) have a humanoid. Previously, we learned about the :FindFirstChild() and :FindFirstChildOfClass() functions. We can use this to find our humanoid:
local Players = game:GetService("Players")function playerJoined(player)
local function characterAdded(character)
local humanoid = character:FindFirstChildOfClass
("Humanoid")if humanoid ~= nil then
print("Humanoid found!")end
end
player.CharacterAdded:Connect(characterAdded)
end
Players.PlayerAdded:Connect(playerJoined)
Now that we learned what events are and when to use them, we can move on to the next section. Sometimes, there are no pre-made events for behavior we are trying to listen to. The following section will explain what to do in those scenarios.
Using properties for missing events
Unfortunately, no event gets fired when a character jumps on the humanoid either. However, there is a property named Jump. This property gets set to true if the character is jumping and changes back to false when the character is done jumping. As we mentioned, this is a property, not an event. We cannot listen to when the value of a property gets changed unless we constantly loop over the property’s value. Or can we?
There is a really useful function on every instance called :GetPropertyChangedSignal(). This :GetPropertyChangedSignal() function is a special type of function. When we call this function, it returns an event. The reason this is a function is so that we can specify a property. When this property changes, the event that the function returns gets fired. The event allows us to listen to property changes on any instance. Take a look at the following:
humanoid:GetPropertyChangedSignal("Jump"):Connect(function() print("Jump property changed: " .. tostring(humanoid.Jump))
end)
If we implement the preceding code into our system and run the game, this message gets printed into the Output frame every time we jump. However, for some reason, it gets printed twice. The fact that it gets printed twice actually makes sense. Our listener gets triggered every time the property changes. We know that our property changes to true when we jump, but it gets changed back to false when we finish jumping. Changing our property back to false also triggers our event. There is a simple fix: an if statement.
Take a look at the following code:
humanoid:GetPropertyChangedSignal("Jump"):Connect(function()if humanoid.Jump == true then
print(player.Name .. " jumped!")
end
end)
What the preceding if statement does is that it checks whether the value of the Jump property equals true. If that is the case, the print() function gets executed. On the other hand, when the property’s value gets changed back to false, this statement prevents the rest of the code from being executed.
Now, all we need to do to finish our code is change the avatar’s color. First, we need to generate a random color. Previously, we learned about the Color3 data type. We also learned that a Color3 data type could be made using RGB (Red, Green, and Blue). Each color has a number between 0 and 255. Additionally, we learned about the math.random() function. This function generates random numbers.
The other thing we need to do is change the children’s color inside the character. There is one problem. There are multiple instances inside a character, and we only need to change the parts. This raises another problem, that is, there are many different parts out there, such as Part, MeshPart, VehicleSeat, Truss, and WedgePart:

Figure 3.2 – Five different BaseParts
All of these classes are grouped together. The group of classes that contain these different types of parts is called BasePart. Because there are many classes in the BasePart class, it is difficult to check the ClassName property for all of them. Luckily, we can use the :IsA() function. This function tells us whether an instance, such as a Part instance, is inside a class group such as the BasePart class group.
If we use the :IsA() function, our code will look like this:
local Players = game:GetService("Players")function playerJoined(player)
local function characterAdded(character)
-- Looking for the Humanoid in the new Character
local humanoid = character:FindFirstChildOfClass
("Humanoid")if humanoid ~= nil then
-- Listening to the changing "Jump" property on
-- the Humanoid
humanoid:GetPropertyChangedSignal("Jump"):Connect(function()
if humanoid.Jump == true then
-- Printing that someone jumped
print(player.Name .. " jumped!")
-- Changing the color of the player›s
-- character
changeCharacterColor(character)
end
end)
end
end
-- Listening to a new Character
player.CharacterAdded:Connect(characterAdded)
end
function changeCharacterColor(character)
-- Getting new Color
local newColor = randomColor()
-- Changing Color
for _, part in pairs(character:GetChildren()) do
-- Checking if the part is in the "BasePart" class
-- group
if part:IsA("BasePart") thenpart.Color = newColor
end
end
end
function randomColor()
local r = math.random(0, 255)
local g = math.random(0, 255)
local b = math.random(0, 255)
return Color3.fromRGB(r, g, b)
end
Players.PlayerAdded:Connect(playerJoined)
When we play the game and jump, you should see the color of your character change into a random color:

Figure 3.3 – Changing avatar color
GitHub Code
You can find the preceding code on the GitHub page for this book.
Now we understand what to do when there are missing events, and we have mastered listening to events. We started by looking at how to use functions on instances. After that, we started listening to various events. Finally, we learned what to do when there is no event to listen to. In the next section, we will learn how to create custom events.
Creating custom events
Previously, we learned that no event gets fired when a character jumps. We started listening to a changed event on a property. This works perfectly. Our current script changes the color of the avatar on a jump change. But what if we wanted to create another script that slowly increases the size of the player’s head. This script needs to listen to the same Jump property, too. Multiple scripts having the same code is a Bad Smell. This is where Custom Events come in handy.
In the following sections, we will learn how to create custom events using bindable events and functions. After that, we will compare them to modules. Finally, we will combine bindable events and modules.
Using bindable events
To make our custom event, we will make a new script. This script will be responsible for managing the event. Then, other scripts can listen to this new event.
But how do we make a custom event? Roblox has something called BindableEvents. These are instances just like any other instance we have seen. The difference is that they have special functions and events. To start listening to BindableEvent, we need a reference to it. Once our reference has been made, we can listen to it using the .Event event. That’s great, but because it is a custom event, we need to trigger it somehow. That is where the :Fire() function comes in. Once the :Fire() function has been executed, the .Event event is triggered.
Let us look at the code of the script that handles this custom event. We will call this script JumpedEventHandler:
local Players = game:GetService("Players")function playerJoined(player)
local function characterAdded(character)
-- Looking for the Humanoid in the new Character
local humanoid = character:FindFirstChildOfClass
("Humanoid")if humanoid ~= nil then
-- Creating our custom event
local customEvent =
Instance.new("BindableEvent")customEvent.Name = "Jumped"
customEvent.Parent = humanoid
-- Listening to the .Jumped event on the
-- Humanoid
humanoid:GetPropertyChangedSignal("Jump"):Connect(function()
if humanoid.Jump == true then
-- Firing our Custom Event
customEvent:Fire()
end
end)
end
end
-- Listening to a new Character
player.CharacterAdded:Connect(characterAdded)
end
Players.PlayerAdded:Connect(playerJoined)
The preceding code looks a lot like our original code. The only primary difference is that we now make a custom event and our :GetPropertyChangedSignal() function fires an event instead of calling a function.
Let us briefly look at the section that creates our custom event. First, we see a function called Instance.new(). What this function does is create a new instance of a specific class. This class is given as an argument in between the parentheses. For our example, this is a BindableEvent. After that, we simply change the values of certain properties. Finally, we name our custom event Jumped. This helps us identify the event from other scripts. When the game is running, you can find the bindable event in the Explorer frame:

Figure 3.4 – Jumped BindableEvent in the Explorer frame
Now we can start listening to our custom event. This is done from another script. We will call it the JumpedEventListener script:
local Players = game:GetService("Players")function playerJoined(player)
local function characterAdded(character)
-- Looking for the Humanoid in the new Character
local humanoid = character:FindFirstChildOfClass
("Humanoid")if humanoid ~= nil then
-- Waiting for Jumped event
local jumpedEvent =
humanoid:WaitForChild("Jumped")-- Listening to our custom event
jumpedEvent.Event:Connect(function()
-- Printing that someone jumped
print(player.Name .. " jumped!")
end)
end
end
-- Listening to a new Character
player.CharacterAdded:Connect(characterAdded)
end
Players.PlayerAdded:Connect(playerJoined)
We have moved all our logic from listening to the property to another script. Something that’s noteworthy is the usage of the :WaitForChild() function. We have not seen this before. Because one of our scripts creates the event and the other script needs it, there is a chance our script looks for our event before it is created. The :WaitForChild() function prevents this.
The :WaitForChild() function does something that we call yielding. Yielding pauses the current thread until it allows the thread to continue. The :WaitForChild() function yields the function for a maximum of 5 seconds. In those 5 seconds, it keeps looking for the instance that we are trying to find.
Previously, we used the :FindFirstChild() function. The difference between the :FindFirstChild() function and the :WaitForChild() function is that the :FindFirstChild() function checks whether it can find an instance. If it cannot find this instance, it returns nil. The :WaitForChild() function does the same. However, instead of instantly returning nil, it keeps checking to find the instance. This does not mean that you should always use the :WaitForChild() function. Let us take a look at the following table to find out how to properly reference instances:

Table 3.1 – Properly referencing instances
With our current script, we can change the avatar’s color or increase the size of its head.
Now that we know how to use BindableEvents, we can look at something similar, BindableFunctions. In the following section, we will learn what they are and how to use them.
Using bindable functions
We might want to increase the size of our character’s head once every five jumps. There are many ways of implementing this. One of the options could be to add a variable into our JumpedEventListener script. Another option is to move this variable into the JumpedEventHandler script and give the Jumped event a parameter that states the number of times the character jumped.
Additionally, we can use BindableFunctions. These are very similar to BindableEvents. The difference is that BindableEvents can never give something back, whereas BindableFunctions are all about giving data back once completed.
All three of these options have their pros and cons. For now, we are going to explore the BindableFunctions option. To practice, feel free to try and implement these other options.
There are a few differences when comparing BindableEvents to BindableFunctions:
- You can listen to the event of the BindableFunction using .OnInvoke. When this is done, a callback starts. The primary difference is that a callback must return data, whereas BindableEvents cannot do this.
- To invoke a BindableFunction, you can use the :Invoke() function.
- There can only be one script that listens to the .OnInvoke event. This makes sense. After all, something must be returned when using the :Invoke() function. We cannot get two results from different scripts. When you do listen to the .OnInvoke event in multiple scripts, only one result gets used and the rest gets ignored.
Let us change our JumpedEventHandler script to implement this BindableFunction:
local Players = game:GetService("Players")function playerJoined(player)
local function characterAdded(character)
-- Looking for the Humanoid in the new Character
local humanoid = character:FindFirstChildOfClass
("Humanoid")if humanoid ~= nil then
-- Total Jumps variable
local totalJumps = 0
-- Creating custom event
local jumped, timesJumped =
createCustomEvents(humanoid)
-- Listening to the .Jumped event on the
-- Humanoid
humanoid:GetPropertyChangedSignal("Jump"):Connect(function()
if humanoid.Jump == true then
-- Incremented Total Jumps
totalJumps += 1
-- Firing our Custom Event
jumped:Fire()
end
end)
timesJumped.OnInvoke = function()
-- Returns the Total Jumps
return totalJumps
end
end
end
-- Listening to a new Character
player.CharacterAdded:Connect(characterAdded)
end
function createCustomEvents(humanoid)
local jumped = Instance.new("BindableEvent")jumped.Name = "Jumped"
jumped.Parent = humanoid
local timesJumped = Instance.new("BindableFunction")timesJumped.Name = "TimesJumped"
timesJumped.Parent = humanoid
-- Returning events
return jumped, timesJumped
end
Players.PlayerAdded:Connect(playerJoined)
Not much has changed compared to our original script. One of the primary differences is that we now have a new function that creates the BindableEvent and BindableFunction. The reason for this is to prevent our other functions from growing too much in size. Previously, we learned how to make our function only do one thing. Creating events is something that can be done in another function. Because we still need these instances in the other function, our createCustomEvents() function returns the RemoteEvent as the BindableFunction.
Something noteworthy is the way we call our function when the bindable function is invoked. When using .Event, we follow by using :Connect(). After that, we declare our function. Callbacks are a bit different. If you use .OnInvoke, you follow it by an equals (=) operator, and then you declare your function. This is something you need to remember when using BindableFunctions.
To test whether the bindable function works, we can change the code in our JumpedEventListener script, as follows:
-- Waiting for Custom Events
local jumped = humanoid:WaitForChild("Jumped")local timesJumped = humanoid:WaitForChild("TimesJumped")-- Listening to our custom event
jumped.Event:Connect(function()
-- Printing that someone jumped
print(player.Name .. " jumped " .. timesJumped:Invoke()
.. " time(s)")
end)
Note
The preceding code is just a section of the JumpedEventListener script. Replace this part in the original script.
We can finish our system now that we understand how to invoke bindable functions:
-- Waiting for Custom Events
local jumped = humanoid:WaitForChild("Jumped")local timesJumped = humanoid:WaitForChild("TimesJumped")-- Listening to our custom event
jumped.Event:Connect(function()
-- Calculating Scale
local headScale = math.floor( timesJumped:Invoke() / 5
) + 1
-- Getting scale value
local scaleValue = humanoid:FindFirstChild("HeadScale")if scaleValue then
scaleValue.Value = headScale
end
end)
Something noteworthy in the preceding code snippet is the math.floor() function. This function turns decimal numbers into whole numbers. For instance, when we have the decimal number 1.9 and use the math.floor() function, the number gets rounded to the whole number of 1. Now, if we want the number to be rounded up instead of down, we use the math.ceil() function. When using the math.ceil() function, the decimal number of 1.2 gets rounded to 2.
Note
The preceding code is just a section of the JumpedEventListener script.
The following screenshot shows the increased head size of our player:

Figure 3.5 – Increased head size
Now that we know how to use BindableFunctions, let us compare them to modules. In the following section, we will learn when to use custom events and modules.
Comparing events to modules (advanced)
This section is for those willing to take their knowledge of event-based programming to the next level. Of course, it is perfectly fine to skip this section and only use the knowledge from the previous sections.
Bindable events and functions allow us to execute code in another script. In the Using modules section of Chapter 2, Writing Better Code, we have seen something that practically does the same, Modules. The only difference is that modules have to be loaded in another script. Once that is done, the module’s functions can be used in the script.
You are allowed to use both for any situation. However, there are some common examples where it makes more sense to pick a particular option. Let us walk through them.
When multiple events are somewhat grouped, such as the Jumped and TimesJumped events from earlier, it might make more sense to create a module. However, if there is just one event, using a BindableEvent or BindableFunction might make more sense. It comes down to preference.
There is one important thing to remember before changing all your BindableEvents to modules. Previously, we made a new BindableEvent inside of the humanoid. Technically, we could have made this BindableEvent anywhere. If we did that, we could have used the BindableEvent for all players instead of making a new one for each character. This means we can implement the usage of BindableEvents and BindableFunctions however we like. On the other hand, modules are a different story.
If you choose to use modules, never copy a module to store it in a specific location. Instead, use one module, even if it will be used for multiple players.
Now that we know when to use modules and when to use custom events, why not combine them? In the following section, we will see how to combine BindableEvents and modules.
Using bindable events in modules (advanced)
This section is for those willing to take their knowledge of event-based programming to the next level. Of course, it is perfectly fine to skip this section and only use the knowledge from the previous sections.
Because we have a custom Jumped event and a TimesJumped function, we might use a module instead. Previously, we learned that if we choose to use a module, there might only be one for all characters.
Let us start by making a new ModuleScript. We place it in ServerStorage and name it CharacterEvents. Once made, we rename the returning table to CharacterEvents. At the end of the module, we return this table. After that, we add a module function called Jumped. The parameter of this function is the reference to the Player instance. Currently, our code in the CharacterEvents module looks like the following:
local CharacterEvents = {}function CharacterEvents.Jumped(player)
end
return CharacterEvents
Note
The reason the function is called Jumped and, therefore, does not follow the lower camel case naming method is that this function will be an event.
We plan to trigger the Jumped function if the player jumps. Now, you are probably wondering, functions get executed on events, since when can they make events? You are right. They cannot. However, we previously learned about bindable events. bindable events can trigger events. If our function creates a bindable event and returns a listener, the scripts that call this function can start listening to the returned listener.
This most likely sounds very complex. Let us take a look at the full code for the CharacterEvents module:
local CharacterEvents = {}function CharacterEvents.Jumped(player)
-- Creating Event
local jumped = Instance.new("BindableEvent")-- Character Added event
local function characterAdded(character)
-- Looking for the Humanoid in the new Character
local humanoid = character:FindFirstChildOfClass
("Humanoid")if humanoid ~= nil then
-- Listening to the .Jumped event on the
-- Humanoid
humanoid:GetPropertyChangedSignal("Jump"):Connect(function()
if humanoid.Jump == true then
-- Firing our Custom Event
jumped:Fire()
end
end)
end
end
-- Listening to a new Character
player.CharacterAdded:Connect(characterAdded)
-- Returning Listener
return jumped.Event
end
return CharacterEvents
The preceding code might look really complex. Let us take a better look. So, the only thing that changed compared to the previous code is the function. The first thing the function does is create a new BindableEvent. Then, we have the same code that we have seen a few times. This detects new characters, finds the humanoid, and fires an event depending on the Jump property. The BindableEvent that gets fired is what we created at the top of the function.
Below that, we have a listener for the CharacterAdded event. We have seen this before, too. Then, we return a listener. Previously, we learned how to listen to BindableEvents. Then, we learned there was an event and a function. This event was named .Event. This is exactly what we return here. Typically, after having the .Event event, we add :Connect(). We do not do this part in our module as we do not want to specify the action based on our trigger here. Instead, we want another script to implement its own action.
Let us look at how we can use this listener. The following script is called the JumpedEventListener script:
local Players = game:GetService("Players")local ServerStorage = game:GetService("ServerStorage")local CharacterEvents = require(ServerStorage.CharacterEvents)
function playerJoined(player)
-- Listening to Jumped Event
CharacterEvents.Jumped(player):Connect(function()
print(player.Name .. " jumped!")
end)
end
Players.PlayerAdded:Connect(playerJoined)
Our global variables reference the Players and ServerStorage services. Inside the ServerStorage service, we find our module. We require this module so that we can use it in our current script.
At the bottom of our script, we listen to the .PlayerAdded event. Once a player has joined our game, we start listening to the .Jumped event by calling it on the CharacterEvents module. When we were using bindable events, we had to look for the character, then the humanoid, and then listen to an event. We no longer have to do this because the module does this for us. Therefore, our code is a lot cleaner. Now we can quickly implement something by using our very own Jumped event.
If we compare our custom event to a default Roblox event, listening to them is almost identical. See the difference in the following code snippet:
Players.PlayerAdded:Connect(someFunction) -- Roblox Event
CharacterEvents.Jumped(player):Connect(someFunction) -- Custom Event
The only difference between calling our custom event and a default Roblox event is the parentheses behind the event’s name. This is because we are actually calling a function inside a module.
Now that we know how to combine bindable events and modules, we have finished the advanced sections of event-based programming. As with anything you learn, you might have to practice with this a bit yourself.
In the next section, we will make our very first event-based game in Roblox.
Exercise 3.1 – event-based game
In this exercise, we will make a game based on the knowledge we learned during this chapter. The game will consist of two teams. Each team has to claim as many parts as possible. You can claim parts by simply walking over them. Because this game requires buildings, a premade game has been made. This game is open source. Therefore, anyone can edit the game and create their version. Please bear in mind that the game is not finished. In this exercise, we will finish the game.
You can find the game here:
https://www.roblox.com/games/8645775042/Event-Based-Game
Select the three dots next to the name, and click on Edit to open this game in Roblox Studio.
Once opened, you will see a square in the Workspace service. The gray area is the playing field. This gray area consists of 144 different parts. In ServerScriptService, you will see a script named TeamAssigner. This is a premade script; you do not have to change anything here. This script assigns joining players to the team with the least players. This way, the teams are balanced. It is a fairly simple team assigner.
If we play the game, we get assigned to a team. However, nothing happens if we walk over one of the gray parts. This is what we will do in the following exercise. Let us get started.
Exercise:
Follow these steps to create your event-based game:
- Create a new script in ServerScriptService.
- Create a variable to reference the model named Map in Workspace.
- Create a variable to reference the Players service.
- Create the setup() function and make a for loop to loop through all the child instances of the model by using the :GetChildren() function. The index variable of this for loop will not be used. This can be an underscore (_). The value of the for loop will be a part. The name of this variable can be part.
- Inside the for loop, check whether the part variable is a part by using the :IsA("BasePart") function.
- Start listening to the .Touched event on the part variable. The .Touched event will fire every time that an instance touches our part. The function that listens to this event has a parameter containing the instance that hits our part. For example, the name of this parameter could be hit.
- We understand that the hit parameter has an instance that touches our part. For instance, if a character touches our part, the instance could be a part for the leg of our character. Therefore, the Character model would be the parent of this instance. Create a variable to reference the character.
Tip for 7: local character = hit.Parent
- Get a reference to the Player instance by using a function in the Players service, named :GetPlayerFromCharacter(character).
Tip for 8: Use the reference to the Player service to call the :GetPlayerFromCharacter() function. Use the reference to the character as the argument.
Tip for 9: There is a property on the Player’s instance named Team that can be used to get a reference to the current team.
- Get .TeamColor of the player’s current team and save it in a variable.
Tip for 10: There is a property on the Team instance. Use the variable you created in step 9 to reference the Team instance.
- Change the BrickColor property in the part variable to the TeamColor we saved as a variable in step 10.
- Run the game to see whether it works. See Figure 3.6 to see what a working version could look like:

Figure 3.6 – A working event-based game result
If the game works in Roblox Studio, you can upload the game to your own profile and play it with a friend. Another option is to create a local server in Studio to test with two test accounts. You can see two of these test accounts in Figure 3.6. You can do this by going to Test and selecting Local Server. Then, select 2 Players and press Start, as shown in Figure 3.7:
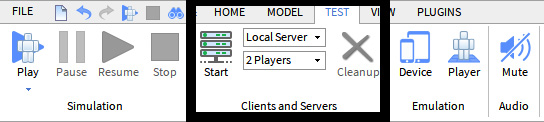
Figure 3.7 – Starting a local server in Roblox Studio
If you cannot figure out one of the preceding steps, or your code does not work, please refer to the example solution from GitHub:
https://github.com/PacktPublishing/Mastering-Roblox-Coding/tree/main/Exercises
Summary
In this chapter, we learned there are functions on instances. A few common functions are :GetChildren() and :FindFirstChild(). Both of these events get the children of an instance. But there are way more functions. Previously, we also used the :GetService() function to get services such as Players. We learned that some of these functions are for all instances, while some are instance-specific.
Besides functions, we also learned that there are events. Once again, some events are found in almost every instance, and there are instance-specific events. Events allow us to write our code in a more optimized way. Instead of constantly checking for certain things to happen, we use events. When using events, our code only gets executed if something happens. Therefore, we learned that our code does not run without anything happening.
We have seen that there are not always events for everything we want to listen to. We learned that in those scenarios, we could look for properties. We learned how to use the :GetPropertyChangedSignal() event to listen to property changes. Using this allows us to still to events even if there is no official one.
Using the :GetPropertyChangedSignal event, we saw how to make a bindable event and create our own event. Then, we learned how to fire and listen to bindable events. Additionally, we learned about bindable functions. When firing bindable events, we do not get a response. However, if we invoke bindable functions, we do get a response. We saw something similar when we used modules. When using modules, we could also call a function and get a response.
Finally, we learned how to use bindable events in modules. This allows our script to listen to events without messing around with bindable events.
In the next chapter, we will learn about the Client and the Server. So far, we have only worked with the server. We will learn what the server and the client are and when to use them. Besides that, we will also learn how to securely communicate between the server and the client. Finally, the chapter will explain how to ensure exploiters (hackers) do not gain access to your server.