Chapter 5: Optimizing Your Game
In this chapter, we will focus on how to optimize our games. Since Roblox games can be played on a wide range of devices, including lower-end devices, we need to ensure everyone can have an amazing time while playing our games. Luckily, there are a few tricks we can follow to boost our games’ performance. Besides this, Roblox also has a built-in system called StreamingEnabled. StreamingEnabled will automatically remove parts that are far away from the player if that user is lagging. In this way, their performance will go up. However, since these parts get removed, we need to adjust our scripting style a bit in order to deal with this.
In this chapter, we will cover the following topics:
- Using StreamingEnabled
- Working with animations
- Working with Tweens
By the end of this chapter, you will understand how to boost the performance of your game by using StreamingEnabled. Besides this, we will learn how to use animations in our game. In addition, we will learn how to ensure these animations are optimized. Finally, we will learn how to make animations on non-characters, such as doors and other in-game objects, by using Tweens.
Technical requirements
To start programming with Luau, you need access to a device with internet access. This can either be a Windows or a Mac device.
Additionally, you need to download the following software:
- Roblox Player
- Roblox Studio
All the code examples for this chapter can be found on GitHub at https://github.com/PacktPublishing/Mastering-Roblox-Coding.
The CiA video for this chapter can be found at https://bit.ly/3z3ksqk.
Understanding and using StreamingEnabled
When your game starts growing in map size, we face a problem. Your game might start lagging, the loading times for players might take way longer, and lower-end devices might even crash. Of course, we want as many players in our game as possible. But no one will play a game that keeps crashing, takes too long to load, or just lags overall. All three of these problems can be fixed by using something called StreamingEnabled.
So, what is StreamingEnabled exactly? And how does it ensure our players have less lag? Typically, when you join a game, the entire map gets loaded. However, with StreamingEnabled, that is not the case. As a matter of fact, even after you have been playing for a while, there is still a chance that some part of the map will not have been loaded. This is because StreamingEnabled only loads a section of the map near you. In this scenario, the parts of the map that you are not interacting with are just simply not there.
Over the past few years, StreamingEnabled has improved a lot. Many new features have been added, resulting in it becoming even more powerful. However, whatever happens in the future, the essence of StreamingEnabled should remain the same.
In the following sections, we will take a deeper dive into how StreamingEnabled works and what the behavior of StreamingEnabled means for our scripts.
Enabling StreamingEnabled
By default, StreamingEnabled is not active. We have already learned that StreamingEnabled changes the behavior of how our map loads. Because of this, we need to make our scripts a bit different. We will learn about the changes we need to make to our scripts later. First, we need to figure out how StreamingEnabled works exactly. With this knowledge, we can sort of guess all the changes that we need to make in our scripts.
First, let us look at how we even enable StreamingEnabled. Enabling StreamingEnabled is simple; perform the following steps:
- Open your game using Roblox Studio.
- In the Explorer window, select the Workspace service.
- In the Properties window, look for the property named StreamingEnabled and select it.
That’s it! We have now successfully enabled StreamingEnabled. After we enabled it, a few extra properties showed up. Two of these properties are the StreamingMinRadius property and the StreamingTargetRadius property, as shown in Figure 5.1:

Figure 5.1 – Streaming properties
So, what do both of these properties mean? Well, their names imply what they do already. We know that StreamingEnabled does not load the entire map at once. Instead, it loads the area that the player is near. Knowing this, we can guess what both properties mean. The StreamingTargetRadius property determines the distance of the map that will load, measured in Studs. Studs are how sizes and distances are measured, similar to us using inches or centimeters in real life. On the other hand, StreamingMinRadius is the minimum distance in which the map will load. We know that the size of the map gets loaded and unloaded based on the player’s performance. If someone has a lower-end device, the map will get smaller. It is good to mention that the size of the map never gets smaller than the StreamingMinRadius property and never bigger than the StreamingTargetRadius property.
So, what does this look like for a real game? Let us take a look at Figure 5.2. It shows the same map, but there are a few slight differences:

Figure 5.2 – StreamingEnabled scenarios
If we look at Figure 5.2, we see three different scenarios going on. The top picture is what the map of this game looks like when StreamingEnabled is not turned on. As you can see, the map the player is currently standing in is fully loaded. Even if we look further into the distance, we see a completely new map loaded already. While it might look good, it is not very efficient performance-wise. After all, the player is not even there.
We could argue that we want this other map to be visible from our current map because it might look better. If we want to do this, we could make the StreamingTargetRadius property higher. Then, we can still see the second map while using StreamingEnabled. In addition, Roblox might automatically scale down the quality of some meshes in the distance. If we were to make a third map behind it, we can still have the one in the middle visible and get rid of the third one. This comes down to a design choice that you will have to make for your own game.
For this example, we only chose to have one map visible at the time. You can see this in the first StreamingEnabled screenshot of Figure 5.2. As you can see, the entire current map is visible, but the map cuts off at the bridge. But what if someone was playing on a lower-end device? What would happen to the map? This is the second StreamingEnabled picture. We can see that the current map has not been fully loaded. Again, this happens if someone plays your game on a lower-end device.
Tip
It is best to see StreamingEnabled active for yourself. You can see how it works by creating a simple Baseplate template and placing many different parts spread around the baseplate. After that, enable StreamingEnabled and set the StreamingTargetRadius property to 64. Then, play the game and walk around. You will see how parts in the distance get removed and loaded.
Now we know how to enable StreamingEnabled and what its most essential properties do. Besides this, we have seen StreamingEnabled’s effects on your map. In the next section, we will learn how to change our scripts to work with the StreamingEnabled behavior.
Programming with StreamingEnabled
As we have heard a few times, we need to change our scripts. This is because the map is not always fully loaded when using StreamingEnabled. Let us clear up one possible point of confusion. Practically, we only need to make changes to LocalScripts and not Scripts. The map is always fully loaded on the server, just not on the client. Actually, there are a few things that we might have to shift to the server, which we would have done on the client, but the way we program on the server does not change.
As mentioned a few times, certain things load instantly when you join the game. However, there are a lot of things that do not load instantly, too. For example, when the player joins a game that uses StreamingEnabled, no part is loaded when the player joins. Instead, the parts are sent later. Please keep in mind that only the parts that fit within the StreamingTargetRadius property are sent. So, what is being sent and what is not?
Here is a list of what happens when the player joins:

Table 5.1 – List of sent instances while joining the game when using StreamingEnabled
Note
* Humanoids are only loaded if all of their parents are either models or folders.
** The Terrain object is sent on join. However, the actual terrain is not fully sent.
From this list, we can conclude that, practically, all the structuring classes get sent, but not those that fill the game, such as parts or meshes, which are both BaseParts. Additionally, we can conclude that if we had a structure like Model > BasePart > Model, the final model would not be sent when the player joins. Having other BaseParts inside of BaseParts might create some weird streaming behavior. Therefore, it is best to avoid having children inside of a BasePart altogether.
In the following sections, we will learn about the different things we have to do to make our local scripts compatible with StreamingEnabled.
Using WaitForChild
Previously, we learned that parts do not directly load once we join the game. In fact, we can test this ourselves in a simple Baseplate game. Enable StreamingEnabled and create a LocalScript in any location that they work. Once you have done this, enter the following code into your local script:
local spawnLocation = workspace:FindFirstChild("SpawnLocation")print(tostring(spawnLocation))
Once we run the game, we will see nil appear in our Output frame. This proves that the SpawnLocation does not exist when this script runs. SpawnLocations are BaseParts, too. Therefore, they get sent later than when the player joins.
So, what do we do if we want to reference this part anyway? In Chapter 3, Event-Based Programming, we learned about the:WaitForChild() function. We learned that the :WaitForChild() function yields. This means that the current thread temporarily pauses, for a maximum of 5 seconds, until the instance can be found. This sounds like the perfect solution to our problem. Let us take a look at the following code:
local spawnLocation = workspace:WaitForChild("SpawnLocation")print(tostring(spawnLocation))
Now if we run our game, we will see SpawnLocation appear in the Output frame instead of the nil result we previously got. This means that we now successfully referenced the SpawnLocation. If we want to reference objects in the Workspace service when StreamingEnabled is on, we must use :WaitForChild(). Please keep in mind that even if you decide not to use StreamingEnabled, it is best to make your scripts StreamingEnabled compatible anyway. Then, if you ever decide to turn on StreamingEnabled in the future, there is less code to be updated.
But what happens if we accidentally try to use the :WaitForChild() function to find an instance that does not exist? Let us take a look at the following code:
local spawnLocation = workspace:WaitForChild("SomethingThatDoesNotExist")if spawnLocation ~= nil then
print("Found!")else
print("Couldn't find!")end
In the preceding code, we are looking for an instance named SomethingThatDoesNotExist in the Workspace service. As the name implies, this would not actually be something in our game. However, then something interesting happens. If it cannot find the instance, it will give an Infinite yield warning in the Output frame. However, we actually expected it to print Couldn’t find, too. For some weird reason, it does not do this. This is expected behavior from the :WaitForChild() function and something you should keep in mind when programming.
However, sometimes, you cannot afford your thread entering the infinite yield state. In those scenarios, you can actually add a second argument to the :WaitForChild() function. This second argument will determine for how long the function might yield. If it exceeds this time, it will simply return nil, as the :FindFirstChild() function would. The same code, but now with a second argument, looks like this:
local spawnLocation = workspace:WaitForChild("SomethingThatDoesNotExist", 5)if spawnLocation ~= nil then
print("Found!")else
print("Couldn't find!")end
Now that we have specified our second argument, we no longer get the infinite yield warning, but a nil result. As previously mentioned, the second argument determines how long it will keep looking for the instance. We can make this time as short or long as we want.
Now that we know all about the :WaitForChild() function, we can move on to the next thing we might have to do when using StreamingEnabled. In the next section, we will look at a useful event called .ChildAdded.
Using ChildAdded
Let us imagine a large grid of aligned square parts. All of these parts are stored in a folder called ColoredParts. We want to give all of them a random color. But there is one catch; these colors should be different for each client. That means we have to make this coloring script for the client. But first, let us start by making this grid. The following code makes a 50 x 50 grid in our game:
local BLOCK_SIZE = 25
local AMOUNT_OF_BLOCKS = 50
local folder = Instance.new("Folder")folder.Name = "ColoredParts"
folder.Parent = workspace
for x = 1, AMOUNT_OF_BLOCKS do
for y = 1, AMOUNT_OF_BLOCKS do
local part = Instance.new("Part")part.Parent = folder
part.Name = x .. ", " .. y
part.Anchored = true
part.Size = Vector3.new(BLOCK_SIZE, .25,
BLOCK_SIZE)
local positionToCenter = ( (BLOCK_SIZE *
AMOUNT_OF_BLOCKS ) / 2 )
part.Position = Vector3.new(x * BLOCK_SIZE –
positionToCenter, 1, y * BLOCK_SIZE -
positionToCenter)
end
task.wait()
end
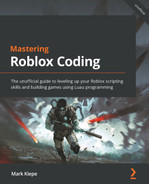
print("Command completed!")But where do we place the preceding code? We can use Command Bar to execute this code, as shown in Figure 5.3:
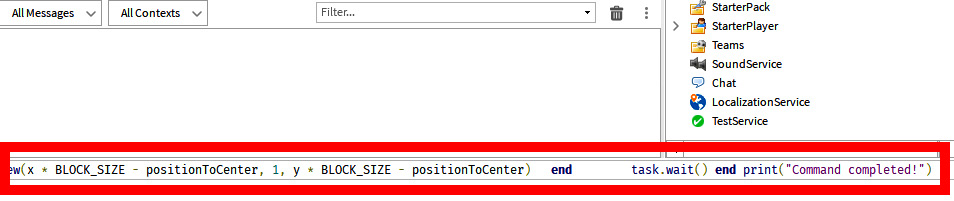
Figure 5.3 – Command Bar
Once we have entered our script in Command Bar, hit Enter on your keyboard. You will see a grid of gray parts spawn in your game. Command Bar allows us to execute code in Studio without running the game.
Now that we have our grid, let us turn on StreamingEnabled. First, we will set the StreamingTargetRadius property to 64 to test more easily. Implementing this system is not a problem in a game without StreamingEnabled. We could have used the :GetChildren() function and looped through each part to give them a new random color, just like we learned in Chapter 3, Event-Based Programming. Unfortunately, this is not an option with StreamingEnabled. After all, there is a high chance that not all parts will be loaded once we do this. One solution could be to call the function multiple times.
As we learned in Chapter 3, Event-Based Programming, this is a bad idea. Just as we learned in this chapter, we should try and look for an event that gets fired once a part is loaded. Luckily, there is one. The event is called .ChildAdded. Let us take a look at the following code:
local coloredParts = workspace:WaitForChild("ColoredParts")function randomRGB()
local r = math.random(0, 255)
local g = math.random(0, 255)
local b = math.random(0, 255)
return Color3.fromRGB(r, g, b)
end
coloredParts.ChildAdded:Connect(function(addedInstance)
if addedInstance:IsA("BasePart") thenaddedInstance.Color = randomRGB()
print("New instance colored!")end
end)
The preceding code snippet is used in a LocalScript. If we run our game, we will see some of the grid with colored parts. Once we start walking in a specific direction, more parts spawn. Because we use the .ChildAdded event, these parts automatically get a random color assigned. This means our script is now compatible with StreamingEnabled:
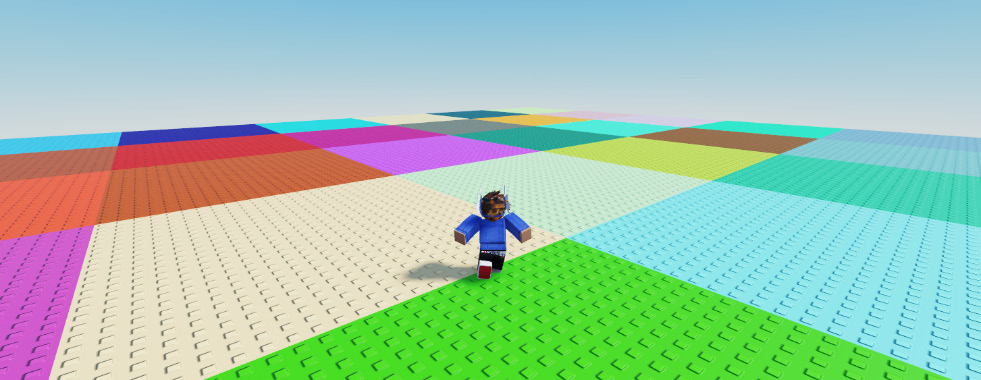
Figure 5.4 – Colored blocks using StreamingEnabled
Because StreamingEnabled prevents all parts from loading at once, we have to make our local scripts more dynamic. The .ChildAdded event is an excellent example of this. In the next section, we will look at how we can start loading a certain part of the map if we know a player will enter this area soon.
RequestStreamAroundAsync function
This time, we have two parts each on the other side of the map. If you touch one of the parts, you get teleported to the other one. Because both parts are on different sides of the map, there is a high chance that the area the player will be teleported to will not be loaded:
local Players = game:GetService("Players")local partA = workspace.PartA
local partB = workspace.PartB
function teleportPlayer(player, position)
if playerHasDebounce(player) == false then
-- Preloading Area
player:RequestStreamAroundAsync(position)
-- Teleporting player
player.Character:SetPrimaryPartCFrame(CFrame.new(
position + Vector3.new(0, 5, 0)))
end
end
function teleportA(hit)
local player = wasHit(hit)
if player then
teleportPlayer(player, partA.Position)
end
end
function teleportB(hit)
local player = wasHit(hit)
if player then
teleportPlayer(player, partB.Position)
end
end
function wasHit(hit)
-- Getting Character
local character = hit.Parent
if character ~= nil then
-- Getting Player
local player =
Players:GetPlayerFromCharacter(character)
if player ~= nil then
return player
end
end
return false
end
partA.Touched:Connect(teleportB)
partB.Touched:Connect(teleportA)
All the functions and variables related to debounces are left out in the preceding code snippet to save space. You can find the complete code on GitHub. Let us analyze what this code does step by step. We will begin with the listeners at the bottom of the script. If something touches partA or partB, the teleport function gets activated. The reason that partA uses the teleportB() function is that you want to teleport to the other part. There’s no point in teleporting to a part you are already on.
We have a parameter called hit in the teleportA() and teleportB() functions. This parameter contains the instance that touched the part. This can be one of the parts of the player’s character. This is precisely what the wasHit() function checks. If the hit parameter contains a BasePart of a character, the player’s character model would be the parent of this hit BasePart. Then, if we have a presumed character, we use the :GetPlayerFromCharacter() function in the Players service that confirms this is actually a character.
Once we confirm an actual player has touched this part, we start the teleportPlayer() function. First, this function checks whether the player has an active debounce. We learned about debounces in Chapter 4, Securing Your Game. Once again, the functions related to debounces are left out to save space. Then, we use the :RequestStreamAroundAsync() function. This function uses a Vector3 data type, which is the data type we use for positions and sizes. In this case, we use it to define the position that we want to load the area of. Because we do this, the map should be mostly loaded once we teleport them here.
Note
The :RequestStreamARoundAsync() function gives an error if you do not have StreamingEnabled.
Finally, we teleport the player using the :SetPrimaryPartCFrame() function on the player’s character. We can use this function for any model that has a Primary part. By selecting a model in the Explorer frame, you can specify the Primary part in the Properties frame. To teleport the player, we use another data type called CFrame. CFrame is the data type used to specify a position with a rotation. You can make a CFrame by using the code in the preceding code snippet. Later in this book, we will see more use cases for CFrames.
In this section, we learned about a lot of useful functions. Most importantly, we learned how to use the :RequestStreamAroundAsync() function if we were to teleport a player when using StreamingEnabled. We also saw another use case of the:GetPlayerFromCharacter() function. Previously, we used this in Chapter 3, Event-Based Programming. Finally, we had a short introduction to CFrames and the :SetPrimaryPartCFrame() function. In the next section, we will take a look at some of the things we have to do on the server when using StreamingEnabled.
Server tasks
In the previous sections, we looked at many ways to change our scripts inorder to make them compatible with StreamingEnabled. However, there are certain things that we could have done on the client that we need to move to the server. Here are a few examples of systems that could have been done on the client, but should now be done on the server, and why:
- Think of a navigation system. You might want to know the distance from your character to a particular object or maybe another player. It is not guaranteed that this object or player is loaded for you when using StreamingEnabled. It will be very difficult to calculate the distance of something that is not there. This system is something you could have done on the client before but now needs to be partially done on the server.
- Have you ever played a Simulator or Tycoon game on Roblox? Usually, there is some sort of pointer toward something that you can or should interact with. This can be the closest upgrade you can buy for your Tycoon or the cheapest. Maybe it is something completely different; who knows. If you want to point a player toward the cheapest upgrade for their Tycoon, you have to know all the possible upgrades. Previously, this could have been done on the client. However, since StreamingEnabled, not all upgrades might be loaded for the player. Therefore, we might have to calculate this cheapest upgrade on the server.
- In the previous section, we looked at a teleporting system. Teleporting is something we could do for the client, too. However, if the part or position is not loaded, it might not be wise to keep it on the client. Therefore, teleporting should be done by the server.
These are just three examples of systems that should be, partially or entirely, done on the server. While there is no fixed list of the things that should be done and where, it is always good to ask yourself: is there a chance that certain instances are not there, and would it matter? This way, you can change your system to make it StreamingEnabled compatible.
In the previous sections, we learned a lot about StreamingEnabled. We learned what it was and how it benefits us. Additionally, we learned that we had to change how we program certain things in our games. We learned about useful functions such as :WaitForChild() and :RequestStreamAroundAsync(). Besides this, we also learned how to make our scripts more dynamic by using the .ChildAdded event.
Now that we know how to use StreamingEnabled, we have the choice to enable it for our games. Enabling StreamingEnabled is optional and requires a few extra thoughts when programming. Whether or not you decide to enable it, it is best to make your scripts compatible with it. From now on, all the scripts that we make in this book will be StreamingEnabled compatible. In the next section, we will learn what animations are and how to use them.
Working with animations
Every time we walk, jump, swim, climb, fall, dance, or perform any other action, we use animations. Animations are the things that make our characters move. If you type /e dance, in most games, you will start dancing. This dance was animated. In this book, we will not cover how to make animations. Instead, we will learn how to use them in scripts.
In the following sections, we will learn how to load and play animations. Besides this, we will learn about other cool things we can do with animations on both your character and Non-Player Characters (NPCs).
Uploading animations
Before we can start playing an animation, we need an animation. If you use the right mouse button on pretty much any instance in the Explorer frame, you will see an Insert Object… option. Use this to insert something called an Animation. There is a unique property to this animation. This property is called AnimationId. This property holds a certain Roblox Asset ID. If we upload images, animations, or sounds, we get a unique Roblox Asset ID. Usually, the animators will provide us with the Asset ID or give us something so that we can upload it ourselves. In the scenario where you get an animation sent to you, you can simply press the Save to Roblox button in Studio, and it will be uploaded, resulting in you getting a Roblox Asset ID.
If we have a Roblox Asset ID of 4212455378, we can use this as the AnimationId property for our animation. Once we have done this, we will see that it automatically changes into a proper Roblox Asset ID, rbxassetid://4212455378. So, we have now successfully set up our animation. But one question remains; where should we place it?
As previously mentioned, we can create it as a child of any instance. But this does not directly mean that we should place them there. While there is no fixed rule on where to place animations, generally, there are two locations used for them, and both have their advantages and disadvantages. The first option is to place the animation in the model or instance that it belongs to. This way, the animation is close to what it will be used for. The disadvantage of this is that this model could be cloned a few times. Then, if we have to change the AnimationId property, we have to change it in many places. The other frequently used location for animations is in the ReplicatedStorage service. You can create a new folder called Animations and place all the animations there. This option solves the disadvantage of the previous one. However, the animation could get a bit vague in a game with many animations. So, what was the dancing animation used for again?
Throughout this book, we will try to center all the animations within a folder inside the ReplicatedStorage service. However, feel free to use whatever your preference is. Now that we know how to make animations, we should start programming them. In the next section, we will look at the Animator object.
Understanding the Animator object
Now that we have an Animation object, let us start it. Unfortunately, there is not a :Play() function on the Animation object. After all, how would it even know what character it should play the animation on? So, we have to use another object. This is the Animator object. We can find the Animator object inside the Humanoid object.
Animation History
In the past, animations were loaded into the Humanoid object. However, since November 2020, this method of loading animations has been deprecated.
As you might have found out from the previous explanation, we need to load our previously made animation on an Animator object. The following code snippet is a LocalScript inside the StarterCharacterScripts folder:
local ReplicatedStorage = game:GetService("ReplicatedStorage")local character = script.Parent
local animations = ReplicatedStorage:WaitForChild("Animations")--
function playAnimation()
local humanoid =
character:FindFirstChildOfClass("Humanoid")if humanoid ~= nil then
local animator =
humanoid:FindFirstChild("Animator")local animation =
animations:FindFirstChild("DorkyDance")if animator ~= nil and animation ~= nil then
local animationTrack =
animator:LoadAnimation(animation)
-- To be continued
end
end
end
--
task.wait(1)
playAnimation()
Let us take a look at the preceding code snippet. Because we placed our local script inside the StarterCharacterScripts folder, we can assume that the parent of the script is the player’s character. Also, we can conclude from the code snippet that the animations are stored in a folder, called Animations, inside the ReplicatedStorage service.
In the script, we have a function called playAnimation(). The first thing this function does is that it looks for the Humanoid object inside of the character. After that, it finds the Animator object inside of the Humanoid object, and it looks for an animation called DorkyDance inside the Animations folder in ReplicatedStorage. If it finds all of that, it loads the DorkyDance animation on the Animator object using the :LoadAnimation() function. Finally, this function gives us an AnimationTrack.
Now that we know what the Animator object is and how to use the :LoadAnimation() function, we can move on to the next section to dive deeper into AnimationTrack.
Programming an AnimationTrack
In the previous sections, we learned about the Animation object and the Animator object. Besides this, we have seen a code snippet that uses the :LoadAnimation() function. As you might have guessed by the variable’s name, this function returns something called an AnimationTrack. This AnimationTrack actually controls the animations.
In the following subsections, we will look at unique functions that we can use on these AnimationTracks.
Starting animation
Now that we have the AnimationTrack, let us start the animation to see whether it works. Take a look at the following code snippet:
local animationTrack = animator:LoadAnimation(animation)
animationTrack:Play()
You can place the preceding code snippet into the previously made script that we viewed in the Understanding the Animator object section. In the preceding code, we simply use the :Play() function on the AnimationTrack for it to start playing the animation. If we run the game, we will see that our character is now animated, similar to Figure 5.5:
Figure 5.5 – The dorky dancing animation
Try these animations
There are many animations you can use. Try the following, too: rbxassetid://4841405708, rbxassetid://4265725525, rbxassetid://5917459365, rbxassetid://5918726674, rbxassetid://3333387824, and rbxassetid://3333331310.
For this particular animation, the animation keeps playing until we stop it. This is because it is a looped animation. We can choose whether we want to keep it this way or not. There is a simple property on the AnimationTrack, called .Looped, which allows us to specify whether the animation restarts once it is done or not. Let us take a look at the following code snippet:
local animationTrack = animator:LoadAnimation(animation)
animationTrack.Looped = false
animationTrack:Play()
If we run our game now, the animation still plays. However, after some time, it stops automatically. But what if we wanted to stop the animation before that? For instance, after just a second? In the following section, we will look at how to stop animations.
Stopping animations
What if we only wanted to play the first 2 seconds of the animation? We want to specify at which second the animation should start, let it play, and finally stop it when we want it to stop.
Let us take a look at the following code snippet:
local animationTrack = animator:LoadAnimation(animation)
while true do
animationTrack.TimePosition = 0
animationTrack:Play()
task.wait(2)
animationTrack:Stop()
task.wait(2)
end
In the preceding code, we have a while loop that sets the position of the animation to the second 0, which is the beginning of the animation, by using the .TimePosition property. Then, it plays the animation for 2 seconds. After that, we use the :Stop() function to stop the animation from playing. After that, we wait another 2 seconds, and we repeat the loop.
On a side note, the loop will run indefinitely because we specified true as our condition in the while loop. After all, while loops keep running until the condition is false, which can never be the case here.
Now that we know how to start and stop animations, we also understand the essentials of working with animations. In the next section, we will look at how we can change the speed of animations.
Speeding animations
We now understand how to start and stop animations, but there are other cool things we can do with animations. One of these things is changing their speed. Let us take a look at the following code snippet:
local animationTrack = animator:LoadAnimation(animation)
animationTrack:Play()
animationTrack:AdjustSpeed(5)
The preceding code snippet loads the animation followed by the :Play() function. The animation is now playing. After that, we adjust the speed to 5 by using the :AdjustSpeed() function. This 5 means that the animation plays five times faster than the original one. If we were to use 2, the animation would play twice as fast, and if we used 1, it would have been the default speed. However, we can also go lower than 1. If we were to use the number 0.5, the duration of the animation would be twice as much compared to the default duration.
Now we know about all the essential functions for AnimationTracks. So far, we have learned how to set up animations, use the Animator object, and load animations on the Animator object to get an AnimationTrack. Finally, we learned how to use various functions on the AnimationTrack, such as :Play() and :Stop(), and properties such as .Looped and .TimePosition. In the next section, we will continue talking about animations. However, this time, we will use these animations on an NPC.
Animations on NPCs
Earlier, we learned how to use animations on our own character. However, what if we wanted to use these animations on NPCs? Luckily, it works almost identically. However, there are a few things we have to keep in mind while doing it.
First, we need to keep in mind that the Animator object might not always be inside the Humanoid object for NPCs. Luckily, there is a very simple fix: create one yourself. You can do this in the Explorer window by inserting it. That’s the first possible problem already solved. Let us continue.
For NPCs, we can perform some optimizations for the animations. First, we should perform all animations on each client instead of on the server. That is because NPC animations do not replicate to the server if they are started on the client. This is a good thing. After all, there is no point in having this animation played on the server. This is different from the animations in our own character. They do replicate to the server.
Besides it being a minimal performance gain on the server not to have this animation run, it might not seem very useful. However, the opposite is true. Because we control the animation on each client individually, we can have it interact differently for each player at the same time. For instance, in your game, we have an NPC that is the owner of a clothing store. Every time a player enters the store, the NPC will perform a waving animation. Because we only perform this animation on the client, the player that enters the store will see the animation. Any players that might already be inside will not see it.
Also, we need to keep in mind that NPCs do not have any animations by default. Where our own character plays an idle animation, the NPC would not play any animation when it is not doing anything. If we want to do this, we have to play an idle animation ourselves. Once again, we start this animation on the client. To test all of this, let us set up a testing area. To set this up, follow the following steps:
- In ReplicatedStorage, create a folder called Animations. Inside this folder, create two animations named WaveAnimation and IdleAnimation:
WaveAnimation Asset ID = rbxassetid://507770239
IdleAnimation Asset ID = rbxassetid://507766666
- Create an R15 dummy NPC using the built-in Build Rig plugin in Roblox Studio, as shown in Figure 5.6. Make sure you keep the name of this NPC as Dummy.
- Create a LocalScript inside the StarterPlayerScripts folder. Then, insert the code snippet that follows Figure 5.6 inside this local script:
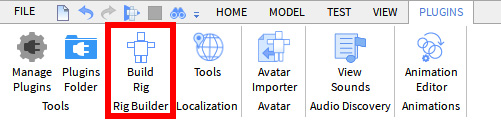
Figure 5.6 – The Build Rig plugin
local ReplicatedStorage = game:GetService("ReplicatedStorage")local animations = ReplicatedStorage:WaitForChild("Animations")local npc = workspace:WaitForChild("Dummy")function setup()
playAnimation(npc, "IdleAnimation", true,
Enum.AnimationPriority.Idle)
task.wait(10)
playAnimation(npc, "WaveAnimation", false,
Enum.AnimationPriority.Action)
end
function playAnimation(character, animationName, looped, animationPriority)
-- Getting Humanoid and Animation
local humanoid = npc:WaitForChild("Humanoid", 5)local animation =
animations:FindFirstChild(animationName)
if humanoid ~= nil and animation ~= nil then
-- Getting Animator
local animator = humanoid:WaitForChild("Animator", 5)
if animator ~= nil then
-- Playing Animation
local animationTrack =
animator:LoadAnimation(animation)
animationTrack.Looped = looped
animationTrack.Priority = animationPriority
animationTrack:Play()
end
end
end
setup()
If we follow the preceding steps, we have an NPC that keeps looking around as their idle animation. Then, after 10 seconds, it starts waving. Once they are done waving, they continue with the idle animation.
Animations stopping for others is actually interesting behavior of animations that we have not covered yet. Before we look into what is going on, let us try to understand what this script does. We have a setup() function; this is not anything new. In this setup() function, we call the playAnimation() function. First, we start playing the idle animation, and after 10 seconds, we use the same function again. However, this time, instead of making it play the idle animation, we play the wave animation. When the wave animation finishes, the NPC magically goes back to the idle animation, even though we did not tell it to do this?
The reason for this is actually pretty straightforward; we never stop the idle animation. But why does it stop the idle animation to play the wave animation instead? This has to do with the priority we gave the animations. The fourth parameter of the playAnimation() function determines this priority.
As we can see when we call the playAnimation() function, we set the idle animation to loop with the Idle priority type. The wave animation gets the Action priority type with looping turned off. So, what do these priorities mean? There are four different priority types:
- Action (the highest priority)
- Movement
- Idle
- Core (the lowest priority)
For each AnimationTrack, you can specify which priority it has. The animation with the highest priority plays. If another animation with a lower priority already plays, it stops until it is the highest priority animation again. This priority system also works for animations on non-NPCs. Please keep in mind that the priority of the animations has to be specified by using enums. We looked at enums in Chapter 4, Securing Your Game.
Sometimes, this priority is not enough, or you might want to stop all animations from playing and simply start playing a new set of animations. So, how do we get all the AnimationTracks that are playing on an Animator object? To do this, we can use the :GetPlayingAnimationTracks() function.
Let us take a look at the following code snippet that uses this function:
local npc = workspace:WaitForChild("Dummy")function stopAllAnimations()
-- Getting Humanoid
local humanoid = npc:WaitForChild("Humanoid", 5)if humanoid ~= nil then
-- Getting Animator
local animator = humanoid:WaitForChild("Animator", 5)
if animator ~= nil then
-- Playing Animation
local animationTracks =
animator:GetPlayingAnimationTracks()
-- Looping through animation tracks
for _, animationTrack in pairs(animationTracks)
do
animationTrack:Stop()
end
end
end
end
stopAllAnimations()
The preceding code snippet uses the :GetPlayingAnimationTracks() function. This function returns a table of all the AnimationTracks active on this Animator object. Then, we use a for loop and loop through all of the AnimationTracks. Then, we use the :Stop() function on each AnimationTrack, which results in all of them stopping.
Previously, we learned all about animations. We combined this information with some additional information about priorities and things to keep in mind when using NPCs. Now we truly understand how animations work. However, what if we wanted to play animations on instances without a Humanoid object? In the next section, we will take a look at Tweens.
Working with tweens
Sometimes, we do not want to animate our own character or an NPC. Instead, we would rather animate something else, such as a gate. This could be the gates for a castle that open when you get close to it. It looks way better if these doors open by using some sort of animation rather than just being open instantly. Technically, we could use a hacky way of adding a Humanoid object into a model that contains the gate; then, we could play an animation on it. However, there is a better alternative. We can make Tweens.
In the following sections, we will create the previously described animated gate. We will start by making the gate ourselves and looking at Pivots. After that, we will start animating the gate.
Setting up the gate
Let us start by making the gate. In Figure 5.7, we can see a full gate with two doors. We will be making these doors ourselves:

Figure 5.7 – Gate
Follow these steps to make both doors:
- Create a new part in Workspace and name it either RightGatePart or LeftGatePart.
- Make sure you anchor the part. This means the Anchored property should be set to true.
- Change the Size property on the gate part so that the size is equal to {17.5, 1, 28}.
- Change the Orientation property on the gate part so that the orientation is equal to {-90, 0, 0}.
- Change the Material property on the gate part to WoodPlanks.
- Position the gate somewhere in the Workspace service or next to the other gate part.
Repeat these steps for the other gate part and position them next to each other.
We should have two identical doors for our gate next to each other, similar to Figure 5.8:

Figure 5.8 – Creating LeftGatePart and RightGatePart
Now that we have both sides of the door, let us see what needs to happen. We want both sides to rotate 90 degrees, resulting in both sides of the door opening. Before we script this, we can use the Rotate tool in Roblox Studio to turn the parts. However, if we rotate both parts by 90 degrees, we will see that they rotated in the center, as shown in Figure 5.9, not on the sides, like a typical door:

Figure 5.9 – Incorrectly rotated RightGatePart
The reason the part rotates from the center is because of Pivots. By default, the pivot of a part, which is the rotation point, is in the center. Rather than having the part rotate from the center, we want it to rotate from the right or left side of the part. For RightGatePart, we want the rotation point to be on the part’s right side. We can do this by changing the Pivot Offset Position property on the part.
Because both gate parts have a width of 17.5 studs, the Pivot Offset Position property needs to move to the right-hand side by 8.75 studs. This is because it is in the center by default, so adding half of the width moves the pivot to the side. For RightGatePart, our Pivot Offset Position property would be {-8.75, 0, 0} and for LeftGatePart, our Pivot Offset Position property is {8.75, 0, 0}.
Once we have done this, we can easily rotate our door, as shown in Figure 5.10:
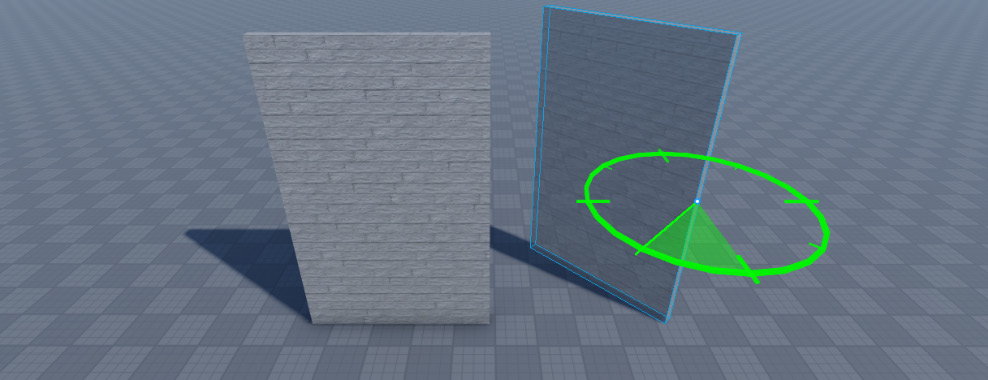
Figure 5.10 – Correctly rotated RightGatePart
We can more easily rotate our gate part because now we have a changed pivot offset. While rotating, we notice the values of the Position property and Orientation property change. In later sections, we will need these properties.
Now that we have set up our gate parts, let us start scripting them. In the next section, we will set up the server script that we will use for the gate.
Setting up the server scripts
Before tweening our gate, we need to create an action to open the gate. In front of these door parts, we will create another part, named GateActivation. The CanCollide property of this part should be turned off. The wanted behavior is to make the tween play once we walk through the GateActivation part. Because our game works with StreamingEnabled, we choose to make this activation script on the server. However, we could do this for the client, too. In later chapters, we will take a look at how to do this. For now, let us take a look at the following code snippet:
local Players = game:GetService("Players")local ReplicatedStorage = game:GetService("ReplicatedStorage")local events = ReplicatedStorage.Events
local gateActivation = workspace.GateActivation
-- GATE FUNCTIONS
function toggleGate(hit)
-- Server Check
local distance = ( hit.Position -
gateActivation.Position ).Magnitude
if distance >= 25 then
return
end
-- Function Logic
local player = getPlayerFromHit(hit)
if player ~= nil then
if playerHasDebounce(player) == false then
events.ToggleGate:FireClient(player)
end
end
end
function getPlayerFromHit(hit)
-- Checking variables
if hit ~= nil and hit.Parent ~= nil then
-- Getting player
local character = hit.Parent
return Players:GetPlayerFromCharacter(character)
end
return nil
end
-- DEBOUNCE FUNCTIONS
-- ... debounce functions ...
--
gateActivation.Touched:Connect(toggleGate)
The preceding code snippet is a server script located in ServerScriptService. Let us take a look at what this script does. At the bottom of the script, we see a .Touched event listener. We use this event because we want to know when a player touches our gateActivation part. Once someone touches the gateActivation part, the toggleGate() function is activated.
Inside the toggleGate() function, we start with a Server Check. You probably did not think of this server check yourself. After all, it seems a bit unnecessary, right? The .Touched event only gets fired once someone touches the part. However, exploiters can trigger this event, too. That is why it is wise to have this distance server check either way.
But how does this Server Check even work? To calculate the distance, we use two positions. In our scenario, this is the position of the part that hit the gateActivation part and the position of the gateActivation part itself. We subtract both positions. However, if we do this, we get another Vector3 value while needing distance. This is where the .Magnitude property comes in. Each Vector3 and Vector2 data type has the .Magnitude property. We can use this to get the distance. Once we get this, we check whether the distance is larger than 25 studs. If that is the case, the player is too far from the gateActivation part. Therefore, we stop the function.
If the player is close enough to the part, we continue our function. First, we check whether the part that hit the gateActivation part is actually a part of the player’s character and not some random part in our game. After that, we check whether this player has an active debounce. To prevent a lengthy code snippet, we have removed the code related to the debounce. This code is included in the GitHub version. If the player does not have a debounce, we fire a ToggleGate RemoteEvent inside the Events folder in the ReplicatedStorage service.
Now we have implemented the trigger to activate the tween on the gate. In the next section, we will start gathering information that the tween will use.
Getting tween data
Now that we have set up the gate and the server event, we can start working on the tween. First, we need to get some values for our tween. What position and rotation should each gate part be once it is closed, and what are they when it is open? You will need to rotate both gate parts yourself and read their properties. Once we have done this, we will store all this data in a three-dimensional table. So far, we have never seen this. However, we did see a two-dimensional table. Both work practically the same. Your three-dimensional table could look like this:
local GATE_DATA = { ["Open"] = { ["LeftGatePart"] = {["Orientation"] = Vector3.new(-90, 90, 0),
["Position"] = Vector3.new(-40, 15, 83)
},
["RightGatePart"] = {["Orientation"] = Vector3.new(-90, -90, 0),
["Position"] = Vector3.new(-74, 15, 83)
}
},
["Closed"]= { ["LeftGatePart"] = {["Orientation"] = Vector3.new(-90, 0, 0),
["Position"] = Vector3.new(-50, 15, 75)
},
["RightGatePart"] = {["Orientation"] = Vector3.new(-90, 0, 0),
["Position"] = Vector3.new(-67, 15, 75)
}
}
}
The preceding code snippet is our three-dimensional table containing a lot of data for our gate parts. First, we differentiate the data from an Open gate part and a Closed gate part. After that, we differentiate between the left and right gate parts. Finally, we store the Orientation and Position properties of the parts. Once again, these are just example Vector3 values. You will have to change these to the ones you see in the Properties window once you rotate both gate parts.
Now that we have our tween data, we can continue making our tween. In the next section, we will take a look at the TweenInfo data type.
Understanding TweenInfo
Now that we have this, we can listen to the ToggleGate RemoteEvent. After that, we can use a tween to change the orientation and position. But how do tweens even work? To use Tweens, we need to use the TweenService service. Besides TweenService, we also need TweenInfo. This is another data type. Let us take a look at that first:
local tweenInfo = TweenInfo.new(
-- Duration of Tween
1,
-- Tween style (EasingStyle)
Enum.EasingStyle.Quad,
-- EasingStyle direction
Enum.EasingDirection.Out,
-- Amount of times the tween repeats
0,
-- Tween Reverse
false,
-- Delay before the Tween starts
0
)
The preceding code snippet contains all the arguments you can provide when creating a TweenInfo data type. The values displayed here are the default values. You do not have to provide all of them. Generally, only the first or the first two arguments are provided; they are the most common. We can experiment with all of the different values once we have made our first tween.
Now that we have seen how TweenInfo works, let us use it in an actual tween. In the next section, we will make our first tween by combining all the information we have previously learned.
Creating a tween
As previously mentioned, we will listen to the ToggleGate RemoteEvent. Once this event is fired, we will start a tween. Let us take a look at the following code snippet:
local ReplicatedStorage = game:GetService("ReplicatedStorage")local TweenService = game:GetService("TweenService")local events = ReplicatedStorage:WaitForChild("Events")local GATE_DATA = ...
function toggleGate()
-- Getting gate parts
local leftGatePart =
workspace:WaitForChild("LeftGatePart", 5)local rightGatePart =
workspace:WaitForChild("RightGatePart", 5)if leftGatePart ~= nil and rightGatePart ~= nil then
-- Opening gate
animateGate(leftGatePart, "Open")
animateGate(rightGatePart, "Open")
--
task.wait(10)
-- Closing gate
animateGate(leftGatePart, "Closed")
animateGate(rightGatePart, "Closed")
end
end
function animateGate(gate, doorStatus)
-- Getting Tween Data
local tweenData = GATE_DATA[doorStatus][gate.Name]
local tween = TweenService:Create(gate,
TweenInfo.new(2), tweenData)
tween:Play()
end
events:WaitForChild("ToggleGate").OnClientEvent:Connect(toggleGate)Take a look at the preceding code snippet. At the bottom of the script, we listen to the ToggleGate RemoteEvent. Once this RemoteEvent gets fired, we start the toggleGate() function. In this function, the first thing we do is get a reference to both gate parts by using the :WaitForChild() function. Did you notice how we used the second argument for this function? This means that the result will be nil if the part cannot be found. That is why we have an if statement on the next line, checking whether nil was returned. Finally, we use the animateGate() function if both gate parts can be found.
The animateGate() function has the gate part as the first parameter. This is the part that we will animate. The second parameter is doorStatus. This parameter tells us if the door is going to be opened or closed. We use the GATE_DATA variable that we made in the Getting tween data section. Both parameters are required to select the right piece of data from the GATE_DATA variable. Finally, we store this right piece of data in a variable called tweenData.
Then, we reach the point where we make our actual tween. We do this by using the :Create() function in the TweenService service. The :Create() function has three arguments. The first argument is the object, in our scenario, the gate part, that we want to tween. The second argument is the TweenInfo data type that we saw in the previous section. In our current scenario, we only specify the duration of the tween. Because we only specify the duration, all the other arguments are automatically set to their default values. Finally, we have our tweenData variable. The tweenData variable is the table containing what is going to be changed. In our current scenario, we are changing the Position property and the Orientation property, as they are the specified items in our GATE_DATA dictionary.
Now, we have our tween. Similar to animations, we still have to start our tween. However, we can simply call the :Play() function on the tween. If we combine all the scripts and start the game, we will see that our gate opens once we touch the gateActivation part, as shown in Figure 5.11:

Figure 5.11 – Our first tween
We now know how to make tweens. However, there are a few cool tricks and things we should keep in mind. In the next section, we will look at Client-Sided Debounces.
Client-sided debounces
Currently, we already have a debounce on the server. This debounce takes a few seconds. For now, let us say it takes 20 seconds. Our tween on the client side takes 2 seconds to open, with an 8-second extra intermission. The reason there is only an 8-second extra intermission is that the first 2 seconds are already calculated for the opening tweens. Finally, we have another 2 seconds to close. Combined, the tween takes 14 seconds, which means our server debounce is long enough. However, what if we accidentally lowered the debounce on the server or made the tween longer? There might be a chance the server wants the tween to start while it is still performing the previous tween.
We can prevent this from ever being an issue by adding a client-sided debounce. The client-sided debounce is much easier to implement. Let us look at the updated toggleGate() function, which now features a client-sided debounce. Please remember that all the function logic has been left out from the following code snippet as nothing has changed there:
local debounce = false
function toggleGate()
if debounce == false then
debounce = true
-- Function Logic
debounce = false
end
end
events:WaitForChild("ToggleGate").OnClientEvent:Connect(toggleGate)The preceding code snippet features a client-sided debounce. It is a simple variable with one if statement. Once the function starts, it checks whether there is an active debounce. If there is an active debounce, the function ends. However, if there is no active debounce, the debounce variable gets set to true. Then, the function would do what it would normally do. Once it is done, the debounce variable gets set to false again.
Even if we were to accidentally make our debounce on the server too short, our client-sided debounce prevents two tweens from starting simultaneously. Yes, the debounce on the server would still think that the action is performed. However, this should not be a serious issue unless you have debounces of a few hours. If that is the case, it is highly recommended that you simply time the duration of your tween or any other action that you might perform that has a client-sided debounce, and ensure your server debounce is longer.
We have seen how to make a client-sided debounce. They give us extra protection against weirdly behaving tweens. However, we can use them for other things, too. Theoretically, you could use client-sided debounces in any function. However, there is no point in implementing one when it is not required. By adding the client-sided debounce, we removed a flaw in our code. However, there is another one. In the next section, we will eliminate this flaw by making Custom Yielding Functions.
Custom yielding functions
Let us take a look at the following code snippet:
-- Opening gate
animateGate(leftGatePart, "Open")
animateGate(rightGatePart, "Open")
--
task.wait(10)
-- Closing gate
animateGate(leftGatePart, "Closed")
animateGate(rightGatePart, "Closed")
The preceding code snippet is a section from the toggleGate() function. In this snippet, we can find a similar problem that we solved in the previous section. In the previous section, we saw that the toggleGate() function could be executed multiple times while already active. Technically, we have this here, too. But what if we decided to make our tween last for 12 seconds? We would have a problem. The door would still be opening while the tween closing the gate already starts.
As mentioned previously, we solved this issue by adding a client-sided debounce. So, could we add one for the animateGate() function, too? Unfortunately, this will not work. If we were to do this, the rightGatePart part would never open. After all, there is a debounce on the animateGate() function. So, how do we solve this issue? One possible solution could be found by taking advantage of Yielding. We have heard about yielding functions a few times already. An example of a yielding function is the :WaitForChild() function.
But how would yielding help us? Let us take a look at the updated code:
local INTERMISSION_TIME = 5
local TWEEN_DURATION = 2
local GATE_DATA = ...
local debounce = false
function toggleGate()
if debounce == false then
debounce = true
-- Getting gate parts
local leftGatePart =
workspace:WaitForChild("LeftGatePart", 5)local rightGatePart =
workspace:WaitForChild("RightGatePart", 5)if leftGatePart ~= nil and rightGatePart ~= nil
then
-- Opening Gate
animateGate(leftGatePart, "Open", false)
animateGate(rightGatePart, "Open", true)
-- Intermission
task.wait(INTERMISSION_TIME)
-- Closing gate
animateGate(leftGatePart, "Closed", false)
animateGate(rightGatePart, "Closed", true)
end
-- Ending client-sided debounce
debounce = false
end
end
function animateGate(gate, doorStatus, yield)
local tweenData = GATE_DATA[doorStatus][gate.Name]
local tween = TweenService:Create(gate,
TweenInfo.new(TWEEN_DURATION), tweenData)
tween:Play()
--
if yield == true then
tween.Completed:Wait()
end
end
events:WaitForChild("ToggleGate").OnClientEvent:Connect(toggleGate)The preceding code snippet contains the updated code, which now features a function that might Yield. Once again, this is just a snippet of the entire script. The entire script is available on the GitHub page. However, to save space, only the changed code is shown.
The animateGate() function now has a third parameter, called yield. This parameter will contain a Boolean data type. If the Boolean equals true, the function will yield. But how do we even make it yield? To make the function yield, we use an event called .Completed on the tween. Combining this .Completed event with the :Wait() function will make our function yield until the .Completed event fires.
So, how does this work? As the name implies, the :Wait() function waits, and therefore, it yields. However, we can use the :Wait() function more than just the .Completed event. As a matter of fact, we can use it for any event. Adding the :Wait() function on an event will yield the current thread until the event is fired. Using this, we made our animateGate() function yield depending on the parameter’s input.
However, besides the changes in the animateGate() function, we also made a slight change in the toggleGate() function. The toggleGate() function now provides the third argument when calling the animateGate() function. What is noteworthy is that only the second gate part is supposed to yield, not the first one. Try changing both to true yourself, and try to explain why both gate parts wait turns to open and close.
Now we have solved the second flaw in our code. We solved this flaw by taking advantage of what we learned about yielding. We can now make fantastic tweens by combining all the information we learned previously. This section taught us about TweenService, TweenInfo, Tweens, client-sided debounces, yielding functions, and Pivots. In the next section, we have an exercise to combine many of the learned aspects of this chapter.
Exercise 5.1 – greeting an NPC
In this exercise, we will make a greeting system compatible with StreamingEnabled. There will be an NPC on the map that constantly plays idle animations. A waving animation will start on the NPC if the player comes near the player. At the same time that the NPC is waving, the player near the NPC should wave, too. The waving animation of the NPC should not replicate in other clients. This means that the NPC is only waving for the player near the NPC, not for other players that see the NPC but are not close to it.
There are multiple ways of implementing this system. There will be steps to make this system next. However, you are not required to follow those steps. If you know a better way or want to experiment yourself, feel free to try it on your own. Just make sure your system meets all the previously mentioned criteria.
Exercise:
We will start by setting up the game from an empty Baseplate template:
- Create an R15 dummy in Workspace, called Dummy, using the Build Rig plugin. Make sure you create an Animator object inside the Humanoid object.
- In ReplicatedStorage, make a folder called Events and insert a RemoteEvent called ActivateGreeting.
- In ReplicatedStorage, make a folder called Animations and insert two animations:
- IdleAnimation with AnimationId: rbxassetid://507766666
- WaveAnimation with AnimationId: rbxassetid://507770239
- Create a part in Workspace called GreetingActivation and ensure the Anchored property is set to true and the CanCollide property is set to false. Change the Size property of the part to {15, 1, 15} and position the part on the dummy character. Try to make the dummy character centered on the GreetingActivation part.
Now we will make our server script, named GreetingSystem, in ServerScriptService:
- Start listening to the .Touched event in the GreetingActivation part. Connect this listener to a function named activateGreeting(). The first and only parameter of this function should be called hit.
- Check whether the hit part is within 25 studs of the GreetingActivation part by using the .Magnitude property on a Vector3 data type.
- Confirm an actual player has touched the GreetingActivation part by using the hit parameter. First, get the character connected to this hit parameter. Then, use the :GetPlayerFromCharacter() function to get the player and confirm that the result is not nil.
- Make a debounce system that only allows a player to interact with the GreetingActivation part once every 30 seconds. While making this system, make sure the cooldown table gets cleared if a player leaves.
- If the player does not have an active debounce, fire the ActivateGreeting RemoteEvent in the Events folder for the right player.
Now that the server script is done, we will continue in a local script, called AnimationHandler, inside StarterPlayerScripts:
character, animationName, priority, looped, yield
- In the playAnimation() function, get a reference to the correct animation using the Animations folder in ReplicatedStorage and the animationName parameter.
- In the playAnimation() function, get a reference to the Animator object inside the Humanoid object.
- Get the AnimationTrack by loading the previously referenced Animation object on the Animator object. Make sure you set the priority property and the looped property on the AnimationTrack based on the values from the parameters that we made in Step 1. Finally, play the animation.
- At the bottom of the playAnimation() function, check whether the yield parameter equals true and the IsPlaying property on the AnimationTrack object equals true. If both are true, yield the function until the AnimationTrack is finished using the :Wait() function.
Tip for 5: There is an event called .Stopped on AnimationTracks.
- Create a setup() function that starts playing the idle animation on the NPC. Make sure the priority of the animation equals Idle, the looped parameter equals true, and the yield parameter equals false.
- Start listening to the ActivateGreeting RemoteEvent and start a function called greetingSequence().
- In the greetingSequence() function, start the wave animation for both the player and the NPC. Make sure that the priority of the animation is Action and the looped parameter equals false. The second time you call the playAnimation() function, make sure the yielding parameter equals true, while the first one stays false.
- Make a client-sided debounce for the greetingSequence() function.
Run the game, walk toward the NPC, and test whether both characters greet each other. An example answer for this system can be found on the GitHub page for this book at https://github.com/PacktPublishing/Mastering-Roblox-Coding/tree/main/Exercises.
Exercise 5.2 – falling block
In this exercise, we will create a simple part that we will position in the air. Instead of letting physics do the work of making the block fall down, we will use tweens to make this block fall. Once the Tween is done, we will position the part back to its original position and create another tween. Throughout this exercise, we will use different EasingStyles, as explained in the Understanding TweenInfo section. This will give each fall a different effect:
Exercise:
First, we will start by setting up the part that we will create a tween for:
- Create a new part in the Workspace service. Give this part the following properties:
- Name: TweenPart
- Size: {5, 5, 5}
- Position: {0, 2.5, 0}
- Anchored: true
Now that we have our TweenPart, let us start creating the tweens.
- Create a new LocalScript in StarterPlayerScripts.
- In our LocalScript, create the following global variables:
- targetPosition: Vector3.new(0, 2.5, 0)
- startPosition: Vector3.new(0, 10, 0)
- tweenDuration: 2
Tip for 3: You can add more global variables if the following steps require them.
- Create a function, named tween(), with the following parameters:
part, easingStyle, yield
- Inside the tween() function, change the Position property of the part to the position stored in the startPosition variable.
- Inside the tween() function, create a new variable named tweenInfo. Set the following properties for our TweenInfo data type:
- time: The tweenDuration global variable
- easingStyle: The easingStyle parameter
- Create and start a new tween using the :Create() and :Play() functions on the TweenService.
- Implement a custom yielding system in the tween() function. Use the yield parameter.
- Implement a debounce system inside the tween() function.
- Create a new function named setup(). Insert the following code in the setup() function:
while true do
tween(tweenPart, Enum.EasingStyle.Linear, true)
tween(tweenPart, Enum.EasingStyle.Bounce, true)
tween(tweenPart, Enum.EasingStyle.Elastic, true)
end
Run the game and watch our part fall with different EasingStyles. An example solution for this system can be found on the GitHub page for this book at https://github.com/PacktPublishing/Mastering-Roblox-Coding/tree/main/Exercises.
Summary
We started this chapter by learning about StreamingEnabled. We learned that StreamingEnabled is not enabled by default as it changes the way loading in your game works. Normally, when a player joins a game, everything is loaded instantly. However, we learned that only certain instances get sent when the player is joining with StreamingEnabled. Even after the joining process, there is a high chance not everything is loaded on the map. This had to do with the StreamingMinRadius property and the StreamingTargetRadius property.
Besides the behavior that changes when using StreamingEnabled, we also learned that we have to change our local scripts to be compatible with StreamingEnabled. For example, we learned that we need to use the :WaitForChild() function to reference instances in the Workspace service. Sometimes, we cannot rely on the :WaitForChild() function because a part might not be loaded unless we are near it. In this scenario, we learned how to use the .ChildAdded event. Besides this, we also learned how to use the :RequeststreamAroundAsync() function if we want to teleport a player around the map.
However, in this chapter, we did not only learn about StreamingEnabled. We also learned how to use animations. We saw how an Animation has an AnimationId property, which stores a Roblox Asset ID. These animations are uploaded to Roblox. If we want to play an animation, we have to load the animation on an Animator object. When we load these animations on the Animator object, we get something called AnimationTrack. We have seen various functions and properties on this AnimationTrack, such as :Play(), :Stop(), .Looped, and .TimePosition.
Finally, we learned about a type of animation that is not played on an Animator object. These “animations” are called Tweens. We have seen an example where we made our own gate that slowly opens. While doing this, we learned how to make tweens by using TweenService, TweenInfo, and client-sided debounces, and we even made our own yielding functions. Besides this, we also used the .Magnitude property on a Vector3 data type to calculate the distance. We even made a four-dimensional table that worked exactly like a two-dimensional table.
We have truly learned a lot about programming Roblox games throughout the previous chapters. In the next chapter, we will dive deeper into Graphical User Interfaces (GUIs). In Chapter 4, Securing Your Game, we had a short introduction to GUIs. However, in the next chapter, we will take this knowledge to the next level. We will learn how to make GUIs ourselves and how to scale and program them for all devices that Roblox supports.