
2
Configuring the RoadRunner Application Server
When developing a web application in Laravel, we are used to using a web server for the delivery of our web application over the network.
A web server exposes the application via the HTTP or HTTPS protocol and implements functionality that is typically closely related to the delivery of resources via the HTTP protocol.
An application server is a somewhat more structured and complex piece of software in that it can handle different protocols; it can handle HTTP, as well as lower-level protocols such as TCP, or other protocols, such as WebSocket.
In addition, an application server can implement an articulated worker structure. This means that the application server for the execution of the application logic delegates its execution to a worker. A worker is an isolated thread that is tasked with executing a given task.
Worker management allows applications running via the application server to have access to features such as concurrency and parallel task execution.
The application server to be able to manage the various workers must also be able to implement load distribution features across workers and must also be able to implement proper balancing (using a load balancer).
There are many application servers in the PHP ecosystem, two of which are RoadRunner and Swoole. They are relevant to the Laravel ecosystem because they are directly supported by Laravel Octane.
These two solutions have different features; however, both allow Laravel Octane to start different workers that will take over the resolution of HTTP requests.
Additional features accessible through Laravel Octane and available only in Swoole (and not in RoadRunner) are the ability to execute multiple concurrent functions, manage shared data in an optimized manner through special tables, and start functions in a scheduled and repetitive mode. We will walk through the additional features provided by Swoole in Chapter 3, Configuring the Swoole Application Server.
RoadRunner is perhaps the simplest application server in terms of available features, and it is also the easiest to install.
Therefore, in order to become familiar with the Laravel Octane configuration, we will start with using RoadRunner.
The goal of this chapter is to show you how to set up a basic Laravel application, add Laravel Octane, start using Octane with RoadRunner, and configure it.
Understanding the setup and the configurations are the first steps that allow you to control the behavior of your application.
In this chapter we will cover the following topics:
- Setting up a basic Laravel application
- Installing RoadRunner
- Installing Laravel Octane
- Launching Laravel Octane
- Laravel Octane and RoadRunner advanced configuration
Technical requirements
This chapter will cover the framework and the application server setup (installation and configuration).
The assumption is that you have already installed PHP and Composer. We recommend you have PHP (at least version 8.0) and Composer updated to the latest version.
Typically, we have two main approaches for installing languages and development tools. The first one is to install the tools directly in the operating system of your machine. The second one is to install the tools in an isolated environment such as a virtual machine or Docker.
If you want to follow the instructions and the examples in the book with Docker, the assumption is that you have Docker Desktop already installed on your machine.
For Docker, we will provide you instructions in order to have an image up and running with PHP and Composer.
With this approach, you will be able to run commands and follow examples the same way, regardless of whether you have Docker or want to run PHP and Composer natively.
We will launch commands from the console application (or Terminal Emulator) so the expectation is that you are quite familiar with this type of application (Terminal, iTerm2, Warp for MacOS, Windows Terminal for Windows, Terminator, xterm, GNOME Terminal, Konsole for GNU/Linux, or Alacritty, which is available for all operating systems).
Within the terminal emulator, you will need a shell environment, typically Bash or ZSH (Z shell). We will use the shell configuration to set some environment variables, such as the PATH variable. The PATH variable specifies the directories to be searched to find a command.
Source code
You can find the source code of the examples used in this chapter in the official GitHub repository of this book: https://github.com/PacktPublishing/High-Performance-with-Laravel-Octane/tree/main/octane-ch02.
Setting up a basic Laravel application
Our aim in this chapter is to configure Laravel Octane with the RoadRunner application server. To do that, we have to install the RoadRunner application server. However, before that, we must first create a new Laravel application and then add and install the Laravel Octane package. In short, to demonstrate how to install RoadRunner, we will do the following:
- Create a new Laravel application from scratch.
- Add the Laravel Octane package to the new Laravel application.
- Install Laravel Octane, executing a specific command provided by the Laravel Octane package. The command execution will create a basic configuration, which is useful when we start with Laravel Octane. We will show how to install Laravel Octane in the Installing Laravel Octane section later.
Getting the Laravel installer
To install Laravel from scratch, you could use the Laravel installer. To globally install the Laravel installer, in your terminal emulator, enter the following:
composer global require laravel/installer
Once Laravel is installed, be sure that your PATH variable includes the directory where the global composer packages are stored, typically .composer/vendor/bin/ in your home directory.
To make the PATH variable persistent and to ensure that it is loaded correctly after rebooting your operating system, you can add it to your shell configuration file. For example, if you are using Zshell, add this line in your .zshrc file:
export PATH=$PATH:~/.composer/vendor/bin/
To make sure that your shell configuration is reloaded correctly and you are using Zshell, enter the following:
source ~/.zshrc
If you have some doubts, restart the console application (the application you are using to launch commands).
To check if everything is fine, try to execute the Laravel installer tool with the -V option via command line:
laravel -V
If you receive an output such as Laravel Installer 4.2.11, everything is fine; otherwise, you could see an error such as command not found. In this case, my suggestion is to check the following:
- The laravel command is present in ~/.composer/vendor/bin/
- The laravel command is executable
- The PATH variable includes the ~/.composer/vendor/bin/ directory
To check whether the Laravel installer command is present and executable, you can check it with the classic ls command:
ls -l ~/.composer/vendor/bin/laravel
And to see if the permissions include the x char, you will see something like -rwxr-xr-x.
If the command exists in the right place without executable permission, you can fix it with the chmod command, adding executable (+x) permission to the owner (u):
chmod u+x ~/.composer/vendor/bin/laravel
If the command exists and has the right permissions, check if the PATH variable is correct and includes the ~/.composer/vendor/bin/ path.
If the PATH variable doesn’t include the right path, check that you added it to the PATH variable and if the PATH variable includes the right path, be sure to have reloaded the shell environment or, at least, restart your terminal emulator.
I wanted to spend a few additional words on this type of check. This type of check is useful and will continue to be useful as we add new commands. The existence of the command, its permissions, and its reachability are checks that can save time if we run into problems running a newly installed command.
Now, let me show you how to install a Laravel application before adding Laravel Octane.
Installing a new Laravel web application from scratch
To create a new basic Laravel application, we can use the Laravel installer:
laravel new octane-ch2
If you don’t have a Laravel installer, you can use the composer command to install the Laravel application:
composer create-project laravel/laravel octane-ch2
In this basic usage, these commands (laravel new and composer create-project) are pretty similar. They do the following:
- Clone the laravel/laravel repository
- Create a .env file from .env.example
- Install all dependencies found in composer.json
- Generate optimized autoload files
- Register or discover any new supported packages via the execution of the php artisan package:discover command
- Publish laravel-assets files
- Generate the application key in the .env file
I suggest you use the Laravel command because it has some additional options and arguments that allow you to enable some nice features, such as adding Jetstream scaffolding, choosing the Livewire stack or Inertia for Jetstream, and enabling teams management for Jetstream. All these options, for the goal we currently have, are not needed, so for this reason using the first or second command has the same result.
So, now you can enter the new octane-ch2 directory to check your new Laravel application.
To launch the internal web server, you can use the artisan command provided by Laravel:
php artisan serve
If you open the browser at http://127.0.0.1:8000 you can see the default home page of Laravel.
Now that we have our Laravel application up and running, it’s time to set up the RoadRunner application server.
Installing RoadRunner
RoadRunner is a PHP application server that is mature and stable, so you can use it in your production environment. It is written in the Go programming language, which means that under the hood, RoadRunner uses goroutines and the multi-threading capabilities provided by Go. Thanks to its Go implementation, RoadRunner runs on the most common operating systems, such as macOS, Windows, Linux, FreeBSD, and ARM.
Thanks again to its Go implementation, RoadRunner is released as a binary, so the installation process is very simple.
RoadRunner is an open source project, so you have access to the source code, binaries, and documentation:
- The source code: https://github.com/roadrunner-server/roadrunner
- The binary releases: https://github.com/roadrunner-server/roadrunner/releases
- The main documentation: https://roadrunner.dev/docs/readme/2.x/en
We can obtain RoadRunner in more than one way.
Just for starting quickly, I’m going to use the Composer method. The Composer approach requires two steps:
- Install the RoadRunner CLI.
- Get RoadRunner binaries via the RoadRunner CLI.
So, as a first step, let me install the RoadRunner CLI, according to the official documentation available at https://roadrunner.dev/docs/intro-install:
composer require spiral/roadrunner:v2.0 nyholm/psr7
As you can see, we are going to add two packages:
- RoadRunner CLI version 2
- The Nyholm implementation of PSR7
Nyholm
Nyholm is an open source PHP package that implements the PSR7 standard. The source code is here: https://github.com/Nyholm/psr7.
At the end, the composer command adds two lines into the require section of your composer.json file:
        "nyholm/psr7": "^1.5",
        "spiral/roadrunner": "v2.0"
The mentioned, PSR7 is a standard that defines the PHP interfaces for representing HTTP messages and URIs. In this way, if you are going to use a library to manage HTTP messages and URIs, and the library implements a PSR7 standard, you know that you have some methods with a standardized signature to manage the request. For example, you know that you have getMethod() to retrieve the HTTP method, and the value is a string (because is defined by the standard).
After installing the RoadRunner CLI via Composer, you will find the rr executable in the vendor/bin/ directory.
To check that it’s there, use this command:
ls -l vendor/bin/rr
You will see a file, more or less 3 KB, with executable permissions (denoted by the x symbol).
This executable is the RoadRunner CLI, which allows you to install the RoadRunner application server executable. To obtain the executable, you can execute the RoadRunner CLI with the get-binary option:
vendor/bin/rr get-binary
The output generated by the command execution will show the version of the package, the operating system, and the architecture as shown in the figure below:
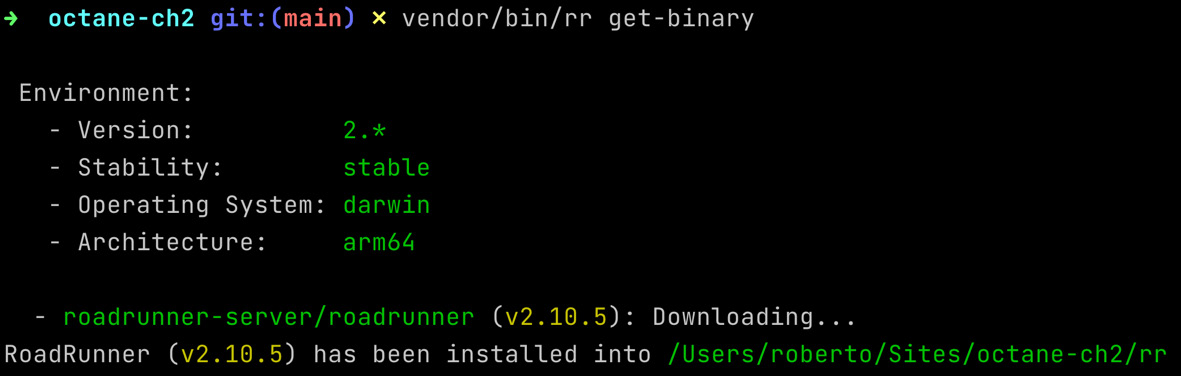
Figure 2.1: Getting the RoadRunner executable
You might have some confusion in that the RoadRunner CLI executable is called rr, like the RoadRunner executable. What you should know is that the RoadRunner CLI is stored in the vendor/bin directory, while the RoadRunner application server executable is stored in the project root directory. Also, the CLI is about 3 KB, while the application server is about 50 MB.

Figure 2.2: The two rr executables, the CLI and the application server
In addition, you can run the two executables with the option to show the version:

Figure 2.3: The rr versions
Now that we have installed the rr executables (RoadRunner), we can start to use it.
Executing the RoadRunner application server (without Octane)
To execute the RoadRunner application server with a basic example, we need to do the following:
- Create a configuration file
- Create a PHP script called by the application server once an HTTP request hits the application server
- Launch the application server
The configuration file for RoadRunner by default is .rr.yaml. It has a lot of configuration directives and parameters.
A minimal configuration file requires a few things:
- The command to launch for each worker instance (server.command)
- The address and port to bind and listen for new HTTP connections (http.address)
- The number of workers to launch (http.pool.num_workers)
- The level of the log (logs.level)
An example of a configuration file with the preceding considerations is shown here:
version: '2.7'
server:
  command: "php test-rr.php"
http:
  address: "0.0.0.0:8080"
  pool:
    num_workers: 2
logs:
  level: info
With this configuration file, test-rr.php is the script to launch for workers, 8080 is the port to listen to connections, with 2 workers and info for the log levels.
The script file for implementing the logic of the workers is test-rr.php:
<?php
include 'vendor/autoload.php';
use NyholmPsr7;
use SpiralRoadRunner;
$worker = RoadRunnerWorker::create();
$psrFactory = new Psr7FactoryPsr17Factory();
$worker = new RoadRunnerHttpPSR7Worker($worker, $psrFactory, $psrFactory, $psrFactory);
// creating a unique identifier specific for the worker
$id = uniqid('', true);
echo "STARTING ${id}";
while ($req = $worker->waitRequest()) {
    try {
        $rsp = new Psr7Response();
        $rsp->getBody()->write("Hello ${id}");
        echo "RESPONSE SENT from ${id}";
        $worker->respond($rsp);
    } catch (Throwable $e) {
        $worker->getWorker()->error((string) $e);
        echo 'ERROR ' . $e->getMessage();
    }
}
The script does the following:
- Includes vendor/autoload.php
- Instances the worker object with classes provided by RoadRunner (RoadRunnerHttpPSR7Worker)
- Generates a unique ID for showing how the traffic is balanced and delegated to the two workers ($id = uniqid('', true))
- Waits for a new connection ($worker->waitRequest())
- Generates a new response ($worker->respond()) when a new connection request arrives
With the configuration file and the preceding worker script, you can launch the application server with the serve option:
./rr serve
With this configuration, you will see one server started and two workers started by the server.
Now you can hit the serve via the curl command. The curl command is a command that sends an HTTP request to a specific URL.
In another instance for the terminal emulator (or another tab), launch the following:
curl localhost:8080
By executing curl four times, we will send four different requests to the application server to port 8080.
On the terminal emulator, if you launch the application server, you will see the log of the application server:
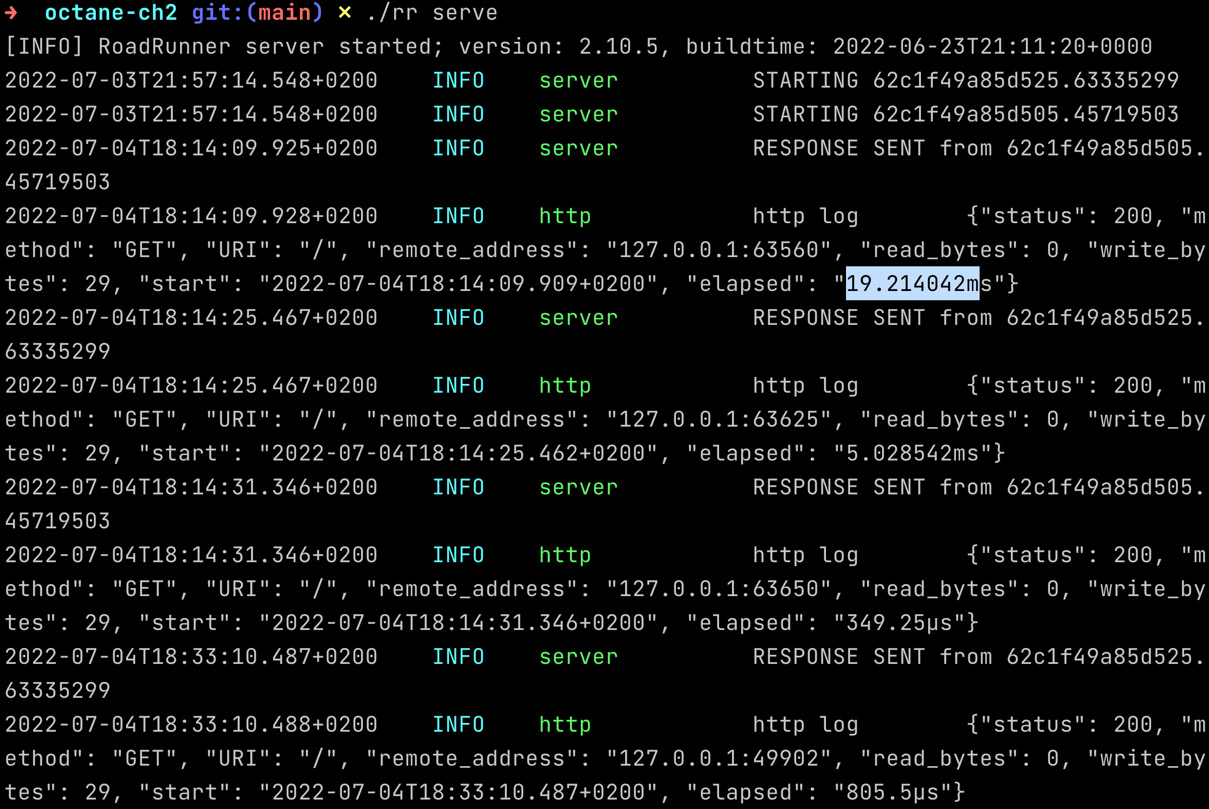
Figure 2.4: The INFO log of the application server
The most relevant thing is that after the first two requests, the elapsed time is reduced by at least an order of magnitude.
If you look at the elapsed value, you will see that the first request takes 20 milliseconds to be executed, while subsequent requests take approximately some hundred microseconds (1 millisecond is equivalent to 1,000 microseconds).
The response time in milliseconds (the absolute value) probably depends on multiple factors (load, resources, memory, CPU). Take a look at the relative value and how much the response time decreases in the next requests. The response times are dramatically reduced from a few milliseconds to a few microseconds.
So, we are saying that thanks to the architecture based on workers implemented with RoadRunner, we can improve the performance, especially for requests after the first request.
But how do we include and use RoadRunner in our Laravel application?
The preceding example uses objects and methods shipped by RoadRunner in a pure PHP environment. Now we have to figure out how all of these features/improvements could be included in Laravel, especially for all things related to the bootstrap of the framework.
This is the goal of Octane. It allows us to use the RoadRunner features while hiding the complexity of the integration, the bootstrap process, and the configuration.
Installing Laravel Octane
The script file (test-rr.php) and the configuration file (.rr.yaml) were created so that the dynamics of the operation of RoadRunner can be understood. Now, let’s focus on the installation of Laravel Octane. Let’s pick up the discussion from the installation of the Laravel application via the laravel new command and the installation of the RoadRunner executable by running composer require and then running the rr get-binaries. Let me recap quickly:
# installing Laravel application
laravel new octane-ch2b
# entering into the directory
cd octane-ch2b
# installing RoadRunner CLI
composer require spiral/roadrunner:v2.0 nyholm/psr7
# Obtaining Roadrunner Application Server executable, via CLI
vendor/bin/rr get-binary
Now you can install Laravel Octane:
composer require laravel/octane
Then you can correctly configure Laravel Octane with the octane:install command:
php artisan octane:install
With the latest command, you have to decide whether to use RoadRunner or Swoole. For the purpose of this chapter, select RoadRunner. We will cover Swoole in the next chapter.
The tasks performed by octane:install are as follows:
- Avoiding commit/push on Git repository RoadRunner files: check and eventually fix the gitignore file that includes rr (the RoadRunner executables) and .rr.yaml (the RoadRunner configuration file).
- Ensuring the RoadRunner package is installed in the project. If not, it executes the composer require command.
- Ensuring the RoadRunner binary is installed into the project. If not, it executes ./vendor/bin/rr get-binary to download the RoadRunner application server.
- Ensuring the RoadRunner binary is executable (chmod 755).
- Checking some requirements, such as version 2.x, if the RoadRunner application server has already been installed.
- Setting the OCTANE_SERVER environment variable in the .env file (if it’s not already present).
The last octane:install command will create a config/octane.php file and will also add a new configuration key to the .env file. The new key is named OCTANE_SERVER and the value is set to roadrunner.
This value is used in the config/octane.php file:
return [
    /*
    |--------------------------------------------------------------------------
    | Octane Server
    |--------------------------------------------------------------------------
    |
    | This value determines the default "server" that will
      be used by Octane
    | when starting, restarting, or stopping your server
      via the CLI. You
    | are free to change this to the supported server of
      your choosing.
    |
    | Supported: "roadrunner", "swoole"
    |
    */
    'server' => env('OCTANE_SERVER', 'roadrunner'),
So, with the environment variable, you can control which application server you want to use.
Now that we have installed Laravel Octane, it’s time to launch it.
Launching Laravel Octane
To launch Laravel Octane, run the following command:
php artisan octane:start
Once Laravel Octane is started you can visit http://127.0.0.1:8000 in your browser.
Your browser will be shown the classic Laravel welcome page. There are no visual differences in the welcome pages of Laravel and Laravel Octane. The big difference is the way your application is served via HTTP.
You can control the execution of Octane with some parameters:
- --host: Default 127.0.0.1, the IP address the server should bind to
- --port: Default 8000, the port the server should be available on
- --workers: Default auto, the number of workers that should be available to handle requests
- --max-requests: Default 500, the number of requests to process before reloading the server
For example, you can launch Octane with just two workers:
php artisan octane:start --workers=2
So now, open the page at http://localhost:8000 more than twice (two is the number of workers). You can open the page via your browser or by launching curl:
curl localhost:8000
You can see something that we already know because of the previous tests with RoadRunner installed without Laravel. The first two requests (two is the number of workers) are slower than the next requests.
The following output is related to the log shown by the Laravel Octane server:
  200    GET / .................................. 76.60 ms
  200    GET / .................................. 60.39 ms
  200    GET / ................................... 3.46 ms
  200    GET / ................................... 2.70 ms
  200    GET / ................................... 2.66 ms
  200    GET / ................................... 3.66 ms
If you launch the server, define the maximum number of requests to process (for each worker) before starting the server with the max-requests parameter:
php artisan octane:start --workers=2 --max-requests=3
You can see a similar output but after six requests (a maximum of three requests for two workers), you will see that the message worker has stopped and the response after the stopped worker takes the same amount of time as the first two requests:
  200    GET / .................................. 86.56 ms
  200    GET / .................................. 52.30 ms
  200    GET / ................................... 2.38 ms
  200    GET / ................................... 2.73 ms
  200    GET / ................................... 2.57 ms
worker stopped
  200    GET / ................................... 2.75 ms
worker stopped
  200    GET / .................................. 63.95 ms
  200    GET / .................................. 60.83 ms
  200    GET / ................................... 1.75 ms
  200    GET / ................................... 2.74 ms
Why is restarting the server important? To ensure we prevent any memory leak issues due to the long life cycle of the objects (the server and the workers), it is a common practice to reset the status. If you are not going to define the max-requests parameter in the command line, the default is set automatically by Laravel Octane to 500.
In the classic web server scenario (without Laravel Octane), the life cycles of all objects related to your application, but especially to the objects automatically instantiated and managed by the framework, are confined to each individual request. In every single request, all the objects necessary for the framework to work are instantiated, and the objects are destroyed when the response is sent back to the client. This also explains and helps you understand why the response times in a classic framework with a web server are longer than the response times of an already initialized worker.
Now that Laravel Octane is launched, we can look at its configuration.
Laravel Octane and RoadRunner advanced configuration
As mentioned in the previous section, we can control some parameters during the launch of Laravel Octane. This is because you want to change some options, such as the number of workers or the port and, like in the next examples, if you want to activate the HTTPS protocol.
Under the hood, Octane collects parameters from the command line and some Octane configuration and starts the RoadRunner process (it starts the rr command).
In the Octane source code, there is a file called StartRoadRunnerCommand.php that implements a Laravel artisan command with the following code:
$server = tap(new Process(array_filter([
    $roadRunnerBinary,
    '-c', $this->configPath(),
    '-o', 'version=2.7',
    '-o', 'http.address='.$this->option('host').':
      '.$this->option('port'),
    '-o', 'server.command='.(new PhpExecutableFinder)-
     >find().' '.base_path(config('octane.roadrunner
     .command', 'vendor/bin/roadrunner-worker')),
    '-o', 'http.pool.num_workers='.$this->workerCount(),
    '-o', 'http.pool.max_jobs='.$this->option(
      'max-requests'),
    '-o', 'rpc.listen=tcp://'.$this->option('host').':
     '.$this->rpcPort(),
    '-o', 'http.pool.supervisor.exec_ttl='
     .$this->maxExecutionTime(),
    '-o', 'http.static.dir='.base_path('public'),
    '-o', 'http.middleware='.config(
     'octane.roadrunner.http_middleware', 'static'),
    '-o', 'logs.mode=production',
    '-o', app()->environment('local') ? 'logs.level=debug'
     : 'logs.level=warn',
    '-o', 'logs.output=stdout',
    '-o', 'logs.encoding=json',
    'serve',
]), base_path(), [
    'APP_ENV' => app()->environment(),
    'APP_BASE_PATH' => base_path(),
    'LARAVEL_OCTANE' => 1,
]))->start();
Looking at this source code helps you understand which parameters are used to launch the RoadRunner executable.
With the -c option ($this->configPath()), an additional configuration file is loaded. This means that if there are no basic options managed by Octane that match your expectations, you can define them in the .rr.yaml configuration file.
The basic parameters managed by Octane (shown in the previous section) are hostname, port, worker count, max requests, max execution time for supervisor, the HTTP middleware, and the log level.
The RoadRunner configuration file allows you to load special and advanced configurations. A classic example is the option to allow local RoadRunner instances to listen to and receive HTTPS requests.
Why do you need to serve HTTPS locally in the development environment? You might need to activate the HTTPS protocol because some browser features are available only when the page is served via HTTPS or localhost. These features are geolocation, device motion, device orientation, audio recording, notifications, and so on.
Typically, during local development, we are used to serving pages via localhost. In this context, there is no need to serve the traffic via HTTPS. However, if we wanted to expose pages to the local network so that we could test our web application via a mobile device connected to the local network, we would have to make sure that the service is reachable via a valid local network address and thus localhost is not sufficient. In this case (for those special browser features), HTTPS is needed.
Or another scenario, wherein your page served locally is included in a web page (via iFrame or as assets) and the host page is served via HTTPS. In this case, including assets or including a page delivered by HTTP in an HTTPS context raises a security exception in the browser.
If you want to configure Octane to serve HTTPS requests, you have to do the following:
- Install a tool such as mkcert that allows you to create and manage certificates. Because of the design and implementation of HTTPS, the protocol requires public/private certificates to work.
- Create certificates for localhost or addresses you want.
- See the location of the CA certificate and key storage location.
To better understand what is needed, let’s look at RoadRunner’s configuration for HTTPS:
version: "2.7"
http:
  # host and port separated by semicolon
  address: 127.0.0.1:8000
  ssl:
    # host and port separated by semicolon (default :443)
    address: :8893
    redirect: false
    # Path to the cert file. This option is required for
    # SSL working.
    # This option is required.
    cert: "./localhost.pem"
    # Path to the cert key file.
    # This option is required.
    key: "./localhost-key.pem"
    # Path to the root certificate authority file.
    # This option is optional.
    root_ca: "/Users/roberto/Library/Application
              Support/mkcert/rootCA.pem"
The two mandatory fiels and one optional file are as follows:
- Cert: The cert file
- Key: The cert key file
- Root_ca: The root certificate authority file
With the first two files, HTTPS works but a warning is raised by your browser (there’s not a valid certificate, because the certificate is self-signed). Filling only the two first parameters, the certificate is evaluated as self-signed and, typically, browsers tend not to consider such certificates trustable.
With the third file, the browser allows you to browse via HTTPS without any warnings (the certificate is valid).
So, first, you have to install mkcert. The Git repository of mkcert is https://github.com/FiloSottile/mkcert.
mkcert is an open source tool available for all platforms.
The instructions to install mkcert and create certificates for macOS are as follows:
brew install mkcert
mkcert -install
mkcert localhost
If you are using Windows, you could use the Chocolatey package manager (https://chocolatey.org/ ) and use the following command:
choco install mkcert
For GNU/Linux, you can use the package manager provided by your distribution.
Now you have two new files in the project directory: localhost-key.pem and localhost.pem.
Note
I strongly recommend listing these two files in the .gitignore file prevent them from being pushed into your Git repository (if it is used).
You can use the first one in your .rr.yaml file for the key parameter and the second one for the cert parameter.
To fill the root_ca parameter, you have to see where CA files are stored via the mkcert command (with the CAROOT option):
mkcert -CAROOT
This command will show you the directory where the CA files are stored.
To see the name of CA files, run the following:
ls "$(mkcert -CAROOT)"
You can fill the root_ca parameter with the full path of the rootCA.pem file.
Note
If you are using Firefox and you are still getting the self-signed certificate warning, install certutil (with Homebrew, certutil is included in the nss package, so execute brew install nss) and then execute mkcert -install again (and restart the Firefox browser).
Now you can start Octane with the following:
php artisan octane:start
Open your browser at the URL defined in the address parameter. According to the parameters used in the last example (the RoadRunner configuration in the .rr.yaml file), you should open your browser and open the page at this URL: https://127.0.0.1:8893. (note that https:// is the protocol instead of http://)
So, now you are familiar with installing RoadRunner with Laravel Octane, starting the Octane server, and accessing the advanced configuration.
Summary
In this chapter, we explored the installation and configuration of Laravel Octane with the RoadRunner application server. We took a look at the benefit we get from the usage of RoadRunner and how to enable advanced features such as the HTTPS protocol.
In the next chapter, we will see how to do the same things with Swoole. We will see the additional features Swoole has, compared with RoadRunner, and in Chapter 4, Building a Laravel Octane Application, we will start to look at the code for the web application using the Octane service, which is now up and running.