
6
Using Queues to Apply the Asynchronous Approach in Your Application
In the previous chapter, we saw how delegating some tasks to external functions in the controller while creating the HTTP request can have a positive impact from a performance perspective. However, the case analyzed in the previous chapter was limited to a scoped topic: querying the database and populating the cache. This strategy is also known as the cache-only strategy. The process only needs the data to be retrieved from the cache.
This type of approach works in a case where information needs to be retrieved from a data source. Typically, applications are more complex than this, such as when executing specific tasks that need to modify and process data.
Think about a scenario where there is a request that starts a backup process. Typically, a backup process takes time to be completed. Implementing a synchronous approach means that the controller (who serves the request) keeps the client (the web page) on hold until the process is completed. Two bad things about this solution are that the user sees a long waiting loader in the browser, and the solution could fall into the request time-out scenario.
For asynchronous implementation, an additional tool is typically used to manage the list of task execution requests. To allow asynchronous implementation, we need a mechanism that works as a queue where we have a producer that needs the job to be executed (the producer produces jobs requests and feeds the queue) and a consumer that extracts the job requests from the queue and performs the job, one at a time. Typically, a queue system adds some features to monitor the queues, manage the queues (empty the queues), manage prioritization, and manage multiple channels or queues.
Laravel provides a mechanism to implement all the queue logic management, such as putting a task in the queue, extracting a job from a queue, managing failed tasks, and notifying the user about executions.
To store the list of tasks, Laravel allows the developer to select one of the queue backends available: the database, Redis, Amazon SQS, or beanstalkd.
This chapter aims to help you understand what a queuing mechanism is, how it can be used with Laravel, and how it is configured – because an asynchronous approach with queues not only reduces the response time but also implements a different user experience, especially when time-consuming tasks have to be handled.
In this chapter, we will cover the following:
- Introducing the queue mechanism in Laravel
- Installing and configuring the queue
- Managing the queues
- Managing queues with Redis and monitoring them
Technical requirements
Thanks to the previous chapters, we assume you have your basic Laravel application installed with Laravel Octane. For the current chapter, you can use Octane with Swoole, Open Swoole, or RoadRunner.
The source code for the example described in the current chapter is available here: https://github.com/PacktPublishing/High-Performance-with-Laravel-Octane/tree/main/octane-ch06.
Introducing the queue mechanism in Laravel
We will implement a simple use case in order to shed light on the asynchronous aspects and how much a queuing mechanism can improve the user experience for the end users of our web application.
For every request, a time-consuming task will be executed. To simulate the time-consuming task, we will call sleep() to last 3 seconds. The sleep() function, which suspends execution for a certain number of seconds, is intended to simulate the execution of a task that may take some time to implement. In a real case, the sleep() function is replaced with complex business logic that could take a certain amount of time to complete.
With the synchronous approach, the request will hold the response to the browser for 3 seconds. As a user, you will request the page, wait for 3 seconds, and then the page will be shown. The page will contain the message that the operation is completed – so you are safe and sure that the process is correctly executed in 3 seconds, but you have to wait for the answer.
With the asynchronous approach, the routing mechanism takes charge of the request; a job is created in the queue to call the logic, which includes a call to the sleep(3) function to simulate a time-consuming operation, provided by the ProcessSomething::handle() function. After the job is created in the queue, the response is generated and sent to the client.
The user will receive a response in a few milliseconds without waiting for the task to be completed. You know that the task has been pushed into the queue, and some workers will execute the job.
To carry out the asynchronous approach, we are going to do the following:
- Install the queue mechanism, creating a table in the database to store the job queued.
- Create the class for implementing the logic of the job.
- Implement a time-consuming logic in the handle() method of the job class.
- Create a route for calling the handle() method in the classical synchronous way.
- Create another route for asynchronously calling the job through the queue mechanism.
- Analyze the result of calling the two routes.
First, we will create the data structure that will allow the queue mechanism to store the list of jobs. We can use a MySQL database or Redis. To simplify understanding, we will initially use the MySQL database-based queuing mechanism (because it is more basic and simpler). Subsequently, we will use the more advanced Redis-based system.
Redis
Redis is an open source data store used for storing data, caching values, and queuing data/messages. Working mainly in memory, one of its main features is speed.
Now, we are going to configure the database-based queuing mechanism in a Laravel application.
Installing and configuring the queue
To create the data structure to store the jobs in the queue, we can execute the command in the terminal in our Laravel project directory:
php artisan queue:table
The command is provided by Laravel without the need to install additional packages.
The queue:table command creates a new migration file for creating the jobs table.
The file is created in the database/migrations/ directory.

Figure 6.1: The migration file for creating the jobs table
The migration will create the following:
- A new table named 'jobs'
- 'id': For the unique identifier
- 'queue': The queue name, helpful for controlling the queue via the command line
- 'payload': The data in JSON format that contains information to manage and launch the task by the consumer of the queue
- 'attempts': The number of attempts to execute the jobs
- 'reserved_at': The timestamp when the task is taken in charge by the consumer
- 'available_at': When the task is available to be consumed
- 'created_at': When the job is created in the queue
An example of the JSON payload (in the payload field) is as follows:
{
  "displayName" : "App\Jobs\ProcessSomething",
  "failOnTimeout" : false,
  "retryUntil" : null,
  "data" : {
    "command" :
      "O:25:"App\Jobs\ProcessSomething":0:{}",
    "commandName" : "App\Jobs\ProcessSomething"
  },
  "maxExceptions" : null,
  "maxTries" : null,
  "uuid" : "e8b0c6c7-29ce-4108-a74c-08c70bb679a6",
  "timeout" : null,
  "backoff" : null,
  "job" : "Illuminate\Queue\CallQueuedHandler@call"
}
The JSON payload has some attributes:
- failOnTimeout: The Boolean field indicating whether the job should fail when it times out
- retryUntil: The timestamp (integer field) indicating when the job should time out
- maxExceptions: The number (integer field) of times to attempt a job after an exception
- maxTries: The number (integer field) of times to attempt a job
- uuid: The UUID (string field) of the job
- timeout: The number (integer field) of seconds the job can run
- backoff: The number of seconds to wait before retrying a job that encountered an uncaught exception – can be an array of integers to track the seconds for each attempt (a job could be attempted more than once because of errors)
- job: The name (string field) of the queued job class
Once we have created the schema definition for the table with the php artisan queue:table command, we can create the jobs table in the database via the migrate command.
For creating the table in the database, you can launch the migrate command:
php artisan migrate
To check that the correct table has been created, you can use the db:table command:
php artisan db:table jobs
Now that all the data structure is in place, we have to create the files to implement the logic of our jobs.
Managing the queues
For managing the jobs, in Laravel, by convention, we have one class for each job. The job class has to implement the handle() method. The method handle() is invoked by the framework when the job has to be executed.
For creating the class to manage the jobs, see the following:
php artisan make:job ProcessSomething
With the make:job command, a new file, app/Jobs/ProcessSomething.php, that includes the ProcessSomething class with some methods ready to be filled with the logic is created. The primary methods are the constructor and the method invoked for managing the job, the handle() method.
We will implement the logic into the handle() method. In the app/Jobs/ProcessSomething.php file, insert the following:
public function handle()
{
    Log::info('Job processed START');
    sleep(3);
    Log::info('Job processed   END');
}
As an example of a time-consuming operation, we are going to pause the execution of the handle() method for 3 seconds via the sleep() function. This means that the thread will be suspended for 3 seconds. We will log the method execution’s start and end to track more information. You can find the logs in the storage/logs/laravel.log file with the default configuration.
The classical synchronous approach
Typically, with a synchronous approach, if you call the method, the response takes 3 seconds.
In the routes/web.php file, we are going to add a new /time route for dispatching (requesting the execution of) the job synchronously:
Route::get('/time-consuming-request-sync', function () {
    $start = hrtime(true);
    ProcessSomething::dispatchSync();
    $time = hrtime(true) - $start;
    return view('result', [
        'title' => url()->current(),
        'description' => 'the task has been complete with
                          dispatchSync()',
        'time' => $time,
    ]);
});
Calling the static dispatchSync() method allows you to invoke the handle() method (through the queue mechanism) synchronously. This is the classic scenario we have in PHP when we call a method.
To render the view, we have to implement the result view, a basic blade template to render the title, description, and time set in the view() function.
Create the resources/views/result.blade.php blade file:
<!DOCTYPE html>
<html lang="{{ str_replace('_', '-', app()->getLocale()) }}">
<head>
  <meta charset="utf-8">
  <meta name="viewport" content="width=device-width,
    initial-scale=1">
  <title>Laravel</title>
</head>
<body class="antialiased">
  <div class="relative flex items-top justify-center
    min-h-screen bg-gray-100 dark:bg-gray-900
    sm:items-center py-4 sm:pt-0">
    <div class="max-w-6xl mx-auto sm:px-6 lg:px-8">
      <div class="mt-8 bg-white dark:bg-gray-800
        overflow-hidden shadow sm:rounded-lg">
        <div class="grid grid-cols-1">
          <div class="p-6">
            <div class="flex items-center">
              <div class="ml-4 text-lg leading-7
                font-semibold">{{ $title}}</div>
            </div>
            <div class="ml-12">
              <div class="mt-2 text-gray-900
                dark:text-gray-900 text-2xl">
                {{ $description }}
              </div>
              <div class="mt-2 text-gray-900
                dark:text-gray-900 text-2xl">
                {{ $time / 1_000_000 }} milliseconds
              </div>
            </div>
          </div>
        </div>
      </div>
    </div>
  </div>
</body>
</html>
The blade file will show the result on the page displaying the $description and $time parameters. If you request the page via your web browser at http://localhost:8000/time-consuming-request-sync, you must wait at least 3 seconds before the page is fully rendered. This figure shows that the time value is slightly more than 3,000 milliseconds:
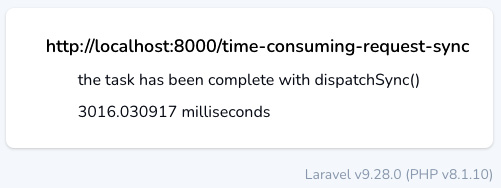
Figure 6.2: The synchronous job execution
This means your job takes 3 seconds, and Laravel waits to send the response until the job is completed.
This is probably nothing special because, as PHP developers, we are used to managing synchronous jobs. Even if we are not managing queues, the PHP engine synchronously drives the methods and functions. Some other languages have the async call for functions – so now, let’s see how to dispatch the execution to another process that can asynchronously execute the job.
The asynchronous approach
Instead of using the sync method, we will dispatch the jobs through the queue.
To extract the jobs from the queue, it is necessary to start a specific process for the consumer to take over the various tasks. To begin the process, you can execute the artisan command:
php artisan queue:work
The command checks whether any jobs are in the jobs table and consumes the queue by deleting the row after the job is completed.
From the producer side, in the router logic, we can call the dispatch() functions available:
Route::get('/time-consuming-request-async', function () {
    $start = hrtime(true);
    dispatch(new ProcessSomething());
// OR you can use ProcessSomething::dispatch();
    $time = hrtime(true) - $start;
    return view('result', [
        'title' => url()->current(),
        'description' => 'the task has been queued',
        'time' => $time,
    ]);
});
The dispatch() functions need the instance of the job class as a parameter. The dispatch() function will send the job instance to the queue and release the control to the caller, with no need to wait for the complete execution of the job. In the end, the response is created immediately without waiting for the job to be completed, instead of the typical behavior where the response is created once the job is completed.
We are just sending an instance of the ProcessSomething class to the dispatch() method. The convention is that the consumer will execute the handle() method when taking care of the job.
Now, you can open the browser and call the URL, http://localhost:8000/time-consuming-request-async:
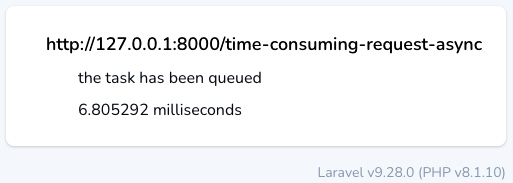
Figure 6.3: The asynchronous execution
To allow the browser to receive the response, we have to be sure that we launched two commands:
- php artisan octane:start: For launching the Octane server, listening on port 8000
- php artisan queue:work: For launching the consumer service, for executing the jobs
If you want to see the status of the queue, you can execute it via the command line:
php artisan queue:monitor default
The queue:monitor command will show the status of the queues and the jobs in the queue for each queue:

Figure 6.4: The queue monitor tool
If you have pending jobs in the queue, you will see the number of waiting jobs in the square brackets:

Figure 6.5: The queue with some waiting jobs
In the example, we have 76 jobs in the queue.
If you use a database as a backend for managing queues, I suggest increasing your confidence directly by querying the jobs table with SQL.
You can access the database with the artisan db command:
php artisan db
Then, you can execute SQL queries; for example, you could count how many rows each queue has:
select count(id) as jobs_count, queue
from jobs
group by queue;
The SQL command counts the number of identifiers (the count) from the jobs table, grouping the rows by the queue field.
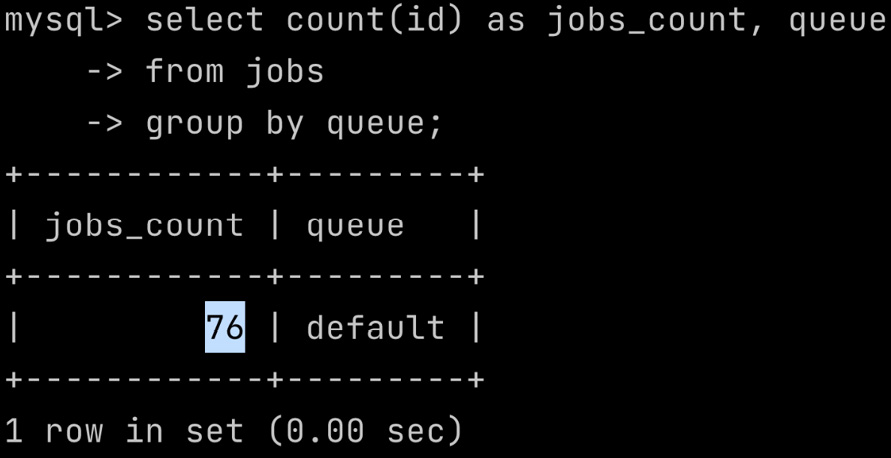
Figure 6.6: Executing queries on the jobs table
If you have more than one job in the queue, please be sure that you are running the consumer:
php artisan queue:work
If you want to have more than one consumer that executes your jobs in parallel, you can launch queue:work more than once. If you launch queue:work twice, you will have two consumers that extract the jobs from the queue.
If you have to manage time-consuming tasks, using a queue is not just implementing an asynchronous approach to manage tasks. It is a way to control the level of parallelism and contain the number of concurrent time-consuming tasks that your architecture can take charge of or handle. By managing time-consuming tasks synchronously, if there were a high number of requests, you could reach a high number of concurrent requests on the web server, and your system could collapse due to the high resource usage.
Delegating tasks to specific workers means that you keep the load on the workers used for serving the requests lighter, and you can launch the consumer processes on a dedicated instance or virtual machine. You can also increase the number of processes for the consumers.
Managing multiple queues
You can use more than one queue – for example, first and second.
When you have to assign the job to a queue, you can use the onQueue() method:
ProcessSomething::dispatch()->onQueue("first");You can control both queues:
php artisan queue:monitor first,second
Then, you can launch the consumer for the "first" queue:
php artisan queue:work --queue=first
And then for the queue named "second":
php artisan queue:work --queue=second
You can, for example, launch two consumers for the "first" queue and only one for the "second" queue, giving more priority to the "first" queue (because it has two dedicated consumers instead of one). To achieve this, in different shell environments, you can launch the following:
php artisan queue:work --queue=first
php artisan queue:work --queue=first
php artisan queue:work --queue=second
If you need to clear the queue and delete all pending tasks, you can use the queue:clear command:
php artisan queue:clear database --queue=first
Here, database is the name of the connection (we are using the database now; in the next section, we will use another type of connection), and we can also define the queue via the --queue parameter. You can also specify more than one queue:
php artisan queue:clear database --queue=first,second
The connection is optional; if we don’t specify database (the connection) on the command line, the QUEUE_CONNECTION environment parameter (from .env file) will be used.
Now we have seen how to create and manage queues with the database as the backend, let’s try to configure Redis as the backend.
Managing queues with Redis and monitoring them
Using database as the connection is convenient for people who start using the queue and have already had the database set up for storing application data, for example. Why use Redis instead of a database? Because Redis has more optimization for managing queues than a database, and you can use Laravel Horizon to monitor the queue. Laravel Horizon provides a web dashboard for monitoring your queues and the metrics about the usage of the queues.
As the first step of managing queues with Redis, first, let’s install the Redis service.
Installing Redis
Installing Redis means that you have added software and service to your stack. If you are a macOS user, you can install it via Homebrew:
brew install redis
brew services start redis
The first command installs the software; the second one starts the service.
You can use your package manager if you have a GNU/Linux distribution; Redis is included in most GNU/Linux distributions.
Alternatively, you can use Sail (as shown previously in Chapter 3, Configuring the Swoole Application Server, in the Setting up Laravel Sail section, during the installation of Swoole).
Execute the following sail:install command:
php artisan sail:install
Be sure you also select the Redis service (option number 3).
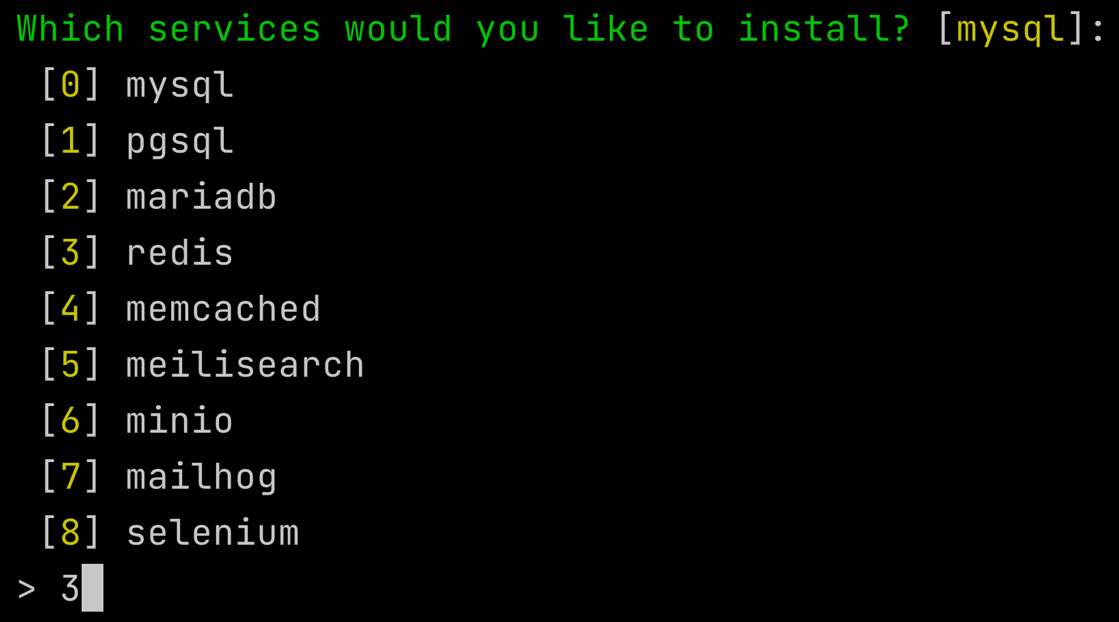
Figure 6.7: The Laravel Sail configuration for Redis
In the case that you need more than one service (for example, both MySQL and Redis), you can select 0,3 (comma-separated).
Once the Redis service runs, we can start configuring the queue mechanism to use Redis as the connection.
Configuring Redis
In the environment configuration file placed in the Laravel project directory (the .env file), we have to adjust some parameters:
QUEUE_CONNECTION=redis
REDIS_CLIENT=predis
REDIS_HOST=localhost
REDIS_PASSWORD=null
REDIS_PORT=6379
With QUEUE_CONNECTION, you define the connection to be used (redis).
With REDIS_CLIENT, you can define the client to be used by Laravel to connect to the Redis service. The default is phpredis (which uses the PECL module), or you can use predis, which uses the PHP package: https://github.com/predis/predis. The phpredis module is written in C, so could be faster than a predis implementation (which is pure PHP). On the other hand, a predis implementation has a lot of features and the community and the development team are really supportive.
If you want to change the name of the default queue (typically, “default”), you can add the REDIS_QUEUE parameter into the .env file:
REDIS_QUEUE=yourdefaultqueue
About the connection between Laravel and Redis service, if you are not familiar with Redis, my suggestion is to start by using the predis package just because it requires adding a package:
composer require predis/predis
If you are installing the predis/predis package, you have to set the REDIS_CLIENT parameter to predis:
REDIS_CLIENT=predis
All of these configurations are related to the .env file.
If you are using the Predis package to complete the configuration correctly, you must set an alias in the Laravel bootstrap configuration. To do that, in the config/app.php file, in the 'aliases' section, add a specific entry for Redis:
'aliases' => Facade::defaultAliases()->merge([
    // 'ExampleClass' => AppExampleExampleClass::class,
    'Redis' => IlluminateSupportFacadesRedis::class,
])->toArray(),
Setting the alias is useful for Laravel to access the Redis object correctly and helps Laravel to correctly resolve the reference to the Redis object because we could have a name conflict with the Redis object provided by the Predis package and with the Redis object provided by the phpredis module. If you forget to set this configuration, you will not receive an error in executing the Laravel application, but you could face some unexpected application behavior. For example, when you want to clear the queue on a specific connection, the queue selected is not removed.
If you switch the connection, for example, from the database to Redis, you don’t have to change anything in your application code. The Laravel queue mechanism provides an abstraction layer that hides all the different implementations specific to each connection (under the hood, managing a database connection uses other implementations than a Redis connection).
If you are using the code (in the routes/web.php file), see the following:
Route::get('/time-consuming-request-async', function () {
    $start = hrtime(true);
    ProcessSomething::dispatch()->onQueue("first");
    $time = hrtime(true) - $start;
    return view('result', [
        'title' => url()->current(),
        'description' => 'the task has been queued',
        'time' => $time,
    ]);
});
We are using the "first" queue on the configured connection.
To see the configured connection, you can use the about command:
php artisan about --only=drivers
The command displays the information on the drivers used by your Laravel application for the queue:
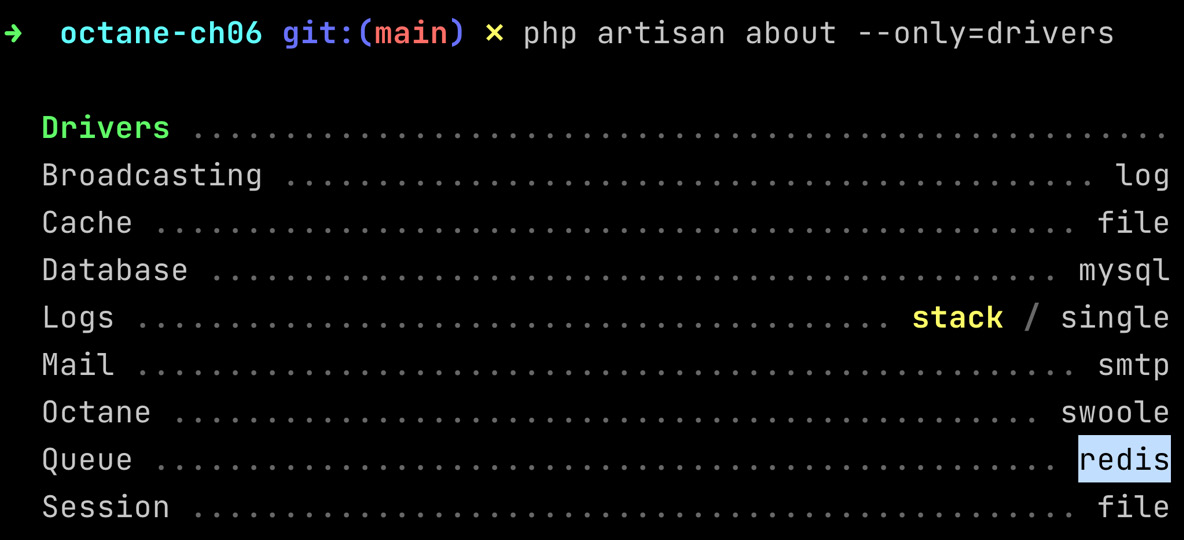
Figure 6.8: The driver configuration
The command shows that for the queue, we are using Redis as the backend connection for queues.
Now, opening the page at http://127.0.0.1:8000/time-consuming-request-async, you will see that deferring the task to a Redis queue is faster than a database. For example, the dispatch method takes less than a millisecond on my local machine. With the database connection in our example, the same code takes 7 milliseconds:
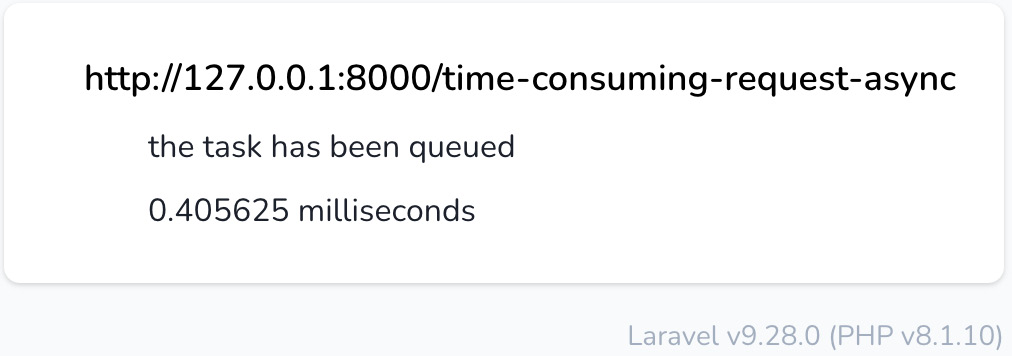
Figure 6.9: Dispatching a job on the Redis queue
With the queue mechanism, we improved the responsiveness of the application, allowing the user to receive an immediate response about the task. Then, with the Redis connection, we reduced the time taken to queue the job.
Thanks to the Redis connection, we can also use Laravel Horizon for monitoring the queues.
Monitoring queues with Laravel Horizon
We are going to add Horizon to our application. This means that you can access the Horizon dashboard using the /horizon path at the end.
To install Laravel Horizon, you have to install the package:
composer require laravel/horizon
Then ,you need to publish the files needed by Horizon: the configuration file (config/horizon.php), the assets (in the public/vendor/horizon/ directory), and the service provider (in the app/Providers/HorizonServiceProvider.php file):
php artisan horizon:install
horizon:install will copy all needed files into the correct directories.
Launch Laravel Octane with the following:
php artisan octane:start
With the default Horizon configuration, you can access http://127.0.0.1:8000/horizon:
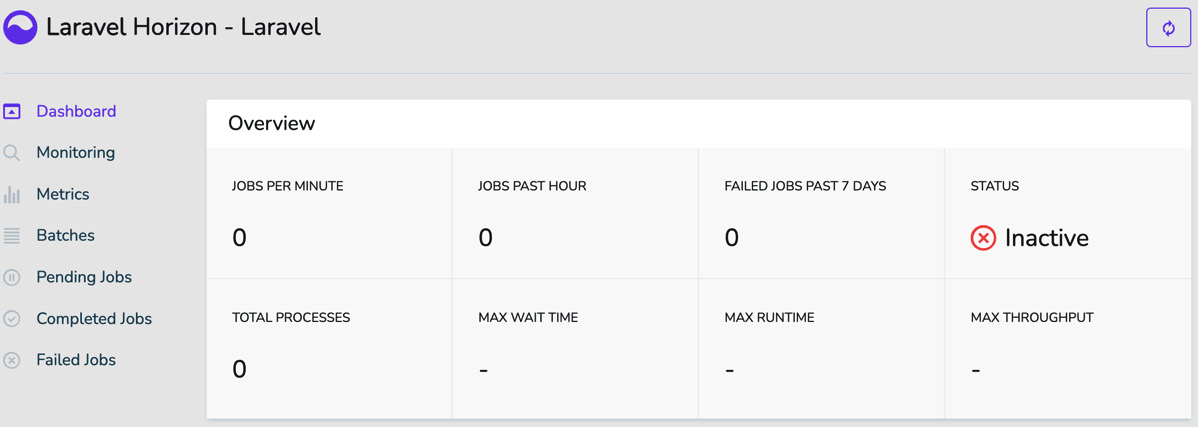
Figure 6.10: The Laravel Horizon dashboard
The status indicates whether the supervisor of Horizon processes is up and running. To collect all the metrics correctly, launch the supervisor:
php artisan horizon
Then, if you load the page http://127.0.0.1:8000/time-consuming-request-async multiple times, multiple jobs are created in the queue. Launch the consumer:
php artisan queue:work --queue=first
You will have a consumer up and running, ready to execute jobs from the queue.
So, you have Octane, Horizon, and the queue worker up and running. Load the page multiple times, and then go to the dashboard at http://127.0.0.1:8000/horizon/dashboard. You will see the dashboard page filled with the metrics:
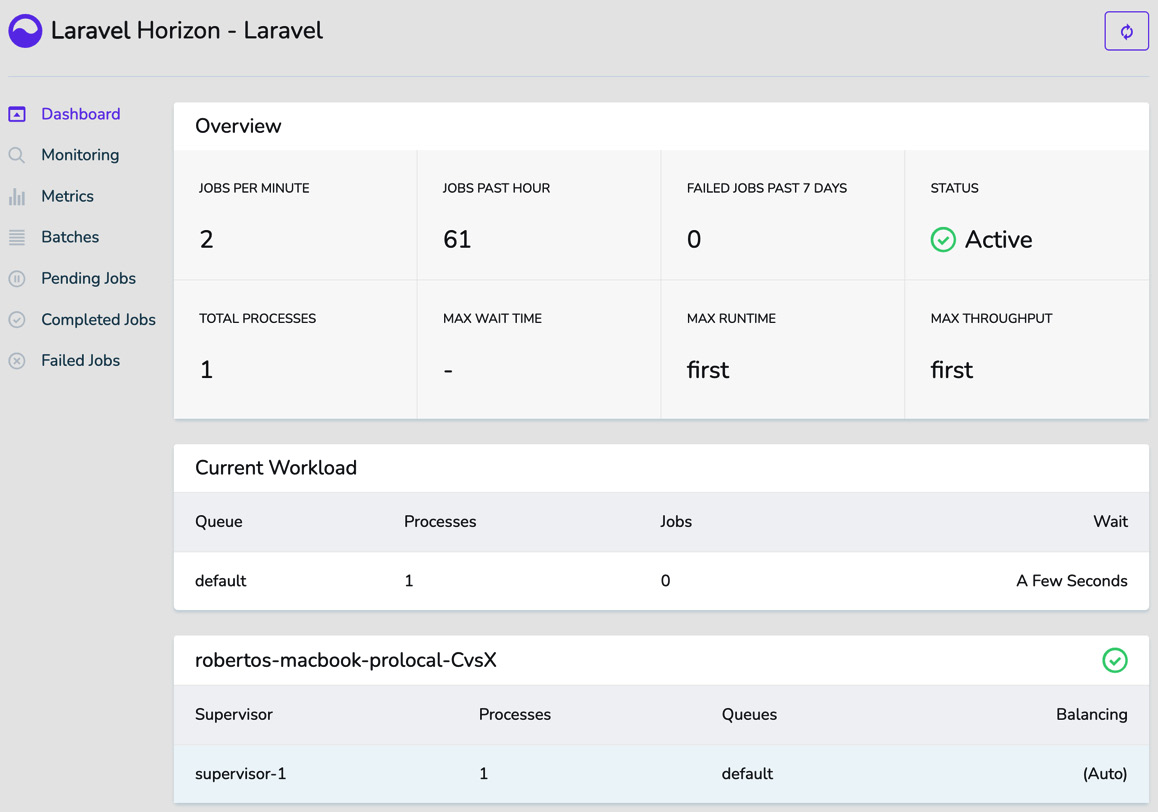
Figure 6.11: The Horizon Dashboard page elaborating on the metrics
The metrics are retrieved and calculated in near real-time (NRT), which means that under the hood, there is a process that continuously (every 3 seconds) performs HTTP calls to the /horizon/api/stats endpoint implemented by Horizon.
If you look at the API’s response, you could programmatically retrieve the same information you can see in the dashboard UI.
Note
In a scenario such as this one, where you have the UI that calls multiple endpoints (APIs) via polling (every 3 seconds), if you have the APIs served by Octane, you can inherit all the benefits that come from using Octane. Octane reduces latency thanks to all its optimization.
For the statistics API, the JSON response has this structure:
{
    "failedJobs": 0,
    "jobsPerMinute": 1,
    "pausedMasters": 0,
    "periods": {
        "failedJobs": 10080,
        "recentJobs": 60
    },
    "processes": 1,
    "queueWithMaxRuntime": "first",
    "queueWithMaxThroughput": "first",
    "recentJobs": 0,
    "status": "running",
    "wait": {
        "redis:default": 0
    }
}
Here, you can retrieve the following:
- The count of recently failed jobs, "failedJobs".
- The jobs processed per minute since the last snapshot, "jobsPerMinute".
- The number of master supervisors that are currently paused, "pausedMasters".
- The configuration for how long (in minutes) Horizon has managed the recent and failed jobs. The values are expressed in seconds, and the configuration is defined in config/horizon.php in the trim section.
- The process count, "processes".
- The name of the queue that has the most extended runtime, "queueWithMaxRuntime".
- The name of the queue that has the highest throughput, "queueWithMaxThroughput".
- The count of recent jobs, "recentJobs".
- The status of the supervisor (the supervisor is the process run via php artisan horizon), "status".
- The time to clear per queue, "wait" (in seconds).
The Horizon dashboard is a convenient way to monitor the status and statistics of all running queues. Via Horizon, you can’t control the queues; for managing the queues, you can use the commands explained here:
- queue:monitor: For monitoring the status of the queue and the number of waiting jobs
- queue:clear: For deleting all the jobs in a connection or queue
- queue:flush: For deleting all failed jobs
- queue:forget: For deleting a specific failed job (to avoid retrying the execution of a failed job)
- queue:retry: Retrying the execution of a previously failed job
- queue:work: Processing the queue (or the queues specified via the –queue parameter)
Thanks to all these commands, you can control the queue’s status and health.
With Horizon, you can monitor the queues’ execution and status.
So now, we have an architecture for running and monitoring queues with Redis as the backend.
Summary
With an asynchronous approach, we can defer the execution of some tasks and be more responsive to the user’s request. In other words, the job is queued, and it will be taken care of later. The behavior is different from the classic approach where the job is executed immediately, but the benefit is that control of the application’s UI is consistently available to the user. The user experience of your application is smoother, so the user, in the meantime, can do other things with your application. Besides improving the user experience, the asynchronous approach is more scalable because you can control the processes that will take charge of the jobs in a granular way. You also can execute more than one worker via the php artisan queue:work command – and if your hardware architecture has more virtual machines for running backend processes, you can run the consumer processes across multiple virtual machines.
To achieve asynchronous architecture in the current chapter, we introduced the queue mechanism; we have shown the following:
- How to install and set up the queue in Laravel first with a database as the backend connection, then with a more powerful backend with Redis
- The differences between executing a job in a synchronous way and in an asynchronous way
- The benefit of using the queues in terms of the responsiveness of the system and the impact on the user experience
- Installing Horizon to monitor the queue usage
In the next chapter, we will see how to prepare the application and how to set up the tools to deploy a Laravel Octane application in a production environment.