
Chapter 2: Data Acquisition from iOS Devices
Mobile devices present a unique set of challenges compared to desktop computers when approaching the data acquisition phase. While in the world of desktop computers there is a consolidated workflow that allows an investigator to carry out a so-called forensically sound acquisition, when we're dealing with mobile devices there is no single, one-size-fits-all procedure that can be adapted to each and every device. This becomes even more evident when we are dealing with iOS devices, as the variety of models and different versions of iOS implies that the procedure to be carried out to achieve a satisfactory acquisition will be different, depending on the device itself. Often, a particular tool, exploit, or vendor solution will stop working if the device is updated to a new iOS release. This is the case for most jailbreaks that rely on publicly disclosed vulnerabilities that are subsequently patched by Apple. A further challenge is represented by the possibility of dealing with locked devices; in this case, the chances of extracting useful information from the device are much more limited.
For these reasons, data acquisition is arguably the most challenging aspect of the iOS forensic workflow. In this chapter, therefore, we will discuss various solutions, starting by distinguishing the different types of acquisition methods and their limits. We will then move on to the practical phase, in which we will learn how to perform a logical, a filesystem, and a physical acquisition of an iOS device.
In this chapter, we will cover the following topics:
- Understanding acquisition methods
- Jailbreaking the device
- Triaging the device
- Performing a logical acquisition
- Performing a full filesystem acquisition
Understanding acquisition methods
In the first chapter, we briefly discussed acquisition methods and the difference between a logical, filesystem, and physical extraction. We will now be building on that foundation and diving deep into more advanced topics to gain a full understanding of how they work and what kind of data we can expect from each of these acquisition methods.
Logical acquisitions
A logical acquisition is usually the easiest and fastest way to extract the most common types of evidence from an iOS device. If the device is unlocked or if you have the passcode, you will certainly be able to perform a logical acquisition, as all iOS devices support it; based on the Apple File Connection (AFC) protocol, this acquisition is essentially equivalent to running a local (iTunes) backup, and some forensic tools will actually rely on Apple's libraries and iTunes capabilities to extract data from the device.
A logical acquisition can be performed using free software like iTunes, third-party libraries such as libimobiledevice, or by using forensic software. In the following sections of this chapter, we will use three of the most popular digital forensics tools to perform a logical acquisition: Cellebrite UFED, Elcomsoft iOS Forensic Toolkit, and Magnet ACQUIRE.
As we've learned from the previous chapter, the main limitation in a logical acquisition is the depth and quality of the data that is extracted; although it will include most user-generated content, such as text messages, call logs, photos, and notes, it will not include other precious artifacts, such as emails, location data, third-party apps, and precise system logs. The key point to understand here is that both Apple and iOS developers can restrict logical extractions by deciding which files will be included in a backup and which files will not be backed up. For instance, many popular applications, such as Twitter, Facebook, Instagram, Telegram, or Signal, do not include their files in a local backup, so these artifacts will not be available through a logical acquisition.
To make things even more complicated, with the release of iOS 4, Apple introduced a feature that enables the user to encrypt local backups using a password. This setting can be activated by using iTunes and, once enabled, all subsequent backups will be automatically encrypted using the provided password. In other words, if I decide to enable backup encryption, the next time I attempt a local backup on any computer, the password will be required to read the backup files. Clearly, this poses a problem for the forensic investigator on several fronts; if backup encryption is enabled and the password is unknown, data extracted from a logical acquisition will be useless, as it won't be possible to decrypt it. Some forensic tools, such as Elcomsoft Phone Breaker, allow investigators to attack the encrypted backup by brute-forcing the password; however, this does not guarantee that the password will be effectively recovered, and brute-force attacks usually take quite a long time.
There is, however, another option. Since iOS 11, Apple introduced the possibility of removing the password used to encrypt local backups directly from the device.
Here's the caveat: although this solution works perfectly, it does not only remove the encryption password but also resets all the device's settings. Clearly, this will have an effect on some of the files stored in the device, but it may be your only option if you don't have access to the backup password.
Here's how to reset the local backup encryption password:
- From the iOS device, go to Settings | General | Reset.
- Select the Reset All Settings option and enter the device passcode.
- Follow the steps to reset the device.
By following this procedure, you will not lose any user data or other passwords, but it will reset general device settings, such as wallpaper, display settings, and so on. This will, of course, cause some changes to system files and databases; for this reason, if you're dealing with a device in a criminal case, be sure you understand the consequences of making changes to the original device and make sure you have the legal authority to perform this kind of operation.
Tip
It's important to note that, since iOS 13, if the user decides to encrypt a local backup, a lot more data will be included, including some data from Keychain, calls, health data, Safari history, and so on. When performing a logical acquisition, most forensic tools check whether backup encryption is enabled, and if it's not, it is temporarily enabled to acquire the biggest amount of data and then disabled again when the acquisition process finishes. Keep this in mind – if you don't encrypt backups before performing a logical acquisition, you will miss crucial evidence!
To have a better understanding of what artifacts you can expect to find in a logical extraction, take a look at the following screenshot taken from Cellebrite Physical Analyzer, which shows what data was acquired from an iOS device through a logical acquisition:

Figure 2.1 – Data acquired through a logical acquisition
The main reason why you would want to perform a logical acquisition is when working with newer devices, because they are generally supported following the release of an iOS update, so you won't have to wait too long to start collecting evidence; however, as we've already discussed, many items will not be included in a logical acquisition.
In comparison with a standard logical extraction, a full filesystem extraction or a physical extraction gives investigators access to a lot more user data on iOS devices, including full access to Keychain, which will also include encryption keys that can be used to decrypt data from secure apps, such as Signal, Wickr, Snapchat, or Facebook.
By acquiring the full filesystem, investigators will also gain access to many of the system artifacts, such as the complete history of events that occurred on the device (locked/unlocked states, user interaction, installed applications, AirDrop, Bluetooth, camera, and airplane mode history). Also, a lot more geodata will be available from a full filesystem acquisition, including artifacts from cell towers, Wi-Fi connections, and GPS locations with the corresponding geo-coordinates and timestamps.
The following screenshots show the differences between a logical acquisition and a full filesystem acquisition from the same device; the full filesystem extraction, on the right, contains a lot more data:
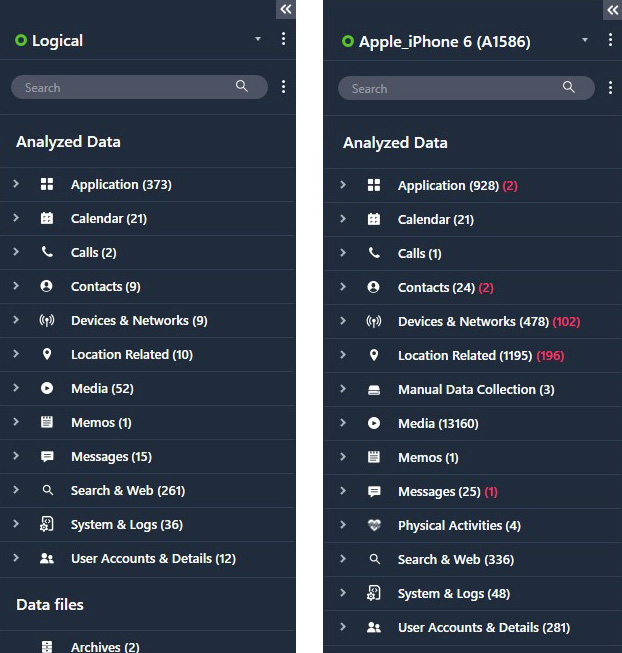
Figure 2.2 – Comparison of data extracted from a logical and a filesystem acquisition
By now, you should have a clear understanding of the benefits and limits of a logical acquisition and why it may not be sufficient to gather the required evidence. We will learn how to perform a logical acquisition later on, but before that, let's take a look at how we can extract the device filesystem by performing a physical or full filesystem acquisition.
Physical acquisitions
In the first chapter, we briefly introduced physical acquisitions and learned how a physical extraction will contain the biggest amount of evidence from a device, including data present in unallocated space on the disk that can be used to recover deleted artifacts.
A physical acquisition can be defined as a bit-per-bit copy of the device's flash memory. Clearly, this is the best of all worlds for a forensic examiner, but it isn't always possible; since data on an iOS device is encrypted, using traditional techniques such as imaging the physical volume would result in the acquisition of encrypted data, which would be completely useless. We've already seen how Apple manages security by protecting encryption keys within the Secure Enclave, so starting with the iPhone 5s, there is no way of obtaining a physical extraction of the device.
At the time of writing, the latest device that allows a physical acquisition to be performed is the iPhone 5c, a device released almost eight years ago. It's safe to say that, at present, it's highly unlikely that an investigator will run into one of these devices; nevertheless, a physical acquisition can be carried out by using the Elcomsoft iOS Forensic Toolkit.
Filesystem acquisitions
A full filesystem acquisition provides a logical representation of all files on an iOS device, and this is a great compromise between a logical acquisition and a physical one. All the data we previously saw in a logical extraction is still obtained during a filesystem acquisition, but the examiner is also granted access to raw files stored within the device. This allows investigators to access, for example, databases of all third-party applications without restrictions, and recovery of deleted artifacts can also be attempted.
Although there are many tools that allow you to perform this kind of acquisition, Apple restricts direct access to the device's filesystem, so you will have to find a workaround to gain full access to the device before a full filesystem acquisition can be performed.
So, you may be wondering – how do I access the device filesystem? Is a jailbreak required? Although jailbreaking is one of the available options, it is not the only one.
At the time of writing, there are three different solutions to gain access to the device's filesystem:
- Using tools that leverage Checkm8, a BootROM exploit
- Using an extraction agent
- Jailbreaking the device
Checkm8
The publication of the Checkm8 vulnerability in 2019 by the hacker @axi0mX, which is based on an unpatchable vulnerability present in the BootROM of millions of iOS devices, is arguably the biggest game changer ever in the forensics industry.
Checkm8 is compatible with A5 to A11-based devices; this includes all devices starting from the iPhone 5s up to the iPhone X, as there is no working implementation for 4S hardware.
Before we get into the details, it's useful to understand how the iOS boot procedure works and why the Checkm8 vulnerability cannot be patched.
iOS boot process
The first layer of security in the iOS platform is the secure boot chain, which refers to the sequence of steps carried out by the application processor, starting with the loading of the BootROM and ending with the loading of the iOS. This ensures that attackers cannot run a modified operating system or malicious applications on the device. The boot process relies on a chain of trusts, which begins from the key that is embedded into hardware during manufacturing.
The boot process of an iOS device can be broken down into five steps: the BootROM, the Low-Level Bootloader (LLB), iBoot, the kernel bootloader, and the main operating system. iOS has a very strict process of booting the operating system, where each stage checks the authenticity of the following stage. This is achieved by digitally signing each step of the process. The steps are as follows:
- When the device is powered on, the processor executes the code in the BootROM, which is a read-only block of memory that's created during the manufacturing process. The BootROM contains the Apple Root CA public key, which is used to decrypt the LLB.
- The LLB is the lowest level of code that can be updated via a software update. It initializes and executes the second-level bootloader called iBoot, after verifying its authenticity. If the verification fails, the device enters recovery mode, or Device Firmware Upgrade (DFU) mode, which requires a factory reset to resolve.
- The iBoot bootloader verifies, loads, and executes the iOS kernel.
- The kernel loads the system core services and iOS components.
- The iOS operating system is launched.
The following diagram illustrates the entire process:

Figure 2.3 – iOS secure boot chain
As you can see, the first step in the boot process is the execution of the code from the device's BootROM. This stage of the process is implicitly trusted because, as its name implies, the BootROM is a read-only memory component that cannot be modified after manufacturing by anyone, not even by Apple.
The Checkm8 exploit is based on a vulnerability that resides within this portion of read-only memory, so this means that Apple has no way of patching it, leaving hundreds of millions of iOS devices vulnerable. To have a better understanding of what a breakthrough this is, keep in mind that the previous BootROM exploit was discovered in 2010!
Tip
If you're interested in the technical details, you can find a full report on the Checkm8 vulnerability at the following link: https://habr.com/ru/company/dsec/blog/472762/.
Although Checkm8 allows developers to get around Apple's security and run low-level code on the device's BootROM, Checkm8 is not a jailbreak by itself, as it requires additional software that leverages the exploit to perform a fully fledged jailbreak.
checkra1n
checkra1n is the first publicly available jailbreak based on the Checkm8 vulnerability, and it's the result of the hard work carried out by hackers and security researchers from all over the world. Jailbreaking the device via checkra1n allows users to gain root permissions and install unofficial applications and repositories, such as Cydia.
Investigators that are dealing with a device that is vulnerable to Checkm8 have the possibility of jailbreaking the device through checkra1n, thus gaining access to the entire filesystem and successfully performing a full filesystem acquisition.
However, from a forensics perspective, checkra1n definitely has its drawbacks:
- checkra1n requires a Mac or Linux system to apply the jailbreak to an iOS device. Support for Windows is under development, although it is actually possible to run checkra1n from a Windows PC by running a live CD, such as bootra1n.
- Any kind of jailbreak will leave permanent traces on the device due to the modifications that are being made to the filesystem.
- Often additional packages will need to be installed on the device, such as Cydia, AFC2, or SSH, which make more changes to the filesystem.
Checkm8 acquisitions
In light of these limitations, some vendors have come up with a built-in solution that allows investigators to perform a full filesystem acquisition, exploiting the Checkm8 vulnerability but without actually jailbreaking the device.
Currently, this feature is available in some of the most popular forensic tools, including Cellebrite UFED, Elcomsoft iOS Forensic Toolkit, and Oxygen Forensic Detective.
The difference between these solutions and performing a traditional jailbreak through checkra1n is that these tools do not modify the device in any way; the exploit is performed in the device's RAM. Once the acquisition process ends, the device will reboot normally, leaving no traces.
Whenever possible, this should be the preferred method to acquire the full filesystem from an iOS device, as this is definitely the most forensically sound solution.
Agent-based acquisitions
The main drawback in Checkm8 acquisitions is that they're not supported by newer devices like the iPhone 12 or the iPhone 13, as these devices are not vulnerable to the Checkm8 exploit.
In 2020, vendors responded to these limitations by providing an alternative method to extract the full filesystem from any iOS device, including the latest iPhone 12; this solution relies on installing an extraction agent that will exploit software vulnerabilities, gain access to the entire filesystem, and establish a secure connection between the device and the computer.
Although this method requires installing an application (the agent) on the device, this is considered forensically safe, as the agent leaves a drastically smaller footprint compared to other solutions, like jailbreaking the device. The only traces left on the device are some minor changes in system log files; however, because of this, depending on your jurisdiction, you may need authorization or legal authority to use this method.
The following is a list of requirements to use this method:
- Supported iOS devices: all devices starting from the iPhone 5s up to iPhone 12.
- Supported iOS versions: iOS 9.0 through to iOS 14.3.
- Using an Apple ID registered in Apple's Developer Program is strongly recommended for installing the agent on the device, as this relieves the need to open internet access on the device.
Currently, Elcomsoft iOS Forensic Toolkit and Belkasoft Evidence Center X are the only tools that provide agent-based extraction capabilities.
Jailbreaking the device
Finally, let's talk about jailbreaks! We've seen how it's possible to extract a full filesystem from an iOS device by exploiting the Checkm8 vulnerability or by performing an agent-based acquisition. However, as we've learned, both these methods have their limitations, and there could be some cases where jailbreaking the device is your only option to perform a filesystem acquisition.
Applying a jailbreak will leave some permanent traces on the device, so this option should only be considered as a last resort and only if you have the legal authority to do so.
At the moment, the most popular jailbreaks are checkra1n and unc0ver. Both these jailbreaks allow investigators to install third-party tools such as SSH, which will give unrestricted access to the device's filesystem.
In the following table, you can check the compatibility for both these jailbreaks:

Jailbreaking with checkra1n
Previously in this chapter, we introduced checkra1n and we learned about its features and limitations. We'll now take a deep dive and learn how to actually perform the jailbreak:
- The first step is to head to checkra1n's official webpage and download the required tool. You can download the latest version from https://checkra.in.
- Once you have downloaded the file, run it and plug in the device. Make sure you use a USB-A cable, as currently there is no support for USB-C cables.
- When the main window loads, check that the device is recognized. If your device is running an A11 processor, you will need to head into Options and then enable the Skip A11 BPR Check option.
If your device runs iOS 14.6 or later, you will need to head into Options and then enable Allow Untested Versions:
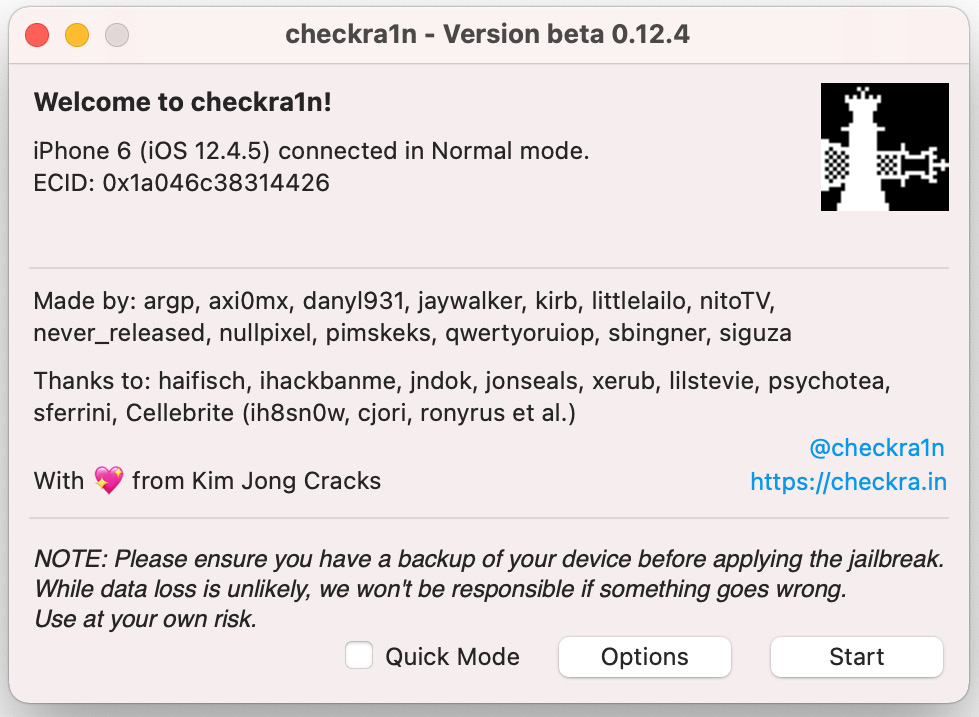
Figure 2.4 – The main checkra1n screen
- When you're ready, click Start. The device will reboot into recovery mode automatically.
- You will now be presented with instructions on how to reboot the device into DFU mode. Follow the instructions until your device shows a black screen:

Figure 2.5 – Follow the instructions to put the device in DFU mode
- At this point, checkra1n will begin the jailbreak process. The device will boot PongoOS and should look like this:
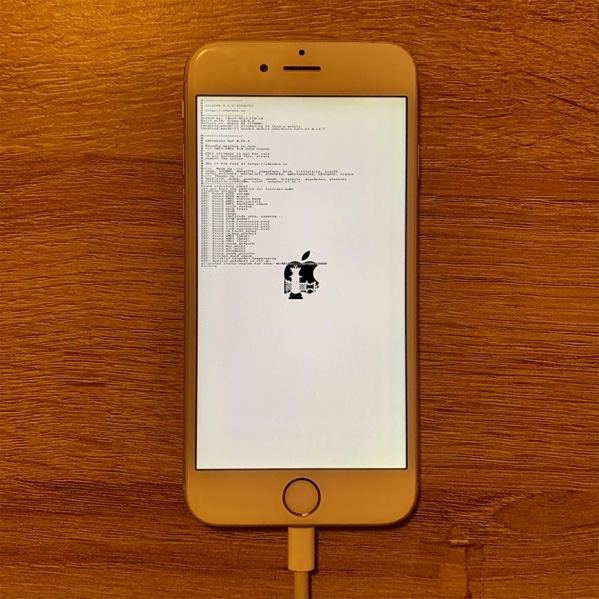
Figure 2.6 – The device booting PongoOS

Figure 2.7 – Enter the passcode when requested
When the device reboots, you will find the checkra1n icon. Launching that application will allow you to install Cydia. Once Cydia is installed, you can proceed to install any third-party packages, such as SSH.
Remember that checkra1n is a semi-tethered jailbreak; if you reboot the device, you will have to jailbreak it again using the checkra1n tool.
Once the device has been successfully jailbroken, you can perform a full filesystem acquisition using the tool of your choice.
Triaging the device
When you're dealing with iOS devices, it's useful to gather some information directly from the device prior to starting the acquisition process. Knowing what iOS version is running on the device, for instance, can be useful to determine what the best acquisition method is. For this purpose, we're going to use libimobiledevice.
The libimobiledevice library is a cross-platform library that allows users to communicate with an iOS device using their native protocol to provide access to the device's filesystem, including information about the device and its internals. It works with all devices, including the most recent ones.
The first step is to head to http://libimobiledevice.org, where the library can be downloaded for free. If you're running Windows, instead of downloading the source files and compiling them, you can download precompiled binaries from the project's GitHub repository.
If you're running macOS, you can install the library simply by running the following command from the terminal:
brew install libimobiledevice
If you're running a Linux distribution that supports the apt packet manager, you can install the library by running the following command:
sudo apt-get install usbmuxd libimobiledevice6 libimobiledevice-utils
Once you have installed the library, connect the device to your forensic workstation and run the following command from the terminal:
ideviceinfo
This command will connect to the device, parse data relevant to the hardware and software, and display it on screen. Keep in mind that the device will have to be paired with the host system by entering the passcode. If you're running Linux or macOS, you can combine the previous command with the grep command to view some key data:
- Identifying the device model:
You can read the device model by running the following command:
ideviceinfo | grep ModelNumber
- Identifying the iOS version:
To identify what version of iOS the device is running, you can run the following command:
ideviceinfo | grep ProductVersion
- Identifying the device serial number:
The device's serial number can be parsed by running the following command:
ideviceinfo | grep SerialNumber
- Identifying the phone number:
Finally, to identify the phone number related to the SIM card in the device, run the following command:
ideviceinfo | grep PhoneNumber
Deciding the best acquisition method
Once the device has been seized, it has been correctly isolated, and you have identified the hardware model and iOS version, the next step in the examination process is assessing what the best acquisition method is to extract the richest dataset from the device while preserving data integrity.
Generally speaking, you'll want to keep these two concepts in mind before performing any actions on the device:
- Acquire evidence by order of volatility.
- Acquire evidence, starting with the less intrusive method.
The first step in any acquisition process is determining the volatility of the data of interest; for example, if the scope of the investigation is to extract photos from a device or parse text messages, clearly this doesn't pose any kind of concern because this data is written on the flash memory, it isn't volatile, and any acquisition method will extract these artifacts. However, if the investigation seeks to understand how the device was used, or if there was any human interaction on a particular date and time, or where the device was located a few days ago, these artifacts are much more volatile, as log files and databases on iOS devices are constantly overwritten. For instance, location data is generally maintained on the device for several weeks; however, precise location data, including cell tower data, is only maintained for a few days. In this case, we'll want to extract this kind of data as soon as possible before it gets overwritten. This means performing a full filesystem acquisition (if possible) before anything else, as logical acquisitions do not contain this data.
The investigator should have a clear understanding of how forensic tools work and what impact they have on data and on the device itself:
- Anything you decide to do (including nothing!) will have an impact on the device.
- What impact will your actions have on the data?
- Does the chosen acquisition method require a device reboot?
- Will artifacts of interest survive a device reboot?
- How long are artifacts stored on the device before being overwritten?
- What files or folders will be affected by a jailbreak?
- What changes will occur by running a Checkm8 acquisition?
- What changes will occur by performing an agent-based acquisition?
A logical acquisition will have virtually no impact on the device, so most often, this will be your first choice. If the device is vulnerable to Checkm8 and if you have tools that can perform this kind of acquisition, a Checkm8 acquisition will be the best option to gain access to the entire filesystem without making any changes to the device. If this is not an option, the next step would be considering an agent-based acquisition. Finally, as a last resort, jailbreaking the device will give the investigator access to the entire filesystem, but make sure you understand how this will affect the device and its data.
Performing a logical acquisition
Now that we've learned the theory, it's time to put it into practice by performing our first logical acquisition.
Almost all forensic tools can perform a logical acquisition; we'll concentrate on two of the most popular ones, Cellebrite UFED and Elcomsoft iOS Forensic Toolkit.
Cellebrite UFED is considered the industry standard, as it allows investigators to perform a variety of different acquisitions, including a traditional logical acquisition, a partial filesystem, a full filesystem acquisition through Checkm8, and a full filesystem acquisition from devices that have been jailbroken.
Elcomsoft iOS Forensic Toolkit, on the other hand, can perform logical acquisitions, a full filesystem acquisition from jailbroken devices, full filesystem acquisitions through agent-based extractions, and it also supports physical acquisitions from older devices.
Logical acquisition with Cellebrite UFED
In this example, we'll acquire an iPhone 6 running iOS 12:
- The first step is to launch Cellebrite UFED and choose Mobile device from the main screen:

Figure 2.8 – The home screen of Cellebrite UFED
- Next, select the AUTO DETECT option or choose the device model using the search function in the upper-left part of the screen:

Figure 2.9 – Choose the device or let UFED auto-detect it
- Once the device is recognized, UFED will show the available acquisition methods depending on the iPhone model. Choose the Logical (Partial) acquisition to continue:

Figure 2.10 – Choose the type of acquisition
- One of the best features of Cellebrite UFED is that it will allow you to select what data you want to extract. This will greatly speed up the extraction process, allowing you to access useful evidence within minutes. Select the artifacts that should be extracted and click Next to start the acquisition process:

Figure 2.11 – Choose what artifacts should be extracted
- To perform a logical acquisition, the device must be unlocked. Consider disabling Auto-lock from the device's settings. You should also Trust the computer when the device prompts you for the pairing request:
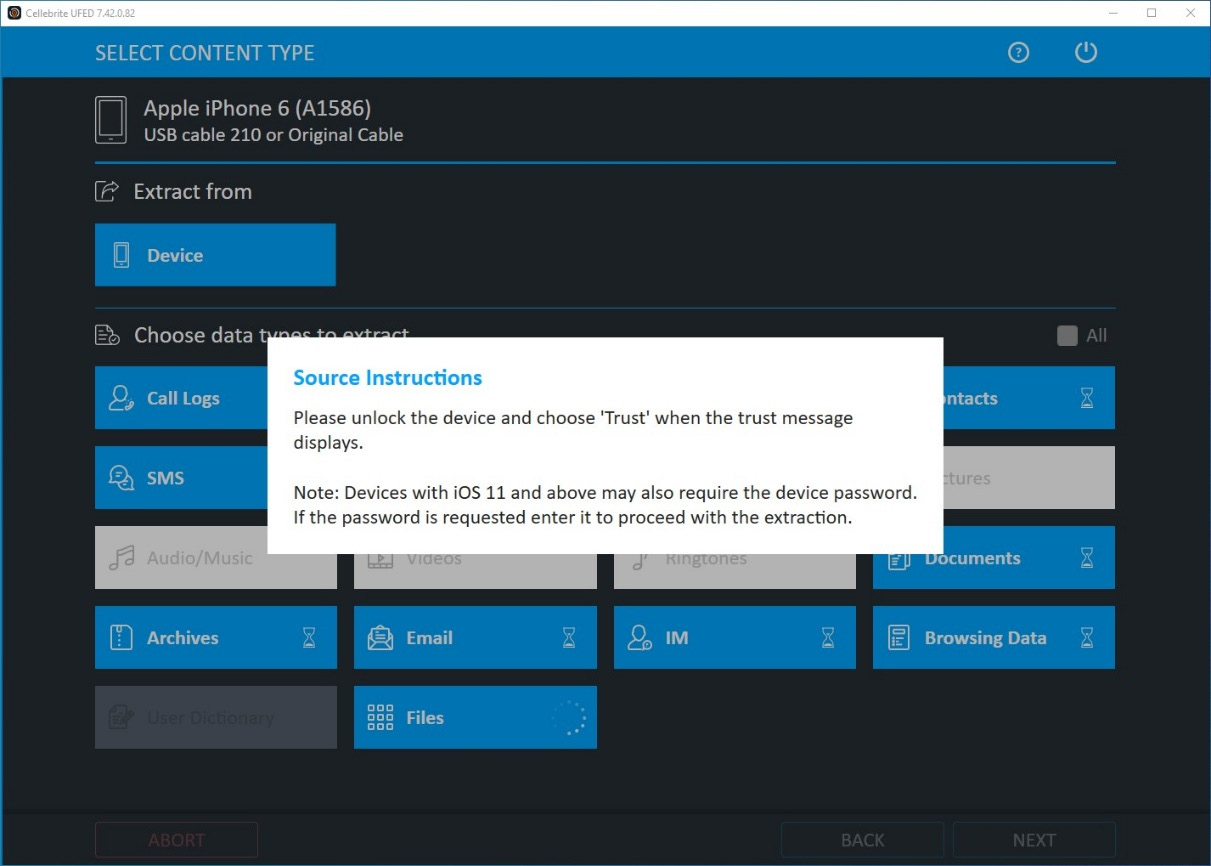
Figure 2.12 – Establish pairing between the workstation and the device
- Wait for the task to finish successfully. The extraction summary will give you an idea of what data was extracted and how many artifacts were found:
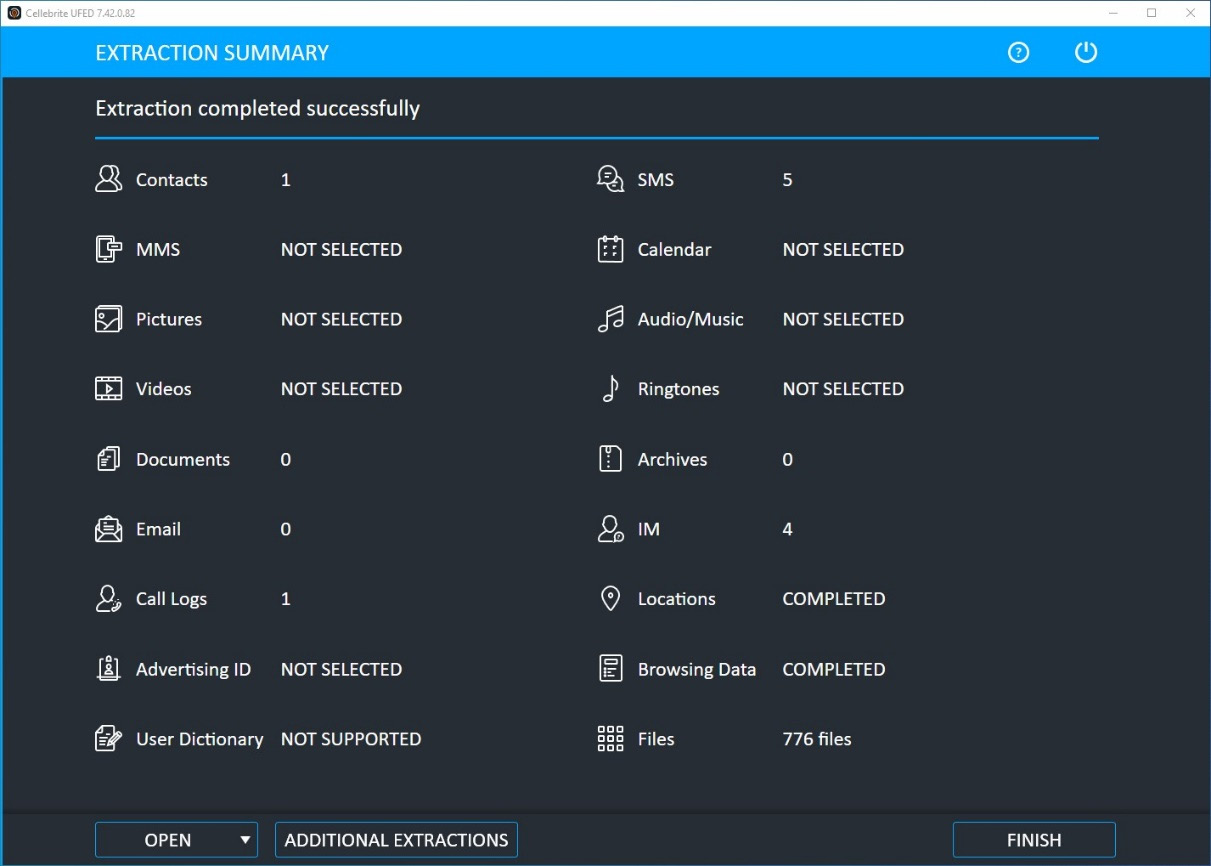
Figure 2.13 – The extraction summary displays what data was extracted
You can view the extracted data by loading the logical acquisition into a forensic tool, such as Belkasoft Evidence Center X, Elcomsoft Phone Viewer, or Cellebrite Physical Analyzer.
Logical acquisition with Elcomsoft iOS Forensic Toolkit
Another great tool to perform acquisitions from iOS devices is the forensic toolkit by Elcomsoft. This toolkit has been specially designed for iOS devices and offers some unique features, such as agent-based extractions. The steps for this are as follows:
- Launch Elcomsoft iOS Forensic Toolkit and check whether the device is correctly recognized. As you can see from the following screenshot, the tool is divided into four sections, which each deal with different acquisition processes. In our example, we want to acquire a logical image and the device is not jailbroken, so we're going to choose the Backup option, which will perform a logical acquisition:

Figure 2.14 – The home screen of Elcomsoft iOS Forensic Toolkit

Figure 2.15 – Choose where the backup should be stored
- To obtain the fullest logical image, backup encryption should be enabled. The toolkit will automatically detect whether encryption is enabled and, if it's not, it will enable it by setting the password to 123. Backup encryption will be disabled at the end of the acquisition process:

Figure 2.16 – The toolkit will show progress and debug information on screen
At the end, the toolkit will give you a summary of the acquisition process. The extracted files can now be examined using the forensic tool of your choice.
We've seen how to perform logical acquisitions using two different tools. Keep in mind that there are a variety of different tools that can perform this kind of acquisition, including free tools. In the next section, we'll learn how to perform a full filesystem acquisition.
Performing a filesystem acquisition
In the first part of this chapter, we learned that a full filesystem acquisition is generally the best way to extract the largest number of artifacts from an iOS device and that this acquisition can be carried out by jailbreaking the device, exploiting the Checkm8 vulnerability, or by performing an agent-based acquisition.
We'll now put this into practice by performing a Checkm8 full filesystem acquisition using Cellebrite UFED, which has a built-in Checkm8 solution. Then, we'll perform an agent-based acquisition using Elcomsoft iOS Forensic Toolkit.
Both acquisitions provide the same result: an image of the entire filesystem. Checkm8 acquisitions can be considered forensically sound and represent the best option, although newer devices are not compatible with this method. On the other hand, agent-based acquisitions require you to install an application on the device, which will make some minor changes to system log files, but this solution is compatible with newer devices, such as the iPhone 12.
Checkm8 full filesystem acquisition using Cellebrite UFED
Cellebrite UFED features a built-in solution to perform Checkm8 acquisitions, so the entire process is made extremely easy by simply following the onscreen instructions:
- The first step is to launch Cellebrite UFED and select Mobile device from the main menu. Then, choose the device model from the search option or use AUTO DETECT to detect it automatically. Keep in mind that you will need to use a USB-A cable to perform the full filesystem acquisition.
- Select Advanced Logical and then choose the Full File System (checkm8) option. The other options can be used to obtain a partial filesystem or a full filesystem extraction from jailbroken devices:

Figure 2.17 – Choose the Full File System (checkm8) option
- Next, the device must be powered off. Once it's off, you'll want to enter Recovery mode and from there put the device in DFU mode. The onscreen instructions are pretty accurate, but, basically, once the device is off, you should press and hold the Home button while connecting the device. This will put the device in Recovery mode. From there, press both the Power button and the Home button for 10 seconds and then release the Power button, while keeping the Home button pressed for a few more seconds. This procedure may vary depending on the device model. Once the device enters DFU mode, the Continue button will light up:

Figure 2.18 – UFED will display instructions on how to enter Recovery and DFU modes
- At this point, UFED will exploit the device by leveraging the Checkm8 vulnerability. This could take a few minutes. The entire procedure is performed in the device's volatile memory, so no changes will occur on the device itself, and it will boot back to normal at the end of the acquisition process:
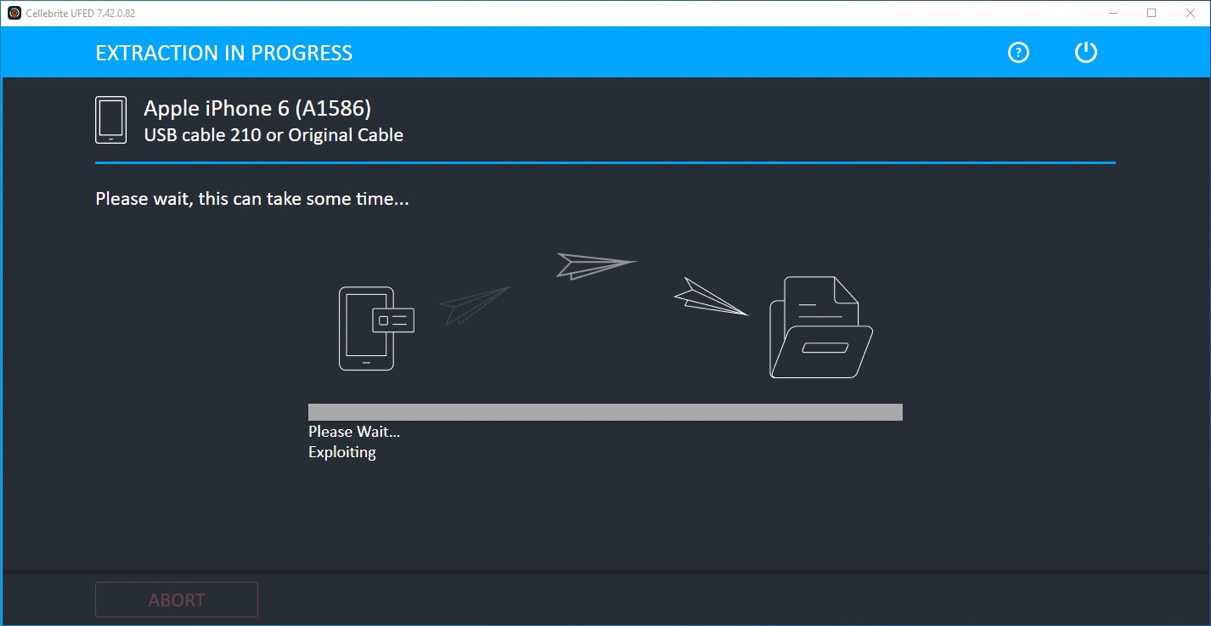
Figure 2.19 – Exploiting the device could take a few minutes
- Once the device has been successfully exploited, the acquisition stage will start, and the device will display a progress indicator:
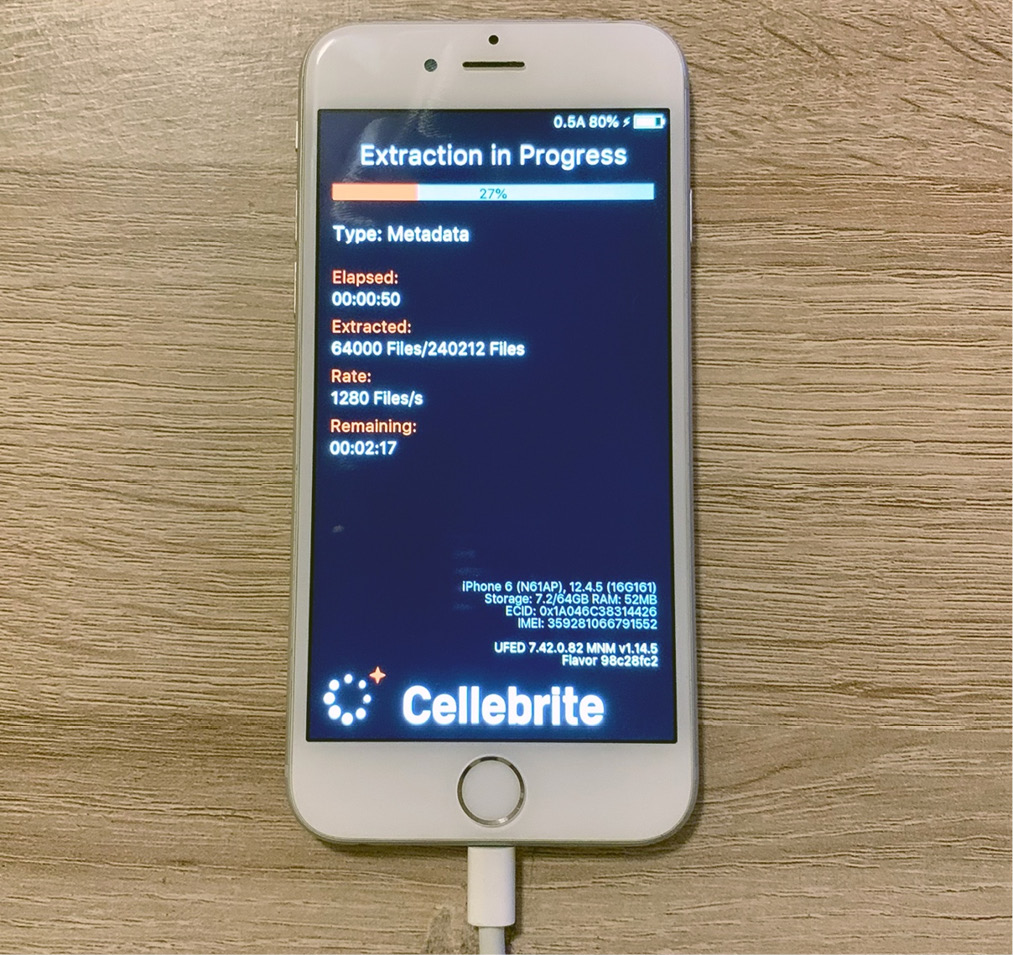
Figure 2.20 – Acquisition in process

Figure 2.21 – The extraction will be archived in a DAR file
When the acquisition process ends, the device will automatically reboot normally. The resulting DAR archive can be analyzed by importing it into Cellebrite Physical Analyzer or the tool of your choice.
Agent-based full filesystem acquisition
Elcomsoft iOS Forensic Toolkit is one of the few tools that supports agent-based acquisitions. As this method requires sideloading an application (the agent) onto the device, you'll need an Apple ID. On the Windows version, you'll need an Apple Developer ID, while on macOS, you can use a traditional account:
- To start, launch the toolkit and check that the device is correctly recognized:

Figure 2.22 – Elcomsoft iOS Forensic Toolkit home screen
- From the menu, choose option 1, which will install the agent on the device. You will be asked to provide Apple ID credentials and you will have to pass two-factor authentication. Then, the agent will be signed in with your Apple ID and installed on the device:

Figure 2.23 – Installing the agent onto the device
- Once the agent has been successfully installed, launch the application on the device. Now, to extract the keychain, choose option 2 from the toolkit.
- When the keychain extraction process finishes, you can proceed to extract the full filesystem. Generally, you will want to choose option 4, which will extract the user partition:

Figure 2.24 – Acquiring the full filesystem using the agent
- The filesystem image will be archived in a TAR file. When the process finishes, choose option 5 to uninstall the agent.
That concludes our filesystem acquisition!
Both Checkm8-based acquisitions and agent-based acquisitions are a complete breakthrough, as they allow forensically sound extractions of the entire filesystem, including all files related to third-party apps. As you've learned, a full filesystem will contain so much more data compared to a logical extraction. In the following chapters, we'll delve into these files and learn how to analyze them to gain meaningful evidence.
Summary
In this chapter, we learned the differences between acquisition methods and what kind of data we can expect to find in an iOS extraction. We learned how the Checkm8 exploit works, how this vulnerability can be used to gain access to a device's filesystem, and its limits. Then, we discussed agent-based acquisitions and learned what iOS versions support this acquisition.
Jailbreaks are a fascinating topic in the iOS world; we discussed two of the most popular ones, checkra1n and unc0ver, and their compatibility. Then, we learned how to jailbreak a device using checkra1n.
Finally, we learned how to perform a logical acquisition using Cellebrite UFED and Elcomsoft iOS Forensic Toolkit, and we approached two different options to perform a full filesystem acquisition.
Keep in mind that in this chapter, we focused on After First Unlock (AFU) acquisition methods, so it's imperative that the examiner has full access to the device. Over the course of the next chapters, we will look into Before First Unlock (BFU) acquisition methods to understand what kind of artifacts we can find in locked devices.
In the next chapter, we will discuss forensic tools, which ones are most popular, and how to use these to analyze extracted data.