Chapter 2: Data Engineering with Alteryx
In Chapter 1, Getting Started with Alteryx, we began exploring the Alteryx platform and its use in data engineering. In this chapter, we will examine what the role of data engineering involves and how a person in that role would use the Alteryx platform. Throughout this book, we will assume you have a solid understanding of analytical processes but don't have any experience with Alteryx to deliver end-to-end analytic datasets. We will also learn about the DataOps framework and how an Alteryx data engineer can use it.
We will cover the following topics in this chapter:
- What is a data engineer?
- Using Alteryx products as a data engineer
- Applying DataOps as an Alteryx data engineer
What is a data engineer?
In Chapter 1, Getting Started with Alteryx, we defined data engineering as follows:
Data engineering is the process of taking data from any number of disparate sources and transforming them into a usable format for an end user.
This definition focuses on data engineering as a process and getting the data from the source to the end user. It does not consider where the data source is, who the end user is, or even the tools they use to accomplish the job. Those details are not crucial to the definition. You want to get data from the source to the user.
The definition only captures part of the complexity of the data engineering job. For example, while identifying the end user does not matter to our definition of data engineering, completing a data engineering project relies on knowing the end user.
As the data engineer, building a data pipeline requires knowing where the data is coming from, its format, and if that format has changed. Understanding these factors is the basis for delivering successful projects and trusted pipelines.
Finally, a data engineer cannot be wedded to any tool, but should use whatever device makes your work smoother and more manageable.
One tool you can use is Alteryx. It's a tool I find flexible and adaptable, which allows you as the data engineer, data analyst, or data scientist, to quickly iterate over a problem set, test theories, and expand the complexity into any area you need.
As a data engineer, you connect to core databases or data lakes as the source material for most of your pipelines. You will cleanse and sterilize those datasets to fit the requirements of your end user. But you won't stop with those internal datasets. You will often enrich that information with publicly available data, such as government datasets or publicly shared commercial data. You will search out commercial datasets where the cost is a direct investment in the value of your output. And you will craft metrics and features so your users will have the best chance of achieving their own goals.
As a data engineer, you are an enabler.
You can see the data engineering process in the following diagram:

Figure 2.1 – The general data engineering process with Alteryx
So, let's finally get down to my definition of a data engineer:
A data engineer is a person who takes any available tools to collect data and then cleanse and transform the raw data to create an enriched dataset. The raw data can be from any company, commercial, or public source. The final enriched dataset is a cohesive, interpretable, and usable data source that end users trust.
With this definition of a data engineer, we need to understand how a data engineer would use Alteryx and how each Alteryx product achieves each part of the definition.
Using Alteryx products as a data engineer
With our definition of data engineering and data engineers, we ask, where does Alteryx fit in for a data engineer? In Chapter 1, Getting Started with Alteryx, we described a medium-sized business to demonstrate the Alteryx platform. This section will expand the above example to see how each part of the Alteryx platform works together to solve that use case and how that process follows my definition.
As a reminder, the example use case is as follows:
When we look at that use case, it fits with my definition of data engineering:
- A data engineer is a person who takes any available tools to collect data together. In this step, you will use Designer to connect to and extract the raw data sources:
- Then, cleanse and transform the raw data to create an enriched dataset. While still in Designer, you apply transformations to the dataset to combine the data sources and enrich them with additional information.
- Publish the final enriched data as a valuable data source. We can publish the data source from Designer as a one-off output, but as a data engineer, you will most likely automate the process with Alteryx Server.
- End users can trust that data source. With Alteryx Connect, you post the meta information about the data source and what transformations were applied to build confidence in the data source.
Working through the preceding steps, each product from the Alteryx platform fills a role in the process. Designer makes connecting to multiple data sources simple and performs the transformations needed. It is automated by Server, thus removing any key human dependency, and the pipeline can run reliably. Finally, Connect enables the final data output to be used by surfacing and exposing the data lineage, provides a data dictionary, and allows accessible communication of what datasets are available.
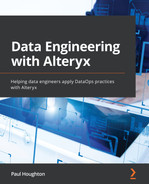
Let's look at the whole process in the following diagram and see where the Alteryx products fit in delivering each requirement:
Figure 2.2 – The data pipeline for an Alteryx data engineer
From the preceding diagram, we see the overall data pipeline. Let's understand these processes next:
- The Create process is where the connection to data sources happens and where the transformation and enrichment occur. Creating these processes is done by building Alteryx Designer workflows.
- The Automate section encompasses where the dataset is output for users to access it and do so in an automated fashion. We discuss automation of workflows in the Automating with Server for data engineers section.
- Finally, the Connect section is where users find and access the datasets in the data discovery platform. Finding the datasets is enabled with Alteryx Connect, allowing end users and communities to share breakdown data silos and build dataset understanding.
In the Alteryx platform, Designer enables the Create process, Server allows the automation process, and Connect enables data discovery.
Using example use cases, we can look at how to achieve each of those processes.
Creating with Designer for data engineers
The first section of the data engineering process involved creating the pipeline and completing any transformations. For our example, the dataset we are looking at is world_data.txt, sourced from the MySQL website (https://downloads.mysql.com/docs/world-db.zip) with original data sourced from Statistics Finland (https://tilastokeskus.fi/tup/kvportaali/index_en.html). The dataset includes population data that we can use to find a target market. Looking at the following diagram, we can see an example workflow that imports a population file containing three linked datasets. Next, those datasets are parsed and transformed into individual data tables. You can see the process as a whole in the following diagram:

Figure 2.3 – World data table preparation
You can find the example workflows in the book's GitHub repository here: https://github.com/PacktPublishing/Data-Engineering-with-Alteryx/tree/main/Chapter%2002.
We can break the workflow down into five sections. They are as follows:
- Initial connection: We connect to the specific file of interest with an input tool, world_data.txt. This file contains the global city information, population data, and language information tables. We can use this information to decide where to expand our business based on the population demographics in the cities, and the connection is shown in the following diagram:

Figure 2.4 – Importing the world data file
- Parsing the data values: Unfortunately, the single file holds the country information as the three related tables. Each table is a separate dataset with a different number of columns, and various data types, which we will discuss more in Chapter 5, Data Processing and Transformations. Additionally, the values in the columns are in the following format:
'table name' VALUES (value1, value2, value3,…, valueN);
This format requires parsing into a table format for analysis. We can use a combination of Regex for powerful text manipulation and a standard text-to-rows operation to parse the value information we need. You can learn more about Regex in Alteryx on the tool's help pages (https://help.alteryx.com/20214/designer/regex-tool). The process for separating the table values is shown in the following screenshot:

Figure 2.5 – Processing the values from the world data file
- Parsing the table metadata: Next, we need to transform the table metadata. The metadata is the information that identifies what the column names are supposed to be. Using that metadata, we can confirm that the data types match the data types we set for the columns. The metadata preparation is seen in the following screenshot:

Figure 2.6 – Processing the metadata from the world data file
- Combining the data values and metadata: Once we have processed the data values and metadata, we need to combine this information. We use an Alteryx standard macro to encapsulate a repeated process. To learn how to build an Alteryx macro from Alteryx Community, refer to the following link: https://community.alteryx.com/t5/Alteryx-Designer-Knowledge-Base/Getting-Started-with-Standard-Macros/ta-p/488149. When we make changes or updates to the process, the modifications are reflected in all locations and will minimize the errors caused by duplication. The table separation is shown in the following screenshot:

Figure 2.7 – Combining values and metadata in separate tables
In production, we would add error handling to ensure our outputs and field types are consistent, but we will look at that in Chapter 9, Testing Workflows and Outputs.
- Outputting to a storage location: Finally, we will need to output the final datasets for use. This output location could be a local or networked folder, a relational database such as MySQL, an analytical database such as Snowflake, or a data lake for large data applications. In the workflow shown in the following screenshot, we haven't added the output tool, and the dataset is made available in a Browse tool for review:

Figure 2.8 – Outputting the final world data tables
When we decide how to output the data, we will also need to determine how we want to automate this process. In the next section, we will see how we automate the process with Server.
Automating with Server for data engineers
Deciding on your output source will also inform your automation decisions. Will the output be a local file, and what uses are there for the data source? If you upload to a database (which any business should be doing for company data), how frequently does that data need to be updated and examined?
Deciding on the freshness of the data is also linked to the source. For example, is the source a static file or a regularly updated Application Programming Interface (API) or File Transfer Protocol (FTP) output? Each of these questions helps inform how often you would need to run the workflow for automation.
Now we can publish the workflow to Server (we'll look at that more in Chapter 11, Securing and Managing Access) and set a schedule to automate the running of the workflow. The published workflow also acts as a source-controlled version of the processing steps. Your Connect catalog will reference the changes to maintain the data lineage.
Figure 2.9 shows the process for setting a schedule on a published workflow:

Figure 2.9 – Screen capture of the scheduling process
As you can see, there are three steps for creating the schedule:
- First, click on the Schedule button.
- Define the time and frequency of the schedule.
- Save the schedule to start it running.
Important Note
The ability to schedule workflows on Alteryx Server requires additional permissions. If you don't have access to the Schedule button, you will need to speak to your Alteryx Server manager, who will change your permissions and allow the scheduling capability.
Now that we know how to schedule a workflow, we can investigate how to make the dataset discoverable. In the next section, we will see how Alteryx Connect enables the discoverability of your dataset and provides the information required for users to understand how to use the dataset.
Connecting end users with Alteryx Connect
Now that we have the workflow created and the data updating process automated, the next and final step is to get the data source to our end users. The primary end user, the person or team who requested the dataset, can quickly be informed of the data source's existence via email or Slack. However, they will still be reliant on you for finding out what the fields are, whether there is any scaling information they need to know about, or whether they want to know what transformations took place. If we can populate this information into a data dictionary, we can make the data source discovery self-service.
The following screenshot shows an example of the information that the Connect Data Dictionary can hold:

Figure 2.10 – Screenshot of an example table in Connect
The preceding screenshot shows that the example Person table in the Person database contains the extracted columns, the column types, and column sizes. These fields are all automatically populated. Additional information, such as the Description and User Defined References fields, are also extracted when available in the database. If that information is not there, it can be populated once you create the entry in Connect.
You can add alternate names for easier searching and descriptions of the table and individual fields, and request access from the data source owner. It is also possible to start a new workflow on the data source using the action button.
We will further show how Connect can make data discoverable and easy to use in Chapter 12, Making Data Easy to Use and Discoverable with Alteryx.
Now that we know how to enable Alteryx for your data engineering practices, we can introduce a framework to produce the best data pipelines that deliver great data products.
Applying DataOps as an Alteryx data engineer
In this chapter, we have examined how Alteryx can achieve a data engineering pipeline. We have looked at different definitions and examples of data engineering and data pipelines. However, the whole time we have been skirting around some underlying principles that underpin the process of our data engineering pipeline.
The DataOps methodology provides the structures and systems for delivering a data pipeline. It allows you to improve the cycle time and quality when producing data sources and analytics. Using the DataOps methodology for developing a data pipeline in Alteryx formalizes the iterative processes that naturally happen during development. DataOps also adds reporting and monitoring structures to ensure high data quality.
Using DataOps with Alteryx fits well as developing a workflow or pipeline in Alteryx involves an iterative process, which links to the improving cycle time. Additionally, implementing the strategies for quality improvement and management from DataOps into your Alteryx pipeline ensures the reliability of your data and the confidence that end users have in it.
DataOps extends concepts from the DevOps practices into data analytics. One of the critical principles that DataOps implements is to make the testing and deployment of new datasets as automatic as possible and integrated as soon as possible. It should also follow Agile software development practices to reduce cycle times as much as possible.
For an Alteryx data engineer, there are four main areas where we leverage the DataOps principles (which I'll explain in Chapter 3, DataOps and Its Benefits):
- Data sourcing and processing
- Storage and value extraction
- Governance and monitoring
- Improving access
We can build a structure into our workflows by implementing the DataOps process when developing with Alteryx. This structure makes it easier to create data pipelines and produce reliable data sources for all our end users.
Summary
In this chapter, we focused on understanding how to use Alteryx for data engineering. In the examples, we looked at how a workflow can take data from the source to the end users. We also examined how we can make those datasets more usable for both the end user who requested the data and any other user who may require that data in the future.
We also introduced DataOps and explained how the framework makes the data pipeline process automated and faster while delivering higher quality data.
In the next chapter, we will look at DataOps in more depth. We will learn how to apply DevOps with Alteryx and detail the benefits that a DevOps practice will bring to your Alteryx data engineering.