
6
Setting Up Collision Objects
In the previous chapter, we covered some of the basic concepts of collision, namely Line Traces and Sweep Traces. We learned how to execute different types of Line Traces, how to create custom Trace Channels, and how to change how an object responds to a specific channel. Many of the things you learned in the previous chapter will be used in this chapter, where we’ll learn about object collision.
Throughout this chapter, we will continue to build upon our top-down Dodgeball game by adding game mechanics that revolve around object collision. We will create the Dodgeball actor, which will act as a dodgeball that bounces off of the floor and walls; the Wall actor, which will block all objects; the Ghost Wall actor, which will only block the player, not the enemies’ lines of sight or the dodgeball; and the Victory Box actor, which will end the game when the player enters the Victory Box, representing the end of the level.
We will cover the following topics in this chapter:
- Understanding object collision in UE5
- Understanding collision components
- Understanding collision events
- Understanding collision channels
- Creating physical materials
- Introducing timers
- Understanding how to spawn actors
Before we start creating our Dodgeball class, we will go over the basic concepts of object collision.
Technical requirements
The project for this chapter can be found in the Chapter06 folder of the code bundle for this book, which can be downloaded here: https://github.com/PacktPublishing/Elevating-Game-Experiences-with-Unreal-Engine-5-Second-Edition.
Understanding object collision in UE5
Every game development tool must have a physics engine that simulates collision between multiple objects, as explained in the previous chapter. Collision is the backbone of most games released nowadays, whether 2D or 3D. In many games, it’s the main way in which the player acts upon the environment, be it running, jumping, or shooting, and the environment acts accordingly by making the player land, get hit, and so on. It is no understatement to say that, without simulated collision, it wouldn’t be possible to make many games at all.
So, let’s understand how object collision works in UE5 and how we can use it, starting with collision components.
Understanding collision components
In UE5, two types of components can affect and be affected by collision; they are as follows:
- Meshes
- Shape objects
Meshes can be as simple as a cube, or as complex as a high-resolution character with tens of thousands of vertices. A mesh’s collision can be specified with a custom file imported alongside the mesh into UE5 (which is outside the scope of this book), or it can be calculated automatically by UE5 and customized by you.
It is generally a good practice to keep the collision mesh as simple (for example, a few triangles) as possible so that the physics engine can efficiently calculate collision at runtime. The types of meshes that can have collision are as follows:
- Static Meshes: Meshes that are defined as static and do not change.
- Skeletal Meshes: Meshes that can have a skeleton and change their poses, which allows them to be animated. Character meshes, for instance, are skeletal meshes.
- Procedural Meshes: Meshes that can be generated automatically according to certain parameters.
Shape objects, which are simple meshes represented in wireframe mode, are used to behave as collision objects by causing and receiving collision events.
Note
Wireframe mode is a commonly used visualization mode in game development, usually for debugging purposes, which allows you to see meshes without any faces or textures – they can only be seen through their edges, which are connected by their vertices. You will see what wireframe mode is when we add a Shape component to an actor.
Please note that Shape objects are essentially invisible meshes and that their three types are as follows:
- Box Collision (Box Component in C++)
- Sphere Collision (Sphere Component in C++)
- Capsule Collider (Capsule Component in C++)
Note
There’s a class that all the components that provide geometry and collision inherit from, which is the Primitive component. This component is the basis for all components that contain any sort of geometry, which is the case for mesh components and shape components.
So, how can these components collide, and what happens when they do? We shall have a look at this in the next section.
Understanding collision events
Let’s say that two objects are colliding with one another. Two things can happen:
- They overlap each other, as if the other object weren’t there, in which case the Overlap event is called.
- They collide and prevent each other from continuing their course, in which case the Block event is called.
In the previous chapter, we learned how to change an object’s response to a specific Trace channel. During this process, we learned that an object’s response can be either Block, Overlap, or Ignore.
Now, let’s see what happens in each of these responses during a collision:
- Block: Two objects will only block each other if both of them have their response to the other object set to Block:
- Both objects will have their OnHit events called. This event is called whenever two objects block each other’s path at the moment they collide. If one of the objects is simulating physics, that object must have its SimulationGeneratesHitEvents property set to true.
- Both objects will physically stop each other from continuing with their course.
The following diagram shows an example of when two objects are thrown and bounce off each other:
Figure 6.1 – Object A and object B blocking each other
- Overlap: Two objects will overlap each other if they don’t block each other and neither of them is ignoring the other:
- If both objects have the GenerateOverlapEvents property set to true, they will have their OnBeginOverlap and OnEndOverlap events called. These overlap events are called when an object starts and stops overlapping another object, respectively. If at least one of them doesn’t have this property set to true, neither of them will call these events.
- The objects act as if the other object doesn’t exist and will overlap each other.
As an example, suppose the player’s character walks into a trigger box that marks the end of the level, which only reacts to the player’s character.
The following diagram shows an example of two objects overlapping each other:

Figure 6.2 – Object A and object B overlapping each other
- Ignore: Two objects will ignore each other if at least one of them is ignoring the other:
- No events will be called on either object.
- Similar to the Overlap response, the objects will act as if the other object doesn’t exist and will overlap each other.
An example of two objects ignoring each other would be when an object other than the player’s character goes into a trigger box that marks the end of the level, which only reacts to the player’s character.
Note
You can look at the previous diagram, where two objects overlap each other, to understand Ignore.
The following table will help you understand the necessary responses that two objects must have to trigger the previously described situations:

Figure 6.3 – Resulting responses on objects based on Block, Overlap, and Ignore
Following this table, consider that you have two objects – object A and object B:
- If object A has set its response to object B to Block and object B has set its response to object A to Block, they will Block each other.
- If object A has set its response to object B to Block and object B has set its response to object A to Overlap, they will Overlap each other.
- If object A has set its response to object B to Ignore and object B has set its response to object A to Overlap, they will Ignore each other.
Note
You can find a full reference to UE5’s collision interactions at https://docs.unrealengine.com/en-US/Engine/Physics/Collision/Overview.
A collision between objects has two aspects to it:
- Physics: All collisions related to physics simulation, such as a ball being affected by gravity and bouncing off the floors and walls.
The physically simulated response of the collision within the game can be either of the following:
- Both objects continue their trajectories as if the other object wasn’t there (no physical collision).
- Both objects collide and change their trajectories, usually with at least one of them continuing its movement – that is, they are blocking each other’s paths.
- Query: A query can be divided into two aspects of collision, as follows:
- The events related to the collision of the objects that are called by the game and that you can use to create additional logic. These events are the same ones we mentioned previously:
- The OnHit event
- The OnBeginOverlap event
- The OnEndOverlap event
- The physical response to the collision within the game, which can be either of the following:
- Both objects continued their movement as if the other object wasn’t there (no physical collision)
- Both objects collide and block each other’s path
The physical response from the physics aspect may sound similar to the physical response from the query aspect; however, although they are both physical responses, they will cause objects to behave differently.
The physical response from the physics aspect (physics simulation) only applies when an object is simulating physics (for example, being affected by gravity, bouncing off the walls and ground, and so on). Such an object, when hitting a wall, for instance, will bounce back and continue moving in another direction.
On the other hand, the physical response from the query aspect applies to all objects that don’t simulate physics. An object can move without simulating physics when being controlled by code (for example, by using the SetActorLocation function or by using the Character Movement component). In this case, depending on which method you use to move the object and its properties, when an object hits a wall, it will simply stop moving instead of bouncing back. This is because you’re simply telling the object to move in a certain direction and something is blocking its path, so the physics engine doesn’t allow that object to continue moving.
Now that we’ve learned about collision events, let’s move on to the next section, where we will be looking at collision channels.
Understanding collision channels
In the previous chapter, a looked at the existing Trace Channels (Visibility and Camera) and learned how to make a custom channel. Now that you know about Trace Channels, it’s time to talk about Object Channels, also known as Object Types.
While Trace Channels are only used for Line Traces, Object Channels are used for object collision. You can specify a “purpose” for each Object channel, much like with Trace Channels, such as Pawn, Static Object, Physics Object, Projectile, and so on. Then, you can specify how you want each Object Type to respond to all the other Object Types by blocking, overlapping, or ignoring objects of that type.
Now that we’ve taken a look at how collision works, let’s go back to the collision settings of the cube we selected in the previous chapter, where we changed its response to the Visibility Channel.
Follow these steps to learn more about collision channels:
- The cube can be seen in the following screenshot:

Figure 6.4 – Cube blocking the SightSource of the enemy
- With the level open in the editor, select the cube and go to the Collision section of its Details panel:

Figure 6.5 – The changes in the level editor
Here, we can see some options that are important to us:
- Simulation Generates Hit Events, which allows the OnHit events to be called when an object is simulating physics (we’ll talk about this later in this chapter).
- Generate Overlap Events, which allows the OnBeginOverlap and OnEndOverlap events to be called.
- Can Character Step Up On, which allows a character to easily step onto this object.
- Collision Presets, which allows us to specify how this object responds to each Collision Channel.
- Let’s change the Collision Presets value from Default to Custom and take a look at the new options that show up:

Figure 6.6 – Changes in Collision Presets
The first of these options is the Collision Enabled property. It allows you to specify which aspects of collision you want this object to be considered for: Query, Physics, Both, or None. Again, physics collision is related to physics simulation (whether this object will be considered by other objects that simulate physics), while query collision is related to collision events and whether objects will block each other’s movement:

Figure 6.7 – Collision Enabled for Query and Physics
The second option is the Object Type property. This is very similar to the Trace Channel concept but is specifically for object collision and, most importantly, dictates what type of collision object this is. The Object Type values that come with UE5 are as follows:
- WorldStatic: An object that doesn’t move (structures, buildings, and so on)
- WorldDynamic: An object that may move (objects whose movement is triggered by code, objects the player can pick up and move, and so on)
- Pawn: Used for Pawns that can be controlled and moved around the level
- PhysicsBody: Used for objects that simulate physics
- Vehicle: Used for Vehicle objects
- Destructible: Used for destructible meshes
As mentioned previously, you can create custom object types (which will be mentioned later in this chapter) as well, similar to how you can create Trace Channels (which was covered in the previous chapter).
The last option we have is related to Collision Responses. Given that this Cube object has the default collision options, all the responses are set to Block, which means that this object will block all the Line Traces and all objects that block WorldStatic objects, given that that is this object’s type.
Because there are so many different combinations of collision properties, UE5 allows you to group collision property values in the form of Collision Presets.
Let’s go back to the Collision Presets property, which is currently set to Custom, and click it so that we can see all the possible options. Some of the existing Collision Presets are as follows:
- No Collision: Used for objects that aren’t affected by collision whatsoever:
- Collision Enabled: NoCollision
- Object Type: WorldStatic
- Responses: Irrelevant
- Example: Objects that are purely visual and distant, such as an object that the player will never reach
- Block All: Used for objects that are static and block all other objects:
- Collision Enabled: Query and Physics
- Object Type: WorldStatic
- Responses: Block all channels
- Example: Objects that are close to the player character and block their movement, such as the floor and walls, which will always be stationary
- Overlap All: Used for objects that are static and overlap all other objects:
- Collision Enabled: Query only
- Object Type: WorldStatic
- Responses: Overlap all channels
- Example: Trigger boxes placed in the level, which will always be stationary
- Block All Dynamic: Similar to the Block All preset, but for dynamic objects that may change their transform during gameplay (Object Type: WorldDynamic)
- Overlap All Dynamic: Similar to the Overlap All preset, but for dynamic objects that may change their transform during gameplay (Object Type: WorldDynamic)
- Pawn: Used for pawns and characters:
- Physics Actor: Used for objects that simulate physics:
- Collision Enabled: Query and Physics
- Object Type: PhysicsBody
- Responses: Block all channels
- Example: Objects that are affected by physics, such as a ball that bounces off the floor and walls
Just like the other collision properties, you can also create your own collision presets.
Note
You can find a full reference to UE5’s collision responses here: https://docs.unrealengine.com/en-US/Engine/Physics/Collision/Reference.
Now that we know about the basic concepts of collision, let’s go ahead and start creating the Dodgeball class. The next exercise will guide you toward doing just that.
Exercise 6.01 – creating the Dodgeball class
In this exercise, we’ll be creating our Dodgeball class, which will be thrown by our enemies and bounce off the floor and walls, just like an actual dodgeball.
Before we start creating the Dodgeball C++ class and its logic, we should set up all the necessary collision settings for it.
The following steps will help you complete this exercise:
- Open Project Settings and go to the Collision subsection within the Engine section. Currently, there are no Object Channels, so you need to create a new one.
- Press the New Object Channel button, name it Dodgeball, and set its Default Response to Block.
- Once you’ve done this, expand the Preset section. Here, you’ll find all the default presets available in UE5. If you select one of them and press the Edit option, you can change that Preset Collision settings.
- Create your own Preset by pressing the New button. We want our Dodgeball preset settings to be as follows:
- Name: Dodgeball
- Collision Enabled: Collision Enabled (Query and Physics) (we want this to be considered for physics simulation as well as collision events)
- Object Type: Dodgeball
- Collision Responses: Select Block for most of the options, but Ignore the Camera and EnemySight (we don’t want the dodgeball to block the camera or the enemy’s line of sight)
- Once you’ve selected the correct options, press Accept.
Now that the Dodgeball class’s collision settings have been set up, let’s create the Dodgeball C++ class.
- Inside the Content Browser area, right-click and select New C++ Class.
- Choose Actor as the parent class.
- Choose DodgeballProjectile as the name of the class (our project is already named Dodgeball, so we can’t name this new class that too).
- Open the DodgeballProjectile class files in Visual Studio. The first thing we’ll want to do is add the collision component of the dodgeball, so we’ll add a SphereComponent to our class header (actor component properties are usually private):
UPROPERTY(VisibleAnywhere, BlueprintReadOnly, Category =
Dodgeball, meta = (AllowPrivateAccess = "true"))
class USphereComponent* SphereComponent;
- Next, include the SphereComponent class at the top of our source file:
#include "Components/SphereComponent.h"
Note
Keep in mind that all header file includes must be before the .generated.h include.
Now, head to the DodgeballProjectile class’s constructor, within its source file, and perform the following steps:
- Create the SphereComponent object:
SphereComponent = CreateDefaultSubobject<USphereComponent>(TEXT("Sphere
Collision"));
- Set its radius to 35 units:
SphereComponent->SetSphereRadius(35.f);
- Set its Collision Preset to the Dodgeball preset we created:
SphereComponent->SetCollisionProfileName(FName("Dodgeball"));
- We want Dodgeball to simulate physics, so notify the component of this, as shown in the following code snippet:
SphereComponent->SetSimulatePhysics(true);
- We want Dodgeball to call the OnHit event while simulating physics, so call the SetNotifyRigidBodyCollision function to set that to true (this is the same as the SimulationGeneratesHitEvents property that we saw in the Collision section of an object’s properties):
//Simulation generates Hit events
SphereComponent->SetNotifyRigidBodyCollision(true);
We will also want to listen to the OnHit event of SphereComponent.
- Create a declaration for the function that will be called when the OnHit event is triggered, in the DodgeballProjectile class’s header file. This function should be called OnHit. It should be public, return nothing (void), have the UFUNCTION macro, and receive some parameters, in this order:
- UPrimitiveComponent* HitComp: The component that was hit and belongs to this actor. A primitive component is an actor component that has a Transform property and some sort of geometry (for example, a Mesh or Shape component).
- AActor* OtherActor: The other actor involved in the collision.
- UPrimitiveComponent* OtherComp: The component that was hit and belongs to the other actor.
- FVector NormalImpulse: The direction in which the object will be moving after it has been hit, and with how much force (by checking the size of the vector). This parameter will only be non-zero for objects that are simulating physics.
- FHitResult& Hit: The data of the hit resulting from the collision between this object and the other object. As we saw in the previous chapter, it contains properties such whether as the location of the hit is normal, which component and actor it hit, and so on. Most of the relevant information is already available to us through the other parameters, but if you need more detailed information, you can access this parameter:
UFUNCTION()
void OnHit(UPrimitiveComponent* HitComp, AActor* OtherActor,
UPrimitiveComponent* OtherComp, FVector
NormalImpulse, const
FHitResult& Hit);
Add the OnHit function’s implementation to the class’s source file and within that function, at least for now, destroy the dodgeball when it hits the player.
- Cast the OtherActor parameter to our DodgeballCharacter class and check if the value is not a nullptr. If it’s not, which means that the other actor we hit is a DodgeballCharacter, we’ll destroy this DodgeballProjectile actor:
void ADodgeballProjectile::OnHit(UPrimitiveComponent *
HitComp, AActor * OtherActor, UPrimitiveComponent *
OtherComp, FVector NormalImpulse, const FHitResult &
Hit)
{
if (Cast<ADodgeballCharacter>(OtherActor) !=
nullptr)
{
Destroy();
}
}
Given that we’re referencing the DodgebalCharacter class, we’ll need to include it at the top of this class’s source file:
#include "DodgeballCharacter.h"
Note
In the next chapter, we’ll change this function so that we have the dodgeball damage the player before destroying itself. We’ll do this when we talk about Actor components.
- Head back to the DodgeballProjectile class’s constructor and add the following line at the end to listen to the OnHit event of SphereComponent:
// Listen to the OnComponentHit event by binding it to
// our function
SphereComponent->OnComponentHit.AddDynamic(this,
&ADodgeballProjectile::OnHit);
This will bind the OnHit function we created to this SphereComponent OnHit event (because this is an actor component, this event is called OnComponentHit), which means our function will be called alongside that event.
- Lastly, make SphereComponent this actor’s RootComponent, as shown in the following code snippet:
// Set this Sphere Component as the root component,
// otherwise collision won't behave properly
RootComponent = SphereComponent;
Note
For a moving actor to behave correctly on collision, whether it’s simulating physics or not, it is usually necessary for the main collision component of the actor to be its RootComponent.
For example, the RootComponent component of the Character class is a Capsule Collider component, because that actor will be moving around and that component is the main way the character collides with the environment.
Now that we’ve added the DodgeballProjectile C++ class’s logic, let’s go ahead and create our Blueprint class.
- Compile your changes and open the editor.
- Go to Content | ThirdPersonCPP | Blueprints in the Content Browser area, right-click, and create a new Blueprint class.
- Expand the All Classes section and search for the DodgeballProjectile class. Then, set it as the parent class.
- Name the new Blueprint class BP_DodgeballProjectile.
- Open this new Blueprint class.
- Notice the wireframe representation of the SphereCollision component in the actor’s Viewport window (this is hidden by default during the game, but you can change that property in this component’s Rendering section by changing its HiddenInGame property):
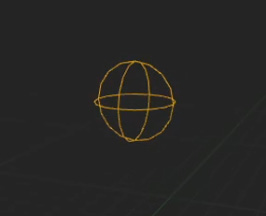
Figure 6.8 – Visual wireframe representation of the SphereCollision component

Figure 6.9 – Adding a Sphere mesh
- Change its scale to 0.65, as shown in the following screenshot:

Figure 6.10 – Updating the scale
- Set its Collision Presets to NoCollision:
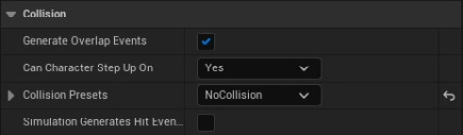
Figure 6.11 – Updating Collision Presets to NoCollision
- Finally, open our level and place an instance of the BP_DodgeballProjectile class near the player (this one was placed at a height of 600 units):

Figure 6.12 – Dodgeball bouncing on the ground
After you’ve done this, play the level. You’ll notice that the dodgeball will be affected by gravity and bounce off the ground a couple of times before coming to a standstill.
By completing this exercise, you’ve created an object that behaves like a physics object.
You now know how to create collision object types, use the OnHit event, and change an object’s collision properties.
Note
In the previous chapter, we briefly mentioned LineTraceSingleByObjectType. Now that we know how object collision works, we can briefly mention its use: when executing a Line Trace that checks for a Trace Channel, you should use the LineTraceSingleByChannel function; when executing a Line Trace that checks for an Object Channel (Object Type), you should use the LineTraceSingleByObjectType function. It should be made clear that this function, unlike the LineTraceSingleByChannel function, will not check for objects that block a specific Object Type, but those that are of a specific Object Type. Both those functions have the same parameters and both the Trace Channels and Object Channels are available through the ECollisionChannel enum.
But what if you wanted the ball to bounce off the floor more times? What if you wanted to make it bouncier? Well, that’s where Physical Materials come in.
Creating Physical Materials
In UE5, you can customize how an object behaves while simulating physics using Physical Materials. To get into this new type of asset, let’s create our own:
- Create a new folder inside the Content folder called Physics.
- Right-click on the Content Browser area while inside that folder and, under the Create Advanced Asset section, go to the Physics subsection and select Physical Material.
- Name this new Physical Material PM_Dodgeball.
- Open the asset and take a look at the available options:

Figure 6.13 – Asset options
The main options we should note are as follows:
- Friction: This property goes from 0 to 1 and specifies how much friction will affect this object (0 means this object will slide as if it was on ice, while 1 means this object will stick like a piece of gum).
- Restitution (also known as Bounciness): This property goes from 0 to 1 and specifies how much velocity will be kept after colliding with another object (0 means this object will never bounce off of the ground, while 1 means this object will bounce for a long time).
- Density: This property specifies how dense this object is (that is, how heavy it is relative to its mesh). Two objects can be of the same size, but if one is twice as dense as the other, that means it will be twice as heavy.
To have our DodgeballProjectile object behave closer to an actual dodgeball, it’ll have to suffer quite a bit of friction (the default value is 0.7, which is high enough) and be quite bouncy. Let’s increase the Restitution property of this Physical Material to 0.95.
After you’ve done this, open the BP_DodgeballProjectile Blueprint class and change the Sphere Collision component’s Physical Material, inside its Collision section, to the one we just created, PM_Dodgeball:

Figure 6.14 – Updating the BP_DodgeballProjectile Blueprint class
Note
Make sure the instance of the Dodgeball actor you added to your level also has this physical material.
If you play the level that we created in Exercise 6.01 – creating the Dodgeball class, again, you’ll notice that our BP_DodgeballProjectile will now bounce off the ground several times before coming to a standstill, behaving much more like an actual dodgeball.
With all that done, we’re just missing one thing to make our Dodgeball actor behave like an actual dodgeball. Right now, there is no way for us to be able to throw it. So, let’s address that by creating a Projectile Movement Component, which is what we’ll be doing in the next exercise.
In the previous chapters, when we replicated the Third Person template project, we learned that the Character class that comes with UE5 has a CharacterMovementComponent. This actor component is what allows an actor to move around in the level in various ways, and has many properties that allow you to customize that to your preference. However, there is another movement component that is also frequently used: ProjectileMovementComponent.
The ProjectileMovementComponent actor component is used to attribute the behavior of a projectile to an actor. It allows you to set an initial speed, gravity force, and even some physics simulation parameters such as Bounciness and Friction. However, given that our Dodgeball Projectile is already simulating physics, the only property that we’ll be using is InitialSpeed.
Exercise 6.02 – adding a ProjectileMovementComponent to DodgeballProjectile
In this exercise, we will be adding a ProjectileMovementComponent to our DodgeballProjectile so that it has an initial horizontal speed. We’re doing this so that it can be thrown by our enemies and doesn’t just fall vertically.
The following steps will help you complete this exercise:
- Add a ProjectileMovementComponent property to the DodgeballProjectile class’s header file:
UPROPERTY(VisibleAnywhere, BlueprintReadOnly, Category =
Dodgeball, meta = (AllowPrivateAccess = "true"))
class UProjectileMovementComponent* ProjectileMovement;
- Include the ProjectileMovementComponent class at the top of the class’s source file:
#include "GameFramework/ProjectileMovementComponent.h"
- At the end of the class’s constructor, create the ProjectileMovementComponent object:
ProjectileMovement = CreateDefaultSubobject<UProjectileMovementComponent>(TEXT("Pro
jectile Movement"));
- Then, set its InitialSpeed to 1500 units:
ProjectileMovement->InitialSpeed = 1500.f;
Once you’ve done this, compile your project and open the editor. To demonstrate the dodgeball’s initial speed, lower its position on the Z-axis and place it behind the player (this one was placed at a height of 200 units):

Figure 6.15 – Dodgeball moving along the X-axis
When you play the level, you’ll notice that the dodgeball starts moving toward its X-axis (red arrow)
And with that, we can conclude our exercise. Our DodgeballProjectile now behaves like an actual dodgeball. It falls, bounces, and gets thrown.
The next step in our project is going to be adding logic to our EnemyCharacter so that it throws these dodgeballs at the player. However, before we address that, we must address the concept of timers.
Introducing timers
Given the nature of video games and the fact that they’re strongly event-based, every game development tool must have a way for you to cause a delay, or a wait time, before something happens. For instance, when you’re playing an online deathmatch game, where your character can die and then respawn, usually, the respawn event doesn’t happen the instant your character dies but a few seconds later. There is a multitude of scenarios where you want something to happen, but only after a certain amount of time. This will be the case for our EnemyCharacter, which will be throwing dodgeballs every few seconds. This delay, or wait time, can be achieved through timers.
A timer allows you to call a function after a certain amount of time. You can choose to loop that function call with an interval and also set a delay before the loop starts. If you want the timer to stop, you can also do that.
We will be using timers so that our enemy throws a dodgeball every X amount of time, indefinitely, so long as it can see the player character, and then stop that timer when the enemy can no longer see its target.
Before we start adding logic to our EnemyCharacter class that will make it throw dodgeballs at the player, we should take a look at another topic, which is how to spawn actors.
Understanding how to spawn actors
In Chapter 1, Introduction to Unreal Engine, you learned how to place an actor that you created in the level through the editor, but what if you wanted to place that actor in the level as the game is being played? That’s what we’re going to be taking a look at now.
UE5, much like most other game development tools, allows you to place an actor in the game while the game itself is running. This process is called spawning. To spawn an actor in UE5, we need to call the SpawnActor function, available from the World object (which we can access using the GetWorld function, as mentioned previously). However, the SpawnActor function has a few parameters that need to be passed, as follows:
- A UClass* property, which lets the function know the class of the object that will be spawned. This property can be a C++ class, available through the NameOfC++Class::StaticClass() function, or a Blueprint class, available through the TSubclassOf property. It is generally a good practice not to spawn actors from a C++ class directly, but to create a Blueprint class and spawn an instance of that instead.
- The TSubclassOf property is a way for you to reference a Blueprint class in C++. It’s used for referencing a class in C++ code, which might be a Blueprint class. You must declare a TSubclassOf property with a template parameter, which is the C++ class that the class must inherit from. We will be taking a look at how to use this property in practice in the next exercise.
- Either an FTransform property or the FVector and FRotator properties, which will indicate the location, rotation, and scale of the object we want to spawn.
- An optional FActorSpawnParameters property, which allows you to specify more properties specific to the spawning process, such as who caused the actor to spawn (that is, Instigator), how to handle the object spawning if the location that it spawns at is being occupied by other objects, which may cause an overlap or a block event, and so on.
The SpawnActor function will return an instance to the actor that was spawned from this function. Given that it is also a template function, you can call it in such a way that you receive a reference to the type of actor you spawned directly using a template parameter:
GetWorld()->SpawnActor<NameOfC++Class>(ClassReference,
SpawnLocation, SpawnRotation);
In this case, the SpawnActor function is being called, where we’re spawning an instance of the NameOfC++Class class. Here, we have provided a reference to the class with the ClassReference property and the location and rotation of the actor to be spawned using the SpawnLocation and SpawnRotation properties, respectively.
You will learn how to apply these properties in Exercise 6.03 – adding projectile-throwing logic to the EnemyCharacter class.
Before we continue with the exercise, though, I’d like to briefly mention a variation of the SpawnActor function that may also come in handy: the SpawnActorDeferred function. While the SpawnActor function will create an instance of the object you specify and then place it in the world, this new SpawnActorDeferred function will create an instance of the object you want, and only place it in the world when you call the actor’s FinishSpawning function.
For instance, let’s say we want to change the InitialSpeed of our dodgeball at the moment we spawn it. If we use the SpawnActor function, there’s a chance that the dodgeball will start moving before we set its InitialSpeed property. However, by using the SpawnActorDeferred function, we can create an instance of the dodgeball, then set its InitialSpeed to whatever we want, and only then place it in the world by calling the newly created dodgeball’s FinishSpawning function, whose instance is returned to us by the SpawnActorDeferred function.
Now that we know how to spawn an actor in the world, and also about the concept of timers, we can add the logic that’s responsible for throwing dodgeballs to our EnemyCharacter class, which is what we’ll be doing in the next exercise.
Exercise 6.03 – adding projectile-throwing logic to the EnemyCharacter class
In this exercise, we will be adding the logic that’s responsible for throwing the Dodgeball actor that we just created to our EnemyCharacter class.
Open the class’s files in Visual Studio to get started. We will begin by modifying our LookAtActor function so that we can save the value that tells us whether we can see the player and use it to manage our timer.
Follow these steps to complete this exercise:
- In the EnemyCharacter class’s header file, change the LookAtActor function’s return type from void to bool:
// Change the rotation of the character to face the
// given actor
// Returns whether the given actor can be seen
bool LookAtActor(AActor* TargetActor);
- Do the same in the function’s implementation, inside the class’s source file, while also returning true at the end of the if statement where we call the CanSeeActor function. Also, return false in the first if statement, where we check if TargetActor is a nullptr, and also at the end of the function:
bool AEnemyCharacter::LookAtActor(AActor * TargetActor)
{
if (TargetActor == nullptr) return false;
if (CanSeeActor(TargetActor))
{
FVector Start = GetActorLocation();
FVector End = TargetActor->GetActorLocation();
// Calculate the necessary rotation for the Start
// point to face the End point
FRotator LookAtRotation =
UKismetMathLibrary::FindLookAtRotation(
Start, End);
//Set the enemy's rotation to that rotation
SetActorRotation(LookAtRotation);
return true;
}
return false;
}
- Next, add two bool properties, bCanSeePlayer and bPreviousCanSeePlayer, set to protected in your class’s header file, which will represent whether the player can be seen in this frame from the enemy character’s perspective and whether the player could be seen in the last frame, respectively:
//Whether the enemy can see the player this frame
bool bCanSeePlayer = false;
//Whether the enemy could see the player last frame
bool bPreviousCanSeePlayer = false;
- Then, go to your class’s Tick function implementation and set the value of bCanSeePlayer to the return value of the LookAtActor function. This will replace the previous call to the LookAtActor function:
// Look at the player character every frame
bCanSeePlayer = LookAtActor(PlayerCharacter);
- After that, set the value of bPreviousCanSeePlayer to the value of bCanSeePlayer:
bPreviousCanSeePlayer = bCanSeePlayer;
- In-between the previous two lines, add an if statement that checks whether the values of bCanSeePlayer and bPreviousCanSeePlayer are different. This will mean that either we couldn’t see the player in the last frame and now we can, or that we could see the player in the last frame and now we can’t:
bCanSeePlayer = LookAtActor(PlayerCharacter);
if (bCanSeePlayer != bPreviousCanSeePlayer)
{
}
bPreviousCanSeePlayer = bCanSeePlayer;
- Inside this if statement, we want to start a timer if we can see the player and stop that timer if we can no longer see the player:
if (bCanSeePlayer != bPreviousCanSeePlayer)
{
if (bCanSeePlayer)
{
//Start throwing dodgeballs
}
else
{
//Stop throwing dodgeballs
}
}
- To start a timer, we’ll need to add the following properties to our class’s header file, which can all be protected:
- An FTimerHandle property, which is responsible for identifying which timer we want to start. It works as the identifier of a specific timer:
FTimerHandle ThrowTimerHandle;
- A float property, which represents the amount of time to wait between throwing dodgeballs (the interval) so that we can loop the timer. We give this a default value of 2 seconds:
float ThrowingInterval = 2.f;
- Another float property, which represents the initial delay before the timer starts looping. Let’s give it a default value of 0.5 seconds:
float ThrowingDelay = 0.5f;
- A function to be called every time the timer ends, which we will create and call ThrowDodgeball. This function doesn’t return anything and doesn’t receive any parameters:
void ThrowDodgeball();
- An FTimerHandle property, which is responsible for identifying which timer we want to start. It works as the identifier of a specific timer:
Before we can call the appropriate function to start the timer, we will need to add an #include to the object responsible for that, FTimerManager, in our source file.
Each World has one Timer Manager, which can start and stop timers and access relevant functions related to them, such as whether they’re still active, how long they will be running for, and so on:
#include "TimerManager.h"
- Now, access the current World Timer Manager by using the GetWorldTimerManager function:
GetWorldTimerManager()
- Next, call the SetTimer function of the Timer Manager, if you can see the player character, to start the timer responsible for throwing dodgeballs. The SetTimer function receives the following parameters:
- An FTimerHandle that represents the desired timer: ThrowTimerHandle.
- The object that the function to be called belongs to: this.
- The function to be called, which must be specified by prefixing its name with &ClassName::, resulting in &AEnemyCharacter::ThrowDodgeball.
- The timer’s rate, or interval: ThrowingInterval.
- Whether this timer will loop: true.
- The delay before this timer starts looping: ThrowingDelay.
The following code snippet comprises these parameters:
if (bCanSeePlayer)
{
//Start throwing dodgeballs
GetWorldTimerManager().SetTimer(ThrowTimerHandle,
this,
&AEnemyCharacter::ThrowDodgeball,ThrowingInterval,
true,
ThrowingDelay);
}
- If we can no longer see the player and we want to stop the timer, we can do so using the ClearTimer function. This function only needs to receive an FTimerHandle property as a parameter:
else
{
//Stop throwing dodgeballs
GetWorldTimerManager().ClearTimer(ThrowTimerHandle);
}
The only thing left is to implement the ThrowDodgeball function. This function will be responsible for spawning a new DodgeballProjectile actor. To do this, we’ll need a reference to the class we want to spawn, which must inherit from DodgeballProjectile. So, the next thing we need to do is create the appropriate property using the TSubclassOf object.
- Create the TSubclassOf property in the EnemyCharacter header file, which can be public:
//The class used to spawn a dodgeball object
UPROPERTY(EditDefaultsOnly, BlueprintReadOnly, Category =
Dodgeball)
TSubclassOf<class ADodgeballProjectile> DodgeballClass;
- Because we’ll be using the DodgeballProjectile class, we also need to include it in the EnemyCharacter source file:
#include "DodgeballProjectile.h"
- Then, within the ThrowDodgeball function’s implementation in the source file, start by checking if this property is a nullptr. If it is, we return immediately:
void AEnemyCharacter::ThrowDodgeball()
{
if (DodgeballClass == nullptr)
{
return;
}
}
- Next, we will be spawning a new actor from that class. Its location will be 40 units in front of the enemy and its rotation will be the same as the enemy. To spawn the dodgeball in front of the enemy character, we’ll need to access the enemy’s ForwardVector property, which is a unitary FVector (meaning that its length is 1) that indicates the direction an actor is facing, and multiply it by the distance at which we want to spawn our dodgeball, which is 40 units:
FVector ForwardVector = GetActorForwardVector();
float SpawnDistance = 40.f;
FVector SpawnLocation = GetActorLocation() + (ForwardVector *
SpawnDistance);
//Spawn new dodgeball
GetWorld()->SpawnActor<ADodgeballProjectile>(DodgeballClass,
SpawnLocation, GetActorRotation());
This concludes the modifications we need to make to the EnemyCharacter class. Before we finish setting up the Blueprint of this logic, let’s make a quick modification to our DodgeballProjectile class.
- Open the DodgeballProjectile class’s source file in Visual Studio.
- Within its BeginPlay event, set its LifeSpan to 5 seconds. This property, which belongs to all actors, dictates how much longer they will remain in the game before being destroyed. By setting our dodgeball’s LifeSpan to 5 seconds on its BeginPlay event, we are telling UE5 to destroy that object 5 seconds after it’s spawned (or if it’s already been placed in the level, 5 seconds after the game starts). We will do this so that the floor isn’t filled with dodgeballs after a certain amount of time, which would make the game unintentionally difficult for the player:
void ADodgeballProjectile::BeginPlay()
{
Super::BeginPlay();
SetLifeSpan(5.f);
}
Now that we’ve finished our C++ logic related to the EnemyCharacter class’s dodgeball-throwing logic, let’s compile our changes, open the editor, and then open our BP_EnemyCharacter Blueprint. There, head to the Class Defaults panel and change the Dodgeball Class property’s value to BP_DodgeballProjectile:

Figure 6.16 – Updating Dodgeball Class
After you’ve done this, you can remove the existing instance of the BP_DodgeballProjectile class we placed in our level if it’s still there.
Now, we can play our level. You’ll notice that the enemy will almost immediately start throwing dodgeballs at the player and will continue to do so, so long as the player character is in view:

Figure 6.17 – Enemy character throwing dodgeballs if the player is in sight
With that, we have concluded our dodgeball-throwing logic for EnemyCharacter. You now know how to use timers, an essential tool for any game programmer.
Now, let’s jump into the next section, where we’ll be creating walls that handle collision differently.
Creating the Wall classes
The next step in our project is going to be creating the Wall classes. We will have two types of walls:
- A normal wall, which will block the enemy’s line of sight, the player character, and the dodgeball.
- A ghost wall, which will only block the player character, and ignore the enemy’s line of sight and the dodgeball. You may find this type of collision setup in specific types of puzzle games.
We’ll create both these Wall classes in the next exercise.
Exercise 6.04 – creating Wall classes
In this exercise, we will be creating the Wall classes that represent both a normal Wall and a GhostWall, which will only block the player character’s movement, but not the enemies’ lines of sight or the dodgeballs they throw.
Let’s start with the normal Wall class. This C++ class will be empty because the only thing that it’ll need is a mesh to reflect the projectiles and block the enemies’ lines of sight, which will be added through its Blueprint class.
The following steps will help you complete this exercise:
- Open the editor.
- In the top-left corner of the Content Browser area, press the green Add New button.
- Select the first option at the top; that is, Add Feature or Content Pack.
- A new window will appear. Select the Content Packs tab, select the Starter Content pack, and then press the Add To Project button. This will add some basic assets to the project, which we’ll use in this chapter and some of the following chapters.
- Create a new C++ class, called Wall, with the Actor class as its parent.
- Next, open the class’s files in Visual Studio and add a SceneComponent as our Wall’s RootComponent:
- The Header file will be as follows:
private:
UPROPERTY(VisibleAnywhere, BlueprintReadOnly, Category = Wall,
meta = (AllowPrivateAccess = "true"))
class USceneComponent* RootScene;
- The Source file will be as follows:
AWall::AWall()
{
// Set this actor to call Tick() every frame. You
// can turn this off to improve performance if you
// don't need it.
PrimaryActorTick.bCanEverTick = true;
RootScene = CreateDefaultSubobject<USceneComponent>(
TEXT("Root"));
RootComponent = RootScene;
}
- The Header file will be as follows:
- Compile your code and open the editor.
Next, go to Content | ThirdPersonCPP | Blueprints inside the Content Browser area, create a new Blueprint class that inherits from the Wall class, name it BP_Wall, and open that asse:.
- Add a Static Mesh component and set its StaticMesh property to Wall_400x400.
- Set its Material property to M_Metal_Steel.
- Set the Static Mesh component’s location on the X-axis to –200 units (so that the mesh is centered relative to our actor’s origin):

Figure 6.18 – Updating the Static Mesh component’s location
This is what your Blueprint class’s Viewport should look like:

Figure 6.19 – The Blueprint class’s Viewport Wall
Note
It is generally good practice to add a SceneComponent as an object’s RootComponent, when a collision component isn’t necessary, to allow for more flexibility with its child components.
An actor’s RootComponent cannot have its location or rotation modified, which is why, in our case, if we had created a Static Mesh component in the Wall C++ class and set that as its root component, instead of using a scene component, we’d have a hard time offsetting it.
Now that we’ve set up the regular Wall class, let’s create our GhostWall class. Because these classes don’t have any logic set up, we’re just going to create the GhostWall class as a child of the BP_Wall Blueprint class and not our C++ class:
- Right-click the BP_Wall asset and select Create Child Blueprint Class.
- Name the new Blueprint BP_GhostWall.
- Open it.
- Change the Static Mesh component’s collision properties:
- Set its CollisionPreset to Custom.
- Change its response to both the EnemySight and Dodgeball channels to Overlap.
- Change the Static Mesh component’s Material property to M_Metal_Copper.
The BP_GhostWall Viewport should now look like this:

Figure 6.20 – Creating the GhostWall class
Now that you’ve created both these Wall actors, place each in the level to test them. Set their transforms to the following transform values:
- Wall: Location: (710, -1710, 0)
- Ghost Wall: Location: (720, 1720, 0); Rotation: (0, 0, 90):

Figure 6.21 – Updating the GhostWall class’s locations and rotation
The outcome should look like this:

Figure 6.22 – Outcome of the GhostWall and Wall classes
You’ll notice that when you hide your character behind the normal Wall (the one on the right), the enemy won’t throw dodgeballs at the player; however, when you try to hide your character behind GhostWall (the one on the left), even though the enemy can’t go through it, the enemy will throw dodgeballs at the character and they will pass through the wall as if it wasn’t there!
And that concludes our exercise. We have made our Wall actors, which will either behave normally or ignore the enemies’ lines of sight and dodgeballs!
Creating the VictoryBox actor
The next step in our project is going to be creating the VictoryBox actor. This actor will be responsible for ending the game when the player character enters it, given that the player has beaten the level. To do this, we’ll be using the Overlap event. The following exercise will help us understand VictoryBox.
Exercise 6.05 – creating the VictoryBox class
In this exercise, we will be creating the VictoryBox class, which, when entered by the player character, will end the game.
The following steps will help you complete this exercise:
- Create a new C++ class that inherits from the actor and call it VictoryBox.
- Open that class’s files in Visual Studio.
- Create a new SceneComponent property, which will be used as a RootComponent, just like we did with our Wall C++ class:
- Header file:
private:
UPROPERTY(VisibleAnywhere, BlueprintReadOnly, Category =
VictoryBox, meta = (AllowPrivateAccess = "true"))
class USceneComponent* RootScene;
- Source file:
AVictoryBox::AVictoryBox()
{
// Set this actor to call Tick() every frame. You
// can turn this off to improve performance if you
// don't need it.
PrimaryActorTick.bCanEverTick = true;
RootScene =
CreateDefaultSubobject<USceneComponent>(TEXT("Root"));
RootComponent = RootScene;
}
- Header file:
- Declare a BoxComponent in the header file that will check for overlap events with the player character, which should also be private:
UPROPERTY(VisibleAnywhere, BlueprintReadOnly, Category =
VictoryBox, meta = (AllowPrivateAccess = "true"))
class UBoxComponent* CollisionBox;
- Include the BoxComponent file in the class’s source file:
#include "Components/BoxComponent.h"
- After creating the RootScene component, create BoxComponent, which should also be private:
RootScene = CreateDefaultSubobject<USceneComponent>(TEXT("Root"));
RootComponent = RootScene;
CollisionBox =
CreateDefaultSubobject<UBoxComponent>(
TEXT("Collision Box"));
- Attach it to RootComponent using the SetupAttachment function:
CollisionBox->SetupAttachment(RootComponent);
- Set its BoxExtent property to 60 units on all axes. This will cause BoxComponent to be double that size – that is, (120 x 120 x 120):
CollisionBox->SetBoxExtent(FVector(60.0f, 60.0f, 60.0f));
- Offset its relative position on the Z-axis by 120 units using the SetRelativeLocation function:
CollisionBox->SetRelativeLocation(FVector(0.0f, 0.0f,
120.0f));
- Now, you will require a function that will listen to the BoxComponent’s OnBeginOverlap event. This event will be called whenever an object enters BoxComponent. This function must be preceded by the UFUNCTION macro, be public, return nothing, and have the following parameters:
UFUNCTION()
void OnBeginOverlap(UPrimitiveComponent* OverlappedComp,
AActor* OtherActor, UPrimitiveComponent* OtherComp,
int32
OtherBodyIndex, bool bFromSweep, const FHitResult&
SweepResult);
These parameters are as follows:
- UPrimitiveComponent* OverlappedComp: The component that was overlapped and belongs to this actor.
- AActor* OtherActor: The other actor involved in the overlap.
- UPrimitiveComponent* OtherComp: The component that was overlapped and belongs to the other actor.
- int32 OtherBodyIndex: The index of the item in the primitive that was hit (usually useful for Instanced Static Mesh components).
- bool bFromSweep: Whether the overlap originated from a Sweep Trace.
- FHitResult& SweepResult: The data of the Sweep Trace resulting from the collision between this object and the other object.
Note
Although we won’t be using the OnEndOverlap event in this project, you will most likely need to use it sooner or later, so here’s the required function signature for that event, which looks very similar to the one we just learned about:
UFUNCTION()
void OnEndOverlap(UPrimitiveComponent* OverlappedComp, AActor* OtherActor, UPrimitiveComponent* OtherComp, int32 OtherBodyIndex);
- Next, we need to bind this function to the BoxComponent’s OnComponentBeginOverlap event:
CollisionBox->OnComponentBeginOverlap.AddDynamic(this,
&AVictoryBox::OnBeginOverlap);
- Within our OnBeginOverlap function implementation, we’re going to check whether the actor we overlapped is a DodgeballCharacter. Because we’ll be referencing this class, we also need to include it:
#include "DodgeballCharacter.h"
void AVictoryBox::OnBeginOverlap(UPrimitiveComponent *
OverlappedComp, AActor * OtherActor,
UPrimitiveComponent *
OtherComp, int32 OtherBodyIndex, bool bFromSweep,
const
FHitResult & SweepResult)
{
if (Cast<ADodgeballCharacter>(OtherActor))
{
}
}
If the actor we overlapped is a DodgeballCharacter, we want to quit the game.
- We will use KismetSystemLibrary for this purpose. The KismetSystemLibrary class contains useful functions for general use in your project:
#include "Kismet/KismetSystemLibrary.h"
- To quit the game, we will call the QuitGame function of KismetSystemLibrary. This function receives the following:
UKismetSystemLibrary::QuitGame(GetWorld(),
nullptr,
EQuitPreference::Quit,
true);
The important parameters from the preceding code snippet are as follows:
- A World object, which we can access with the GetWorld function.
- A PlayerController object, which we will set to nullptr. We’re doing this because this function will automatically find one this way.
- An EQuitPreference object, which means how we want to end the game, by either quitting or just putting it as a background process. We will want to quit the game, and not just put it as a background process.
- A bool, which indicates whether we want to ignore the platform’s restrictions when it comes to quitting the game, which we will set to true.
Next, we’re going to create our Blueprint class.
- Compile your changes, open the editor, go to Content | ThirdPersonCPP | Blueprint inside the Content Browser area, create a new Blueprint class that inherits from VictoryBox, and name it BP_VictoryBox. Open that asset and make the following modifications:
- Add a new Static Mesh component
- Set its StaticMesh property to Floor_400x400
- Set its Material property to M_Metal_Gold
- Set its scale to 0.75 units on all three axes
- Set its location to (-150, -150, 20), on the X, Y, and Z axes, respectively.
Once you’ve made those changes, your Blueprint’s Viewport tab should look something like this:

Figure 6.23 – VictoryBox placed in the Blueprint’s Viewport tab
Place that Blueprint inside your level to test its functionality:

Figure 6.24 – VictoryBox Blueprint in the level for testing
If you play the level and step onto the golden plate (and overlap the collision box), you’ll notice that the game abruptly ends, as intended.
And with that, we conclude our VictoryBox class! You now know how to use the overlap events in your projects. There’s a multitude of game mechanics that you can create using these events, so congratulations on completing this exercise.
We are now very close to reaching the end of this chapter, where we’ll be completing a new activity, but first, we’ll need to make some modifications to our DodgeballProjectile class, namely adding a getter function to its ProjectileMovementComponent. We’ll do this in the next exercise.
A getter function is a function that only returns a specific property and does nothing else. These functions are usually marked as inline, which means that when the code compiles, a call to that function will simply be replaced with its content. They are also usually marked as const, given that they don’t modify any of the class’s properties.
Exercise 6.06 – adding the ProjectileMovementComponent getter function to DodgeballProjectile
In this exercise, we will be adding a getter function to the DodgeballProjectile class’s ProjectileMovement property so that other classes can access it and modify its properties. We will be doing the same in this chapter’s activity.
To do this, you’ll need to follow these steps:
- Open the DodgeballProjectile class’s header file in Visual Studio.
- Add a new public function called GetProjectileMovementComponent. This function will be an inline function, which in UE5’s version of C++ is replaced with the FORCEINLINE macro. The function should also return a UProjectileMovementComponent* and be a const function:
FORCEINLINE class UProjectileMovementComponent*
GetProjectileMovementComponent() const
{
return ProjectileMovement;
}
Note
When using the FORCEINLINE macro for a specific function, you can’t add the declaration of that function to the header file and its implementation to the source file. Both must be done simultaneously in the header file, as shown previously.
With that, we have concluded this quick exercise. Here, we have added a simple getter function to our DodgeballProjectile class, which we will be using in this chapter’s activity, where we’ll replace the SpawnActor function within the EnemyCharacter class with the SpawnActorDeferred function. This will allow us to safely edit our DodgeballProjectile class’s properties before we spawn an instance of it.
Activity 6.01 – replacing the SpawnActor function with SpawnActorDeferred in EnemyCharacter
In this activity, you will be changing the EnemyCharacter’s ThrowDodgeball function to use the SpawnActorDeferred function instead of the SpawnActor function so that we can change the DodgeballProjectile’s InitialSpeed before spawning it.
The following steps will help you complete this activity:
- Open the EnemyCharacter class’s source file in Visual Studio.
- Go to the ThrowDodgeball function’s implementation.
- Because the SpawnActorDeferred function can’t just receive a spawn location and rotation properties and must receive an FTransform property instead, we’ll need to create one of those before we call that function. Let’s call it SpawnTransform and send the spawn rotation and location, in that order, as inputs for its constructor, which will be this enemy’s rotation and the SpawnLocation property, respectively.
- Then, update the SpawnActor function call in the SpawnActorDeferred function call. Instead of sending the spawn location and spawn rotation as its second and third parameters, replace those with the SpawnTransform properties we just created, as the second parameter.
- Make sure you save the return value of this function call inside an ADodgeballProjectile* property called Projectile.
Once you’ve done this, you will have successfully created a new DodgeballProjectile object. However, we still need to change its InitialSpeed property and spawn it.
- Once you’ve called the SpawnActorDeferred function, call the Projectile property’s GetProjectileMovementComponent function, which returns its ProjectileMovementComponent, and change its InitialSpeed property to 2200 units.
- Because we’ll be accessing properties that belong to ProjectileMovementComponent inside the EnemyCharacter class, we’ll need to include that component, just like we did in Exercise 6.02 – adding a ProjectileMovementComponent to DodgeballProjectile.
- Once you’ve changed the value of the InitialSpeed property, the only thing left to do is call the Projectile property’s FinishSpawning function, which will receive the SpawnTransform property we created as a parameter.
- Once you’ve done this, compile your changes and open the editor.
Expected output:

Figure 6.25 – Dodgeball thrown at the player
Note
The solution for this activity can be found on https://github.com/PacktPublishing/Elevating-Game-Experiences-with-Unreal-Engine-5-Second-Edition/tree/main/Activity%20solutions.
By completing this activity, you’ve consolidated the use of the SpawnActorDeferred function and know how to use it in your future projects.
Summary
In this chapter, you learned how to affect an object with physics simulations, create Object Types and Collision Presets, use the OnHit, OnBeginOverlap, and OnEndOverlap events, update an object’s Physical Material, and use timers.
Now that you’ve learned about these fundamental collision topics, you’ll be able to come up with new and creative ways to use them when creating projects.
In the next chapter, we’ll be taking a look at actor components, interfaces, and Blueprint Function Libraries, which are very useful for keeping your project’s complexity manageable and highly modular, thereby allowing you to easily take parts of one project and add them to another.