
15
Exploring Collectibles, Power-Ups, and Pickups
In the previous chapter, you created the player projectile and used Anim Notifies to spawn the player projectile during the Throw animation. The player projectile will serve as the player’s main offensive gameplay mechanic to use against the enemies throughout the level. Due to the combination of default Anim Notifies provided by UE5 and your own custom Anim_ProjectileNotify class, the player projectile mechanic looks and feels great.
In this chapter, we will cover the following topics:
- How to create and integrate UI elements using the Unreal Motion Graphics (UMG) UI Designer system within UE5.
- Use the lessons learned from this project to create an interesting power-up that will increase the players’ movement speed and jump height.
- How to use inheritance in C++ to derive multiple classes from one parent base class for both collectibles and power-ups. You will also be adding visual and audio elements to both the collectible and the power-up so that they are more polished.
- How to use URotatingMovementComponent to add rotation to actors in a very optimized and straightforward way.
By the end of this chapter, you will have the finished SuperSideScroller game project, complete with coin collectibles and a corresponding UI to track the number of coins collected, a new potion power-up that increases the player’s movement speed and jump height, as well as a base class in which to derive potentially new power-ups and collectibles for the game.
Technical requirements
For this chapter, you will need the following technical requirements:
- Unreal Engine 5 installed
- Visual Studio 2019 installed
- Unreal Engine 4.27 installed
Let’s begin this chapter by learning more about URotatingMovementComponent, which we will use for our collectibles.
The project for this chapter can be found in the Chapter15 folder of the code bundle for this book, which can be downloaded here: https://github.com/PacktPublishing/Elevating-Game-Experiences-with-Unreal-Engine-5-Second-Edition.
Understanding URotatingMovementComponent
URotatingMovementComponent is one of a few movement components that exists within UE5. You are already familiar with CharacterMovementComponent and ProjectileMovementComponent from the SuperSideScroller game project alone, and RotatingMovementComponent is just that – another movement component. As a refresher, movement components allow different types of movements to occur on actors, or characters, that they belong to.
Note
CharacterMovementComponent, which allows you to control the movement parameters of your character, such as their movement speed and jump height, was covered in Chapter 10, Creating the SuperSideScroller Game, when you created the SuperSideScroller player character. ProjectileMovementComponent, which allows you to add projectile-based movement functionality to actors, such as speed and gravity, was covered in Chapter 14, Spawning the Player Projectile, when you developed the player projectile.
RotatingMovementComponent is a very simple movement component compared to CharacterMovementComponent and that’s because it only involves rotating the actor that RotatingMovementComponent is a part of; nothing more. RotatingMovementComponent continuously rotates a component based on the defined Rotation Rate, pivot translation, and the option to use rotation in local space or world space. Additionally, RotatingMovementComponent is much more efficient compared to other methods of rotating an actor, such as through Event Tick or Timelines within Blueprints.
Note
More information about movement components can be found here: https://docs.unrealengine.com/en-US/Engine/Components/Movement/index.html#rotatingmovementcomponent.
We will be using RotatingMovementComponent to allow the coin collectible and potion power-up to rotate in place along the Z-axis. This rotation will draw the player’s attention to the collectible and give them a visual cue that the collectible is important.
Now that you have a better understanding of RotatingMovementComponent, let’s move on and create the PickableActor_Base class, which is what the coin collectible and the potion power-up will derive from.
Exercise 15.01 – creating the PickableActor_Base class and adding URotatingMovementComponent
In this exercise, you will be creating the PickableActor_Base actor class, which will be used as the base class that both the collectible coin and potion power-up will derive from. You will also create a Blueprint class from this C++ base class to preview how URotatingMovementComponent works. Follow these steps to complete this exercise:
Note
You have performed many of the following steps numerous times throughout the SuperSideScroller game project, so there will be limited screenshots to help guide you. Only when introducing a new concept will there be an accompanying screenshot.
- Inside the UE5 editor, click the Tools option at the top of the editor and then choose New C++ Class.
- From the Choose Parent Class window, select the Actor option, and then click the Next button at the bottom of this window.
- Name this class PickableActor_Base and leave the default Path directory as-is. Then, select the Create Class button at the bottom of this window.
- After selecting the Create Class button, UE5 will recompile the project code and automatically open Visual Studio with both the header and source files for the PickableActor_Base class.
- By default, Actor classes provide you with the virtual void Tick(float DeltaTime) override; function declaration inside the header file. For the PickableActor_Base class, we will not require the Tick function, so remove this function declaration from the PickableActor_Base.h header file.
- Next, you will need to remove the function from the PickableActor_Base.cpp file; otherwise, you will receive a compile error. In this source file, find and remove the following code:
void PickableActor_Base::Tick(float DeltaTime)
{
Super::Tick(DeltaTime);
}
Note
In many cases, the use of the Tick() function for movement updates can lead to performance issues as the Tick() function is called every single frame. Instead, try using Gameplay Timer functions to perform certain updates at specified intervals, rather than on each frame. You can learn more about Gameplay Timers here: https://docs.unrealengine.com/4.27/en-US/ProgrammingAndScripting/ProgrammingWithCPP/UnrealArchitecture/Timers/.
- Now, it is time to add the components that the PickableActor_Base class requires. Let’s start with USphereComponent, which you will use to detect overlap collision with the player. Add the following code underneath the Protected access modifier inside the PickableActor_Base.h header file:
UPROPERTY(VisibleDefaultsOnly, Category = PickableItem)
class USphereComponent* CollisionComp;
The declaration of USphereComponent should be very familiar to you by now; we’ve done this in previous chapters, such as Chapter 14, Spawning the Player Projectile, when we created the PlayerProjectile class.
- Next, add the following code underneath the declaration of USphereComponent to create a new UStaticMeshComponent. This will be used to visually represent either the coin collectible or the potion power-up:
UPROPERTY(VisibleDefaultsOnly, Category = PickableItem)
class UStaticMeshComponent* MeshComp;
- Finally, add the following code underneath the declaration of UStaticMeshComponent to create a new URotatingMovementComponent. This will be used to give the collectible coin and potion power-up simple rotational movement:
UPROPERTY(VisibleDefaultsOnly, Category = PickableItem)
class URotatingMovementComponent* RotationComp;
- Now that you have the components declared inside the PickableActor_Base.h header file, navigate to the PickableActor_Base.cpp source file so that you can add the required #include statements for these added components. Add the following lines after #include “PickableActor_Base.h”, at the top of the source file:
#include "Components/SphereComponent.h"
#include "Components/StaticMeshComponent.h"
#include "GameFramework/RotatingMovementComponent.h"
- Now that you have the necessary #include files for the components, you can add the necessary code to initialize these components within the APickableActor_Base::APickableActor_Base() constructor function:
APickableActor_Base::APickableActor_Base()
{
}
- First, initialize the USphereComponent component variable, CollisionComp, by adding the following code to APickableActor_Base::APickableActor_Base():
CollisionComp = CreateDefaultSubobject
<USphereComponent>(TEXT("SphereComp"));
- Next, initialize USphereComponent with a default sphere radius of 30.0f by adding the following code underneath the code provided in the previous step:
CollisionComp->InitSphereRadius(30.0f);
- Since the player character needs to overlap with this component, you will need to add the following code so that, by default, USphereComponent has the collision settings for Overlap All Dynamic:
CollisionComp->BodyInstance.SetCollisionProfileName("OverlapAllDynamic");
- Lastly, CollisionComp USphereComponent should be the root component of this actor. Add the following code to assign this:
RootComponent = CollisionComp;
- Now that CollisionComp USphereComponent has been initialized, let’s do the same for MeshComp UStaticMeshComponent. Add the following code. After, we’ll discuss what the code is doing for us:
MeshComp = CreateDefaultSubobject<UStaticMeshComponent>(TEXT("MeshComp"));
MeshComp->AttachToComponent(RootComponent,
FAttachmentTransformRules::KeepWorldTransform);
MeshComp->SetCollisionEnabled(ECollisionEnabled::NoCollision);
The first line initializes MeshComp UStaticMeshComponent using the CreateDefaultSubobject() template function. Next, you are attaching MeshComp to the root component, which you made for CollisionComp, using the AttachTo() function. Lastly, MeshComp UStaticMeshComponent should not have any collision by default, so you are using the SetCollisionEnabled() function and passing in the ECollisionEnable::NoCollision enumerator value.
- Lastly, we can initialize URotatingMovementComponent RotationComp by adding the following code:
RotationComp =
CreateDefaultSubobject<URotatingMovementComponent>(
TEXT("RotationComp"));
- With all the components initialized, compile the C++ code and return to the UE5 editor. After compilation succeeds, you can start creating a Blueprint class for PickableActor_Base.
- In the Content Drawer area, create a new folder called PickableItems by right-clicking on the Content folder and selecting the New Folder option.
- In the PickableItems folder, right-click and select Blueprint Class. From the Pick Parent Class window, search for the PickableActor_Base class and left-click Select to create a new Blueprint.
- Name this Blueprint BP_PickableActor_Base and double-left-click the Blueprint to open it.
- In the Components tab, select MeshComp UStaticMeshComponent and assign the Shape_Cone static mesh to the Static Mesh parameter in the Details panel. Please refer to the following screenshot:

Figure 15.1 – The Shape_Cone mesh assigned to MeshComp StaticMeshComponent
- Next, select RotationComp URotatingMovementComponent and find the Rotation Rate parameter in the Rotating Component category of the Details panel.
- Set Rotation Rate to the following values:
(X=100.000000,Y=100.000000,Z=100.000000)
These values determine how fast the actor will rotate along each axis per second. This means that the cone-shaped actor will rotate along each axis at 100 degrees per second on each axis.
- Compile the PickableActor_Base Blueprint and add this actor to your level.
- Now, if you use PIE and look at the PickableActor_Base actor in the level, you will see that it is rotating. Please refer to the following screenshot:

Figure 15.2 – The BP_PickableActor_Base rotating in place
Note
You can find the assets and code for this exercise here: https://github.com/PacktPublishing/Game-Development-Projects-with-Unreal-Engine/tree/master/Chapter15/Exercise15.01.
With this exercise complete, you’ve created the base components required for the PickableActor_Base class and learned how to implement and use URotatingMovementComponent. With the PickableActor_Base class ready, and with URotatingMovementComponent implemented on the Blueprint actor, we can complete the class by adding overlap detection functionality, destroying the collectible actor, and spawning audio effects when the actor is picked up by the player. In the following activity, you will add the remaining functionality required for the PickableActor_Base class.
Activity 15.01 – player overlap detection and spawning effects in PickableActor_Base
Now that the PickableActor_Base class has all the required components and has its constructor initializing the components, it is time to add the remaining aspects of its functionality. These will be inherited by the coin collectible and potion power-up later in this chapter. This additional functionality includes player overlap detection, destroying the collectible actor, and spawning an audio effect to give feedback to the player that it has been successfully picked up. Perform the following steps to add functionality that allows a USoundBase class object to be played when the collectible overlaps with the player:
- Create a new function in the PickableActor_Base class that takes in a reference to the player as an input parameter. Call this function PlayerPickedUp.
- Create a new UFUNCTION called BeginOverlap(). Make sure to include all the required input parameters for this function before moving on. Refer to Chapter 6, Setting Up Collision Objects, where you used this function inside the VictoryBox class.
- Add a new UPROPERTY() for the USoundBase class and name it PickupSound.
- In the PickableActor_Base.cpp source file, create the definitions for both the BeginOverlap() and PlayerPickedUp() functions.
- Now, add the required #include files for the SuperSideScroller_Player class and the GameplayStatics class at the top of the source file.
- In the BeginOverlap() function, create a reference to the player using the OtherActor input parameter of the function.
- Next, if the player reference is valid, make a call to the PlayerPickedUp() function, passing in the player variable.
- In the PlayerPickedUp() function, create a variable for the UWorld* object that’s returned by the GetWorld() function.
- Use the UGameplayStatics library to spawn PickUpSound at the location of the PickableActor_Base actor.
- Then, call the Destroy() function so that the actor gets destroyed and removed from the world.
- Finally, in the APickableActor_Base::APickableActor_Base() constructor, bind the OnComponentBeginOverlap event of CollisionComp to the BeginOverlap() function.
- Download and install the Unreal Match 3 project from the Samples tab of Epic Games Launcher under the UE Legacy Samples section. Migrate the Match_Combo soundwave asset from this project into your SuperSideScroller project using the knowledge you gained in Chapter 14, Spawning the Player Projectile.
- Apply this sound to the PickupSound parameter of the BP_PickableActor_Base Blueprint.
- Compile the Blueprint, and if one does not exist in your level, add the BP_PickableActor_Base actor to your level now.
- In PIE, have your character overlap with the BP_PickableActor_Base actor.
Expected output:
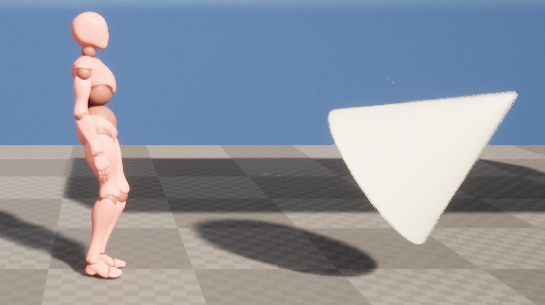
Figure 15.3 – The BP_PickableActor_Base object can be picked up by the player
Note
The solution for this activity can be found on https://github.com/PacktPublishing/Elevating-Game-Experiences-with-Unreal-Engine-5-Second-Edition/tree/main/Activity%20solutions.
With this activity complete, you have proven your knowledge regarding how to add the OnBeginOverlap() functionality to your actor classes and how to use this function to perform logic for your actor. In the case of PickableActor_Base, we added logic that will spawn a custom sound and destroy the actor.
Now that the PickableActor_Base class is set and ready, it is time to develop the collectible coin and power-up potion classes that will derive from it. The coin collectible class will inherit from the PickableActor_Base class you have just created. It will override key functionality, such as the PlayerPickedUp() function, so that we can implement unique logic for the collectible when it’s picked up by the player. In addition to overriding functionality from the inherited parent PickableActor_Base class, the coin collectible class will have its own unique set of properties, such as its current coin value and unique pickup sound. We’ll create the coin collectible class together in the next exercise.
Exercise 15.02 – creating the PickableActor_Collectable class
In this exercise, you will be creating the PickableActor_Collectable class, which will be derived from the PickableActor_Base class you created in Exercise 15.01 – creating the PickableActor_Base class and adding URotatingMovement, and finished in Activity 15.01 – player overlap detection and spawning effects in PickableActor_Base. This class will be used as the main collectible coin that the player can collect within the level. Follow these steps to complete this exercise:
- Inside the UE5 editor, click the Tools option at the top of the editor and choose New C++ Class.
- From the Choose Parent Class window, select the PickableActor_Base option, and then click the Next button at the bottom of this window.
- Name this class PickableActor_Collectable and leave the default Path directory as-is. Then, select the Create Class button at the bottom of this window.
- After selecting the Create Class button, UE5 will recompile the project code and will automatically open Visual Studio with both the header and source files for the PickableActor_Collectable class.
- By default, the PickableActor_Collectable.h header file has no declared functions or variables within its class declaration. You will need to add the override for the BeginPlay() function underneath a new Protected Access Modifier. Add the following code:
protected:
virtual void BeginPlay() override;
The reason we are overriding the BeginPlay() function is that URotatingMovementComponent requires the actor to initialize and use BeginPlay() to correctly rotate the actor. Therefore, we need to create the override declaration of this function and create a basic definition inside the source file. First, however, we need to override another important function from the PickableActor_Base parent class.
- Override the PlayerPickedUp() function from the PickableActor_Base parent class by adding the following code under Protected Access Modifier:
virtual void PlayerPickedUp(class ASuperSideScroller_Player* Player)override;
With this, we are saying that we are going to use, and override, the functionality of the PlayerPickedUp() function.
- Lastly, create a new integer called UPROPERTY() that will hold the value that the coin collectible will have; in this case, it will have a value of 1. Add the following code to do this:
public:
UPROPERTY(EditAnywhere, Category = Collectable)
int32 CollectableValue = 1;
Here, we are creating the integer variable that will be accessible in Blueprints and has a default value of 1. If you so choose, with the EditAnywhere UPROPERTY() keyword, you can change how much a coin collectible is worth.
- Now, we can move on to the PickableActor_Collectable.cpp source file and create the definition of the overridden PlayerPickedUp() function. Add the following code to the source file:
void APickableActor_Collectable::PlayerPickedUp(class
ASuperSideScroller_Player* Player)
{
}
- For now, we need to make a call to the PlayerPickedUp() parent function by using the Super keyword. Add the following code to the PlayerPicked() function:
Super::PlayerPickedUp(Player);
The call to the parent function, which uses Super::PlayerPickedUp(Player), will ensure that the functionality you created in the PickableActor_Base class is called. As you may recall, the PlayerPickedUp() function in the parent class makes a call to spawn the PickupSound sound object and destroys the actor.
- Next, create the definition of the BeginPlay() function inside the source file by adding the following code:
void APickableActor_Collectable::BeginPlay()
{
}
- Finally, in C++, once again make the call to the BeginPlay() parent function using the Super keyword. Add the following code to the BeginPlay() function inside the PickableActor_Collectable class:
Super::BeginPlay();
- Compile the C++ code and return to the editor.
Note
You can find the assets and code for this exercise at the following link: https://packt.live/35fRN3E.
Now that you’ve successfully compiled the PickableActor_Collectable class, you have created the framework needed for the coin collectible. In the following activity, you will create a Blueprint from this class and finalize the coin collectible actor.
Activity 15.02 – finalizing the PickableActor_Collectable actor
Now that the PickableActor_Collectable class has all of the necessary inherited functionality and unique properties it needs, it is time to create the Blueprint from this class and add a Static Mesh, update its URotatingMovementComponent, and apply a sound to the PickUpSound property. Perform the following steps to finalize the PickableActor_Collectable actor:
- From Epic Games Launcher, find the Content Examples project in the Samples tab, underneath the Engine Feature Samples category.
- Create and install a new project from the Content Examples project.
- Migrate the SM_Pickup_Coin asset and all its referenced assets from the Content Examples project to your SuperSideScroller project.
- Create a new folder within the Content/PickableItems directory in the Content Drawer window and name it Collectable.
- In this new Collectable folder, create a new Blueprint from the PickableActor_Collectable class that you created in Exercise 15.02 – creating the PickableActor_Collectable class. Name this new Blueprint BP_Collectable.
- In this Blueprint, set the Static Mesh parameter of the MeshComp component to the SM_Pickup_Coin mesh you imported earlier in this activity.
- Next, add the Match_Combo sound asset to the PickupSound parameter of the collectible.
- Lastly, update the RotationComp component so that the actor rotates along the Z-axis at 90 degrees per second.
- Compile the Blueprint, place BP_Collectable in your level, and use PIE.
- Overlap the player character with the BP_Collectable actor and observe the results.
Expected output:

Figure 15.4 – The coin collectible rotates and can be overlapped by the player
Note
The solution for this activity can be found on https://github.com/PacktPublishing/Elevating-Game-Experiences-with-Unreal-Engine-5-Second-Edition/tree/main/Activity%20solutions.
With this activity complete, you have proven that you know how to migrate assets into your UE5 project and how to use and update URotatingMovementComponent to fit the needs of the coin collectible. Now that the coin collectible actor is complete, it is time to add functionality to the player so that the player can keep track of how many coins they have collected.
First, we will create the logic that will count the coins using UE_LOG. Later, we will implement the coin counter using the Unreal Motion Graphics (UMG) UI Designer system on the game’s UI.
Logging variables using UE_LOG
In Chapter 11, Working with Blend Space 1D, Key Bindings, and State Machines, we used and learned about the UE_LOG function to log when the player should throw the projectile. Then, we used the UE_LOG function in Chapter 13, Creating and Adding the Enemy Artificial Intelligence, to log when the player projectile hit an object. UE_LOG is a robust logging tool we can use to output important information from our C++ functions into the Output Log window inside the editor when playing our game. So far, we have only logged FStrings to display general text in the Output Log window to know that our functions were being called. Now, it is time to learn how to log variables to debug how many coins the player has collected.
Note
There is another useful debug function available in C++ with UE5 known as AddOnScreenDebugMessage. You can learn more about this function here: https://docs.unrealengine.com/en-US/API/Runtime/Engine/Engine/UEngine/AddOnScreenDebugMessage/1/index.html.
When creating the FString syntax used by the TEXT() macro, we can add format specifiers to log different types of variables. We will only be discussing how to add the format specifier for integer variables.
Note
You can find more information on how to specify other variable types by reading the following documentation: https://www.ue4community.wiki/Logging#Logging_an_FString.
This is what UE_LOG() looks like when passing in FString “Example Text”:
UE_LOG(LogTemp, Warning, TEXT("Example Text"));
Here, you have Log Category, Log Verbose Level, and the actual FString, “Example Text”, to display in the log. To log an integer variable, you need to add %d to your FString within the TEXT() macro, followed by the integer variable name outside the TEXT() macro, separated by a comma. Here is an example:
UE_LOG(LogTemp, Warning, TEXT("My integer variable %d), MyInteger);
The format specifier is identified by the % symbol, and each variable type has a designated letter that corresponds with it. In the case of integers, the letter d is used, representing a digit. You will be using this method of logging integer variables to log the number of coin collectibles the player has in the next exercise.
Exercise 15.03 – tracking the number of coins for the player
In this exercise, you will be creating the necessary properties and functions that will allow you to track how many coins the player collects throughout the level. You will use this tracking to show the player using UMG later in this chapter. Follow these steps to complete this exercise:
- In Visual Studio, find and open the SuperSideScroller_Player.h header file.
- Under Private Access Modifier, create a new int variable called NumberofCollectables, as shown here:
int32 NumberofCollectables;
This will be a private property that will keep track of the current number of coins the player has collected. You will be creating a public function that will return this integer value. We do this for safety reasons to ensure that no other classes can modify this value.
- Next, under the existing public access modifier, create a new UFUNCTION() using the BlueprintPure keyword called GetCurrentNumberOfCollectables(). This function will return an int. The following code adds this as an inline function:
UFUNCTION(BlueprintPure)
int32 GetCurrentNumberofCollectables() { return NumberofCollectables; };
Here, we are using UFUNCTION() and the BlueprintPure keyword to expose this function to Blueprints so that we can use it later in UMG.
- Declare a new void function, under the public access modifier, called IncrementNumberofCollectables() that takes in a single integer parameter called Value:
void IncrementNumberofCollectables(int32 Value);
This is the main function you will use to keep track of how many coins the player has collected. We will also add some safety measures to ensure this value is never negative.
- With the IncrementNumberofCollectables() function declared, let’s create the definition of this function inside the SuperSideScroller_Player.cpp source file.
- Write the following code to create the definition of the IncrementNumberofCollectables function:
void ASuperSideScroller_Player::IncrementNumberofCollectables(int32 Value)
{
}
- The main case to handle here is if the integer value that’s passed into this function is less than or equal to 0. In this case, we do not want to bother incrementing the NumberofCollectables variable. Add the following code to the IncrementNumberofCollectables() function:
if(Value == 0)
{
return;
}
This if() statement says that if the value input parameter is less than or equal to 0, the function will end. With the IncrementNumberofCollectables() function returning void, it is perfectly okay to use the return keyword in this way.
We’re adding this check of ensuring the value parameter that’s passed into the IncrementNumberofCollectables() function is neither 0 nor negative because it is important to establish good coding practices; this guarantees that all possible outcomes are handled. In an actual development environment, there could be designers or other programmers who attempt to use the IncrementNumberofCollectables() function and try to pass in a negative value, or a value that equals 0. If the function does not take these possibilities into account, there is potential for bugs later on in development.
- Now that we’ve handled the edge case where value is less than or equal to 0, let’s continue with the function using an else() statement to increase NumberofCollectables. Add the following code under the if() statement from the previous step:
else
{
NumberofCollectables += Value;
}
- Next, let’s log NumberofCollectables using UE_LOG and the knowledge we learned about logging variables. Add the following code after the else() statement to properly log NumberofCollectables:
UE_LOG(LogTemp, Warning, TEXT("Number of Coins: %d"), NumberofCollectables);
With this UE_LOG(), we are making a more robust log to track the number of coins. This lays out the groundwork of how the UI will work. This is because we will be logging the same information to the player using UMG later in this chapter.
With UE_LOG() added, all we need to do is call the IncrementNumberofCollectables() function inside the PickableActor_Collectable class.
- In the PickableActor_Collectable.cpp source file, add the following header:
#include "SuperSideScroller_Player.h"
- Next, inside the PlayerPickedUp() function, add the following function call before the Super::PlayerPickedUp(Player) line:
Player->IncrementNumberofCollectables(CollectableValue);
- Now that our PickableActor_Collectable class is calling our player’s IncrementNumberofCollectables function, recompile the C++ code and return to the UE5 editor.
- Within the UE5 editor, open the Output Log window by clicking Window, and then select Output Log.
- Now, add multiple BP_Collectable actors to your level and use PIE.
- When you overlap over each coin collectible, observe the Output Log window to find that each time you collect a coin, the Output Log window will show you how many coins you’ve collected.
Note
You can find the assets and code for this exercise here: https://github.com/PacktPublishing/Game-Development-Projects-with-Unreal-Engine/tree/master/Chapter15/Exercise15.03.
With this exercise completed, you have now completed half of the work needed to develop the UI element of tracking the number of coins collected by the player. The next half will involve using the functionality developed in this activity inside UMG to show this information to the player on-screen. To do this, we need to learn more about UMG inside UE5.
Introducing Unreal Motion Graphics UI
UMG UI Designer is UE5’s main tool for creating UI menus, in-game HUD elements such as health bars, and other user interfaces you may want to present to the player.
In the SuperSideScroller game, we will only be using the Text widget to construct our Coin Collection UI in Exercise 15.04 – creating the Coin Counter UI HUD element. We’ll learn more about the Text widget in the next section.
Understanding the Text widget
The Text widget is one of the simpler widgets that exists. This is because it only allows you to display text information to the user and customize the visuals of this text. Almost every single game uses text in one way or another to display information to its players. Overwatch, for example, uses a text-based UI to display crucial match data to its players. Without the use of text, it would be very difficult – maybe even impossible – to convey key pieces of statistical data to the player, such as total damage dealt, total time playing the game, and much more.
The Text widget appears in the Palette tab within UMG. When you add a Text widget to the Canvas panel, it will display the text Text Block by default. You can customize this text by adding your text to the Text parameter of the widget. Alternatively, you can use Function Binding to display more robust text that can reference internal or external variables. Function Binding should be used whenever you need to display information that can change; this could be text that represents a player’s score, how much money the player has, or in our case, the number of coins the player has collected:
You will be using the Function Binding functionality of the Text widget to display the number of coins collected by the player using the GetCurrentNumberofCollectables() function you created in Exercise 15.03 – tracking the number of coins for the player.
Now that we have the Text widget in the Canvas panel, it is time to position this widget where we need it to be. For this, we will take advantage of anchors.
Anchors
Anchors are used to define where a widget’s desired location should be on the Canvas panel. Once defined, this Anchor point will ensure that the widget will maintain this position with varying screen sizes through different platform devices such as phones, tablets, and computers. Without an anchor, a widget’s position can become inconsistent between different screen resolutions, which is never desired.
Note
For more information about anchors, please refer to the following documentation: https://docs.unrealengine.com/en-US/Engine/UMG/UserGuide/Anchors/index.html.
For our Coin Collection UI and the Text widget you will use, the Anchor point will be at the top-left corner of the screen. You will also add a position offset from this Anchor point so that the text is more visible and readable to the player. Before moving on to creating our Coin Collection UI, let’s learn about Text Formatting, which you will use to display the current number of collected coins to the player.
Text formatting
Much like the UE_LOG() macro available to us in C++, Blueprints offers a similar solution to display text and format it to allow custom variables to be added to it. The Format Text function takes in a single text input labeled Format and returns the Result text. This can be used to display information:

Figure 15.5 – The Format Text function
Instead of using the % symbol like UE_LOG() does, the Format Text function uses the {} symbols to denote arguments that can be passed into the string. In-between the {} symbols, you need to add an argument name; this can be anything you want, but it should be representative of what the argument is. Refer to the example shown in the following screenshot:

Figure 15.6 – An example integer in the Format Text function
The Format Text function only supports Byte, Integer, Float, Text, or EText Gender variable types, so if you are attempting to pass any other type of variable into the function as an argument, you must convert it into one of the supported types.
Note
The Format Text function is also used for Text Localization, where you can support multiple languages for your game. More information about how this can be done in both C++ and Blueprints can be found here: https://docs.unrealengine.com/en-US/Gameplay/Localization/Formatting/index.html.
You will be using the Format Text function in conjunction with the Text widget in UMG in the next exercise, where we will be creating the Coin Counter UI widget to display the number of coins that have been collected by the player. You will also be using Anchor points to position the Text widget at the top-left corner of the screen.
Exercise 15.04 – creating the Coin Counter UI HUD element
In this exercise, you will be creating the UMG UI asset, which will display and update the number of coins collected by the player. You will use the GetCurrentNumberofCollectables() inline function you created in Exercise 15.02 – creating the PickableActor_Collectable class, to display this value on the screen using a simple Text widget. Follow these steps to accomplish this:
- Let’s start by creating a new folder inside the Content Drawer area called UI. Do this by right-clicking on the Content folder at the top of the browser directory in the editor and selecting New Folder.
- Inside the new /Content/UI directory, right-click and, instead of selecting Blueprint Class, hover over the User Interface option at the bottom of this list and left-click the Widget Blueprint option.
- Name this new Widget Blueprint BP_UI_CoinCollection, and then double-left-click the asset to open the UMG editor.
- By default, the Widget panel is empty, and you will find an empty hierarchy on the left-hand side, as shown in the following screenshot:

Figure 15.7 – The Widget panel’s empty hierarchy
- Above the Hierarchy tab is the Palette tab, which lists all the available widgets you can use inside your UI. We will only focus on the Text widget, which is listed under the Common category. Do not mistake this option with the Rich Text Block widget.
Note
For a more detailed reference regarding all the available widgets inside UMG, please read the following documentation from Epic Games: https://docs.unrealengine.com/en-US/Engine/UMG/UserGuide/WidgetTypeReference/index.html.
- If one is not automatically created, add a Canvas Panel widget as the base of the Hierarchy area.
- Add the Text widget to the UI panel by either left-clicking and dragging the Text widget from the Palette tab to the Hierarchy tab underneath the Canvas panel root, or by left-clicking and dragging the Text widget directly into the Canvas panel itself in the middle of the UMG editor.
Before changing the text of this widget, we need to update its anchor, position, and font size so that it fits the needs we have for displaying the necessary information to the player.
- With the Text widget selected, you will see many options under its Details panel to customize it. The first thing to do here is anchor the Text widget to the top-left corner of the Canvas panel. Left-click on the Anchors dropdown and select the top-left anchoring option, as shown in the following screenshot:

Figure 15.8 – By default, there are options to anchor a widget at different locations on the screen
Anchoring allows the widget to maintain its desired location within the Canvas panel, regardless of varying screen sizes.
Now that the Text widget is anchored to the top-left corner, we need to set its relative position to this anchor so that there is an offset for better positioning and readability of the text.
- In the Details panel, underneath the Anchors option, are parameters for Position X and Position Y. Set both these parameters to 100.0f.
- Next, enable the Size To Content parameter so that the Text widget will automatically resize itself depending on the size of the text it is displaying, as shown in the following screenshot:

Figure 15.9 – The Size To Content parameter will ensure that the Text widget won’t be cut off
- Lastly, we must update the size of the font that’s used for the Text widget. Underneath the Appearance tab of the Details panel for the Text widget, you will find the Size parameter. Set its value to 48.
- The final Text widget will look like this:

Figure 15.10 – The Text widget is now anchored to the top left of the Canvas panel
Now that we have the Text widget positioned and sized the way we need it to be, let’s add a new binding to the text so that it will automatically update and match the value of the number of collectibles the player has.
- With the Text widget selected, find the Text parameter in its Details panel, under the Content category. There, you will find the Bind option.
- Left-click the Bind option and select Create Binding. When doing this, the new Function Binding will be created automatically and be given the name GetText_0. Please refer to the following screenshot:

Figure 15.11 – The new bound function of the text
- Rename this function Get Number of Collectables.
- Before continuing with this function, create a new object reference variable called Player that’s of the SuperSideScroller_Player type. Make this variable Public and exposable on spawn by enabling both the Instance Editable and Expose on Spawn parameters of the variable, as shown in the following screenshot:

Figure 15.12 – The Player variable with the Instance Editable and Expose on Spawn parameters enabled
By making the Player variable Public and exposed on spawn, you will be able to assign this variable when creating the widget and adding it to the screen. We will do this in Exercise 15.05 – adding the coin counter UI to the player screen.
Now that we have a reference variable to SuperSideScroller_Player, let’s continue with the Get Number of Collectables bind function.
- Add a Getter of the Player variable to the Get Number of Collectables function.
- From this variable, left-click and drag and from the context-sensitive drop-down menu, and find and select the Get Current Number of Collectables function. Please refer to the following screenshot:

Figure 15.13 – The Get Current Number of Collectables function you created in Exercise 15.03
- Next, left-click and drag out the Return Value text parameter of Get Number of Collectables to Return Node. From the context-sensitive drop-down menu, search for and select the Format Text option, as shown in the following screenshot:

Figure 15.14 – Now, we can create customized and formatted text
- Within the Format Text function, add the following text:
Coins: {coins}
Please refer to the following screenshot:
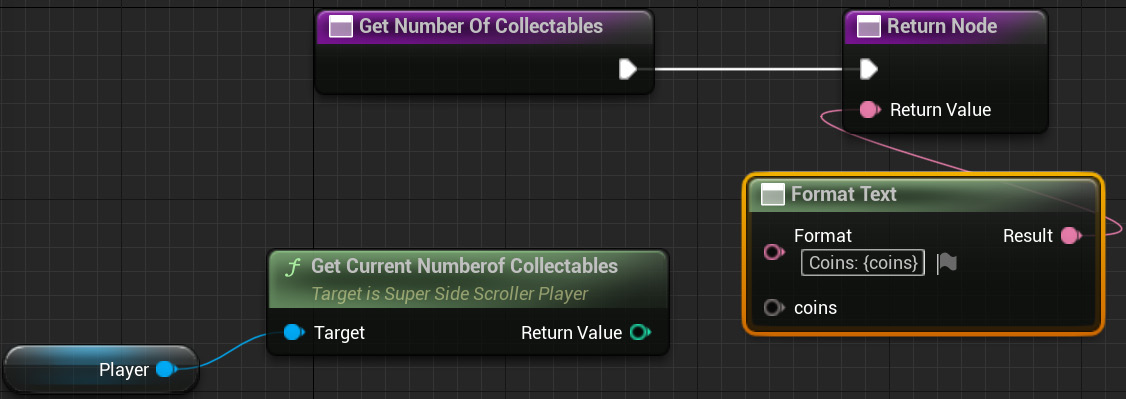
Figure 15.15 – Now, there is a new input argument for the formatted text
Remember that using the {} symbols denotes a text argument that allows you to pass variables into the text.
- Finally, connect the Return Value int of the GetCurrentNumberofCollectables() function to the wildcard coins input pin of the Format Text function, as shown here:

Figure 15.16 – The Text widget will update automatically based on the Get Current Number of Collectables function
Note
You can find the assets and code for this exercise here: https://packt.live/3eQJjTU.
With this exercise completed, you have created the UI UMG widget needed to display the current number of coins collected by the player. By using the GetCurrentNumberofCollectables() C++ function and the binding functionality of the Text widget, the UI will always update its value based on the number of coins collected. In the next exercise, we will add this UI to the player’s screen, but first, we’ll briefly learn about how to add and remove UMG from the player screen.
Adding and creating UMG user widgets
Now that we have created Coin Collection UI in UMG, it is time to learn how to add and remove the UI to and from the player screen, respectively. By adding Coin Collection UI to the player screen, the UI becomes visible to the player and can be updated as the player collects coins.
In Blueprints, there is a function called Create Widget, as shown in the following screenshot. Without a class assigned, it will be labeled Construct None, but do not let this confuse you:

Figure 15.17 – The Create Widget function as-is by default, without a class applied
This function requires the class of the User widget to be created and requires a Player Controller that will be referenced as the owning player of this UI. This function then returns the spawned user widget as its Return Value, where you can then add it to the player’s viewport using the Add to Viewport function. The Create Widget function only instantiates the widget object; it does not add this widget to the player’s screen. It is the Add to Viewport function that makes this widget visible on the player’s screen:

Figure 15.18 – The Add to Viewport function with ZOrder
The viewport is the game screen that overlays your view of the game world, and it uses what is called ZOrder to determine the overlay depth in cases where multiple UI elements need to overlap above or below one another. By default, the Add to Viewport function will add the User widget to the screen and make it fill the entire screen – that is, unless the Set Desired Size In Viewport function is called to set the size that it should fill manually:

Figure 15.19 – The Size parameter determines the desired size of the passed in the User widget
In C++, you also have a function called CreateWidget():
template<typename WidgetT, typename OwnerT>
WidgetT * CreateWidget
(
  OwnerT * OwningObject,
  TSubclassOf < UUserWidget > UserWidgetClass,
  FName WidgetName
)
The CreateWidget() function is available through the UserWidget class, which can be found in /Engine/Source/Runtime/UMG/Public/Blueprint/UserWidget.h.
An example of this can be found in Chapter 8, Creating User Interfaces with UMG, where you used the CreateWidget() function to create BP_HUDWidget:
HUDWidget = CreateWidget<UHUDWidget>(this, BP_HUDWidget);
Refer back to Chapter 8, Creating User Interfaces with UMG, and Exercise 8.06 – creating the health bar C++ logic, for more information regarding the CreateWidget() function in C++.
This function works almost identically to its Blueprint counterpart because it takes in the Owning Object parameter, much like the Owning Player parameter of the Blueprint function, and it requires the User Widget class to be created. The C++ CreateWidget() function also takes in an FName parameter to represent the widget’s name.
Now that we have learned about the methods to use to add a UI to the player screen, let’s put this knowledge to the test. In the following exercise, you will be implementing the Create Widget and Add to Viewport Blueprint functions so that we can add the coin collection UI that we created in Exercise 15.04 – creating the Coin Counter UI HUD element, to the player screen.
Exercise 15.05 – Adding Coin Counter UI to the player screen
In this exercise, you will be creating a new Player Controller class so that you can use the player controller to add the BP_UI_CoinCollection widget Blueprint to the player’s screen. From there, you will also create a new Game Mode class and apply this game mode to the SuperSideScroller project. Perform the following steps to complete this exercise:
- In the UE5 editor, navigate to Tools and then New C++ Class.
- From the Choose Parent Class dialog window, find and select the Player Controller option.
- Name the new Player Controller class SuperSideScroller_Controller and then click the Create Class button. Visual Studio will automatically generate and open the source and header files for the SuperSideScroller_Controller class, but for now, we will stay inside the UE5 editor.
- In the Content Drawer area, under the MainCharacter folder directory, create a new folder called PlayerController.
- In the PlayerController folder, right-click and create a new Blueprint Class using the new SuperSideScroller_Controller class. Please refer to the following screenshot:

Figure 15.20 – Finding the new SuperSideScroller_Controller class to create a new Blueprint from
- Name this new Blueprint BP_SuperSideScroller_PC and then double-left-click the asset to open it.
To add the BP_UI_CoinCollection widget to the screen, we need to use the Add to Viewport function and the Create Widget function. We want the UI to be added to the player’s screen after the player character has been Possessed by the player controller.
- Right-click inside the Blueprint graph and, from the context-sensitive menu, find the Event On Possess option and left-click to add it to the graph. Please refer to the following screenshot:

Figure 15.21 – Event On Possess
The Event On Possess event node returns Possessed Pawn. We will use this Possessed Pawn to pass into our BP_UI_CoinCollection UI Widget, but first, we need to Cast To the SuperSideScroller_Player class.
- Left-click and drag the Possessed Pawn parameter of the Event On Possess node from the output. Then, search for and find the Cast to SuperSideScroller_Player node. Please refer to the following screenshot:

Figure 15.22 – We need to Cast To SuperSideScroller_Player
- Now, right-click and search for the Create Widget function to add it to the Blueprint graph.
- From the drop-down class parameter, find and assign the BP_UI_CoinCollection asset you created in Exercise 15.04 – creating the Coin Counter UI HUD element. Please refer to the following screenshot:

Figure 15.23 – The Create Widget function
After updating the Class parameter to the BP_UI_CoinCollection class, you will notice that the Create Widget function will update to show the Player variable you created, set to Exposed on Spawn.
- Right-click in the Blueprint graph to search for and find the Self reference variable from the context-sensitive drop-down menu. Connect the Self object variable to the Owning Player parameter of the Create Widget function, as shown in the following screenshot:

Figure 15.24 – The Owning Player input parameter is of the Player Controller type
The Owning Player parameter refers to the Player Controller type that will show and own this UI object. Since we are adding this UI to the SuperSideScroller_Controller Blueprint, we can just use the Self reference variable to pass into the function.
- Next, pass in the returned SuperSideScroller_Player variable from the Cast node to the Player input node of the Create Widget function. Then, connect the execution pins of the Cast node and the Create Widget function, as shown in the following screenshot:

Figure 15.25 – Creating the BP_UI_CoinCollection widget
Note
You can find the preceding screenshot in full resolution for better viewing at the following link: https://github.com/PacktPublishing/Game-Development-Projects-with-Unreal-Engine/blob/master/Chapter15/Images/New_25.png.
- Upon pulling the Create Widget function from the Return Value parameter, search for and find the Add to Viewport function so that you can place it in the graph.
- Connect the output Return Value parameter of the Create Widget function to the Target input parameter of the Add to Viewport function; do not change the ZOrder parameter.
- Lastly, connect the execution pins of the Create Widget and Add to Viewport functions, as shown here:

Figure 15.26 – After creating the BP_UI_CoinCollection widget, we can add it to the player viewport
Note
You can find the preceding screenshot in full resolution for better viewing at the following link: https://packt.live/2UwufBd.
Now that the player controller adds the BP_UI_CoinCollection widget to the player’s viewport, we need to create a GameMode Blueprint and apply both the BP_SuperSideScroller_MainCharacter and BP_SuperSideScroller_PC classes to this game mode.
- In the Content Drawer area, create a new folder by right-clicking the Content folder and selecting New Folder. Name this folder GameMode.
- Next, right-click and select Blueprint Class to begin creating the game mode Blueprint. From the Pick Parent Class dialog window, search for and find SuperSideScrollerGameMode under All Classes.
- Name this new GameMode Blueprint BP_SuperSideScroller_GameMode. Double-left-click this asset to open it.
The GameMode Blueprint contains a list of classes that you can customize with your unique classes. For now, we will only worry about Player Controller Class and Default Pawn Class.
- Click the Player Controller Class dropdown to find and select the BP_SuperSideScroller_PC Blueprint you created earlier in this exercise.
- Then, click the Default Pawn Class dropdown to find and select the BP_SuperSideScroller_MainCharacter Blueprint.
Now that we have a custom GameMode that utilizes our custom Player Controller and Player Character classes, let’s add this game mode to the Project Settings window so that the game mode is used by default when using PIE and when cooking builds of the project.
- From the UE5 editor, navigate to the Edit option at the top of the screen. Click this option and from the drop-down menu, find and select the Project Settings option.
- On the left-hand side of the Project Settings window, you will be provided with a list of categories divided into sections. Under the Project section, click the Maps & Modes category.
- In the Maps & Modes section, you have a handful of parameters related to your project’s default maps and game mode. At the top of this section, you have the Default GameMode option. Click this dropdown to find and select the SuperSideScroller_GameMode Blueprint you created earlier in this exercise.
Note
Changes made to the Maps & Modes section are automatically saved and written to the DefaultEngine.ini file, which can be found in your project’s Config folder. Default GameMode can be overwritten per level by updating the GameMode Override parameter, which can be found in the World Settings window of your level.
- Close the Project Settings window and return to your level. Use PIE and start collecting coins. Observe that the BP_UI_CoinCollection widget is shown and updated each time you collect a coin, as shown in the following screenshot:

Figure 15.27 – Now, every coin you collect will appear on the player UI
Note
You can find the assets and code for this exercise here: https://github.com/PacktPublishing/Game-Development-Projects-with-Unreal-Engine/tree/master/Chapter15/Exercise15.05.
With this exercise complete, you have created the UI UMG widget needed to display the current number of coins collected by the player. By using the GetCurrentNumberofCollectables() C++ function and the binding functionality of the Text widget, the UI will always update its value based on the number of coins collected.
So far, we have focused on the collectible coin and allowing players to collect these coins and add the total coins collected to the player’s UI. Now, we will focus on the potion power-up and granting movement speed and jump height increases to the player for a short period. To implement this functionality, we first need to study timers.
Using timers
Timers in UE5 allow you to perform actions after a delay or every X number of seconds. In the case of the SuperSideScroller potion power-up, a timer will be used to restore the player’s movement and jump to their defaults after 8 seconds.
Note
In Blueprints, you can use a Delay node in addition to timer handles to achieve the same results. However, in C++, timers are the best means to achieve delays and reoccurring logic.
Timers are managed by Timer Manager, or FTimerManager, which exists in the UWorld object. There are two main functions that you will be using from the FTimerManager class, called SetTimer() and ClearTimer():
void SetTimer
(
    FTimerHandle & InOutHandle,
    TFunction < void )> && Callback,
    float InRate,
    bool InbLoop,
    float InFirstDelay
)
void ClearTimer(FTimerHandle& InHandle)
You may have noticed that, in both functions, there is a required FTimerHandle. This handle is used to control the timer you have set. Using this handle, you can pause, resume, clear, and even extend the timer.
The SetTimer() function also has other parameters to help you customize this timer when initially setting it. The callback function will be called after the timer has been completed, and if the InbLoop parameter is True, it will continue to call the callback function indefinitely, until the timer has been stopped. The InRate parameter is the duration of the timer itself, while InFirstDelay is an initial delay that’s applied to the timer before it begins its timer for InRate.
The header file for the FTimerManager class can be found here: /Engine/Source/Runtime/Engine/Public/TimerManager.h.
Note
You can learn more about timers and FTimerHandle by reading the documentation here: https://docs.unrealengine.com/4.27/en-US/ProgrammingAndScripting/ProgrammingWithCPP/UnrealArchitecture/Timers/.
In the following exercise, you will create your own FTimerHandle in the SuperSideScroller_Player class and use it to control how long the effects of the potion power-up last on the player.
Exercise 15.06 – adding the potion power-up behavior to the player
In this exercise, you will be creating the logic behind the potion power-up and how it will affect the player’s character. You will take advantage of timers and timer handles to ensure that the power-up effects only last for a short duration. Follow these steps to accomplish this:
- In Visual Studio, navigate to and open the SuperSideScroller_Player.h header file.
- Under our Private Access Modifier, add a new variable of the FTimerHandle type and name it PowerupHandle:
FTimerHandle PowerupHandle;
This timer handle will be responsible for keeping track of how much time has elapsed since it was initiated. This will allow us to control how long the potion power-up’s effects will last.
- Next, add a Boolean variable under our Private Access Modifier called bHasPowerupActive:
bool bHasPowerupActive;
We will use this Boolean variable when updating the Sprint() and StopSprinting() functions to ensure we update the player’s sprint movement speed appropriately based on whether the power-up is active.
- Next, declare a new void function called IncreaseMovementPowerup() under our Public Access Modifier:
void IncreaseMovementPowerup();
This is the function that will be called from the potion power-up class to enable the effects of the power-up for the player.
- Finally, you need to create a function that handles when the power-up effects end. Create a function called EndPowerup() under Protected Access Modifier:
void EndPowerup();
With all the necessary variables and functions declared, it’s time to start defining these new functions and handling the power-up effects on the player.
- Navigate to the SuperSideScroller_Player.cpp source file.
- First, add the #include “TimerManager.h” header file to the top of the source file; we will need this class to use the timers.
- Define the IncreaseMovementPowerup() function by adding the following code to the source file:
void ASuperSideScroller_Player::IncreaseMovementPowerup()
{
}
- When this function is called, the first thing we need to do is set the bHasPowerupActive variable to true. Add the following code to the IncreaseMovementPowerup() function:
bHasPowerupActive = true;
- Next, add the following code to increase both the MaxWalkSpeed and JumpZVelocity components of the player character’s movement component:
GetCharacterMovement()->MaxWalkSpeed = 500.0f;
GetCharacterMovement()->JumpZVelocity = 1500.0f;
Here, we are changing MaxWalkSpeed from the default value of 300.0f to 500.0f. As you may recall, the default sprinting speed is also 500.0f. We will address this later in this activity to increase the sprinting speed when the power-up is active.
- To take advantage of timers, we need to get a reference to the UWorld object. Add the following code:
UWorld* World = GetWorld();
if (World)
{
}
As we’ve done many times before in this project, we’re using the GetWorld() function to get a reference to the UWorld object and saving this reference in its variable.
- Now that we have the reference to the World object and have performed a validity check, it is safe to use TimerManager to set the power-up timer. Add the following code within the if() statement shown in the previous step:
World->GetTimerManager().SetTimer(PowerupHandle, this,
&ASuperSideScroller_Player::EndPowerup, 8.0f, false);
Here, you are using the TimerManager class to set a timer. The SetTimer() function takes in the FTimerHandle component to use; in this case, the PowerupHandle variable you created. Next, we need to pass in a reference to the player class by using the this keyword. Then, we need to provide the callback function to call after the timer has ended, which in this case is the &ASuperSideScroller_Player::EndPowerup function. 8.0f represents the duration of the timer; feel free to adjust this as you see fit, but for now, 8 seconds is fine. Lastly, there is the final boolean parameter of the SetTimer() function that determines whether this timer should loop; in this case, it should not.
- Create the function definition for the EndPowerup() function:
void ASuperSideScroller_Player::EndPowerup()
{
}
- The first thing to do when the EndPowerup() function is called is set the bHasPowerupActive variable to false. Add the following code within the EndPowerup() function:
bHasPowerupActive = false;
- Next, change the MaxWalkSpeed and JumpZVelocity parameters of the character movement component back to their default values. Add the following code:
GetCharacterMovement()->MaxWalkSpeed = 300.0f;
GetCharacterMovement()->JumpZVelocity = 1000.0f;
Here, we are changing both the MaxWalkSpeed and JumpZVelocity parameters of the character movement component to their default values.
- Again, to take advantage of the timers and to clear the timer to handle PowerupHandle, we need to get a reference to the UWorld object. Add the following code:
UWorld* World = GetWorld();
if (World)
{
}
- Finally, we can add the code to clear the timer handle’s PowerupHandle:
World->GetTimerManager().ClearTimer(PowerupHandle);
By using the ClearTimer() function and passing in PowerupHandle, we are ensuring that this timer is no longer valid and will no longer affect the player.
Now that we have created the functions that handle the power-up effects and the timer associated with the effects, we need to update both the Sprint() and StopSprinting() functions so that they also take into account the speed of the player when the power-up is active.
- Update the Sprint() function to the following:
void ASuperSideScroller_Player::Sprint()
{
if (!bIsSprinting)
{
bIsSprinting = true;
if (bHasPowerupActive)
{
GetCharacterMovement()->MaxWalkSpeed = 900.0f;
}
else
{
GetCharacterMovement()->MaxWalkSpeed = 500.0f;
}
}
}
Here, we are updating the Sprint() function to take into account whether bHasPowerupActive is true. If this variable is true, then we increase MaxWalkSpeed while sprinting from 500.0f to 900.0f, as shown here:
if (bHasPowerupActive)
{
GetCharacterMovement()->MaxWalkSpeed = 900.0f;
}
If bHasPowerupActive is false, then we increase MaxWalkSpeed to 500.0f, as we did by default.
- Update the StopSprinting() function to the following:
void ASuperSideScroller_Player::StopSprinting()
{
if (bIsSprinting)
{
bIsSprinting = false;
if (bHasPowerupActive)
{
GetCharacterMovement()->MaxWalkSpeed = 500.0f;
}
else
{
GetCharacterMovement()->MaxWalkSpeed = 300.0f;
}
}
}
Here, we are updating the StopSprinting() function to take into account whether bHasPowerupActive is true. If this variable is true, then we set the MaxWalkSpeed value to 500.0f instead of 300.0f, as shown here:
if (bHasPowerupActive)
{
GetCharacterMovement()->MaxWalkSpeed = 500.0f;
}
If bHasPowerupActive is false, then we set MaxWalkSpeed to 300.0f, as we did by default.
- Finally, all we need to do is recompile the C++ code.
Note
You can find the assets and code for this exercise here: https://github.com/PacktPublishing/Game-Development-Projects-with-Unreal-Engine/tree/master/Chapter15/Exercise15.06.
With this exercise complete, you have created the potion power-up effects within the player character. The power-up increases both the default movement speed of the player and increases their jump height. Moreover, the effects of the power-up increase the sprinting speed. By using timer handles, you were able to control how long the power-up effect would last.
Now, it is time to create the potion power-up actor so that we can have a representation of this power-up in the game.
Activity 15.03 – creating the potion power-up actor
Now that the SuperSideScroller_Player class handles the effects of the potion power-up, it’s time to create the potion power-up class and Blueprint. This activity aims to create the potion power-up class, inherit from the PickableActor_Base class, implement the overlapping functionality to grant the movement effects that you implemented in Exercise 15.06 – adding the potion power-up behavior to the player, and create the Blueprint actor for the potion power-up. Follow these steps to create the potion power-up class and create the potion Blueprint actor:
- Create a new C++ class that inherits from the PickableActor_Base class and name this new class PickableActor_Powerup.
- Add the override function declarations for both the BeginPlay() and PlayerPickedUp() functions.
- Create the function definition for the BeginPlay() function. Within the BeginPlay() function, add the call to the parent class function of BeginPlay().
- Create the function definition for the PlayerPickedUp() function. Within the PlayerPickedUp() function, add the call to the PlayerPickedUp() parent class function.
- Next, add the necessary #include file for the SuperSideScroller_Player class so that we can reference the player class and its functions.
- In the PlayerPickedUp() function, use the Player input parameter of the function itself to make the function call to IncreaseMovementPowerup().
- From Epic Games Launcher, find the Action RPG project from the Samples tab, under the UE Legacy Samples category. Use this to create and install a new project.
- Migrate the A_Character_Heal_Mana_Cue and SM_PotionBottle assets, as well as all of their referenced assets, from the Action RPG project to your SuperSideScroller project.
- Create a new folder in the Content Drawer area within the PickableItems directory called Powerup. Create a new Blueprint within this directory based on the PickableActor_Powerup class and name this asset BP_Powerup.
- In BP_Powerup, update the MeshComp component so that it uses the SM_PotionBottle static mesh.
- Next, add A_Character_Heal_Mana_Cue, which you imported as the Pickup Sound parameter.
- Finally, update the RotationComp component so that the actor will rotate 60 degrees per second around the Pitch axis (Y axis) and rotate 180 degrees per second around the Yaw axis (X axis).
- Add BP_Powerup to your level and use PIE to observe the results when overlapping with the power-up.
Expected output:

Figure 15.28 – The potion power-up
Note
The solution for this activity can be found on https://github.com/PacktPublishing/Elevating-Game-Experiences-with-Unreal-Engine-5-Second-Edition/tree/main/Activity%20solutions.
With this activity complete, you were able to put your knowledge to the test in terms of creating a new C++ class that inherits from the PickableActor_Base class and overrides the PlayerPickedUp() function to add custom logic. By adding the call to the IncreaseMovementPowerup() function from the player class, you were able to add the movement power-up effects to the player when overlapping with the actor. Then, by using a custom mesh, material, and audio assets, you were able to bring the Blueprint actor to life from the PickableActor_Powerup class.
Now that we have created the coin collectible and the potion power-up, we need to implement a new gameplay feature into the project: the Brick class. In games such as Super Mario, bricks contain hidden coins and power-ups for the players to find. These bricks also serve as a means of reaching elevated platforms and areas within the level. In our SuperSideScroller project, the Brick class will serve the purpose of containing hidden coin collectibles for the player, and as a means of allowing the player to reach areas of the level by using the bricks as paths to access hard-to-reach locations. So, in the next section, we will create the Brick class, which needs to be broken to find the hidden coins.
Exercise 15.07 – creating the Brick class
Now that we have created the coin collectible and the potion power-up, it is time to create the Brick class, which will contain hidden coins for the player to collect. The brick is the final gameplay element of the SuperSideScroller project. In this exercise, you will be creating the Brick class, which will be used as part of the platforming mechanic of the SuperSideScroller game project, but also as a means to hold collectibles for players to find. Follow these steps to create this Brick class and its Blueprint:
- In the UE5 editor, navigate to Tools and then New C++ Class.
- From the Choose Parent Class dialog window, find and select the Actor class.
- Name this class SuperSideScroller_Brick and click Create Class. Visual Studio and Unreal Engine will recompile the code and open this class for you.
By default, the SuperSideScroller_Brick class comes with the Tick() function, but we will not need this function for the Brick class. Remove the function declaration for Tick() from the SuperSideScroller_Brick.h header file and remove the function definition from the SuperSideScroller_Brick.cpp source file before continuing.
- Under Private Access Modifier for the SuperSideScroller_Brick.h file, add the following code to declare a new UStaticMeshComponent* UPROPERTY() function to represent the brick in our game world:
UPROPERTY(VisibleDefaultsOnly, Category = Brick)
class UStaticMeshComponent* BrickMesh;
- Next, we need to create a UBoxComponent UPROPERTY() that will handle the collision with the player character. Add the following code to add this component under our Private Access Modifier:
UPROPERTY(VisibleDefaultsOnly, Category = Brick)
class UBoxComponent* BrickCollision;
- Create the UFUNCTION() declaration for the OnHit() function under our Private Access Modifier. This will be used to determine when UBoxComponent is hit by the player:
UFUNCTION()
void OnHit(UPrimitiveComponent* HitComp, AActor* OtherActor,
UPrimitiveComponent* OtherComp, FVector
NormalImpulse,
const FHitResult& Hit);
Note
Recall that you used the OnHit() function when developing the PlayerProjectile class in Chapter 13, Creating and Adding the Enemy Artificial Intelligence, for this project. Please review that chapter for more information about the OnHit() function.
- Next, create a new Boolean called UPROPERTY() under our Private Access Modifier using the EditAnywhere keyword called bHasCollectable:
UPROPERTY(EditAnywhere)
bool bHasCollectable;
This Boolean will determine whether the brick contains a coin collectible for the player.
- Now, we need a variable that holds how many coin collectibles are available within this brick for the player. We will do this by creating an integer variable called Collectable Value. Make this a UPROPERTY(), under Private Access Modifier, with the EditAnywhere keyword, and give it a default value of 1, as shown here:
UPROPERTY(EditAnywhere)
int32 CollectableValue = 1;
The brick will need to contain a unique sound and particle system so that it has a nice layer of polish for when the brick is destroyed by the player. We’ll add these properties next.
- Create a new Public Access Modifier in the SuperSideScroller_Brick.h header file.
- Next, create a new UPROPERTY() using the EditAnywhere and BlueprintReadOnly keywords for a variable of the USoundBase class. Name this variable HitSound, as shown here:
UPROPERTY(EditAnywhere, BlueprintReadOnly, Category = Brick)
class USoundBase* HitSound;
- Then, create a new UPROPERTY() using the EditAnywhere and BlueprintReadOnly keywords for a variable of the UParticleSystem class. Make sure to put this under Public Access Modifier and name this variable Explosion, as shown here:
UPROPERTY(EditAnywhere, BlueprintReadOnly, Category = Brick)
class UParticleSystem* Explosion;
Now that we have all the necessary properties for the Brick class, let’s move on to the SuperSideScroller_Brick.cpp source file, where we will initialize the components.
- Let’s start by adding the following #include directories for StaticMeshComponent and BoxComponent. Add the following code to the #include list of the source file:
#include "Components/StaticMeshComponent.h"
#include "Components/BoxComponent.h"
- First, initialize the BrickMesh component by adding the following code to the ASuperSideScroller_Brick::ASuperSideScroller_Brick() constructor function:
BrickMesh = CreateDefaultSubobject<UStaticMeshComponent>(TEXT("BrickMesh"));
- Next, the BrickMesh component should have a collision so that the player can walk on top of it for platforming gameplay purposes. To ensure this occurs by default, add the following code to set the collision to “BlockAll”:
BrickMesh->SetCollisionProfileName("BlockAll");
- Lastly, the BrickMesh component will serve as the root component of the Brick actor. Add the following code to do this:
RootComponent = BrickMesh;
- Now, add the following code to the constructor function to initialize our BrickCollision UBoxComponent:
BrickCollision = CreateDefaultSubobject<UBoxComponent>
(TEXT("BrickCollision"));
- Just like the BrickMesh component, the BrickCollision component will also need to have its collision set to “BlockAll” to receive the OnHit() callback events we will be adding later in this exercise. Add the following code:
BrickCollision->SetCollisionProfileName("BlockAll");
- Next, the BrickCollision component needs to be attached to the BrickMesh component. We can do this by adding the following code:
BrickCollision->AttachToComponent(RootComponent,
FAttachmentTransformRules::KeepWorldTransform);
- Before we can finish the initialization of the BrickCollision component, we need to add the function definition for the OnHit() function. Add the following definition to the source file:
void ASuperSideScroller_Brick::OnHit(UPrimitiveComponent* HitComp, AActor*
OtherActor, UPrimitiveComponent* OtherComp, FVector
NormalImpulse, const
FHitResult& Hit)
{
}
- Now that we have defined the OnHit() function, we can assign the OnComponentHit callback to the BrickCollision component. Add the following code to the constructor function:
BrickCollision->OnComponentHit.AddDynamic(this,
&ASuperSideScroller_Brick::OnHit);
- Compile the C++ code for the SuperSideScroller_Brick class and return to the UE5 editor.
- In the Content Drawer area, right-click on the Content folder and select the New Folder option. Name this folder Brick.
- Right-click inside the Brick folder and select Blueprint Class. From the All Classes search bar in the Pick Parent Class dialog window, search for and select the SuperSideScroller_Brick class.
- Name this new Blueprint BP_Brick, and then double-left-click the asset to open it.
- Select the BrickMesh component from the Components tab and set its Static Mesh parameter to the Shape_Cube mesh.
- With the BrickMesh component still selected, set the Element 0 material parameter to M_Brick_Clay_Beveled. This material is provided by Epic Games by default when creating a new project. It can be found within the StarterContent directory, in the Content Drawer area.
The last thing we need to do with the BrickMesh component is adjust its scale so that it fits the needs of the player character, as well as the platforming mechanics of the SuperSideScroller game project.
- With the BrickMesh component selected, make the following change to its Scale parameter:
(X=0.750000,Y=0.750000,Z=0.750000)
Now that the BrickMesh component is 75% of its normal size, the Brick actor will become more manageable for us as designers when we place the actor into the game world, as well as when we’re developing interesting platforming sections within the level.
The final step here is to update the location of the BrickCollision component so that it only has some of its collision sticking out from the bottom of the BrickMesh component.
- Select the BrickCollision component from the Components tab and update its Location parameter to the following values:
(X=0.000000,Y=0.000000,Z=30.000000)
The BrickCollision component should now be positioned as follows:

Figure 15.29 – Now, the BrickCollision component is just barely outside the BrickMesh component
We are making this adjustment to the position of the BrickCollision component so that the player can only hit UBoxComponent when jumping underneath the brick. By making it slightly outside of the BrickMesh component, we can control it better and ensure that this component cannot be hit by the player in any other way.
Note
You can find the assets and code for this exercise here: https://github.com/PacktPublishing/Game-Development-Projects-with-Unreal-Engine/tree/master/Chapter15/Exercise15.07.
With this exercise complete, you were able to create the base framework for the SuperSideScroller_Brick class and put together the Blueprint actor to represent the brick in the game world. By adding a cube mesh and brick material, you added a nice visual polish to the brick. In the following exercise, you will add the remaining C++ logic to the brick. This will allow the player to destroy the brick and obtain a collectible.
Exercise 15.08 – adding the Brick class’s C++ logic
In the previous exercise, you created the base framework for the SuperSideScroller_Brick class by adding the necessary components and creating the BP_Brick Blueprint actor. In this exercise, you will add on top of the C++ code of Exercise 15.07 – creating the Brick class, to grant logic to the Brick class. This will allow the brick to give players coin collectibles. Perform the following steps to accomplish this:
- To begin, we need to create a function that will add the collectible to the player. Add the following function declaration to the SuperSideScroller_Brick.h header file, under our Private Access Modifier:
void AddCollectable(class ASuperSideScroller_Player* Player);
We want to pass in a reference to the SuperSideScroller_Player class so that we can call the IncrementNumberofCollectables() function from that class.
- Next, create a void function declaration called PlayHitSound() under our Private Access Modifier:
void PlayHitSound();
The PlayHitSound() function will be responsible for spawning the HitSound property you created in Exercise 15.07 – creating the Brick class.
- Finally, create another void function declaration called PlayHitExplosion() under our Private Access Modifier:
void PlayHitExplosion();
The PlayHitExplosion() function will be responsible for spawning the Explosion property you created in Exercise 15.07 – creating the Brick class.
With the remaining functions needed for the SuperSideScroller_Brick class declared in the header file, let’s move on and define these functions inside the source file.
- At the top of the SuperSideScroller_Brick.cpp source file, add the following #include statements to the list of #include directories that already exist for this class:
#include "Engine/World.h"
#include "Kismet/GameplayStatics.h"
#include "SuperSideScroller_Player.h"
The includes for the World and GameplayStatics classes are necessary to spawn both the HitSound and the Explosion effects for the brick. Including the SuperSideScroller_Player class is required to make the call to the IncrementNumberofCollectables() class function.
- Let’s start with the function definition for the AddCollectable() function. Add the following code:
void ASuperSideScroller_Brick::AddCollectable(class
ASuperSideScroller_Player* Player)
{
}
- Now, make the call to the IncrementNumberofCollectables() function by using the Player function input parameter:
Player->IncrementNumberofCollectables(CollectableValue);
- For the PlayHitSound() function, you will need to get a reference to the UWorld* object and verify whether the HitSound property is valid before making the function call to SpawnSoundAtLocation from the UGameplayStatics class. This is a process you have done many times, so this is the entire function code:
void ASuperSideScroller_Brick::PlayHitSound()
{
UWorld* World = GetWorld();
if (World && HitSound)
{
UGameplayStatics::SpawnSoundAtLocation(World,
HitSound,
GetActorLocation());
}
}
- Just like the PlayHitSound() function, the PlayHitExplosion() function will work in an almost similar way, and it’s a process you have done many times in this project. Add the following code to create the function definition:
void ASuperSideScroller_Brick::PlayHitExplosion()
{
UWorld* World = GetWorld();
if (World && Explosion)
{
UGameplayStatics::SpawnEmitterAtLocation(World,
Explosion,
GetActorTransform());
}
}
With these functions defined, let’s update the OnHit() function so that if the player does hit the BrickCollision component, we can spawn HitSound and Explosion, and also add a coin collectible to the player’s collection.
- First, in the OnHit() function, create a new variable called Player of the ASuperSideScroller_Player type that equals Cast of the OtherActor input parameter of the function, as shown here:
ASuperSideScroller_Player* Player =
Cast<ASuperSideScroller_Player>(OtherActor);
- Next, we only want to continue with this function if Player is valid and bHasCollectable is True. Add the following if() statement:
if (Player && bHasCollectable)
{
}
- If the conditions in the if() statement are met, that is when we need to make the calls to the AddCollectable(), PlayHitSound(), and PlayHitExplosion() functions. Make sure to also pass the Player variable inside the AddCollectable() function:
AddCollectable(Player);
PlayHitSound();
PlayHitExplosion();
- Finally, add the function call to destroy the brick inside the if() statement:
Destroy();
- With the OnHit() function defined as we need, recompile the C++ code but do not return to the UE5 editor just yet.
- For the VFX and SFX of the brick’s explosion, we will need to migrate assets from two separate projects available to us from Epic Games Launcher: the Blueprints project and the Content Examples project.
- Using your knowledge from previous exercises, download and install these projects using Unreal Engine version 4.24. Both projects can be found in the Samples tab, in the UE Legacy Samples and UE Feature Samples categories, respectively.
- Once installed, open the Content Examples project and find the P_Pixel_Explosion asset in the Content Drawer area.
- Right-click this asset and select Asset Actions, then Migrate. Migrate this asset and all its referenced assets into your SuperSideScroller project.
- Once this asset has been successfully migrated, close the Content Examples project and open the Blueprints project.
- From the Content Drawer area of the Blueprints project, find the Blueprints_TextPop01 asset.
- Right-click this asset, then select Asset Actions, and then Migrate. Migrate this asset and all its referenced assets into your SuperSideScroller project.
With these assets migrated to your project, return to the Unreal Engine 5 editor of your SuperSideScroller project.
- Navigate to the Brick folder in the Content Drawer window and double-left-click the BP_Brick asset to open it.
- In the Details panel of the actor, find the Super Side Scroller Brick section and set the HitSound parameter to the Blueprints_TextPop01 soundwave you imported.
- Next, add the P_Pixel_Explosion particle you imported into the Explosion parameter.
- Recompile the BP_Brick Blueprint and add two of these actors to your level.
- Set one of the bricks so that the bHasCollectable parameter is True; set the other to False. Please refer to the following screenshot:

Figure 15.30 – This Brick actor is set to have a collectible spawn
- Using PIE, observe the differences in behavior between the two brick actors when you attempt to hit the bottom of the brick with the character’s head when jumping, as shown in the following screenshot:

Figure 15.31 – Now, the player can hit the brick and it will be destroyed
When bHasCollectable is True, SuperSideScroller_Brick will play our HitSound, spawn the Explosion particle system, add a coin collectible to the player, and be destroyed.
Note
You can find the assets and code for this exercise here: https://github.com/PacktPublishing/Game-Development-Projects-with-Unreal-Engine/tree/master/Chapter15/Exercise15.08.
With this exercise complete, you have now finished developing the gameplay mechanics for the SuperSideScroller game project. Now, the SuperSideScroller_Brick class can be used for both the platforming gameplay and the coin-collecting mechanic that we want for the game.
Now that the brick can be destroyed and hidden coins can be collected, all the gameplay elements that we set out to create for the SuperSideScroller game project are complete.
Summary
In this chapter, you put your knowledge to the test to create the remaining gameplay mechanics for the SuperSideScroller game project. Using a combination of C++ and Blueprints, you developed the potion power-up and coins for the player to collect in the level. Also, by using your knowledge from Chapter 14, Spawning the Player Projectile, you added unique audio and visual assets to these collectible items to add a nice layer of polish to the game.
You learned and took advantage of the UMG UI system within UE5 to create a simple, yet effective, UI feedback system to display the number of coins that the player has collected. By using the binding feature of the Text widget, you were able to keep the UI updated with the number of coins the player has currently collected. Lastly, you created a Brick class using the knowledge you learned from the SuperSideScroller project to hide coins for the player so that they can collect and find them.
The SuperSideScroller project has been an extensive project that expanded upon many of the tools and practices available within UE5. In Chapter 10, Creating the SuperSideScroller Game, we imported custom skeleton and animation assets to use in developing the Animation Blueprint of the player character. In Chapter 11, Working with Blend Space 1D, Key Bindings, and State Machines, we used Blend Spaces to allow the player character to blend between idle, walking, and sprinting animations, while also using an Animation State Machine to handle the jumping and movement states of the player character. We then learned how to control the player’s movement and jump height using the character movement component.
In Chapter 12, Animation Blending and Montages, we learned more about animation blending inside Animation Blueprints by using the Layered Blend per Bone function and Saved Cached Poses. By adding a new AnimSlot for the upper body animation of the player character’s throw animation, we were able to have both the player movement animations and the throw animation blend together smoothly. In Chapter 13, Creating and Adding the Enemy Artificial Intelligence, we used the robust systems of behavior trees and Blackboards to develop AI behavior for the enemy. We created a Task that will allow the enemy AI to move in-between points from a custom Blueprint that we also developed to determine patrol points for the AI.
In Chapter 14, Spawning the Player Projectile, we learned how to create an Anim Notify and how to implement this notify in our Animation Montage for the player character’s throw to spawn the player projectile. Then, we learned about how to create projectiles and how to use Projectile Movement Component to have the player projectile move in the game world.
Finally, in this chapter, we learned how to create UI using the UMG toolset for the coin collectible, as well as how to manipulate our Character Movement Component to create the potion power-up for the player. Lastly, you created a Brick class that can be used to hide coins for the player to find and collect.
In the next chapter, you will learn about the basics of multiplayer, server-client architectures, and the gameplay framework classes used for multiplayer inside UE5. You will use this knowledge to expand upon the multiplayer FPS project in UE5.
This summarization only really scratches the surface of what we learned and accomplished in the SuperSideScroller project. Before you move on, here are some challenges for you to test your knowledge and expand upon the project:
Additional Challenges
Test your knowledge from this section by adding the following functionality to the SuperSideScroller project.
- Add a new power-up that lowers the gravity that’s applied to the player character. Import a custom mesh and audio assets to give this power-up a unique look compared to the potion power-up you made.
- When the player character collects 10 coins, grant the player a power-up.
- Implement the functionality that allows the player to be destroyed when it’s overlapping with the AI. Include being able to respawn the player when this happens.
- Add another power-up that gives immunity to the player so that they cannot be destroyed when they’re overlapping with an enemy. (In fact, when overlapping an enemy with this power-up, it could destroy the enemy.)
- Using all the gameplay elements you’ve developed for the SuperSideScroller project, create a new level that takes advantage of these elements to make an interesting platforming arena to play in.
- Add multiple enemies with interesting patrol points to challenge the player when they’re navigating the area.
- Place power-ups in hard-to-reach areas so that players need to improve their platforming skills to obtain them.
- Create dangerous pitfalls for the player to navigate across and add functionality that will destroy the player if they fall off the map.