
Chapter 11: Azure Information Protection
With data governance (DG) becoming more and more important, Microsoft 365 administrators need to consider how to identify and classify all of the data stored in their organization and take steps to protect against any sort of data loss, whether it be accidental or malicious.
Microsoft provides Azure Information Protection (AIP) to respond to these requirements. AIP enables the use of labels and policies to allow your users to classify and protect the data they are working with. This includes documents and emails. When you protect an email or document, encryption is applied, ensuring that the email or document may only be accessed by those who have permission. An example of AIP would be to apply a Do not forward label to an email, meaning that the recipient of that email is unable to forward the email to other parties who are not authorized to look at that content.
In this chapter, we will introduce the features of AIP. You will learn how to plan your organization's AIP deployment and activate the Azure Rights Management service, and how to use classifications, labeling, and protection. In addition, we will show you how to create labels and label policies, use the AIP scanner to identify and protect on-premises data, deploy the AIP client where required, and track and revoke protected documents using the document tracking site, Microsoft Office, or File Explorer.
We shall cover these topics in the following order:
- Planning and implementing an AIP deployment for your organization
- Setting up AIP labels and policies
- Use the AIP scanner to detect and protect on-premises content
- Tracking and revoking protected documents
Planning and implementing an AIP deployment for your organization
In order to effectively plan for an AIP deployment in your organization, you need to have an understanding of how AIP is licensed in order to decide which Microsoft 365 subscriptions you are going to require for your users.
There are four subscription options available for AIP. These are described in the following table:

To summarize this, should you need to encrypt emails and documents, but not apply label classifications, then AIP for Office 365 is going to work just fine. If you need to take this a step further and require label classification capabilities, then AIP Premium P1 is the way to go. Finally, if you require all of the features mentioned in the preceding table, but also need to be able to automatically apply label classifications to sensitive content and use the on-premises AIP scanner, then you will need to use AIP Premium P2.
Once you have determined your AIP licensing requirements and acquired the necessary licenses for your users, you may proceed and check the activation settings for AIP within your Microsoft 365 tenant. Tenants that were provisioned after 2018 will have AIP activated by default. However, activation can be checked or completed by using any of the following methods:
- Office 365 Admin Center
- Azure portal
- Azure AD Rights Management PowerShell
Let's look at each of these methods.
Checking AIP activation status using the Office 365 Admin Center
In order to manage the activation status of AIP from the Office 365 Admin Center, you must be a Global Administrator, Security Administrator, or Azure Information Protection Administrator. You will need to navigate to https://admin.microsoft.com and complete the following steps:
- Select Settings | Services & add-ins | Microsoft Azure Information Protection, as shown in the following screenshot:

Figure 11.1 – Services and add-ins
- Click on Manage Microsoft Azure Information Protection Settings. You will see the option to activate or deactivate rights management, as shown in the following screenshot:
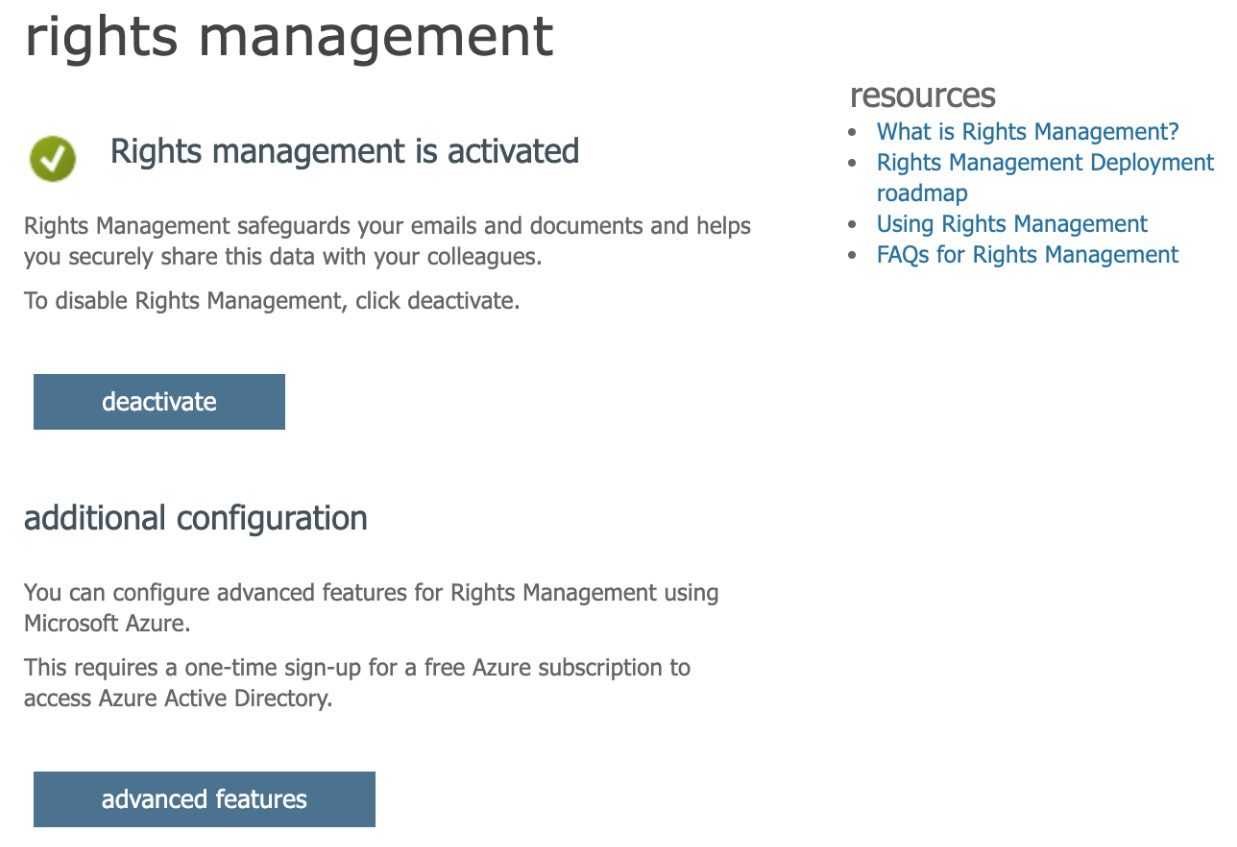
Figure 11.2 – Rights management
The preceding screenshot also shows you an option for advanced features. If you select this option, you will be taken to the AIP page within the Azure portal. Next, we will take a look at the Azure portal options for AIP.
Checking AIP activation status using the Azure portal
In order to manage the activation status of AIP from the Azure portal, you must be a Global Administrator, Security Administrator, or Azure Information Protection Administrator.
You will need to navigate to https://portal.azure.com and complete the following steps:
- Select All services | Azure Information Protection, as shown in the following screenshot:
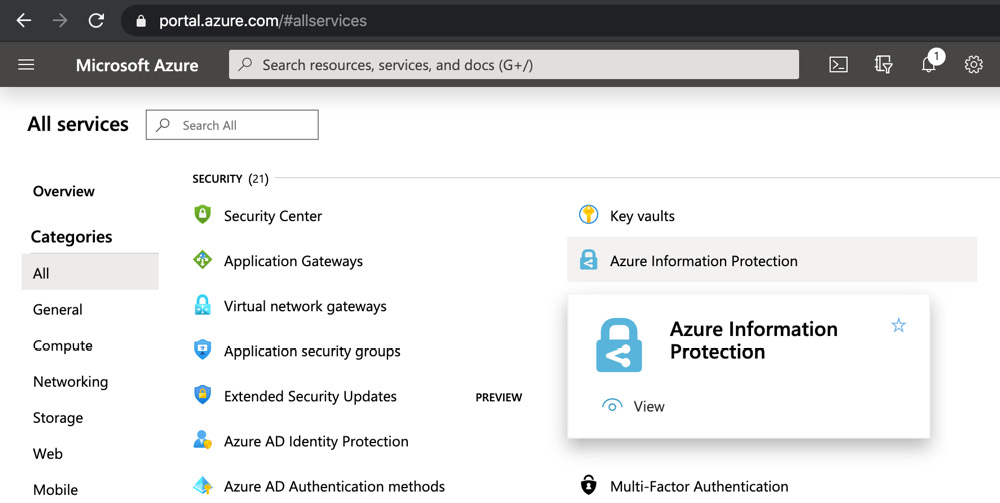
Figure 11.3 – Azure Information Protection
- You will be taken the Azure Information Protection section. From the left-hand side menu, click on Protection activation from the Manage section, as shown in the following screenshot:
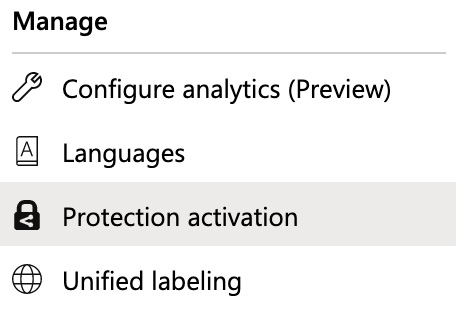
Figure 11.4 – Protection activation
- Next, you will see the activation status for AIP in your tenant, as the following screenshot illustrates:
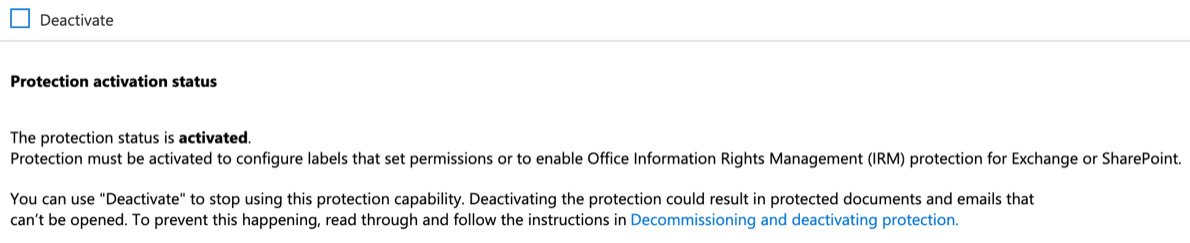
Figure 11.5 – Activation status
As with the Office 365 Admin Center, you have the same options to Activate or Deactivate the AIP feature for your tenant. Finally, let's look at how you can check the AIP activation status using the Azure AIPService PowerShell module.
Checking AIP activation status using the Azure AIPService PowerShell
In order to manage the activation status of AIP from Windows PowerShell, you will need to install the AIPService module. The AIPService module replaces an older module called the AADRM module. The AADRM module must be uninstalled on the computer that you are using PowerShell on before you can install the newer AIPService module. This process is detailed in the following steps:
- Run PowerShell as an administrator on your computer and run the following command to uninstall the older module, if you have it installed already:
Uninstall-Module -Name AADRM
- Now, you may proceed and install the new AIPService module by running the following command:
Install-Module -Name AIPService
- Next, we need to connect to the service. This is done by running the following command:
Connect-AIPService
- When prompted, enter your Azure AD Global Administrator credentials to authenticate to Office 365. Once connected, run the following command to check whether AIP is activated for your tenant:
Get-AIPService
- This command will show you the current activation status for AIP. The following screenshot shows all of the preceding commands running in sequence and illustrates that AIP is enabled for this example:
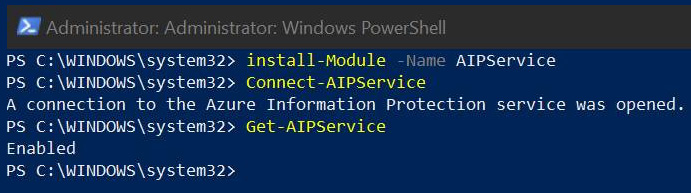
Figure 11.6 – AIP activation status in PowerShell
- If the status had been set to disabled, AIP could be activated for the tenant by running the following command:
Enable-AIPService
Now that we have ensured that AIP is activated, we are one step closer to being able to start using the AIP service to create labels and policies. One additional step that is important to complete at this point is configuring one of more superusers for AIP. This requirement will be described in the next section.
Configuring AIP superusers
AIP uses the Azure Rights Management service to protect organizational data. One or more AIP superusers can be created in order to ensure that there is always someone authorized to read or inspect AIP protected data. This is important in the event that a user leaves the business and they have applied protection to documents. In this situation, AIP superusers have the ability to alter or completely remove the protection.
The superuser feature is not enabled by default, and no users are assigned to the role. In order to enable this feature, we need to complete the following steps:
- Run Windows PowerShell as an administrator and connect to AIPService, as demonstrated in the previous section.
- Run the following command:
Enable-AIPServiceSuperUserFeature
In the following screenshot, we can see the successful activation of the super user feature:

Figure 11.7 – Enabling the super user feature in PowerShell
- Now that the feature is enabled, we can assign the AIP superuser role to either individual users or to a group of users who are to be trusted with this role. Do this by executing the following PowerShell commands:
Add-AipServiceSuperuser
Set-AipServiceSuperUserGroup
Important note
It is good practice to assign superusers individually as opposed to using groups. This is due to the fact that Azure Rights Management will cache group content, which can result in delays when adding or removing members of a group.
- In order to see which individual users are set as AIP superusers, use the following command:
Get-AIPServiceSuperUser
Important note
You can limit the number of Global Administrators in your Microsoft 365 tenant by adding users as AIP Service Administrators. This can be done by using the Add-AIPServiceRoleBasedAdministrator command from within Windows PowerShell. Users assigned this role are able to enable the superuser feature and also assign other users the superuser role.
So, to recap what we have learned in this section, we have shown you the various methods you can use to check whether AIP has been enabled in your Microsoft 365 tenant, along with how to activate or deactivate the AIP feature as required. Now that you know how to access and enable AIP and set up super users, we can look at how to create labels and label policies, as well as how to enable unified labeling.
Setting up AIP labels and policies
The core functionality of Azure Information Protection is based on labels and policies. Microsoft 365 Administrators can define sensitivity labels in the Azure portal. These labels can be configured with protection settings, visual markings (such as watermarks), and, depending on your subscriptions, they may also include conditions so that a label can be automatically applied.
Once the AIP labels have been created, policies may then be defined in order to determine which users will be able to see and use the labels within their Microsoft Office applications.
Important note
At the time of writing this book, sensitivity labels are available within Microsoft Office applications for Windows, Mac, Office Online, and iOS and Android.
Historically, AIP labels have been controlled and deployed from the Azure portal. More recently, however, the Unified labeling feature has been included, which allows you to synchronize and manage your labels from the Microsoft 365 Security and Compliance Center.
Let's take a look at how this works, starting with setting up labels from the Azure portal.
Setting up labels
Once you have activated Azure Information Protection for your tenant, you will have some predefined labels already present. These can be found in the Azure portal, under All services | Azure Information Protection | Classifications | Labels, as shown in the following screenshot:
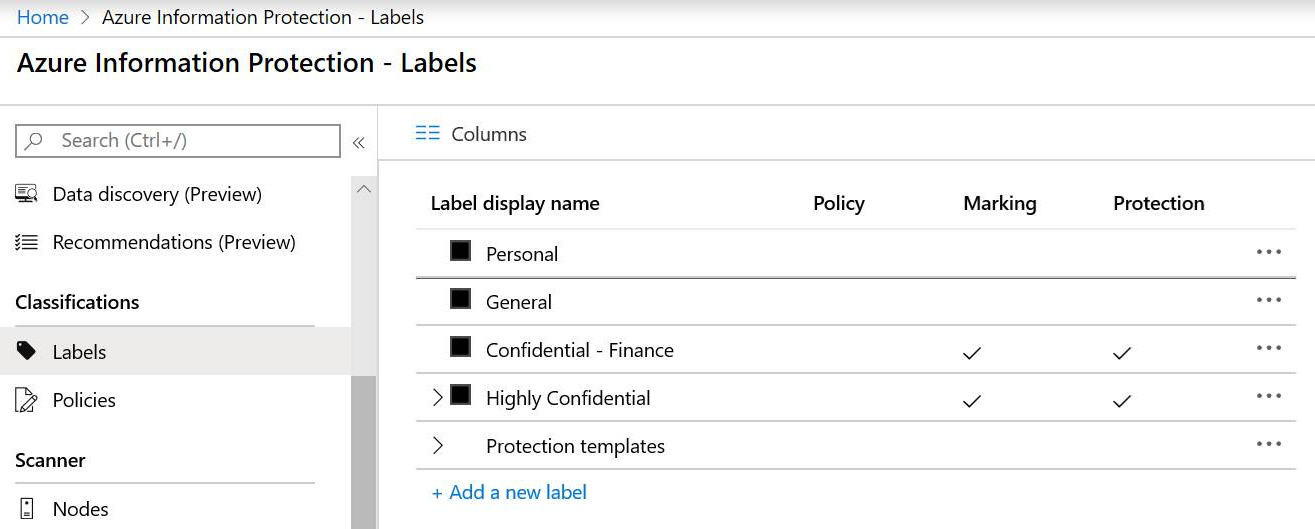
Figure 11.8 – AIP labels
These default labels may be suitable for many organizations and are often a good starting point when considering an AIP deployment pilot to a small group of users. As you will note from the preceding screenshot, the labels have different settings related to protection and marking.
The Highly Confidential label may also be expanded to show available sublabels. Let's take a look at the various options you have for labels by going through the process of setting up a new label. To do this, we need to complete the following steps:
- Click on Add a new label. You will see the following screen:
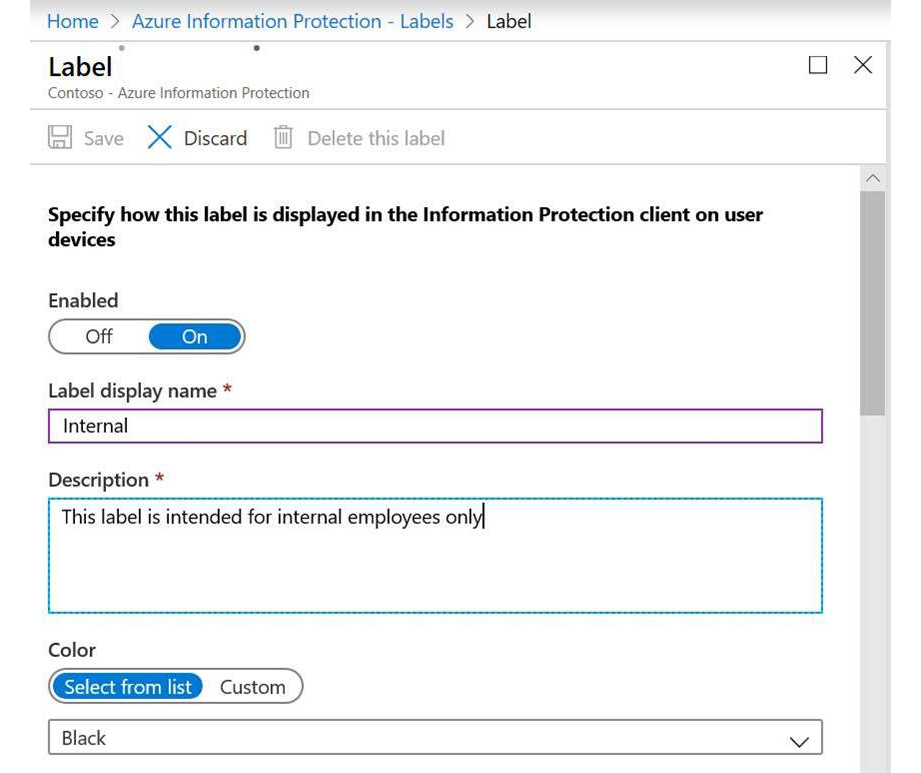
Figure 11.9 – Adding a new label
In this example, we will create a label called Internal, which is only intended for use by internal tenant users. We need to enter a Label display name, a Description, and choose a label Color, if required, as the preceding screenshot illustrates. Additionally, we can set the Enabled slider to On or Off, depending on whether we wish the label to be activated immediately. Alternatively, we can choose to activate it at a later time.
- Next, we need to scroll down and select the option to Protect, which can be found under Set permissions for documents and emails containing this label, as shown in the following screenshot:
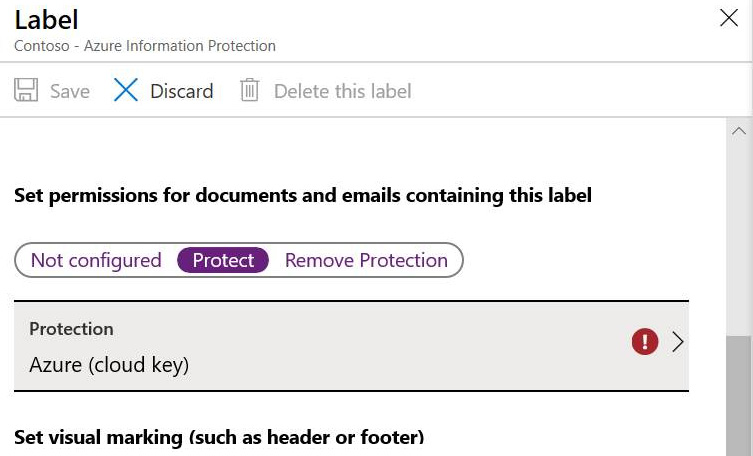
Figure 11.10 – Protection settings
- Next, under Protection, click on Azure (cloud key). You will see the protection options shown in the following screenshot:
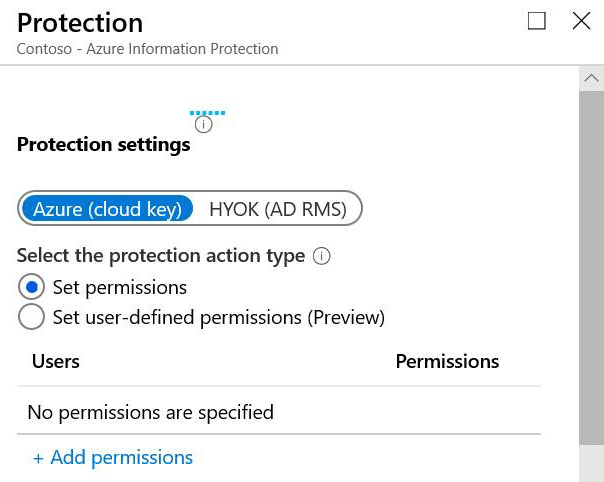
Figure 11.11 – Cloud key settings
- From the Label protection settings, you can choose between an Azure (cloud key) or the option to hold your own key with HYOK (AD RMS). In most cases, and for the purposes of this example, Azure (cloud key) is the recommended option.
- You then have the option to select the protection action type. We have two options here. These are Set permissions and Set user-defined permissions (Preview). We are going to set up this label with traditional permissions by leaving the Set permissions option selected.
Important note
The Set user-defined permissions (Preview) option allows you to configure email-only labels so that you can apply the Do not forward option to emails.
- Next, with Set permissions selected, click on Add permissions. You will see the options shown in the following screenshot:
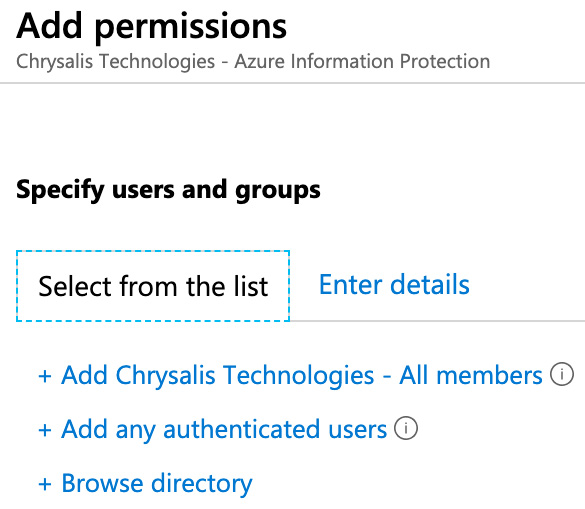
Figure 11.12 – Setting label permissions
- From the Add permissions options, you can choose to add all tenant members, any authenticated users, or you may browse the directory to search for specific Azure AD Users and Groups. The Enter details tab is also available, should you wish to specify any external users or domains who should have permissions. In this example, however, we will choose the first available option, which is to add All Members.
- Next, if we scroll down the Add permissions options, we will see the available permissions options for the users we are assigning to the label. We will leave the default setting of Co-Owner as-is, which means that users have full permission to access any content that this label may be applied to. This is shown in the following screenshot:
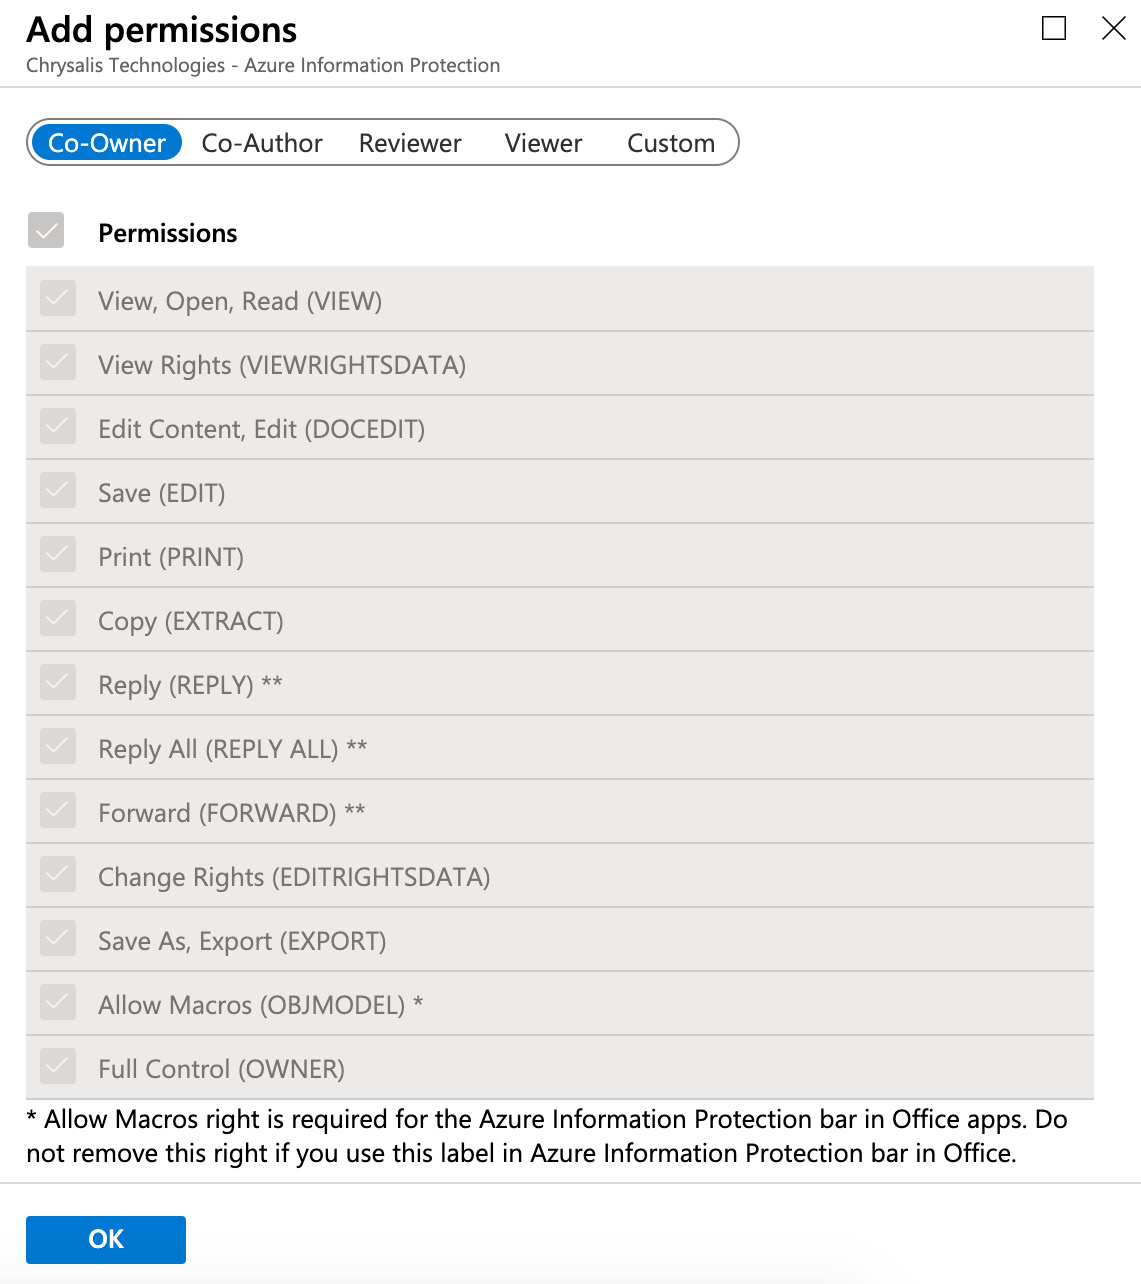
Figure 11.13 – Permissions options
- Click on OK to finish setting up the permissions. This will take you back to the Protection settings screen, as shown in the following screenshot:

Figure 11.14 – Protection settings
You will see additional options for File Content Expiration in this section, as illustrated in the preceding screenshot. You can set expiry dates for access, configure offline access, and also set a number of days for which access can be granted without an internet connection. Click OK to complete these settings. This takes you back to the main label creation dialog, as shown in the following screenshot:
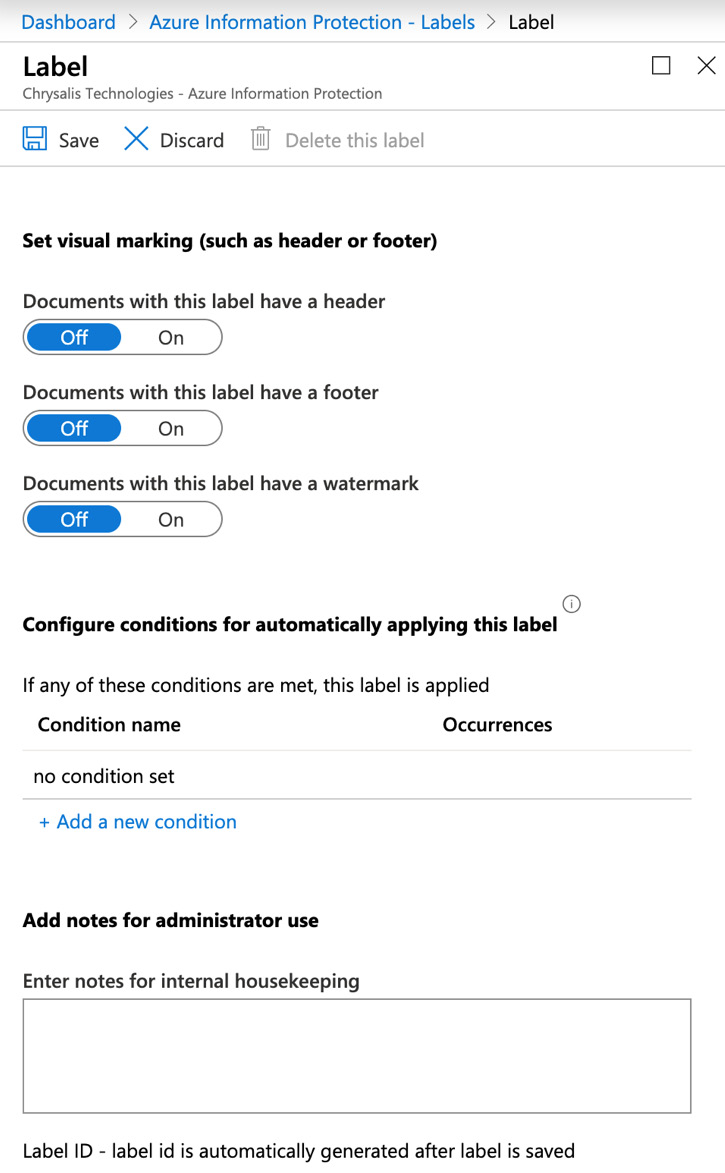
Figure 11.15 – Additional options
Here, you can set some additional options, such as applying visual markings to content protected by this label.
- Additionally, you have some options to Configure conditions for automatically applying this label. Selecting Add a new condition will take you to the following screen, where you can choose from a selection of built-in sensitive information types or define your own:
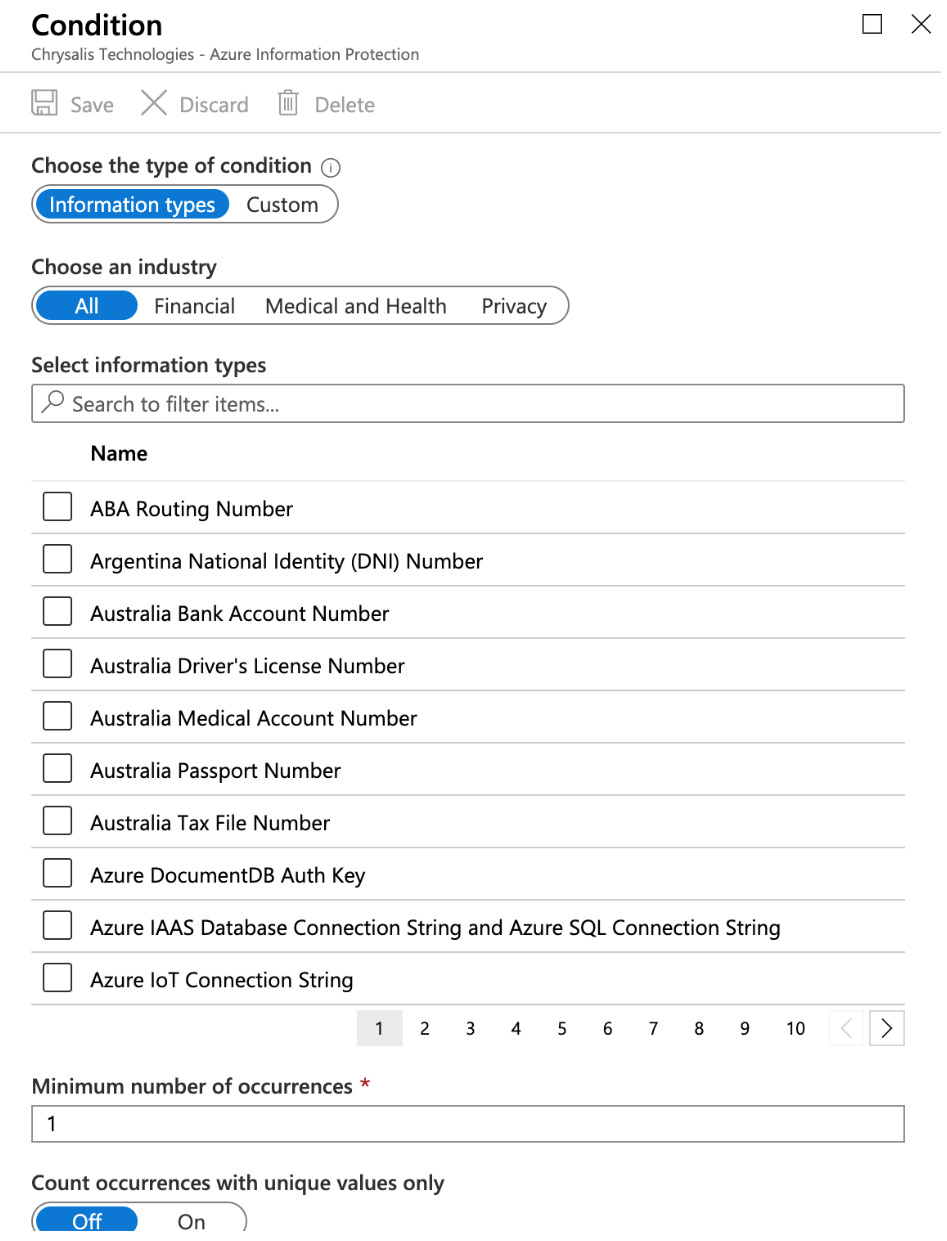
Figure 11.16 – Applying conditions
- When you have made your selections, click Save.
Important note
In order to apply enforced conditions to a label, you will need either an Azure Information Protection P2 license, an EM+S E5 license, or a Microsoft 365 E5 license.
- You may then choose to have the label applied automatically or recommended this to your users, as shown in the following screenshot:

Figure 11.17 – Applying conditions
- Finally, you can optionally add notes to your label for administrator use. All of the required settings for the new label have now been completed. Click on Save to finish creating your label. You will now see your new label in the list of labels, as shown in the following screenshot:

Figure 11.18 – Labels
Important note
Note that for this label, we have applied Protection settings, but no visual markings.
So, now that we have shown you how to create a label in Azure Information Protection, let's look at setting up a label policy.
Setting up label policies
Once you have one or more labels defined, the next step is to set up or apply an existing label policy to your users and groups in Azure AD. Label policies can be found in the Azure portal, under All services | Azure Information Protection | Classifications | Policies, as shown in the following screenshot:
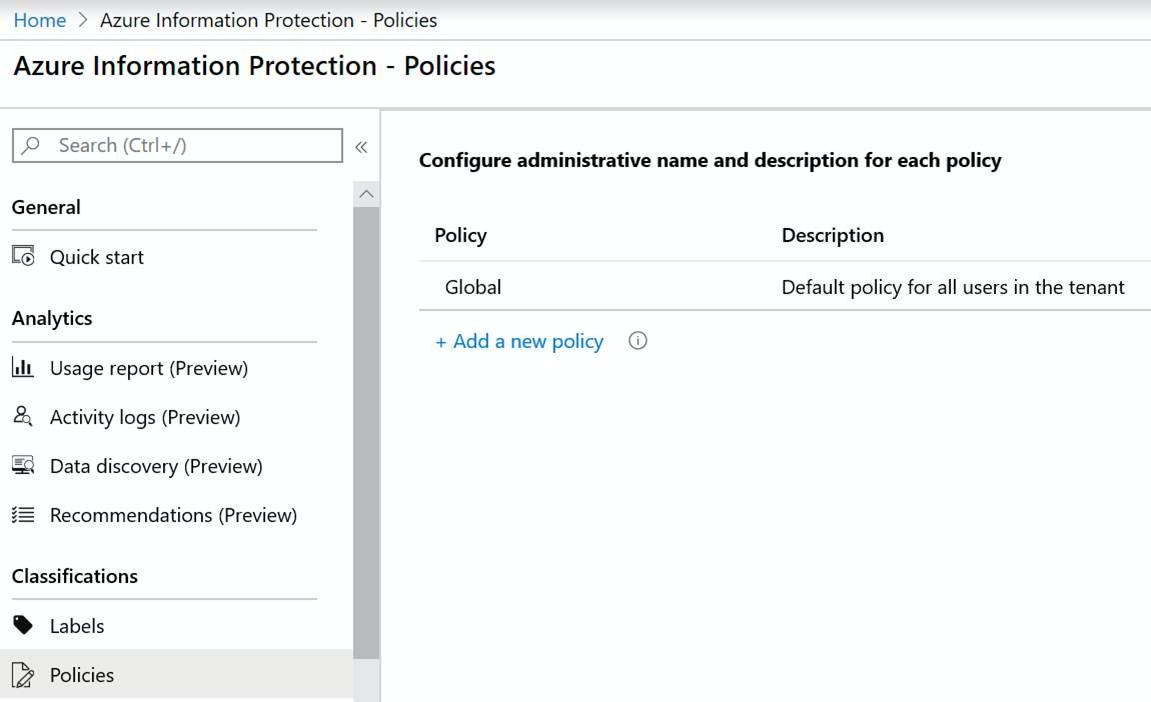
Figure 11.19 – Label policies
You will see one existing policy here named Global, which is the Default policy for all users in the tenant. Here, you may modify the default policy or add your own. We will show you this process in the following steps:
- Double-click the Global policy to review the settings that have been configured for it, as shown in the following screenshot:

Figure 11.20 – Editing the global policy
We can see the name and description that have been assigned to the policy, and also that we are unable to modify the users or groups that this policy applies to. By default, no labels are assigned to the default Global Policy.
- We can choose to include some labels by clicking Add or remove labels. This will provide us with the options shown in the following screenshot:
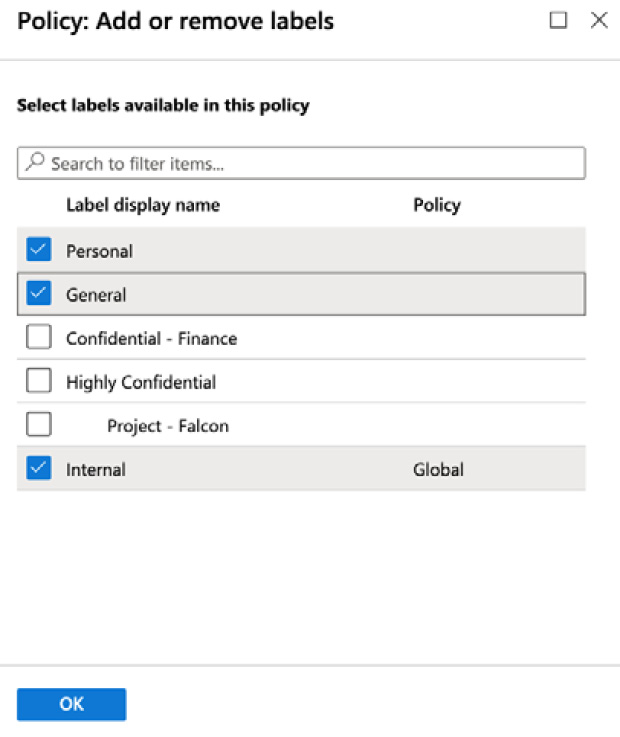
Figure 11.21 – Choosing labels for the policy
In this example, we have chosen to add three labels to the default policy (including the Internal label, which we set up in the previous step).
- After clicking OK, we can see that our three chosen labels are now included in the policy settings.
- We are also able to enter a Title and Tooltip, along with a default label for the policy. In this example, we have set the default label to the Internal label, as shown in the following screenshot:
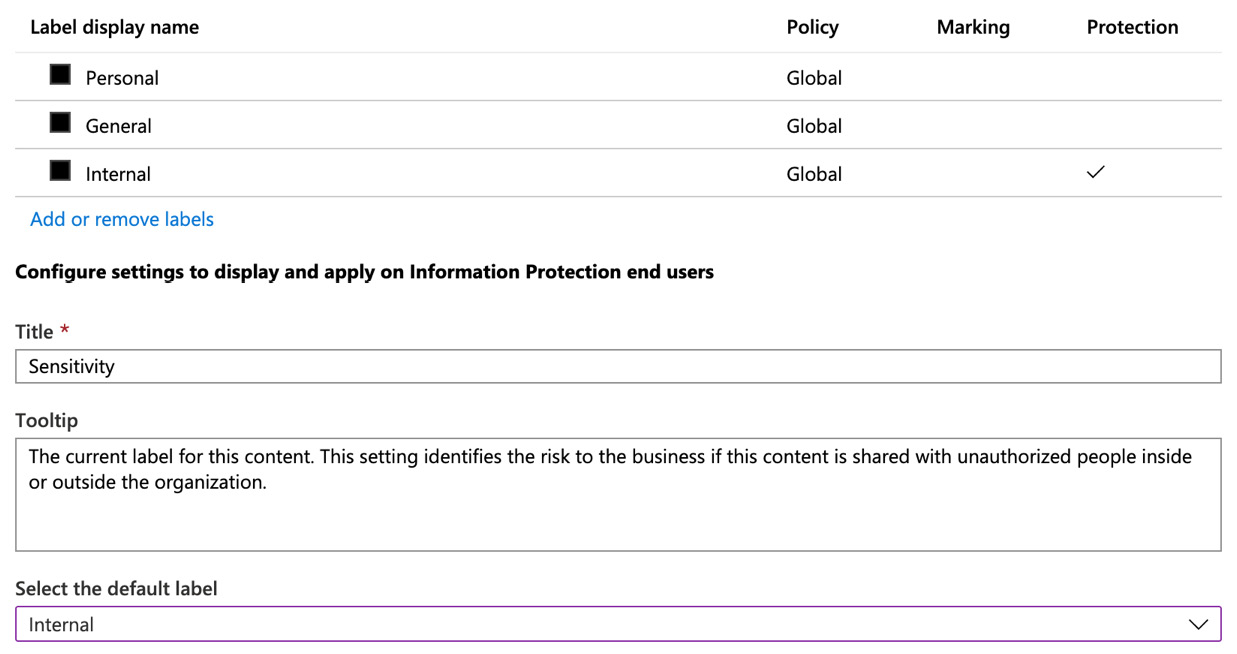
Figure 11.22 – Setting the default label
- If we scroll down further, we have some additional options we can configure. In this example, we will set the remaining options as per the following screenshot:
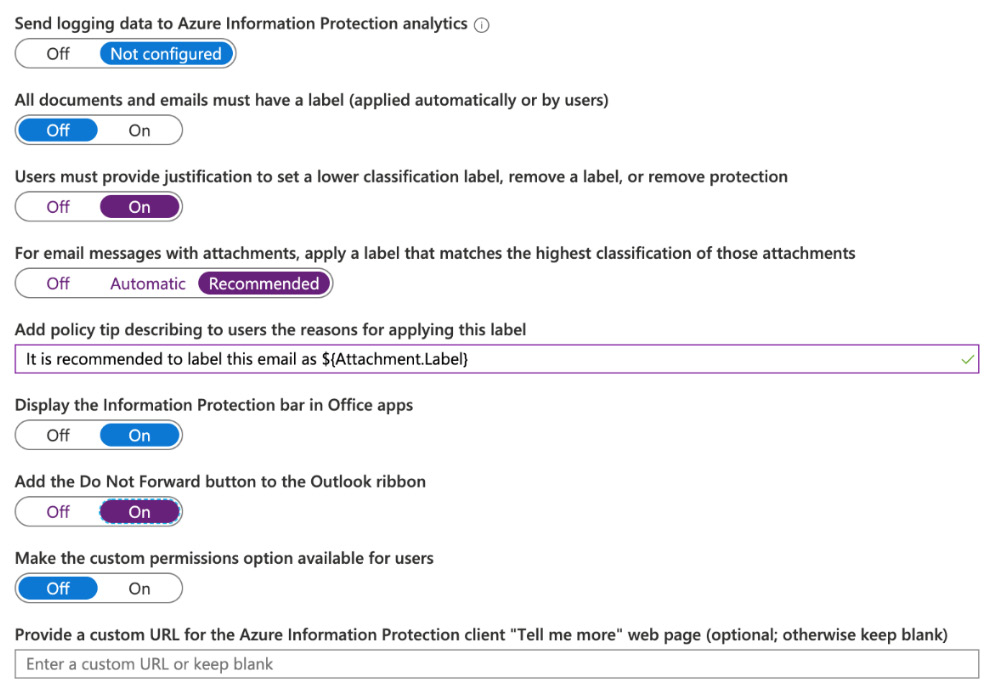
Figure 11.23 – Additional options
- Once you have applied the desired changes to the policy, click on Save, and then click on OK.
The preceding steps have shown you how to modify the default Global Policy, which, as we have stated, will apply to all users. You will likely want to consider creating your own custom label policy and applying it to selected users or groups in order to roll out labels to your users in a phased approach. You can click Add a new policy in order to create your own custom policy. The settings within your custom policy can be configured in exactly the same way as shown in the preceding steps.
Now that we have shown you how to set up or modify AIP labels and label policies from the Azure portal, let's look at how to enable unified labeling in order to manage sensitivity labels from the Microsoft 365 Security and Compliance Center.
Enabling Unified labeling
With Azure Information Protection, you also have the option to use Unified labeling. In newer Microsoft 365 tenants, you will find that Unified labeling is activated by default. You may can the status of your own tenant by completing the following steps:
- Navigate to All services | Azure Information Protection | Manage | Unified labeling, as shown in the following screenshot:
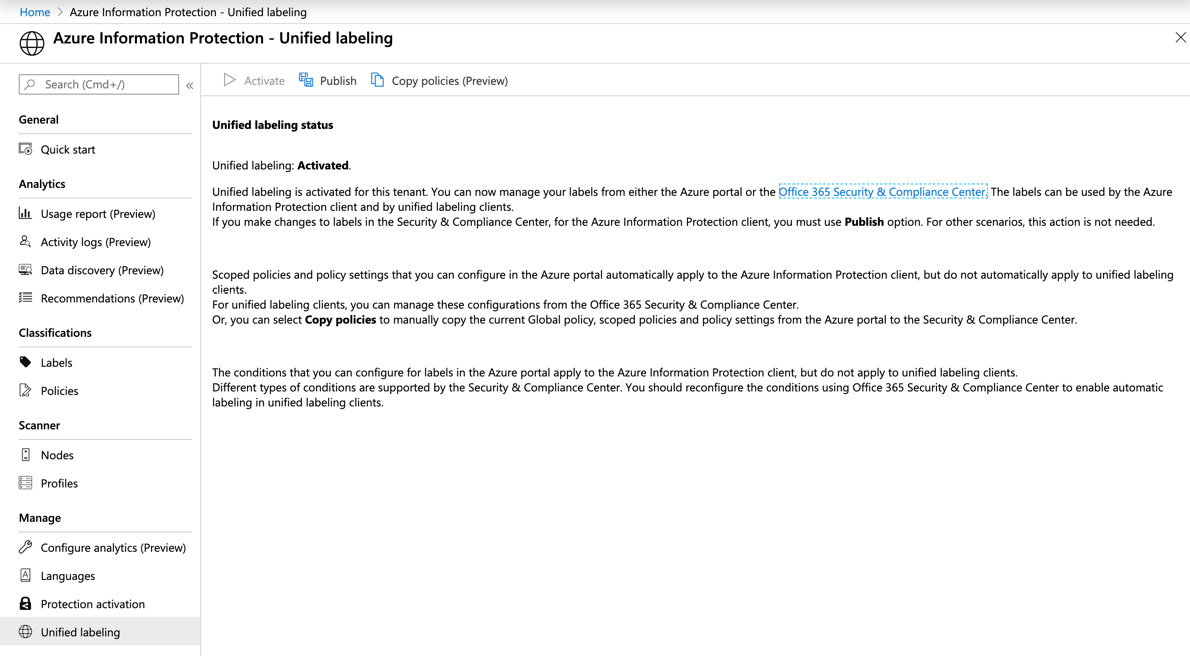
Figure 11.24 – Unified labeling
- If Unified labeling is not already activated, you can click on Activate to do so.
- Once enabled, the labels that you have defined in your Azure portal will be published to the Security and Compliance Center. You can trigger the option to publish the labels manually if you wish this to take place immediately by clicking on Publish.
- While it is not possible to publish your label policies to the Security and Compliance Center at this time, there is now a preview feature included, called Copy policies (Preview), where you can choose to copy the Global default policy to the Security and Compliance Center, as shown in the following screenshot:

Figure 11.25 – Copy policies (Preview) feature
- Once you have chosen this option, you will see that the policy is successfully published, as shown in the following screenshot:
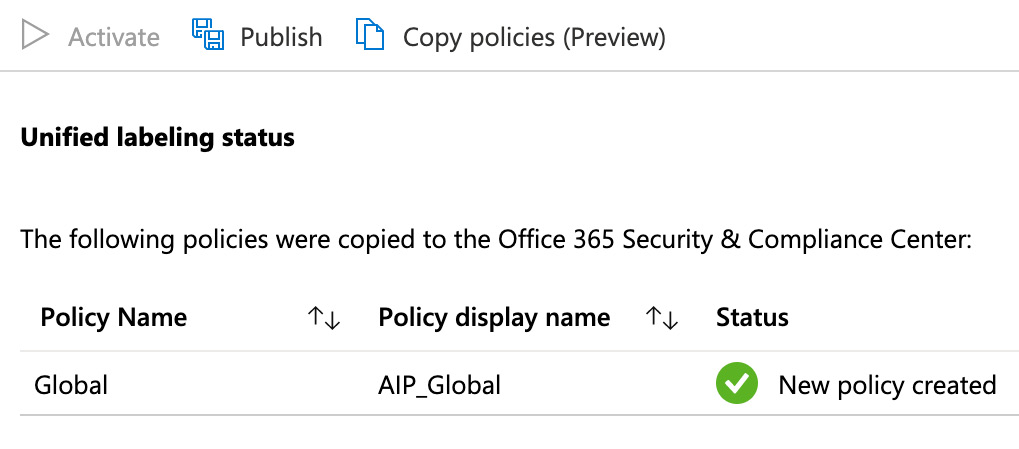
Figure 11.26 – New policy created
- Now that we have checked that Unified labeling is activated and published, we can switch over to the Security and Compliance Center at https://protection.office.com and check the labels by choosing Sensitivity Labels | Labels.
As shown in the following screenshot, all of the labels from the Azure portal have been successfully published, including the Internal label, which we set up earlier in this chapter:

Figure 11.27 – Labels in the Security and Compliance Center
- If we click on Label policies, we will also see that the AIP Global policy that we published using the preview feature in the previous step is visible, as shown in the following screenshot:

Figure 11.28 – Label policies in the Security and Compliance Center
New policies can also be created manually from the Security and Compliance Center. Some examples that have been created can be seen in the preceding screenshot. If you create label policies from here, you will need to use the Publish labels setting to apply the labels to selected users and groups.
Important note
The Unified labeling client is required on devices so that you can use sensitivity labels and policies published from the Security and Compliance Center. Details on the Unified labeling client and the more traditional AIP client can be found in the References section at the end of this chapter.
Now that we have configured the settings for Unified labeling within the Azure portal and the Microsoft 365 Security and Compliance Center, we can look at how our users will experience these features.
User experience
When your users are targeted by label policies, they will see the sensitivity bar available within their Microsoft Office applications, as shown in the following screenshot:
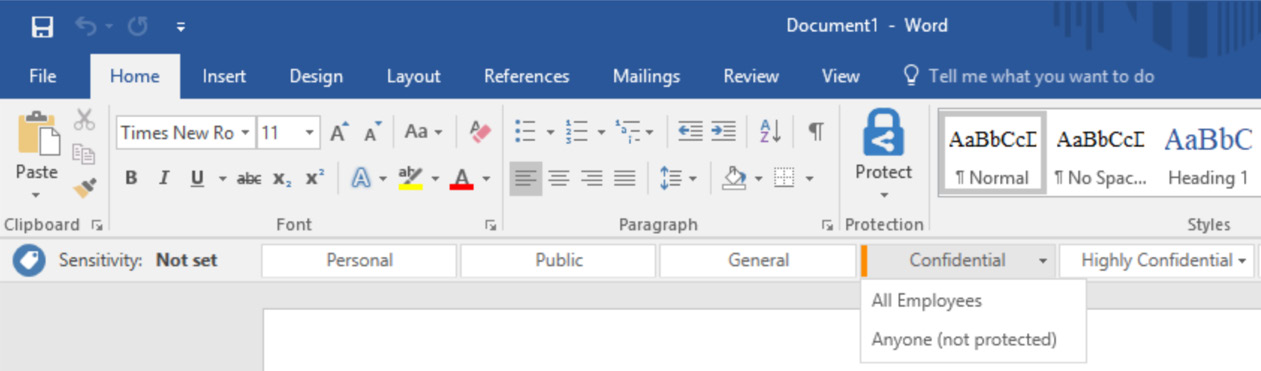
Figure 11.29 – Sensitivity bar in Microsoft Office
The experience will differ slightly, depending on the platform or operating system. In addition, there is a distinct difference between the experience of the traditional AIP labeling client and the newer Unified labeling client. If you have the traditional client installed, your users will see the Protect button, as shown in the preceding screenshot. However, should they have the Unified labeling client, they will see the Sensitivity button instead.
In this section, we have shown you how to configure AIP labels and policies, how to enable Unified labeling, and demonstrated the user experience.
Next, we will explore how to use the AIP Scanner to search for on-premises content and apply protection to it.
Using the AIP Scanner to detect and protect on-premises content
If you have an Azure Information Protection Premium P2 subscription, you can use the AIP Scanner tool to automatically classify and label documents that are stored within on-premises file shares or SharePoint servers. The AIP Scanner is a tool that can be installed on a Windows Server.
Once installed in your environment, the AIP Scanner uses the AIP client to index the on-premises content that it detects. Microsoft 365 sensitive information types (which are included in Data Loss Prevention) are used to determine whether the scanned content needs to be labeled.
Installing the AIP Scanner
To install the AIP Scanner, we need to use Windows PowerShell on the server that was chosen to host the service. This can be achieved by completing the following steps:
- Run Windows PowerShell as an administrator and run the following command:
Connect-AIPService
- Enter your administrator credentials when prompted.
Important note
In order to configure the AIP Scanner, you will need to have an AIP superuser already configured. The process of enabling superusers was described earlier in this chapter, in the Configuring AIP superusers section.
Use the following command to install the scanner:
Install-AIPScanner
- When prompted, enter some credentials to create a SQL database for the context of the service to run in.
Once installed, we need to create a profile in the Azure portal. This can be done by completing the following steps:
- Log into the Azure portal and navigate to All services | Azure Information Protection | Scanner | Profiles, as shown in the following screenshot:
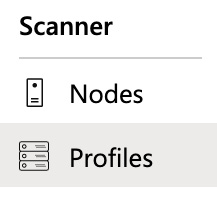
Figure 11.30 – AIP scanner profiles
- Choose Add. Enter a Profile name and Description and configure your chosen profile settings, as shown in the following screenshot:
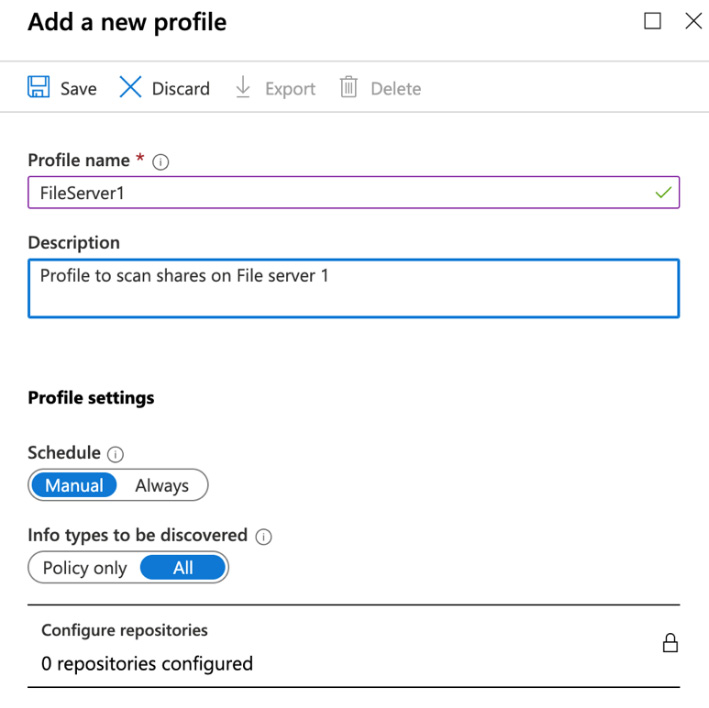
Figure 11.31 – Adding a new profile
Important note
You will be unable to click on Configure repositories to enter a UNC path for the content you wish to scan until you have saved your new profile.
- Scroll down to Policy enforcement. You will see the options shown in the following screenshot:

Figure 11.32 – Policy enforcement
- Choose the appropriate options and click Save. Once saved, you will have the ability to click on Configure Repositories and enter the UNC paths of the content you wish to scan. You will see that the profile has been created, as shown in the following screenshot:

Figure 11.33 – New profile created
Note that you will be unable to run the profile at this time and that the Scan now option remains grayed out. In order to enable the profile for use, you must ensure that the AIP client is fully installed on the server that you are scanning, and you must also create two applications registered in Azure Active Directory. These will be used for the Set-AIPAuthentication cmdlet. The applications required are as follows:
- A web app/API application
- A native application
Instructions on how to configure the required applications are included in the References section at the end of this chapter.
In this section, we have explained the purpose of the AIP Scanner. We have shown you how to install the scanner and configure a profile for the scanner, which will enable it to interrogate an on-premises data repository, as well as how to apply classifications and labels based on the profile settings you create.
In the final section of this chapter, we will show you how to track and revoke protected documents.
Tracking and revoking protected documents
Once you have your AIP configuration defined and rolled out to your Microsoft 365 users, as well as started applying labels to documents, you can access the document tracking site in order to view and, if necessary, revoke access to content, should it no longer be deemed appropriate. We will demonstrate this process in the following steps:
- You can access the document tracking site from the following URL: https://portal.azurerms.com/#/admin.
- If you are logging in for the first time, you will be prompted to download and install the app. You will need to download the version that's appropriate for your operating system.
- Once installed, you can launch the Azure Information Protection Viewer and then click Open on a protected file, as the following screenshot illustrates:

Figure 11.34 – Azure Information Protection Viewer
- Alternatively, you can perform the same steps from within your Microsoft Office applications. Click on the Protect icon from the sensitivity bar (or the Sensitivity icon, if you're using the Unified labeling client). Next, click on Track and Revoke.
Using both the Azure Information Protection Viewer and the sensitivity bar options within your Microsoft Office applications, you will be able to track access to your content and either export the list to a CSV file or Revoke access, as shown in the following screenshot:

Figure 11.35 – Revoke access
Important note
Links to the tracking and revocation options for your protected documents can be found in the References section at the end of this chapter.
In this section, we demonstrated how to track and revoke access to content in your organization that has been protected with Azure Information Protection. We showed how this can be done from within your Microsoft Office applications, and also how to do this by downloading and installing the Azure Information Protection viewer. Both methods provide quick and easy access for users and administrators so that they can inspect their documents and revoke any access that may no longer be appropriate.
Summary
In this chapter, we introduced you to Azure Information Protection (AIP). We showed you how AIP is a powerful feature of Azure AD Premium that allows you to apply labels and label policies to your emails and documents within Microsoft 365.
We illustrated how to activate AIP for your tenant, as well as how to synchronize your labels to the Security and Compliance Center using Unified Labeling. In addition, we showed you how to use the AIP Scanner to interrogate your on-premises content and apply classifications to this content automatically.
Finally, we showed you how to track and revoke the content you have protected with AIP labels using the in-built sensitivity bar in your Microsoft Office applications, or by using the Azure Information Protection Viewer.
In the next chapter, we will be looking at Data Loss Prevention (DLP) and how it can be used to safeguard your users from accidentally sharing sensitive content.
Questions
- Which of the following subscriptions can't be used to automatically classify and protect content with Azure Information Protection?
a. Azure Information Protection Premium P2
b. EM+S E3
c. EM+S E5
d. Microsoft 365 E5
- You can activate AIP for your Microsoft 365 tenant using PowerShell.
a. True
b. False
- Which PowerShell module was replace by the newer AIPService module?
a. AIP
b. AADRM
c. Activedirectory
d. ADRMS
- Which of the following is not a visual marking setting available for an AIP label?
a. Watermark
b. Highlight
c. Header
d. Footer
- AIP labels can be published to the Microsoft 365 Security and Compliance Center using the Unified labeling feature.
a. True
b. False
- Which of the following commands is used to install the AIP Scanner?
a. Import-AIPScanner
b. Install-AIPScanner
c. Set-AIPScanner
d. Get-AIPScanner
- Which of the following two methods can be used to track and revoke content protected with AIP?
a. The Azure Information Protection Scanner
b. The Azure Information Protection client
c. The Azure Information Protection unified client
d. The Azure Information Protection viewer
e. The track and revoke option within Microsoft Office applications
- The Azure Information Protection Scanner does not require a dedicated Windows Server.
a. True
b. False
- Which of the following PowerShell commands is a valid method for assigning the AIP superuser role, without needing to grant full Global Administrator access?
a. Add-AIPServiceRoleBasedAdministrator
b. EnableAIPServiceSuperUserFeature
c. EnableAIPService
d. Set-AIPServiceSuperUserGroup
- Which of the following Azure AD roles is unable to activate the Azure Information Protection Service in a Microsoft 365 tenant?
a. User Administrator
b. Global Administrator
c. Azure Information Protection Administrator
d. Security Administrator
References
Please refer to the following links for more information:
- Activating the protection service with AIP: https://docs.microsoft.com/en-us/azure/information-protection/activate-service
- Installing the AIPService PowerShell Module: https://docs.microsoft.com/en-us/azure/information-protection/install-powershell
- Configuring an AIP super user: https://docs.microsoft.com/en-us/powershell/module/aipservice/add-aipservicesuperuser?view=azureipps
- Using PowerShell with the AIP client: https://docs.microsoft.com/en-au/azure/information-protection/rms-client/client-admin-guide-powershell
- Deploying the AIP Scanner: https://docs.microsoft.com/en-us/azure/information-protection/deploy-aip-scanner
- Using the AIP scanner to label files, and creating and configuring the Azure AD applications for Set-AIPAuthentication: https://docs.microsoft.com/en-us/azure/information-protection/rms-client/client-admin-guide-powershell#how-to-label-files-non-interactively-for-azure-information-protection
- Configuring and using document tracking: https://docs.microsoft.com/en-us/azure/information-protection/rms-client/client-admin-guide-document-tracking
- Track and revoke documents in AIP: https://docs.microsoft.com/en-us/azure/information-protection/rms-client/client-track-revoke