Chapter 15: Personal Data Protection in Microsoft 365
One of the challenges faced by Microsoft 365 compliance administrators is to be aware of their responsibilities concerning any personal data that resides within their environment. The General Data Protection Regulations (GDPR) describes personal data as any information that relates to an identified or identifiable natural person.
In this chapter, we will demonstrate how you can identify and protect personal data within your Microsoft 365 environment by using content searches to find personal data, and then we will look at how to protect that data using retention or sensitivity labels. We will also explain how Data Loss Prevention (DLP) reports, audit logs, alert policies, and Cloud App Security can be used to monitor leaks of personal data.
We will cover these topics in the following order:
- Conducting searches for personal data
- Using retention labels to protect personal data
- Accessing logs and reports to search for and monitor personal data leaks
Conducting searches for personal data
Under GDPR, compliance administrators are obliged to respond to any requests by users for access to any personal data relating to them that is stored in the Microsoft 365 tenant. In order to provide the required information, the Content search feature can be used. Content searches use built-in sensitive information types, which can be found in the Security & Compliance Center under Classification | Sensitive info types.
We have discussed these sensitive information types in previous chapters of this book when we talked about DLP and Azure Information Protection (AIP). DLP is particularly useful in protecting your organization against personal data loss as it is capable of detecting personal data in transit in an Exchange Online email and can act accordingly with policy tips, and DLP policies and rules. We will examine this in further detail later on in this chapter.
First, let's take a look at how you can use content searches to find personal data in your Microsoft 365 environment. This requires you to complete the following steps:
- Sign in to the Security & Compliance Center at https://protection.office.com and navigate to Search | Content search. This will take you to the eDiscovery page, as in the following screenshot:

Figure 15.1 – The content search page
- You have three options to choose from here, which are as follows:
a. New search: This is the default option, which we will use in the following steps.
b. Guided search: This option is a wizard-based guide that helps you through the search process.
c. Search by ID List: The final option allows you to search for Exchange Online mailbox items. This process was formerly known as targeted search and requires a CSV file to identify the mailbox items that should be targeted by the search.
- For this example, we will select the default New search option, as in the following screenshot:
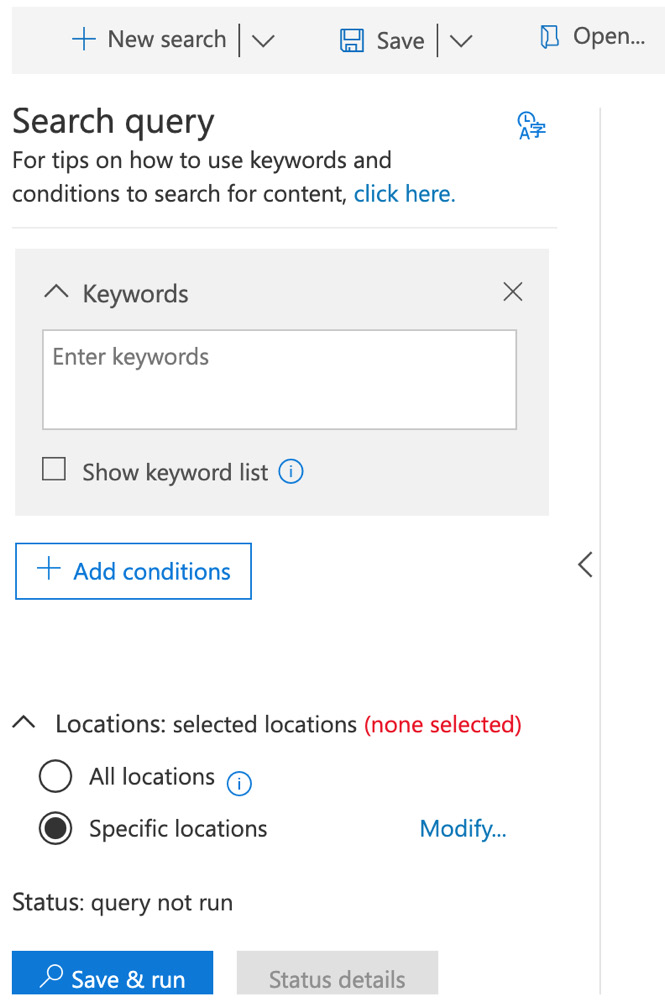
Figure 15.2 – New search
- The first Search query option is Keywords. In this section, you can enter any keywords that you wish your content search to look for, along with other properties such as the date, author, or subject. You can also use the Show keyword list option to display all of the keywords you enter on individual rows.
- Once you have set your keywords, you can also choose to add conditions to your search. Conditions help you to narrow down your search parameters and get the specific results that you are searching for. When you click on Add conditions, you will see a list of conditions that you can select from, as shown:

Figure 15.3 – Adding conditions to your content search
- Once you have added any conditions you require to your search, you can choose the Microsoft 365 locations that you wish to search against. By default, Specific locations is selected. By clicking on Modify, you will see the location options, as in the following screenshot:

Figure 15.4 – Modifying the search locations
- Use the toggle switches to select which areas you wish to include in your search; you can then filter your choices further by choosing specific users, groups, teams, or sites. When you have made your selections, click Save. Alternatively, if you wish to search through all the locations, choose the All locations option.
- Now that you have made your selections, you are ready to run your content search. Click on Save & run to start the search.
- Next, you will see the Save search page, where you need to enter a name for your search and an optional description, as in the following screenshot:

Figure 15.5 – Saving your search
- Click on Save and your content search will now start. Depending on the keywords, conditions, and locations you configured for your search, the results may take some time to display. You will see the search in progress, as in the following screenshot:

Figure 15.6 – The content search in progress
- Once the search is complete, you can access the results by clicking on the relevant search in the list of searches, as in the following screenshot:

Figure 15.7 – Completed searches
- When you open your search, you can choose to preview your search results by clicking on View results, or you can choose the Export report option to generate a report that can be viewed in more detail in Excel. You can also re-run the search if required:

Figure 15.8 – Viewing or exporting the search results
- If you choose the Export report option, eDiscovery Export Tool will open, as shown:

Figure 15.9 – eDiscovery Export Tool
- Copy and paste the export key (which we can see in Figure 15.8), and then choose a folder to download the report to. Then, click Start. The following files will be created in the folder you selected:

Figure 15.10 – Exported content
- In the following screenshot, we can see the Export Summary CSV file. The Results CSV file shows more detailed information exported from the search:
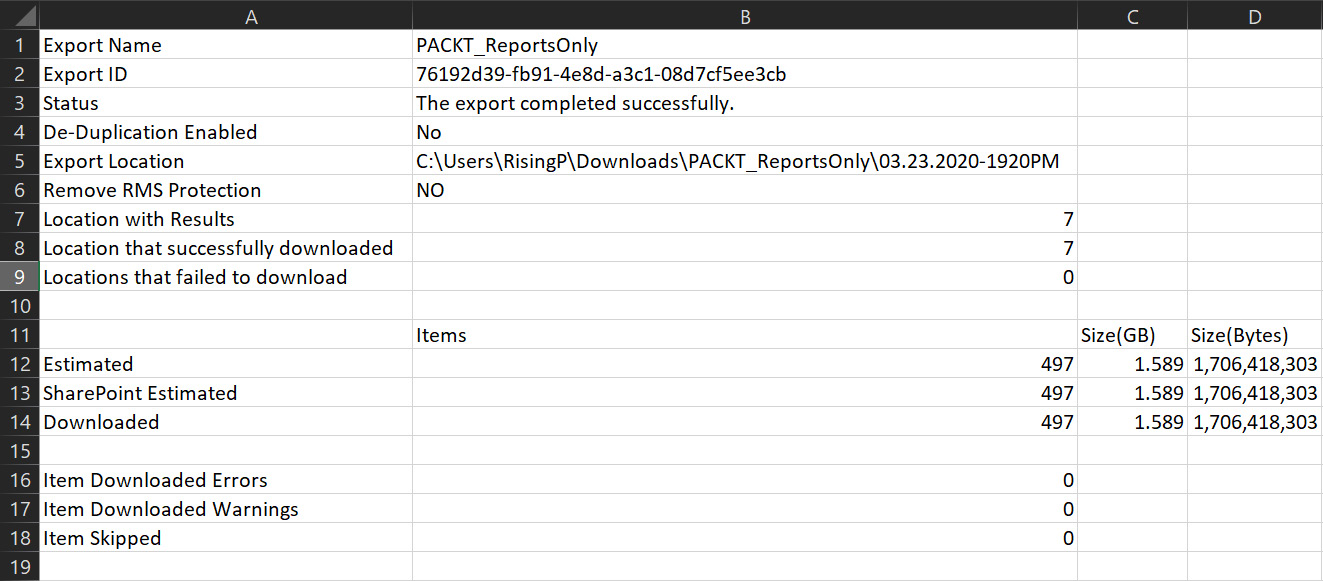
Figure 15.11 – The CSV export
Important note
At the time of writing this book, sensitive information types cannot be selected to search for data contained in Exchange Online mailboxes at rest.
In this section, we showed you how to run a content search from the Security & Compliance Center to look for personal data within your Microsoft 365 locations. You learned how content searches can be set up with one or more keywords to search against and how conditions can narrow down your search results and provide you with the content you are searching for. Finally, we showed you how you can choose to search through specific Microsoft 365 locations or search through all locations during your search.
Next, we will show you how labels can be used to help you protect personal data in your Microsoft 365 environment.
Using retention labels to protect personal data
In Chapter 11, Azure Information Protection, we showed you how to use sensitivity labels and policies to protect emails and documents in your Microsoft 365 environment. Retention labels can also be used to apply protection to personal data within Microsoft 365. With retention labels, you can automatically apply labels when sensitive information types are detected or allow your users to manually apply retention labels. Your retention labels can be set up to force the retention of the content you are applying the policy to for a specified retention period.
The way that retention labels are set to be published determines which Office 365 locations the labels will be applied to.
When a retention label is published to your end users, or auto-applied based on a query, your retention label policy can apply to the following locations:
- Exchange Online
- SharePoint Online
- OneDrive
- Office 365 groups
When a retention label is auto-applied based on sensitive information types, your retention label policy can apply to the following locations:
- Exchange Online (all mailboxes only)
- SharePoint Online
- OneDrive
Microsoft recommends that you use retention labels for any personal data. In the following example steps, we will show you how to set up retention labels and policies using sensitive information types:
- Open the Security & Compliance Center from https://protection.office.com and navigate to Classification | Retention labels, as in the following screenshot:

Figure 15.12 – Retention labels in the Security & Compliance Center
- Click on Create a label and you will see the following options:
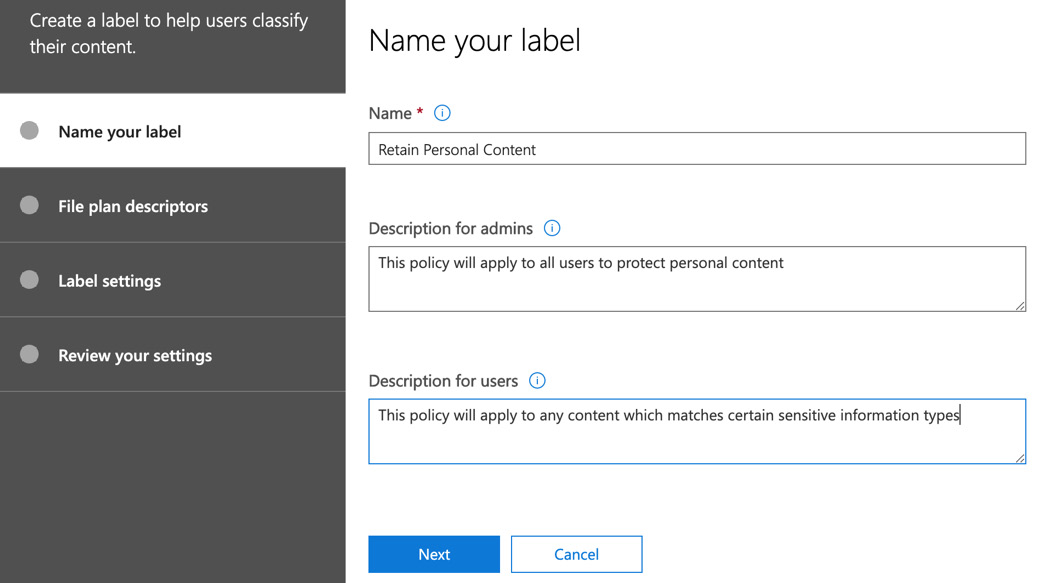
Figure 15.13 – Naming your label
- Enter a name and description for admins and users, and then click on Next. You will see the File plan descriptors options. If you choose to set file plan descriptors, then, based on the conditions you set, your retention label will automatically apply, as the following screenshot illustrates:

Figure 15.14 – Setting file plan descriptors to automatically apply retention labels
- Click Next and you will see the Label settings options. If you set file plan descriptors, then the option to manually set retention is not available. However, if you left File plan descriptors blank, then you can choose to apply retention by configuring the settings, as shown:
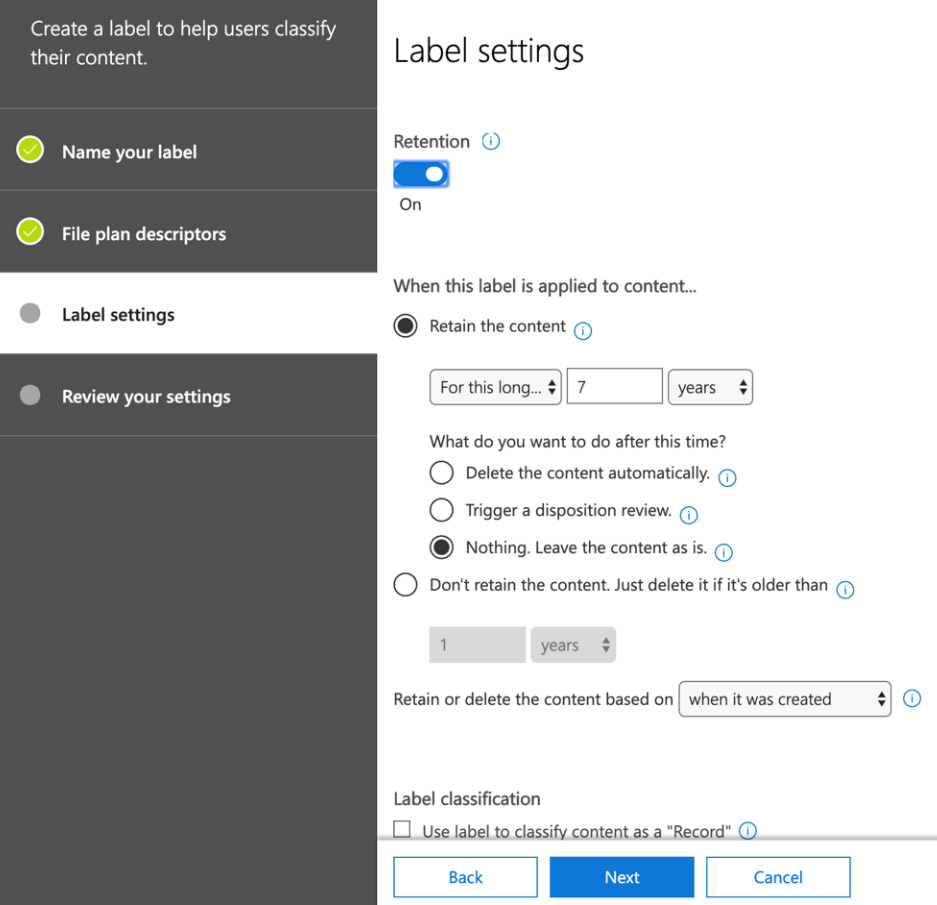
Figure 15.15 – Manually setting the retention settings
- Here, you can choose to set Retention to On or Off, as well as set how long the content is to be retained for and what actions are taken at the end of the retention period. You can also choose to use your label to classify the content as a record. When you have completed the required settings, click Next to review the settings of your label, and then click Create this label to complete the setup of your new retention label.
- Your new label will appear in the list of retention labels and if you select it, you can choose to edit, publish, or auto-apply your label, as follows:

Figure 15.16 – A new retention label
- Publishing your label creates a label policy that allows you to target the Office 365 locations where the label will be available. Once you have published your labels to a policy, you can view the new policy under the Label policies section.
- Auto-applying a label will enable you to set the conditions for when you want a label to apply, as shown:

Figure 15.17 – Conditions for auto-applying a retention label
- Once you set the sensitive information types that trigger that label to be automatically applied, you can continue to Name your policy and apply it to the required Office 365 locations.
- Users can manually apply a label from Outlook on the web by right-clicking on the email, selecting Assign policy, and then selecting the desired label, as shown:

Figure 15.18 – Assigning a label
- Once the chosen label is applied to the email, you can see this by clicking on the email, where you will notice that the label is visible, as shown:
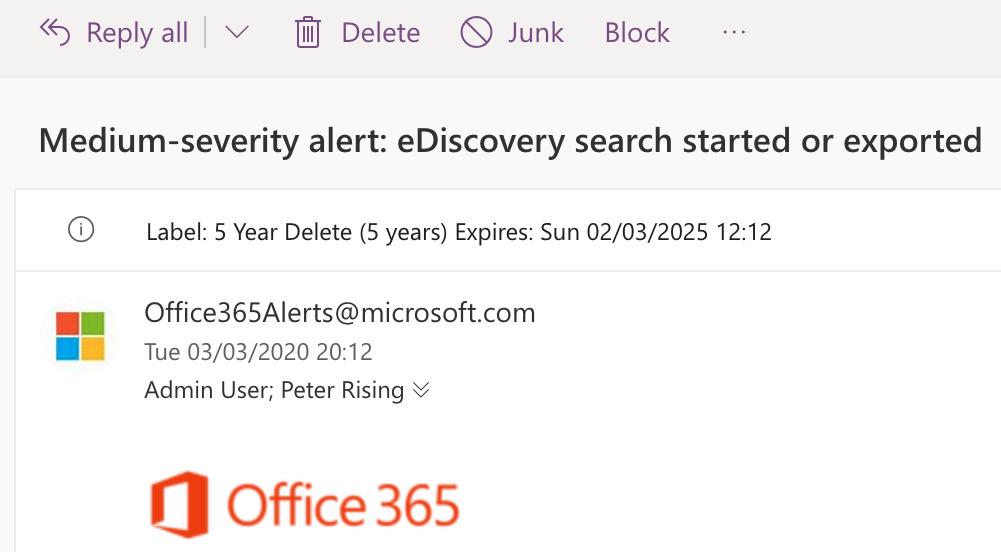
Figure 15.19 – The label
Important note
You can apply retention labels to Outlook, SharePoint, OneDrive, and Office 365 groups in a similar way. Further details on applying retention labels to your Office 365 content can be found in the References section at the end of this chapter.
In this section, we showed you how retention labels can be applied to emails and documents within your Microsoft 365 environment. You learned that labels can be created with file plan descriptors to automatically apply a label to content, as well as by manually setting the retention label settings.
We also showed you how retention labels can then be published to Office 365 locations using label policies or by auto-application. Finally, we showed you how your end users can view and apply retention labels in their applications and how they would appear.
In the final section of this chapter, we will show you how to use logs and reports within your Microsoft 365 environment to search for any potential personal data leaks.
Accessing logs and reports to search for and monitor personal data leaks
Now that you are aware of some of the tools and methods that can be used to prevent personal data loss, it is equally important to diligently monitor the use of personal data in your organization. There are a number of methods available to assist Microsoft 365 compliance administrators to achieve this. They include the following:
- Data loss prevention reports
- Alert policies
- Microsoft Cloud App Security
Let's examine each of these methods.
Data loss prevention reports
With data loss prevention reports, you can monitor any personal data contained in OneDrive or SharePoint Online, along with any email that is in transit, by viewing policy matches and trends within the Security & Compliance Center.
To view the data loss prevention reports, you need to complete the following steps:
- Go to the Security & Compliance Center and navigate to Reports | Dashboard, as shown:

Figure 15.20 – The Reports dashboard
- Locate the DLP policy matches tile and click on it to open it. This will take you to the Security & Compliance report viewer, as the following screenshot shows:

Figure 15.21 – The Security & Compliance report viewer
- Within the report viewer, you can navigate through DLP policy matches, DLP Incidents, and DLP false positives and overrides.
- In order to generate a report, click on the Request report button and you will see the options to create your report, as in the following screenshot:

Figure 15.22 – Requesting a report
- Click Next and enter an email recipient that you want to send this report to:

Figure 15.23 – Successful report request submission
- Click Finish and wait for the report to be emailed to you. The email will appear in your inbox, as shown:

Figure 15.24 – Custom email report
- Within the email, you can click on the You can access the report here option and it will open the report for you.
- Alternatively, you can access the report from the Security & Compliance Center under Reports | Reports for download.
It may take a number of hours for the report to be emailed to you. The information included in these reports will help you to detect and view any personal data leakage occurrences.
Alert policies
Alert policies can also be used in conjunction with the Office 365 audit log to review both user and admin activities across your Office 365 services. With alert policies, you can set up and view alerts, and with the audit log, you can carry out manual searches to look for events based on specific criteria or time frames.
Alert policies can be created and viewed by completing the following steps:
- Open the Security & Compliance Center from https://protection.office.com and navigate to Alerts | Alert policies, as shown:

Figure 15.25 – Alert policies
- You will see the list of alert policies, as in the following screenshot, and you can set up new alert policies or edit existing alert policies to notify you when a specific activity occurs:

Figure 15.26 – The New alert policy wizard
- Next, choose the alert settings for your policy and select the activities that will trigger the policy. Set the recipients and then, finally, review and create the policy.
- The users you select to be targeted by the policy will start to receive email alerts when a policy match is detected. An example of this sort of email is shown in the following screenshot:

Figure 15.27 – An alert policy email notification
- Click on View alert details and it will take you directly to the alert within the Security & Compliance Center, as the following screenshot shows:

Figure 15.28 – Alert details
In addition to using these types of alerts, you can view the audit log to manually search for events relating to data loss prevention.
Important note
For more details on alert policies and the Office 365 audit log, please refer to Chapter 14, Security Analytics and Auditing Capabilities, where we covered alert policies and the audit log in greater detail.
Microsoft Cloud App Security
It is also possible to use the Microsoft Cloud App Security Investigate feature to view how personal data travels within cloud applications.
From the Cloud App Security portal, which is accessed via https://portal.cloudappsecurity.com, you can view the activity log and files to view sharing activities, which will help you to identify potentially sensitive information that is leaving the organization. The Investigate feature is shown in the following screenshot:
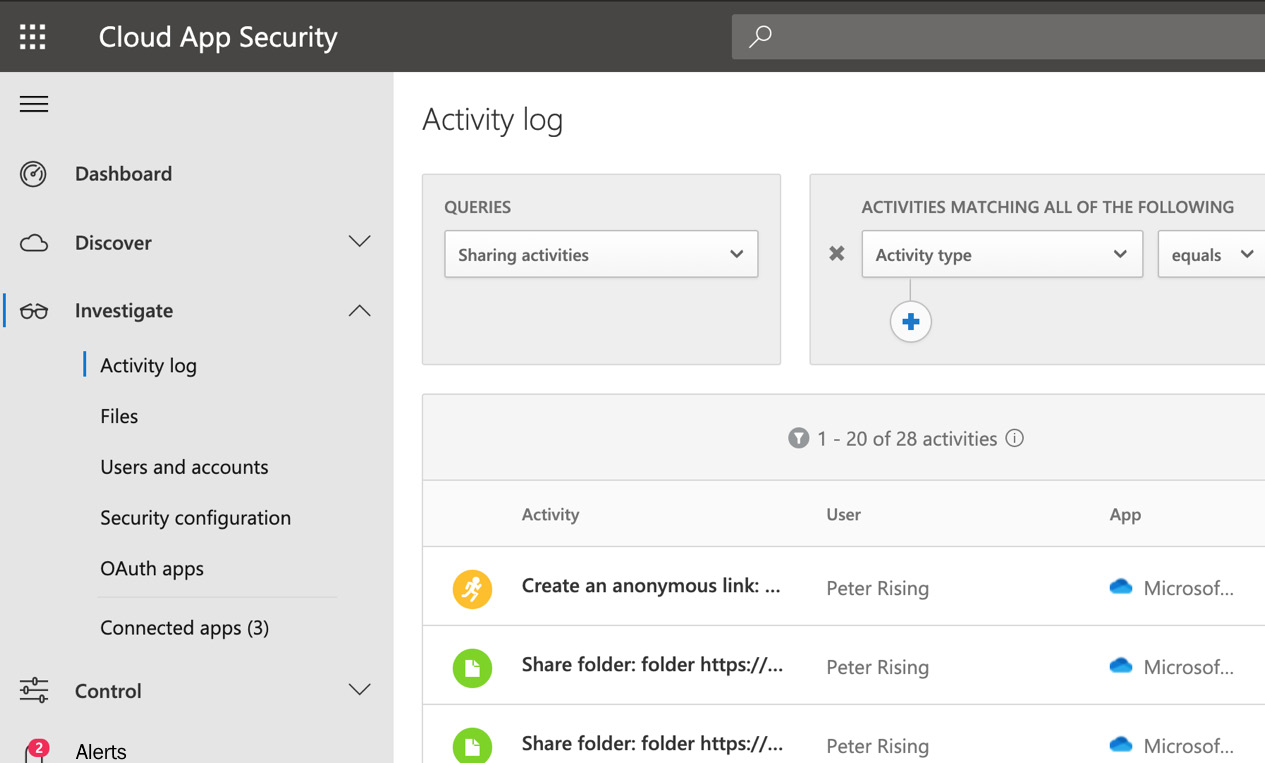
Figure 15.29 – The Cloud App Security portal
You can also configure Cloud App Security policies to assist you with managing sensitive data. We will create an example policy in the following steps:
- Create the following policy from the Cloud App Security dashboard by going to Control | Templates and creating a new policy based on the File containing PII detected in the cloud (built-in DLP engine) template, as in the following screenshot:

Figure 15.30 – Creating a policy from a template
- Scroll down and select the settings shown in the following screenshot:
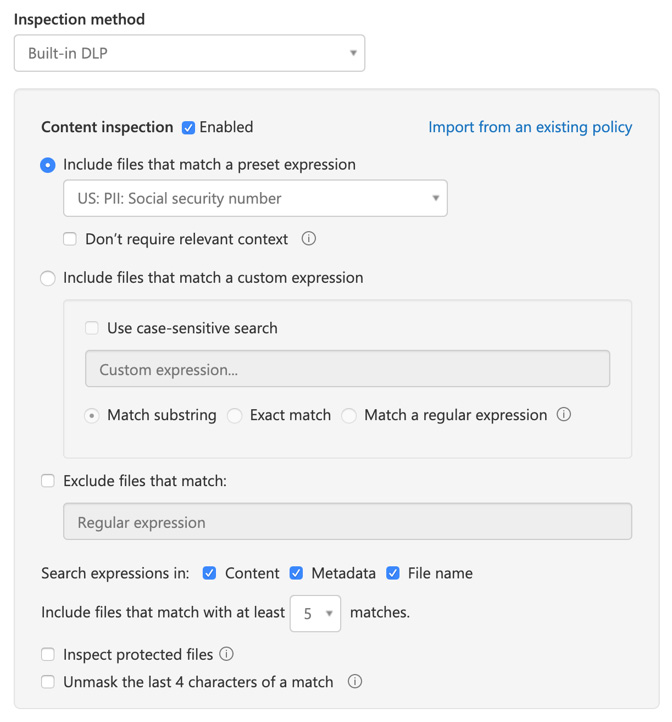
Figure 15.31 – Creating a policy from a template
- Finally, scroll down and configure the Alerts and Governance actions options, as shown:

Figure 15.32 – Creating a policy from a template
- Click Create to finalize your new policy.
The policy we created in the preceding steps will alert us when a file containing Personally Identifiable Information (PII) is detected by the built-in DLP engine within any sanctioned cloud app.
Another potentially useful policy that you could create using Cloud App Security is one to block any downloads of files within your cloud apps to unmanaged devices. Alerts for this activity would show you any cases of these download attempts.
Important note
Microsoft Cloud App Security was covered in greater detail in Chapter 13, Cloud App Discovery and Security. Please refer to that chapter for more information on Cloud App Security.
In this section, you learned how to access and monitor logs and reports within Microsoft 365 to gain visibility on personal data activity in your organization. We demonstrated how DLP reports, including policy matches, incident reports, and false positives and overrides, can be used to detect sensitive information.
In addition, we demonstrated how alert policies within the Security & Compliance Center can be used to generate email alerts to administrators to be triggered when a match to sensitive information types is detected. The Office 365 audit log can also be interrogated to locate these activities.
Finally, we showed you how Cloud App Security can provide visibility on activities related to file and sharing activity, as well as how policies can be created to alert us about these activities.
Summary
In this chapter, we introduced you to the principles of protecting personal data within Microsoft 365. You learned how to run content searches from the Security & Compliance Center and how to preview and export the results.
We also showed you how retention labels and policies can be set up to be applied either automatically, based on matches to sensitive information types, or by manually applying your preferred retention settings.
Finally, we demonstrated the various methods of monitoring and reporting in relation to personal data within Microsoft 365. This includes configuring alert policies and viewing the Office 365 audit log activities, along with viewing and interpreting the DLP reporting options within the Security & Compliance Center and setting up policies within Cloud App Security.
In the next chapter, we will examine data governance and retention, which includes how to view data governance logs, how to plan and execute retention tags and policies, and how to use supervision policies and apply in-place and litigation holds.
Questions
- True or false: A content search can be configured to specific Office 365 locations.
a. True
b. False
- Where in the Security & Compliance Center would you go to configure retention labels?
a. Classification | Sensitivity Labels
b. Classification | Retention Policies
c. Classification | Retention Labels
d. Classification | Sensitive info types
- True or false: With a content search, the results can be exported and viewed in Excel.
a. True
b. False
- Which of the following cannot be used to view and interpret personal data within Microsoft 365?
a. DLP reports
b. Alert policies
c. Cloud App Security policies
d. Threat detection reports
- Which of the following is an option when using content searches?
a. Focused Search
b. Guided Search
c. Advanced Search
- Which of the following options would you use if you wanted to automatically apply a retention label based on conditions?
a. File plan descriptors
b. Label settings
c. Label classification
- True or false: Retention can be manually enabled on a retention label when file plan descriptors have also been configured.
a. True
b. False
- Where in the Security & Compliance Center would you go to start a content search?
a. eDiscovery | Advanced eDiscovery
b. Search | eDiscovery
c. Search | Content Search
d. Investigation | Content Search
- Where in the Cloud App Security portal would you go to set up a new alert policy based on a template?
a. Control | Templates
b. Control | Policies
c. Investigate | Files
d. Investigate | Security Configuration
- True or false: Retention labels can be viewed and applied by users to emails when using Outlook on the web.
a. True
b. False
References
Please refer to the following links for more information:
- Content search in Office 365: https://docs.microsoft.com/en-us/microsoft-365/compliance/content-search?view=o365-worldwide
- Keyword queries and search conditions for content search: https://docs.microsoft.com/en-us/microsoft-365/compliance/keyword-queries-and-search-conditions?view=o365-worldwide
- Exporting content search results: https://docs.microsoft.com/en-us/microsoft-365/compliance/export-search-results?view=o365-worldwide
- Exporting content search reports: https://docs.microsoft.com/en-us/microsoft-365/compliance/export-a-content-search-report?view=o365-worldwide
- An overview of retention labels: https://docs.microsoft.com/en-us/microsoft-365/compliance/labels?view=o365-worldwide
- Bulk-creating retention labels using PowerShell: https://docs.microsoft.com/en-us/microsoft-365/compliance/bulk-create-publish-labels-using-powershell?view=o365-worldwide
- Alert policies in the Security & Compliance Center: https://docs.microsoft.com/en-gb/microsoft-365/compliance/alert-policies?view=o365-worldwide#default-alert-policies?wt.mc_id=4039827