Chapter 1: Overview of HubSpot – What you MUST Know
HubSpot is a mega platform on its own and it's easy to get lost in all the guidelines suggested when setting up your portal. But whether you have a free HubSpot account or a paid account, some basic features must be set up for your portal to operate correctly.
In this chapter, we will break this down for you. The goal is not to do everything at first but to do what's absolutely necessary to get you started. Many features are not covered in this chapter—such as the chatbot tool, the Ads tool, and so on—but they will be covered in later chapters throughout the book. For now, we will keep it stupid simple so that by the end of this chapter, you will have your HubSpot portal ready to send out your first campaign with your company's branding, ensure your emails reach the recipient's inbox and not their spam folder, have multiple channels to engage with your prospects—such as social media, email, and website—as well as track the return on investment (ROI) of your efforts.
Here is a list of topics we will cover in this chapter. You will learn the value each of these steps will bring to you so that you can decide whether it is important for you to do them or not during your setup or simply skip to sections you may have overlooked in the initial setup so that you can return to fix them:
- Setting your brand colors and logo: This step allows you to ensure all landing pages, emails, and so on appear with your company's logo, address, and brand colors.
- Connecting your website to HubSpot: This step allows you to collect information on how individual visitors engage with the content on your site so that you ensure you are giving them relevant and engaging content at exactly the right point of their journey.
- Connecting Google Analytics to HubSpot: Google Analytics is the most robust platform for tracking how visitors engage with your website. However, it only gives you general data, not specific individual data. Connecting Google Analytics to HubSpot allows you to use HubSpot analytics to show not just how many people came to your site and which pages were the most visited but exactly who those individuals were once they had been converted as a lead in your HubSpot portal.
- Filtering out personal traffic: In order to have a true reflection of the ROI of your campaigns, you must filter out visits from you, your team, and anyone else who is not a potential customer but may interact with your site regularly—for example, vendors, and so on.
- Setting up your subdomains—landing pages and blog: Many companies overlook this step, but it is important if you plan to use HubSpot to host your landing pages and/or blog. Without doing this step, your Uniform Resource Locator (URL) will be HubSpot-branded, instead of having your own domain branding.
- Verifying your email domain: In order to send marketing emails via HubSpot from your own company's domain, it is important to verify your domain with HubSpot. This is essential to ensure your emails don't land in the recipient's spam folder.
- Connecting your social media accounts: HubSpot's social media tool is more than just a scheduling tool. Connecting your social media accounts— LinkedIn, Facebook, Instagram, and Twitter—with HubSpot not only allows you to manage multiple profiles at once on various platforms but also helps you monitor what people are saying about you and see exactly which of your contacts are more engaged on social media. This helps you prepare specific campaigns for them via social media.
- Deciding which integrations are necessary during setup: HubSpot has a vast marketplace of third-party platforms that can integrate seamlessly into your portal—for example, Zoom for sending meeting links or hosting your webinars, Slack for sending notifications to your sales teams, or Salesforce if you are using this platform as your customer relationship management (CRM) system. These are just a few integrations that can be useful during setup, and in a later chapter, we will take you through these setups and more.
- Importing your contacts into HubSpot: Now that everything is set up, the next important step is to import your contacts so that you can begin executing some campaigns and tracking the engagement of your contacts.
- Incorporating planning and strategy: As mentioned in the introduction, the main part of this book is about showing the best practices of what works for other companies. HubSpot has set the trend for us by providing all the templates they use combined with other industry best practices in order to execute various marketing tactics such as webinars, gated content, email nurtures, and so much more. This tool gives you the framework for planning and executing your campaigns.
- Analyzing ROI and performance: Today, everything that is done in digital marketing is measurable. This section shows you how to set up performance tracking dashboards covering areas such as contacts by lead source, deals by lead source, contacts by industry, deal forecast, deal velocity, and much more.
Technical requirements
Before we get into the details of the setup, be sure you have the following items:
- Super Admin access to HubSpot
- Admin access to your WordPress installation
- (Editor or Reader permission to your website gives insufficient privileges and won't allow you to download the HubSpot plugin.)
- Admin access to your Google Analytics account
- Admin access to the platform where you purchased your domain—for instance, GoDaddy, Namecheap, Bluehost, and so on
- Admin access to your social media accounts—LinkedIn, Facebook, Twitter, Instagram
- Company logos and brand guidelines
So, let's begin!
Setting your brand colors and logo
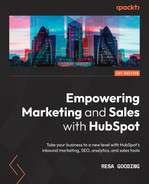
In your HubSpot portal, under Account Defaults, click on Branding and then My Brand Kit, and upload your logo and favicon, as seen in the following screenshot:
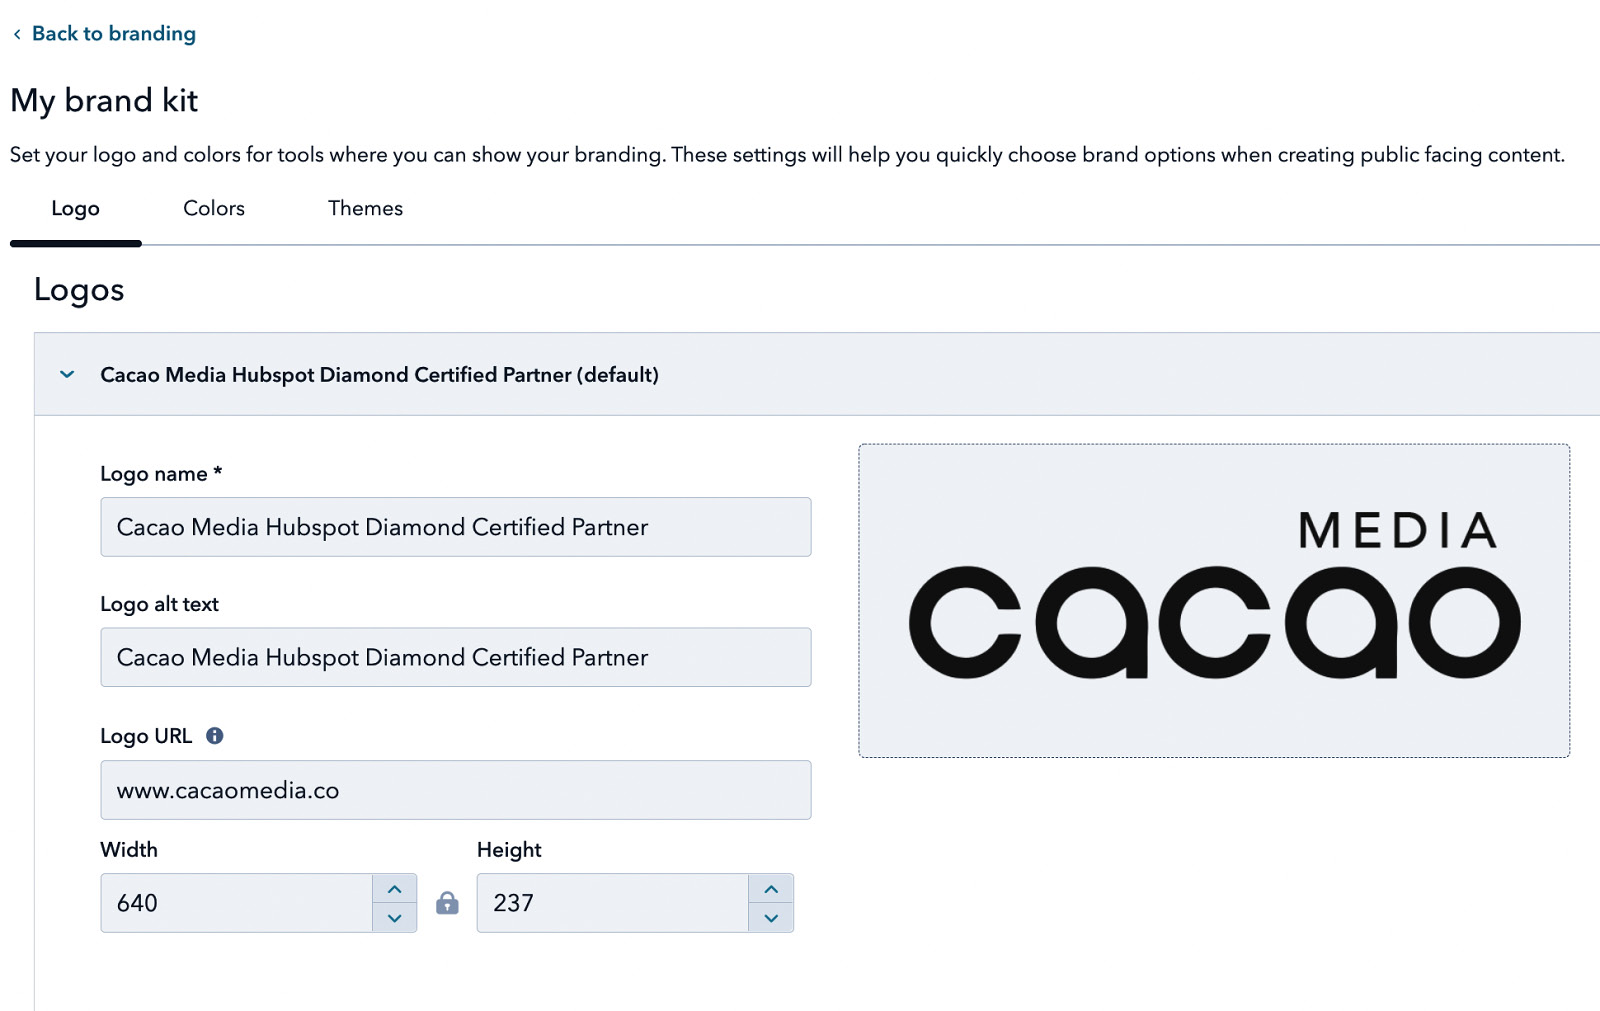
Figure 1.1 – Adding your branding assets to HubSpot
These logos appear on your landing pages as well as the URL of your pages, so your brand will always be recognized as users engage with your content.
Be sure to also update the Logo alt text section with the name of your company so that search engines have another way to index your company.
Your brand is an integral part of your marketing message as it provides a constant recall to your audience via subliminal signals to the brain that reminds people who you are. So, every chance you get to include your logos in your message should be taken.
Connecting your website to HubSpot
The most common content management system (CMS) used for hosting websites is WordPress. If you are using WordPress, HubSpot has a plugin that, once downloaded, allows you to connect your website to HubSpot. Follow these steps for a successful integration between your website and HubSpot. First, we need to install the HubSpot WordPress plugin.
Follow these steps to connect WordPress to HubSpot using the HubSpot plugin:
- Log in to your WordPress dashboard.
- Scroll down to Plugins.
- Click on Plugins, as shown in the following screenshot:

Figure 1.2 – WordPress plugins
- Click Add New Plugin.
- Search for the HubSpot All-in-One Marketing – Forms, Popups, Live Chat plugin, as shown in the following screenshot:
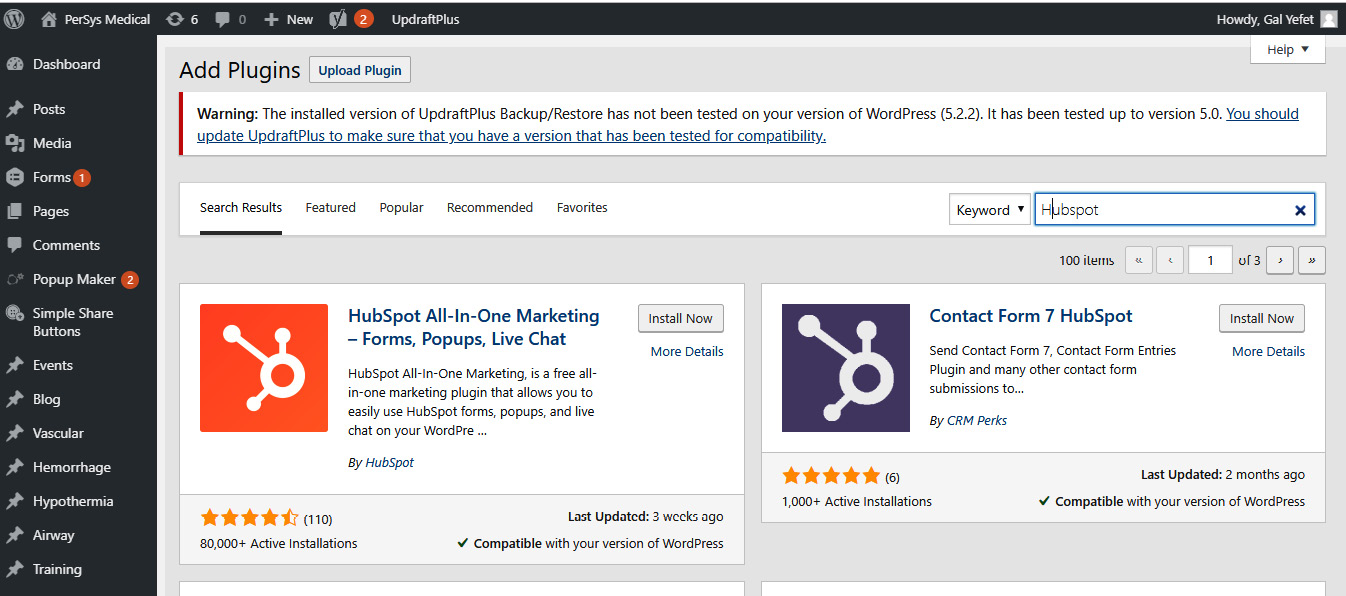
Figure 1.3 – HubSpot plugin
Once your installation is successfully completed, you will be redirected to a confirmation page, as shown in the following screenshot:
Figure 1.4 – Success screen: your website is now connected to HubSpot
With these actions completed, you have now installed the HubSpot WordPress plugin and connected your website to it.
Connecting Google Analytics to HubSpot
There are several options to consider when adding your Google Analytics tracking code. You can add tracking to the following areas:
- All pages on all domains
- All pages on a specific domain
- A specific blog
- A specific page
The easiest and most recommended approach is the first option—adding tracking to all pages on all domains.
To do this, perform the following steps:
- Go to Settings on the top navigation bar of your HubSpot portal.
- Then, scroll down to the last section on the side menu, Tools.
- Click on Website, then Pages on the left navigation sidebar.
- For the Choose a domain to edit its settings option, choose Default settings for all domains.
- Choose Integrations on the menu that appears below it.
- Then, check the Integrate with Google Analytics box and enter your Google Analytics tracking code, as shown in the following screenshot:
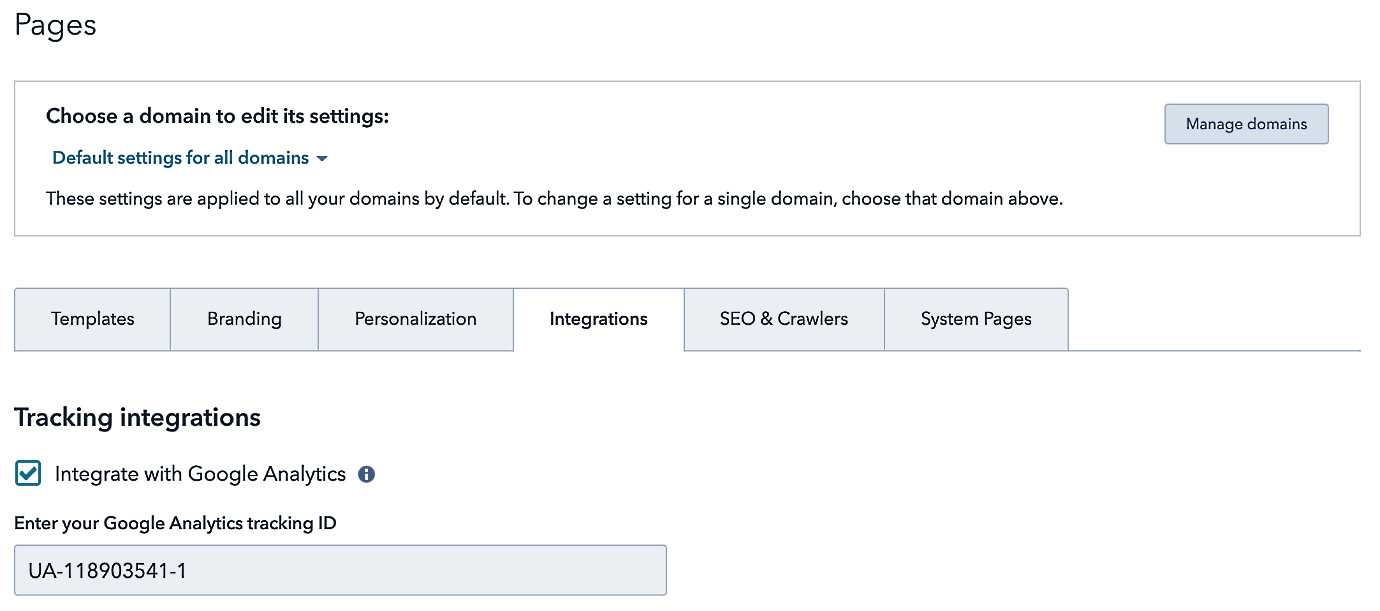
Figure 1.5 – Installing the Google Analytics tracking code
Note
It is important to note that if you have a cookie consent policy operating on your site (which is required by law today in most countries), the Google Analytics script will not load until a user has accepted, and if a visitor does not accept this policy, then Google Analytics will not be tracked for them. This functions only on HubSpot-hosted pages. HubSpot cannot control the Google Analytics script on externally hosted pages.
Filtering out personal traffic
To ensure your analytics are a true reflection of your visitors' behavior, add Internet Protocol (IP) addresses or domains you wish to exclude from your traffic. Do this by following these steps:
- Go to Settings, then on the left navigation bar look for Tracking & Analytics and then Tracking Code.
- Click on the Advanced Tracking tab.
- Scroll down until you see the IP Addresses to Exclude and From these referrers sections. Here, you can place the IP addresses of your partners, employees' home addresses, various office locations, and so on. Just ask the person from each one of the locations to google My IP Address and send you the coded sequence of numbers that will appear.
- You can also exclude traffic from competitors or irrelevant companies you find visiting your site often by adding their domains to the From these referrers section, as illustrated in the following screenshot:
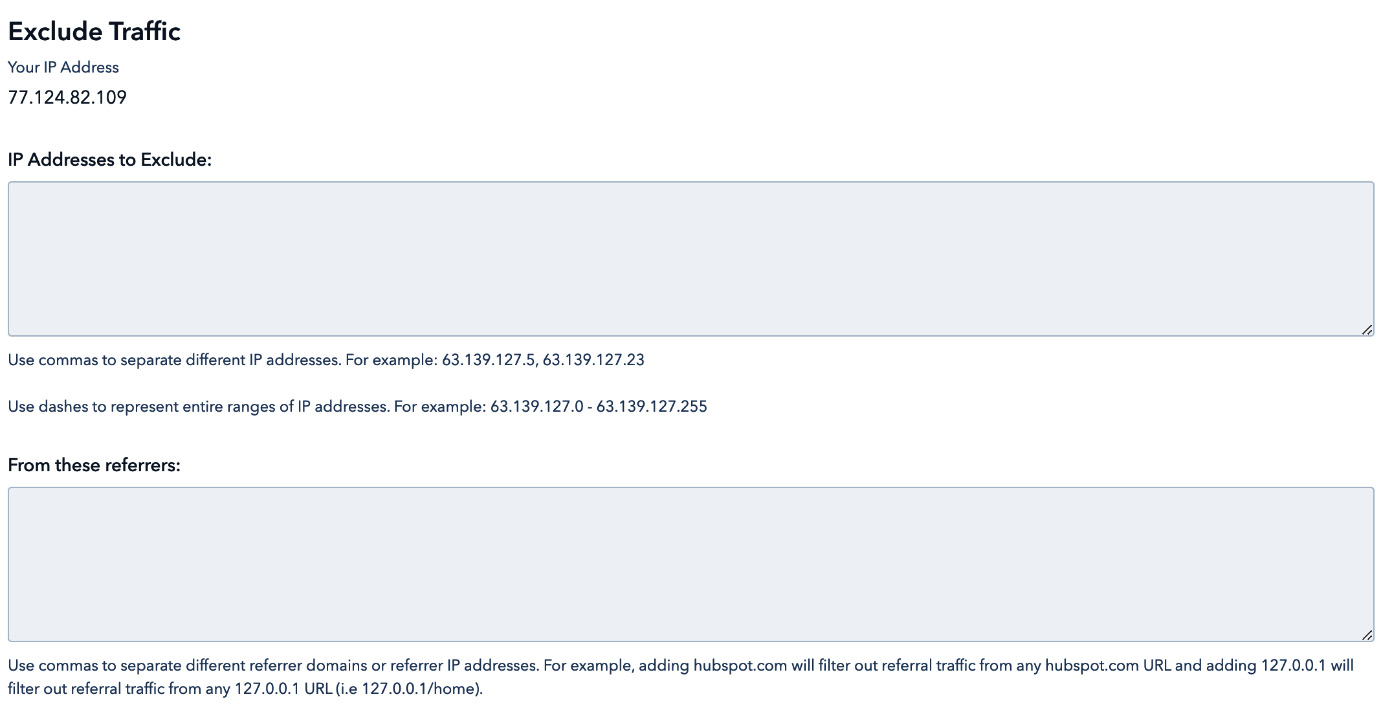
Figure 1.6 – Exclude Traffic screen
Now that traffic from visitors who aren't potential prospects—such as your team, vendors, or management—is filtered out from your analytics, you will have a truer reflection of your efforts.
Setting up your subdomains – landing pages and blog
The next most important thing to set up is making your subdomains for your landing pages and blog visible.
As mentioned at the beginning of this chapter, if you do not connect your landing pages and blog to your main domain, then you will effectively be hosting them on a HubSpot domain. This erodes your brand recognition as the URL that will be visible will look something like this: [HubSpot ID].hs-sites.com.
Connecting these pages to your main domain helps ensure that only your URL is visible. It will look something like this: go.[url name] or info.[url name]. Note that you cannot use your original domain because this is already hosting your website. Since HubSpot is another CMS hosting your content, you cannot effectively host two CMS sites on the same domain. For this reason, you need to create what is referred to as a subdomain. You can choose anything you wish for the prefix of your subdomain, such as marketing, pages, and so on.
We will now set up your subdomains. Before doing that, ensure you have Admin access to the platform from which you bought the domain. The most common platforms are GoDaddy, Namecheap, and Bluehost. If in doubt, ask your information technology (IT) department.
Once you have the login credentials, log in to the site, keep the page open, and in a different tab, go to your HubSpot portal and follow these steps:
- Navigate to Settings, then scroll down to the Tools subsection.
- In this section, click on Website and then Domains and URLs.
- Click on Domains in the submenu.
- A new section appears. Click Connect a domain, which takes you to the following screen:
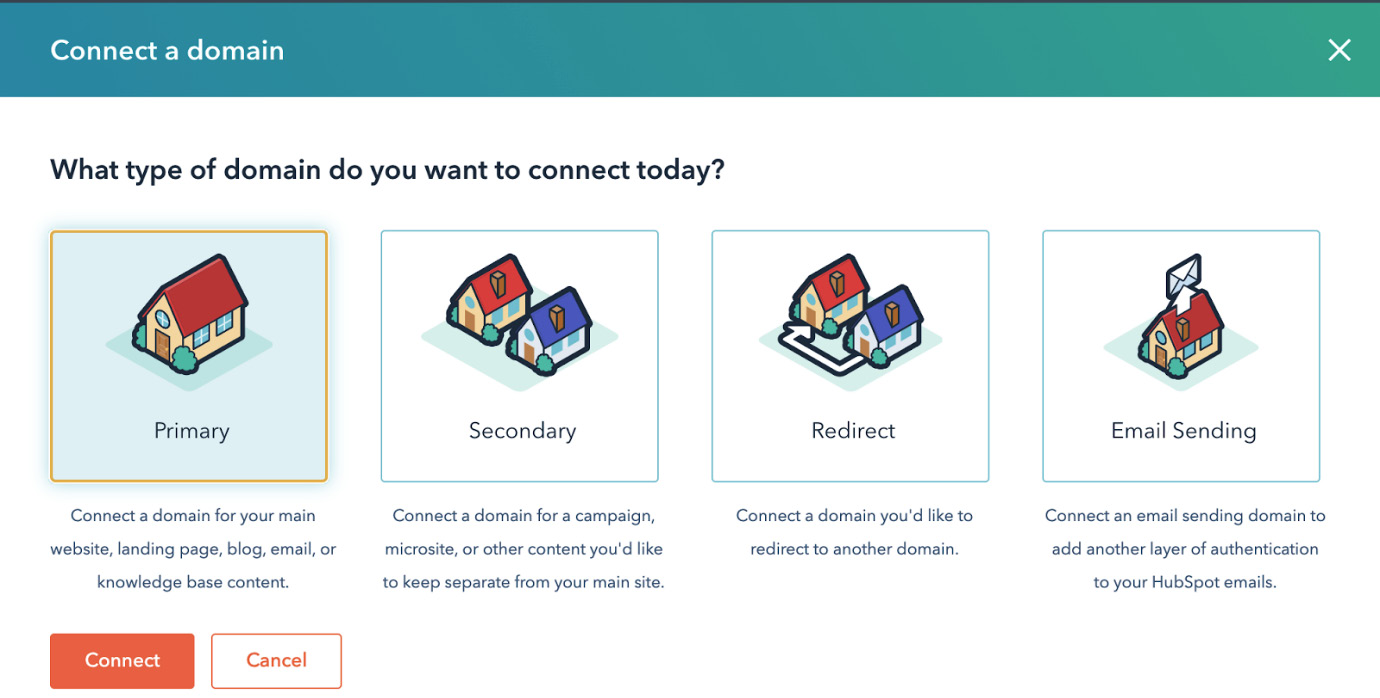
Figure 1.7 – Connect a domain screen
- When the box shown in Figure 1.7 appears, choose the type of domain you wish to connect.
- Primary domains are the main subdomain that will host content such as landing pages or blogs. It can be info.[your company name].com or marketing.[your company name].com. For example, for my business, I use info.cacaomedia.co.
- Secondary domains are alternative domains to your primary domain that can be used for subcategories of different content—for instance, events, workshops, and so on. For example, this domain can be events.[your company name].com.
- Redirect domains are used when you would like to redirect content from a site that is already hosting your content but you would like to update the URL currently being used.
- Email sending is connected in order to send emails from HubSpot using your existing email addresses.
It is recommended at this first stage of your setup to connect the primary and email-sending domains.
- Another page then appears, prompting you to select which types of assets you are creating today. As your website and blog are most likely hosted on another platform such as WordPress, you will want to choose Landing pages and Email at this stage, as shown in the following screenshot. Then, click Next:
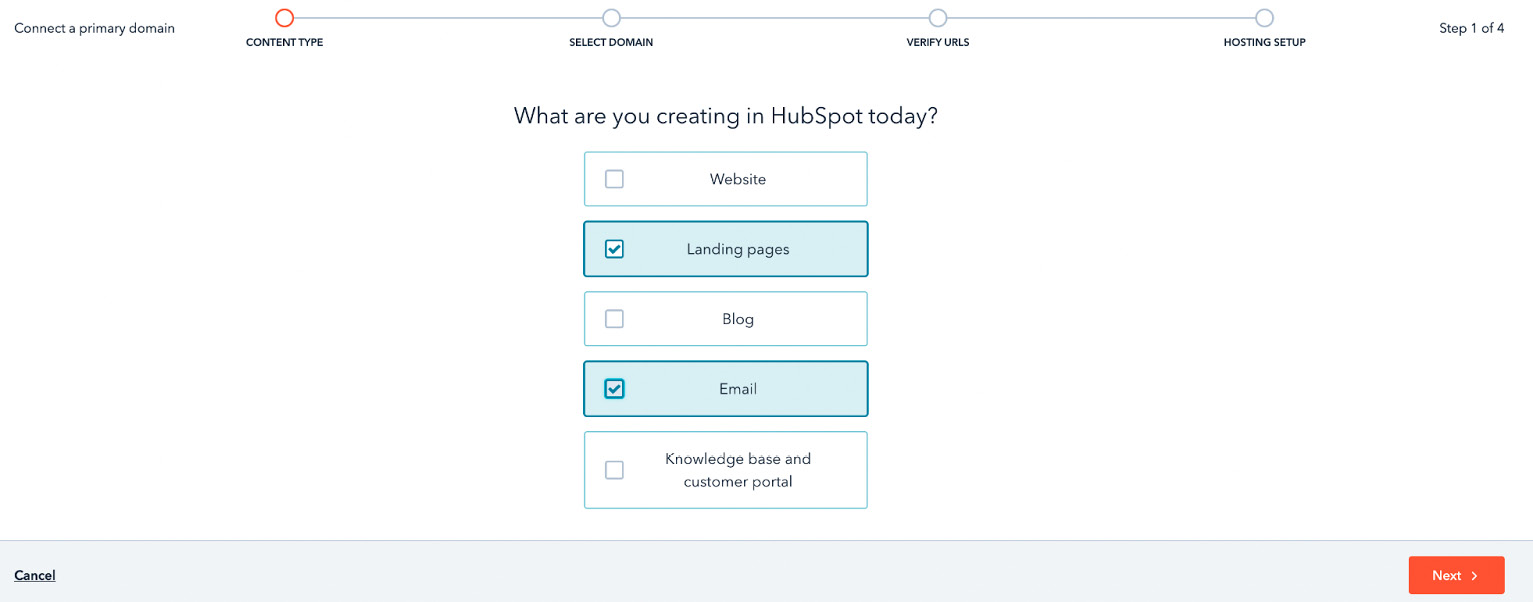
Figure 1.8 – Choosing content type
- In the next section that appears, enter your root domain—for instance, mysite.com, and click Next, as illustrated in the following screenshot:

Figure 1.9 – Entering your root domain
- Enter information for your subdomain (info.), brand domain (your company name), top-level domain (.com), and primary language (English), as illustrated in the following screenshot:
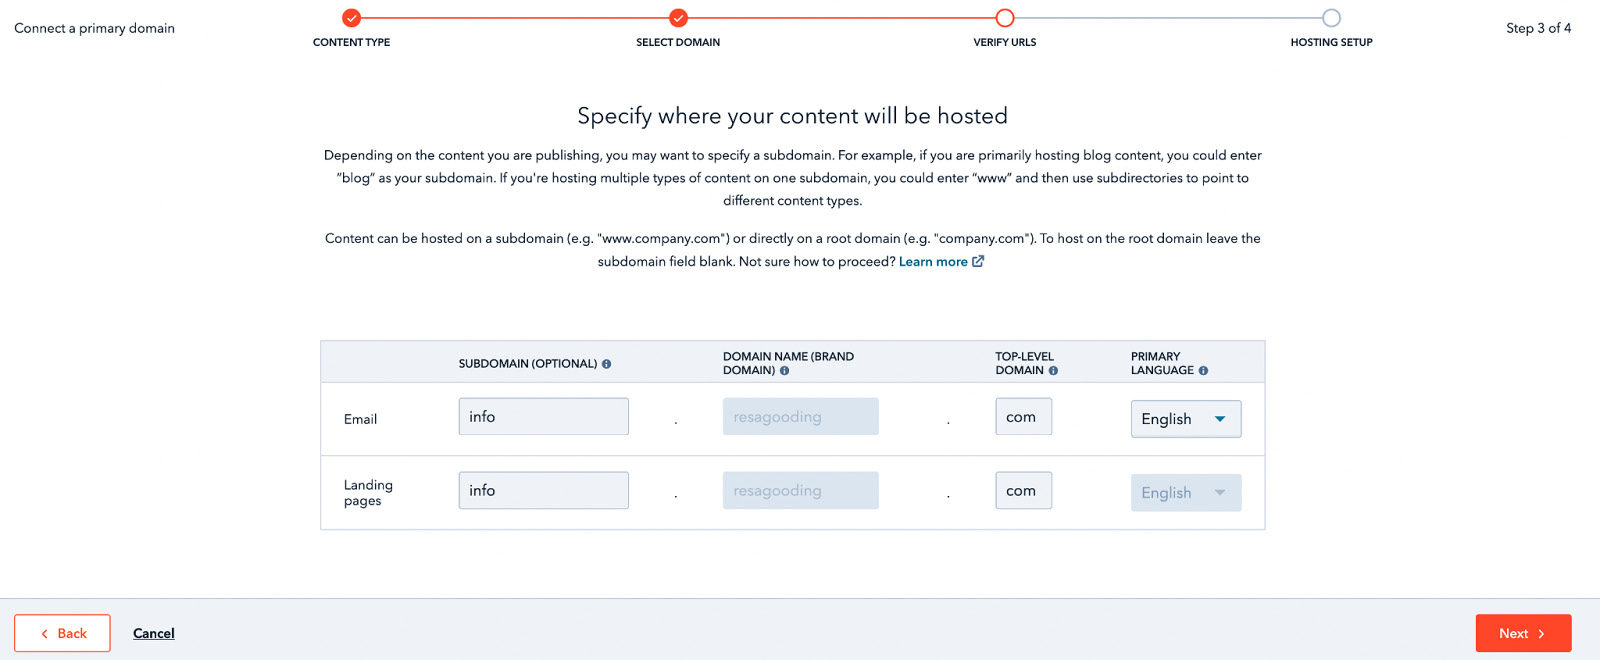
Figure 1.10 – Entering information for your subdomain
- Next, you will be taken to a screen to verify that these are the URLs you wish to use, as shown here:

Figure 1.11 – Verifying your URLs
- After clicking Next, you are then redirected to another page that asks you to set up your hosting. If you are using GoDaddy, for instance, you can simply choose the Authorize with GoDaddy option, as shown in the following screenshot:
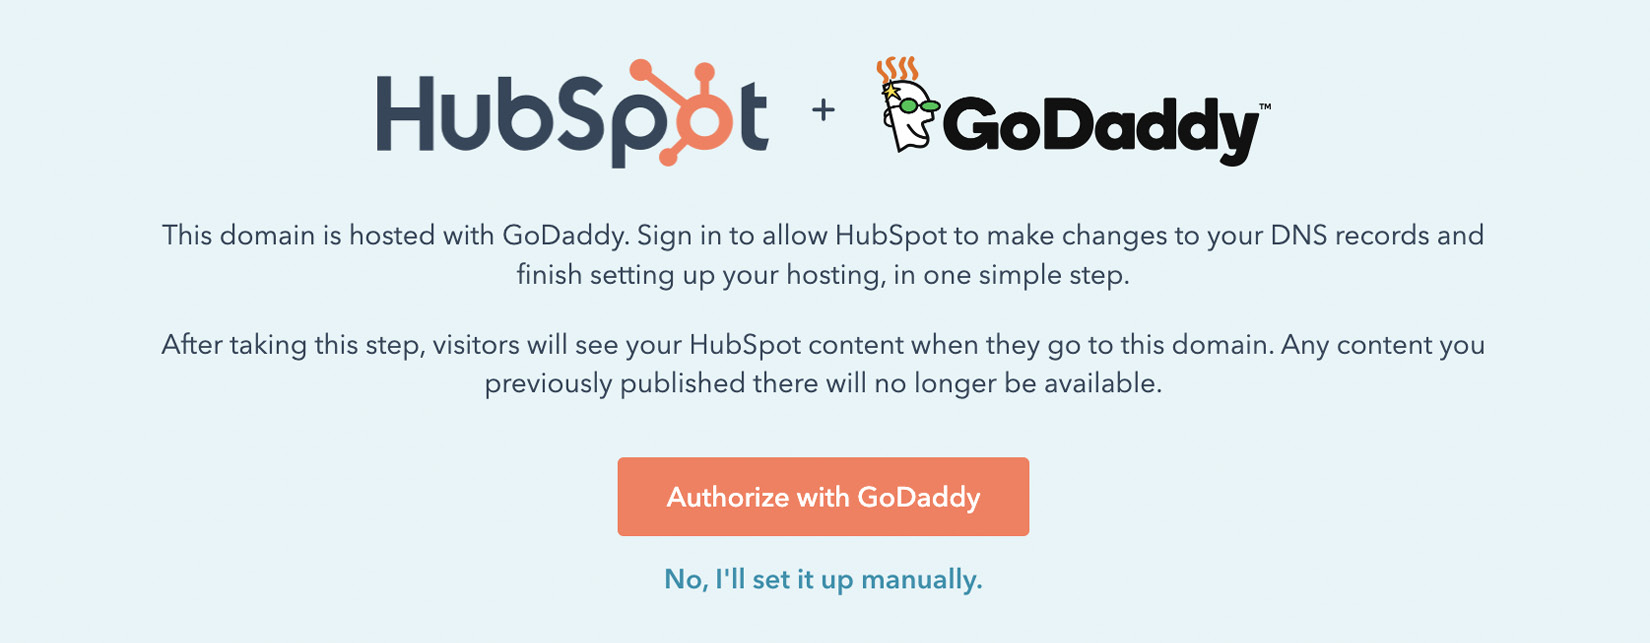
Figure 1.12 – Setting up your host
- You will then be redirected to GoDaddy to confirm access. Click Connect, as shown in the following screenshot. Remember that you must be logged in as Admin to GoDaddy for these changes to take effect:
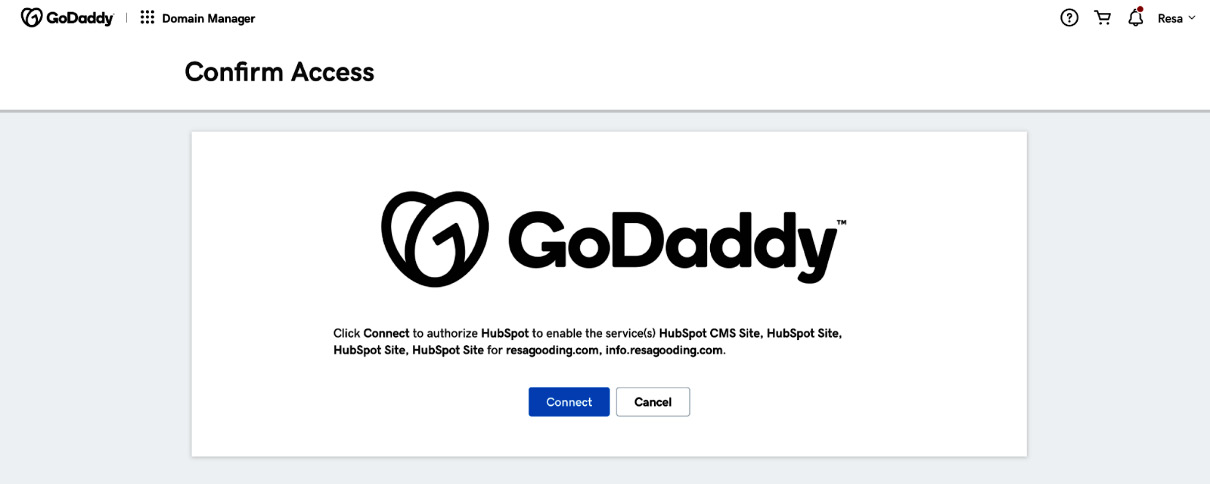
Figure 1.13 – Confirming access with GoDaddy

Figure 1.14 – Domain connection is successful
If your domain is hosted by another provider, you will need to manually log in to your hosting provider and look for DNS Settings, then Manage DNS, and update the Canonical Name (CNAME) record. Here are the steps to take if you need to do a manual setup of your domain connection.
First, choose the No, I'll set it up manually option when you get to the screen shown here:
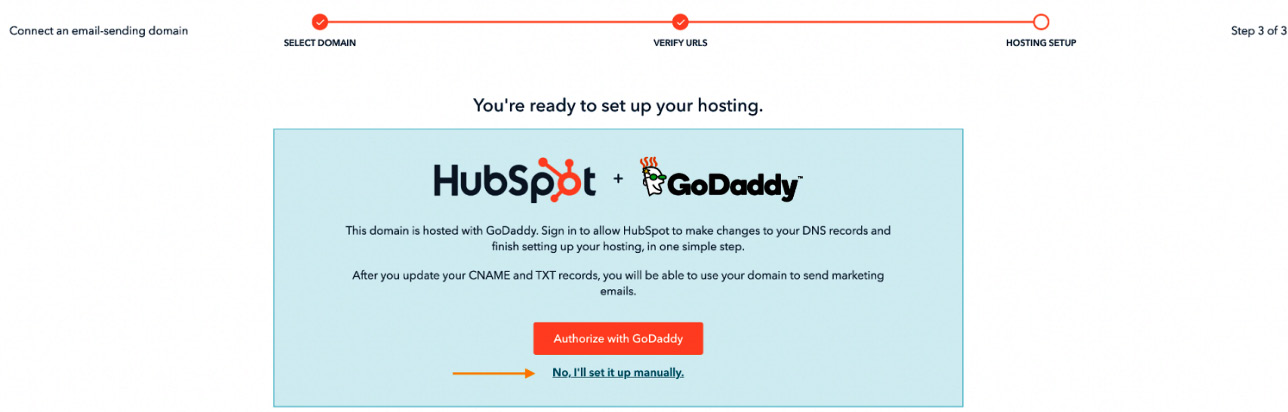
Figure 1.15 – Choosing the manual option to connect your domains to HubSpot
You will then arrive at the following screen, with four steps to follow. Check the boxes for each of these steps when you have completed the actions. Then, copy the Domain Name System (DNS) records as directed to your domain hosting provider. If you are unsure where your domain is hosted, speak to the IT administrator within your company:

Figure 1.16 – Updating your DNS records
Once these steps are completed, whenever you publish a landing page, it will be hosted under your company's URL and not HubSpot's URL. Now, let's look at the steps to connect your email domain.
Verifying your email domain
This step is crucial as it verifies your domain so that it improves the chances of your email landing in the recipient's inbox instead of their spam folder. Follow these steps to verify your email domain:
- In your portal, go to Settings | Tools | Website | Domains and URLs. Click on Domains in the submenu and then Connect a Domain. When the box shown in the following screenshot appears, select Email Sending and then Connect:
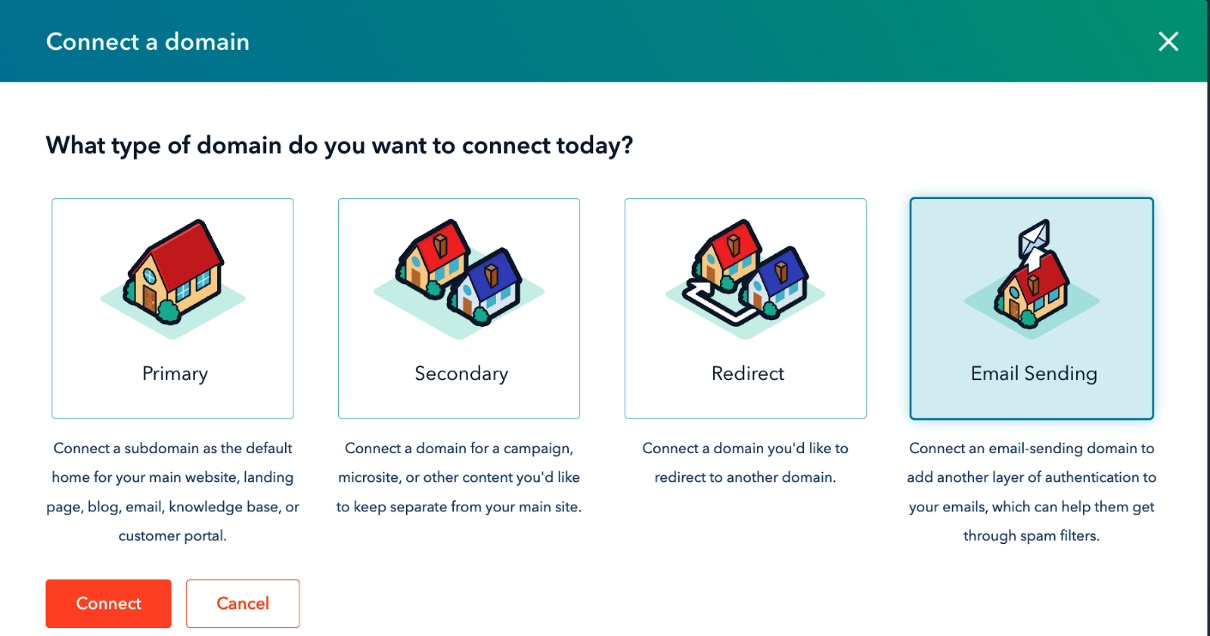
Figure 1.17 – Connecting your email domain
- Choose any email address—preferably one that is generic, such as [email protected]—and insert it in the box, as shown in Figure 1.18. Note that it is recommended to connect a generic domain such as [email protected] and not an actual user email address since this address may not be valid once the employee leaves, and this will cause this connection to break:
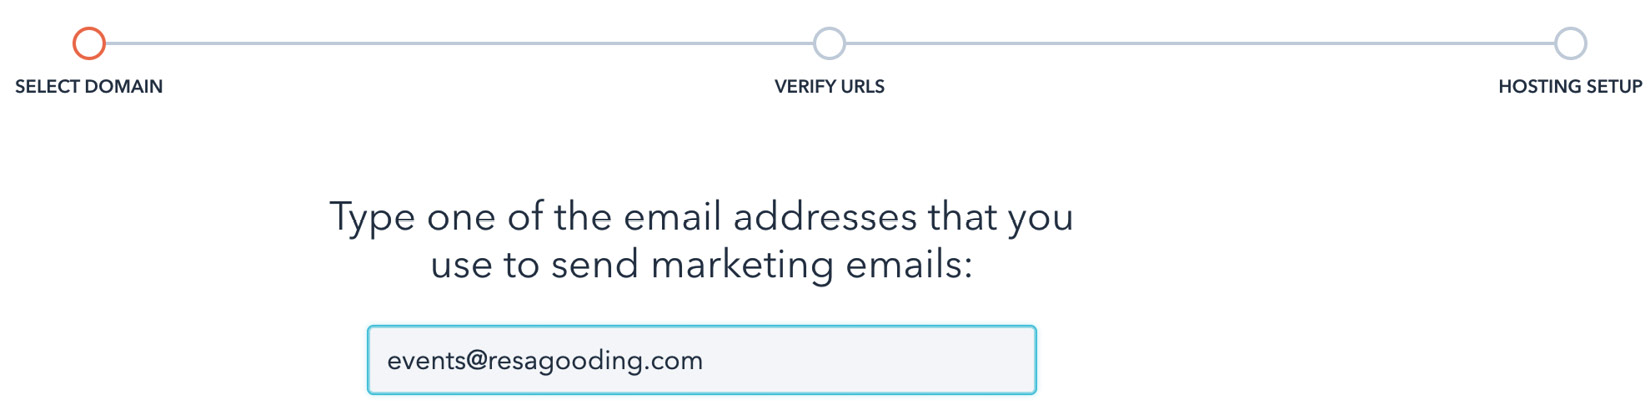
Figure 1.18 – Entering a generic email address in this box
- Even though this screen is asking you to verify emails will be sent out from this email address, note that you will have the ability to add many more email senders to your portal. So, simply click on Next to continue to the next screen, as illustrated in the following screenshot:

Figure 1.19 – Verifying the email sender
- Now, you will arrive at the following screen, which by now is quite familiar. This is where you will either authorize GoDaddy to connect your domains or choose to do this manually. Similar to setting up your landing page, follow the preceding steps until you have reached the confirmation screen that shows your email is connected:
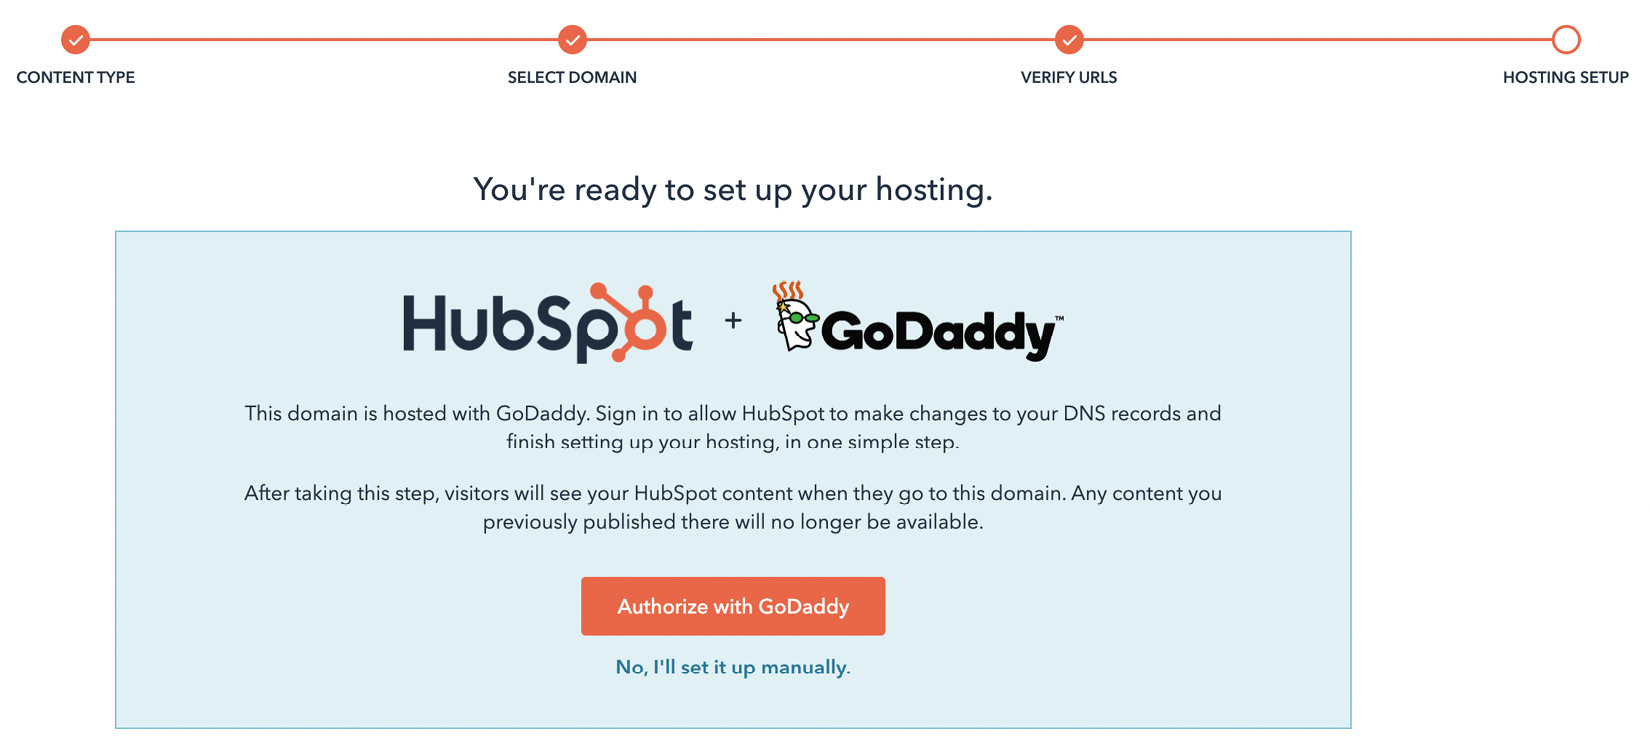
Figure 1.20 – Connecting to your hosting provider
This brings us to the end of one of the most technical setups in HubSpot—ensuring your domains are connected to HubSpot. Once it's completed correctly, you will see the following screen, confirming with a green light that your domains are connected:
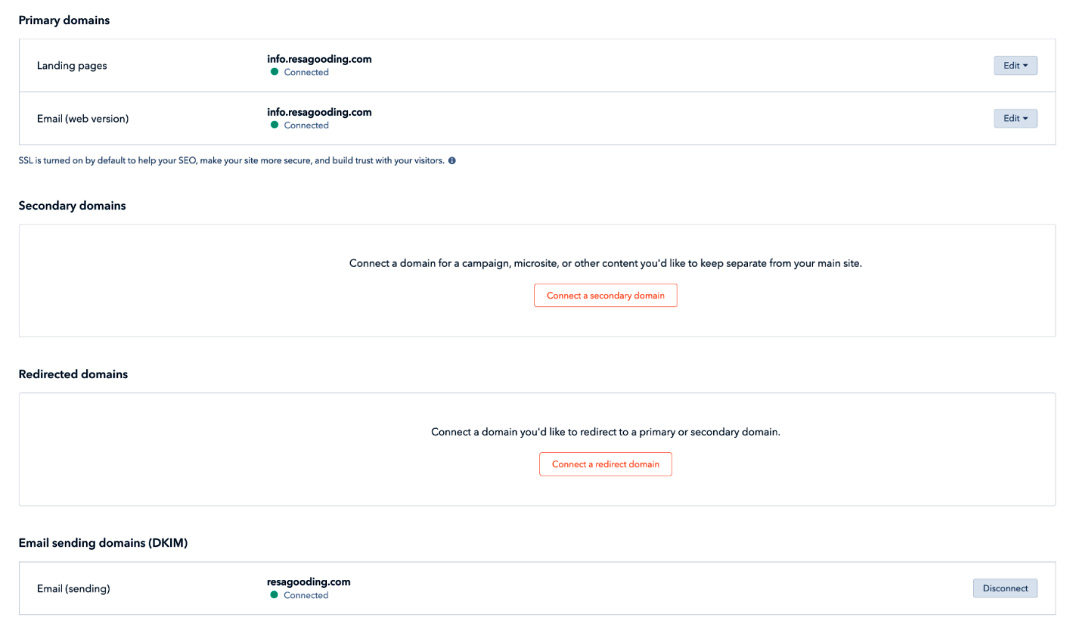
Figure 1.21 – Confirmation that all domains are connected
I cannot stress enough how important this step is. Without completing these actions, you will not be able to use HubSpot for hosting landing-page content or sending emails. But understanding that not everyone wishes to dabble in such technical details, be sure to ask your IT administrator for help if you don't feel confident in doing these steps.
Important Note
HubSpot is an inbound platform, which means they strictly advise against contacting people who have not opted in to hearing from you or given you some form of consent to email them—for example, having met them at a trade show or conference. You therefore should desist from purchasing lists of cold emailing contacts who have never heard from you. If this is an important part of your strategy, it is highly suggested to use another type of email platform to prevent you from compromising your HubSpot portal.
Connecting your social media accounts
Social media is a crucial channel for businesses to engage with potential and existing customers, but it can also be a time-consuming activity. With HubSpot, marketers now have a social media tool that can help them effectively manage their company's social accounts and give better insights into which contacts in their database prefer interacting on social media. Let's get you connected.
Follow these steps to connect your social media accounts to HubSpot:
- Go to Settings | Tools | Marketing | Social | Accounts.
- Click on Connect Accounts. The following screen will pop up, enabling you to choose which social media accounts you would like to connect. At the time of publishing, the social media accounts illustrated here are what HubSpot currently supports:

Figure 1.22 – Choosing which social media accounts to connect to HubSpot
- You must have Admin access to accounts you wish to connect to HubSpot. Then, follow each step that will appear on subsequent screens to connect the accounts.
- Once your social media accounts are connected, you can choose the scheduling format you'd like by clicking on the Publishing tab, as shown next. Here, you can choose the times you wish to publish each day, as well as choose the intervals at which each post should be published:

Figure 1.23 – Publishing schedule
- Next, you can set up how often you would like to receive notifications and updates about your social media activity by clicking on Email Notifications, as illustrated in the following screenshot:

Figure 1.24 – Email Notifications
HubSpot's social media tool is much more than a scheduling tool. It allows you to monitor conversations happening online about your brand and business, respond to those comments within the HubSpot platform instead of logging in to each social media channel, see exactly which contacts in your database are more interactive on social media than other channels, and measure the engagement you are achieving on each platform. In later chapters, we will show how you can successfully integrate your social media strategy into an existing campaign using HubSpot's social media tools.
Managing contacts and creating lists
The power of HubSpot lies within its CRM. It is your single source of truth (SSOT). The CRM collects all information about the contacts in your database as the properties are used to gather and store this intelligence. With a very robust CRM in place, you can fuel all other activities that take place in HubSpot—marketing, sales, and service. This section is dedicated to helping you manage the CRM efficiently and correctly.
Understanding properties
Properties are used to store data on certain objects within HubSpot—for example, contacts, companies, deals, and tickets. There are default properties that are built into the HubSpot platform and cannot be edited. A few examples of such properties are First Name, Last Name, Email, and so on, and there are custom properties that every user can decide to build.
Tips for building your own custom properties
Before adding more properties to HubSpot, take time to understand what already exists and—more importantly—how it is configured. Then, examine your business needs and what kind of information you would like to collect about contacts, their companies, your sales process, or your service process, and then create properties accordingly.
Here are a few things to consider when creating your own properties:
- Choose for which object a property should be created—contacts, companies, deals, or tickets: If it is a property that will collect information about an individual, then create it under Contacts. If it's about the company, then it should be created under Companies. Information about your sales process should be created under Deals, while information related to your service process should be captured under Tickets. Note that only properties created under the Contact object type, as in the following screenshot, can be used in forms. All other properties will only be seen by internal users of HubSpot:

Figure 1.25 – Creating a custom property: choosing an object type
- Deciding under which group the property should sit: Choosing the appropriate group helps you find information easily when you want to use it eventually. For example, under the Contact object type, you may want to collect information about a contact's social media profile, so you can add this field under Social Media Information. Note that you can also create your own group to fit your business requirements. The following screenshot illustrates how to select a group:

Figure 1.26 – Creating a custom property: selecting a group
- Choosing a label and a description: When choosing a label, consider what you would like users to see when they fill out a form. It should be short, clear, and to the point. The Description field can be used to explain to internal users the purpose of the field. The following screenshot illustrates how to choose a label and a description:
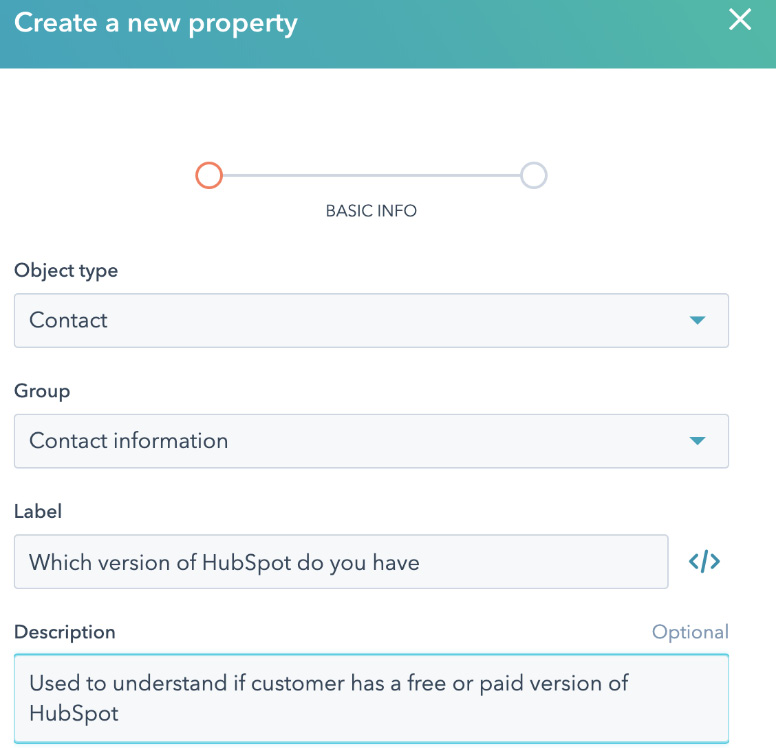
Figure 1.27 – Creating a custom property: choosing a label and description
- Selecting a field type: This is very important as it determines the format of your field.
Important Note
Wherever possible, avoid giving users the opportunity to write free text; instead, give them options to choose from. This will help control how your data is collected so that it makes reporting and other segmentation easier. Therefore, fields such as Dropdown select, Multiple checkboxes, and Radio select should always be considered first.
Note when creating options for these types of fields, an internal value is automatically created that matches the label. You cannot edit this internal value as this is what the system reads to update values in the system. So, if you wish to change a label, you must create a new label and delete the old one.
The following screenshot shows how to select a field type:
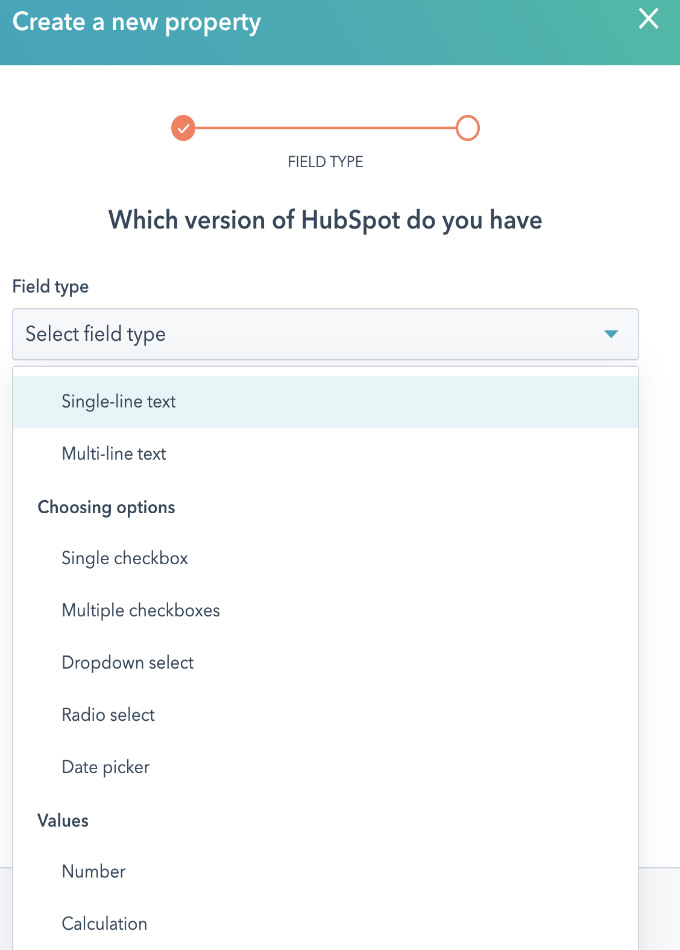
Figure 1.28 – Creating a custom property: selecting a field type
Properties are the backbone of your CRM system as they help you build the information you need about your contacts, but to ensure you are collecting information in a systematic way, it is important that you build properties correctly.
Contact management
Once the necessary fields have been created, you are now able to organize your contacts in a more systematic way to segment your database for better management and activities. Here are a few ways to better manage your contacts.
Filters
Filters are one way to segment your database, giving you a quick view of a segment of your database right from the Contacts page, Companies page, Deals page, or Tickets page. Note that these filters cannot be used in anything such as an email list, report, and so on—their purpose is simply for viewing the database. There are many use cases for filters, but some reasons behind why you may want to use filters could include the following:
- To see contacts that belong only to you or a specific contact owner
- To see which contacts are missing information—for instance, Country or First name field
- To see that contacts from a certain country/region are assigned to the right contact owner
The following screenshot provides an example of this:
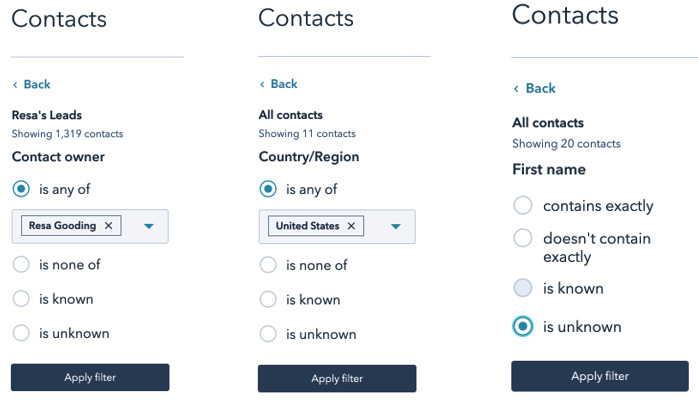
Figure 1.29 – Various filters created in Contacts
You can also save views of your filters and share them with other members of your team for easy access in the future. Simply click Apply filter, then Save filter, choose a name for the filter, and finally, select the Share with everyone option.
Lists
Lists also allow you to segment your database, but the main difference is that they give you more options to choose from. For example, under Contact Properties, you can choose from submissions, page views, and so on. This allows you to use these options to segment your database for specific marketing activities, such as the following:
- Nurturing emails based on page views or form submissions
- Enrolling in workflows
- Keeping track of people who sign up for an event when it is integrated into another platform—for example, registrants to a webinar event hosted on Zoom or GoTo Webinar
Note that lists exist in two forms: static and active. Active lists are updated in real time as contacts meet the criteria, as seen in the following screenshot, while static lists are not updated after a list is created:

Figure 1.30 – Active list
These lists can then be used to do many things. You can attach them to your email marketing campaigns, use them in workflows when you need to update certain features, or simply use them to keep track of leads being generated from ongoing campaigns.
Exploring tools for every marketer
HubSpot has built many tools that can definitely help marketers strategically organize various parts of your campaigns, as well as digitally "pick the brains" of HubSpot expert marketers as they share with you everything that has worked for them to build such a successful company over the last few decades. There is no denying that when it comes to inbound marketing, these guys are the litmus test to measure against.
Some of the tools we will discuss in this section are listed here:
- Calendar
- Campaigns
- SEO
- Projects
You should definitely consider setting these tools up in order to help you plan and execute your campaigns more successfully.
Calendar tool
The HubSpot Calendar tool is mostly used for managing your social calendar. You can find it by going to Marketing | Social. Then, click on Manage and Calendar, as shown in the following screenshot:
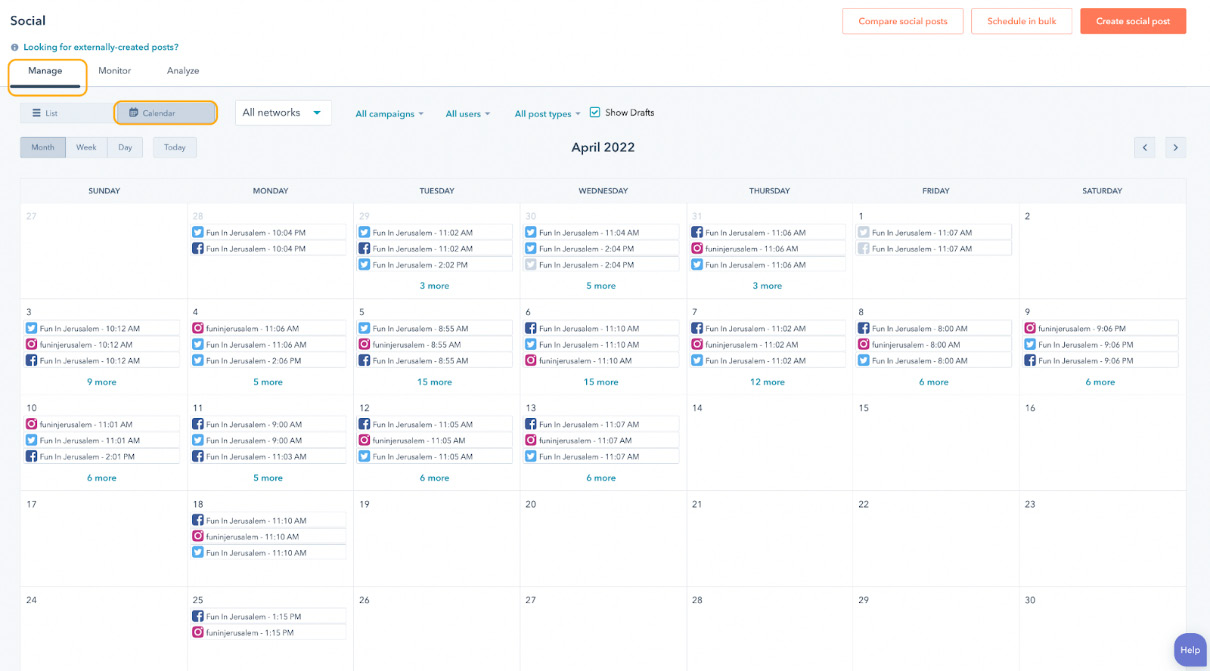
Figure 1.31 – Calendar tool
At a glance, you can see when social media posts have been published or are due to be published and on which channels. You can also use the calendar for planning your blog-post schedule, email scheduling, landing pages, and event tasks.
The goal is to use the HubSpot calendar tool as your marketing content calendar, giving you a bird's-eye view of the amount of content you have produced over time.
Campaigns tool
This is one tool that is often used incorrectly. To locate it, go to Marketing | Campaigns. In HubSpot, a campaign is created only when you have more than one marketing asset or content related to a main theme or event. For example, should you be attending an upcoming conference such as CES, then you can open a campaign and associate all marketing assets—such as emails, social media posts, blog posts, landing pages, and so on—with this campaign. You can even add a budget to measure how much money you allocated and spent on this campaign. The goal is then to use campaign analytics to measure which activity or asset generated the most leads or customers. This allows you to know which campaigns were most effective and on which channels you should focus your efforts and resources.
The following screenshot shows an example of the Campaigns tool in use:

Figure 1.32 – Campaigns tool
As mentioned before, one of the most common mistakes made is opening a campaign for each marketing tactic, such as a blog post or email. A campaign is meant to show the various channels that brought leads to a specific theme, so opening a campaign for every blog post provides no additional information except how many views were received for each blog post. However, opening a campaign for a topic on which a blog post is written and then associating the blog with the campaign, then sending a social media post promoting the blog to the campaign and an email to subscribers about the blog to the campaign provides more value because you can then measure which asset generates more leads for this topic.
SEO tool
Search engine optimization (SEO) is critical for content visibility and conversion. Without good SEO, no one finds your content online, and since HubSpot supports your blog, landing pages, and even your website (if needed), the SEO functionality was added in order to help you plan your content strategy and build search authority.
To get to the SEO tool, go to Marketing | Website | SEO. In Chapter 5, Increasing Online Visibility Using HubSpot's SEO Tool, we deep dive into exactly how to use the SEO tool. For now, we would like to simply give you some insights into why you should consider setting it up.
The SEO tool works alongside Google Search Console (GSC). Integrating this free tool with HubSpot's SEO tool allows you to bring search data from Google directly into your HubSpot portal for a better understanding of how your content shows up on Google search engines, as seen in the following screenshot:

Figure 1.33 – SEO tool
It is important to recognize that green lines indicate that the sub-content is associated with the main pillar page, while a red line indicates that the sub-content is not linked to the main content. To fix this, you will need to go into the sub-content piece and hyperlink a relevant phrase connecting it to the main pillar content. There's more on this in Chapter 5, Increasing Online Visibility Using HubSpot's SEO Tool.
Projects tool
This is literally every marketer's hack for appearing as a marketing rockstar. Being the masters of inbound marketing, HubSpot has gifted each portal owner with templates and step-by-step instructions for executing any and every type of digital campaign. Just dream it, then search for it in Project Templates, and it appears. To get to this tool, click your company name in the top right-hand corner of your portal, then scroll down to Projects, as illustrated in the following screenshot. You will then see Project Templates as a submenu, and there, you can search for any type of template you are looking for:
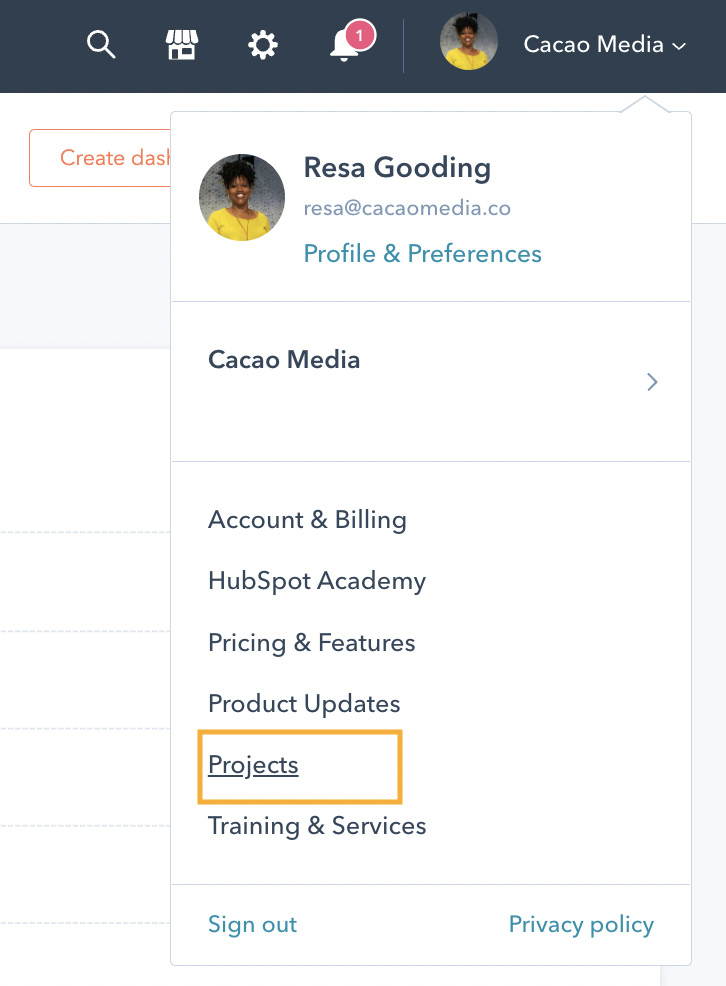
Figure 1.34 – Projects
So, if you are ever unsure where to begin with a webinar campaign or how to set up and launch an e-book, or even how to build reports your manager actually cares about, it can all be found in HubSpot Project Templates.
The following screenshot shows some of the things you can do with the Projects tool:
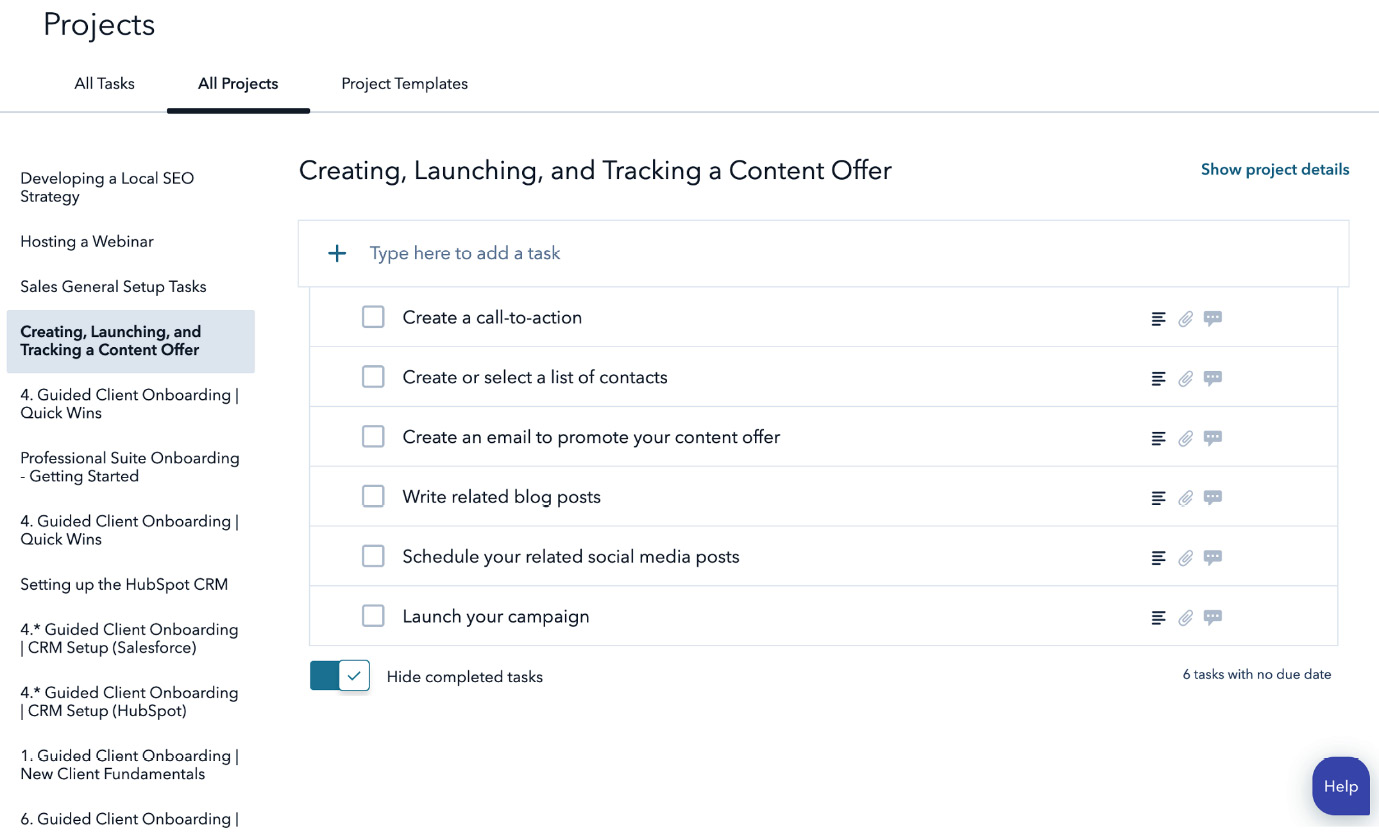
Figure 1.35 – Projects tool
Using these tools can give you the advantage you need to better execute and manage your campaigns as well as to measure their success, so do take some time to familiarize yourself with how they work. We will expand on their usefulness in later chapters.
Analyzing ROI and performance
Back in the day, marketing ROI was extremely hard to measure. How did we ever know that because of a billboard posted on a freeway, X amount of leads were generated that converted to Y amount of revenue? It was virtually impossible. However, today, with digital marketing, where every click, visit, and page view can be measured, it has become of paramount importance to justify your marketing spend.
HubSpot's Analytics tool provides you with built-in reports that are already automatically generated for you within the portal. At your disposal, you have many ready-made reports. Let's take a look at a few of them, as follows:
- Website Analytics: This report focuses on your website pages (if they are hosted on HubSpot, landing pages, and blog pages). In the following screenshot, you can see an example of a Website Analytics report:

Figure 1.36 – Website Analytics
- Traffic Analytics: This report breaks down the various sources of your traffic and gives you a traffic overview of your website pages (even if your website is not hosted on HubSpot) and topic clusters if you are using the SEO tool. In the following screenshot, you can see an example of a Traffic Analytics report:
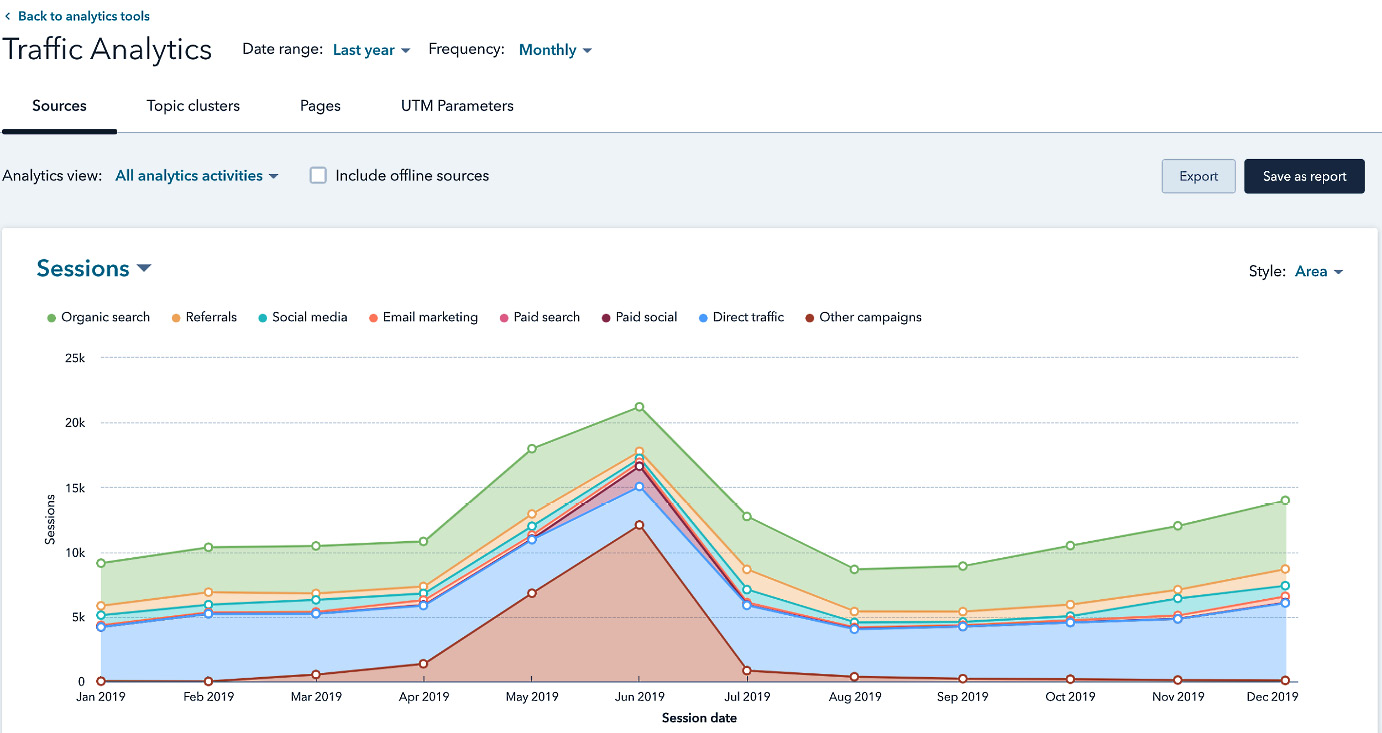
Figure 1.37 – Traffic Analytics
- Contact Analytics: This report shows you how many contacts and which contacts came from various sources. In the following screenshot, you can see an example of a Contact Analytics report:
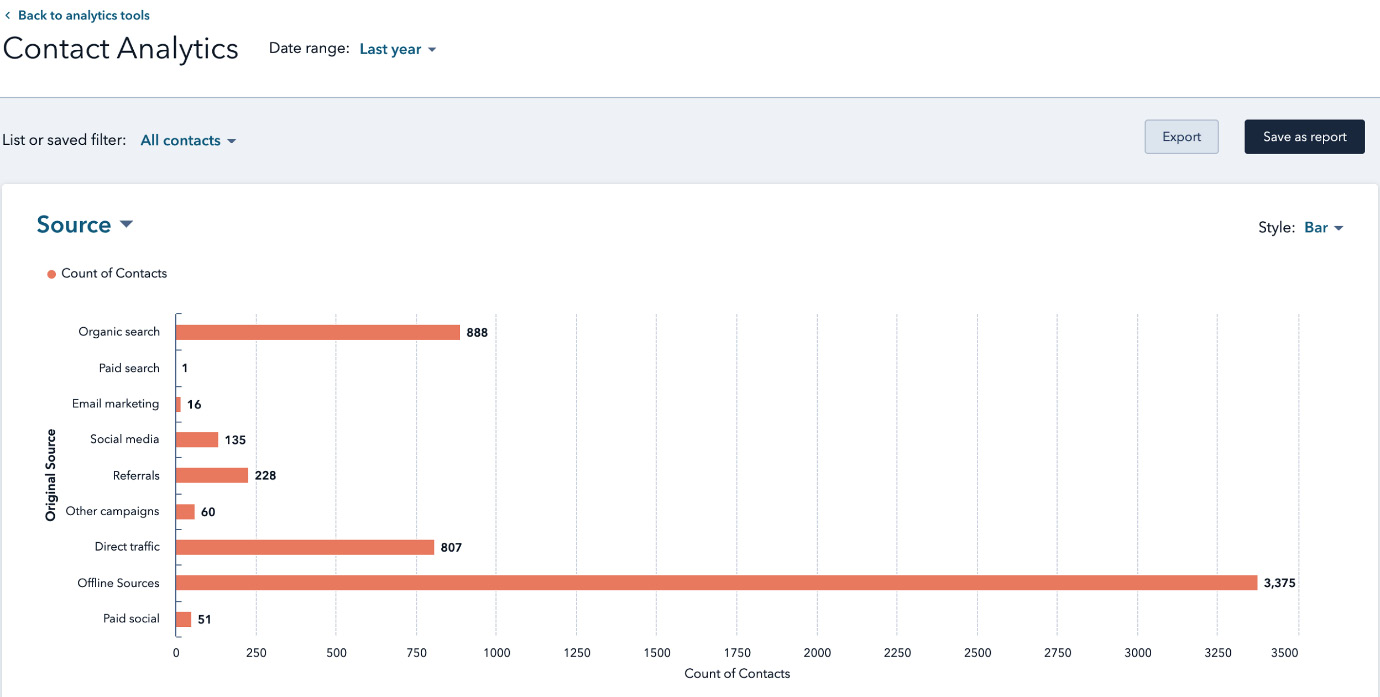
Figure 1.38 – Contact Analytics
- Campaign Analytics: This report shows you a summary of which contacts came from individual campaigns. In the following screenshot, you can see an example of a Campaign Analytics report:
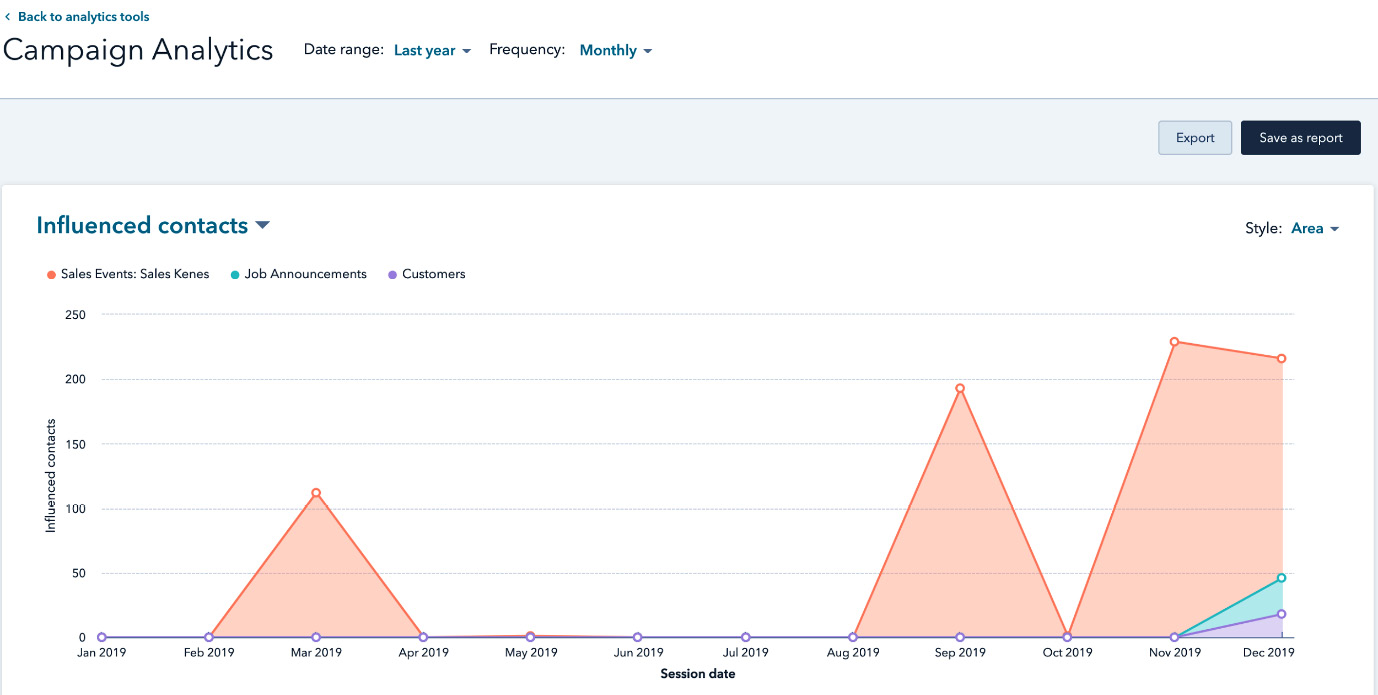
Figure 1.39 – Campaign Analytics
- Sales Team Productivity: This report gives exactly what it says—it shows you which team members are closing the most deals, having the most meetings, making the most calls, sending the most emails, and so on. In the following screenshot, you can see an example of a Sales Team Productivity report:
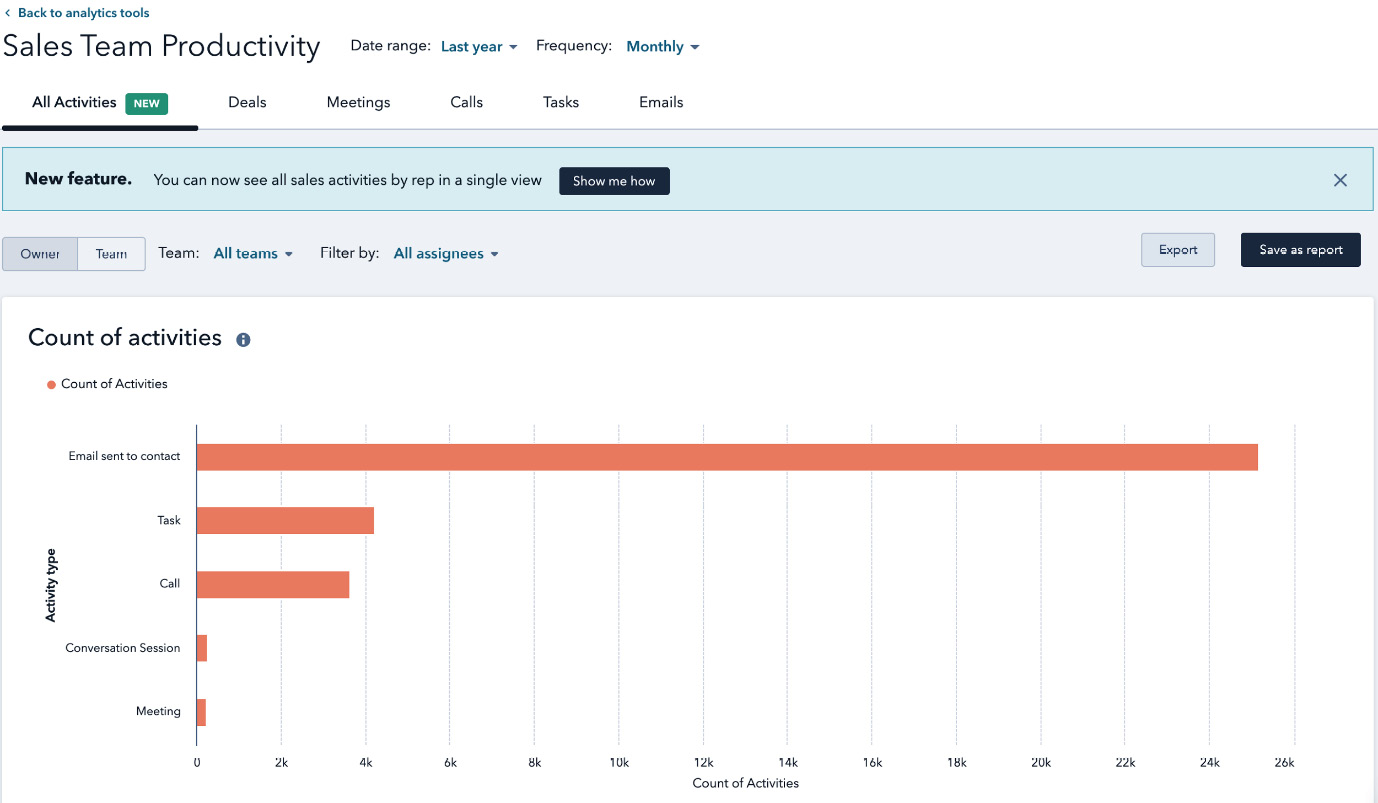
Figure 1.40 – Sales Team Productivity
- Sales Content Analytics: This shows you which sales assets are performing the best in terms of templates, documents, and sequences. In the following screenshot, you can see an example of a Sales Content Analytics report:
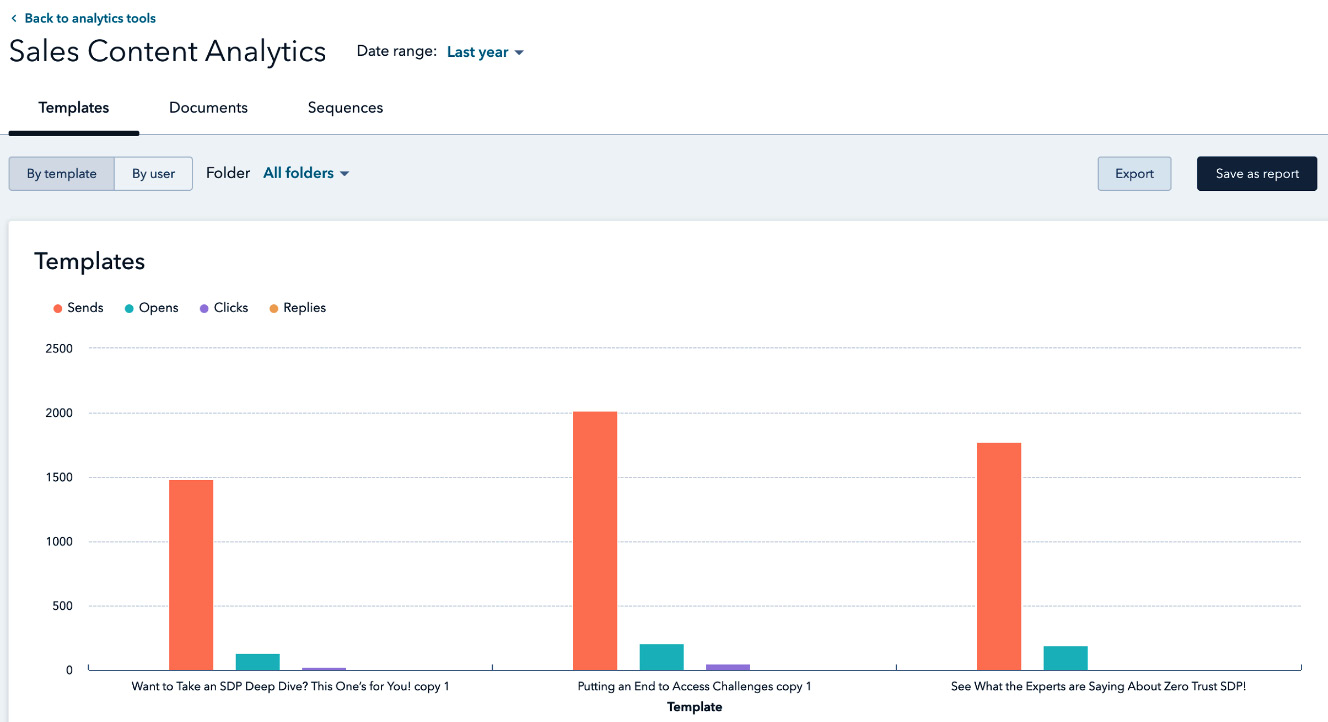
Figure 1.41 – Sales Content Analytics
At the same time, if you don't find a report that you are looking for, you can build your own custom reports using any of the objects available to you, such as contacts, companies, deals, tickets, and even activities. Additionally, you can create funnel reports as well as attribution reports (if you have the enterprise version).
And last but not least, you can use dashboards to organize your reports more visually so that you can view at a glance the performance of your marketing or sales activities, as well as use this format for meeting updates. One of the most valuable features of this dashboard is the ability to send automatic updates to your management team by email so that it takes one more task off your plate.
I know that was a lot to digest, so in Chapter 11, Proving That Your Efforts Worked Using These, we have covered everything you will need to know about building reports in HubSpot.
Summary
There's a whole lot more you can do with HubSpot, but I am sure this was more than enough to get you started. The goal of this chapter was simply to give you an overview of what you can expect from the HubSpot portal. We covered the main parts of the platform and gave you a starting point from which to focus your resources and efforts.
Specifically, you have now connected your website to HubSpot to track your visitors' engagement, connected your email domains so that you can now send relevant and engaging content such as newsletters, and nurtured your contacts after they downloaded one of your gated assets from your landing pages. Most importantly, you have now imported your contacts and segmented them as needed so that you can ensure you are delivering a personalized experience. And finally, you have set up your dashboard to help measure your efforts to ensure you are meeting your business goals.
In the next chapter, we will explore in more detail each of the tools and functionalities of HubSpot and show you how to generate some quick wins in the first 30 days of setting up your portal.
Questions
To ensure you understand the value of the steps you've just completed, let's practice some common troubleshooting tactics you can implement if faced with any of these issues. Have a go at answering the following questions:
- Why do you need to create subdomains for your landing pages or blogs if you are hosting these assets in HubSpot?
- If one of your team members asks why the company needs to use HubSpot analytics if it already has Google Analytics, how would you respond?
- If you would like to plan an upcoming webinar campaign but are unsure of all the steps you need to do to ensure this campaign is a success, where can you go for a detailed step-by-step guideline?
Further reading
For more information or instructions on any of the items covered in this chapter, do check out these resources:
- HubSpot's Knowledge Base: https://help.hubspot.com/
- Contact HubSpot Support: https://help.hubspot.com/