
Chapter 8: Conducting a Portal Audit
If you are a current customer of HubSpot, by now, you must have realized there is a whole lot more you can do with your portal than sending emails. Although HubSpot initially began as a marketing automation tool, today, it is described as a CRM platform with complete marketing, sales, and service capabilities. Its goal is to help small, medium, and enterprise companies scale efforts and reach revenue targets. The problem is that even though most companies may have the correct licenses, they aren't utilizing all the functionalities within their respective portals.
On the other hand, some companies may fully utilize the various tools in their portal. Still, maintaining the data or generally keeping the CRM clean isn't optimal. For this reason, it is recommended to at least do a portal audit every 6 months or so to identify any issues and perform the cleanup necessary to get proper reports and insights.
Remember the rule of thumb for good data hygiene – garbage in, garbage out. And the most effective way to measure if your portal is optimized is to check if you can rely on the reports that have been generated. If you still have to depend on Excel sheets for your reports, you need to consider doing a portal audit.
In this chapter, we will cover the following topics:
- Identifying issues in your HubSpot portal
- Step 1 – Implementing structure and order in your portal
- Step 2 – Mapping your customer journey
- Step 3 – Performing a technical audit
- Step 4 – Conducting an audit for your Marketing Hub
- Step 5 – Conducting an audit for your Sales Hub portal
- Step 6 – Prioritizing which problems to fix first
Note that the goal of this chapter is not to get you to use all the functions available just for the sake of using them. Instead, this chapter aims to highlight some of the options that may already exist in your portal that you may not be fully utilizing and can help you achieve some of your business goals.
To make this chapter most relevant, we will focus on the HubSpot Professional and HubSpot Enterprise licenses.
Let's get to it!
Identifying issues in your HubSpot portal
Like most things in life, you often don't know you have a problem until something disastrous happens. HubSpot users are often anxious to begin using the platform and prove a return on investment (ROI), as discussed in Chapter 2, Generating Quick Wins With HubSpot in 30 Days, so that they can justify the budget they asked from CEOs to get the platform. This means they often don't take time to plan how they will organize the portal and optimize the tools at their disposal.
Therefore, some of the most common issues customers face after using HubSpot for some time without proper planning are as follows:
- They can't find or understand anything in your portal. If you find yourself with too many lists or workflows and don't remember why they were created or can't understand the reason why they were created, this means you did not maintain a proper log of your assets. Even if you find yourself scrambling to find the last email you sent out, or the last landing page you created for a webinar 3 months ago so you can clone it for the next upcoming event, this is a clear sign that you need to consider better naming conventions for your assets.
- They're sending the wrong emails to the wrong contacts. This is a sign your database hasn't been segmented correctly.
- Your leads haven't been entered correctly in your CRM from your website or campaigns. You may have an issue with your technical setup.
- Them not being able to rely on the reports. This is often a sign that the data hasn't been captured correctly in the right properties.
- They don't understand the contacts in your database and their status. This signals a lack of understanding of effectively using lead status stages and/or life cycle stages.
- Your email deliverability and open rates are below the industry average. This highlights an opportunity for better segmentation and even personalization.
- Your sales managers are still running their reports and team meetings primarily using Excel. This indicates a low adoption rate of CRM among sales reps.
- Your marketing, sales, and service teams still have too many meetings to get updates on leads. This shows that the leads are not updated in the CRM and that there is no clear handover process within the departments.
- Your management team is asking for daily updates on the status of potential leads and customers. The reports aren't making sense to them.
- You are considering adding more platforms to your MarTech stack, but not sure if they integrate with HubSpot or even if it's necessary. This signals the need to revisit the tools HubSpot offers and look at their integration app list to check how easy it would be to use this new tool with HubSpot.
…and the list can go on and on. However, now that we understand the nature of the symptoms, let's explore the cure.
Step 1 – implementing structure and order in your portal
Similar to a financial audit, the goal of a portal audit is to go over every detail of your portal to understand where the gaps may exist. The following are a few scenarios that you can begin with when performing a HubSpot portal audit:
- Access to platform: Double-check who currently has access to the platform and what level of access they have. This is a great time to review all the users on your platform and make sure you understand who everyone is, their role, and how they are expected to use HubSpot to determine their level of access. For instance, do all the people with super admin access need such access? This access generally gives such users the ability to edit, delete, and view everything and anything about your portal. One of the most crucial things they can do is delete everything in your portal and not note that deleted items can't be recovered. So, you will want to pay special attention to who has super admin access. Another group of people you may want to pay attention to is your external vendors. Sometimes, a web developer has access to your portal to help build out some customized landing pages or website pages for your brand. Although they do need access to the development tools within HubSpot, they do not need access to your contacts' data. So, ensuring that their visibility is set to View – None, Edit – None, and Delete – None will safeguard your data.
- Naming conventions: An important aspect of maintaining your portal's cleanliness is being able to establish naming conventions to quickly identify your assets. One suggestion for structuring such a naming convention is Type of Campaign | MM/YY | Name of asset. So, for example, Nurture Campaign | 08/22 | Email 1 or Webinar Campaign | May 2022 | Invitation Email or Customers List | 2022.
- Folder structure: Another system that helps keep your items organized is folders. Most assets in HubSpot can be grouped into folders. For example, lists, files, emails, and workflows can all be organized into folders, which should follow a similar pattern as your naming convention.
Step 2 – mapping your customer journey
Now that you have implemented some form of structure in your portal, the next step is to map out the customer journey that a contact typically follows in your business to become a customer. This is often overlooked but is critical as, by now, you would realize that after using your portal for some time, you have a variety of contacts in your system, and you aren't always sure how to deal with them.
At this stage, we recommend that you have a plan for the five scenarios most contacts will typically encounter in your business:
- Entry path: In this scenario, you want to make sure you have defined a process for how new leads are treated. For example, you may want to consider what their lead status and life cycle stage should be. Most times, these fields would be updated to Lead status - New and Lifecycle stage – Subscriber (if they simply filled out their email to subscribe to your newsletter) or Lead (if they filled out a form to download a piece of content).
- Success path: As outlined previously, the goal is to make most of the contacts in your database customers if they are relevant to your business. So, you would want to map out various paths a contact could take to move along the journey of becoming a customer. For example, you may need to consider what will move a contact from a lead to a marketing qualified lead (MQL). Is it when they download a specific type of content that is more middle of the funnel, such as a white paper and not just a checklist? Or is it when they sign up for a webinar and give their company emails and do not use generic email systems such as Gmail or Yahoo? And then what will make them a sales-qualified lead (SQL)? Must they fill out a form to request a demo or ask to speak to a salesperson through the contact us form? Or would it be sufficient that they satisfy all the criteria that identify them as an ideal client? Such criteria include the right job title, right company size, right country, and whether they've visited more than three website pages and attended one webinar. Does this make them a SQL and can you hand them over to sales for a follow-up? Whatever your decision, these paths must be mapped out and built into the system using workflows.
- Fast track path: You then need to consider how hot leads are treated. These include contacts who came to your website and immediately requested a demo. They could also be people who spent a lot of time combing through your website, visiting multiple pages. For these types of leads, you will want to consider how to notify sales immediately by email or text to let them know these are "hot" leads and should be treated with priority. As discussed in Chapter 13, Leveraging the Benefits of the Marketing Flywheel, you may consider using a specific lead status and life cycle stage combination such as New | MQL so that the sales team will prioritize these contacts over other leads that may have come in on that day.
- Dead end path: The reality is that not all contacts that come into your CRM are relevant. Oftentimes, this happens when research students come across your ebook and download it. Even your competitors may be interested in taking a sneak peek at your content. So, how you prevent these leads from reaching your sales teams is another factor you must consider. To manage such leads, you can build a workflow that has enrollment triggers. For example, if the job title is student, professor, unemployed, or any of the gibberish you sometimes see people enter into your forms, then set this contact with a lead status of unqualified. Note that sometimes, these contacts' life cycle stages may have already progressed because they took a specific action, such as requesting a demo, and you may have a previous workflow that set them a SQL. It's okay that their life cycle stage is advanced because you want to track how many contacts reached these stages only to be deemed unqualified. This would help inform you of the gaps in your campaigns so that you can tighten the reins there.
- Recycled path: In this case, some leads may have reached out to the sales teams and had several discussions, but they were not ready to buy yet. These leads should be returned to the marketing team so that they can be nurtured accordingly until they are ready to buy. Even contacts that were active opportunities, but eventually turned out to be lost sales, should be identified so that marketing can also help nurture them. One way to build this recycled path is to place a condition in the deal stages for the sales reps to choose a reason when the Closed lost deal stage is chosen. For example, the stages could be competitor, budget, project postponed, missing feature, price, champion left, no longer relevant, and other. Then, depending on the reason, the marketing team would have predefined sales nurtures set up that would automatically enroll these contacts to the respective nurtures. This could keep your business in the contact's mind for when your product or service becomes relevant to them again.
Taking the time to map out these five possible paths that contacts can take when entering your database will help you set up more successful campaigns as you will have a better understanding of the contacts in your database.
Next, let's look at the most important technical things you must check in your portal as you conduct your audit.
Step 3 – performing a technical audit
As we described in Chapter 1, Overview of HubSpot – What You MUST Know, several technical aspects are needed when you're setting up your portal for the first time. This includes connecting your domain, connecting your website, connecting your social media account as well as your paid ad accounts, and even setting up all your branding assets such as logos, brand colors, and more. If you need further tips on how to do this correctly, I suggest that you revisit Chapter 1, Overview of HubSpot – What You Must Know. In this section, we will focus on how to audit the most critical aspects of your technical setup, which are as follows:
- Checking that your domains are connected
- Checking that your website is connected (especially if you rebranded recently)
- Checking that your branding has been updated in the correct places
- Checking that the pages that allow your subscribed contacts to unsubscribe are working correctly
- Checking that your social media and paid ads channels are connected
Let's learn how to perform an audit on each of these elements and fix them at the same time.
Are your domains connected?
The first thing you must double-check is whether your domains are connected. Your domains are the URLs where your company website sits, as well as where your company emails are based. Connecting your domains to HubSpot is critical if you wish to host your content on HubSpot. For example, you should build your blog or landing pages where the URLs will be branded with your company domain name, not HubSpot's. You can do the same if you wish to send emails from HubSpot using your company email addresses.
So, if you are having difficulty with any of these things, follow these steps:
- Go to Settings at the top right-hand corner of your portal.
- Scroll down on the left-hand side menu and choose Website | Domains and URLs.
Once you're there, you should see green dots on the various domains you've connected, such Blog and Landing pages. You can always connect additional domains if you want to create additional sub-domains to host specific types of content, such as events:
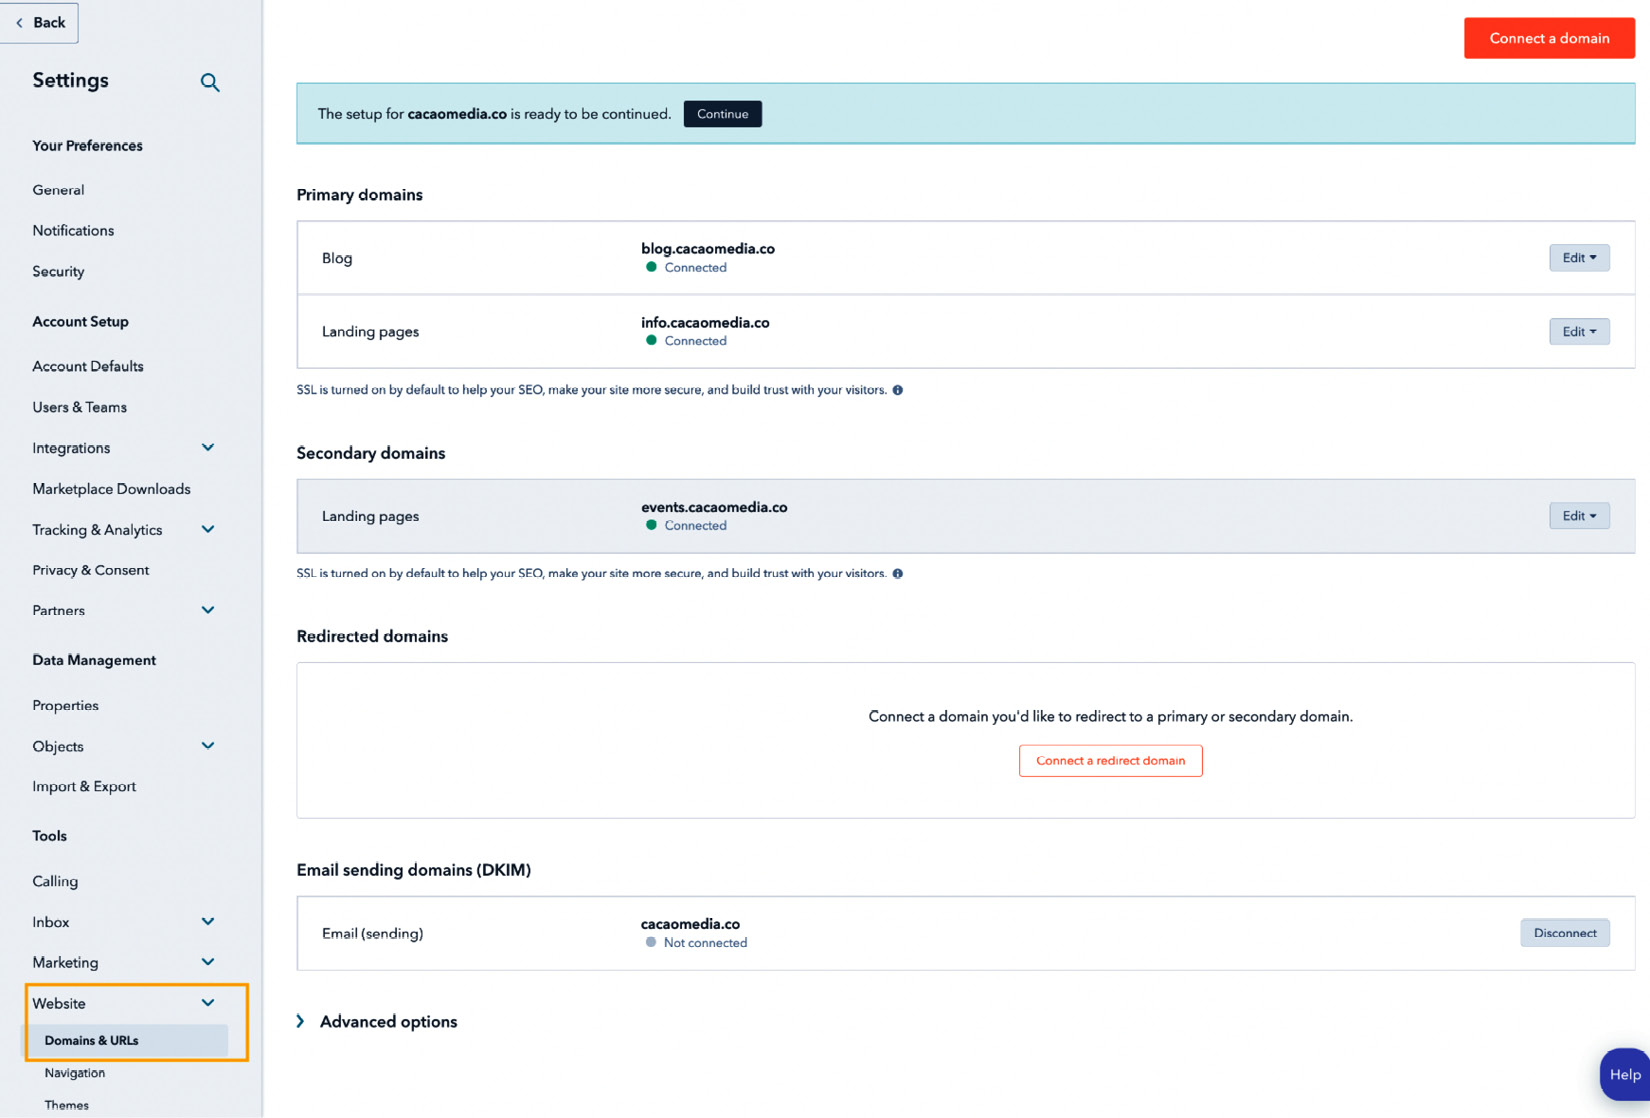
Figure 8.1 – Connecting your domains to HubSpot
- Note that if you do not see a green dot on one of your supposedly connected domains, such as what's shown in the preceding screenshot, then you will need to reconnect this domain. To do this, you must have super admin access to your HubSpot portal and access to the platform where you purchased the domain, such as GoDaddy, 123reg, or something else. You may need to work with your IT administrator to get this access.
- Once you've gained the relevant access, simply click Continue on the blue banner that appears at the top of the page and complete the steps that follow.
Again, if you get stuck, we have outlined step-by-step instructions in Chapter 1, Overview of HubSpot – What You MUST Know, so feel free to revisit this content.
Is your website connected to HubSpot?
You likely completed this step while updating your portal for the first time, but sometimes, this is often overlooked in a rebranding exercise. It is often only much later, when leads don't come into the CRM, that you notice there is a problem. But how do you know if there is a problem? There are two telltale signs in your portal.
First, you can check the Traffic Analytics report by going to Reports | Analytics Tools | Traffic Analytics to see if there has been any data for the last few days. If you see no traffic over a period, but there has been traffic before, it means there might be a problem with the connection. The following screenshot shows an example of this type of report:

Figure 8.2 – Traffic analytics report
Another health check to do is to fill out a few forms on your website and see if the data is coming into your CRM. If you see the information, then everything's fine. You can also go to Marketing | Lead Capture | Forms to see if the website forms appear there.
Note that if you have not changed the forms on your website to HubSpot forms yet and your site is built on WordPress and using gravity forms, you will typically see your forms listed as #gform_1, #gform_2, and so on.
Checking your branding
In HubSpot, there are two places you can update your brand assets.
First, you can go to Settings | Account Defaults | Branding | My brand kit, as shown in the following screenshot. You can update this brand kit to choose these options and create public-facing content such as emails:

Figure 8.3 – Setting up your brand assets for public-facing content
You can also update your branding by going to Settings | Website | Pages | Branding, as shown in the following screenshot. This is where you update your logo for your pages such as blogs, landing pages, and unsubscribe pages. By default, when you do update your logo here, the size is usually 2,500 x 500 px. Therefore, you will need to adjust it to something more reasonable, such as 640 x 237 px, so that it doesn't take over the entire page when loaded. I'm sure that if you click the unsubscribe button in your emails, you will be surprised to see that your logo is very large here. So, this is the place to fix it:
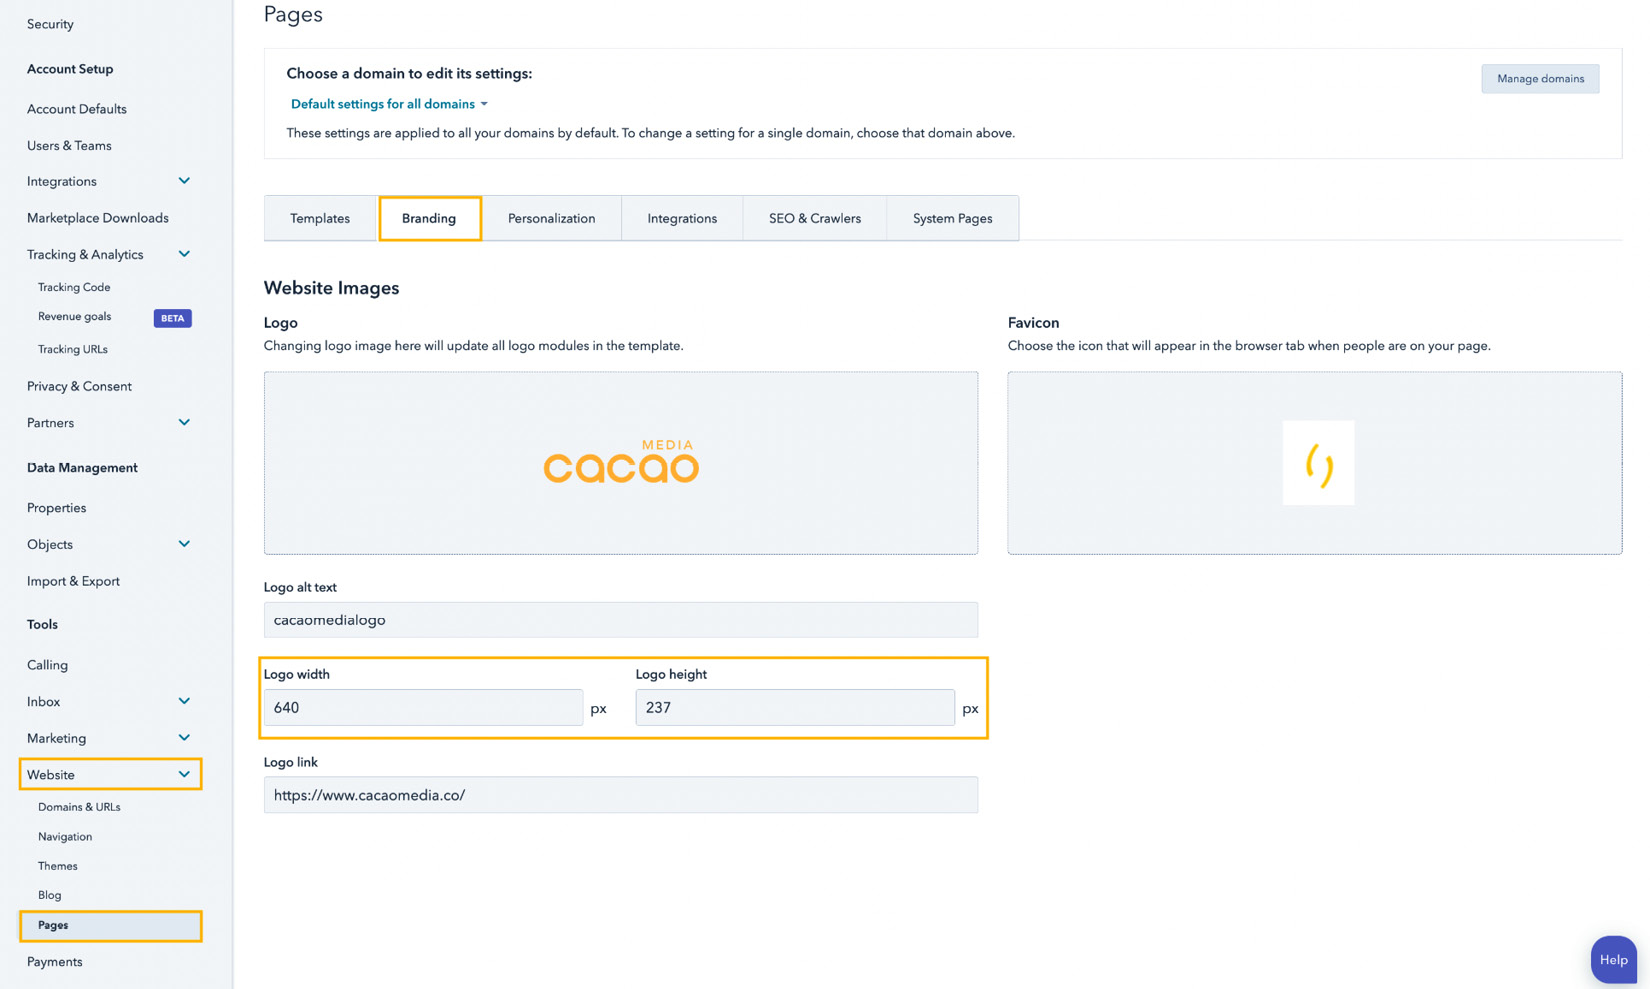
Figure 8.4 – Setting up brand assets for pages in HubSpot
This brings us to the next most overlooked setup in HubSpot – unsubscribe pages.
Checking your unsubscribe pages
One of the most overlooked but easiest points of reconversion is the unsubscribe page. By law, every marketing email that's sent out must have an unsubscribe button. By default, HubSpot has already added this button to your marketing emails. But you may want to make some adjustments when you see this page.
To access this page, go to Settings. Then, via the left-hand menu, scroll down to Marketing | Email | Subscriptions, as shown in the following screenshot. Once there, you will see three options:
- Subscription preference pages: This page allows users to decide which of your subscription types they wish to stay subscribed to or unsubscribe from.
- Subscription update confirmation page: This page confirms to the unsubscriber that they have successfully unsubscribed from your emails.
- Unknown contact submission preferences: This page is the first page that contacts who wish to unsubscribe will see when they click on the unsubscribe button. It will prompt them to enter their email addresses so that they can be unsubscribed.
These options can be seen in the following screenshot:

Figure 8.5 – Subscription pages in HubSpot
You can customize and rebuild these pages by clicking Edit Page. This will take you to HubSpot's CSS platform. However, if you aren't into coding, feel free to ask your designer to create a design that's on brand and then have a developer develop it for you.
Checking your social media and paid ads connection
The last thing I would suggest that is critical to check are your connections with your social media channels and paid ads channels. As part of their privacy policies, most social media channels' integration with third-party tools expire. Sometimes, they expire every 3 months or every year or at their discretion. So, you will want to double-check that all the respective social media channels and paid channels are connected:

Figure 8.6 – Reconnecting your social media channels
To check if any of your channels are disconnected, go to Settings. Then, via the left-hand side menu, scroll down to Marketing | Social and click on Accounts.
As shown in the preceding screenshot, you will see which accounts need attention; then, you can click the Reconnect button. As always, you will need to have super admin access to HubSpot and be an admin on the social media channels you are trying to connect.
Now that you have the most critical technical elements of HubSpot set up, the next step is to carefully do a marketing and sales audit and then identify which actions you should prioritize to fix.
Step 4 – conducting an audit for your Marketing Hub
There are several components of the Marketing Hub in HubSpot. For a detailed description of how to use them, you can explore Chapter 6, Geting Known through Social Media on HubSpot, to Chapter 10, Revive your Database with HubSpot's Email Marketing Tools. In this section, we will focus on the most common and important aspects that should be checked for every HubSpot portal, regardless of the types of campaigns they are running.
When performing a marketing audit, there are five critical elements you must check:
- Contact fields and segmentation
- Lead source
- Email campaigns
- Lead management
- Reporting
There are, of course, many more items to check, such as landing page optimization, forms, tracking URLs, and much more. But for now, let's take a look at what it takes to ensure these five elements are running properly in your portal.
Contact fields and segmentation
This part of the audit involves checking what percentage of your contacts have the fields filled out that you have deemed critical for understanding your database. For instance, every contact in your database should have a valid email address. To check this, you must create an active list with the Email address is unknown, Email hard bounced reason is known, Unsubscribed email is equal to True, or Opted out of all email marketing information is known filters. This can be seen in the following screenshot.
If you take this number and divide it by the total number of contacts in your database, then multiply it by 100, you will get the percentage of the invalid entries in the database:

Figure 8.7 – Filters for building a list to check for invalid contacts in your database
You should repeat this process to understand how many contacts don't have job titles, whether the country is unknown, or any other criteria necessary for you to understand who is who in your contact database. Generally, having this information helps you understand how to segment your database to send them relevant information or enroll them into specific nurture content. During your audit, you will find out which fields are lacking information, so you could decide on tighter restrictions or implement additional workflows or integrations with platforms such as Zoominfo to fill in any missing contact information.
For example, if you notice that the country field is missing, which is necessary to assign the contacts to the respective sales reps for that country, then you have a few options. The first is to make sure that the country field is mandatory for all the forms on your website and campaigns.
You can also build workflows to copy the internet protocol (IP) country to the country field, as the IP country is always automatically captured when a contact submits your form. However, the drawback of heavily depending on this field is that some companies use virtual private networks (VPNs). This helps them falsify their location to protect their network. So, if it is a much-needed field to ensure your sales reps follow up on qualified leads and you notice that it is generally missing during the audit, then implementing either of these options will improve this process going forward.
Understanding where your leads come from
The lead source is often a critical component in every marketing strategy. It helps marketers understand which channels bring the best leads so that they can increase the resources toward that channel and optimize lead generation.
HubSpot automatically captures the source of every lead in a property called Original Source. This field cannot be updated and captures the first channel that brought a lead to you. The seven sources that are tracked by HubSpot are as follows:
- Organic search
- Direct traffic
- Organic social
- Paid social
- Referrals
- Email marketing
- Other campaigns
- Offline sources
You can see these sources when you go to Reports | Analytics Tools | Traffic Analytics and scroll down a bit until you see the table shown in the following screenshot. Remember that if you don't see any information here, you may want to check if your website is connected to HubSpot properly:

Figure 8.8 – Sources of traffic
Notice that the source that often brings the most contacts and customers is Offline sources, and this can mean many things. Offline sources capture leads that are manually created in the system, uploaded via an Excel spreadsheet, or created via integrations such as email integration, or with any other tool that's integrated with HubSpot. Therefore, it is often necessary to break down this source so that you can understand where these leads come from. One way to do this is to build a custom lead source that itemizes the major buckets where leads are generally coming from, then build workflows that will associate these various lead sources with your custom lead source.
Auditing your email campaigns
When it comes to your email campaigns, the quickest way to audit your activities is to check your email health in your portal. To access this feature, navigate to Marketing | Email and click on the Health option:
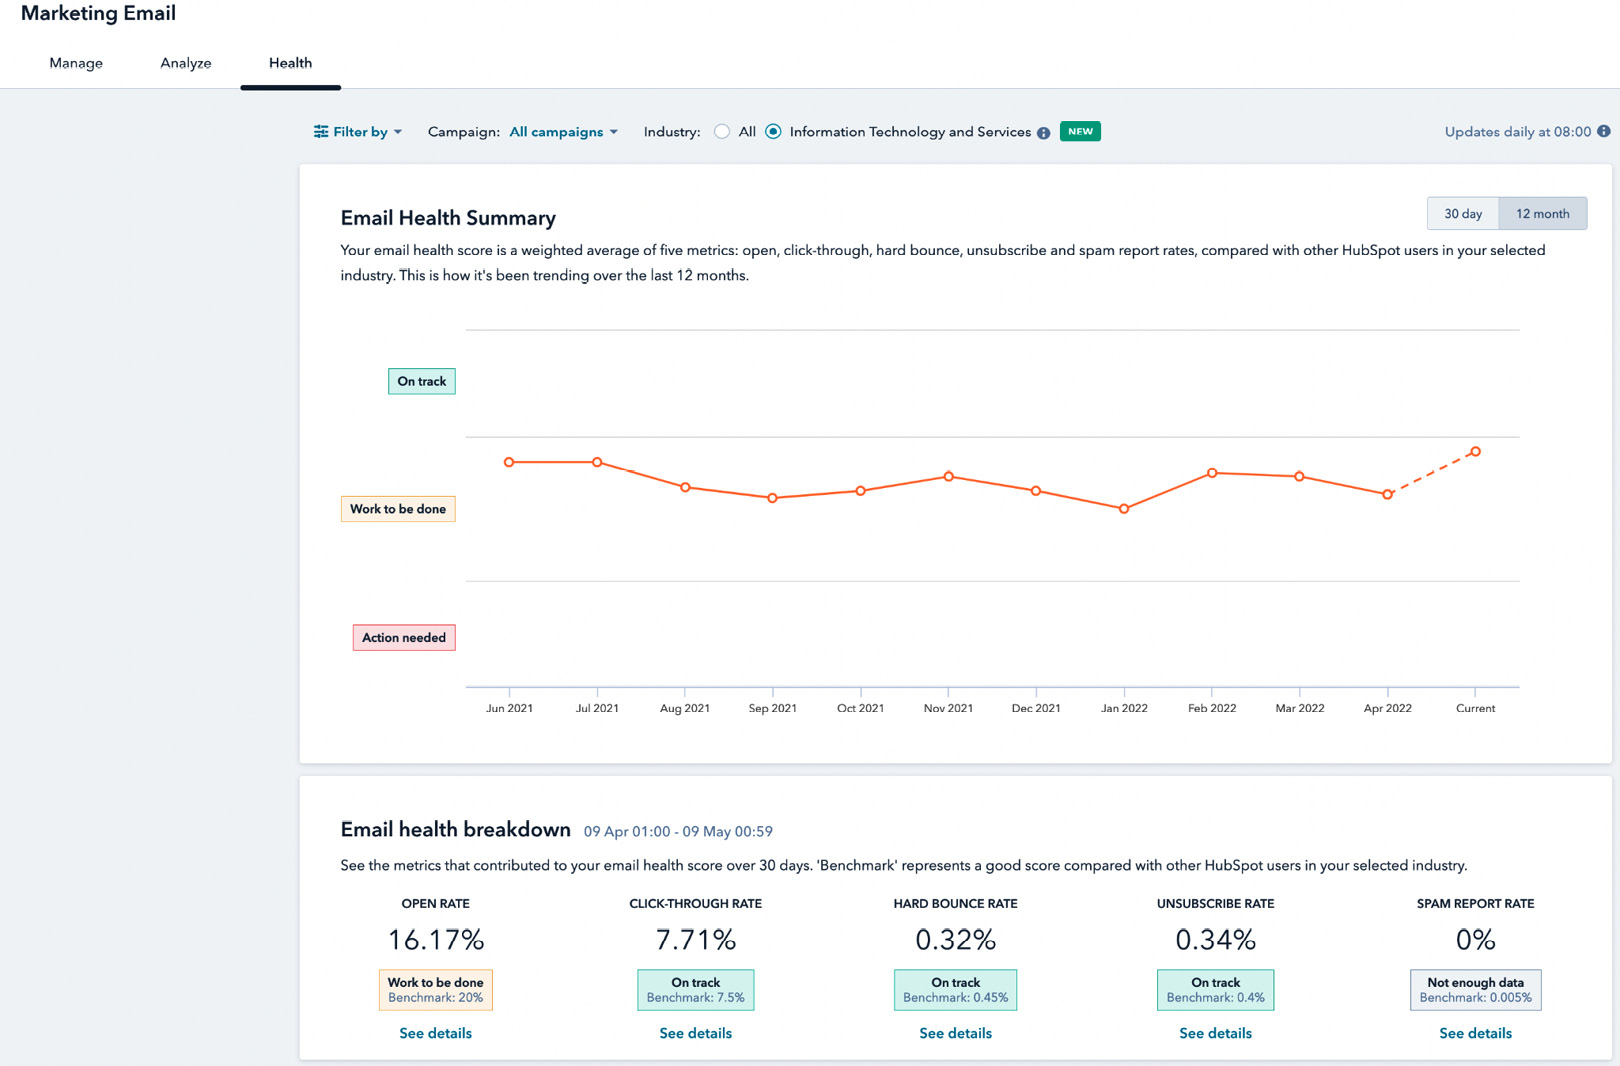
Figure 8.9 – Email health summary
This tool gives you an email health summary and a breakdown of how your emails are performing on average. It looks closely at your open rate, click-through rate, hard bounce rate, unsubscribe rate, and spam report rate compared to your chosen industry average. Clicking on See details for any of the options for email health breakdown gives you further details and suggestions on how to improve any email-related metric that is underperforming against the industry's benchmarks.
Besides these typical benchmarks, you will also want to consider if there are any emails you should be denylisting. Or, more importantly, how to manage the burnout rate of contacts so that they don't get too many emails from you. Another factor to consider is which contacts should be enrolled or unenrolled from nurtures when they no longer fit the criteria.
These are all things you should consider when performing an audit on your email operations. However, should you need further resources on this, feel free to review Chapter 10, Revive your Database with the HubSpot's Email Marketing Tools.
Effective lead management
Lead management is one of the primary reasons marketers often choose HubSpot. Using the workflow tool, leads can be managed quickly, getting them to the right people at the right time. Some of the most common issues you should be checking for when auditing your portal for effective lead management are as follows:
- Setting lead owners for new contacts: Are your contacts assigned to a contact owner? As contacts come into the database, they should be assigned to the relevant person, depending on the path that was previously defined in your strategic planning.
- Qualifying leads: Do you clearly understand which leads are qualified and are ready to talk to your sales team? Using properties such as lead status and life cycle stages is a good way to highlight which contacts are qualified.
- Handover from marketing to sales: Is there a clear handover process between marketing and sales so that the sales reps know exactly which leads they are now accountable for? With lead scoring, as will be discussed in detail in Chapter 9, Converting Your Visitors to Customers, marketing teams can implement a method to qualify leads automatically and hand them off to sales to begin working on them.
- Onboarding new customers: Does your team have a clear handover process to the finance team and customer success team for new customers so that the entire onboarding process for new customers runs smoothly? If there are still gaps in this process, you may want to consider automating some of these handoffs. For example, it may help speed up the onboarding process if, from the moment a customer signs their agreement, an automated email is sent to customer success teams and finance, informing them that a new customer just signed up so that they can begin the onboarding process.
- Reporting gaps: Reporting is usually the place in your audit where you see all the problems in your portal because, usually, either your reports make very little sense or you simply cannot rely on the data. Chapter 11, Proving That Your Efforts Worked Using These Reports, provides an in-depth overview of how to build reports. But you must remember that even though you may be able to build the report, it is still dependent on the data in the system. So, ensuring all the previous steps are optimized as best as possible will make your reports more reliable.
Now that you understand how to conduct a marketing audit on your portal and fix the crucial issues, let's look at how to do a sales audit and fix some of those issues at hand.
Step 5 – conducting an audit for your Sales Hub portal
As you know by now, you have the option to choose which HubSpot hubs you will use within your company. At the time of writing, HubSpot has five hubs, including the CRM – Marketing, Sales, Service, CMS, and Operations. Most companies use one of the hubs individually or some together. In this section, we will focus on Sales Hub Professional and how to perform an audit on this part of your portal if you've been using it for some time.
Remember that the goal of the audit is to be aware of the gaps that may exist in your processes or data so that they can be fixed for your portal to produce reliable reports. Your CRM system should be your single source of truth for your business and this can only happen if the data in the platform is being maintained.
Sales Hub is meant to be used in close conjunction with the CRM so that it can help your sales team convert qualified prospects into paying customers. Therefore, there are a few crucial elements you will want to pay attention to, to ensure you have correctly implemented and optimized your Sales Hub instance. Some of the features we will pay attention to are as follows:
- Custom fields
- Deal pipeline and stages
- Sales tools such as connected inbox, meetings, templates, sequences, and more
Let's take a look at what symptoms these features exhibit to indicate that there is room for improvement.
Custom fields
Similar to Marketing Hub, you can create specific fields related to your sales process. However, sometimes, when setting up a portal – in the first instance or even using it over time – duplicate fields tend to be created as new users are added to the system, and time isn't taken to check what was created before. For example, when you examine the list of properties that have been created, you may see several properties for the Country field. This happens because, in the first instance of setting up the portal, the Country field was single-line text and once data was imported, the field became uneditable. So, later on, when the field was used to create a form, another property for Country was created to make the field a list of dropdown options so that users couldn't fill in whatever they wished. Instead, they have a list of options to choose from. Cases like these are often the root cause of problems in reporting, so you need to double-check how your fields are constructed.
Another problem with fields built for sales teams is that the field needs to be built in the Deal properties object, not Contact properties if they are to be used in Pipelines or specific sales reports. If the field needs to be used across contacts and pipeline properties, it would need to be duplicated, and in this case, you will need to use workflows to keep the fields updated on both object properties.
Now that you understand what to pay attention to, let's look at the deal pipeline and stages and some of the problems that may exist there.
Deal pipeline and stages
The most common issue that occurs across most portals is how the deal stages were set up in the first place. Often, when HubSpot was first set up, the deal stages were not set up as action-oriented stages that objectively signal what the potential buyer had done. Therefore, there are often stages in the pipeline that may say Follow up or Unqualified, which should either be action items or state why the deal was closed.
Remember that the deal stages in the pipeline should reflect the exact stage a prospect is at to give you an idea of how many more steps are needed to close that deal. If you need to ask your sales rep what it means when a prospect is in that stage, then you don't have a clear pipeline. You can read more about best practices when setting up your pipeline in Chapter 3, Using HubSpot for Managing Sales Processes Effectively.
Your audit process is also a good time to revisit any improvements or changes that may be needed to the initial setup of your pipeline with your sales managers. Another common scenario that you will often come across is how to get the sales teams to input critical data on an opportunity they are working on. For example, most sales managers need to know the date a Proof of Concept (PoC) or pilot project started, so they will need that field to be populated each time an opportunity is moved to the PoC/pilot stage. To ensure sales reps fill this out, a condition can be set up in the pipeline to make these prompts appear each time a deal is moved to a different stage. This ensures that the sales reps are reminded to populate it.
To set up this feature, follow these steps:
- Go to Settings, then scroll through the left menu to Objects | Deals.
- A new page will appear. Click on Pipelines via the top menu bar, select the relevant pipeline, and then hover over the stage you wish to add a condition to.
- Then, select Edit properties and choose the field you wish to populate. You must have created the field as a deal property first to select it from this list:

Figure 8.10 – Edit properties
So, this is one way HubSpot helps you optimize sales experience and get the reps to enter more data about the current opportunities they are working on. It is important to highlight that this feature is available to everyone, but only Sales Professional account users can make it mandatory. For free users, this feature is optional.
Next, let's look at the sales tools that are available – and that most users don't even know exist in their portals for free – and should be used regularly.
Sales tools
Sometimes, HubSpot users aren't aware of all the free tools that are available within their portal that can optimize the way sales reps work. In Chapter 5, Increasing Online Visibility Using HubSpot's SEO Tool, we discussed all of these tools thoroughly, so I suggest going back to that chapter for a refresher. But for now, we will focus on a few tools that we think are critical:
- Connected inbox: If your sales teams have not done this yet, you must get them to do this. This free tool, which is available to all levels of HubSpot customers, will give you insights into what kind of communication your sales reps are having with prospects and the questions that are being received. This information can be useful to marketers as it provides the content that's needed for playbooks or sales presentations for the sales teams. Of course, do this within the legal restrictions under which your business operates.
- Templates: This is another free tool that allows your team to share best practices of emails that work to get prospects to book meetings or move forward in the deal. It allows other teammates to copy the text straight into their email inboxes.
- Sequences: This is automation for sales reps as it can allow your sales reps to send out a series of emails to prospects until they take action. It is only available to sales professional users, but it can save a lot of time chasing customers for a follow-up after that demo call, or after you've sent a contract.
- Meetings: This free tool allows you to create a meeting link where users can see your availability and book time with you directly.
- Calling: You can call prospects directly from your laptop or phone and record the call in your portal so that other sales reps can hear the best practices of that call.
- Call transcriptions: Previously, this was a tool that was only accessible to sales enterprise users, but HubSpot has now made it available to Sales Professional users so that they can transcribe calls. This can often be of great help to sales teams and marketers as they can repurpose text to improve sales training or collateral.
This is just the tip of the iceberg of the sales tools that are available within HubSpot (at the time of writing), but I would suggest that you at least start with these in your audit to ensure your sales teams are using them correctly.
Now that you have performed a detailed analysis of your portal and found areas of improvement, you may be overwhelmed with how many things you need to do. But, where should you begin? We will outline a few tips to help you get started in the next section.
Step 6 – prioritizing which problems to fix first
There is nothing scarier than a to-do list. This is why we suggest using this formula to decide which of the tasks from your portal audit are urgent, important, and nice to have. But how do you decide which tasks fit into each of these categories? The rule of thumb is to start by asking yourself which tasks will get your flywheel spinning faster (more on that in Chapter 13, Leveraging the Benefits of the Marketing Flywheel), but to simplify it, these are some of the questions you will need to answer:
- Which tasks, if done, will improve customer experience significantly?
- Which tasks, if done, will reduce the stress on the sales teams and make them more efficient?
- Which tasks can be done in a short amount of time and produce quick wins for our customers and internal team?
- Which tasks will take longer and maybe need additional resources but will make our lives easier?
Once you have understood the answers to these questions, you can begin tackling your lists accordingly. Remember, the goal is not to fix everything at once or to get your portal at 100% capacity. But being able to move the needle a bit so that you are 10% or 20% better off than where you were pre-audit can make a huge difference.
Summary
Conducting a portal audit can seem to be a monumental task that requires significant experience to complete. Although you must have some experience in HubSpot and understand your functions as a marketer or sales rep, you can still perform at least some of the actions described in this chapter without being an expert.
The goal of the audit is not to focus on finding what's wrong but instead to find places where there are inefficiencies or where things could be done better and made easier. Always remember that the goal when working with any CRM platform is to measure if this platform is meeting the needs of your company and customers or providing more friction.
If you are in doubt about performing the audit yourself, or you would simply prefer to hire an expert, you can always work with one of the many HubSpot partners that exist within the ecosystem. Many of them offer portal audits as part of their services. In the next chapter, you'll master how to create landing pages, forms, and workflow strategies and how to nurture programs to engage with their leads and customers.
Questions
Let's now see whether the concepts in this chapter have resonated with you:
- Why is it important to do a portal audit?
- If leads are not coming from your website to your HubSpot portal, what should you check?
- If you cannot generate reliable reports from your portal, what should you focus on fixing?
Further reading
To learn more about the topics that were covered in this chapter, take a look at the following resources:
- How to audit your HubSpot Portal: https://events.hubspot.com/events/details/hubspot-madison-presents-how-to-audit-your-hubspot-portal/
- HubSpot Partner Directory: https://ecosystem.hubspot.com/marketplace/solutions