
Chapter 3: Using HubSpot for Managing Sales Processes Effectively
First things first, let's put this on the table – your sales process will never be perfect. It simply cannot be as the two main parties involved are often at opposite ends of the spectrum – sales teams wanting the best price to maximize their commissions and customers wanting the lowest price to reduce costs.
That being said, the goals in your sales process should be to gain clarity, achieve transparency, and, most importantly, understand what is the best way to serve your customers in order for them to fuel your business.
These goals are ultimately achieved by establishing a functioning CRM that becomes your company's source of truth for every interaction your sales teams has with potential and existing customers.
In this chapter, we will focus on the following points:
- How to define your sales process
- How to set up your sales process in HubSpot
- Best practices for setting up and managing your sales pipeline in HubSpot
- Automate actions to save your reps time
- How to set up custom views to keep track of potential prospects
Prerequisites
To get the most out of this chapter, it would be helpful to consult with your sales team leaders when building your sales processes and discuss with them the best terminology to use for building the pipeline. Of course, having admin access to your HubSpot portal is a requirement so you can set up the pipeline as needed.
Defining your sales process
Most business sales processes are well...lacking a process. Sales teams often cite the need to do things their own way and rebuke any level of input or system that gives insights into their daily activities. But this is not the main purpose of investing in a CRM or building a sales process. The goal is not to be a "big brother," but instead to implement a set of repeatable steps that each member of your team can take to move a prospect from a lead to a customer. The goal of such a process is to help your reps consistently and successfully close deals with a framework that works.
In addition, setting up a well-defined framework for your sales process in HubSpot gives the following added value to the marketing team:
- It allows Marketing to tie the ROI from campaigns directly to the revenue generated.
- It can be used as a future indicator to approximate the number of customers and the amount of revenue a particular campaign should generate. After all, if you know how many leads should become customers, you can backtrack and figure out how many leads you'll need to hit a certain goal.
- It improves the timing of sales and marketing programs. For example, now you know how long a typical lead should spend in your funnel. That way you can launch new campaigns and know how long it will take to close those deals.
- It helps to identify bottlenecks. Are leads getting stuck at one stage? What can you do to improve? Maybe you need better messages/offers/information at that stage. What literature, tools, or information can you provide to meet the customer's requirements at this step? Or maybe you need to train your reps in a particular area. Or perhaps leads are falling through the cracks! Do you have any ideas for decreasing the time that a prospect will spend at each step?
So how do you get started with building your sales process?
HubSpot has advised that for each step in your sales process, you work with your sales teams and ask the following questions:
- What does the rep need to do to help the prospect move forward?
- What indicates that the rep has completed their role in that phase of the buying process?
- Is there any particular information they need to collect from the prospect?
- Are there certain commitments they need to secure?
Being able to answer these questions provides the foundation for setting up the deal stages required to build the sales pipeline in HubSpot. But before getting into HubSpot, you may need to trim down some of the steps.
Let's look at an example. If you are a B2B tech company selling software to a potential prospect, more often than not, your sales process will look something like this:
- Identify Prospect
- Qualify Lead
- Warm Lead
- Hot Lead
- Discovery Call
- Decision Maker Brought In
- Define Project/POC
- Project Approval
- Evaluation
- Quote
- Contract
- Negotiation
- Closed Won
The potential problem with some of these stages is that it isn't always clear what actually needs to be done in that respective stage or if every prospect must go through each stage in order to be qualified as a customer. For example, see the following points:
- Identify Prospect: Does this mean you know the prospect's name and company or does it mean you have made contact with them?
- Discovery Call: Does this mean you have booked a call with the prospect or if the call has been completed?
To overcome this ambiguity, group your sales stages into these buckets:
- Mandatory: These are the steps your sales rep must complete in order to identify the prospect as a customer. When examining your current sales process, consider taking out anything that can reasonably be skipped without hurting the customer's long-term success and happiness. In the preceding example, this might be Discovery Call, Contract, or Closed Won.
- Factual: Identify which stages in your sales process are tied to a specific action rather than based on a feeling. In other words, when it comes to determining whether a step has been completed, you want a clear-cut yes or no. Looking at our example again, these stages could be Discovery Call, and so we will change this definition to Discovery Call Booked to make it clear that at this stage, you at least have something on the calendar with the prospect. We will know whether the discovery call was completed and the prospect moved on to later stages.
- Inspectable: Sometimes, companies include stages such as Warm Lead or Hot Lead as part of their sales process. However, because these are stages that are most likely identified because of an action the prospect took with the company, such as filling out a demo form, it is considered to be an inspectable step. This means you can see this information in the contact's record inside the CRM. Your sales process needs to focus on the things that are under your team's control.
- Buyer-centric: The last consideration when setting up your sales process is to understand which steps must be taken by the buyer in order for the deal to move forward; for example, contract signed or POC approved.
Once you have identified a combination of rep-focused actions as well as a buyer-focused outcome, you are now ready to define your deal stages. One example of such would be the following:
- Discovery Call Booked
- Project Scope/Defining POC
- POC In Progress
- Proposal Sent
- Negotiation
- Final Contract Sent
- Closed Won
- Closed Lost
Now that you have your sales pipeline defined, the next step is to set it up in HubSpot.
Setting up your sales process in HubSpot
With your sales process clearly defined, it is time to set them up as deal stages in HubSpot. A deal stage is simply the milestones a salesperson must complete in order to move an opportunity forward. To do so, follow these steps:
- Navigate to Settings on the top menu. Then, on the right-hand side menu bar, scroll down to Data Management | Objects | Deals. Scroll down a bit more and you will then see the fields for stage names, as demonstrated in the following screenshot:
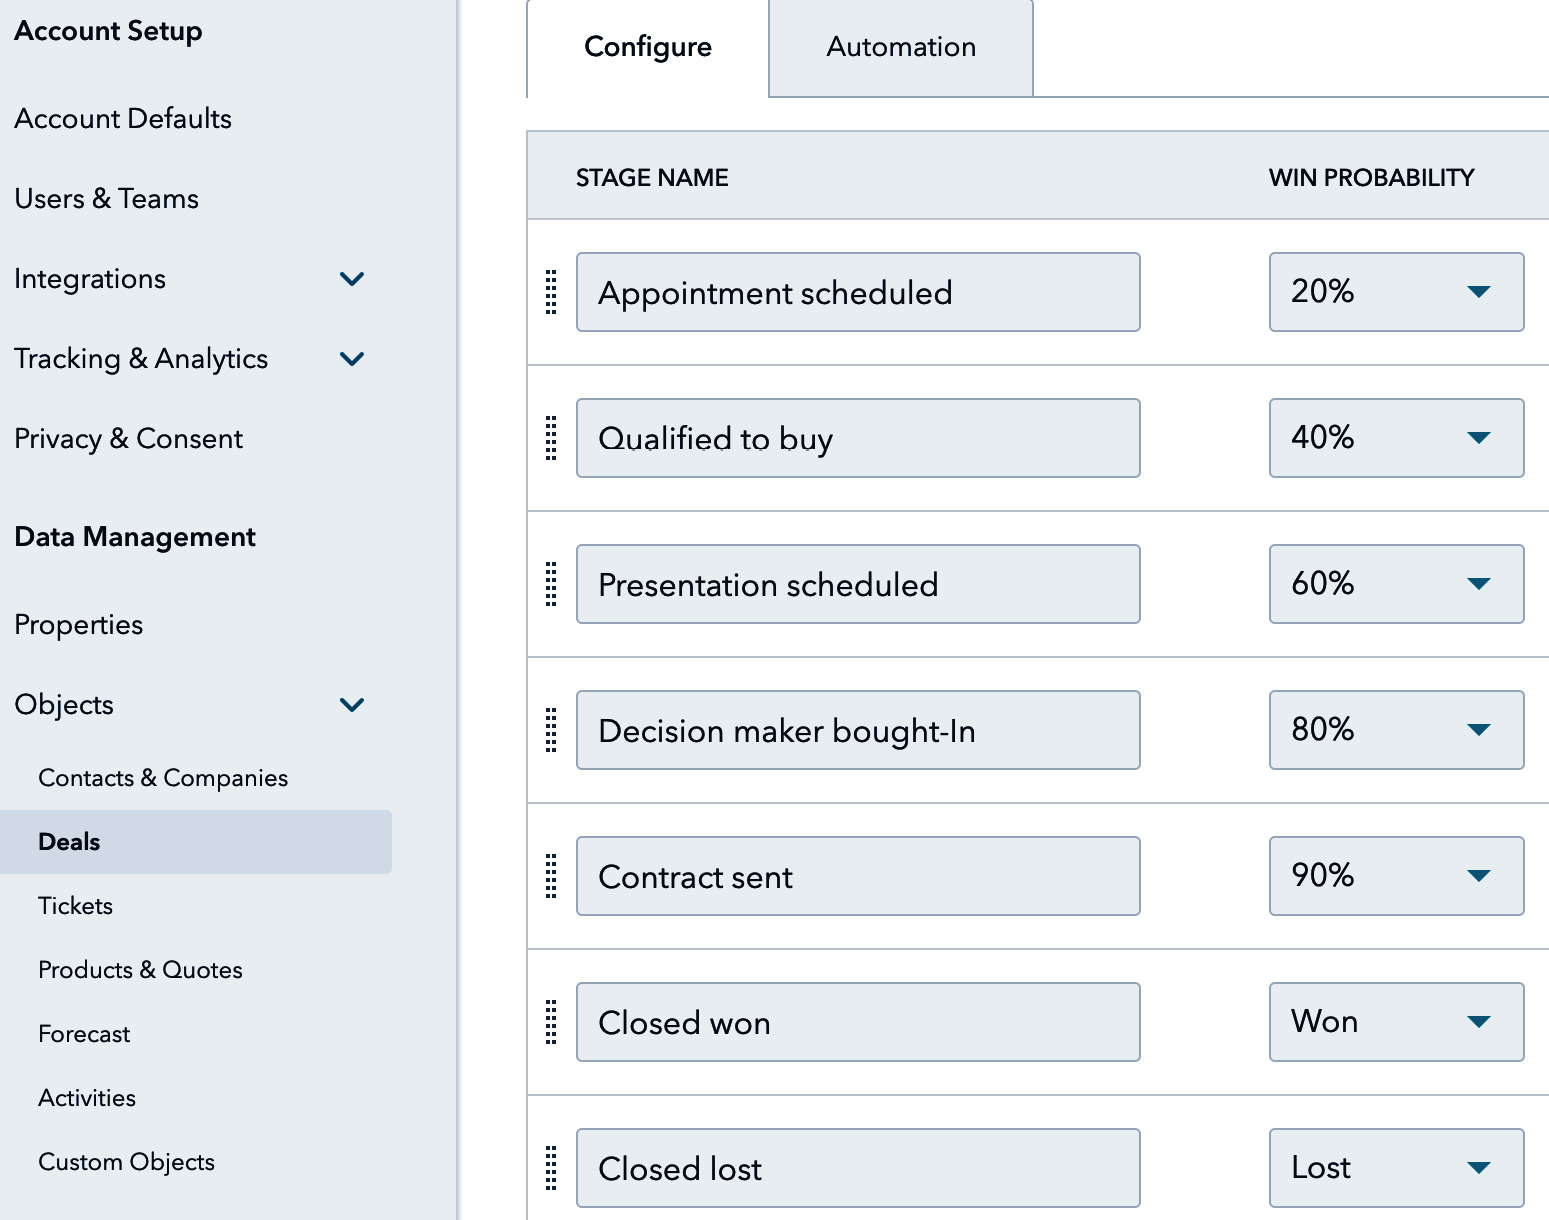
Figure 3.1 – Updating Deals stages
- Now, replace the existing stages with your pre-defined stages. It is also important to add the probability of winning the deal to each stage. This is often a guesstimate at this stage and doesn't have to be 100% accurate. However, as your sales process becomes more precise, you can always return and update these probabilities as it will affect your forecasting reports.
- Once completed, click Save:

Figure 3.2 – Updating Deals stages and probabilities
- Once you've set up your deals, the next consideration is to add reminders for the sales rep to update certain information when a prospect is moved to specific stages. For example, when the sales rep is sending the Final Contract for signature, they may have changed the amount following some negotiations. Therefore, a reminder can be set for them to update this amount so it's reflected in HubSpot. To set these alerts, hover over the stage until you see the Edit properties button appear:

Figure 3.3 – Edit properties in deal stages
- When you click on Edit properties, a box will appear from where you choose the field you want the sales reps to update by checking the checkbox on the left. In this case, it's the Amount field. If you have a subscription for Sales Professional in HubSpot, you can check the REQUIRED box, which also makes it mandatory for sales reps to fill in this information before they can move the prospect to that stage. Once done, click Next.
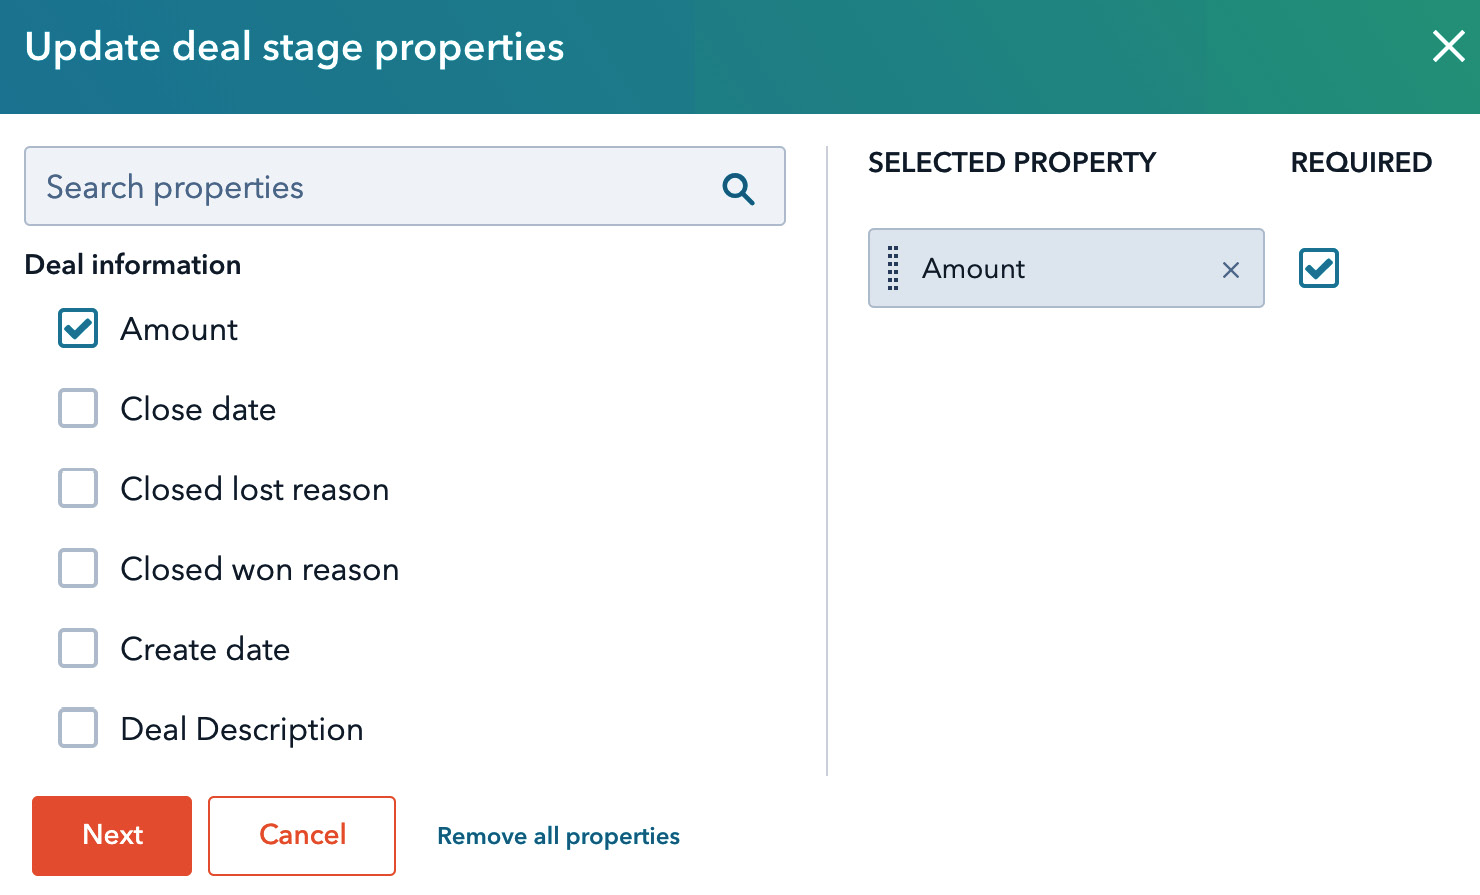
Figure 3.4 – Setting mandatory fields for your deal stages
- You will be returned to the main screen and then you can click Save to keep this setting.

Figure 3.5 – Saving your settings
Once done, your reps now have certain fields they must fill out before moving a prospect to a specific deal stage. One more stage that should have a mandatory setting is that of Closed lost. Not all prospects will inevitably turn into customers, but often, management and sales reps believe that they lose customers because of price. Intentionally tracking the reasons why customers did not choose your business helps you to better understand the real reason behind their decisions.
Follow these steps to set up the processes correctly:
- First, set up the reasons why you may lose a prospect so that it's easy for the reps to choose an option instead of creating their own version. To do this, navigate to Settings | Data Management | Properties. Change the filter from Contact properties to Deal properties.

Figure 3.6 – Going to Deal properties
- Type in reason in the Search properties bar. Click on Closed lost reason, as you can observe in the following screenshot:
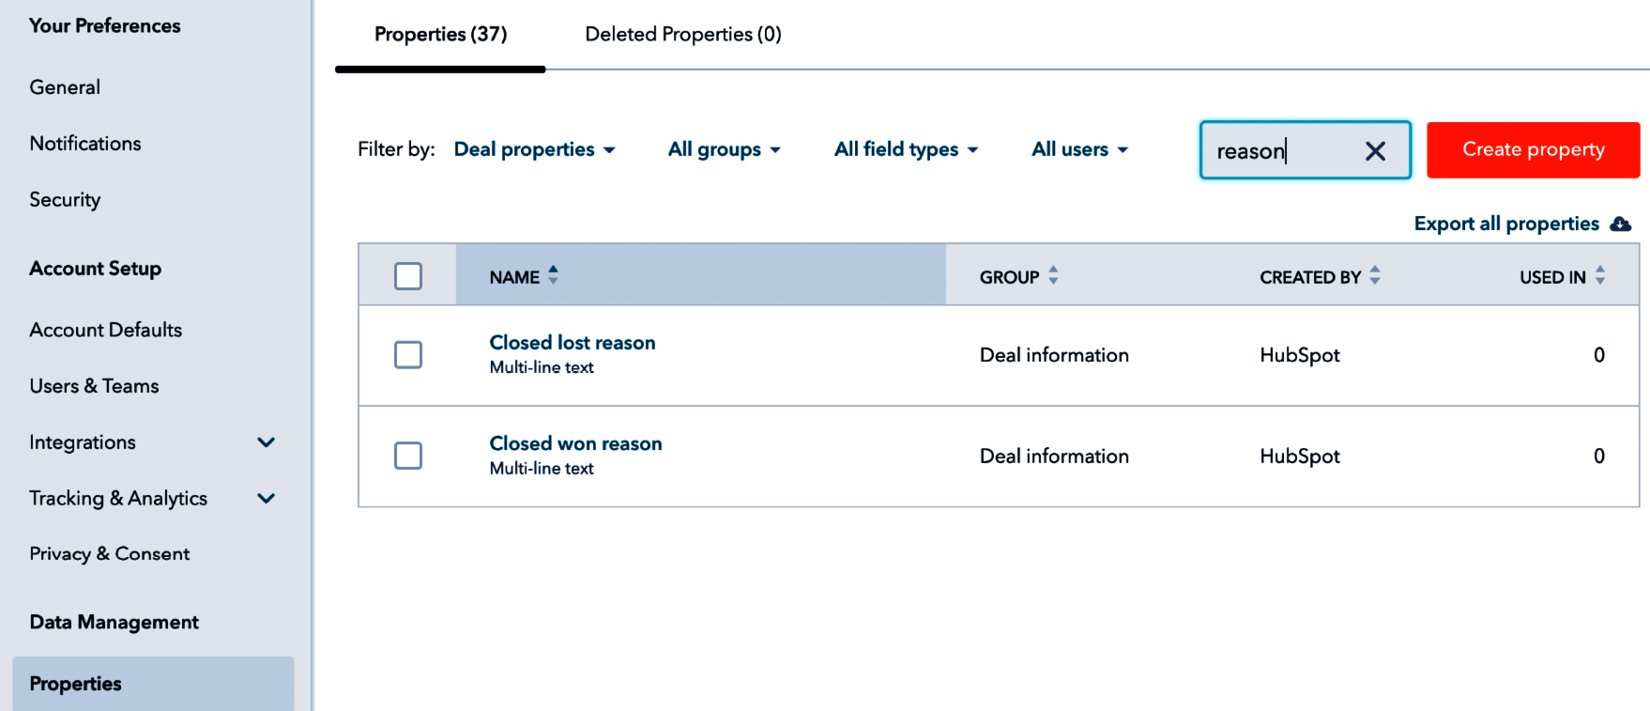
Figure 3.7 – Finding the Closed lost reason property
- Once the pop-up box appears, click on Field type and then choose Dropdown Select, as shown in the following screenshot:

Figure 3.8 – Changing the field type to Dropdown select
- Type in the options you generally think are the reasons why a deal is lost. Once you have included your options, click Save.

Figure 3.9 – Adding the reasons for losing a deal
- Return to the sidebar menu and go to Data Management | Objects | Deals. Hover over the Closed lost stage and then click on Edit properties.

Figure 3.10 – Adding the Closed lost reasons to the Closed lost deal stage
- Tick the checkbox on the left-hand side for Closed lost reason. Then, once again, if you have a HubSpot Sales Professional license, check the REQUIRED box on the right-hand side and then click Next. The following screenshot shows what the screen looks like:

Figure 3.11 – Making the Closed lost reason feature mandatory
- Once you are returned to the deal stages, click Save and this setting will now be implemented moving forward. With this particular setup, whenever a sales rep tries to move a deal to the Closed lost stage, the following notification box will pop up, prompting them to choose a reason:

Figure 3.12 – Notification pop-up box for choosing the Closed lost reason
This concludes the main features to take into consideration when setting up your sales pipeline. But let's now look at some best practices that should be taken into account for maintaining and managing your pipeline.
Best practices for managing your sales pipeline in HubSpot
Ask any sales rep what's the least favorite part of their job and 9 out of 10 times, they will say doing administrative work. Sales reps would prefer spending time on those activities that directly contribute to their bonus plan, so unless you wish to include an incentive for keeping the CRM up to date, the alternative would be to make the process as painless as possible. So how can you achieve that? Let's examine some best practices in this section.
When to set up multiple pipelines
If you have HubSpot Sales Professional, then you have the option to set up more than one pipeline. However, before setting up another pipeline, do ask yourself the following questions:
Do you sell multiple products to various segments of your audience? For example, a company such as HubSpot sells its Marketing Hub mainly to the marketing departments of companies, while the Sales and Service Hub are sold to the sales and customer service teams, respectively, within that same company.
Do you sell across verticals? For example, selling to e-commerce companies compared to medical institutions can demand a different approach in the expected sales stages.
Does your sales cycle vary significantly from one territory to another or from one type of customer to another? For example, the sales cycle of an SMB compared to an enterprise or governmental organization can be drastically different.
Do you have distinct funnels (for example, new customers versus upsell)?
If your answer is yes to any of these questions, then it might be worthwhile opening a second pipeline. One popular use case that is often seen for B2B companies opening a second pipeline is when they wish to track the POC stage compared to the actual order stages. This can be especially useful when the POC stages are longer, like more than 3 months, and there is a need to follow the various steps involved in this type of sale.
To implement a second pipeline, simply follow these steps:
- Navigate to Settings | Data Management | Deals. Click on Options on the right-hand side and then choose Create new pipeline.

Figure 3.13 – Creating a second pipeline
- Name your pipeline when the pop-up box appears.

Figure 3.14 – Naming your pipeline

Figure 3.15 – Customizing the stages in the second pipeline
- Now your second pipeline is created and ready to be used. To create deals in this pipeline, navigate to the top menu, click on Sales | Deals, and then choose the pipeline in which to create the new deal.

Figure 3.16 – Creating deals in your new pipeline
Now that you have the pipelines required to manage your sales process, let's look at how to create an actual deal.
How to create a deal and ensure your reps fill in all the required fields
Deals are the actual records that capture the information required to convert a prospect to a customer. There are several properties in this object and you can add your own custom fields if required.
To create a deal in either of your pipelines, follow these steps:
- Navigate to the top menu and click on Sales | Deals.
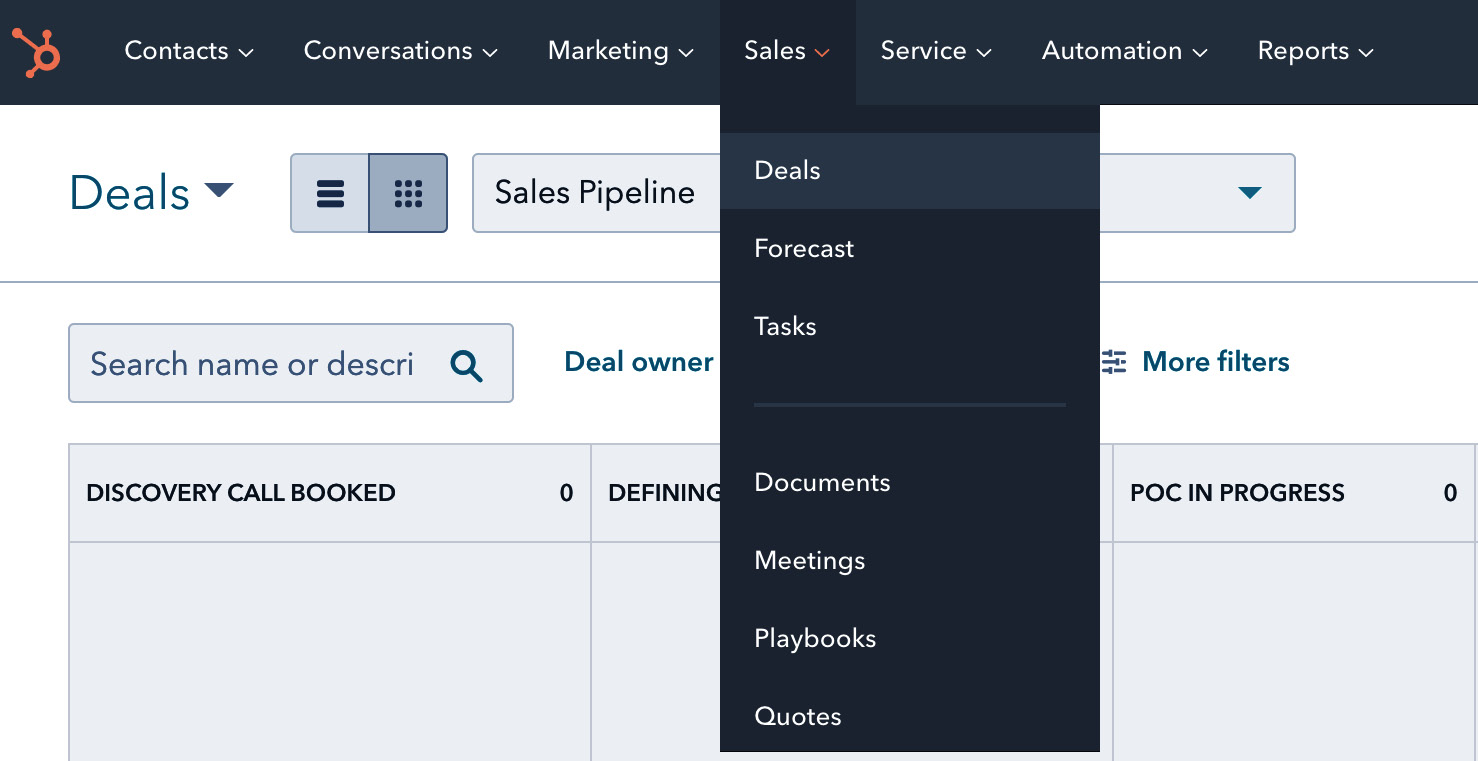
Figure 3.17 – Navigating to Deals
- Then, click on Create deal in the top right-hand corner.

Figure 3.18 – Creating a deal
- A pop-up box will appear. Insert all the details about the deal. Be aware that if you created two pipelines, you must be careful to choose the correct pipeline so that the deal can be created there.

Figure 3.19 – Enter the relevant information as it relates to the respective deal
Before creating the deal, it is important to associate a company and respective contact(s) with the deal. These associations help identify which contacts are in an open process with your sales reps, meaning that when it comes to building reports and tracking the ROI on marketing campaigns, these results can be clearly seen.

Figure 3.20 – Associate contacts and companies to the deal
Another consideration to take into account when your reps are creating deals is which fields they should see when creating a deal. To set these fields, follow these steps:
- Navigate to Settings | Data Management | Objects | Deals. Then, scroll to the top and click on Manage for the second option, Set the properties your team sees when creating deals.

Figure 3.21 – Set the properties your team sees when creating deals
- Once the Manage button is clicked, a pop-up box, as seen in the following figure, will appear asking whether you wish to start from the default properties or start from scratch. The former is recommended.
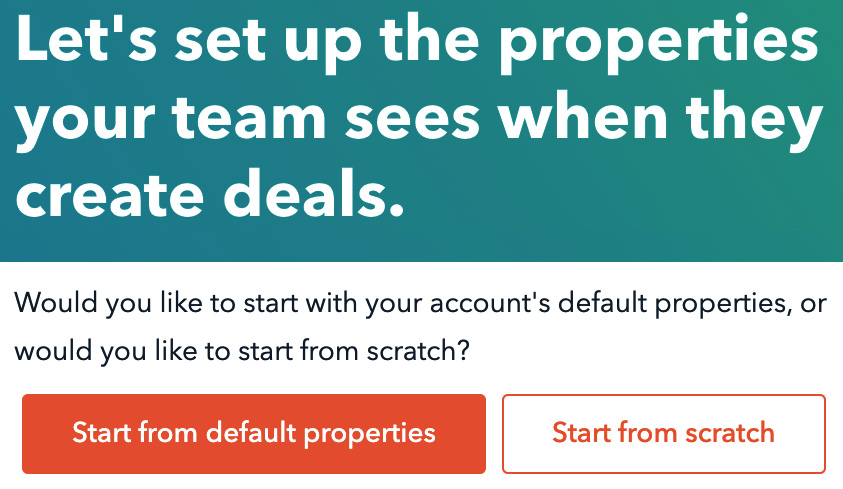
Figure 3.22 – Choosing whether to set these properties from scratch or apply the default properties
- Once one of the options is selected, you are now taken to a screen where you can choose which properties you want the team to fill out when creating a deal (see Figure 3.23). Note that if you have HubSpot Sales Professional, you will also have the option to make any of the fields mandatory, meaning sales reps won't be able to create the deal without filling them in.

Figure 3.23 – Choosing which fields should be seen when creating a deal record
These few steps help you to save time chasing reps up to complete missing information on a deal record. Therefore, it is highly recommended to take the time to set these up. Next up is how to make it easier for the reps to see the most important information when they look at a deal record.
Customizing what field reps see on their accounts
Another important feature within the deal record is being able to customize the information that is seen when they view the record. Generally speaking, when a rep or member of the team looks at a deal record, they generally see the information they have inserted about the deal on the left-hand side under About this deal, as shown in the following screenshot:

Figure 3.24 – Contact record
If you wish to add more properties that all members of the team should see, follow these steps:
- Navigate to Settings | Data Management | Objects | Deals. Then, click on Go to properties and repeat the steps in Figure 3.23 where you select the different properties you want your team to see.
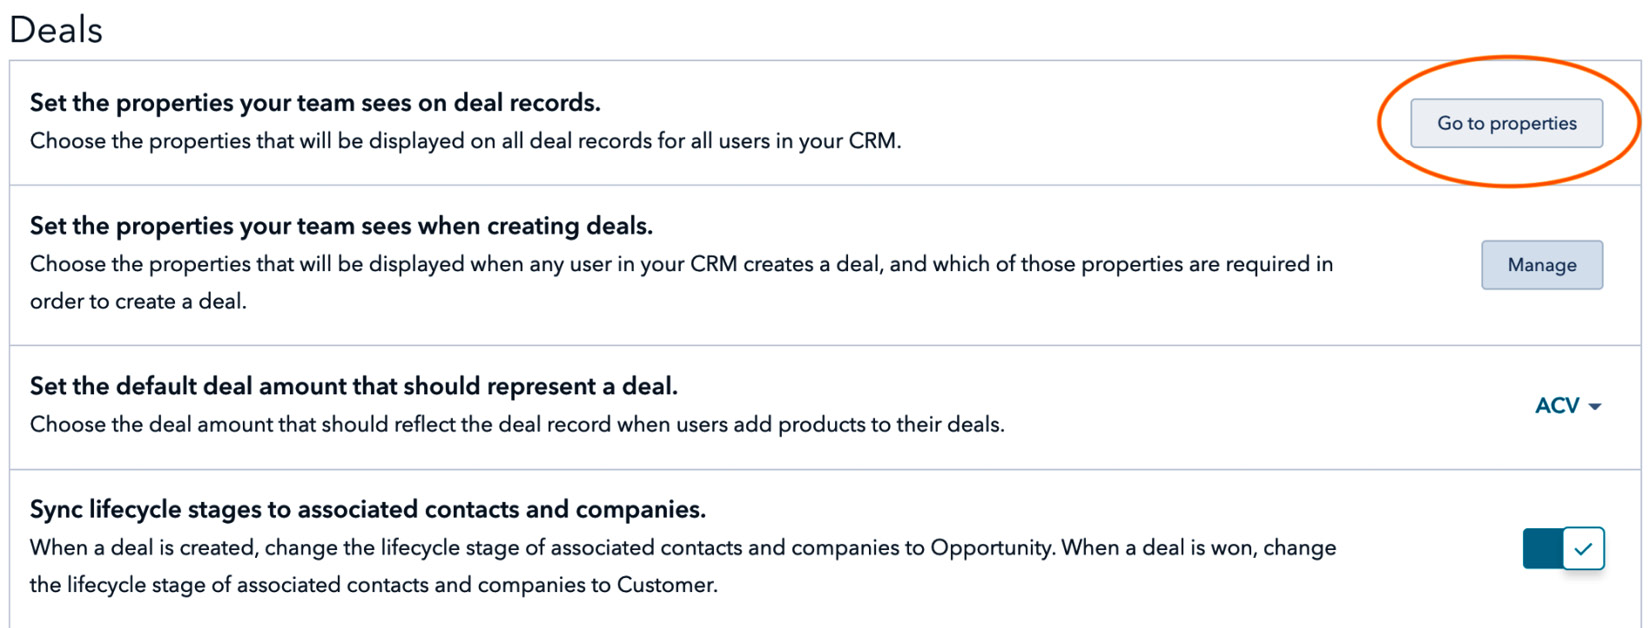
Figure 3.25 – Setting the properties your team sees on deal records
- If a team member prefers to customize their own view, then they need to go to the contact record and click on View all properties.

Figure 3.26 – View all properties
- Then, once you are directed to the next page, hover over the property to be added to the view, click on Add to your view and return to the deal record. Note that any property added to your deal record will be shown for all deals going forward.

Figure 3.27 – Adding the respective property to your view
These few steps help to make it easier for your reps to navigate the system and therefore update the necessary details to provide more clarity and transparency regarding a pending deal.
There are, however, two more points that we must mention in order to ensure that everyone has the same understanding of how to interpret the information on the deal record and how to simplify the number of updates needed for a deal to move forward.
Choosing the correct deal amount on a contact record
Let's begin with the deal amount. Before we dive into this, you must first check that the default currencies are updated in your portal. You can choose to have multiple currencies if needed. To set up your currencies, complete the following steps:
- Navigate to Settings on the top menu and, on the left menu bar, click on Account Defaults. Select the Currency tab on the top menu of the page and then click on Add Currency.

Figure 3.28 – Adding another currency
- In the pop-up box that appears, select the other currency you wish to add.
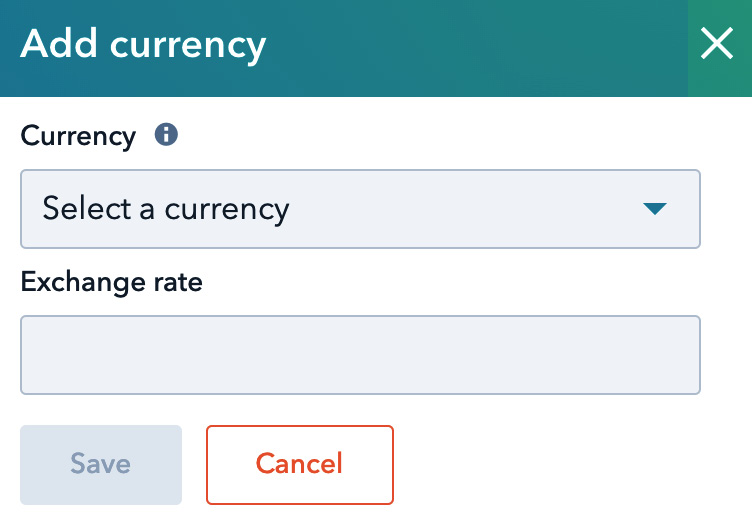
Figure 3.29 – Selecting a currency
- Then, insert the exchange rate of this currency and click Save. This currency is now added to your system.

Figure 3.30 – Inserting the exchange rate for the selected currency
Now that you have the currencies added to your portal, it is time to set the default deal amount that should represent a deal. To do this effectively, you must first understand the four different types of deal amounts that HubSpot captures:
- Annual contract value (ACV): ACV is the value of the deal over a 12-month period in the deal's currency, if your HubSpot account uses more than one currency.
- Annual recurring revenue (ARR): ARR is the total amount of revenue earned annually for this deal. This is calculated based on the term length and values of the recurring line items associated with the deal. If there is no term length, HubSpot assumes a term of 12 months. It does not take into account the value in the Amount property. This is shown in the deal's currency if your HubSpot account uses more than one currency.
- Monthly recurring revenue (MRR): MRR is the recurring monthly revenue in relation to this deal. This is calculated using the values and term length of the recurring line items associated with the deal (in other words, the total value divided by the number of months in the term's length). It does not take into account the value in the Amount property. This is shown in the deal's currency if your HubSpot account uses more than one currency.
- Total contract value (TCV): TCV is the total value of the deal, based on the line items associated with the deal, including any recurring revenue and one-time charges. It does not take into account the value in the Amount property. This is in the deal's currency if your HubSpot account uses more than one currency.
If none of these fit your processes, then you have a final option called Manual entry.
Once you have decided which deal amount fits your business, you set it by navigating to Settings | Data Management | Objects | Deals and select the appropriate value under Set the default deal amount that should represent a deal.

Figure 3.31 – Set the default deal amount that should represent a deal
Once you've set up your default deal amount, it's time to look at how to simplify some of these processes for the sales teams.
Using deal automation features to amplify your efficiency
We began this chapter by emphasizing the fact that our sales process can never be perfect, but we do want to minimize errors, remove friction from the sales process, and turbocharge the efficiency of your sales reps. So how do we accomplish this? Through the use of the deal automation features embedded in HubSpot software. Some of the most popular ways to use these automation features are as follows:
- Updating other properties as deals progress through the pipeline
- Creating tasks for the sales reps so leads don't fall through the cracks
- Sending internal email notifications for important updates so you don't have to spend time updating colleagues
- Sending follow-up emails once a lead reaches a certain stage in the sales process
Reporting
Adding a few of these automated processes within the pipeline allows your sales teams to remember to fill out crucial data points in the sales process or to be notified when something significant happens with a specific opportunity or deal. So do try it out.
Setting up views that allow your reps to complete their daily tasks
One of the most common questions sales reps have when starting to use any system is, "What data should I be looking at every day in this system?" The answer to this question lies in the various ways they segment the database in order to keep track of new leads or important contacts that should be followed up on. There are four views or segmentations that each sales rep should set up in HubSpot and any CRM as a matter of course:
- New Leads
- Follow-Up Needed
- VIP Leads
- Medium Priority
Let's examine in detail what each of these segments means and how they can be set up in HubSpot.
New Leads
New Leads are contacts that have just entered the database, are qualified, and no one has contacted them as yet. In Chapter 9, Converting Your Visitors to Customers, and Chapter 11, Proving That Your Efforts Worked Using the Reports, we discuss the mechanics of how to set up lead scoring and use automation to define qualified leads, but once this process is done the goal is to make sure the sales teams have easy visibility of these leads. This filter is particularly useful for inbound leads or leads generated by marketing efforts as these leads are generally the leads that fall through the cracks for follow-up by sales reps.
To set up this view, navigate to Contacts | All Filters and then look for the Create date property, as seen in Figure 3.32:

Figure 3.32 – Creating views using filters in Contacts
Then, consider adding some of the filters that the marketing team uses to qualify leads, such as job title or company size. In this example shown in Figure 3.33, we also show the option of excluding certain job titles such as "Student" so the sales team won't be distracted by unqualified leads. Also, we added the New lead status, so once again the reps will only see leads that have never been touched. (Lead statuses are discussed in Chapter 11, Proving That Your Efforts Worked Using the Reports).

Figure 3.33 – Adding more filters to see relevant contacts
Once all the filters have been selected, you can choose to save the view by clicking Save, View, and then Save as new, as seen in Figure 3.34:

Figure 3.34 – Saving the view of chosen contacts
Once you click on Save as new, you are then able to choose who should see this view of contacts. Setting it to Everyone makes it easy for the other sales reps to choose this view as one of their options once it's created.

Figure 3.35 – Saving the view for everyone to have visibility of these lists of contacts
Once this view is saved, it will appear in the top sub-menu, as shown in Figure 3.36, for easy access on the part of the sales reps to see the list of new contacts when starting their day:
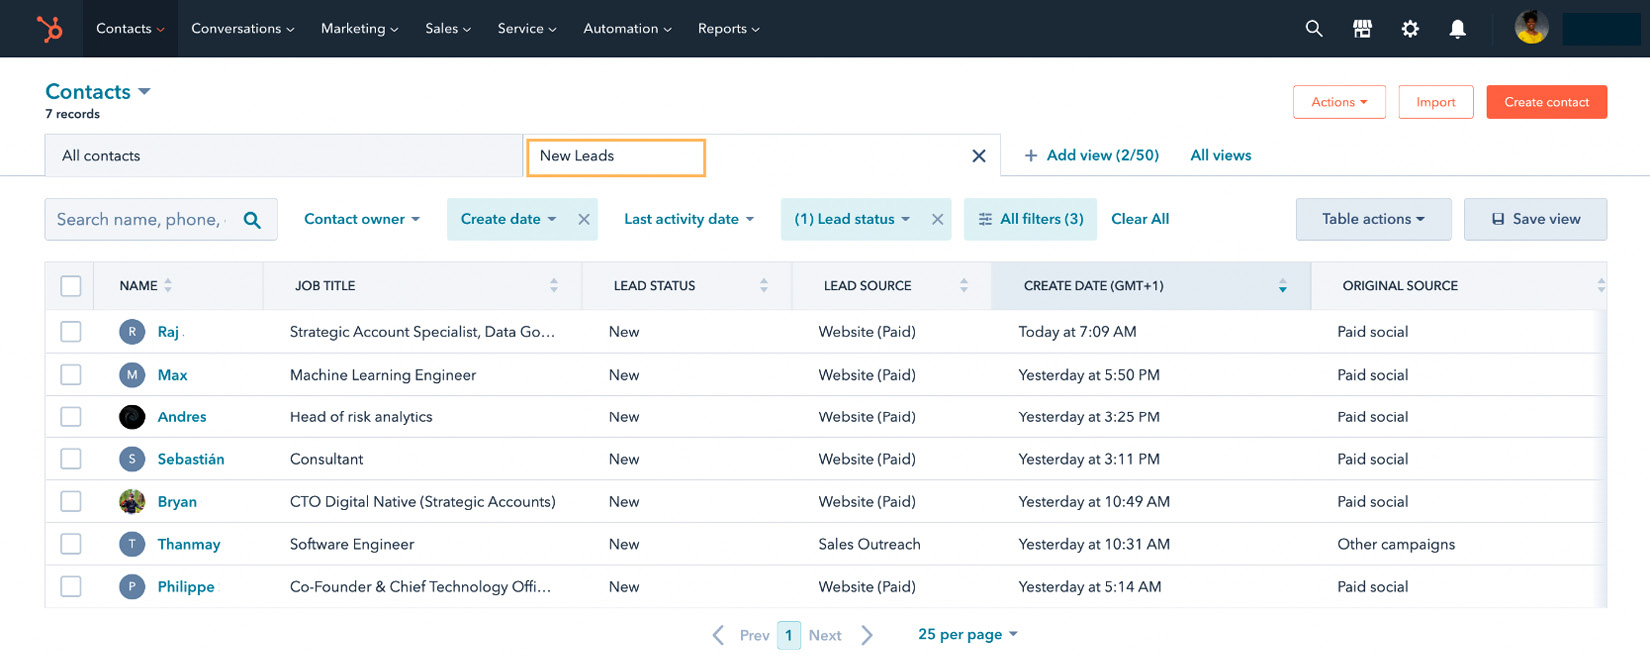
Figure 3.36 – New Leads view
This is just one view that helps give sales reps a start for the day. Let's now look at the next view.
Follow-Up Needed
This next view is supposed to show which leads have not been touched for some time. It uses a property called Last Contacted in HubSpot, which collects the time when a contact was last emailed by a team member personally or called. Note that this does not include marketing emails, just sales emails that are tracked when a sales rep connects their email to HubSpot.
To build this view, the same process described above is followed. The only difference in this view is the properties used to filter the relevant contacts. In this case, we used the following properties: Last contacted is a period that is considered too long for a sales rep not to have been in touch, for instance, last month; Lead status is any status you have currently incorporated into the system to represent the fact that some follow-up is needed, for instance, Open and Attempting to Contact, and Job title doesn't include any irrelevant titles that sales reps shouldn't deal with, such as student or teacher. See Figure 3.37 for an illustration:
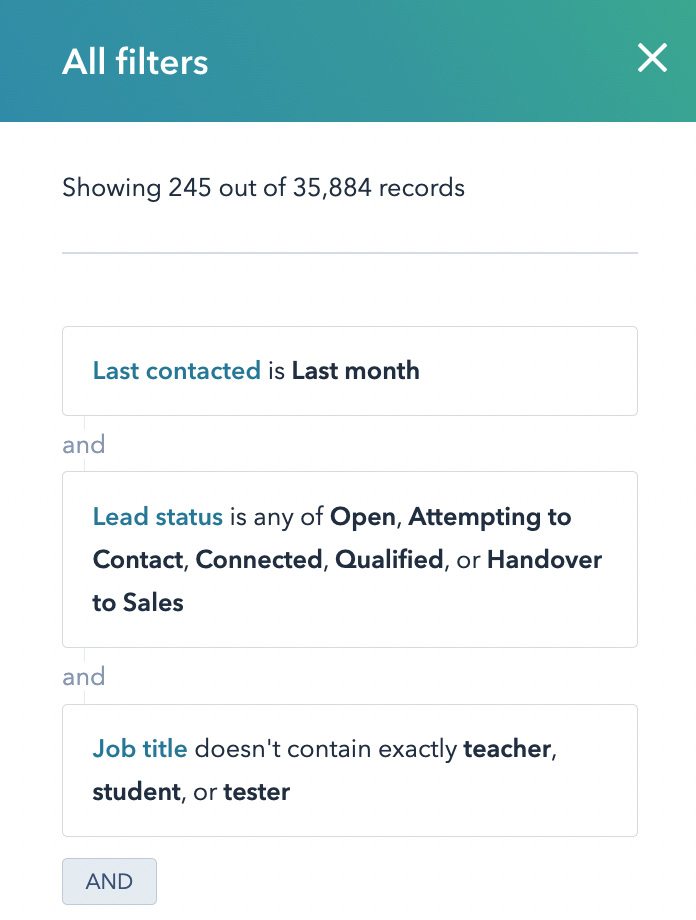
Figure 3.37 – Filters for creating a view of contacts that should be followed up
Once the filters are saved, the view can now be seen at the top, as shown in Figure 3.38. This ensures that whenever a sales rep logs in to the system, there will be a daily view of the relevant contacts that should be followed up with.

Figure 3.38 – View of contacts that the sales rep should follow up with
VIP Leads
This view should be used to fast-track contacts so that they get the sales reps' immediate attention, for example, contacts that filled out a demo form or contact us form. Figure 3.39 shows an example of what the filters can be for this view:

Figure 3.39 – Filter for creating a view of VIP leads
The next important view is that of Medium Priority.
Medium Priority
These contacts are leads that could potentially be of interest to sales but haven't yet shown an interest in speaking to sales. To set up this filter, lead scoring, if implemented, can be used as a possible criterion. Figure 3.40 shows an illustration of how to set up these filters. Another easier criterion to use in lieu of lead scoring is probably adding the website pages you deem to be of high intent to purchase pages such as a pricing page or an about us page.

Figure 3.40 – Filters for setting up views for contacts that are not such a high priority
These are just a few views that can be quickly implemented in your setup of HubSpot for your sales teams. It helps to give them some focus and action items when using the portal. There are a few points to note, however, regarding the tips discussed in this section as you may be wondering why you wouldn't use lists instead to do this:
- First, lists tend to get lost in the mayhem as there could be hundreds of lists created eventually. Hence, the point of doing this exercise to ensure that the sales reps know exactly which contacts to focus on once they open their computers at the start of the day would be lost if yet more lists were used for this exercise.
- Also, at the time of writing, when creating filters for views in contacts, there is no "OR" option, only "AND". For lists, this is possible. So, if you wish to add multiple filters you will need to create separate views.
Summary
By completing the steps in this chapter, you now have a clearly defined sales process set up in HubSpot and your sales teams can now begin following through with respective opportunities until they are closed-won. Note that although many companies have operated thus far without such a process, having one brings a level of clarity to the team and management on exactly where prospects stand and allows them to see which opportunities currently exist in their pipeline, the stages they are at, and when it is forecast that they will be closed.
In the next chapter, we will learn how to manage HubSpot CRM and Sales Hub for sales teams and managers. We will also learn how to use the HubSpot tools to create meetings, tasks, and functions only designed for sales.
Questions
Let's now see whether the concepts in this chapter have resonated with you:
- What are two conditions you should consider when setting up the sales pipeline?
- When should you open a second pipeline?
- What are two actions you should consider automating in your pipeline?
Further reading
- How to document your sales process: http://www.marketingmo.com/strategic-planning/how-to-document-your-sales-process/
- How to design your sales process in HubSpot: https://blog.hubspot.com/customers/how-to-design-your-sales-process-in-hubspot-crm
- HubSpot Academy Lesson – Set Up Your HubSpot CRM for Growth: https://academy.hubspot.com/courses/set-up-your-hubspot-crm-for-growth?library=true&_ga=2.36803296.1117529161.1633694052-1936490580.1584861075