
Spielberg your way to information literacy: producing educational movies and videos
Abstract:
This chapter looks at how simple it has become for library staff with even the most inexpensive of equipment to create effective promotional, marketing or instructional videos. It first examines the various roles that movies can play, from complementing elements of taught sessions through to reinforcement of learning or marketing goals with external readers. As well as considering the production of bespoke video works, it also considers the trade-offs in outsourcing elements of the production process and making use of off-the-shelf movies. Tips on selling the benefits of film making and pitching film concepts to potentially sceptical stakeholders and managers are also covered.The main part of the chapter takes the prospective producer from their original concept and pre-production planning activities, through the scripting, filming, editing, reviewing and evaluation processes. The importance of maintaining a clear narrative vision throughout the whole process is stressed as an important central theme. Guidance is included on the key team roles and responsibilities, along with scripting and plotting templates as a production aid. Additionally, a focus is placed on making maximum advantage of the visual delivery medium by utilising action, rather than relying on dialogue alone to convey information.Consideration is given throughout to illustrating the common pitfalls and obstacles that can frustrate the would-be producer, and the easy steps that can be taken to overcome them. Short examples of film projects are used to illustrate real world examples of the how the production techniques can be applied. Particular attention is drawn to the time and staffing resource requirements to successfully complete a filming project.A selection of advice on suitable equipment and software, a glossary of specialised terms and a range of suggested further readings and exemplar viewings are provided at the end of the chapter.
Introduction
The advent and availability of inexpensive but impressive video cameras and powerful yet accessible suites of editing software in recent years has placed the ability to produce movies in the hands of any educator. The question has shifted from ‘Should I be making films as part of my training?’ to ‘Why aren’t I making films?’ If the answer to the second question is lack of experience, uncertainty about the process and the practical steps; then welcome potential Spielberg.
However, just because you are able to produce a film does not necessarily mean it will be an effective information literacy delivery method. In this chapter we will examine the process and forethought needed to produce video outputs that will compliment effective teaching. We will explore the process from initial concept to final screening, using readily understandable underpinnings of film theory and production; guiding you through the creation of your own first videos. For those advanced producers who have already dabbled in the celluloid arts hopefully the guidance will help refine your techniques.
While in a single chapter there is a limit to what can be covered, hopefully through following these guidelines, and with appetites whetted, you will soon be producing satisfying educational videos.
Using videos
Videos can serve a number of purposes within all kinds of information literacy or staff training sessions. We will be primarily looking at them as a complementary component of taught classes, although viewed in isolation they can still act as valuable training objects. The ways in which videos can be brought into play successfully are detailed in Table 7.1.
Table 7.1
| Relaxation | Introducing a session with a video provides an ice-breaker for audiences expecting to hear a dull library talk. This will counter preconceptions and warmed up they will be more receptive to your subsequent teaching. |
| Reinforce | Illustrate concepts that you will talk about during the session. By exploring them from two differing perspectives you will connect with a wider portion of your audience. |
| Respite | Using a film to break up a lecture allows the trainer to take a moment, gather their thoughts and to reflect on any student questions or concerns that have arisen. |
| Refocus | Similarly a shift of focus has been shown to aid audience attention. Changing format from speaker to screen and then back again will refresh attention to a considerable degree; enhancing impact and retention. |
| Re-usable | Once created it will be possible to reuse videos repeatedly. As you become skilled in producing films you may find creating even a small library of them, without sell-by-dates to their content, will enable their regular reuse. |
| Remote | Videos can serve as vodcasts, mounted on your website and accessed by learners at their leisure. Especially beneficial for any students studying outside their native language or wishing to revisit key elements. |
Reflect back on recent classes you have led. Chances are one or more of the uses shown in Table 7.1 should fit the bill and should go a way towards answering key educational needs within your own teaching. Even if you are somewhat sceptical about the use of visual media in this way, try it and evaluate your audience’s reaction; you may be pleasantly surprised.
Attention and length
A slight caveat, as with all educational approaches videos will not connect with every audience member. However, for other participants the same might be true for long demonstrations or hands-on sessions or workbooks. As a further weapon in your educational arsenal, videos will allow you to pitch your teaching to a broader range of learning preferences, delivering improved retention of training outcomes.
Throughout this chapter the focus is on short videos, of around five minutes duration. Why no longer? Again, attention span is key here. The longer a non-interactive video continues, the greater the risk of attention drop-off. As you will see in the ‘Concept’ section both brevity and impact of your core message are linked.
Bespoke vs reusing
While we are concerned with the production of custom videos there is no reason why you should not make use of the vast collection of materials produced by other librarians and educationalists. Sites such as YouTube and educational sites such as Jorum Open and institutional repositories are rich sources of films for easy reuse. Explore them, seek colleagues’ recommendations or see the Videography for a few initial suggestions. Even if you want to make customised videos but feel you lack the time or resources to create them yourself, this does not rule out bespoke creation. See, the sections on ‘Filming’ and ‘Editing’ for more on how to outsource elements of production.
Pre-production
Before we look at outlining concepts, it is important to familiarise yourself with an overview of the film-making process (see Table 7.2). This pre-production phase usually takes minutes, although it may take longer the first time. The question to answer here is ‘Am I prepared to devote time and effort to make a video?’ Assuming the answer is yes then yourself, and a small team, should be able to take the first practical steps into the production process.

The process of producing a short educational movie is in many regards not dissimilar to that for longer movies. As with all good formulas it is important to start at the beginning and work through each phase sequentially, resisting the temptation to jump ahead. You will find the phases interlock in a complementary progression and your final product will consequently be more polished and professional.
Too many would-be library movie moguls jump directly to filming, and then wonder why their editing steps are hellish, their narrative garbled or audience reviews so negative. By working through this process your outputs will be superior, with as little time wasted as possible.
Time commitment
One of the most common questions a new film-maker, or their manager, has is ‘How long will this take?’ Moving from initial idea to final product will take a non-trivial portion of time, especially initially. With experience some steps, such as scripting, will become faster exercises. Others, such as editing, may actually take longer as you bring to bear more of the tools and special effects that your software allows. Since each film-maker will take a variable period of time to accomplish them let’s illustrate this with an example:
James, a first time movie maker, intends to make a three-minute video illustrating a student performing a poor catalogue search for books, followed by another performing a superior search in support of an essay. Each will be filmed performing a couple of searches along with reaction shots respective to their relative successes. Finally, the video is bookended by James talking to camera, highlighting the lessons learned.
There are maybe a dozen separate shots in this film, three actors to organise, one of whom is doubling as producer and director, along with a camera operator. For James to go from start to finish would likely take the time shown in Table 7.3. Nearly 12 hours might seem a lot of time, although it is less than two working days. Some of the commitment can be split across other members of the team so that one person will not carry the whole burden. However, these are sequential rather than parallel steps, and some stages (editing and reviewing) can often involve more than one person in the process, so the team’s total commitment may exceed 12 hours.
Table 7.3
| Production stage | Anticipated commitment |
| Planning | 1 hour |
| Concept | 30 minutes |
| Scripting | 2 hours |
| Filming | 2–3 hours |
| Editing | 2 hours |
| Reviewing and evaluating | 2 hours |
It might be possible to reduce the time James spends on each of these steps, although there is one likely outcome from this skimping. The final product will be less than satisfactory and he may need to re-shoot, re-write or re-edit in order to save the video. James might be able to revive the project from what he has already shot, but would probably end up investing yet more time on it. Haste, makes a waste of his time.
Convincing your managers
While you might be keen to use video, given the required time commitments you will need to obtain senior or line management buy in. As with any new development it is important to be able to stress the benefits, not solely to your teaching practice but to the organisation’s goals and activities (as shown in Table 7.4). Hopefully, you will get to make your pitch face to face. Be prepared to make a simple business case keeping in mind the points shown in Table 7.4.
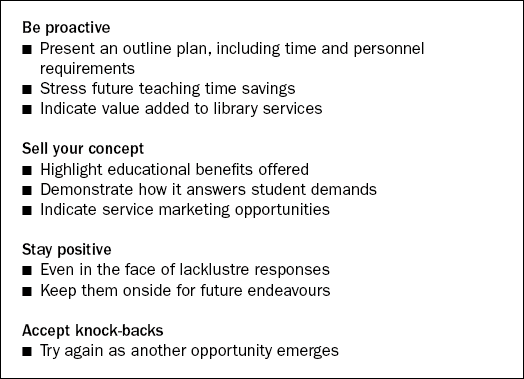
It may well be that you might want to go ahead and make a video in your own time. Even without management’s initial blessings this kind of guerrilla librarianship can deliver dividends. Now you can demonstrate real production experience, a strong awareness of actual time commitment and perhaps a favourable audience response as a demonstration of feasibility.
Concept
Every film starts with an idea. Every great film starts with a concise concept. Knowing what you want to communicate is essential in ensuring your video actually has a clear message that your audience can take away. The very best educational films have this message embedded in every moment.
There is a temptation to cram videos full of information, which is the complete converse of what your audience will be able to digest. Video is a non-interrogative medium with a limited engagement span, thus message clarity is very important. Many library-produced videos have generalised or vague core concepts and the muddy results are neither engaging nor particularly effective education. Take Caroline’s idea:
Example 2: Caroline’s confused pitch
Our video will be about how important it is for students to think about searching lots of different resources, how to access ebooks and the new mobile phone application that the systems team has written. Oh, and it will also explain which referencing style is the most practical one for students.
Good luck getting all that across succinctly in just five minutes! Chances are the resultant video from Caroline’s pitch would be muddled, rushed and unsatisfying for her audience. Your core message must ring out from every scene. There is simply too much information in a idea like Caroline’s to convey in a short time-frame. Thankfully there is a simple tool that can help.
The pitch
In Hollywood they believe in the 25 words or less movie pitch; that is any good film can be boiled down to a short concept (see Table 7.5). This effective tool helps to ensure that your idea is a solid one and can be communicated within the brevity of a video. It will also help sell your proposal to key stakeholders such as management. Let us illustrate how this approach works with some real movies.
Table 7.5
| Concept | Film |
| All of reality is a computer game, but someone has the cheat codes. | The Matrix |
| Biography of a rise and fall of a small time hood, and the lives he touches. | Goodfellas |
| Classic fantasy tale of noble heroes and heroines against evil overlords and their fortress of terror; in space! | Star Wars |
| Respected man and only possible suspect tries to prove he did not murder his wife as he flees unstoppable and dogged pursuit. | The Fugitive |
While these potted concepts do not give the full details, they do give you the distilled essence of these films. Enshrining this kind of clarity in your production will aid in shaping the script by helping identify what is truly relevant in your visual narrative and provide a benchmark for reviewers to evaluate against. Table 7.6 shows some library.
Table 7.6
Dressing appropriately for the job means that customers will treat staff with respect.
Boolean operators are powerful tools, and can save students time and effort to find articles.
Using the library catalogue to renew books will save you money, but only you have the power to do it!
Now think of what you want to communicate in a film. Write it down, in 25 words or less. If it takes more than 25 words, chances are you are trying to cram too much in. Better to split these ideas across multiple videos.
Now you are clear on what your audience should take away from watching, it is time to start planning the details.
Planning
Fail to plan? Then plan to fail. It’s a maxim that applies to video making as much as other endeavours in life. Now you have committed to making a film it is essential to first gather your team, set a production schedule and set a semblance of a project plan in place. This helps ensure that you will deliver a product to the satisfaction of yourselves and your stakeholders.
Roles and responsibilities
Educational video making works well as a team process from bouncing ideas off each other to assisting in the overall production process (see Table 7.7). Like any project it will work more smoothly where people accept clearly defined roles, ensuring activities are completed in a timely and successful manner.
Table 7.7
| Role | Responsibility |
| Producer | Oversees and drives entire film making process. |
| Troubleshoots problems where necessary. Coordinates support for other roles. | |
| Director | Organises film shoot. |
| Directs cast and camera operator. Sorts set, props and shooting locations. | |
| Script writer | Plots, writes and revises script. |
| On-hand to advise on scripting issues during shoot. | |
| Camera operator | Films video. |
| Assists director during shoot. | |
| Editor | Splices filmed segments together in scripted sequence |
| Edits audio and visual effects. Works with producer to ensure final product is as desired. | |
| Cast | Appear on screen and enact your video. |
| Production assistants | Multitasking team members working where the producer applies them. |
| Investors | Management and other stakeholders keep a close eye on the time invested. |
The producer is the most crucial role, driving forward the whole process and overseeing the work of others. Commonly in small teams this role is merged with that of the director. It is possible for one person to embody all of these roles, although this will increase the pressure upon them. As with all projects, a small team will ease the producer’s burden, allowing the producer to take a more high-level overall quality control viewpoint. For those unwilling to take on a named role, assume they have taken on the task of production assistants: willing helpers to all of the other key production staff.
With roles agreed and plans in place it is time for the producer to move the team into the next phase, script writing.
Scripting
Think about your favourite film. What is it that engages you, the audience member, in its narrative? Is it the characters, plot, genre or dramatic performances? Chances are, while the answer will be different for each reader, all of your chosen works will have one thing in common – they hooked you from the start, drawing you in. The counterpoint to the hook is the sting – the final moment or line of a movie that drives a point home or reinforces what you were trying to communicate. Therefore it is the opening and closing lines of dialogue that you must focus the most attention on getting just right.
You don’t need to know a lot about screen writing, though it might help a little. Just remember to always write with your intended audience in mind. Carefully consider brevity, clarity, punch and message; as well as terminology and language. Where possible try and use naturalistic spoken phraseology and syntax, rather than formal language; although you should minimise slang.
Scripting layout
Laying out a script (see Table 7.8) may be a little different to anything you have written previously. You may also be astonished by how few words (perhaps 200) you can have your actors speak on screen in a three-minute script. Visuals and action will have impact on your audience beyond the spoken narrative which supports a brevity of spoken word.
Table 7.8
| [Title] | |
| [Opening credits/title] | |
| INT/EXT | [Location] [Day/Night] |
| [SCENE] Details of set/scene layout [SHOT] Instructions for camera & director [SFX] Music or visual effects |
|
| [SPEAKER] | |
| Spoken words. (emphasis) | |
| [Transition] Cut to next scene | |
| [End credits] | |
| [© Notice] | |
| -End- |
The following is an example of a simple screen writing format, that should be readily comprehensible to your team. This layout format will mean one script page equates to approximately one minute of screen time.
Let us illustrate this with a script extract (see Table 7.9) to give you an idea of how this might look on the page.
Table 7.9
Extract: Librarians dress for success
| INT | Different library. DAY |
| [SCENE] Ruined landscape and dead animals everywhere – burning flames/smoke if possible tracking across the scene. | |
| [SHOT] WIDE tracking from R->L, then cut to close ups of dead animals | |
| [SFX] Clanging sad/haunting tune | |
| NARRATOR (mournful) | |
| The librarians of Mountsorrel Community Library didn’t think the dress code was important. Too late they learned that their patrons no longer respected them, or the library code. | |
| [SHOT] Close up on Library Code of Practice – burned and tattered | |
| NARRATOR (continued) | |
| Chaos was inevitable. Do you want to know more? | |
| [ON SCREEN TEXT] Do you want to know more? (Green lurid font) | |
| [Transition] Fade through | |
| INT | Another library (2) with busy workers. DAY |
| [SFX] Shift to more upbeat main theme music | |
| NARRATOR (encouraging) | |
| Dressing correctly demonstrates to our customers the respect in which we hold them. |
You do not need to follow this style exactly and you will likely develop your own house style, but it should help in laying out your earliest scripts. It also illustrates how much more than simple dialogue makes up a script, since actions, sets and camera directions all play a part. Let us explore how to plan out a good script.
Plotting
Put simply, plot is the sequence of events that will occur in your video and will be used to guide the dialogue and actions performed by the cast. How you plan out your plot is up to you. A list of scenes is easy enough, or if you are artistic you might prefer to storyboard them as a series of illustrations. Alternatively you can use the following template approach (see Table 7.10). Planning out each scene and establishing resource requirements for the shoot can also save the director and camera operator time later.
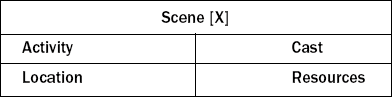
Large post-it notes are ideal for recording this sort of detail. These can be arranged to help plan out the plot sequence visually, and should you want to re-order the events of your video they can be easily rearranged. A plot outline for one of James’ Example 1 scenes might look like the one shown in Table 7.11.
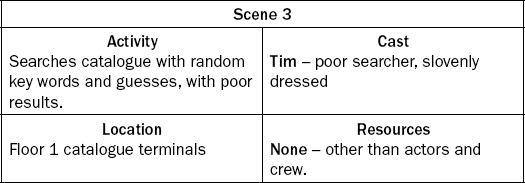
With each scene plotted in this way James can easily plan out the half-dozen or so that make up his video’s narrative. However you prefer to approach it, once you are happy with the event sequence it is time to write the dialogue.
Dialogue
While it may be the visual cues and actions on screen that carry your narrative forward, it is dialogue that will punctuate the situations and give them context. Always write the dialogue before you decide on the actions or camera work, otherwise you may find it hard to make it flow naturally. Aside from the hook and sting the flow of dialogue is important to maintain your audience’s attention.
The easiest construction to aid this flow is the question and answer technique between two characters, mirroring many real world conversations. In practice this might look like this:
How does the catalogue help me?
It lists all the books the library has, and it’s easy to use too.
Really? I had a real problem last time I tried to use it.
Don’t worry. I’ll show you how you can save time and get better results too.
In this way you can see how this example video would continue into a demonstration of good searching techniques. Questions and answers mirror the audience’s thoughts which will help their engagement with your message.
Pacing
For education videos speech needs to be delivered at a steady pace, a little slower than normal conversation. This will limit the number of words you can use in a script. Don’t worry about this when you write the initial draft, but when you come to revise it try focusing on brevity and impact. A more staccato pattern, such as in Example 3 works better than long expository passages. Aim ideally for between 150–200 words in total.
Edutainment
A touch of light educational comedy (or edutainment) can improve a video’s impact significantly. Conversely an utterly straight-laced approach will diminish the audience’s attention span and engagement with your topic. Humour offers in many respects as powerful a communication tool as does rhetoric or repetition within an information literacy setting. More importantly within a video it offers three key advantages for your message: engaging the audience’s interest, making messages memorable and subjects more digestible. In this way humour will deliver serious audience engagement and recall dividends.
Action
However powerful your dialogue is, a video script needs to show more than just a pair of heads talking to camera. One of the major advantages of video is that you can take your audience to locations, times, and circumstances beyond that which they would be able to experience within a lecture hall. It also needs to include any actions, locations and special effects you anticipate using. The maxim show don’t tell is key here; it takes more dialogue to describe how short loans can be borrowed than to simply show it in action. With lecture slides you do not put every word up on screen to be read, because you are talking about the topic as well. In the same way a video will be able to show how to accomplish something without a speaker having to explain it all in words.
Visual shorthand or cliché can be a useful tool here. For James it could be an effective shorthand to have his poor and good searchers dressed slovenly and smartly respectively along with a note in the script for the former to slouch and their counterpart to sit neatly. A large amount of information will now have been communicated to the audience about their respective approaches without a word being uttered.
Video is a medium that is predicated on movement. Static shots of people standing and talking are visual poison to an audience. Show people entering a room, reacting to their situations and other speakers and carrying out the activities you are demonstrating. It will save on your dialogue budget and convey your message effectively. Otherwise you may as well forget the video and simply lecture to your audience.
Even if you feel you cannot engage with a humorous approach do make the most of the dynamic video medium. At the very least try and avoid the mundane talking head to camera paradigm and you will find that your audience will respond positively.
Polishing
By now your script should be full of engaging dialogue and well thought out sequential actions which all convey your core message. The most effective way to discover if your dialogue works is to have it read aloud by someone unconnected with your project. Does it flow? Are there moments that lack clarity? Did your attention wander? Take these perceptions away and revise your script to tighten up the dialogue. Rehearse it with your cast and make any final minor modifications.
Once done it is time to take your narrative and capture it on camera.
Filming
Shooting a video short is not brain surgery, although a steady hand or a camera tripod are a must. Let’s examine some key shooting elements.
Location, location, location
You may well expect to shoot most of your videos in library-related locations. If you have in mind something a bit different be prepared to get filming permission. Public places can limit the times at which you can film without interference from passersby, although having a production assistant keeping onlookers back can be invaluable. If your script calls for a more unusual setting, then it will be up to the producer and director to come to a realistic compromise if it is unavailable locally.
The first time you use a location, shoot some test footage and then view it. Does the POV (point of view) of the audience take in too much or too little of the set? How well lit does it appear? Is it difficult to make out your cast against the background? How does the dialogue sound? With these thoughts in mind the director can then make the final decisions about the locations used and the set-up.
Sets and set-up
Many of your sets will need little dressing or set-up, for example filming scenes set at an issuing desk, although you will need to allow room for actors to enter and leave the frame of your shot.
It can be easier to substitute a mock-up location than use a real one. Seminar and meeting rooms can be easily redressed with desks, lecterns and other props to imitate other areas with the advantage that you will not be interrupted mid-scene by a passing customer. The relative privacy can help coax less confident members of your cast into better performances. You also should not have to worry about keeping the noise down so much either.
Wherever possible avoid busy backgrounds. Library shelves may be visual shorthand for the library, but they can be a distraction if the focus of that scene is on the speaker. Simple cloth or wall backdrops ensure the viewer’s focus is on your cast’s situation, and not trying to read the titles of books behind them.
Shooting footage
Good camera work comes from operator experience, as much as good direction. Make sure you frame the speakers centrally, keep the shots steady and remember the maxim: shoot once, shoot twice, shoot thrice. Chances are at least some takes will be of inferior quality. Re-shoots can be problematic in terms of getting your cast back together or even accessing your filming location again. Through capturing multiple takes, the editor will be able to splice the movie together from a choice selection of shots.
Lighting
Illuminating a set well is key since most camcorders will struggle with even the best office lighting. Without good lighting camera auto-focus will struggle and your final product will look gloomy and unappetising. Obtaining a free-standing spotlight will help enhance visual quality and multiple spotlights can help eliminate shadows behind your subjects giving a more professional on-screen look. Be wary of directly lighting reflective surfaces as glare may ruin the shot.
Strong back-lighting, like a window, can wipe out any clear impression of your cast so be cautious filming near them. Exterior shooting introduces additional lighting complexities that there is not room to cover here. However, for most interior shoots it is sufficient to light locations to minimise shadows, illuminate the focus of attention and ensure the cast can be clearly differentiated from the background.
Cast
In an ideal world your cast would be word perfect, have memorised your script and have a background in amateur dramatics. In reality you may well have to make do with whomever of your colleagues are available. They must be able to speak clearly and audibly, prepared to repeat actions and lines; and crucially prepared to listen and respond to the director’s instructions.
Be prepared to be a patient but firm director as you uncover the divas in your midst. Working with peers can be difficult if you have not defined responsibilities at the outset. Persuade rather than order, but remember it is the director’s goal to deliver the shoot as required from the script and so the whole production team should be prepared to back them up. If you make sure your cast know what you expect from them, fewer tantrums, a more professional work ethic and a smoother shoot will result.
Outsourcing or Do-It-Yourself?
You may have a choice between filming yourself or making use of organisational audiovisual assets, though there are pros and cons in either case. Outsourcing means you can draw on superior equipment and experience, likely ending up with a more polished final product. On the downside you will need to slot filming and editing sessions around their timetables. It is also possible that they will not have quite the same creative vision which in a worst case scenario might necessitate re-filming portions yourself.
Keeping the whole process in-house means you will retain a much stronger creative control of the final product. It might not look quite as polished but you can be sure few of your audience will notice. It also allows you to be more adaptable to your cast’s availability and to any last minute script revisions. Drawbacks include a need for initial outlay on equipment, and the time to become familiar with it to film and edit the video. The choice is something you need to carefully consider in pre-production.
Whatever your approach, once all the key scenes have been captured it is time to edit them into your final video.
Editing
Editing takes time, care and attention to detail but it is a rewarding role to produce the video from the raw shooting footage. If someone else is editing your shoot then there is no need for you to learn the software packages; although you will need to regularly view their rough cuts to ensure that the visual narrative matches your aspirations. Don’t be afraid to ask them to recut it; many a potentially good educational movie can be ruined by third parties editing the shoot to match their vision. Nothing is worse than suddenly discovering the day before your premier that the video needs a complete re-edit. If you edit yourself then you will need to become familiar with the software. Attend training, read the manual, find a good website or get someone who is experienced to take you through the basics.
If you have never edited a film together before, then it is best to start small and short, since more complex scripts make for longer, and more frustrating, editing processes. For each minute of final screen time it will probably take initially around an hour of editing time to produce a reasonably polished product, although speed comes with experience. Adding visual or audio effects, multiple shot angles and even cutting between speakers all increases process complexity and editing time. Let us consider an example:
Example 4: Hunting for searching success
A 90 second video involving 20 lines of dialogue between two speakers discussing the importance of well constructed search strategies set to a royalty free soundtrack. Each speaker is shot separately in close up, along with a wide angle establishing shot.
In this short video the editor will need to make a number of cuts, working with the director to ensure everything looks okay before making the final version. As a rough estimate there are at least 42 visual cuts needed here, on screen titles, credits and any audio adjustments to ensure that speakers can be heard. Only once these are done can the final cut be produced.
Splicing
Step one of any edit is to take the raw footage and arrange it in sequence of the scripted scenes. Here the plot outline and script can be valuable references. Glance through the footage to ensure that at least one take from each scene is of usable quality. If not let the director know as soon as possible that they will need to reshoot.
Selecting
The next step is to select which of the multiple takes you will use in the final film. Once you have cut out the unused takes you will have the very first rough cut. Do not worry about exact timings or silence between scenes as you will refine these later. Screen this rough cut for the director and team to give them an idea of the final product. If some scenes need to be re-shot then this is a decision best taken sooner rather than later.
Fine edit
Once the team are broadly satisfied the editor will refine the rough cut and will trim footage around the dialogue, remove silence and irrelevant moments and ensure a strong and engaging visual narrative. While high action drama may cut the viewer’s POV every three seconds, shots of 20–30 seconds are quite acceptable in an educational video, although the editor may introduce additional cuts for timing and flow if judged appropriate. You might wish to cut a scene up into several shots, perhaps inter-cutting a speaker with reaction shots of someone listening. This is a more advanced technique, but looks excellent on screen.
An almost imperceptible pause of a second is needed between the end of each speaker’s line and any response; otherwise the audience will find it hard to follow the conversation’s thread. Where speakers are on screen at the same time and there is no gap, it is possible to slow the footage down or insert an interstitial shot to provide the necessary pause for the audience to process the speech.
Where a speaker’s line has been poorly recorded or delivered, but the visual is strong, it is possible to overdub replacement dialogue. This works well in distanced shots as matching mouth movements in close up is hard. This is one of the ways in which an editor can rescue a video from minor shooting flaws.
SFX
Most training videos do not call for extensive special effects. However, you may wish to strengthen your on-screen presentation through the addition of scene transitions, video effects, captions, subtitling, music or sound effects. These can enhance the viewer’s engagement if used well. They will detract from your message if overused; like too many PowerPoint animations. Use sparingly for maximum effect, remembering that each one will add complexity and time to the editing process.
Still images with voice-over can be used to occasionally illustrate points, but overuse will make your video look more like a narrated slide-show. Using text captions over your scenes to highlight points, complementing the cast’s actions on screen, is a better approach.
Final cut
Once your edits for time and quality are made, credits and captions positioned and any special effects added it is time to output the final video. Produce this in two sized formats: a compact web-ready version for swift downloading and a larger high quality version. This higher quality version will be the one used in face-to-face lectures and archived for long-term storage; and the one you will present to your stakeholders and students for review.
Reviewing and evaluating
Before you go live with the video in a taught class it is worth showing the final cut to a small assembled audience. If time permits you might have been able to do this during the editing process, but if not this is the final opportunity for the team and stakeholders to provide constructive criticism. Oral feedback is useful but a questionnaire (see Table 7.12) can help in recording detailed comments.
Table 7.12
Screening review questionnaire
In no more than 10 words – what impact did the video make on you?
What were the strongest features of the video?
What elements of the video could have been improved?
What message was the video trying to convey?
Be prepared for criticism as much as praise. At this late stage, if the reaction is entirely negative it is more effective to start the production process again rather than waste hours attempting to re-edit what you have already shot into a passable product. Where there are minor comments on timing or audibility of dialogue or clarity of message, do go back and make minor revisions.
With these made it is time to celebrate your endeavours with the other team members. However, it is not the end of the process because now you must deploy the video in the role for which it was created: within an information literacy session.
Evaluating
As you premiere your video to a live classroom audience, take a moment to reflect back on how much you will have achieved by this point. Remember not all of your audiences will love your video so be prepared for some critical reactions. Learn from their reactions to your screening as well as their comments afterwards. Observe them as they watch the movie. Which bits resonate with them? Where do they smile? Where do they react? Where do they appear not to be watching? All of these insights will become invaluable guidance in producing your next video project!
Next steps
Hopefully your next step will be to start planning work on creating your own films. You may well be lucky enough to have access to filming equipment and expertise through your audiovisual departments. You might not, or may just decide it is more practical to have your own in-house filming equipment.
Cameras
Read some of the popular electronics review magazines, such as Which? and What Digital Camera, before trying to identify what is suitable. A few hundred pounds will buy a camcorder sufficient for your filming needs, and even a ‘Flip Video Camcorder’ can produce reasonable quality results. Borndigital (hard-drive or flash) is an easier format to work with since there is less physical media (discs, tape, etc.) lying around and you never have the problem of forgetting to load the camera and then losing a session’s shooting. It is also simple to transfer camera footage onto computers or network drives.
Preferably obtain a camcorder with an optical as well as digital zoom and make sure it has a name brand lens (like Zeiss) as your results will be significantly sharper. You can invest in other add-ons like microphones if you like and while not essential it can be worth future-proofing your purchase by making sure there are compatible peripherals available.
There are a lot of places to buy cameras and filming equipment from and online retailers probably offer the broadest selection and range of prices, alongside helpful user reviews. You might even be able to take advantage of organisational deals with local firms.
Software
Editing software is relatively inexpensive and may be already available locally. The Corel VideoStudio packages are excellent, but Adobe Premier, Microsoft Moviemaker or iMovie might well suit your needs just as well. They all offer user friendly interfaces allowing for easy editing, and graduated discovery of more advanced functionality. You can practically go from installation to editing your first video within minutes.
Final thoughts
Hopefully this chapter has offered a few words of guidance for those of you looking to create your own educational, promotional or otherwise illuminating videos. You will probably have your own ideas about where you want to explore next. It is only a starting point and there will be much to learn through hands-on experience. Experiment as you become more confident with your equipment, cast and locations, and soon you will be producing quality and high impact information literacy-enhancing videos.
Golden rules
Some final tips to remember when producing your own films:
![]() Sell your idea to obtain management buy-in.
Sell your idea to obtain management buy-in.
![]() Commit sufficient time to all stages of production.
Commit sufficient time to all stages of production.
![]() Keep the concept and message in mind throughout production.
Keep the concept and message in mind throughout production.
![]() Get someone to read scripts out loud to identify dialogue problems.
Get someone to read scripts out loud to identify dialogue problems.
![]() Do not let your background detract or distract from your intended focal point.
Do not let your background detract or distract from your intended focal point.
![]() Keep it light, keep it bright, keep it clear – get some spotlights.
Keep it light, keep it bright, keep it clear – get some spotlights.
![]() Shoot multiple takes to avoid lengthy re-shoots.
Shoot multiple takes to avoid lengthy re-shoots.
![]() Screen rough cuts as soon as possible for comment.
Screen rough cuts as soon as possible for comment.
Glossary
Establishing shot wide-angled shot used to establish the location and characters present.
Final cut final master version of your video.
Hook opening line or visual/audio cue that grabs the viewer’s attention.
POV short for Point of View, the viewer’s perspective as framed by the film-maker’s camera.
Rough cut unfinished video assembled in scene order without exact timings or effects. Reviewed to establish if shot footage is adequate to the task.
Shoot the process of filming your video.
Shooting script final version of the script including camera directions, set details and any special effects required.
Sting closing line or visual/audio cue that underscores a video’s message.
Visual narrative the message the video conveys in a structured and understandable sequence.
Vodcast the use of video as a downloadable, rewatchable information resource.
Costello, John. Writing a Screenplay, 2006. [Pocket Essentials].
Cresswell, Julia. The Penguin Dictionary of Clichés. London: Penguin Group; 2000.
Frensham, Raymond G. Screenwriting. London: Hodder Headline Plc; 1996.
Johnson, G.J., Weaselling your way into your student’s hearts. CILIP Umbrella, University of Hartforshire, 2009. online at (accessed 13/7/09). http://www.slideshare.net/GazJJohnson/weaseling-your-way-into-your-students-hearts-1735226
Johnson, G.J., The Weasel That Roared: Creating and using effective promotional educational videos for libraries and information services. University of Staffordshire workshop, 2009. Online at: http://tinyurl.com/o9kf3g
Johnson, G.J., The Weasel Dialogues. UC&R/CoFHE Joint Conference, Liverpool Hope, 2008. http://www.slideshare.net/GazJJohnson/the-weasel-dialogues [Online at:, (accessed 8/5/10).].
Johnson, G.J., Puppetry For Information Literacy Videos?!. AOSEC Winter Workshop, Portsmouth. 2010. http://www.slideshare.net/GazJJohnson/puppetry-for-information-literacy-videos [online at:, (accessed 8/5/10)].
Muchnick, A. When Pancakes Go Bad: Optical Delusions with Adobe Photoshop. Course Technology PTR; 2004.
Novelly, Maria C. Theatre Games for Young Performers. Colorado Springs: Meriweather Publishing Ltd; 1985.
Wikipedia, Comedy. 2009. http://en.wikipedia.org/wiki/Comedy [online at:, (accessed 27/5/09).].
Better Library Inductions for New Readers & Students, online at: http://www.youtube.com/watch?v=nYRQ4KLlyMw (accessed 24/5/10).
Boolean Logic & Database Searching, online at: http://www.youtube.com/watch?v=enPSOq1_QmY (accessed 24/5/10).
Boolean Craft, online at: http://www.commoncraft.com/ (accessed 24/5/10).
Explaining Twitter Simply, online at: http://www.youtube.com/watch?v=G4__htJ-IdU (accessed 24/5/10).
Handling difficult customers, online at: http://www.youtube.com/watch?v=z3Jud4b9ik0 (accessed 24/5/10).
![]() Part 1: Reliability & Relevance, online at: http://www.youtube.com/watch?v=lrXNCj9n6e4 (accessed 24/5/10)
Part 1: Reliability & Relevance, online at: http://www.youtube.com/watch?v=lrXNCj9n6e4 (accessed 24/5/10)
![]() Part 2: Currency & Purpose, online at: http://www.youtube.com/watch?v=PYV3ZmThuls (accessed 24/5/10)
Part 2: Currency & Purpose, online at: http://www.youtube.com/watch?v=PYV3ZmThuls (accessed 24/5/10)
![]() Part 3: Accuracy, Evidence & Presentation, online at: http://www.youtube.com/watch?v=ta1RMXVOig0 (accessed 24/5/10).
Part 3: Accuracy, Evidence & Presentation, online at: http://www.youtube.com/watch?v=ta1RMXVOig0 (accessed 24/5/10).
Learning objects: Movies and demonstrations, online at: http://ilrb.cf.ac.uk/bank_type/demos.html (accessed 24/5/10).
Librarians vs UFOs, online at: http://www.youtube.com/watch?v=kdWUxV1F054 (accessed 24/5/10).
Librarians Dress to Impress: appropriate attire in the library, online at: http://www.youtube.com/watch?v=otCRqwHvEYk (accessed 24/5/10).
Professor Weasel goes on a Mandate, online at: http://www.youtube.com/watch?v=MBdM_0pfyQ8 (accessed 24/5/10).
Understanding Academic Copyright, online at: http://www.youtube.com/watch?v=7giW7efQggo (accessed 24/5/10).
University of Liverpool Library’s Videos, online at: http://tinyurl.com/24wmxok (accessed 24/5/10).