
In this recipe, let's explore how we can use SQL CE—an embedded database from Microsoft—as a local store. Some of the features of SQL CE are as follows:
- It is totally free without any license restrictions.
- Embedded database means you don't even need to install in order access the database; you can just copy the binary into the project folder and use it like a file.
- There are two ways to use the SQL CE in Phone applications; one is as a device storage, which allows read/write access, and the other is as an App storage, which allows read-only access. A scenario for the App storage is when you want to ship something like dictionary data or searchable data that doesn't need to be updated by the user.
- It is supported by Visual Studio for creating and editing databases. Also, you can modify indexes.
- You can use Entity Framework (EF) to create the model code. WP7 applications only support LINQ to SQL for now.
First, you need to make sure you download and install Visual Studio 2010 SP1. Once this is successful, download SQL CE Tools for Visual Studio 2010 SP1 at the following address: http://go.microsoft.com/fwlink/?LinkId=212219.
Next, download SQL Server 2008 R2 Express from the following address: http://www.microsoft.com/express/Database/. SQL Server 2008 R2 Express allows you to open the SQL CE database files for viewing and editing. You can perform these tasks within the Visual Studio Environment as well. Launch the SQL Server Management Studio.
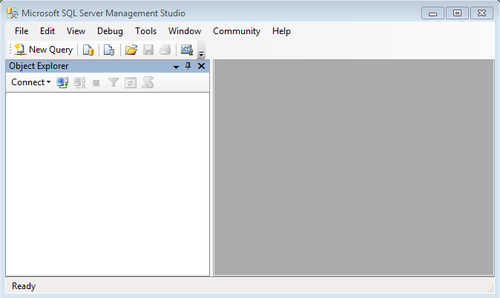
In this recipe, we will learn how to use the SQL Server Management Studio to create an SQL CE database file as well as a basic MyTask table with different columns in it. Once the table is created, we use SQL insert statements to add a couple of sample records to the table.
- Let's create a new compact database from the Connect dropdown using the SQL Server Management Studio.
- SQL CE databases have file extensions of
.sdf.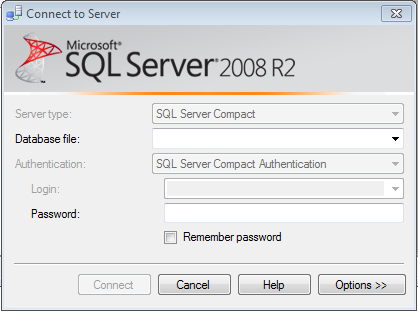
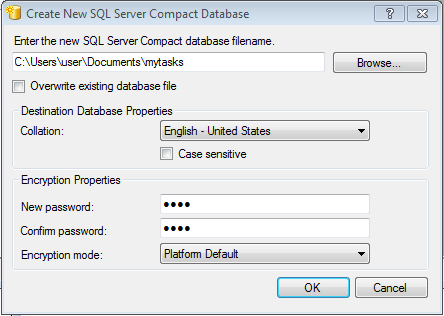
- Navigate to the Database file dropdown and select New database, then enter the name
mytasksfor the database and enter the Login asAdminand a password you can remember. - SQL CE is an embeded database so we can save it to local folder with a filename just like you would create any other file. We can copy and send it in an e-mail or upload it to a server. It is this flexibility that makes SQL CE very desirable for smart phone apps as local storage.
- Now open the
mytasks.sdfdatabase.
- Add a new table called
MyTasks. - Let's add all the data fields we used in the Chapter 1
MyTasksapp recipe.Idis the new Primary Key we added to the table. AddName, Notes, Priority, DueDate, andDateCreatedcolumns to theMyTaskstable. - We used
nvarcharforName, Notes, andPrioritywith different lengths. We useddatetimefor theDueDateandDateCreatedcolumns. - We can also set different defaults for each column, like we can set the
Idcolumn as identity with an Identity Increment and Identity Seed, as shown in the following screenshot: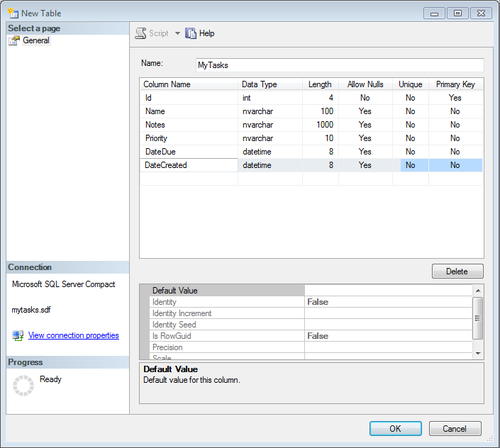
- Once the table is created, let's add a couple of test data rows using SQL
insertstatements.insert into MyTasks values (1,'Task Name 1', 'Task Note 1', 'High','9/1/2011',getdate()); insert into MyTasks values (2,'Task Name 2', 'Task Note 2', 'High','9/1/2011',getdate());
- Click on the New Query icon in the tab bar and then Execute the selected query. You should get the result shown in the following screenshot:
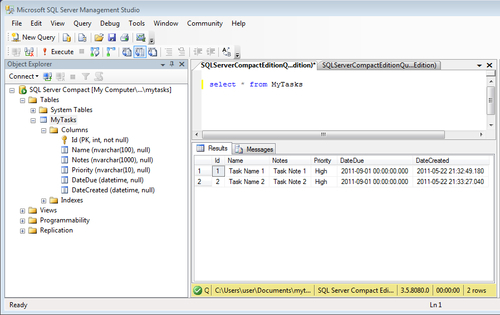
We created a new database file and a new table MyTasks. We then added all the columns needed for the MyTasks app to the table. Next, we inserted a couple of test data rows into the table using SQL insert statements.
Finally, we used a select statement to query the data in the MyTasks tables. We just looked at how easy and similar SQL CE is to other database options. We can also use inline SQL statements to store the data locally.
In order to use this in a WP7 project, you should include this as your project resource. Once it is part of the project you can access the database using LINQ to SQL. You will be accessing the file stored in the installation folder using the following connection string:
String conn = "Data Source = 'appdata:/mydb.sdf'; File Mode = read only;"
"appdata:/" indicates that file resides in the installation folder within the XAP file and it is read only.
The SQL CE solution is very flexible and powerful. We can build scalable apps using SQL CE, as it is supported in the ASP.NET environment too and can be easily upgraded to SQL Server or SQL Azure (Microsoft Cloud Service).
In this section, we will create a sample recipe that will create the local database and the table MyTask. Using the Context object, we can use LINQ to SQL to query the table or we can perform a standard CRUD operation on the MyTask table.
- Open the new project and create a new Phone Application. Name it
Ch5_MyTasks_SqlCE. - Open
MainPage.xamland add a button control and list box control, as shown in the following code snippet, inside theContentPanel. In theListBox DataTemplate, add fourTextBlockcontrols and set the binding properties toName, DateDue, Priority, andNotesrespectively:<!--ContentPanel - place additional content here--> <Grid x:Name="ContentPanel" Grid.Row="1" Margin="12,0,12,0"> <Button x:Name="Button1" Content="Create Sample Records" VerticalAlignment="Top" Click="Button1_Click"/> <ListBox x:Name ="lstTasks" Margin="0,78,0,0"> <ListBox.ItemTemplate> <DataTemplate> <Grid> <Grid.RowDefinitions> <RowDefinition /> <RowDefinition /> <RowDefinition Height="15" /> </Grid.RowDefinitions> <Grid.ColumnDefinitions> <ColumnDefinition Width="150" /> <ColumnDefinition Width="200" /> <ColumnDefinition Width="100" /> </Grid.ColumnDefinitions> <TextBlock Grid.Row="0" Grid.Column="0" Text=" {Binding Name}" FontWeight="Bold" Foreground="OrangeRed"/> <TextBlock Grid.Row="0" Grid.Column="1" Text=" {Binding DateDue}" /> <TextBlock Grid.Row="0" Grid.Column="2" Text=" {Binding Priority}" Foreground="Yellow"/> <TextBlock Grid.Row="1" Grid.ColumnSpan="3" Text="{Binding Notes}" /> <TextBlock Grid.Row="2" Grid.ColumnSpan="3" /> </Grid> </DataTemplate> </ListBox.ItemTemplate> </ListBox> </Grid> - Right-click the project reference folder and add a reference to the assembly
System.Data.Linqand then add the following threeusingdeclaratives at the top of the page:using System.Data.Linq; using System.Data.Linq.Mapping; using Microsoft.Phone.Data.Linq.Mapping;
- Open the
MainPage.xaml.csfile, add theMyTaskclass, which will be used for creating theMyTasktable with all the column properties. Set the Column Attribute IsPrimaryKey to true for property Id. This property will be created as Primary Key in the database table, as follows:[Table] public class MyTask { [Column(IsPrimaryKey = true)] public int Id { get; set; } [Column] public string Name { get; set; } [Column] public string Notes { get; set; } [Column] public string Priority { get; set; } [Column] public DateTime DateDue { get; set; } [Column] public DateTime DateCreated { get; set; } } - Next, add the
MyDataContextclass that is inherited fromDataContext. In this class, we will initialize the table asMyTaskItemswithMyTaskclass, as follows:public class MyDataContext : DataContext { public Table<MyTask> MyTaskItems; public MyDataContext(string connection) : base(connection) { } } - Now, we will initialize
MyDataContextin theMainPageconstructor with the database nameMyTaskDb.sdf, as shown in the following code snippet.isostore:/points to a device storage that has read and write capabilities. After the initialization, we check if the database file exists. If it is not true, then create the database using the methodCreateDatabase():// Constructor public MainPage() { InitializeComponent(); MyDataContext db = new MyDataContext("isostore:/MyTaskDB.sdf"); if (!db.DatabaseExists()) db.CreateDatabase(); } - Next, add a method to display records in the database and bind the results to the list box's
ItemsSource. These steps are shown in the following code snippet:public void MainPage_Loaded(object sender, RoutedEventArgs e) { ShowRecords(); } private void ShowRecords() { MyDataContext db = new MyDataContext("isostore:/MyTaskDB.sdf"); var q = from b in db.MyTaskItems orderby b.Name select b; List<MyTask> myData = q.ToList(); lstTasks.ItemsSource = myData; } - Add the
DeleteRecordsmethod so that we can clean the table every time we create the sample data. In this method, we open the database usingMyDataContextclass and then we use a LINQ statement to query the database for tableMyTaskItems. For each row we will call theDeleteOnSumbitmethod to delete the record, as follows:private void DeleteRecords() { MyDataContext db = new MyDataContext("isostore:/MyTaskDB.sdf"); var q = from b in db.MyTaskItems select b; foreach (MyTask taskItem in q) { db.MyTaskItems.DeleteOnSubmit(taskItem); } db.SubmitChanges(); } - Now we shall add a button click event, which will have the code to insert sample records into the database. Before we insert the sample records we call the
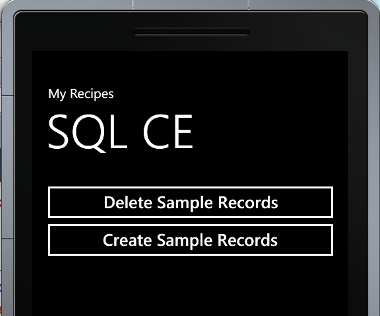
DeleteRecordsmethod to delete any data in the table so that we can insert the sample data. Here we open the database and using the object initializers we create a couple of rows using theInsertOnSubmitmethod. After inserting, we call theShowRecords()method to display the rows in the table:private void Button1_Click(object sender, RoutedEventArgs e) { //let's delete any records so we can recreate the sample data DeleteRecords(); MyDataContext db = new MyDataContext("isostore:/MyTaskDB.sdf"); MyTask myData = new MyTask() { Id = 1, Name = "Task Name 1", Notes = "Task Notes 1", Priority = "Low", DateDue = DateTime.Parse("10/01/2011"), DateCreated = DateTime.Parse("11/01/2011") }; db.MyTaskItems.InsertOnSubmit(myData); myData = new MyTask() { Id = 2, Name = "Task Name 2", Notes = " Task Notes 2", Priority = "High", DateDue = DateTime.Parse("11/11/2011"), DateCreated = DateTime.Parse("10/11/2011") }; db.MyTaskItems.InsertOnSubmit(myData); db.SubmitChanges(); ShowRecords(); } - Press F5. You should see the empty page with two buttons as shown in the following screenshot:
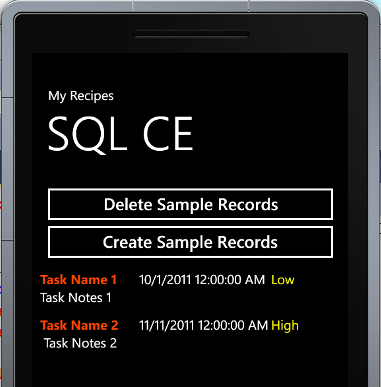
- Click on the Create Sample Records button to create a couple of sample data records and display the results as shown in the following screenshot. You can also try deleting the sample records and recreating them again.
SQL CE is similar to SQLite Client, so check the recipe SQLite Client as an embedded database in this chapter. Check the recipes in Chapter 6 and Chapter 7 for details on how to use web services to save data on remote servers. Also, check the following important links to get more information from MSDN:
- LINQ to SQL Support for Windows Phone:
http://msdn.microsoft.com/en-us/library/hh202872(v=VS.92).aspx
- Local Database Overview for Windows Phone:
http://msdn.microsoft.com/en-us/library/hh202860(v=VS.92).aspx
- Local Database Connection Strings for Windows Phone:
http://msdn.microsoft.com/en-us/library/hh202861(v=VS.92).aspx