
In this recipe we will learn how to save a username and password to local storage settings.
For this recipe let's copy the simple MyTasks app solution folder we built in Chapter 1, Data Binding to UI Elements, and rename the folder to Ch2_Recipe3_MyTasks. After you open the project, just press F5 and run it to make sure you don't get any errors.
Let's add another icon in the bottom navigation bar to link it to the Settings page. Then create the Settings page with the different controls to save the username and password.
- First, add another bar item at the bottom to navigate to user settings page, which we will be creating in step 3:
<!--Sample code showing usage of ApplicationBar-->
<phone:PhoneApplicationPage.ApplicationBar>
<shell:ApplicationBar BackgroundColor="Orange" IsVisible="True" IsMenuEnabled="True">
<shell:ApplicationBarIconButton IconUri="/Images/appbar.folder.rest.png" Click="ButtonFolder_Click" Text="Task Folder"/>
<shell:ApplicationBarIconButton IconUri="/Images/appbar.add.rest.png" Click="ButtonAdd_Click" Text="Add Task"/>
<!-- Add settings item for another icon for settings also create click event -->
<shell:ApplicationBarIconButton IconUri="/Images/appbar.feature.settings.rest.png" Click="ButtonSettings_Click" Text="Picture"/>
</shell:ApplicationBar>
</phone:PhoneApplicationPage.ApplicationBar>
- Add the code to navigate to the new settings page:
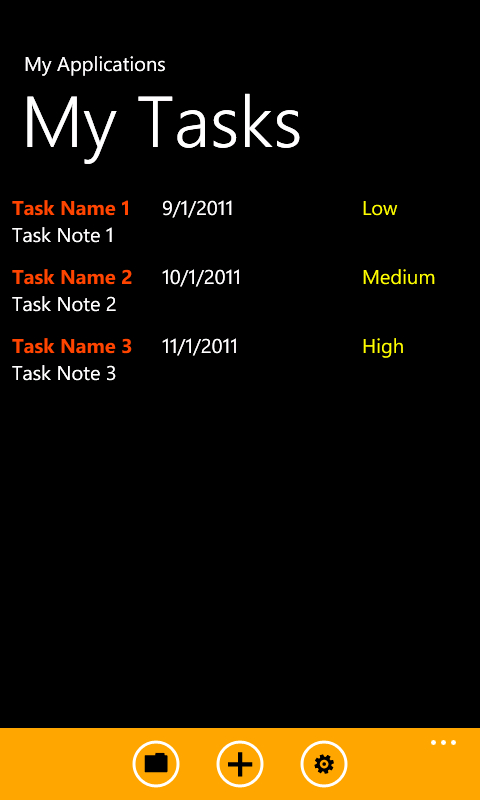
private void ButtonSettings_Click(object sender, EventArgs e) { NavigationService.Navigate(new Uri("/Settings.xaml", UriKind.Relative)); } - Press F5 and you should see the following page with the settings icon in the navigation bar:
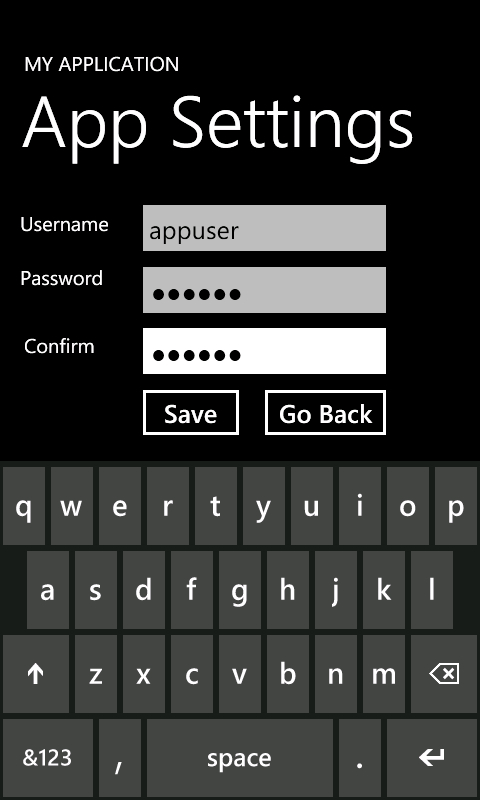
- Right-click on the project in the Solution Explorer and select Add New Item to create a new phone page. Name the page
Settings.xaml. In this page, add three textbox controls for collecting username, password, and confirmation password as shown in the following XAML.<!--LayoutRoot is the root grid where all page content is placed--> <Grid x:Name="LayoutRoot" Background="Transparent"> <Grid.RowDefinitions> <RowDefinition Height="Auto"/> <RowDefinition Height="*"/> </Grid.RowDefinitions> <!--TitlePanel contains the name of the application and page title--> <StackPanel x:Name="TitlePanel" Grid.Row="0" Margin="12,17,0,28"> <TextBlock x:Name="ApplicationTitle" Text= "MY APPLICATION" Style="{StaticResource PhoneTextNormalStyle}"/> <TextBlock x:Name="PageTitle" Text="App Settings" Margin="9,-7,0,0" Style="{StaticResource PhoneTextTitle1Style}"/> </StackPanel> <!--ContentPanel - place additional content here--> <Grid x:Name="ContentPanel" Grid.Row="1" Margin="12,0,12,0"> <TextBlock x:Name="tbUserName" HorizontalAlignment="Left" Height="30" Margin="8,16,0,0" TextWrapping="Wrap" Text="Username" VerticalAlignment="Top" Width="115" RenderTransformOrigin="0.498,0.55"/> <TextBlock x:Name="tbPassword" HorizontalAlignment="Left" Height="30" Margin="8,70,0,0" TextWrapping="Wrap" Text="Password" VerticalAlignment="Top" Width="115"/> <TextBox x:Name="txtUserName" Height="70" Margin= "119,0,70,0" VerticalAlignment="Top"/> <PasswordBox x:Name="txtPassword" Height="70" Margin="119,62,70,0" VerticalAlignment="Top"/> <TextBlock Height="30" HorizontalAlignment="Left" Margin="12,138,0,0" Name="tbConfirm" Text="Confirm" TextWrapping="Wrap" VerticalAlignment="Top" Width="115" /> <PasswordBox Height="70" Margin="119,123,70,0" Name="txtPasswordConfirm" VerticalAlignment="Top" /> <Button x:Name="btnSave" Content="Save" Height="69" Margin="119,0,217,353" VerticalAlignment="Bottom" RenderTransformOrigin="0.969,0.514" Click="btnAdd_Click" /> <Button x:Name="btnCancel" Content="Go Back" HorizontalAlignment="Right" Height="69" Margin="0,0,70,353" VerticalAlignment="Bottom" Width="145" Click="btnCancel_Click" /> </Grid> </Grid> - Now let's add reference with the
usingstatement forSystem.IO.IsolatedStoragein theSettings.xaml.csfile:using System.IO.IsolatedStorage;
- Create an instance of
IsolatedStorageSettingsand name itmySettings:public partial class Settings : PhoneApplicationPage { IsolatedStorageSettings mySettings; public Settings() … - Add the following code in the constructor:
public Settings() { InitializeComponent(); //Initialize the settings mySettings = IsolatedStorageSettings.ApplicationSettings; // Display settings stored in the local storage for setUserName if (mySettings.Contains("setUserName")) txtUserName.Text = mySettings["setUserName"].ToString(); // Display settings stored in the local storage for setPassword if (mySettings.Contains("setPassword")) txtPassword.Password = mySettings["setPassword"].ToString(); } - Add the event click method. Here we will validate if the Password text matches the Confirm text. Then we will either save or add the settings fields, as follows:
private void btnAdd_Click(object sender, RoutedEventArgs e) { if (txtUserName.Text != "" && txtPassword.Password != "") { if (txtPassword.Password == txtPasswordConfirm.Password) { if (mySettings.Contains("setUserName")) { mySettings["setUserName"] = txtUserName.Text; } else mySettings.Add("setUserName", txtUserName.Text); if (mySettings.Contains("setPassword")) { mySettings["setPassword"] = txtPassword.Password; } else mySettings.Add("setPassword", txtPassword.Password); mySettings.Save(); MessageBox.Show("Settings Saved Successfully"); } else MessageBox.Show("Passwords are not matching"); } } - Add the cancel button event method. In this method we just navigate back to the main page:
private void btnCancel_Click(object sender, RoutedEventArgs e) { NavigationService.GoBack(); } - Press F5 and type in a username and password. Click on Save. Now all the information is saved. Just navigate away from the Settings page and then come back to the Settings page. You should see the saved username and password.
Saving username and password follows a concept similar to the recipe Saving User Settings in this chapter.
Here we use the IsolatedStorageSettings.ApplicationSettings class to store and retrieve. We create the instance of the ApplicationSettings in the beginning of the class and then we use this instance for both writing and reading.
Settings are saved as key-value pairs in a dictionary. We check if the setting's name exists, if it does, then we set the value to the key, otherwise we add the key and value pair to create a new one.
When the save button event is triggered, we check if the password and the confirm password match, otherwise an error is displayed and we are asked to enter the password again. If the passwords match, then we set the values to ApplicationSettings either using the Add method or assigning the value to the key. Essentially, we save both username and password information locally for later retrieval.
In this recipe you learned how to save multiple data fields in the local settings. You can use the locally stored settings to remove the requirement from users to enter the same information again and again. For example, you can use the username and password information to login automatically to an online service to download information at a regular interval. Also, you can save an object to application settings and then databind to XAML controls using datacontext.