
In this recipe, we will cover the basic principles of MVVM by creating a simple Phone 7 application with ViewModel and sample data.
Let's create a new Phone 7 Project with a project name Recipe1_SimpleMVVM and a solution name Ch8_Recipes.
Here we will create a simple user interface with a list box to display text in two TextBlock controls. Then, we will add the ViewModel class, which returns data from the sample data.
- Open
MainPage.xamland change theApplicationTitleandPageTitle:<StackPanel x:Name="TitlePanel" Grid.Row="0" Margin="12,17,0,28"> <TextBlock x:Name="ApplicationTitle" Text="Data Recipes" Style="{StaticResource PhoneTextNormalStyle}"/> <TextBlock x:Name="PageTitle" Text="Simple MVVM" Margin="9,- 7,0,0" Style="{StaticResource PhoneTextTitle1Style}"/> </StackPanel> - Add two
TextBlockcontrols as shown in the following code snippet. We will be using one forTaskNameand the other forTaskNotes:<Grid x:Name="ContentPanel" Grid.Row="1" Margin="12,0,12,0"> <ListBox x:Name="MainListBox" Margin="0,0,-12,0" ItemsSource="{Binding Items}"> <ListBox.ItemTemplate> <DataTemplate> <StackPanel Margin="0,0,0,17" Width="432"> <TextBlock Text="{Binding TaskName}" TextWrapping="Wrap" Style="{StaticResource PhoneTextExtraLargeStyle}"/> <TextBlock Text="{Binding TaskNotes}" TextWrapping="Wrap" Margin="12,-6,12,0" Style="{StaticResource PhoneTextSubtleStyle}"/> </StackPanel> </DataTemplate> </ListBox.ItemTemplate> </ListBox> </Grid> - Press F5 and run it to make sure there are no errors.
- Now right-click on the Project folder and add a new folder with the name
ViewModel. - Right-click on the folder
ViewModeland add a new class calledViewModelBase, which is inherited fromINotifyPropertyChanged. Here we will add declarations for events such asPropertyChangedEventHandlerand a method namedNotifyPropertyChanged.public class ViewModelBase : INotifyPropertyChanged { public event PropertyChangedEventHandler PropertyChanged; public void NotifyPropertyChanged(String propertyName) { if (null != PropertyChanged) { PropertyChanged(this, new PropertyChangedEventArgs(propertyName)); } } } - Add a new class and name it
MyTaskItemViewModel.csand then add the following code, which has the classMyTaskItemViewModelderived fromViewModelBaseand has propertiesTaskNameandTaskNotes:namespace Recipe1_SimpleMVVM.ViewModel { public class MyTaskItemViewModel : ViewModelBase { private string _taskName; public string TaskName { get { return _taskName; } set { _taskName = value; NotifyPropertyChanged("TaskName"); } } private string _taskNotes; public string TaskNotes { get { return _taskNotes; } set { _taskNotes = value; NotifyPropertyChanged("TaskNotes"); } } } } - Right-click on
ViewModelagain and add a new class with the nameMyTaskViewModel.cs. Open the file and add the following references at the start:using System.ComponentModel; using System.Collections.ObjectModel;
- Now add the code for class
MyTaskViewModelinheriting fromViewModelBase. Here we have theObservableCollectionproperty forItemsand a Boolean property forIsDataLoaded. Then, we have the methodLoadData, which will add the sample to theItemscollection:namespace Recipe1_SimpleMVVM.ViewModel { public class MyTaskViewModel : ViewModelBase { public MyTaskViewModel() { // Insert code required on object creation below this point. this.Items = new ObservableCollection <MyTaskItemViewModel>(); } /// <summary> /// A collection for ItemViewModel objects. /// </summary> public ObservableCollection<MyTaskItemViewModel> Items { get; private set; } public bool IsDataLoaded { get; private set; } /// <summary> /// Creates and adds a few MyTaskItemViewModel objects into the Items collection. /// </summary> public void LoadData() { // Sample data; replace with real data this.Items.Add(new MyTaskItemViewModel() { TaskName = "Task 1", TaskNotes = "Task Notes 1" }); this.Items.Add(new MyTaskItemViewModel() { TaskName = "Task 2", TaskNotes = "Task Notes 2" }); this.Items.Add(new MyTaskItemViewModel() { TaskName = "Task 3", TaskNotes = "Task Notes 3" }); this.IsDataLoaded = true; } } } - Now open the
App.xaml.csfile and add theViewModelglobal property as shown in the following code snippet:public partial class App : Application { private static ViewModel.MyTaskViewModel viewModel = null; /// <summary> /// A static ViewModel used by the views to bind against. /// </summary> /// <returns>The MyTaskViewModel object.</returns> public static ViewModel.MyTaskViewModel ViewModel { get { // Delay creation of the view model until necessary if (viewModel == null) viewModel = new ViewModel.MyTaskViewModel(); return viewModel; } } - Now let's add the code in the
MainPage.xaml.csfile to load the data intoDataContextand its items:public partial class MainPage : PhoneApplicationPage { // Constructor public MainPage() { InitializeComponent(); DataContext = App.ViewModel; this.Loaded += new RoutedEventHandler(MainPage_Loaded); } // Load data for the ViewModel Items private void MainPage_Loaded(object sender,RoutedEventArgs e) { if (!App.ViewModel.IsDataLoaded) { App.ViewModel.LoadData(); } } } - Press F5 and run to see the results as shown in the following screenshot:
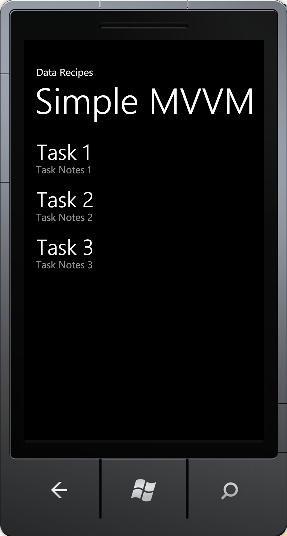
In this recipe, we added two classes MyTaskItemViewModel.cs and MyTaskViewModel.cs. The class MyTaskItemViewModel defines the list of task line items that we are going to store. Here we are just defining two properties for simplicity, TaskName and TaskNotes. We created a ViewModelBase class which is inherited from INotifyPropertyChanged to make this class bindable to the UI. We added the NotfiyPropertyChanged method and called it when setting each property.
In the MyTaskViewModel class, we initialized the MyTaskItemViewModel as ObservableCollection. We added a method LoadData() to load the sample data into the Items collection. In the app.xaml.cs file, we defined the static global property for creating the MyTaskViewModel class.
Finally, we initialized the App.ViewModel object to the DataContext object so that when the page is loaded, an event is fired to load the test data.
In this recipe, we just learned a simple MVVM recipe without much complexity. To make it easy to implement there are many MVVM toolkits and templates available. In the next recipe, we will explore how we can make it easy by using a project template that comes with Visual Studio.
In the last recipe, we understood the different steps involved in creating a simple MVVM recipe. We can create the project with all the different layers using the Windows Phone Databound Application project template.
- Open a new project and pick the project template named Windows Phone Databound Application and name it
Recipe2_DataboundApp.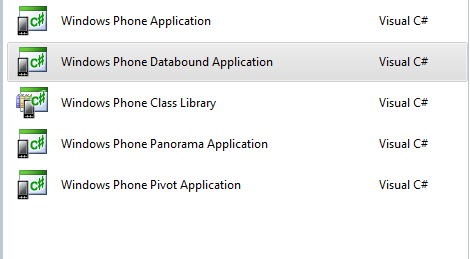
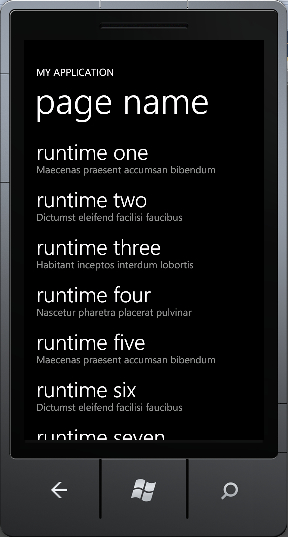
- You should see the following file structure created by the project template by default. This is exactly similar to what we learned in the preceding recipe.

- Press F5 and run it. You should see the following results without adding any line of code.
Check the next recipe in this chapter to further understand how MVVM can be easily adapted to your applications to make it easy to test and maintain. At the time of writing this book, Visual Studio Express 2010 for Windows Phone development doesn't support any toolkit for creating MVVM, so we are going to explore the toolkit called MVVM Light Toolkit, which will help us create all the plumbing required for typical MVVM-patterned applications.