
In the preceding recipe, we learned how to use the MVVM Light toolkit to make it easy for us to separate the Views from Models using ViewModel classes. In this recipe, we will learn how we can update the view without changing anything in the model side. This recipe demonstrates the MVVM's goal of maintainability by changing the MyTask View page.
For this demo, let's use the Phone 7 Toolkit published by Microsoft, which has some nice UI capabilities like AutoCompleteBox, ContextMenu, DateTimePickers, ListPicker, LongListSelector, ProgressBar, and so on. Download the latest version from the following link and install it:
http://silverlight.codeplex.com/releases
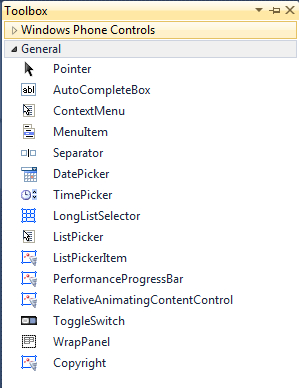
Upon completing the installation, open Visual Studio and select the Toolbox's General Tab. Right-click on and select the Choose Items menu. From the Windows Phone Components, select all the items from the Microsoft.Phone.Controls.Toolkit assembly and click on OK.
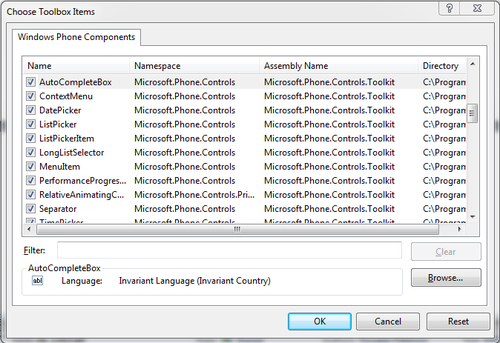
Once you are done, you should see the following controls added to the toolbox:
Let's copy the preceding recipe to another folder, or we can use the same project for this recipe. Let's name the new project Recipe3_MvvmLightMyTasksUIUpdate. We will just update the user interface without touching the ViewModel or Model code.
- Open the
MyTaskView.xamlfile from theViewfolder. Let's add the Phone Resource at the top with aDataTemplateeach forHeader, Footer, andItemTemplate.<phone:PhoneApplicationPage.Resources> <DataTemplate x:Key="TaskListHeader"> <Border Background="Blue"> <TextBlock Text="Task Header" /> </Border> </DataTemplate> <DataTemplate x:Key="TaskListFooter"> <Border Background="Blue"> <TextBlock Text="Task Footer" /> </Border> </DataTemplate> <DataTemplate x:Key="TaskItemTemplate"> <StackPanel Grid.Column="1" VerticalAlignment="Top"> <TextBlock Text="{Binding Name}" FontWeight="Bold" Foreground="OrangeRed"/> <TextBlock Text="{Binding DateDue}" /> <TextBlock Text="{Binding Priority}" Foreground="Yellow"/> <TextBlock Text="{Binding Notes}" /> <TextBlock Text="--------------------------------------- ------------------"/> </StackPanel> </DataTemplate> </phone:PhoneApplicationPage.Resources> - Delete the old code for the list box and drag the
LongListSelectorfrom the toolbox and place it inside theContentPanel2grid:<Grid x:Name="ContentPanel2" Margin="21,17,3,12" Grid.Row="1"> <toolkit:LongListSelector x:Name="TaskList" Background="Transparent" IsFlatList="True" ItemsSource="{Binding MyTasks}" ItemTemplate=" {StaticResource TaskItemTemplate}" ListHeaderTemplate="{StaticResource TaskListHeader}" ListFooterTemplate="{StaticResource TaskListFooter}" /> </Grid> - Press F5 and you should see the new view when you navigate to the MyTask View page.
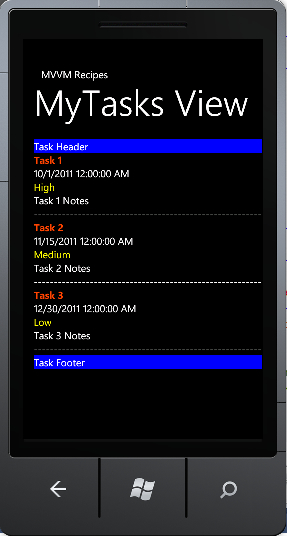
In this recipe, we used the more powerful LongListSelector control for displaying the MyTask list view page. We used the header and footer templates of the control to display the blue header and footer. We also set the IsFlatList property to True so it is just a flat list without any fancy features that the control is capable of offering.
Once we are done with the View, we just compile it without touching the ViewModel or Model code. This demonstrates how easy it is to maintain the frontend for any changes and save a lot of development time.
You noticed how easy it was to update the View without touching the ViewModel or Model code. Similarly, we can add multiple Views that will use the same ViewModel. We can also update Model and ViewModel code without affecting the Views. In the next recipe, let's examine how multiple Views with the same ViewModel and Model work.
Here let's use the preceding recipe and add another View with just a few color changes to the user interface.
- Open the
MainPage.xamlfile and copy theTextBlockcontrol and move it below the first one. Add the new eventMouseLeftButtonDown_1.<!--ContentPanel - place additional content here--> <Grid x:Name="ContentGrid" Grid.Row="1"> <TextBlock Text="{Binding NavName}" Style="{StaticResource PhoneTextNormalStyle}" HorizontalAlignment="Center" VerticalAlignment="Center" FontSize="40" MouseLeftButtonDown="TextBlock_MouseLeftButtonDown" Margin="78,187,86,376" /> <TextBlock Text="{Binding NavName2}" Style="{StaticResource PhoneTextNormalStyle}" HorizontalAlignment="Center" VerticalAlignment="Center" FontSize="40" MouseLeftButtonDown="TextBlock_MouseLeftButtonDown_1" Margin="79,291,54,272" /> </Grid> - Open the
MainPage.xaml.csfile and add the navigation code as shown in the following code snippet:private void TextBlock_MouseLeftButtonDown_1(object sender, System.Windows.Input.MouseButtonEventArgs e) { NavigationService.Navigate(new Uri("/View/MyTaskView2.xaml", UriKind.Relative)); } - Open the
MainViewModel.csfile and add the propertyNavName2.public string NavName2 { get { return "View MyTasks List 2"; } } - Now copy the
MyTaskView.xamlfile and rename it toMyTaskView2.xaml. Open theMyTaskView2.xamlfile and make a few color changes to the View. Here is the partial listing of theXAMLwith changes highlighted:<phone:PhoneApplicationPage.Resources> <DataTemplate x:Key="TaskListHeader"> <Border Background="Green"> <TextBlock Text="Task Header" /> </Border> </DataTemplate> <DataTemplate x:Key="TaskListFooter"> <Border Background="Green"> <TextBlock Text="Task Footer" /> </Border> </DataTemplate> <DataTemplate x:Key="TaskItemTemplate"> <StackPanel Grid.Column="1" VerticalAlignment="Top" Background="#FFF50F0F"> <TextBlock Text="{Binding Name}" FontWeight="Bold" /> <TextBlock Text="{Binding DateDue}" /> <TextBlock Text="{Binding Priority}" Foreground="Blue"/> <TextBlock Text="{Binding Notes}" /> <TextBlock Text="-------------------------------------------- -------------"/> </StackPanel> </DataTemplate> </phone:PhoneApplicationPage.Resources> … … - Press F5. You should see two links on the main page. Click on the text View MyTasks List 2 to navigate to a second View with a different color background. This demonstrates how you can use multiple Views with the same Model data.
For more information on understanding the Phone Toolkit, download the samples and check the different controls provided in the Codeplex site:
http://silverlight.codeplex.com/releases
Another MVVM sample from MSDN is found at:
http://msdn.microsoft.com/en-us/library/gg521153(v=VS.92).aspx
Check this online resource, which has a complete hands-on lab for creating a sample to-do application using MVVM and SQL CE at:
http://msdn.microsoft.com/en-gb/WP7MangoTrainingCourse_TodoLocalDatabase
Also, have a look at this WP7 Dev Guide with many useful links: