
Chapter 7. Bringing better OO practices to the project
- Reviewing components of OO languages
- Using OO principles in brownfield apps
- Other useful practices for maintaining code
Most programmers can recite the four foundational components of an object-oriented (OO) language by rote. But when was the last time you stopped to think about them explicitly while you were coding? Are you using objects to their full advantage? Or do you create a few domain objects and encase them in procedural logic? Be honest—there are no wrong answers.
A good many brownfield projects fail to take advantage of basic OO principles. Often, the principles are ignored completely. This isn’t necessarily a bad thing, but...well, that’s not true. The quickest path to a brownfield application is to ignore OO principles and write large volumes of procedural code wrapped in a couple of classes.
ASP.NET applications are often excellent examples of poor OO design due to the nature of the ASP.NET pipeline. It’s common to have large methods performing complex business logic, or even data access, directly in the code-behind for an ASP.NET page. This code usually sits alongside the same code that determines how to render UI elements on the page. As we’ll see in chapter 10, not only does this practice break the single responsibility principle (discussed later in this chapter), but also it’s fragile and nearly impossible to test in an automated way.
Let’s look at some code to illustrate. Listing 7.1 shows a sample click event from an ASP.NET code-behind class.
Listing 7.1. Sample ASP.NET click event

At first glance, listing 7.1 may seem benign. It’s short, easy to understand, and the complicated work is delegated to other functions. But as we’ll see from the principles in this chapter, it violates more than one OO principle, including abstraction, the single responsibility principle, and encapsulation.
Furthermore, this code is almost impossible to test in an automated fashion. The search results are retrieved using a static
call to a data access class ![]() . Plus, we’re parsing out a search string
. Plus, we’re parsing out a search string ![]() , which is almost certainly something that should be tested in isolation. The code itself exists in a web form’s code-behind,
which means we’ll likely need some ASP.NET infrastructure in place just to run it, let alone test it.
, which is almost certainly something that should be tested in isolation. The code itself exists in a web form’s code-behind,
which means we’ll likely need some ASP.NET infrastructure in place just to run it, let alone test it.
So chapter 7 may seem like review at first, but it’s actually foundational. Everything we talk about between now and the final chapter will be steeped in the concepts we discuss here.
We start with the very first thing you learned about object-oriented design.
7.1. OO fundamentals
Don’t worry, we haven’t suddenly handed off ghostwriting this book to a Comp-Sci professor. We’re well aware that you know the stock interview answer to “What are the fundamentals of OO?”
But we’re going to mention them anyway as the first step in our journey into fundamentals. Like many good principles, they’re worth reviewing from time to time to make sure you keep them in the back of your mind. After all, it’s easy to fall into the trap of writing procedural code and calling it an object just because it’s wrapped in a class.
Object-oriented versus procedural code
The difference between object-oriented code and procedural code is often overlooked. Just because your methods are wrapped in a class doesn’t mean you’re being object oriented. You can still write procedural code in an object-oriented language. We’ve already done it in the lone code sample you’ve seen so far in this chapter, listing 7.1.
Objects aren’t limited to physical concepts like animals and vehicles and beverages. EnglishLanguageParser, TaskScheduler, and DataCollector could be valid objects as well. These examples are more abstract concepts that perform some function rather than represent a real-world thing with arms and legs and wheels and ingredients.
As you read through this chapter and review your code, ask yourself, “Is this procedural code in OO clothing?” at regular intervals. As you become well versed with the ideas in this chapter, you’ll find that question easier to answer, especially if you get into the habit of regularly testing your code.
Without further ado, the foundational principles of object-oriented programming are
- Encapsulation
- Inheritance
- Abstraction
- Polymorphism
Although they’re only four of many object-oriented concepts, these are considered to be the foundation of an object-oriented language. As foundational concepts, these four tenets will be built upon in all the programming techniques that are discussed in part 2 of this book. So before getting into the other concepts, let’s have a quick refresher on these four principles.
7.1.1. Encapsulation
Encapsulation is the process by which you shield the implementation details of an object’s functions from outside callers. For example, when you call a method, Find-DocumentsNamed(name), you don’t care how the class finds the documents. All that matters is that it does what it claims to do.
We feel encapsulation is the most overlooked of the four principles. Evidence of poor encapsulation litters code. In the most egregious cases you’ll find things like forms or web pages having intimate knowledge of data access details such as connection strings or SQL queries.
Instead of being privy to those details, the screens should know only that they’re calling some method on a class to return data to them. How that code performs the data retrieval should be hidden from the screen itself.
Many of the principles we discuss later, such as single responsibility, are based heavily on the idea of encapsulation.
7.1.2. Inheritance
Inheritance is the mechanism by which we create classes that are more specialized versions of other classes. These subclasses inherit properties and methods from their parents and often implement additional behavior or override existing behavior.
You know this definition already. You know that Mammal inherits from Animal and that Dog and Cat both inherit from Mammal. And you’ve no doubt seen countless examples of how each mammal implements the Speak() method through the magic of Console.WriteLine().
Inheritance is probably the most easily understood of the OO principles. You’ve likely written, or at least encountered, an EntityBase class in some form that implemented an ID property. All other identifiable entities inherited from this class and, with it, the ID property.
It’s nearly impossible to work in .NET without inheritance. ASP.NET pages automatically inherit from System.Web.UI.Page and user controls from System.Web.UI.User-Control (which, in turn, inherit from System.Web.UI.Control). And although it’s possible to create a custom exception that doesn’t inherit from System.Exception, that’s the...ummm...exception rather than the rule.
Inheritance is often overused. In chapter 5, we talked about the depth of inheritance metric as one to be aware of. In many brownfield applications, it’s not uncommon to see a large inheritance tree where each class in the tree adds a bit more functionality until the top level has such a large number of functions (new and inherited) that the original intent of the base class is lost.
Using inheritance to create a “pure” object structure tends to be an academic exercise that hurts an application more than it helps. In the case of the ubiquitous Animal > Mammal > Cat, Dog example, if the application has no need for an Animal abstraction, then don’t create it. Later in the book you’ll see places where it may appear that we’re inheriting when we should be maintaining the simplicity of the inheritance tree. We talk more on the importance of keeping things simple in the last section, and we come back to inheritance when we discuss useful OO principles in section 7.4.
7.1.3. Abstraction
Abstraction can be a tricky concept to pin down because the term abstract is used in different contexts (for example, abstract classes in C#). From the perspective of object-oriented programming, it’s the method in which we simplify a complex thing, like an object, a set of objects, or a set of services.
An API is an abstraction in some form. Take any namespace from the .NET Base Class Library and that will be an abstraction. The System.IO namespace, for example, is an abstraction of your system’s I/O functions. It’s further subdivided into other abstractions like System.IO.Compression and System.IO.Ports, which are more specialized cases of I/O. This subdivision is also called a lower level of abstraction.
Abstraction is an important concept in OO design. Many of the principles we discuss in section 7.3 are rooted in it, such as the single responsibility principle and the dependency inversion principle.
7.1.4. Polymorphism
Related to inheritance is polymorphism. We know we can inherit subclasses from base classes. Polymorphism allows us to use subclasses as if they were base classes. This means we can call methods on a subclass without having to know exactly what type it is.
The canonical example of polymorphism is the Speak method on an Animal class, as shown in listing 7.2.
Listing 7.2. Polymorphism example

In this example, we have a method, MakeAnAnimalSpeak ![]() . We don’t care what type of animal it is; we just know that it can speak. In the MainLine method
. We don’t care what type of animal it is; we just know that it can speak. In the MainLine method ![]() , we call MakeAnAnimalSpeak with a couple of different subclasses of Animal.
, we call MakeAnAnimalSpeak with a couple of different subclasses of Animal.
Polymorphism is used prolifically throughout the .NET Framework. One example is the ToString method, which behaves differently depending on the type of object you’re calling it on. ToString is defined on System.Object, from which all classes derive. So we know we can always call it on any object, but how it behaves depends on its implementation within a particular object.
We hope that’s all we need to say on OO fundamentals. We’ll continue with the assumption that you agree that OO programming is good. And while we’re talking about desirable characteristics of our code, let’s turn our attention to some overarching “-abilities” we’d like it to have.
7.2. Code “-abilities”
Although the basic tenets form the bedrock for our development, there are some more general “-abilities” or “attitudes” you should strive for in your code. You should always keep these underlying goals (see figure 7.1) in the back of your mind as you work. They’re important to brownfield applications because it’s the lack of them that has led to your reading this book.
Figure 7.1. Five “-abilities” that help lead to a maintainable application
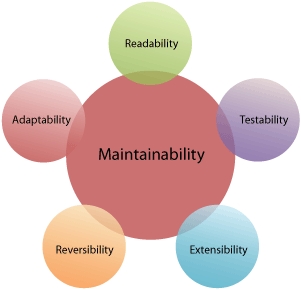
7.2.1. Maintainability
We start with the granddaddy of all abilities: your code absolutely must be maintainable. If it’s not—well, forgive us for not feeling too badly about it because it will lead to more people purchasing this book.
At all times, you should ask yourself the question, “Will the next person who looks at this code be able to easily figure out what it’s doing?” And bear in mind, the next person could be you, a year from now.
Coding for the next guy: An extreme position
Taking the idea of maintainability to the extreme, Damian Conway puts it this way in his book Perl Best Practices: Standards and Styles for Developing Maintainable Code (O’Reilly, 2005): “Always code as if the guy who ends up maintaining your code is a violent psychopath who knows where you live.”
The reason maintainability is so important is because your code spends the vast majority of its life being maintained. In some respects, it enters maintenance mode as soon as it’s written. It makes sense that we’d want to make it as easy as possible to work with during the maintenance phase.
How you make your code maintainable is essentially the topic of the remainder of this book. From the OO design principles, to layering, to inversion of control containers, the primary reason we discuss these topics is so that our code is easy to work with.
In fact, the rest of the “-abilities” essentially follow from the idea of making your code more maintainable, starting with readability.
7.2.2. Readability
Readability is sort of a catchall category for a few related ideas. The overall intent is that you should make your code easy to read. Readability encompasses both low-level things, like appropriate variable and method names, as well as higher-level concepts, like ensuring that developers can easily understand your code at a meta level. That is, they should be able to look at a class and quickly determine its function as well as its boundaries. It’s just as important to understand what a class doesn’t do as what it does do.
Note
If you stop to think about your day-to-day activities when writing code, you’ll discover you don’t spend that much time writing it. Most of the time, you’re reading, and more importantly, trying to understand it, especially in brownfield applications. So it’s reasonable to put effort into ensuring it’s readable.
For a brownfield application, there are a couple of easy things you can do to help out. First, gone are the days when variables needed to be named x and y to save space. If your variable represents a collection of customer objects, called it customerList or listOfCustomers or customers—not custList or list or myList or li. The compiler doesn’t care what your variables are named. But the person reading it does. You can achieve a quick win for little effort by renaming unclear variables.
The same idea applies to method and property names. To a new developer, a method called DoCalc() isn’t nearly as meaningful as CalculateMinimumTemperature( ).
If you’re concerned about carpal tunnel syndrome when typing out long method names, keep in mind that the available IDEs and productivity tools make it easier than ever to access and navigate your code without having to type the names out in full.
Another way to make your code more readable is to consider using a fluent interface. First coined by Eric Evans and Martin Fowler, the term fluent interface refers to a way of having methods build on each other in order to make the code read better.
Fluent interfaces fit into a fairly small niche. They don’t necessarily lend themselves to widespread use but can be useful in specialized areas. We’ve already talked about them in the context of mocking in chapter 4. Listing 7.3 shows another example.
Listing 7.3. Sample fluent interface
imageTransformer
    .From( selectedImage )
    .Using( pixelsPerInch )
    .With( bilinearResampling )
    .ResizeTo( width, height );
In listing 7.3, it’s clear what the code does, even if you have only a vague idea of the domain. This clarity results from the fluent interface as well as from the variable and method names.
Good fluent interfaces can be tricky to build—which is another reason their focus is narrow. As you may have noticed, the “transition” methods in listing 7.3 (such as From, Using, and With) don’t make much sense on their own. They’re designed specifically to be used in a fluent interface. This narrow focus makes the overall API rather chatty, which can confuse matters if the object is used for other, nonfluent purposes.
Nevertheless, fluent interfaces have their place and, when applied appropriately, can add much readability to your code.
Our next “-ability” deals with how testable your code is.
7.2.3. Testability
Designing for testability comes from microelectronics. You design your code specifically so that it can be tested in isolation, free from any other distracting variables. It’s a simple enough goal and one that forms the foundation of science. If a theory can’t be tested, it’s not a valid theory. We should try to maintain the same rigor in our coding.
Chances are, your brownfield application contains many classes that weren’t designed for testability. You may have discovered some of them already if you attempted to write automated tests for them after chapter 4. For example, if you need to set up a connection to a live database, ensure an app.config is in place, and start a web service in order to test a certain method, it was clearly not designed for testability.
A testable class is one that you can test with a minimum of infrastructure. We’ll discuss a number of design principles that can help achieve testability. We’ve already danced around one when we discussed mocking objects in chapter 4: we ensure our class depends only on interfaces that can be stubbed or mocked during testing so that we can focus solely on the behavior being tested.
7.2.4. Extensibility
Whenever possible, you should allow developers to extend your code easily. You don’t know how your code will be used in the future and there’s no need to account for every possible scenario. But you should make it easy for others to add behavior to your code if they need to.
Extensibility isn’t as easy as it looks. Simply converting all your private methods to public isn’t the road to a more maintainable application. Later in this chapter, we discuss the open/closed principle (OCP), which deals with extensibility in detail and describes methods for achieving it in your code.
7.2.5. Reversibility
Reversibility means that you design your code so that any design decisions you make can be reversed easily. The concept may seem counterintuitive at first. Why would you write it if you planned to reverse it later?
But the flexibility to reverse your design decisions is critical to maintainability. How many times have you agonized over a piece of code to get it just right because you knew it would be impossible to change later? (This feeling is often called Framework Builder Anxiety.)
Instead, consider designing with an eye for reversibility. As Martin Fowler in his paper “Is Design Dead” put it: “If you can easily change your decisions, this means it’s less important to get them right—which makes your life much simpler.”[1]
This axiom is true in life—in general. For example, what if, after purchasing a house, you had the option of selling it back to the original owner for its current market value with no questions asked, even years after you purchased it? The house-buying process would be a lot less stressful because it wouldn’t matter if you didn’t like it or your personal circumstances changed.
The same goes with code design. If you make reversible decisions, there’s no need to ponder the far-reaching ramifications. Any discussions can be countered with “We can change it later if we have to.”
Reversibility has some bearing on brownfield applications because, in many cases, you’ll be at the business end of a previous irreversible decision. You’ll often encounter a bad design choice that can’t easily be changed. If you decide to tackle the task of reversing the irreversible, make sure you learn from the original design and don’t replace it with a similarly irreversible one.
Let’s look at an example of an irreversible design decision in listing 7.4.
Listing 7.4. GetData method

There are some interesting decisions made in this design. First, it’s a public method that assumes the caller knows which
stored procedure to retrieve and that does specific tasks depending on the name of that stored procedure ![]() . What if we later decide to retrieve this data directly from the database using SQL or an object-relational mapper? What
if the structure of the data returned by the twi_get_artists_and_tours stored procedure changes? All of these factors impact not only this code but also the code that calls it. Not a happy place
to be when you’re in the data layer.
. What if we later decide to retrieve this data directly from the database using SQL or an object-relational mapper? What
if the structure of the data returned by the twi_get_artists_and_tours stored procedure changes? All of these factors impact not only this code but also the code that calls it. Not a happy place
to be when you’re in the data layer.
7.2.6. Adaptability
Related to the idea of reversibility is adaptability. It’s guaranteed that your code will change over time. Requirements change, bugs are fixed, new features are added. Even migrating from one .NET Framework to another brings about new ways of doing things. When writing your code, you should keep this aspect of its maintenance in mind and make sure that you can change things without massive rework.
Encapsulation is an easy way to accomplish adaptability. Another is through the use of design patterns like the Adapter and the Façade.
Design patterns
Throughout the book, we mention design patterns, like Adapter and Façade above. Patterns are a sort of developer shorthand for ways to solve a particular problem. For example, when we say “We can use a Strategy pattern,” what we mean is “We can encapsulate the underlying algorithm so that the client can swap in different implementations at runtime” (see listing 7.9 later in this chapter for an example).
Patterns can help you focus your thinking when it comes to attacking a problem. You could be talking about how to solve a problem with someone else and they’ll say, “Would X pattern be useful here?” Whether or not it’s useful, it’s sometimes a good way to change your thinking about a problem if it’s giving you trouble.
Design patterns can be powerful when discussing them with other developers but only if your audience is familiar with them. And even then, it doesn’t hurt to be clear. Sometimes developers may have different ideas on how to implement certain patterns.
Similarly, be careful you don’t go pattern crazy, which can occur if you start seeing places to put patterns where a simpler solution may be more viable. Always go back to the maintainability of the application. Often the simplest solution is the best one.
Because we don’t want to focus too much on the use of patterns, we don’t devote any more than a sidebar to the overall concept. We talk about patterns from time to time and briefly explain any that we bring up, but they’re typically in support of another concept.
There are several excellent books on patterns. We suggest starting with Head First Design Patterns (O’Reilly, 2004) and then moving on to both Patterns of Enterprise Application Architecture (Addison-Wesley, 2002) and Design Patterns (Addison-Wesley, 1994).
The Adapter pattern is a method of converting one interface into another. It’s used when a client is expecting one interface but the system it’s connecting to provides a different one.
The Façade pattern is slightly different in its intent. It simplifies a set of interfaces into a single interface that’s presumably easier for the client to use.
Both patterns can be particularly useful to brownfield applications. They allow us to move our code into a more testable state without affecting other areas we haven’t addressed.
We’re not done describing useful code principles just yet. In the next section, we go a little deeper and talk about some principles that apply to object-oriented programming.
7.3. Useful OO principles
Now that we have a handle on the core concepts and underlying goals, we can expand on them with some useful principles that will help guide us as we add new features and refactor existing code.
As with the OO fundamentals, none of these principles are new. Although they aren’t generally as well known, many of them have been around for over 20 years in one form or another. For more in-depth discussions on some of them, we encourage you to read Agile Principles, Patterns, and Practices in C# (Prentice Hall PTR, 2006).
7.3.1. Favor composition over inheritance
In section 7.1, we talked a lot about the dangers of relying heavily on inheritance. It can give you a nice warm feeling to use inheritance often because somewhere, in the deep recesses of our mind, we feel like we’re making Professor Bate, who taught us Computer Science 101, proud. We’re avoiding duplication by putting our reusable code in a base class.
But in many cases, inheritance is a short-term solution to a problem. It often leads to a dense inheritance tree that can be hard to maintain—a phrase that should set off very loud, very annoying alarm bells.
The reason inheritance can become unmaintainable is that when you need to change the behavior of a method at the top of the hierarchy, rippling effects occur all the way down.
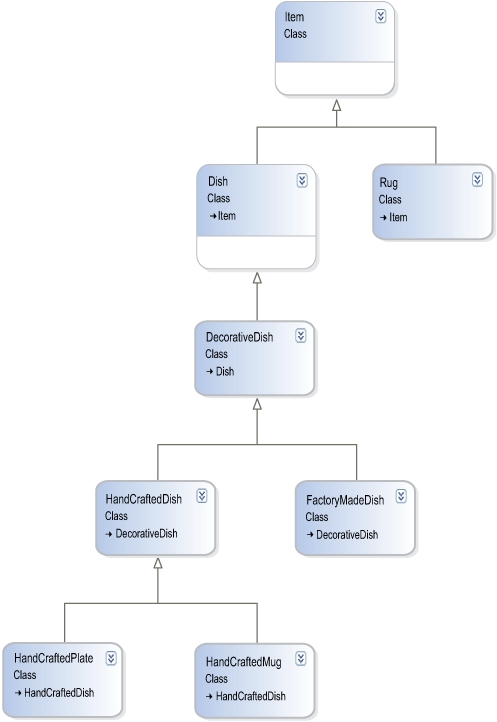
Coming up with an example showing the deficiencies of inheritance isn’t difficult. Take any object that has behavior—say a DinnerPlate class. And some of our plates are decorative, so we create a DecorativeDinnerPlate class with a bunch of new behavior associated with it, like CountryOfOrigin and SnobFactor.
Later, we add mugs to our application. So we create a Mug class. Pretty soon, we discover that some of our mugs can be decorative as well, so we create a DecorativeMug class, also with CountryOfOrigin and SnobFactor properties.
As this point, we discover that we’ve duplicated quite a bit of code between DecorativeMug and the DecorativePlate. It’s clear we’ll have to create new base classes called Dish and DecorativeDish and derive our DecorativeDinnerPlate and DecorativeMug classes from them.
But what if we then start offering decorative rugs? Or decorative glassware? And what if some of our plates, mugs, rugs, and glassware are hand-crafted and some aren’t? Soon, we end up with an inheritance hierarchy with classes like HandCraftedDecorativeMug and FactoryMadeDinnerPlate. See figure 7.2 for a taste.
Figure 7.2. Extreme inheritance isn’t always a good thing. A change in the Item class will have far-reaching ripple effects.
Instead, we should separate out aspects of the objects into classes. We create classes called DecorativeUse and RegularUse as well as an interface, IUse. We do the same for an IManufactureMethod interface. Then, our DinnerPlate and Rug classes look like listing 7.5.
Listing 7.5. Classes that use composition rather than inheritance
public class DinnerPlate
{
    IUse Use { get; set; }
    IManufactureMethod ManufactureMethod { get; set; }
}

public class Rug
{
    IUse Use { get; set; }
    IManufactureMethod { get; set; }
}

public class Tester
{
    public void CreateSomePlatesAndRugs( )
    {
        DinnerPlate regularFactoryMadePlate = new DinnerPlate( );
        regularFactoryMadePlate.Use = new RegularUse( );
        regularFactoryMadePlate.ManufactureMethod = new FactoryMade( );

        Rug handMadeRegularRug = new Rug( );
        handMadeRegularRug.Use = new RegularUse( );
        handMadeRegularRug.ManufactureMethod = new HandMade( );
    }
}
We can now add new behaviors easily as well as new objects that can make use of whatever behaviors are relevant. For example, we may want to include an IFabric interface on the Rug class but not on the DinnerPlate class.
In effect, we’ve switched from using inheritance to using composition. We have a flat structure but we extend the classes by composing behaviors for them. By composing our objects with these behaviors, we allow for much more flexibility than if we’d used inheritance.
7.3.2. Separation of concerns/single responsibility principle
If you learn nothing else from this section, remember the single responsibility principle (SRP) and the notion of separation of concerns (SoC). SoC is the process by which we break down the functionality of an application into distinct modules that don’t overlap. It’s a critical concept that we revisit often.
SoC is abstract; there’s no guidance on how to separate the concerns or even how to define the concerns. A concern is simply an area of interest in the application. And by and large, your definition of a concern may not match someone else’s.
The single responsibility principle can help. It’s a more concrete concept that states “A class should have only one reason to change.” (Agile Principles, Patterns, and Practices in C#)
The key to this definition is “reason to change.” Often the reason to change can be hard to pin down. For example, you could argue that a class called PrintFunctions needs updating only when the application’s printing behavior changes, and therefore, it doesn’t violate SRP. Conversely, you could say that the class is handling the printing of jobs and the printer configuration screen. Thus, it does violate SRP.
The scope of your application will define what a “reason to change” is. It could be that the PrintFunctions class is a façade over a third-party printing subsystem, in which case the only thing wrong with it is the misleading name. Or it could contain half a dozen disparate print-related functions, none of which depends on any others, in which case consider breaking up the class. For example, perhaps you separate it into a Printer-Configuration class, a Printer base class, and a couple of entity-specific subclasses (such as JobPrinter and CustomerPrinter).
Listing 7.6 shows a class that does too much.
Listing 7.6. Class with too many responsibilities
public class PrintFunctions
{
    public void ResetPrinter( )
    {
        // ... code to reset printer
    }

    public void SendPrintCompleteEmail( PrintJob printJob )
    {
        // ... code to send email to the person who printed
    }

    public void PrintToFile( Document documentToPrint, string filename )
    {
        // ... code to print document to file
    }

    public void PrintToPrinter(Document documentToPrint, Printer printer)
    {
        // ... code to print document on printer
    }

    public void SetPrinterConfiguration( Printer printer,
            PageSize pageSize )
    {
        // ...
    }

    public void SetPrinterConfiguration( Printer printer,
            PageSize, ColorScale colorScale )
    {
        // ...
    }

    public void SetPrinterConfiguration( Printer printer,
            ColorScale colorScale )
    {
        // ...
    }
}
The code in listing 7.6 has a lot of responsibilities. It’s resetting printers, printing to printers, printing to files, and making configuration settings.
Listing 7.7 shows the same class with the responsibilities delegated.
Listing 7.7. PrintManager with one responsibility

The code in listing 7.7 is leaner than the previous version. That’s because it doesn’t deal with extraneous functions like emailing the sender or
setting the configuration. All that has been moved to other classes like DefaultPrintConfiguration ![]() and EmailNotifier
and EmailNotifier ![]() .
.
By default this class will print to a file, but the client can override it with another destination if it wants. Ditto for
the print configuration. This class is concerned only with the print action (and even then, that’s delegated off to an IDocumentPrinter object ![]() ).
).
It should be obvious why this class is easier to maintain than the previous version: it doesn’t do very much. Its sole responsibility is to print documents. If we change how printers are configured, we don’t need to touch this class. If we add a new method to notify senders that a print job is complete, again, we don’t need to change this class. This class changes only if the printing process itself changes.
Don’t forget to decouple
Although the class in listing 7.7 has been reduced to a single responsibility, it’s still highly coupled. It contains a lot of default objects. For instance, by default it will notify senders by email if a print job is complete. This behavior can be overridden, but if someone is relying on the fact that emails are sent out and we decide to change to Short Message Service (SMS) notifications, we’ll have some broken code.
In short, this code is still rather dependent on a lot of other objects. In chapter 9, we talk about how to break those dependencies.
SRP and Brownfield Applications
In our opinion, moving your application to be more SRP oriented is the best road to making it more maintainable. With each class responsible for one, and only one, piece of functionality, the classes tend to be much smaller and more manageable. Granted, you’ll have many more classes than you may be used to, but this issue can be mitigated through careful organization of your solution structure and by taking advantage of code navigation abilities in Visual Studio, or a third-party add-in such as JetBrains’ ReSharper or DevExpress’ Code Rush.
In any case, the benefit—a less coupled, more cohesive application—far outweighs any trauma you may feel at having too many files. In addition, you’ll usually find that code that adheres to SRP is easier to maintain because the classes are easier to change. By definition, classes with a single responsibility have only one reason to change—so when that reason arises, it’s easy to determine where the change needs to be made.
Unfortunately, brownfield applications are often notoriously coupled and when you’re staring a 6,000-line method in the face, single responsibility often gets relegated to the status of “would be nice but I have real work to do.”
In addition, in chapter 4 we advised against writing new code without backing tests. Writing fully tested new code 100 percent of the time can seem like a lofty goal if you’re facing a bug in a method that spans four printed pages. It’s often difficult to implement tests on code without having to refactor first. In his book Working Effectively with Legacy Code, Michael Feathers calls this the Legacy Code Dilemma: “When we change code, we should have tests in place. To put tests in place, we often have to change code.”
This conundrum most often manifests itself when you want to break up a piece of code into separate pieces of responsibility: we’re separating dependencies into individual classes.
The reality is that unit tests may not be possible. And when that’s the case, you need to tread lightly when you need to modify the code. If you can’t write a unit test (and you should be very sure that you can’t), chances are it’s because the code has a lot of external dependencies that need to be set up. In this case, an integration test may be possible.
If an integration test is possible, your work is much easier. Now you have a safety net for when you perform the real work. You can start breaking out the dependencies into separate classes/responsibilities and know that you’re not breaking anything.
In addition, as you separate responsibilities, you can also write unit tests for them along the way. Even though you have an integration test backing you up, you still want unit tests for individual classes because they’re run more regularly. The last thing you need is to have someone break one of your new classes and not have it caught until the integration tests are run overnight.
Another important concept is the open/closed principle.
7.3.3. Open/closed principle
The open/closed principle is an important one for brownfield applications because it directly addresses how stable an application is. It states that “Software entities (classes, modules, functions, and so on) should be open for extensibility but closed for modification.”
This idea seems contradictory, but in practice, it’s easy to achieve. Let’s consider an example. Listing 7.8 shows an OrderRepository class with a FindBy method. This method will return an IEnumerable list of Order objects based on some criteria.
Listing 7.8. OrderRepository

Notice that the FindBy method ![]() takes an OrderedDateFinder class. Without knowing its implementation, we can probably deduce that it will find all orders with a specified OrderedDate.
takes an OrderedDateFinder class. Without knowing its implementation, we can probably deduce that it will find all orders with a specified OrderedDate.
The issue with this code is that it depends on a concrete implementation of OrderedDateFinder. For example, suppose the requirement for FindBy changes so that we want to find orders by FilledDate rather than OrderedDate. And assume Ordered-DateFinder is used elsewhere in our code so we can’t change its implementation.
To accomplish this new requirement, we need to create a new class, FilledDateFinder, and change the signature of FindBy to take that class instead of OrderedDateFinder. We need to modify OrderRepository to accommodate a change in the client code. This code isn’t closed for modification.
Let’s backtrack a bit and assume our class looks like listing 7.9 instead.
Listing 7.9. OrderRepository that’s closed for modification

In this version, FindBy ![]() takes an interface, IFinder
takes an interface, IFinder ![]() , rather than a concrete class. The code that calls it can pass in whatever object it likes as long as it implements that
interface. If we want to find orders by OrderedDate, we create an OrderedDateFinder and pass it to the FindBy method. Later, if we want to find orders by FilledDate, we create a FilledDateFinder and pass it instead.
, rather than a concrete class. The code that calls it can pass in whatever object it likes as long as it implements that
interface. If we want to find orders by OrderedDate, we create an OrderedDateFinder and pass it to the FindBy method. Later, if we want to find orders by FilledDate, we create a FilledDateFinder and pass it instead.
This code is now closed for modification. If we change how we wish to find the orders, there’s no need to modify this code.
By the same token, we’ve also allowed this code to be extended in an infinite number of ways. Searching for orders based on OrderedDate or by FilledDate no longer becomes an either/or operation. We can implement both Finder classes. Alternatively, we could implement a CustomerFinder that searches all orders with a particular customer, or an OrderedInTheLastMonthFinder, or an OrderedOnASundayIn2007Finder. However you wish to filter your orders, the solution is simply an IFinder away.
Keep in mind that interfaces aren’t the only way to achieve abstraction. Listing 7.10 shows a much more concise alternative that takes advantage of the .NET Framework to do much of the work for us.
Listing 7.10. Abstraction using Predicate<T>
public class OrderRepository
{
    IEnumerable<Order> FindBy( Predicate<Order> finder )
    {
        return _orders.FindAll( finder );
    }
}
In listing 7.10, we use the Predicate<T> class to achieve the desired extensibility. Listing 7.11 shows how you could call this class in .NET 2.0.
Listing 7.11. Abstraction using anonymous delegate
public IEnumerable<Order> GetOrdersByFilledDate( DateTime filledDate )
{
    IEnumerable<Order> orders = _orderRepository.FindBy(
            delegate( Order order )
            {
                return order.FilledDate == filledDate;
            }
    )
    return orders;
}
Going further, in .NET 3.5, we could call this method using lambda expressions, as in listing 7.12.
Listing 7.12. Abstraction using lambda expressions
public IEnumerable<Order> GetOrdersByFilledDate( DateTime filledDate )
{
    IEnumerable<Order> orders = _orderRepository
            .FindBy( o => o.FilledDate == filledDate );
    return orders;
}
In both listing 7.11 and listing 7.12, we achieve extensibility using a base class, Predicate<T>. As long as we provide the FindBy method a class that inherits from this class, we can retrieve orders in any number of ways. But Predicate<T> also allows us the flexibility of providing a delegate, which means we no longer even need to create a class to perform our searches. This technique can be useful if we want to create many simple, one-off search criteria and still provide the flexibility of allowing search classes for more complex cases.
Maintainable for whom?
If you’re new to predicates, delegates, and lambda expressions, you may be questioning the maintainability of listings 7.10 through 7.12. After all, if the team is just switching from a .NET 1.1 environment, they may view these listings as hieroglyphics.
New language features always bring about a certain amount of trepidation, especially to managers under tight deadlines and who aren’t confident in the team. There’s a certain comfort to following the tried-and-true way that has worked in the past and where you can always find developers to maintain the code.
Although there’s certainly a balancing act, you shouldn’t shy away from a framework feature just because it’s new. It relates back to one of our underlying themes in the book: if it eases friction, do it.
Listings 7.10, 7.11, and 7.12 allow us a tremendous amount of flexibility with little code. The sacrifice is that the person reading the code has to understand how predicates, delegates, and lambdas work. The benefit is that once those three techniques are understood, developers have another tool they can use elsewhere in their day-to-day work. Not such a bad trade-off.
The open/closed principle is usually achieved, consciously or not, through the use of design patterns. All of the examples in this section use the Strategy pattern. We encapsulated the filtering algorithm into an interface, which allowed us to swap out implementations of it at runtime.
Two other patterns that can be used to achieve OCP are the Template Method and the Decorator pattern. The former involves creating an abstract class with a method that makes calls to other abstract (or virtual) methods. It’s up to subclasses to implement or override the base class’s abstract/virtual methods in order for the template method to execute appropriately.
A Decorator is a class that wraps another class and adds behavior to it. Note that this is different than inheriting from a base class. Instead, the Decorator implements the same interface as the base class, and you typically pass the class you’re decorating into the Decorator’s constructor. Listing 7.13 shows an example of using a Decorator to add auditing capabilities to a class without having to edit the original code.
Listing 7.13. Sample Decorator

The AuditableVacationCalculator ![]() is our Decorator. Notice that it implements the same interface, IVacationCalculator
is our Decorator. Notice that it implements the same interface, IVacationCalculator ![]() , as RegularEmployeeVacationCalculator and ExecutiveEmployeeVacationCalculator
, as RegularEmployeeVacationCalculator and ExecutiveEmployeeVacationCalculator ![]() . It also takes another IVacationCalculator instance (the object it decorates) in its constructor. It can be used to decorate any other vacation calculator, including
another AuditableVacationCalculator if you want to audit things in more than one way. In this way, Decorators can be chained together to add increasing levels
of functionality to a group of classes without ever modifying the original code.
. It also takes another IVacationCalculator instance (the object it decorates) in its constructor. It can be used to decorate any other vacation calculator, including
another AuditableVacationCalculator if you want to audit things in more than one way. In this way, Decorators can be chained together to add increasing levels
of functionality to a group of classes without ever modifying the original code.
Naming in patterns
Notice that our AuditableVacationCalculator class doesn’t include the word Decorator in its name. This omission was a conscious decision. There’s a tendency to indicate the use of a pattern by using its name explicitly in the class name. It’s our opinion that incorporating the name of the pattern in the class name should be avoided if possible. It tends to clutter up the name of the class with developer jargon rather than focusing on the actual behavior of the object. Also, the implementation of the class may change at some point and you don’t want that implementation tied to any particular pattern because of a poorly chosen name.
To summarize, in some cases, the pattern name may help make the class’s intent clearer, but in our experience, it’s better to name objects based on their responsibility rather than their implementation.
The Decorator is essentially a textbook definition of OCP. The class being wrapped remains closed for modification, but its functionality is extended through the use of a Decorator.
Also, the Decorator is an example of favoring composition over inheritance (see section 7.3.1). In listing 7.13, we added auditing functionality to the vacation calculator without affecting any base classes. In effect, we compose an auditable vacation calculator from an existing vacation calculator.
There’s much more that could be said about the Decorator, Template Method, and Strategy patterns, and we encourage you to learn about them so that you can recognize their use and, more importantly, when to use them appropriately. But it’s time to bring the discussion back to brownfield applications.
OCP and Brownfield Applications
A sure way to fulfill the “contaminated” criterion of a brownfield application is to ignore the open/closed principle. When adding a new feature to a project, many developers’ first instinct is to add the code to an existing class in the application, regardless of its suitability. This tendency leads to bloated, incohesive classes that are hard to test and difficult to maintain.
It’s not hard to make a class open for extensibility while keeping it closed for modification. The general rule of thumb is this: code (or refactor) to interfaces.
By coding to interfaces, you can easily add new functionality without having to recompile existing code. Remember the Finder example in listing 7.9 or the Decorator example in listing 7.13. In both cases, we were able to achieve a greater degree of flexibility and add new functionality because we used an interface rather than a concrete class.
Moving on, we have the principle of least knowledge.
7.3.4. Principle of least knowledge
Also called the Law of Demeter, the principle of least knowledge is often summarized as follows: Talk only to your immediate friends.
The formal definition is wordier and scientific-sounding. It’s easier to understand with examples.
By and large, the principle states that you shouldn’t go more than one level deep in the object hierarchy when making method calls. For example, a call like myCustomer.GetOverdueInvoices() is valid, but myCustomer.Invoices.FindOverdue( ) is not. The first example makes a call directly on myCustomer. The second example goes two levels deep by first making a call to the myCustomer object, then calling a method on the result of that call, a collection of Invoices.
The reason the second example isn’t valid is that we’ve broken encapsulation. The myCustomer object doesn’t shield us from the inner workings of its collection of invoices. We need to know both how the myCustomer object and the invoices collection work. Requiring this level of knowledge is dangerous because if we change how the invoices collection works, we now potentially have to change both the Customer class as well as the code that uses it.
To make this class less knowledgeable, we create a method on our Customer object called getOverdueInvoices. For now, it’d simply return the results of Invoices.FindOverdue(), but the advantage is that if we change how overdue invoices are loaded for a customer, we need change only the Customer class, not any classes that reference it.
Law of Demeter in practice
Despite the alternate name for the principle of least knowledge, it’s by no means a law. Although it can lead to more maintainable software, it can also lead to an interface with a lot of wrapper methods. Furthermore, these methods can start you down a path where you violate the single responsibility principle and separation of concerns.
In addition, there has been much discussion recently on fluent interfaces, a topic we’ve discussed before. Often, API designers will purposely (and often rightfully) flaunt the principle of least knowledge to make an interface easier to understand and easier to discover.
For example, take the following snippet using version 2.4.6 of the NUnit automated testing framework:
Assert.That( myValue, Is.Not.Null );
Clearly, this code violates the principle by requiring you to go through the Not object on the call to Is. But this bending of the law was a conscious design decision on the part of the designers, and we feel you’ll agree that the result is a piece of code that’s much easier to understand and thus easier to maintain.
Principle of Least Knowledge and Brownfield Applications
Looking at brownfield codebases, you’ll usually see that the principle of least knowledge is broken. It’s not uncommon to see code that looks like this:
MyObject.MyCollection.Add(something);
Although this code looks harmless, there are hidden dangers lurking. The MyCollection property on the MyObject object is likely exposing a List, List<T>, IList, or IList<T> as its type. What if we were to change that return type? Now, MyCollection may not have an Add method available on it (say, for example, if we changed to IEnumerable<T>). The result is that our change has a ripple effect through the codebase with regard to the methods that are available off the MyCollections property.
Consider this alternative:
MyObject.AddSomething(something);
The AddSomething method, on the MyObject class, is now hiding the mechanisms (namely the Add method on the underlying MyCollection collection) required to add an item. The resulting AddSomething method may look like this:
public void AddSomething( Something itemToAdd) {
    _myCollection.Add(itemToAdd);
}
Now if we’re to change the underlying collection type (myCollection), and thus the way we may have to add an item to it, we can focus that change in code in one spot.
How does this discussion apply to brownfield refactorings? Well, the biggest benefit is that you’re more likely to be able to isolate the changes that you’re making within your codebase if you follow the principle of least knowledge. Instead of having to make changes across a wide range of classes with every refactoring, you’re more likely to make the change in one spot. Because brownfield codebases will probably have places where the principle of least knowledge has been ignored, you may find it valuable to refactor to this principle before taking on some of the larger refactorings that we talk about later in this book.
In the end, the principle of least knowledge is a tool that will help you isolate changes within your brownfield codebase. The next principle continues on the track of isolating changes and is the subject of an entire chapter in this book, but we introduce it here first.
7.3.5. Dependency inversion principle
We’ve already danced around the dependency inversion principle a few times and chapter 9 is devoted almost entirely to it. Robert Martin defines it as follows:[2]
- High-level modules should not depend on low-level modules. Both should depend on abstractions.
- Abstractions should not depend upon details. Details should depend upon abstractions.
An abstraction is typically an abstract base class or an interface. So another way to put this principle is this: don’t rely on a concrete implementation—use an abstract base class or an interface instead.
That’s all we’ll say about dependency inversion for now because it will be explained in entertaining detail in chapter 9. Our last concept is interface-based design.
7.3.6. Interface-based design
Although not technically a principle, interface-based design is an approach that can be useful in brownfield applications, especially in large teams. The idea is that the person who writes the code (the supplier) and the person who plans to call the code (the client) agree on an interface for calling a method. The client agrees to pass in appropriate values to the method, and the supplier guarantees that a specific outcome will occur.
All this talk of client and supplier and guarantees is a bit formal considering the underlying idea is simple, especially since you’re usually both the client and supplier. Essentially, interface-based design is one of the core concepts behind test-driven design.
When doing test-driven design, you create the tests before you create the code that’s being tested. By creating the tests first, you’re designing the interface for the code you’ll test later.
Let’s look at an example. Let’s say in our sample application we want a VenueBooker class and we want it to be able to return all available dates for a booking within a given month.
Listing 7.14 shows one possible unit test that could be written for this as-yet uncreated class.
Listing 7.14. Unit test for testing nonexistent code in VenueBooker
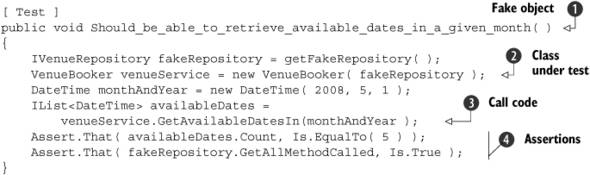
In this method, we create a fake venue repository that contains known data ![]() . In the next line
. In the next line ![]() , we create VenueBooker, which is the class we’re interested in testing. Next, we call GetAvailableDatesIn
, we create VenueBooker, which is the class we’re interested in testing. Next, we call GetAvailableDatesIn ![]() on the VenueBooker instance. Note that we haven’t defined this method yet but we’ve decided on a signature for it. Finally, we include two assertions
that will ensure we’ve retrieved the appropriate value from our VenueBooker object and that we’ve called the appropriate method on IVenueRepository
on the VenueBooker instance. Note that we haven’t defined this method yet but we’ve decided on a signature for it. Finally, we include two assertions
that will ensure we’ve retrieved the appropriate value from our VenueBooker object and that we’ve called the appropriate method on IVenueRepository ![]() .
.
Let’s assume the VenueBooker class and the IVenueRepository interface haven’t been created yet. Obviously, the code in listing 7.14 won’t compile then. To get the code to compile, we must create a VenueBooker class and an IVenueRepository interface.
But even after we create them, note that we’ve made a couple of design decisions in this test. We’ve claimed in the test that there must be a constructor that takes an IVenueRepository interface (whatever that interface may be). We’ve also dictated that the VenueBooker class must have a method called GetAvailableDatesIn that takes a single DateTime parameter. It returns an object that implements IList<DateTime>.
Furthermore, although it isn’t explicitly stated in the code, we can tell from the final line of the test that at some point during the execution of this method, we expect that another method (presumably named GetAll) will be called on the IVenueRepository object that was included in the VenueBooker’s constructor call.
With this one test, we’ve designed a contract for the VenueBooker class and for the IVenueRepository interface. Plus, we’ve provided some guidance as to how to fulfill this contract. When we create the VenueBooker class, we have an idea of how it should work and because the test is in place, we have a built-in mechanism to verify that the code we write will work.
One of the reasons interface-based design is so powerful is that it allows us to look at our interfaces from the perspective of the caller. By working from the client down, we’re building code that we know we’ll need. As we’ve seen from this example, the VenueBooker class had led us to also create an IVenueRepository interface, which in turn, contains a GetAll method. Had we started from the bottom, our design may have looked very different and we may well have coded ourselves into an API that’s cumbersome to work with at higher levels.
Interface-Based Design and Brownfield Applications
As we mentioned in the previous section on the principle of least knowledge, interface-based design in brownfield applications is about being able to isolate your changes. When working with a class that has a set of public-facing methods but isn’t well written internally, you can apply those public-facing components to an interface and start the isolation process. Then you can change all the places that call that code to work with the interface instead of the original concrete class. By making this change, you’ve decoupled the consuming code from the implementation of the original concrete class, which will allow you greater flexibility when refactoring.
With the interface in place, you have more flexibility in refactoring the original concrete class. Rather than work with the messy implementation, you can create a brand-new class that implements the same interface but that has an internal structure more to your liking. When the time comes to begin using your new class, you simply need to change the class that’s being created (instead of the old class, the code will now create the new class), and very little, if any, of the consuming code will be affected by this change.
Using interfaces is a powerful tool for incrementally applying isolated refactorings to your brownfield codebase. Used wisely, interfaces can save you from the ripple effects that many changes can cause.
That’s it for our introduction to design principles. It isn’t a comprehensive list by any stretch, but it should be enough to whet your appetite. Before we move on, let’s raise a touchy subject: how to introduce these principles into your organization.
7.3.7. Introducing design principles to a team
It’s time we broached a sensitive subject. You may be onboard with learning and applying these principles in your application, but what if you’re a lone voice in a sea of dissenters?
There’s a good chance you’ll meet with resistance when you start proposing all these new-fangled ideas. After all, if the basics of OO design were followed to begin with, chances are you wouldn’t be reading this book looking for ways to improve the design of your brownfield application.
When talking about introducing design principles, reactions will vary from skepticism to disinterest to outright hostility. You may encounter junior developers who don’t believe they have the capability to grasp such complex topics as SRP. Or maybe your project manager doesn’t have confidence in his team and would prefer you dumb down your code so that the team can more easily maintain it.
We’ve encountered both types of people and more in our careers. And here’s our official response to all these arguments: pure and utter crap (though you may want to paraphrase when you talk with your team).
This is a brownfield application. By definition (and granted, it’s our definition), the application is contaminated by poor design and practices. It’s suffering to the point where you need to perform drastic action to make it more maintainable. It behooves everyone involved to consider learning these proven techniques in order not to make the same mistakes. Otherwise, you’re left with an application that’s simply a different shade of brown.
The principles we’ve discussed so far aren’t magical and they aren’t complicated. They weren’t thought up in a university laboratory for high-paid consultants to maintain some level of job security. Instead, they emerged from observing real-world applications solving real-world problems. These principles have worked in the past and when rigorously applied, they continue to work and make applications more maintainable.
The fact is no developer is junior enough that she can’t grasp them. In fact, that’s why they were codified in the first place: to translate the experiences of developers in a way that others can benefit without having to go through the same pain.
In addition, one of the key advantages to the principles we’ve discussed so far is that they lend themselves to brownfield applications. With the benefit of 20/20 hindsight, you can refactor your design with much more knowledge than you had when you first wrote the code. There are fewer unknowns and there’s less chance of making the same mistakes that were made originally.
With that said, you won’t be able to convince everybody of their value through sheer force of will alone. Some will believe these are academic meanderings no matter how vehement you are in your stance.
One common argument you’ll encounter is that there’s no time to bring the team up to speed (or its step-cousin, “We’ll worry about that later. Let’s just get this project done first.”). This position is often rooted in corporate culture. Managers’ bonuses are short term; cultivating a strong team of developers is long term.
However you go about introducing design principles to a skeptic, try to avoid turning the discussion into a personality conflict. Easier said than done in many cases, but it’s important to always keep a level head and keep the discussion focused on how your position will benefit the project.
Many people, on both sides of the argument, will dig in their heels when faced with a contrary position. If you’re one of these people, recognize when you’re doing it and consider why the person you’re talking with holds the position he or she does. Is it because they’ve never tried it and don’t see the value of it right away? Or do they have a unique perspective of the application and have an alternative pattern in mind that could be just as effective?
In our experience, more people can be won over if you empathize with them and address their specific concerns rather than just repeat your mantra in different ways. (On the other hand, some people are just big jerks.)
Regardless of whether your team is open to trying new things, at some point there will come a time when you have to put your money where your mouth is. How are you going to start introducing these ideas into the code? Or, if you’re faced with convincing a skeptic, how can you provide hard evidence of their value?
Here are some ways that can be used to broach the topic of design principles. When to use each one will depend on your particular circumstances.
Do a Prototype/Spike
Prototypes are an easy concept to grasp—we’ve all done it in some capacity. You create an isolated coding environment and write some code to test an idea. For example, maybe you take a chunk of the application that’s particularly offensive and try to apply the single responsibility principle. Or perhaps you want to test the effect of converting all calls to a service to use interfaces instead of concrete classes (an implementation of the open/closed principle).
You should consider a couple of guidelines when doing a spike or prototype. First, make sure you’re isolated from the main trunk (or development branch) of the application. Assuming your version control system supports branching, consider making a branch of the code to create a sandbox. If nothing comes of it, you haven’t affected anyone else on the team. But if it turns out to be a successful spike, you can merge your changes into the current development branch and trunk if need be.
Second, time box your spike. Before you start, set a span of time that you think would be reasonable enough to adequately test your experiment. Many an application has been sidelined by a team member saying, “Just one more day and I’ll have it for sure.”
Whether or not your prototype is successful, always report your findings to the team. Let them know what you liked and disliked about the idea. Perhaps you saw value in the dependency inversion principle but a full implementation would require too large a refactoring this early. It’s important to convey your findings to the team so that you can evaluate them on a smaller scale.
Prototypes are useful when you want to test an idea without completely stopping the main work on the application. The prototype can be performed in parallel with regular development by one or two developers.
Lunch ‘n’ Learn
Holding a lunch ‘n’ learn can be as simple as scheduling a room over the lunch hour and inviting a bunch of people to talk code. Generally, the topic of discussion is limited to a single principle or pattern you want to demonstrate or talk about. For example, you could talk about the dependency inversion principle and perhaps one person will look into the topic and come up with code samples to lead the discussion.
The important thing is that the person facilitating the discussion doesn’t need to be the de facto expert. By all means, if someone has experience, she should be called upon to share, but keep in mind that everyone is there to learn.
Challenge your assumptions: Why just technical content?
Lunch ‘n’ learn, or casual classroom learning, is becoming increasingly common in the development community. We’ve found that there’s a belief that the sessions must present dense technical content all the time. We ask you, why not mix it up?
Sure, dense technical content is good to feed to developers (along with pizza and highly caffeinated beverages), but if you mix it up a bit you’ll keep people interested in attending. Think about having someone from the testing group present on something that their team is passionate about. Ask another project to present some of their practices to your group. Hold a session that’s about keyboard shortcuts for a commonly used tool. Heck, why not have a team member present on some open source tool that they’re excited about but that isn’t being used on the project?
All these topics provide value to the members of the team, but they may bring a different level of energy to what can become nothing more than a free lunch.
Lunch ‘n’ learns can be effective because you’re talking things over as a team. It’s as much a social exercise as an academic one. Often, bosses will recognize the benefit of their team taking time out of their day to improve themselves (and by extension, the project) and they’ll offer to bring in the lunch. These two aspects can sometimes appeal to developers who are usually more apt to dismiss these new-fangled ideas.
Mentoring
Mentoring is a useful way of getting someone up to speed on a technique. You sit with a person and implement the practice you wish to adopt with that person.
Mentoring in this way is similar to pair programming in that you’re both working on the same problem together. But it differs in the role you play and in the end goal. In pair programming, you both play the same role: a developer. And you’re trying to implement some functionality. With mentoring, the goal is to teach and there’s a mentor/student relationship instead. Another difference is that pair programming has a stronger emphasis on the pair actively working to prevent erroneous development. With mentoring, it’s perfectly acceptable, and even encouraged, to allow mistakes to be made and learned from. The key is that the mentor is there to control the impact that those mistakes can have as well as to give directed instruction and guidance based on them.
In our opinion, mentoring is the most effective way of teaching a technique to a developer. You can offer personalized advice to pointed questions and tailor it to the person you’re mentoring.
The downside is efficiency. In a team of 20 people, it’s not practical to mentor each developer individually on a full-time basis. With a large team, mentoring is better suited as a supplemental practice to be used to reinforce ideas on a smaller scale, perhaps after a focused lunch ‘n’ learn event.
Refactoring as you go
The final category is a little clandestine. You don’t make a categorical effort to introduce design principles, but as you add features and fix bugs, you refactor in such a way as to introduce them anyway.
Refactoring as you go: An example
Say you’re working on a bug where your Save screen fails when certain inputs are provided—for example, if someone enters a zip code in the wrong format.
As we mentioned in chapter 4, you should make every attempt to write a unit test to expose this bug before you fix it. But in many cases, the code may not be conducive to writing a unit test. Perhaps it has too many dependencies and they make the object you want to test too cumbersome to create in isolation.
In this case, it would help to introduce the single responsibility principle to the code to break apart the dependencies. But rather than calling a meeting to announce what you’re doing, you go about your business, tearing apart dependencies until you reach a point where you can adequately test the code and expose the bug.[3] Then you fix the bug and check in the code as you normally would. The technique you used to fix it is almost beside the point.
3 See Michael Feathers’ Working Effectively with Legacy Code for ways to break apart dependencies to make code more testable.
This method is useful as a supplemental practice only. It shouldn’t be your sole method of introducing OO principles to a team. This is because you’re introducing good OO principles to the code but not to the team. The code will continue on its path into brownfield-dom and you can only slow its descent.
Instead, encourage your team to refactor as they go after you’ve provided guidance in the form of mentoring or a lunch ‘n’ learn. The ideas will be fresh in their minds, and refactoring based on a concept they’ve just learned will help retain the ideas. As they (and you) gain more knowledge about refactoring, it becomes a much more automatic process.
We’ll wrap up this chapter with a few useful acronyms that serve as good guidelines as you refactor.
7.4. Adopting a more agile approach
Although we’re on the topic of changing fundamentals, now would be an excellent time to examine whether or not your team should consider trying a more agile approach to your coding process.
This section isn’t about converting to an Agile (with a capital A) project management style, though we’d certainly encourage that. We’re focusing on code. So how can you make your code more agile in the dictionary sense of the word? (Maybe spry would be a better word.)
To be agile, your code must be able to respond to change quickly. We all know that requirements change. Being agile means that you can accommodate these changes no matter how late in the project they come. Regardless of the project methodology you use, it helps if your code is adaptive enough to respond in the event you need to make design changes.
With that, let’s discuss a few little philosophies you can adopt to achieve this goal. All of them come in convenient acronym format for easy short-term memory retrieval.
7.4.1. Keep it simple, stupid (KISS)
Many developers have a natural tendency to overcomplicate design decisions. We often favor clever solutions rather than simple ones.
But complicated code is hard to understand and thus hard to maintain. We refer back to our tenets of readability and maintainability. Yes, your solution may be elegant in its conciseness, but if the code needs to be changed by someone else, it had better be easy to understand. Otherwise, it becomes one of those magical areas of the application that no one wants to touch for fear of breaking something.
One of the easiest ways to make a project unnecessarily complex is through premature optimization. Premature optimization is when we add code to increase performance without first measuring to see if there’s a problem to begin with.
Premature optimization is a throwback to the days of yore, when programmers had to be more mindful of things like memory management, network topology, and data access methods. Whether you used a stored procedure or direct SQL had significant ramifications on the usability of your application.
These days, many of these infrastructure issues are sufficiently encapsulated that you don’t usually need to make design decisions around them. You can design the application the way you would in an ideal environment.
This isn’t to say you should ignore infrastructure (or optimization, in general) completely. But if you find yourself saying “What if we’re calling this service over the wire?” you should check yourself. It’s possible to put that question off until you’re in a position to test the performance to see if it warrants attention.
Note
Premature optimization makes sense only if you’re in a position to do the optimization in your code at a later time should the need arise. If you’re doing significant design of your code at the start of the project (like in the waterfall methodology), you may want to perform a test early on to see if there will be any issues later. Although performance is important, and developers should be conscious of the impact that their code has on it, usually it isn’t the primary business concern. As a result, our point is, don’t put optimization code into your application until you’re sure you need it.
Another related principle is Occam’s razor, which is often paraphrased as “All things being equal, the simplest solution is the best.” This principle dates back to the fourteenth century and who are we to dispute seven-hundred-year-old philosophers?
7.4.2. You ain’t gonna need it (YAGNI)
This principle is an offshoot of KISS. It states that you shouldn’t add functionality to your code until you need it.
Developers often fancy themselves as forecasters. We like to add methods and classes to our project “just in case.” For example, say you start writing a data access class that connects to a SQL Server database. But then you start to wonder, “What if we switch to Oracle or DB2 or XML files?” So you go on your merry way parameterizing the code that generates a database connection to accommodate every known data storage format.
Next comes the data retrieval. We’re using stored procedures to retrieve data currently. But if we decide to switch to XML files, we’ll need to use XPath. Now we need a framework in place to convert our queries into parameterized XPath.
In short, there’s a lot of work involved for a scenario that may not occur. Why go through this exercise? Typically, you’ll have your hands full implementing just the features the client asked for without including ones she hasn’t. And chances are, your client will be much happier if you spent that time bringing the project in on time.
We’ve already touched on a bit of YAGNI in chapter 4 when we recommended against retrofitting unit tests on existing code until you need to modify it. The reason for this recommendation is, essentially, YAGNI. We assume, in the absence of contradictory data, that the existing code works. So there’s no need to write tests for it. But if a bug gets reported, all of a sudden you’re going to need tests since we’ve mandated that tests are required for all code that we modify.
With that said, there’s a bit of a balancing act with YAGNI. Taken to the extreme, you could argue that we shouldn’t refactor code because it works, so “you ain’t gonna need [refactoring].”
Or taking the previous example of accommodating other data stores, perhaps there’s a company-wide mandate to convert to Oracle in 3 months. In this case, yes, we don’t need to accommodate any databases other than SQL Server, but it would be negligent for us not to plan for a contingency that’s almost certainly going to occur in the short term, possibly even before the project ends.
In short, invoking YAGNI should be balanced with other factors, such as refactoring or future features.
7.4.3. Don’t repeat yourself (DRY)
The final principle is “don’t repeat yourself,” or DRY. This is an intuitive one and basically means “Avoid duplication of code at all costs.” As much as we love our Copy and Paste, it can lead to problems in the long term.
The problems are probably obvious to you. Having more than one version of your code leads to waste and is a maintenance nightmare. Whenever you need to change one piece of code, now you need to remember to change it in other places. And that assumes you know the code was duplicated elsewhere.
DRY is one of the core concepts behind the book The Pragmatic Programmer (Addison-Wesley Professional, 1999) by Andrew Hunt and David Thomas. In it, they describe various ways in which code is duplicated and how to counteract them. We won’t regurgitate their work here, but suffice it to say that you should always be on the lookout for duplicate code and you should deal with it ruthlessly.
Brownfield applications are often a veritable cesspool of duplicate code, and often you stumble on it at random when addressing some other issue. When you do, make every effort to stop what you’re doing and deal with that duplicate code. Don’t allow it to survive until the end of the day. It will come back to haunt you (if it hasn’t already).
7.5. Summary
This chapter has been a whirlwind tour through about 40 years of computer science knowledge. And we’ve only given lip service to most of the concepts we’ve introduced. We’ll hammer home many of them in later chapters with more concrete examples. In addition, there are already several excellent books available that cover each of them in more detail. We list many of them in this chapter.
We started the chapter off with a review of the fundamental tenets of object-oriented programming. More than a refresher, this review set the stage for the remainder of the principles in the chapter as well as the remainder of the book.
Following up on the fundamentals was a discussion on some “-abilities” you should keep in mind when you’re coding, the main one being maintainability. The ultimate goal of all the other principles (and indeed, this entire book) is to make sure your application is maintainable.
After that, we talked about some useful OO principles that have proven successful in the past. Most of them can be found in Robert C. Martin’s book, Agile Principles, Patterns, and Practices in C#, which includes many more useful ones. Our goal wasn’t to enumerate all existing OO principles but to help you get in the right mind-set for introducing good OO practices into your brownfield application. So we included a section on ways you might introduce them to your team.
We concluded with some overarching philosophies that will help you keep your application maintainable, including KISS, YAGNI, and DRY.
Our focus narrows further in chapter 8 where we discuss ways in which you can layer your application.