
Chapter 10. Cleaning up the user interface
- Pain caused by highly coupled UIs
- Importance of separating concerns in UIs
- Useful UI patterns to work toward
- Refactoring to those patterns
The user interface (UI) has traditionally been a bone of contention for developers on many brownfield applications. As often as we’re told to keep the UI simple, it takes only the slightest lapse before some business logic starts mixing with our layout code.
It doesn’t help that historically Microsoft has provided little guidance. Since the days of classic ASP, we’ve been encouraged to put complex logic into our page code. The page-behind method of .NET did little to alleviate this except to move the logic to an equally untestable area: the code-behind.
WinForms applications haven’t fared much better. From the beginning, we’ve been inundated with demos that showed us how to drag and drop database connections onto a page, wire them up to controls, and call it a day. Although these work well for...uh...well, actually, we can’t finish that sentence. Drag-and-drop software doesn’t work well, even in demos.
Adding to the issue was the framework that did originally come out of Microsoft for WinForms applications: the Composite Application Block. Although this framework did provide a way to divorce the UI from the business logic through a publish/subscribe model, the Composite Application Block proved complex and cumbersome for many people. It required an understanding of some advanced concepts to utilize the model to its full potential. As of this writing, its successors, Prism and the Managed Extensibility Framework, appear to be a step in the right direction, but the single responsibility principle has eluded Microsoft in the UI.
That’s enough nay-saying (for now). As usual, let’s start with the pain!
10.1. Pain points
This chapter’s pain points start with a real-life (and abridged) code sample in listing 10.1.
Listing 10.1. Sample code-behind for a web page
public partial class MySubscriptions : System.Web.UI.Page
{
  // ... Local field declarations ...

  protected void Page_Load(object sender, EventArgs e)
  {
    try
    {
      m_domain = ConfigurationManager.AppSettings["My.Domain"];
      m_username = ConfigurationManager.AppSettings["My.UserName"];
      m_pwd = ConfigurationManager.AppSettings["My.Password"];

      subscriptionservice.ClientCredentials
.Windows.ClientCredential.Domain = m_domain;
      subscriptionservice.ClientCredentials
.Windows.ClientCredential.UserName = m_username;
      subscriptionservice.ClientCredentials
.Windows.ClientCredential.Password = m_pwd;
      subscriberservice.ClientCredentials
.Windows.ClientCredential.Domain = m_domain;
      subscriberservice.ClientCredentials
.Windows.ClientCredential.UserName = m_username;
      subscriberservice.ClientCredentials
.Windows.ClientCredential.Password = m_pwd;

      messagingservice.ClientCredentials
.Windows.ClientCredential.Domain = m_domain;
      messagingservice.ClientCredentials
.Windows.ClientCredential.UserName = m_username;
      messagingservice.ClientCredentials
.Windows.ClientCredential.Password = m_pwd;

      if (Common.VerifySecureConnection()) {
        if (Common.EnsureUserIsLoggedIn()) {
          if (subscriberservice
.HasSubscriberSelfServeBeenRegisteredFor(
              Members.Web.Current.MemberId.ToString()))
          {
            try {
              m_localization = new Localization();
              m_localization.ApplicationKey = "Subscriber Self Serve";
              m_localization.CategoryKey = "MySubscription";
              m_localization.Culture = new System.Globalization
.CultureInfo("en");

              lit_Subscription_Title.Text = m_localization
.GetResource("lit_Subscription_Title");
              lit_Subscription_SubTitle.Text = m_localization
.GetResource("lit_Subscription_SubTitle");
              lit_Subscription_Intro_Copy.Text = m_localization
.GetResource("lit_Subscription_Intro_Copy");
              lit_Subscription_Customer_Name.Text = m_localization
.GetResource("lit_Subscription_Customer_Name");
              lit_Subscription_Customer_Email.Text = m_localization
.GetResource("lit_Subscription_Customer_Email");

              //get error/confirmation messaging if passed in
              if (Request.QueryString["message"] != null
&& Request.QueryString["message"].Length > 0)
                lit_Subscription_Error.Text = m_localization
.GetResourceWithCategory(
Request.QueryString["message"], "Errors");

              Member member = new Member(CMembers.Web.Current.MemberId);
              Members.Profile profile = member.GetProfile();
              lbl_Subscription_Customer_Name.Text = string
.Format("{0} {1}", profile.Firstname, profile.Lastname);
              lbl_Subscription_Customer_Email.Text = member
.GetPrimaryEmailAddress().Email;
            }
            catch { }
          }
          else
            Response.Redirect("registration.aspx", true);
        }
     }
   }
   catch (System.Threading.ThreadAbortException) { }
   catch (Exception)
   {
     m_error = true;
   }
  }
}
Note that listing 10.1 shows only the Page_Load event—and even that has been shortened. The original class, which includes custom Render and PreRender code, is a much stronger example of UI code run amok. But including that would look too much like an excerpt from a Douglas Coupland book. We’re not famous enough to be afforded such latitude.
To get more specific, here are some ways a tightly coupled UI can cause problems:
- Screens (web pages and forms) are hard to fit into a unit-testing harness.
- It’s difficult to focus on the specific code when changes are required to the UI and it’s intermingled with other logic.
- You duplicate code when you port over to a different interface (such as for mobile devices).
- You duplicate code between similar screens.
- A tightly coupled UI leads to large, hard-to-read classes in a screen’s code-behind.
- It’s hard to determine what’s screen logic and what’s business logic.
- Screens become fragile. Adding new functionality is difficult.
This list isn’t exhaustive, and we’re sure you’ve experienced your own brand of pain from a monolithic UI. Few people can withstand the psychological kick to the stomach that occurs when you first open a six-thousand-line code-behind file.
That said, techniques, tools, and patterns are available that can help you overcome these past indiscretions. Let’s start our look into those with a discussion of separation of concerns.
10.2. Separating the UI layer’s concerns
A disconnect usually exists between the goals of a user and those of a developer. The user wants to open an application and interact with widgets on the screen to do some meaningful task. The developer, on the other hand, wants to write the code to perform the meaningful tasks and simply needs a way to test it with a GUI. Any GUI.
A (too) common way to test that code is to build a “quick” UI around it and start clicking things. In fact, often the tendency is to start from the UI and work your way to the database. This tendency can lead to too much code in the UI. After all, it’s easy to drag a button onto a form, double-click it in the designer, and then start typing away in the click event for your shiny new button.
It’s easy to see why this approach is the natural tendency. Many developers think in terms of UI. When there’s a requirement to add a new consultant to a timesheet system, immediately a picture of a data entry screen with labels and text boxes is conjured.
Indeed, clients very often word their requirements in terms of screens. “We need a screen to search for jobs by date. We also need a screen to search for jobs by customer.” As a dutiful developer, you go about building a prototype to show the client, who promptly says, “I love it. Deliver it by the end of the week. Actually, I’m feeling generous. Make it next week.”
The result is as brownfield an application as you’ve ever laid eyes on.
Listing 10.1 highlights some rather nasty properties. First is that this code is hard to test. It’s launched from the UI, which means that in order to test it, you’d need to launch the application and wait for the page to load.
Testing UIs
Okay, we lied a little. There are other ways to test code embedded in a UI without launching it manually. GUI test runners, such as NUnitForms for WinForms and WatiN and Selenium for web applications, will automate these UI interactions for you. But UI testing should test only the UI, not the underlying business logic.
Additionally, some mocking frameworks (notably TypeMock) do allow you the flexibility to test the seemingly untestable.
Furthermore, consider all the responsibilities of this page. You can count service configuration (much of it duplicated), authentication, localization string management, and profile retrieval among them. This code is hardly a shining example of single responsibility principle.
In short, if an application is going to violate SRP, it will very likely happen in the UI. In fact, Visual Studio makes it easy to do so. For the rest of this chapter, we’ll help you fight the natural instinct to “whip something together for a demo” that has been instilled through years of Rapid Application Development (RAD) demos.
Let’s start by exploring the components of a user interface.
10.3. Components of a user interface code
We’ve spent so much time trashing monolithic user interface code that you’re probably wondering “Enough already! What’s the alternative?”
There are several. All of them have the same goal: to compartmentalize the code into specific roles. The typical roles are as follows:
- Code that represents the object(s) being manipulated on the screen
- Code used to display information on the screen
- Code that manages the interaction between the two
The first two items have well-established names. The first is called the model and the second, the view. The third depends on how you manage the interaction between model and view.
We’ll talk about each component in detail now.
10.3.1. The model
The model is fairly intuitive. The model is whatever object you’re displaying, editing, deleting, or otherwise managing on the page. It could be something simple, like a username and password for a login screen, or it could be complex, such as a collection of calendar months, each of which contains a number of tasks associated with the day of the month. Whatever data is being rendered or manipulated is the model.
Note that the model doesn’t need to correspond to a specific domain object in your domain model. In chapter 8 we discussed refactoring the application to a domain-centric approach in which the domain model was the most important aspect of the architecture. Here the model is specific to the screen. It contains (or should contain) only the information needed for the screen it’s created for.
This may correspond to a domain object but it doesn’t have to. Say you need to display a portal screen that shows a username along with a collection of current projects for the company. In addition, the screen shows the outstanding invoices and any employees currently unassigned.
Chances are you don’t have a specific domain object that has all this information. Instead, you can create a screen-specific class (that lives outside your domain) that has all the information you need and populate it from your domain model.
Working with screen-specific classes
Screen-specific classes are a type of data transfer object (DTO). They’re simple, lightweight objects responsible only for shuttling data from one place to another—in this case, from the domain model to the screen. Screen-specific classes are sometimes referred to as view models.
There are benefits to using DTOs instead of full-fledged domain objects. First, it helps divorce your UI from changes to the domain. Of course, rarely does the domain change without a corresponding change in the UI, but with DTOs, you can break up the work so that you don’t need to do it all at once.
Another advantage, as we’ve already discussed, is that you can combine domain objects into screen-specific objects that may not make sense as full-fledged domain objects. An example is a portal page that collects information from a variety of sources like the one described earlier.
If you go this route (and we highly recommend you do for all but the simplest applications), you’ll need a separate layer whose responsibility is to translate between domain objects and DTOs. Don’t worry. It’s not as arduous as it may sound. Furthermore, there are tools that can handle much of the plumbing for you. One we like is AutoMapper.[1]
By creating this layer of screen-specific classes, you allow the domain model and the UI concerns to exist without any knowledge of each other. If you’re diligent at keeping the screen-specific classes absent of any logic or business knowledge, you’ll also be one step closer to eliminating that logic from the uppermost levels of the UI concerns, such as the view.
Speaking of the view, that’s our next topic of discussion.
10.3.2. The view
However you define your model, whether as a screen-specific DTO or an actual domain object, you need some way to represent the data on the screen. This is where the view comes in.
At its core, the view is responsible for display only, though some UI validation can be thrown in as well. It decides where the text boxes and labels and drop-down lists are positioned, and it may be the first point of contact for the events that are fired from it.
Generally speaking, the view should be, to put it bluntly, dumb as a sack of door-knobs. Again, just how dumb depends on the presentation pattern, but even in one that allows it more latitude, the view doesn’t do much more than forward calls on to another class.
Web applications provide a natural separation point for views: HTML. Anytime you’re writing HTML, you’re working with the view. JavaScript kind of muddies the waters a bit because with it, you can do some powerful things, especially with Ajax calls. We’ll get into this a bit more when we talk about implementing Model-View-Controller.
In brownfield applications, both WinForms and web, the view is a good place to start major refactorings. In the absence of any directed effort, the view is often an obvious sign of bloat. Most developers can easily recognize when it’s doing too much, even if they have only a vague idea of what to do about it.
The big question still is how you’re going to make the view and the model work together without introducing any business logic. That’s where the interaction class comes in.
10.3.3. The interaction
How the model and view interact is part of the difference between the various patterns to be discussed shortly. In most cases, the view has some knowledge of the model. The Passive View (see section 10.4.1) is the lone exception where the view has no knowledge of the model whatsoever. Before diving into the details of the various interactions that can be used in the next section, let’s talk about why you care about these separations.
10.3.4. Why the separation?
Now that we’ve discussed the various components of a user interface pattern, it’s time to address the burning question: why do you need this separation?
The answer should be obvious by this point in the book. We’re strong proponents of testable code as one of your goals toward maintainable code. User interfaces are inherently tough to test in an automated fashion. Yes, there are GUI testing products such as NUnitForms and WatiN, but by and large, you’d like to test your underlying code in as friction-free a manner as possible.
So to achieve this goal, we repeat a common theme from part 2 of this book: apply the single responsibility principle and separate the UI into its individual concerns. And for the most part, this means having a view to render and interact with your data, a model to represent what you’re interacting with, and the goo that holds it all together. Separate concerns means each component can be tested in isolation.
With that said, the view is still a bit of a sticking point. No amount of refactoring is going to change the fact that, at some point, you need to render a “screen” (a form or a web page). This screen still requires a certain amount of baked-in infrastructure in order to test adequately.
Because of this infrastructure, and the fact that the real business logic is contained outside the view, many teams will often forego testing the view altogether. After all, you’d assume that if a click event is wired up to a button, you wouldn’t need to test to make sure the click event was actually fired. The .NET Framework wouldn’t last too long if the event mechanism weren’t reliable.
The danger with this line of thinking is that you have this entire layer of code that’s not being tested. And it’s easy to fall back into the practice of putting large blocks of “testable” code into the view.
“What’s the harm in adding a check to ensure the phone number is the right length into the view?” you ask yourself one day while you’re working on your air-conditioning management software. All goes well until the day you sell your product to a company in Greenland that has six-digit phone numbers. As you test your system to see if it can handle the new phone number format, it would be nice if those tests included the validation in the UI.
So we tend to favor views that don’t have a lot of logic to them, if any. As we talk about the various UI patterns, you’ll notice that this is sometimes a balancing act between views that provide a good experience for the user and views that don’t contain a lot of untestable code. With that in mind, it’s time to expand on our sparse discussion on the interaction and look at some specific patterns that you can refactor your brownfield application to use.
10.4. User interface patterns
Now that you understand the components of a good UI layer, we can talk about popular patterns used to implement them:
- Passive View
- Supervising Controller
- Presentation Model
- Model-View-Controller
Note
You may have heard the term Model-View-Presenter as a UI pattern as well. The person who originally documented the pattern, Martin Fowler, split it into the Supervising Controller and the Passive View in 2006.[2] They are variations on the same idea but differ in the level of control provided to the presenter.
We’ll take a look at the first three in this section as they have the most direct bearing on brownfield applications. Later, in section 10.6, we’ll examine Model-View-Controller in more detail.
10.4.1. Passive View
Figure 10.1 shows a representation of the Passive View.
Figure 10.1. The Passive View. The presenter mediates between the model and the view, which have no knowledge of each other.

In the Passive View, you have a model and view as described in section 10.3. You also have a presenter, which handles the interaction between the two.
The defining characteristic of the Passive View is that the view has no knowledge of the model whatsoever. All interactions are handled entirely by the presenter.
Let’s consider an example. Say you have a music catalog application and a form that displays the details for a given song in appropriate controls (such as a textbox for the title and artist, and a drop-down list for the genre). Let’s ignore events like Save for now and deal only with oneway communication. That is, you’ll display a selected song.
Because we have no knowledge of the model, you can’t create a Song object and send it to the view. Instead, you need to set the value for each UI element explicitly. Listing 10.2 shows the view code and listing 10.3 shows the presenter.
Listing 10.2. View code for a Passive View

As a bit of a teaser, notice the implementation of an interface on the page class ![]() . We’ll come back to this after the listing for the presenter. Also, you need to set the value of each UI component explicitly
. We’ll come back to this after the listing for the presenter. Also, you need to set the value of each UI component explicitly
![]() as the view has no knowledge of the model.
as the view has no knowledge of the model.
Listing 10.3. Presenter for Passive View

Notice the use of dependency injection ![]() —described in chapter 9—to provide the dependencies to your presenter. Elsewhere, some other piece of code is responsible for creating the view and
the other two components used by the presenter. That’s not the presenter’s job.
—described in chapter 9—to provide the dependencies to your presenter. Elsewhere, some other piece of code is responsible for creating the view and
the other two components used by the presenter. That’s not the presenter’s job.
Now let’s talk about the heart of the Passive View ![]() . Because the view has no knowledge of what it’s displaying (it doesn’t know what a song actually is), you need to tell it
explicitly what to display for each field. You set the view’s Title, Artist, Genre, and other properties explicitly. You even need to manually add each genre to the ListBox.
. Because the view has no knowledge of what it’s displaying (it doesn’t know what a song actually is), you need to tell it
explicitly what to display for each field. You set the view’s Title, Artist, Genre, and other properties explicitly. You even need to manually add each genre to the ListBox.
If this pattern seems unduly chatty, well, you’re right. One of the characteristics of the Passive View is that the view usually requires a large number of methods and/or properties. That’s because you need to interact with each UI element individually.
ISongRetriever or ISongRepository
In the sample code, we inject an ISongRetriever into the class. From the code, it’s clear this is used to retrieve an object (presumably, some sort of Song) from a data-store. So why not call it an ISongRepository, as we’ll discuss in chapter 11?
Depending on the architecture, you may not allow your UI to talk directly to your domain objects, including repositories. Earlier in the chapter, as well as in chapter 8, we talked about a translation layer that converts domain objects into screen-specific DTOs for manipulation in order to divorce the UI from changes to the domain. This is where the ISongRetriever comes in.
Whether or not you wish to directly inject a repository or some other intermediary class depends on the complexity of the screen and a certain degree of personal preference. The primary goal is that we’ve separated the concern and injected the dependency.
As a result, the view is, in a word, stupid. It knows very little about what it’s doing. In the example, if you told the view to display the song’s artist in the Title textbox, it would do so happily.
But that blissful ignorance is also part of its power. As we mentioned in section 10.3.4, one of the major reasons you’re applying a UI pattern in the first place is to enhance testability. With the Passive View, your view has little to no logic of any sort in it. So you don’t care too much that it can’t be tested. You can test everything up until the point where a field is shown on the screen. A developer looking at the view, which is essentially a shell for data, can figure out what it does quickly. Indeed, you’d be hard-pressed to find a bug in listing 10.2.
Why no interface for the presenter?
You may have noticed that we implemented an interface for the view (ISongDetailView) but not the presenter (SongDetailViewPresenter). This strategy is borne out of experience.
Typically, we introduce interfaces to handle dependencies between objects. That is, if we want to test the presenter, we need to handle its dependency on the view and the “song retriever” (see the previous sidebar).
But usually nothing depends on the presenter. Most of the time, it’s our point of entry into a screen. Yes, other classes will be responsible for creating them (usually the view itself) but those classes don’t interact with the presenters they create. The presenter is created and it’s let loose.
Put another way, we don’t generally have any classes that require a presenter to be injected into it, nor do we swap out one implementation of a presenter for another. Hence, there’s no need for an interface on presenters.
There’s one glaring omission from our view that we’ve been ignoring. What happens when the user clicks a button or raises some other event in the view? How does the view know what to do with it? We’ll table that question until section 10.4.3 when we discuss events in your UI.
Careful with your controls
We’ve been in projects where the implementation of a Passive View involved exposing the underlying UI controls in the view to outside callers. For example, rather than exposing a Title string property, we’d expose a TextBox control called Title.
Don’t do this. Ever. That is not the way to a Passive View. It’s an antipattern that combines the chattiness of a Passive View with the untestability of having everything in one monolithic class. You get the worst of both worlds.
Controls should never be exposed outside the view, if you can help it. If you need to add a reference to System.Windows.Forms or System.Web.UI.Controls (or even to the namespace directly above each of those) to your presenter, you’re courting disaster. The whole reason for separating concerns is to decouple your application and make it testable. Tying your presenters to a UI framework isn’t the way to go about this.
In summary, use the Passive View when you want the ultimate in testability. It will allow you to test absolutely everything except the .NET Framework itself. By its nature, the Passive View requires a lot of interaction with the presenter. For simple views, such as a login screen, it is quite well suited. If your screen requires a lot of interaction between the UI elements (for example, in complex validation scenarios), you may want to consider one of the other patterns that we’re going to cover now.
10.4.2. Supervising Controller
Next on our list is the Supervising Controller, depicted in figure 10.2.
Figure 10.2. The Supervising Controller. Unlike the Passive View, the view has direct access to the model.

We’ll save you flipping back to the Passive View for comparison. The only difference between figure 10.2 and figure 10.1 is the arrow from the view to the model. The Supervising Controller is similar to the Passive View except that the view knows about the model and can take advantage of it.
Just how much advantage the view takes is where many applications can fall back into brownfield territory. Your goal is to keep things testable so only simple data binding logic should take place in the view. The .NET Framework includes powerful tools in both WinForms and web applications for binding controls to objects. The Supervising Controller uses its knowledge of the model to make use of these data binding capabilities.
Presenter or controller? Make up your mind
Yes, figure 10.2 refers to a controller although figure 10.1 calls it a presenter. That’s an unfortunate circumstance of naming and how the patterns evolved. The Supervising Controller derived from the now-retired Model-View-Presenter pattern. In his discussion on it, Martin Fowler even includes a note asking whether it should be called a controller or presenter. We used controller in the diagram to match the name of the pattern but will refer to it as a presenter throughout the chapter, again to avoid confusion with Model-View-Controller but also so we can use the term presenter collectively when we refer to both Supervising Controller and Passive View.
On behalf of the industry and the English language, we apologize.
Let’s revisit the example from listings 10.2 and 10.3 but this time using a Supervising Controller. Listings 10.4 and 10.5 are the corresponding view and presenter.
Listing 10.4. View code for a Supervising Controller

Note that in listing 10.4’s version of the view, you can take advantage of the .NET Framework’s data binding mechanism to bind to a list of Genre objects ![]() . Now let’s look at listing 10.5.
. Now let’s look at listing 10.5.
Listing 10.5. Presenter for a Supervising Controller
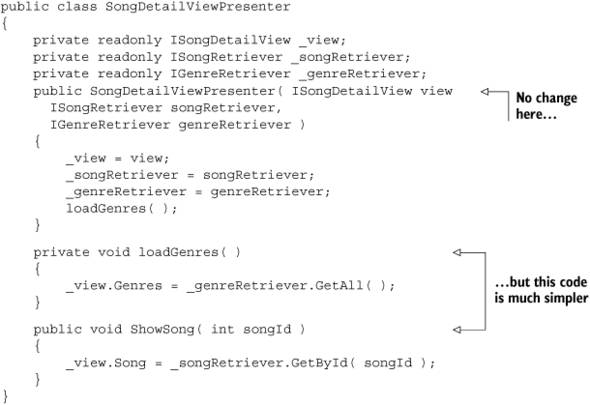
The code for the Supervising Controller is considerably more concise than for the Passive View. It’s so much more concise that you may be wondering why you’d bother with the Passive View.
Consider what you’re giving up with the Supervising Controller. It’s not obvious from this simple example but that’s because the scenario is very contrived. In the real world, this form probably resides in a much more complex application. For example, the user may select a song from a tree view and the form needs to keep track of a history of all songs displayed in it for Previous/Next support (because users have gotten used to the metaphor in browsers). Plus, perhaps it has the ability to add Genres to the master list on the fly—not to mention the ability to listen for changes to the data made by other users accessing the same list of genres in their own instances of the application.
These are a lot of scenarios to keep track of. Any one of them could be the source of an obscure bug. In these cases, you’ll be glad you went to the extra trouble of removing the logic required to keep everything in sync out of the view and in the presenter where it can be tested.
On the other hand, if your data synchronization is straightforward and you’ve got the stomach for having untestable code, a Supervising Controller does lend itself to code that’s easier to understand at first glance. It’s a case of ensuring the application is more readable or more testable. As with most trade-offs, the deciding factor will ultimately depend on your project dynamics.
Another area of difference between the two types of MVP pattern is in the handling of events. Let’s take a look at that in detail right now.
10.4.3. Event handling in the Passive View and the Supervising Controller
We’ve ignored events long enough. It’s all well and good that you show a bunch of data on screen, but what happens when you click the Save button? How does information get from the view back to the presenter?
There are two ways a view can communicate to the presenter:
- By holding a direct reference to the presenter/controller and calling methods on it
- By publishing events that the presenter subscribes to
Direct Reference
In this scenario, the view contains a reference to the presenter by way of a private variable. As the view raises events (as users click buttons, select list items, and otherwise interact with the form), the view calls appropriate methods on the presenter. The presenter will then perform whatever logic needs to be done and may optionally update the view.
Event Publication/Subscription
A publish/subscribe mechanism is another alternative. Here, the presenter subscribes to appropriate events that are raised by either the view or the model itself. In the Passive View, the view must raise the events as it does not contain any reference to the model. In the Supervising Controller, the events can be on the view or the model.
In most cases, it makes sense to apply the events to the model. For example, if you have a list of cascading drop-down lists (for example, Country, State/Province, City), you’d likely put a PropertyChanged event on the corresponding properties of the model class.
Note that this approach is easier to justify when you have a screen-specific model. If you’re using your domain model object, adding events to handle screen interaction is a bad idea and you’d be better off adding events to the view instead. Better yet, switch to a screen-specific model.
There are advantages to each approach. A direct reference is often easier for developers to navigate. User events follow a direct path of method calls from view to presenter to model back to presenter and back to view. With the publish/subscribe scenario, you can’t use the built-in IDE navigation tools to trace through a request. When you see an event being raised, you need to use other ways to determine which objects are listening to that event.
Also, direct references tend to make for easier unit tests. Most mocking frameworks allow you to raise mock events, but this isn’t always for the faint-hearted. The goal of each of these patterns is to make the UI more maintainable. Complicated unit tests that no one wants to touch are only a half-step above complicated UI classes that no one wants to touch.
However, the event mechanism does allow a cleaner separation of concerns. The view has no knowledge of how it was created or how it’s being controlled. Presumably, this would make it easier to swap one view implementation for another.
The publish/subscribe model is also well suited for complex asynchronous scenarios. Let’s take a timesheet submission application as an example. At the end of the month, you’d like to be able to submit your timesheet to various people from a certain screen. Perhaps the system has to go through a complicated automated approval process that could take several minutes. Eventually, you’d like an email confirming whether it was successfully submitted to each person, but there’s no point waiting around for that. (Okay, you may not trust such a system when it deals with your paycheck but let’s assume you have faith in the submission mechanism.)
In this case, perhaps you’d like the view to raise an event to the presenter, which in turn raises an event of its own to a message queue that’s processed on a first-come, first-served basis.
However you choose to handle user clicks on a screen, remember the underlying goal is maintainability. If you find that raising events causes a lot of friction because the view is so chatty, try a direct reference approach. By the same token, if having a direct reference to the presenter is causing too tight a coupling with the view, consider switching to event publication/subscription to reduce the dependencies.
Our favored approach is with a direct reference, but it’s not a position we’ll defend to the death, or even to the slightly injured. It has worked for us in the past as long as we had the discipline not to overload either the presenter or the view. That said, Microsoft tends to favor the event publish/subscribe model with its Prism framework for Windows Presentation Foundation (WPF) applications.
This section was noticeably short on code samples. We’ll address those later in section 10.5. First, let’s finish this section with one final alternative for your UI.
10.4.4. Presentation Model
A slightly different approach to screen synchronization is the Presentation Model, as shown in figure 10.3.
Figure 10.3. In the Presentation Model, the view keeps itself synchronized with a screen-specific Presentation Model object.

This model is a little different from the other patterns. You have a whole new class to deal with. Instead of a presenter, there is a Presentation Model. This differs from the regular model in a couple of ways. It’s created specifically for the screen in which it’s used. Although that’s similar to the idea of screen-specific DTOs mentioned in section 10.3.1, it has more responsibility. The Presentation Model controls both the state and the behavior of the screen.
In effect, the class acting as the Presentation Model performs all the actions that a view might perform. It determines when to enable and disable elements, gets and sets values for fields, populates lists, and so forth. But it does so without referencing any specific user interface components. Text boxes, drop-down lists, radio buttons, and the like are still held within the view. But the view monitors the Presentation Model and updates itself whenever the Presentation Model changes. Because of this, the view requires extra code to synchronize itself with the Presentation Model and the Presentation Model requires code to synchronize itself with the domain model.
Think of the Presentation Model class as an abstraction on top of the view. It does everything you’d expect a view to do, such as store and maintain the state of the screen and control the interaction between the various elements on the screen. But it uses internal variables to store the state, not UI elements. So it doesn’t require a reference to either System.Windows.Forms or System.Web.UI.WebControls.
Where does the actual domain model fit in? It’s still used, though typically it’s wrapped within the Presentation Model class. The Presentation Model class will use the domain model to control its own state and behavior, and the view will react accordingly. In effect, the Presentation Model class acts as both model and presenter.
The Presentation Model and WPF
Despite our relative dismissal of the Presentation Model pattern, it’s the pattern of choice for WPF applications. Though the documentation calls it Model-View-ViewModel, it’s essentially the same pattern.
WPF makes it much easier to create the Presentation Model (or ViewModel) classes that abstract the view. It provides an infrastructure that makes it easy to synchronize with your view, even providing two-way binding support. The result is that you can exercise your view in tests simply by exercising your Presentation Model. The only code remaining untested is the statements that bind the view to the Presentation Model.
Comparatively speaking, you won’t see too many brownfield WPF applications, at least not at the time of this writing. Be aware that they do exist. Although we may consider rewriting a GUI in WPF to take advantage of its testability, in this book we focus on the more traditional UI patterns that we understand and feel are more prevalent in brownfield applications at the moment.
We’ll forego the code sample of the Presentation Model because it’s not nearly as common as the other three (although that’s changing as WPF becomes more prevalent; see the sidebar “The Presentation Model and WPF”) and we’re not, to be completely honest, nearly as knowledgeable about it. The goal of the Presentation Model is to pull all reasonable behavior out of the view so that it can be tested in isolation. It’s useful if you have a screen with a lot of complex state-based behavior because it provides an abstraction between the actual domain model and how the screen/view works. If that’s important to your application, it may be a good alternative to the Passive View or the Supervising Controller. However, in our experience, the annoyance of having to synchronize the Presentation Model with both the view and the model is usually enough to push us to one of the alternatives.
Now that we’ve covered some of the most common UI patterns, let’s talk about how you can refactor your existing brownfield code to make better use of these patterns.
10.5. Refactoring to MVP
We’ve now covered three ways to structure your UI. If your brownfield application is typical, it probably uses none of them. Indeed, if it’s like the ones we’ve seen, it very likely uses much less famous patterns, such as House of Cards and Sheer Force of Will.
In this section, we’ll look at tips on refactoring your UI to one of the patterns discussed here. We’ll focus on the Passive View and the Supervising Controller, the most common ones, but you can apply the same tips if you decide to move toward a Presentation Model. With that, let’s dive in head first. The underlying steps are shown in figure 10.4.
Figure 10.4. The high-level steps to refactoring to an implementation of MVP. The first step, writing a test, may not be possible depending on your current architecture.

10.5.1. Write your test first...if you can
There’s an inherent danger involved with refactoring your UI. Typically, we recommend writing a test before refactoring in order to make sure you don’t break anything during your travels. With the user interface, accomplishing this isn’t as easy. Automated user interface testing tools still have a somewhat spotty track record when it comes to return on investment, especially for complex screens.
A relatively safe way of working is to avoid changing code as you refactor if possible. In chapter 8, we talked about defining seams while you draw your layers. You’re doing the same thing here—you’re defining the seam between your model, your view, and your presenter. As you work, you’ll move code out of the view into its own testable class. As soon as you do so, get a test in place.
Resist the urge to optimize the code until the test has been written. Ideally, you’ll be able to cut and paste the relevant code from the view into some other piece of code, which can be instantiated directly and is easier to test. This strategy minimizes the risk of breaking something during your refactoring and sets the stage for optimization when you’re finished. Regardless, you need to look at the existing code and determine what pieces of it belong in which of the appropriate UI layers (or other layers that you’ve created in your codebase). This task is going to be at the front of your mind, so let’s take a look at it next.
10.5.2. Identify the components
In each of the patterns we’ve discussed, we’ve mentioned three components: the model, the view, and the presenter. (The Presentation Model is slightly different but the underlying idea is the same.) In order to refactor, you first need to identify these components.
The Model
The model is often the easiest thing to pick out for a screen. The model is the actual business object being acted on in the screen. If your web page displays a list of administrators for your discussion board, the model will be a list of administrators. If you’re displaying a screen that allows users to dynamically manipulate an organization chart, the model is the list of employees displayed on the screen and the relationships between them.
Be careful not to limit your scope too much when determining your model. Often the screen displays more than you think. For example, say you’ve got a page that displays the details of one of your branch offices. On it, you can change details such as the name of the office, the contact person, and the address.
On first glance, the model for this page appears to be the details of the office. That is, you would have an Office class with properties like Name, ContactPerson, and Address.
But how are you selecting the contact person? Are you displaying a list of employees assigned to that office and allowing the user to choose one? If so, that list of employees is also part of the model. The same holds for the address if you’re showing a list of states or provinces on the page. So in fact, the model is several pieces of data: the Office object, a list of Employee objects, and a list of State or Province objects.
There are a couple of ways we could potentially collect this information into a single model. Our personal preference is to use a DTO as mentioned in the sidebar in section 10.3.1. With this approach, you can create a specialized object whose sole purpose is to hold information for the specific screen you’re working on. This technique gives us ultimate flexibility when it comes to refactoring the screen later to change or add to its functionality.
Don’t shy away from objects
Another option we’ve seen used for a model is DataSets.
DataSets make for a nice demo, usually one that contains the phrase “...and I did it all without writing a single line of code” at least twice. But they come with quite a bit of baggage. Untyped, they’re prone to errors because you need to reference things using strings. Often, these strings map directly to database columns, and it’s never a good idea to marry your UI logic to a specific data implementation.
These days, custom objects are easy to build and still allow you to take advantage of built-in data binding capabilities. Most controls bind equally well to objects as they do to DataSets.
Objects give you the advantage of discoverability: it’s easy to see what your domain model looks like. Compare that to DataSets, where the schema is buried in syntax such as ds.Tables[1].Rows[3]["ArtistName"].
We’ve come down on DataSets already and will do so a little more harshly in the next chapter. DataSets have their place (though it’s a place we’ve never visited in several years), but once you start rigorously testing your code, you’ll find their usefulness wears thin quickly.
Another alternative is simply not to collect the various pieces of data at all. Because of the tight integration between the view and the presenter, you could request each piece of data individually whenever you need it.
Once you’ve determined the information that’s going to be acted on for display, you need to figure out how you’re going to go about doing that display. Let’s move our focus to the view components.
The View
Once you’ve identified the object you plan to act on, the next step is to determine what the view should do. Identify the tasks that the view must perform in order to display its data and then list the physical actions that can be taken on the view.
In general, the view consists of the user interface widgets (the text boxes, drop-down lists, grids, and so on) that display the data and that the user interacts with. The view should be the only layer of your application that contains a reference to System.Windows.Forms or System.Web.UI.
Your goal is to keep your view as stupid as reasonably possible. You may say to yourself, “When the Update button is clicked, the view needs to calculate the shipping cost and taxes so that it can display a subtotal to the user.” If you do, give yourself an electric shock (it worked for Pavlov[3]).
The view does not need to calculate the shipping cost and taxes. Instead, it needs to record the fact that the Update button was clicked and pass that information on to the presenter. That’s all it’s capable of doing: showing the data it’s told to display and letting someone else know that a widget was interacted with.
The “someone” that the view interacts with could be the model or it could be the domain model (if you’re using the DTO pattern to fill the Model portion of the MVP/ MVC implementation you’ve chosen). Bear in mind that, as much as possible, you’d like to keep any business logic outside of the view. Tax and shipping calculations sure sound like business logic to us.
Instead, you should let the presenter determine what to do with those raw values (in this case, perform tax and shipping calculations) and then take the required actions. This leads us to the last component to identify.
The Presenter/Presentation Model
We’ve left the presenter for last because it falls under the category of “everything else.” Whatever isn’t view or model is handled by the presenter.
This separation isn’t as easy as it may sound. For example, how much do you want the view to do? We talked about having a view that had no knowledge of the model (the Passive View). We also discussed giving the view more responsibility in the Supervising Controller. Your choice of pattern will determine how the presenter looks and behaves.
To define your presenter, you must define how the view will interact with it. Because we’re working with a brownfield application, you have the advantage of knowing how the screen is already behaving. So you have an idea of how much power you want to give to the view.
Ultimately, the deciding factor should be testability. How testable would you like the screen to be? For extreme testability, the Passive View is the way to go. With this pattern, the view can’t even blow its nose without first being told to do so. Almost anything you do on the screen can be tested.
Passive View may be a good option if the screen has historically had a lot of bugs. In this case, it helps to be able to test the interactions between the view and presenter so that you can expose existing bugs and new ones through tests.
But you also must balance this option with the chatty interface (between the presenter and the view) that will arise due to this increased testability. Because the view can’t do anything on its own, there will be a large number of simple methods like GetProvince and SetShippingCostLabel. They’re all testable, mind you, but be prepared for an explosion of small methods.
Another factor in your decision is whether the current screen makes use of built-in data binding capabilities. For example, do you have a list box or repeater control that’s bound directly to a DataSet or a list of objects? If so, it makes sense to move toward a Supervising Controller that allows for this scenario. If not, be prepared to populate these controls manually through the use of custom AddListItem methods on your view.
In general, we like the testability of a Passive View but will often use a Supervising Controller to make our lives easier. If possible, you may find it useful to start with a Passive View simply to get into the habit of testing everything. There’s little question of how much power to give to the view because the answer is always none. It’s harder to accidentally sneak logic into a view that has no place for it.
Once your team is in the habit of writing tests against the presenter and is comfortable handing a model into the view, you can move toward a Supervising Controller. By this time, you should be more familiar with how to separate concerns and have probably felt some pain in writing seemingly meaningless tests to ensure a text box is set properly. A Supervising Controller pattern still isolates the various concerns nicely but allows the view to deal with the model directly.
You still need to take care that you don’t do too much work in the view. If your view is performing any action that you feel should be tested (like calculating shipping costs), this should raise a flag that the view is overstepping its bounds.
That said, if your screen already uses a lot of built-in data binding functionality, a Supervising Controller is the obvious choice. Figure 10.5 shows the major selling point and downside to each implementation. Once you’ve identified the model, view, and interaction, you can start doing the code manipulation.
Figure 10.5. A Passive View is more testable than the Supervising Controller but at the risk of being more chatty.

10.5.3. Isolate the code
With your boundaries defined (if only on paper), now you can start moving code around. By now, you should have an idea about how your presenter will behave. If you are using test-driven development (and we recommend that you do), you are now in a position to write a test against the presenter.
If you aren’t ready to try TDD, that’s fine as well. In the end, your goal is the same: testable code. As long as you move toward a state where there are tests in place, you’re in a good place. We’ll continue the discussion using TDD but it’s easy enough to follow along assuming you write the tests afterward.
Your first test should be one that ensures the presenter and view can communicate with each other. It can (and should) be as simple as asserting that you can create a presenter and that it has a reference to the view. Then, you create the presenter and provide it with a view so that the test can pass. (Don’t worry—we’ll show an example of this in the next section.)
From there, you can flesh out the presenter’s behavior. Doing so will involve moving logic out of the view into the presenter. What should happen when the Calculate Subtotal button is clicked? Well, we should probably have a method called CalculateSubtotal on the presenter. So you create a test for the presenter for such a method to ensure it works as expected. Then you create the CalculateSubtotal method and make sure it passes your test.
Writing tests for existing code
You have an advantage at this stage in that the code is already written. This fact makes the tests easier to write because you can write knowing how the implementation will look.
But this knowledge can be a double-edged sword. Tests that are tailored too much to a specific implementation may be useful in the short term. In the longer term, it could mean that when you refactor your code, you need to also change your tests due to the internal implementation change. Frequent refactoring of your tests should be a clear sign that your tests are overspecified and may be testing things at too granular a level.
For a more detailed discussion on this, see Roy Osherove’s The Art of Unit Testing (Manning, 2006).
Working back and forth between the presenter and the view, you can slowly get the UI into a more testable (and tested) state.
For the most part, you should strive toward moving code rather than rewriting it. Your single purpose is to move the screen to a state where it’s tested. Once you’ve achieved that goal, then you can optimize the code within the presenter, view, or model. But until you’ve got your safety net in place, resist the urge to make things better within the code you’re moving.
The application may work against you. Your application may not yet be properly layered, and even if you move all the relevant code to the presenter, it may be doing too much. A good example we’ve encountered often is a common data access class with static methods on it to retrieve various bits of data.
We’ve already talked a little about how to manage this in chapters 8 and 9: by slowly teasing apart the layers and introducing dependencies into the presenter as appropriate.
Say you have a button click event that extracts data from several controls, performs a database lookup, and then updates several text boxes. Let’s start with the click event itself. What does it do? It retrieves data from the form, performs some action, and then updates the form again. Breaking this down, you could have appropriate methods on the view to retrieve the data and other methods to set the values of controls. Once you have those in place, the presenter can then do everything the click event on the view did: retrieve data (this time from the view rather than directly from the controls), perform a database lookup (via an injected dependency as in chapter 9), and update the display with new values (again, by calling appropriate methods on the view). All concerns are nicely segregated and testable.
It’s getting painfully obvious that we need to show an example. Let’s do that now.
10.5.4. A sample refactoring
Let’s make this theory a little more practical and work through a simple example.
For that, you’ll need a piece of suitably brownfield code to start with. Let’s tackle a nice, controversial control from ASP.NET: the GridView.
The page we’ll refactor is in the administration section of an application that manages bookings for bands. It lists the bands whose tours are currently being managed by the application.
The screen is a simple application of the GridView. It lists the names of some artists and allows the user to edit the name of the artist or delete them. At the top, there’s a way to add new artists to the list.
Listing 10.6 shows the code that’s executed when the page is first loaded.
Listing 10.6. Code-behind for a page showing a list of bands

Right off the bat, we can see a few problems with listing 10.6. It’s using a static class ![]() to retrieve the data required to display. Furthermore, it’s passing in the name of the stored procedure that needs to be
called. This code doesn’t lend itself to a decoupled application.
to retrieve the data required to display. Furthermore, it’s passing in the name of the stored procedure that needs to be
called. This code doesn’t lend itself to a decoupled application.
But remember, your goal is not to change any of the existing code, but only to implement a pattern that allows you to test this code so that you can change it later. So you’ll need to swallow your pride and let the static class be for now.
From this code, you can easily deduce your model. It’s a list of artists. You may argue that the name of the new artist is also part of the model, but it’s better off on its own. It’s a single piece of data that can be requested when needed. For the most part, you’ll be dealing with a list of artists.
So the view consists of a GridView, a TextBox, and a Button. The model is a DataSet containing information about the artists. That leaves you with the presenter. Since you’re binding the GridView directly to the list of artists, a Supervising Controller pattern makes sense in this case.
Let’s write a test to get ourselves started. We’ll start simple and write one that proves we can create a presenter and provide it with a view. See listing 10.7.
Listing 10.7. Test to prove we can create a presenter
[Test]
public void Should_create_presenter_with_view( )
{
    var view = MockRepository.GenerateStub<IBandListView>( );
    var presenter = new BandListPresenter( view );
    Assert.That( presenter, Is.Not.Null );
}
There isn’t much going on in listing 10.7. All we’ve proven is that we can create a presenter and that it isn’t null. But it’s an important first step because we’ve made the decision that the presenter requires an IBandListView in its constructor. That is, we’re claiming that we’ll need a reference to an IBandListView object at some point.
We’re kind of getting ahead of ourselves with that assumption. After all, how do we know that we’ll need a reference to the view from the presenter at this point? Also, if we aren’t actually doing anything with the view in this test, why bother mocking it at all? Why not pass in null to the presenter?
All valid questions—but we’re going to sidestep them and move on. Maybe the next test will make things a little clearer, but for the time being let’s implement the code that makes this test pass. See listing 10.8.
Listing 10.8. Presenter class for our band list page
public class BandListPresenter( )
{

    private readonly IBandListView _bandListView;

    public BandListPresenter( IBandListView bandListView )
    {
       _bandListView = bandListView;
    }
}
Again, we’ve cheated pretty heavily here by assigning the bandListView parameter to a class field. If you were doing true TDD, the code would pass just as easily if you’d left out that line in the constructor. We do encourage you to start with baby steps and implement only what you need, but that’s not the focus of this chapter so we must take some shortcuts.
At this point, you have a presenter that can accept a view interface. You haven’t defined what that interface looks like yet, and at this point, you don’t need to. But let’s take a look at the code-behind for the view and see what you need to do to get things started. Listing 10.9 shows the changes you need to make.
Listing 10.9. Code-behind converted to a view

Listing 10.9 isn’t too different from listing 10.6. You’ve made the class implement the as-yet-undefined IBandListView interface and added a reference to the new BandListPresenter class. Notice that you create the BandListPresenter ![]() in the constructor and pass the view (IBandListView) into it.
in the constructor and pass the view (IBandListView) into it.
This approach seems a little odd. In the view, you maintain a reference to a presenter. And in the presenter, you maintain a reference to the view. Doing so is necessary for the MVP patterns to work because of all the communication that needs to occur between them.
It’s time to speed things up a bit. We’ll forgo the unit tests here (they’re included in the sample code accompanying this chapter) and skip to the implementation.
Lies! Untruths! Falsehoods!
Okay, okay, you don’t really need to maintain references between the classes to make the view and presenter work together. We’ve talked already about using events. In this scenario, the view still creates the presenter and passes itself to it, but after that, the view can forget about the presenter. It will raise events whenever it does something meaningful and rely on the presenter to listen to those events.
You can decouple the view and presenter even further and have what’s called an event aggregator manage the events. Here, a separate centralized class keeps track of event publishers and subscribers. The view will register itself as an event publisher with the aggregator and the presenter will subscribe to those events. Neither class needs to know of the other’s existence.
This pattern is powerful and flexible and is becoming increasingly popular. A full discussion is beyond the scope of this chapter, but we encourage you to investigate the topic further.
Listings 10.10 and 10.11 show the view and the presenter, respectively, after refactoring out the non-UI logic to the presenter.
Listing 10.10. Final view implementation

And now take a look at the presenter in listing 10.11.
Listing 10.11. Final presenter implementation
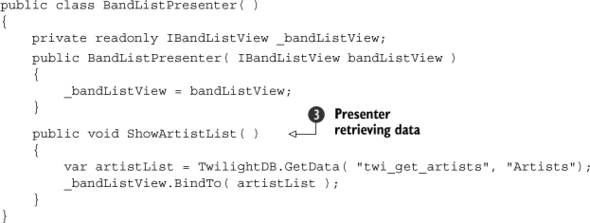
The changes in listing 10.11 are minor, and it may be difficult to see the impact they have. All you’ve done is move code around into different classes.
But notice that the BandListPresenter doesn’t have any references to user controls—which means it can be tested without requiring any user interaction. Yes, you
still have that nasty static method call in there ![]() but at the very least, you can implement an integration test around this class so that you can refactor it further.
but at the very least, you can implement an integration test around this class so that you can refactor it further.
In addition, because you’ve injected the view into the presenter, you write a test with a fake or mock IBandListView class that behaves in a controlled manner (and again, that doesn’t require references to a user control library).
The view’s responsibilities have been crystallized as well. You’ve absolved the view of its responsibility to display a list
of artists ![]() . Instead, it now says, “Once I’m done loading, tell the presenter to do all the work and show the artist list.”
. Instead, it now says, “Once I’m done loading, tell the presenter to do all the work and show the artist list.”
Once the presenter has its data, it turns around and passes the buck back to the view by calling the BindTo method ![]() . But that’s also a good thing. The presenter is responsible for collecting the required data. Once it has what it needs to
display, it says, “Okay, view, here’s what you need. Show it on the screen somehow.” The BindTo method takes a DataSet as a parameter, which means it isn’t capable of retrieving the data it needs to display. It needs to be told what to display—which
is in keeping with the goal to make the view as stupid as possible while the presenter does all the heavy lifting.
. But that’s also a good thing. The presenter is responsible for collecting the required data. Once it has what it needs to
display, it says, “Okay, view, here’s what you need. Show it on the screen somehow.” The BindTo method takes a DataSet as a parameter, which means it isn’t capable of retrieving the data it needs to display. It needs to be told what to display—which
is in keeping with the goal to make the view as stupid as possible while the presenter does all the heavy lifting.
Note
The MVP patterns aren’t limited to the page level. Your user controls can be converted to the pattern as well. The same principles apply, though take extra care when defining the interface in which you interact with the control. If you aren’t careful, the main page view that contains the user controls can end up even messier than before.
You’ve only scratched the surface of all the refactoring that needs to be done in this page. The sample code that accompanies this chapter separates responsibilities even further by moving the data access to a separate class and even providing an intermediate class to convert the data into a DTO for use in the view. Unit tests are provided for all except for the data access class, which we’ll cover in the next chapter.
Before we close this chapter, we’re going to talk about one final presentation pattern: Model-View-Controller.
10.6. Model-View-Controller
The final user interface pattern we mentioned in section 10.4 was Model-View-Controller (MVC). MVC predates MVP by many years, at least as an officially recognized pattern. In fact, the MVP patterns are derivatives of it and are sometimes considered to be an evolution of MVC to accommodate some of the features of modern IDEs. Figure 10.6 shows how the pieces interact.
Figure 10.6. Model-View-Controller. Like the Supervising Controller, the view has access to the model.

Comparing this to figure 10.2, you might think that MVC isn’t so far removed from the Supervising Controller. The controller retrieves a model, then sends it down to the view. The view can interact with the model as it does with the Supervising Controller.
In fact, the Supervising Controller, the Passive View, and Model-View-Controller are all variations on the same theme. Their overall differences can be hard to discern when looking at them for the first time.
Where MVC differs is that the view and the controller are more clearly separated. There isn’t much, if any, communication between the two. In most cases, the controller launches the view, and then goes away. When the view wants to do something, a new controller is created and an appropriate action is taken.
By contrast, in the patterns discussed in section 10.4, the view has a constant connection to the controller, either through direct reference or by events raised from the view and/or model. The presenter has to do quite a bit of synchronization with the view to maintain state. The presenter needs to stick around to keep things in order.
In MVC applications, events raised by the view are typically routed to a centralized location in the application, a front controller. Based on the action raised, the front controller then decides what to do.
Typically, this process means instantiating another controller and performing an action on it (calling a method on the instantiated controller class). That method does whatever processing is necessary, and then retrieves the model appropriate for the action, selects a view to display, and sends the model down to the view, which renders itself. The process then repeats.
As you can imagine, there are differences in how a UI using MVC would be implemented. Let’s take some time to compare MVC and MVP.
10.6.1. Comparing MVC and MVP
MVC and the various flavors of MVP may appear similar on paper. But if you’ve never seen an MVC implementation, it can seem quite foreign to developers who haven’t worked outside of .NET.
In general, MVC is well suited to web applications because of their stateless nature. The pattern lends itself to having a controller launch a view and then disappear until an action is performed on the view. Controller actions are often designed so that they handle state management intrinsically: everything the action needs is provided to it. It doesn’t need to request anything from the view and usually doesn’t even have access to the specific view that launched it.
That said, it isn’t trivial to implement MVC in an ASP.NET Web Forms environment without outside help. Microsoft has gone to great lengths to make Web Forms seem stateful, and it’s difficult to circumvent this out of the box. Server-side web controls were designed specifically to maintain state on the web, and MVC is better suited for scenarios where state isn’t mandatory from one call to the next.
To use MVC in ASP.NET, you’ll probably find it necessary to use a framework designed specifically for this purpose. As of this writing, there are two popular ones: Castle MonoRail from Castle Stronghold and ASP.NET MVC from Microsoft. MonoRail has the advantage of maturity—it has several years on Microsoft’s offering. MonoRail is an open source project, and although ASP.NET MVC is not open source, as of this writing, its source is available for download. Both products are free.
By contrast, the Passive View, Supervising Controller, and Presentation Model work better in stateful environments, such as Windows Forms applications and out-of-the-box Web Forms applications. The MVP patterns require much more interaction between the view and the presenter, so they don’t have the luxury of being disconnected in the same way they are in an MVC implementation. Events that are raised by the view are handled by the same presenter instance that launched the view. Often, a view will have a reference to its presenter, and vice versa.
When discussing the difference between MVC and the MVP patterns, a good rule of thumb is to examine the entry point of a screen. If the view is the first class instantiated, chances are it’s one of the MVP patterns. If the controller is the initial point of contact, it’s probably an MVC pattern.
Think of a typical Web Forms application. A user navigates to an .aspx page. This page is the view. In the code-behind, you create your presenter and pass the view class to it. This configuration is an MVP pattern. By the time the presenter is created, you’ve already determined which view will be shown.
In an MVC world, the controller class is the first piece of code that runs. It executes any code that needs to be done, and based on the action that was requested (and in some cases, on the results of the code that was executed), it will determine which view to display and pass control over to it. The order of instantiation is the opposite of how it’s done in an MVP scenario.
The starting point isn’t the only difference between the two patterns, but it’s a good guideline for understanding the differences between the two styles, as illustrated in figure 10.7.
Figure 10.7. Some differences between MVP and MVC. MVP is usually better suited to brownfield applications.

You may be wondering why we haven’t spent as much time on MVC as with MVP. Good question. Let’s answer it.
10.6.2. Refactoring to MVC?
There’s a reason we’ve isolated the MVC pattern on its own: MVC isn’t conducive to brownfield applications.
As we’ve mentioned, MVC is useful for web applications. But Web Forms wasn’t designed to have a controller as its entry point. Microsoft wants you to start from the view. Plus, they really want to help manage the state of your web page for you. This desire permeates every aspect of Web Forms, from the ViewState, to the ASP.NET page life cycle, to the server-side controls.
To circumvent this, you must intercept requests before they get to the .aspx page and handle them differently from how they’re handled in a traditional Web Form. You can achieve this goal through the use of HTTP handlers, which is how frameworks such as Castle MonoRail and ASP.NET MVC are able to do it.
However, once you introduce such a framework, you’re no longer able to use your existing web pages in the same way. The purpose of the MVC framework is to circumvent the issues arising from the built-in ASP.NET state management mechanism.
Also, the entire notion of an .aspx page is turned on its head. You don’t navigate to a specific page anymore. Instead, you navigate to a route and the framework translates that route into a controller action, which in turn renders an appropriate page.
We aren’t suggesting that you discount MVC by any stretch of the imagination. We’re huge fans of the pattern because of the increased control it provides and, more importantly, because of the clearer separation of concerns (read: testability). It’s our pattern of choice for the UI...for greenfield web applications.
For brownfield applications, we feel the costs of refactoring to it outweigh the benefits. As it is, you wouldn’t so much refactor your UI as you would rewrite it. Each page would have to be rewritten in the new “controller-first” style, and the URL for that page would be different than the original—which means breaking existing links to that page.
In addition, because MVC applications are more suited to stateless environments (like the web), ASP.NET server-side controls are harder to manage. One of the key features (notice we didn’t say “advantages”) of server-side controls is their ability to manage view state. When a form is submitted, the control is able to retain its state even though the page was reloaded.
Many server-side controls rely on the Web Forms view state management pipeline in order to function properly. With the pipeline being subverted in an MVC environment, you’d need to find a workaround.
Finding a workaround isn’t such a big deal for simple controls like a text box. But for complex ones, like a third-party grid, it can be a big challenge to replace the control with something else that’s more conducive to a stateless web (such as a control that uses only HTML and JavaScript).
The same holds true for WinForms application though it’s not quite as drastic a change. With WinForms, you don’t need to worry about breaking s, but there’s considerable work involved to migrate to MVC.
In both cases, one of the main reasons for our position is that there’s already an alternative—three of them in fact: the Passive View, Supervising Controller, and Presentation Model. Any of these is more than adequate to work toward.
For WinForms in particular, they’re a natural fit because of the stateful nature of WinForms. With MVP, you can take advantage of both separation of concerns and the event model provided by form controls.
The same goes for Web Forms. Although we may not agree that making web applications behave like WinForms applications is a wise model, the practice does lend itself to using one of the MVP patterns.
And so concludes our whirlwind tour of MVC. As we mentioned, it’s our preferred pattern for brand-spankin’-new web applications. MVC is garnering a lot of interest in recent months due to the release of Microsoft’s ASP.NET MVC implementation, and we encourage you to investigate it. We recommend ASP.NET MVC in Action (Manning Press, 2009) as a good way to learn about it. But for the focus of this book, it pays to be familiar with the various flavors of MVP.
10.7. Summary
We covered a lot of ground in this chapter and still there’s much we’ve left out. The user interface is an important facet of a brownfield application because many such applications begin their journey to brownfield in the UI. All it takes is one demo application released to production.
In this chapter, we outlined some of the common pain points you may experience from such a user interface. We reiterated the importance of separation of concerns, particularly in the UI.
We also dove pretty deeply into the components of a UI and discussed ways you can configure these components, via the Passive View, the Supervising Controller, and the Presentation Model. Each of these patterns provides a certain trade-off between flexibility and readability, and each has its place in various scenarios.
From there we talked about how to refactor to a less coupled user interface and how you can approach the refactoring. We provided a somewhat detailed example of one such refactoring, though the supplemental code sample goes more in depth.
We closed the chapter with a discussion about Model-View-Controller. Although it’s an important pattern and well worth the effort to learn, MVC is more suited to greenfield web applications. In general, you don’t refactor to MVC so much as you rewrite the UI in it. But MVC is a well-known pattern, and we provided a comparison between it and the other patterns in this chapter.
From the user interface all the way to the database, chapter 11 awaits! Let’s see what’s in store in the data access layer.