Productivity Shortcuts
Automation with the goal of being productive is extremely logical, and this section is dedicated to making and explaining shortcuts with exactly that purpose. There is a download link for each shortcut provided at the end of its section, but I also explain how to build each one manually yourself.
Share PDF
This shortcut takes anything you give it, makes a PDF with it, and shows you the sharing options for a PDF. Here’s what we need to do to build the shortcut:
Add the Make PDF action.
You don’t have to do anything to this action, just add it to your shortcut. As the name says, it makes a PDF.
Add the Share action.
When you add this action, it should automatically say “Share
PDF”, and if you tapPDF, you can tap Reveal Action to see that the PDF comes from the Make PDF action.Tap the More
 icon and toggle on Show in Share Sheet. Then tap Done.
Tap Next in the top-right corner, set the name (“Share PDF”), and optionally tap the icon to change its color or glyph. Then tap Done.
That’s it! You just built a really useful shortcut in four steps! Let’s test it. Go to Safari and open a webpage (such as TakeControlBooks.com). Tap the share  icon, and scroll down in the list of actions until you find Share PDF—tap it. The shortcut makes a PDF of the webpage and opens another share menu to let you share it.
Install Share PDF shortcut: https://alt.cc/shsp
Meeting Time and Notes
Usually as we walk into a meeting (whether that be a meeting room or clicking on a link to join a teleconference) there are plenty of things running through our heads—everything from “Is Bob’s cat back from the vet?” to “I need to check who is on holiday in two weeks and see if it affects our deadlines.” This leaves precious little space for the small but important things like creating a new meeting note and making sure Do Not Disturb is enabled. This shortcut is designed to help us tackle the little things with just a tap.
This shortcut gives you a list of events from your calendar today, asks you to choose from them, and turns on Do Not Disturb until the end of the event. Then it formats the data from your event into a usable format and creates a note with it. Finally, it searches for that note and opens it.
Here are instructions to build this shortcut:
Add a Find Calendar Events action.
Change variable to the right of Start Date from
is in the nexttois today. Then tap Add Filter, which defaults to Calendar isHome(or another calendar on your device.) TapCalendarand chooseIs Not All Day. Then change Sort By to Start Date and set the Order to Oldest First (the default). (When you’ve done this the action should look like Figure 42).
Figure 42: The Find Calendar Events action filled out. Add a Choose from List action.
Shortcuts auto fills the
ListwithCalendar Events, so you don’t have to do any more work.Add a Set Do Not Disturb action.
Tap the
Offvariable to change it toOn, and then tapTurned Off. TapEvent Ends, and then tapEvent. Tap Select Magic Variable and then tapChosen Item(which appears below the Choose fromCalendar Eventsaction).Add a Text action.
Alone this action does nothing, so we have to put in the content. Tap the text field and tap
Chosen Itemin the row above your keyboard. Shortcuts now shows you a list of elements of your Calendar Event. Tap Title (the default). Add a return to the text box, and tapChosen Itemagain, this time selecting Start Date. After another return, tapChosen Item, and this time select Attendees. Add two more returns. Finally, add yet anotherChosen Itemand select Notes. Tap Done. (See the first action in Figure 43.)Add a Create Note action.
This fills out the with section to use the Text action above.

Figure 43: Steps 4 and 5 from this shortcut. Add a Find Notes action.
Unfortunately our Create Note gives us the content of the note, not the note itself. We could open Notes and find it, but where’s the automation in that? Instead we can use the Find Notes action. Tap the
Textvariable and press Delete to clear it. When it prompts you, select All Notes. Tap Add Filter and then change theanythingin Body contains anything to use a magic variable (Figure 44), and select the Text action from above.
Figure 44: Change the variable in the Find Notes action. Select All Notes in the Find Notes action.
Add a Show Note action.
This action automatically uses the magic variable output of the Find Note action.
- Tap Next, give the shortcut a name and icon, and tap Done.
Install Meeting Time shortcut: https://alt.cc/shmt
Event Templates
We all have events we add to our calendar semi-regularly, but they’re not recurring events—haircuts, quiz nights, dinner with friends, and trips to the cinema. This is something we can easily have Shortcuts handle for us: we choose the event and set the start date and it can do the rest of the work for us. (Figure 45).

Follow these steps to create the shortcut:
Add a Choose from Menu action.
Rename “One” and “Two” to
HaircutandDinner, and then add three more menu options forQuiz Night,Cinema, andEvent from Today. Each menu item you add also appears as a separate block beneath the menu, so you can specify different actions for each choice.Beneath the Haircut option add an Ask for Input action.
Set the Question to
Start Date, and in the Show More area, set the Input Type toDate and Time.Directly below Ask
Start Date, add an Adjust Date action.Set this to
[Add] [45] [minutes]toProvided Input(the output of the Ask for Input action).Right after
[Add] [45] [minutes]toProvided Input, add an Add New Event action.Set the Event Title to
Haircut, From toProvided Input(a magic variable from the Ask for Input action in step 2), and To toAdjusted Date. Tap Show More and set the Location to the address of your hairdresser.The whole Haircut section should look like Figure 46.

Figure 46: Event Templates: Haircut. Under the Dinner option, add an Ask for Input action.
Set the Question to
Start Date, and in the Show More area, set the Input Type toDate and Time.Below Ask
Start Date, add an Adjust Date action.Set this to
[Add] [2] [hours]toProvided Input(the output of the Ask for Input action).Under
[Add] [2] [hours]toProvided Input, add an Add New Event action.Set the Event Title to
Dinner, From toProvided Input(a magic variable from the Ask for Input action in step 5), and To toAdjusted Date. Tap Show More and set the Location toAsk Each Time.Under the Quiz Night option, add an Ask for Input action.
Set the Question to
Start Date, and in the Show More area, set the Input Type toDate.Below Ask
Start Date, add a Date action.Set this to
[Specified Date] [Provided Input] [7 PM].Under
[Specified Date] [Provided Input] [7 PM], add an Adjust Date action.Set this to
[Add] [2] [hours]toDate(the output of the Date action).Right after
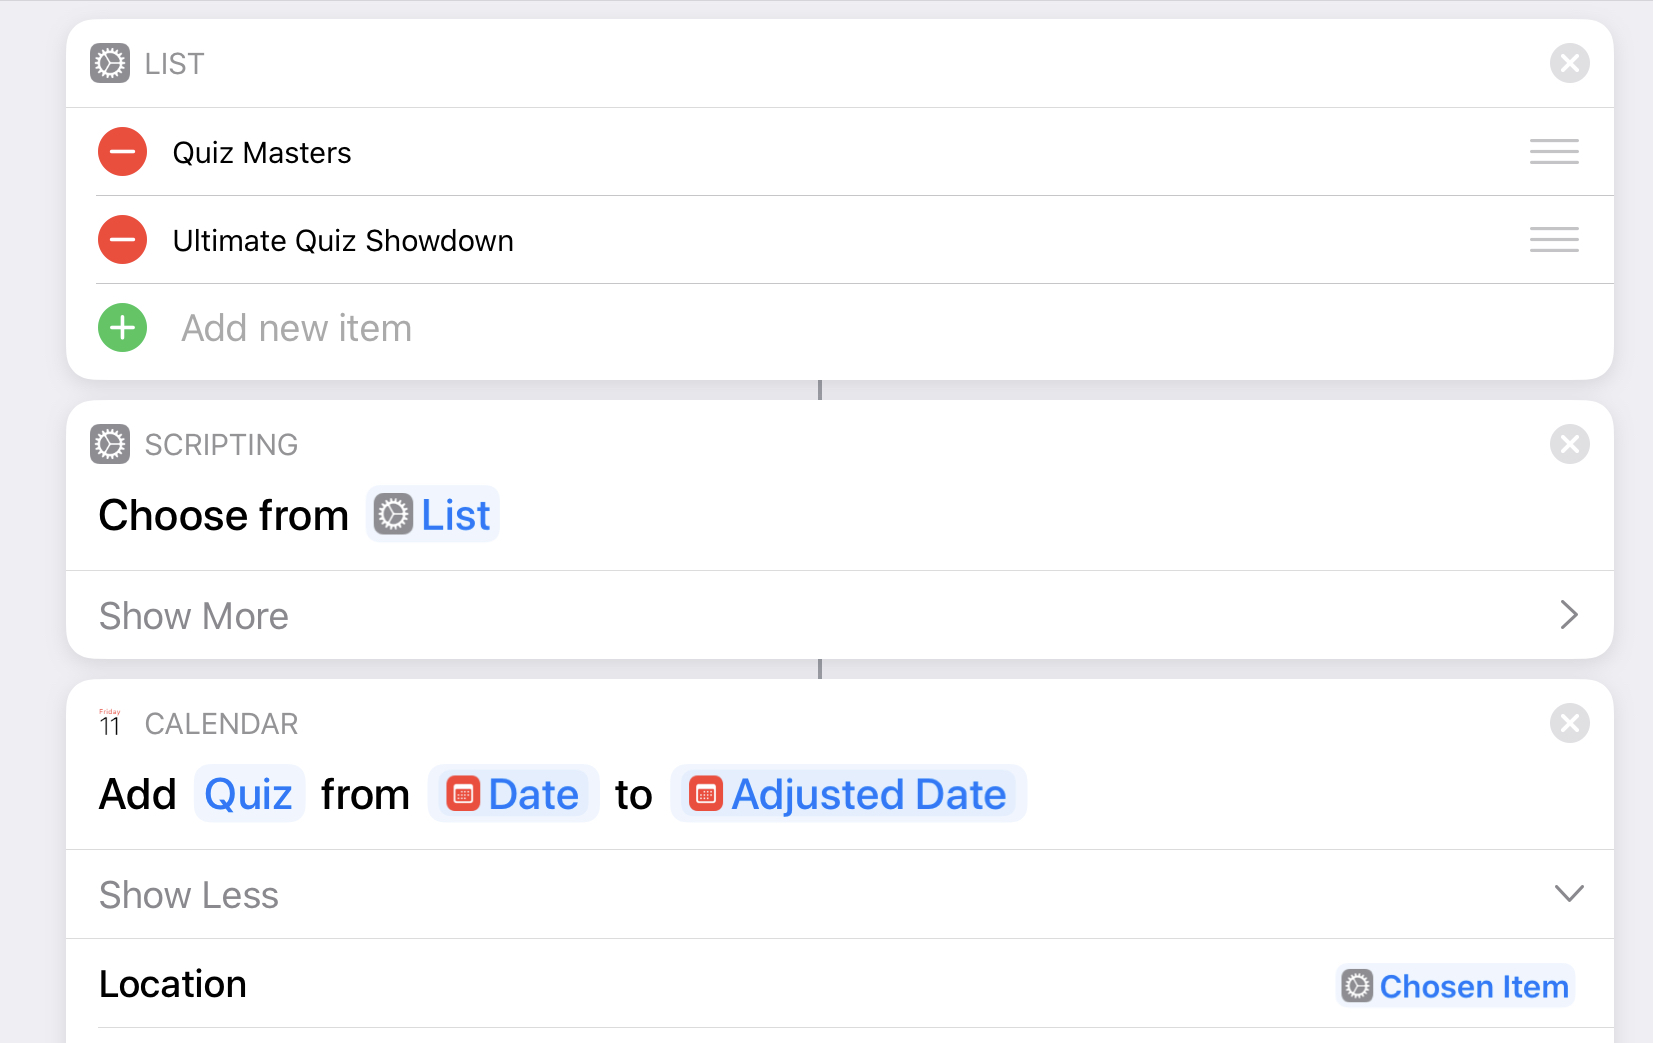
[Add] [2] [hours]toDate, add a List action.Add
Quiz MastersandUltimate Quiz Showdownas list items (these are definitely real places!).Below List, add a Choose from List action.
Make sure that list is set to
List(from the above action).Under Choose from
List, add an Add New Event action.Set the Event Title to
Quiz Night, From toProvided Input(a magic variable from the Ask for Input action in step 8), and To toAdjusted Date. Tap Show More and set the Location toChosen Item. Check Figure 47 to make sure everything looks right.
Under the Cinema option, add an Ask for Input action.
Set the Question to
Start Date, and in the Show More area, set the Input Type toDate and Time.Below Ask
Start Date, add an Adjust Date action.Set this to
[Add] [Ask Each Time] [minutes]toProvided Input(the output of the Ask for Input action).Under
[Add] [Ask Each Time] [minutes]toProvided Input, add an Add New Event action.Set the Event Title to
Cinema, From toProvided Input(a magic variable from the Ask for Input action in step 15), and To toAdjusted Date. Tap Show More and set the Location to the address of your cinema.Under the Event from Today option, add a Find Calendar Events action.
Set the Start Date to
is today.Beneath Find
All Calendar Eventswhere, add a Choose from List action.This should automatically select
Calendar Eventsfrom step 17.Right after Choose from
Calendar Events, add a Get Details of Calendar Events action.Set Detail to
Durationand Calendar Event toChosen Item(the second should be set automatically.)Below Get
DurationfromChosen Item, add an Ask for Input action.Set the Question to
Start Date, and in the Show More area, set the Input Type toDate and Time.Under Ask
Start Date, add an Adjust Date action.Set it to
[Add] [Duration] [seconds]toProvided Input.Below
[Add] [Duration] [seconds]toProvided Inputand just above End Menu (which will be the final block), add an Add New Event action.Set the Event Title to
Chosen Item(from step 18), and then tapTitle. Set From toProvided Input(a magic variable from the Ask for Input action in step 20), and To toAdjusted Date. Tap Show More and set the Location toChosen Item(from step 18), and then tapLocationas the part of the calendar event.Tap Next, give the shortcut a name and icon, and tap Done.
After the marathon of 23 actions, you have built an extremely powerful shortcut! We’re not quite done yet though! Tap the More ![]() icon and then Import Questions. Tap Add New Question and find the Location element of Add Calendar Event in Haircut, and type a suitable prompt (e.g. “Type the address of your Hairdressers”). Repeat this with the cinema. This means when you share your shortcut with someone else, they have to fill in the address of their hairdresser and cinema, instead of following you to yours!
icon and then Import Questions. Tap Add New Question and find the Location element of Add Calendar Event in Haircut, and type a suitable prompt (e.g. “Type the address of your Hairdressers”). Repeat this with the cinema. This means when you share your shortcut with someone else, they have to fill in the address of their hairdresser and cinema, instead of following you to yours!
Install Event Templates shortcut: https://alt.cc/shet
Add Tasks in Bulk
Usually when I think of something I need to do, as soon as I start to write it down I think of another 10 things to do. This shortcut is intended to solve this problem. When you run this shortcut, you can write down multiple tasks without lots of taps, and then process them afterwards (Figure 49).

Let’s build this Shortcut together:
Add an Ask for Input action.
Add this action to your shortcut, and then change
Questionto something helpful—I used Task List.Add a Split Text action.
This automatically updates to “Split
Provided InputbyNew Lines”.Provided inputis the output of the Ask for Input action.Add a Repeat with Each action.
This uses the Split Text action, one repeat for one line.
Just after “Repeat with each item” (so it’s within the Repeat with Each loop), add an Add New Reminder action.
Set Reminder to
Repeat Item. Tap No Alert and then tapAsk Each Time. Tap Show More, and set Reminder toRepeat Item. Tap List followed byAsk Each Time. Then Tap in the Notes field and again, tapAsk Each Time.The beauty of this is you don’t have to fill out any field when this runs. If you want to add more details you can, and you tap Done when you are happy to add the task to Reminders. If you want to always save the tasks to a specific list then you can remove
Ask Each Timefrom the List field and set your preferred list.Tap Next, give the shortcut a name and icon, and tap Done.
Install Add Tasks in Bulk shortcut: https://alt.cc/shtb
Daily Overview
This shortcut gives you an overview of your day—a list of events on your calendar, any reminders, and the weather forecast. But before we get to it, I must insert a giant disclaimer:
I created my daily overview shortcut to use in two ways, one when I turn off my alarm in the morning, and the other through Siri. It makes use of the Show Result action, when you run this through Siri the text in Show Result is spoken and shown, and when you run it from the Today Widget or the app then the text is shown.
I always start these shortcuts with the most important information first; that way, if your attention wanders, you probably got the “good bit.”
Here are the step-by-step instructions to build this Shortcut:
Add a Find Calendar Events action.
Tap
is in the nextand change it tois today—this limits the events to those today. You may also want to add another filter (tap Add Filter) to focus on a specific calendar, or to find events not on a specific calendar. Set your Sort by toStart Dateto make sure the result is ordered by time.Add an If action.
When you add this, it automatically changes to If
Calendar Events, but change theconditiontohas any value. Now we can give ourselves different information if we have events versus when we don’t.Below the If action, but above Otherwise, add a Text action.
Here, type
Calendar events for today:.Below Text, add a Show Result action.
This shows the Text from above.
Below Show
Text, add a Repeat with Each action.When we add this, it automatically uses
Textfrom the first action beneath our If. Tap this, press Delete to clear it, and then tap Select Magic Variable followed byCalendar Events—this is from the very first action in our shortcut.Directly beneath Repeat with each item in
Calendar Events, add a Get Details of Calendar Events action. SetDetailtoIs All DayandCalendar EventtoRepeat Item. This tells us if our event is an all-day event or not.Below Get
Is All DayfromRepeat Item, add a second If action. This should automatically become IfIs All Day, which translates to “if this is an all day event.”Inside the newly added If
Is All Dayaction, but above the Otherwise, add a Text action. Tap the text field, and tap the variableRepeat Item. Then tap that and change theas Texttoas Calendar Event. (Note: As mentioned in the warning above, this is the specific thing you can’t do at the moment.) Now you can tapTitleto get the title of the calendar event.Fill in the Otherwise statement, which was automatically added as part of the If action. (If you accidentally deleted it, tap the action settings
 icon next to the delete
  icon, and choose Put Back “Otherwise” to fix it.) Just below Otherwise, add a Text action. In the same we added the Title in step 8, add “
Start DatetoEnd Date -Title” here. (Again, this isn’t possible as of publication time.)Skip ahead past the first End If statement and the End Repeat statement that follows it, and add a Show Result action (just above the second Otherwise statement—you can delete that as we don’t need it).
This should automatically set
Repeat Resultsas its variable.At the very bottom, right after the End If statement, add a Find Reminders action.
Tap Add Filter, tap
List, and chooseDue Date, and then changeis exactlytois today. Set Sort by toDue Date, which sets the order to Oldest First. This means the reminders we get from this are sorted from earliest to latest due in the day.Add another If action.
Set the
conditiontohas any value, and delete the Otherwise action in this.Below the newly added If
Reminders has any valuebut above End If, add a Text action. Type something likeReminders due today:.Below Text, add a Show Result action. This automatically changes to Show
Text,and theTextis the action immediately above this.Below Show
Text, add another Show Result action. TapText, press Delete to clear it, and use a Magic Variable to select theRemindersfrom step 11.After the End If, add a Get Weather Forecast action.
This automatically chooses the
Dailyforecast atCurrent Location, perfect for our needs.Add a Get Item from List action.
This also changes automatically to Get
First ItemfromWeather Conditions.Add a Text action.
Type “The weather for today is” followed by a space and then add the
Item from ListMagic Variable.Add another Show Result action.
This shows the text in step 18.
Add another If action.
Tap
Textand press Delete to clear it, then set Input toItem from List(through the magic wand ). Tap it again so you can select
 Precipitation Chance. Then tapCondition(in the If) and tapis greater than. In the number field, type in0. This now tells us if there is some chance of rain. Delete the Otherwise section.Add a final Text action.
First let’s input the variables we need. Tap
Item from Listand selectPrecipitation Chanceagain, and then insert a secondItem from Listand change it toPrecipitation Amount. Now we can type in the text around this:There is a
Precipitation Chance% chance of precipitation.Precipitation Amountinches are forecast.Tap Next, give the shortcut a name and icon, and tap Done.
Voilà, Siri is now like Jarvis from Iron Man!
Install Daily Overview shortcut: https://alt.cc/shdo