Chapter 24. Building Hyperbola
Up to this point you have been using the PDE Export Product wizard to create end-user-deliverable versions of Hyperbola. As the Hyperbola product grows and has more configurations, and there are more developers working on it, there’s a pressing need for automated, reproducible, and accessible builds.
Building Eclipse systems by hand is somewhat challenging and tedious. The compile-time classpath for any given plug-in includes the code from all its prerequisites. Just computing the classpath and build order is hard. Mix in variations such as different source locations (e.g., projects in the workspace, checked out from CVS in the file system, or both) and the myriad of output packaging options and you need help.
So far, PDE’s Export wizards have insulated you from most of these details. Unfortunately, those wizards are hard to automate, as you have to click around in a UI to launch a build. It is also hard to make repeatable as it depends on the contents of the user’s workspace. Product teams and communities need release engineering builds that are automated and more rigorous.
Fortunately, the same underlying infrastructure used for exporting plug-ins, features, and products from the workspace can be used to perform release engineering builds of Eclipse-based products. This mechanism is called PDE Build. PDE Build compiles and packages a set of features and plug-ins according to the dependency information in their manifests and a set of control parameters. The output is an archive or directory structure that can be deployed either directly, via an update site, or even using Java Network Launch Protocol (JNLP). In short, PDE Build helps you create regular and reproducible builds.
This chapter dives into PDE Build and guides you through setting up an automated build for Hyperbola. We cover
• Configuring and running a product build
• Running feature-based builds
• The different build.properties files associated with building
• Customizing the build scripts
• Automatic version number qualification
24.1 What Is PDE Build?
At its heart, PDE Build is an Ant script generator. It takes in a collection of plug-ins and features, as well as their manifests and build.properties files, and generates a set of Ant build scripts. These scripts are run to produce a build. The export operations you have been doing throughout this book use PDE Build under the covers.
PDE Build is quite flexible. It can consume hybrid mixes of plug-ins and features that are prebuilt and those that remain to be built. Some may be included in the final output, and others may not. The output of a build can also vary from plug-ins in directories to update sites and ZIP archives of JAR’d and signed plug-ins and features.
The build mechanism builds plug-ins and features, or cascades of the transitively included features and plug-ins starting at a root feature. Cross-platform building is also supported.
The main benefit of PDE Build is that it brings all this together into one relatively simple process. Developers express their normal runtime dependencies in manifest files and a mapping from development-time structure to runtime structure in the feature and plug-in build.properties files. PDE Build does the rest.
Key to this process is the automatic generation of the build scripts. Using the input manifests and build.properties, PDE generates Ant scripts that copy identified files and compile identified code using a classpath derived by effectively flattening the plug-in dependency graph. The runtime classpath for a plug-in is defined as a complex graph of plug-in dependencies as described in its manifest file. The classes referenced at runtime are also needed at compile time, so the compile-time classpath is similarly complex. PDE Build uses the Runtime’s plug-in resolution and wiring mechanisms to derive the classpath for each plug-in being built.
As we mentioned before, you have already been using PDE Build if you followed along with the feature- or product-exporting examples. When you use these actions, you are, under the covers, running PDE Build. The rest of this chapter explores the use of PDE Build in a release engineering setting, where reproducibility and automation are key concerns.
24.2 Plug-in build.properties
Before we get too far into PDE Build itself, let’s recap what you have used as a build process so far in the book. Since the PDE wizards have been doing most of the work, you have seen the build.properties file for the Hyperbola plug-ins and features. This file is exposed on the Build page of the plug-in and feature editors.
The role of the build.properties file is to map development-time structures in a plug-in’s project onto the structures described in the plug-in’s manifest and needed at runtime. For example, by adding elements to the Binary Build section, you are stating that the deployable version of the plug-in must include those elements.
The various PDE editors and wizards take care of managing binary build entries for most of the common cases. When you add images or other runtime resources to a plug-in, you have to update the binary build information in the build.properties to ensure that they are included in the build result.
build.properties HELP
The various build.properties file options are documented in Help > PDE Guide > Reference > Build Configuration > Feature and Plug-in Build Configuration.
24.2.1 Control Properties
The plug-in editor’s Build page helps set up common build-related properties. To add more advanced properties, you have to edit the build.properties file directly using the plug-in editor’s build.properties page. When you set up automated builds, these advanced build properties become more relevant. Here we provide an example properties file and Table 24-1 for reference. See the PDE Help for a full list of build properties.

Table 24-1 Plug-in Build Properties

PDE uses this information, in combination with the plug-in manifests, to generate a build.xml script for each plug-in that is then run during the build process.
24.2.2 Using Custom Build Scripts
You can opt out of build script generation by supplying your own build.xml and selecting Custom Build on the Build page of the plug-in editor, as shown in Figure 24-1.
Figure 24-1 Custom Build selection

If you opt for a custom build.xml, you take complete responsibility for implementing the build script that has all the right targets and that does all the right things. A better solution is to use custom callbacks, as described in Section 24.5.1, “Customizing the Build Scripts.”
24.3 Setting Up a Builder
To see how this works in practice, let’s set up a managed build process for Hyperbola. The code for this build is based on Chapter 14, “Adding Software Management.” The client consists of the product definition, several Hyperbola-related features and plug-ins, and various prebuilt plug-ins from the target platform.
• Start by creating a simple project for the build scripts using File > New... > Project > General > Project. Call it hyperbola.builder.
• In the file system, navigate to your Eclipse IDE install and go to the org.eclipse.pde.build plug-in. For example, look in c:ideeclipsepluginsorg.eclipse.pde.build_3.5.1 if your IDE is installed in c:ide.
• Copy both templatesheadless-build build.properties and scriptsproductBuild productBuild.xml to the hyperbola.builder project. These are templates for the files used to control builds. In the subsequent sections the templates are filled in and used to build the product.
The builder’s build.properties file is quite different from the other build.properties files you have seen so far. It contains key/value pairs that define the input parameters to the build itself. The productBuild.xml is an Ant build file that controls the building of products. Having both files here allows you to override or add behavior to the build.
24.3.1 Tweaking the Target for PDE Build
In addition to setting up the builder project, you must also ensure that the required binary dependencies are available. In particular, you need the right executable launcher for the platform you are building—PDE Build cannot assume it’s already present or know where it is.
The executables for all supported platforms are available in the executables feature. This feature is not intended to be installed; rather it contains native executables for a wide range of platforms. The easiest way to get the executables feature is to get the Eclipse delta pack. We saw the delta pack in Section 3.5, “Target Platform Setup.” Ensure that your target has the delta pack.
With the target set up, we have everything needed to run PDE Build. Unfortunately, as of this writing, PDE Build does not directly support the use of target definition files in its execution. This means that you must manually manage your binary prerequisites. To help with this we have included a simple tool, the Target Export wizard, that collects all of the plug-ins and features from the current target and places them in a single directory. You can then use the output of this tool in PDE Build. Run it now as follows:
• Select File > Export > Plug-in Development > Target definition to export the plug-ins and features that constitute the current target.
• Choose a directory for the Hyperbola binary dependencies, for example, c:hyperbola_prereqs, and click Finish.
24.3.2 build.properties
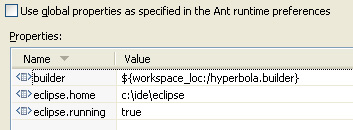
Now that the build structure is in place, it needs to be customized to build our plug-ins. Following is a summary of the changes needed to the template build.properties that was copied to the builder project. Some of the properties shown are needed later but are listed here to show the big picture. If a property is not listed here, it does not need to be changed. Of course, you should replace the file system locations appropriately.

Let’s look at each of these values and see how they affect the build. There are, of course, many more properties, but understanding these should give you an idea of how the build goes together and the level of control you have. The main information in build.properties covers roughly seven areas of concern in the build process. Each of these is detailed in one of the following sections. They are presented roughly in decreasing order of interest; that is, you have to set up the values in the first section but may not have to change things in the last section.
24.3.2.1 Product and Packaging Control
These properties describe what you are building, the branding you want, and the shape of the output:
product—The location of the product file that describes what is being built. The value takes the form /<id>/path/to/.product, where <id> is the ID of the feature or plug-in that contains the .product file.
archivePrefix—The specified prefix is added to the beginning of all paths in the output archive. This gives you control over the shape of your product when it is extracted on the user’s machine.
24.3.2.2 Build Naming and Locating
These properties allow you to control the working directories and names for the build output:
buildDirectory—The absolute file system path where the build is executed. All build input is downloaded to this location, and all compilation and composition are done under this directory. You should keep this path reasonably short to avoid exceeding file system length limits. This is the only directory to which the builder needs write permissions.
buildType—An arbitrary string used to name the build output and identify the type of build. For example, organizations often have nightly (N) builds, maintenance (M) builds, integration (I) builds, and so on. There is no need to limit this value to a single character.
buildId—The buildId is used in composing the name of the output archives. Typically, the ID conveys some semantics, such as TestBuild or CustomerX, or a full date stamp, such as 20090109.
buildLabel—This is used in the naming of the output directories. The buildLabel is typically a composition of buildType and buildId.
24.3.2.3 Base Identification and Location
Most of the time you are building a set of plug-ins that sits on top of some base. Think of the base as the target for your workspace—it is all the plug-ins and features that you are not developing yourself. This may be the Eclipse SDK, or it may be a whole product suite if you are a value-add developer. The properties here allow you to set where the base is, what’s inside, and how to get it if it is not present:
base—The location of the product on which the build is based. This is used to determine if the base needs to be installed. If the directory exists, its contents are assumed to be complete. If it does not exist, the build system fetches the base and installs it at this location. In the example, we set the base to be the target platform that was exported using the Target Definition Export wizard.
baseLocation—The location of the actual base install against which the plug-ins being built are to be compiled. This is the logical equivalent of the target used during development—all the plug-ins and features come from elsewhere. Note that this can be a full Eclipse install using link directories. This is specified separately from base because different products have different internal structures. For example, the standard Eclipse downloads include an eclipse directory in their structure. In these cases the baseLocation is just ${base}/eclipse. In our case we exported our target to c:/hyperbola_prereqs so we can use that directly as both the base and the baseLocation.
baseos, basews, basearch—The os, ws, and arch values for the base set of Eclipse components in the install. Eclipse installations may support many platform configurations, so these settings are used to clarify the set of base plug-ins, fragments, and features to use. If there are several configurations in your base, pick one and assign the properties accordingly.
skipBase—A marker property that, if set, indicates that fetching the base should be skipped.
pluginPath—A list of locations where additional plug-ins and features can be found. Entries in this list are separated with the platform-specific separator.
24.3.2.4 Cross-Platform Building
This property helps control cross-platform building:
configs—An ampersand-separated list of target machine configurations for which you want to build. Each configuration consists of an os, ws, arch triple, such as win32, win32, x86. The build process creates a separate output for each configuration. If the configuration is not set or is set to *, *, *, the build is assumed to be platform-independent. In this example we are building Hyperbola for Linux GTK and Windows.
24.3.2.5 Software Configuration Management (SCM) Access Control
The build process can automatically check out the source for the build from an SCM system. The location of the source is dictated by map files, which can themselves be checked out from an SCM system. The following properties let you bootstrap that process by setting basic locations and SCM tags to use:
mapsRepo—The SCM repository that contains the map files needed for the build.
mapsRoot—The path in the SCM mapsRepo to the map files for the build.
mapsCheckoutTag—The SCM tag used to check out the map files. The map files, in turn, control the SCM tags used for checking out the plug-in and feature projects.
skipMaps—A marker property that, if set, indicates that the map files are local and should not be checked out.
fetchTag—A property used to override the SCM tags defined in the map files. For example, setting it to HEAD is useful for doing nightly builds with CVS.
skipFetch—A marker property that, if set, indicates that the source for the build is local and should not be checked out.
24.3.2.6 Publishing a Product Build to a p2 Repository
Depending on the way you wish to deploy your software, a p2 repository may be more convenient than platform-specific ZIP files. The following properties control the creation of a p2 repository containing the results of the build. The repositories can be used by others to provision Hyperbola and can also be used by PDE Build to build plug-ins intended to run on top of this product.
p2.gathering—A marker property that, if set, indicates that all the build artifacts should be gathered into a p2 repository. During a product build, the p2 repositories are created in a temporary directory and the repository must be explicitly mirrored to the final output directory.
p2.metadata.repo—The location where the metadata repository is written if p2.gathering is on.
p2.artifact.repo—The location where the artifact repository is written if p2.gathering is on.
p2.compress—A marker property that, if set, indicates that the repositories should be compressed if p2.gathering is on.
The artifact and metadata repository properties should identify repository locations under a shared parent. Later in Section 24.5.2, “Repositories and Additional Dependencies,” we may need to use the location of the parent as the repoBaseLocation.
24.3.2.7 Java Class Libraries and Compiler Control
Of course, the build is primarily concerned with compiling Java code. The properties here allow you to define the compilation classpath as well as various arguments passed to the Java compiler:
bootclasspath—The default boot classpath to use when compiling code. This should point to all the classes that are expected to be on the boot classpath when the product being built is run. The value is a semicolon-separated list of file system locations.
compilerArg—A list of arguments to pass to the compiler.
24.4 Running the Builder
Now that the builder is defined, you are ready to build Hyperbola. For most of this chapter we assume that you are working locally and already have the Hyperbola code in your workspace. For simplicity, we also assume that you exported your target to c:/hyperbola_prereqs. With these assumptions, the builder does not need to access a server. To set this up, make sure that build.properties has the following settings:
Because the plug-ins and features are not being checked out from CVS, you need to create the build directory by hand. In the following steps replace ${buildDirectory} with the value from the build.properties, for example, ${user.home}/eclipse.build.
• Create ${buildDirectory}.
• Create ${buildDirectory}/plugins.
• Create ${buildDirectory}/features.
• Copy the required feature projects to the features directory and the plug-in projects to the plugins directory. Figure 24-2 indicates which projects are needed and what the layout should look like in the end.

Copy Files Every Time
Since the builder is not checking files out of CVS every time, the projects must be copied every time their content changes.
Now run the builder. The easiest way is to use a command prompt and change your working directory to the location of your builder. For example, if you have been following along, the builder files build.properties and productBuild.xml are in the hyperbola.builder project in the workspace. Once there, run Eclipse’s AntRunner application using the command line shown below. The -buildfile argument specifies the build file to run. Here we use productBuild.xml. The -consoleLog argument ensures that you can see the output messages as the build progresses.

Choose the Headless AntRunner
Make sure you choose org.eclipse.ant.core.antRunner and not org.eclipse.ant.ui.antRunner when launching the build.
The build produces the structure shown in Figure 24-3 in the ${buildDirectory}/${buildLabel} directory. In our example the output goes in ${user.home}/eclipse.build/I.TestBuild. This directory contains one archive per configuration that was built and a p2 repository. Each archive is a complete, ready-to-run Hyperbola client.

The compilelogs directory contains the build logs for each plug-in that was built. The various assembly and packaging scripts in the build directory are left over from the build and can be deleted. They are automatically deleted and regenerated each time the builder is run.
The repository directory contains the p2 repository from which Hyperbola can be installed.
Debugging the Build
Builds are notoriously hard to get right. Spelling mistakes, commented lines, and typos all contribute to builders that just do not work. The Eclipse IDE includes comprehensive support both for authoring Ant files and for debugging Ant scripts. There are a few quirks to setting this up for PDE Build, so the steps are detailed here.
You must have the root build script in your workspace. If you have been following along, you should have the product build script in your workspace. If not, you can import it:
• Use the Import > Plug-ins and Fragments wizard to import the org.eclipse.pde.build plug-in.
• In the wizard, set the Plug-in Location to your IDE location (e.g., c:ideeclipse) and choose Import As > Binary projects.
• Click Next, select the org.eclipse.pde.build plug-in, and Add it to the list.
• Click Finish.
Now you have to set up a launch configuration to run PDE Build’s build.xml, the root of the build mechanism:
• Navigate to org.eclipse.pde.build/scripts/productBuild/productBuild.xml and use the context menu’s Debug As > Ant Build... to open the Ant launch configuration dialog.
• On the JRE page, select Run in the same JRE as the workspace.
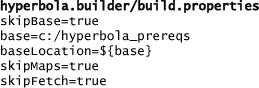
• On the Properties page, uncheck Use global properties... and use Add Property... to add a property called builder, as shown in Figure 24-4.
Figure 24-4 Ant builder properties
• Click Debug and run the build.
Everything should work as before. Now you can open PDE’s Ant scripts, such as productBuild.xml, and add breakpoints by double-clicking in the left margin or using the Toggle Breakpoint context menu. Debug the build again. When the breakpoint is hit, you can inspect Ant properties and step over and into Ant statements.
24.5 Tweaking the Build
Now that you’ve seen the basics of how to build a system, here are some of the more common and useful customizations. These are not mandatory but are generally useful.
24.5.1 Customizing the Build Scripts
The templates directory in the org.eclipse.pde.build plug-in has many useful script templates. These should be copied into your builder and customized as needed. Table 24-2 presents an overview of the most relevant templates. For more information on customizing a build, see the Eclipse online Help documentation at http://help.eclipse.org and navigate to Plug-in Development Environment Guide > Tasks > PDE Build.
Table 24-2 PDE Build Templates

24.5.2 Repositories and Additional Dependencies
For Hyperbola, we used the Target Export wizard to help create the base against which everything was compiled. However, this approach may not be ideal when configuring a build server. You may have various headless scripts and other facilities to get all the parts you need. If the dependencies end up in different directories, the pluginPath and repoBaseLocation properties can be used.
The pluginPath property points to a separated list of additional locations in which PDE Build can look for prebuilt dependencies.
The repoBaseLocation points to a single directory that may contain one or more p2 repositories either in zipped or extracted form. When this property is used, you must also specify the transformedRepoLocation property and point it to a writable location on disk. PDE Build copies the contents of the base repositories and transforms them into a runnable form. All the plug-ins and features in the transformedRepoLocation are then added to the pluginPath.
Runnable Repositories Required
Repositories generally come with all their content as JARs. Features, and some plug-ins, however, need to be expanded on disk to be useful at build time; that is, they need to be in runnable form. PDE Build ensures that the given base repositories are transformed appropriately.
24.5.3 Fetching from an SCM System
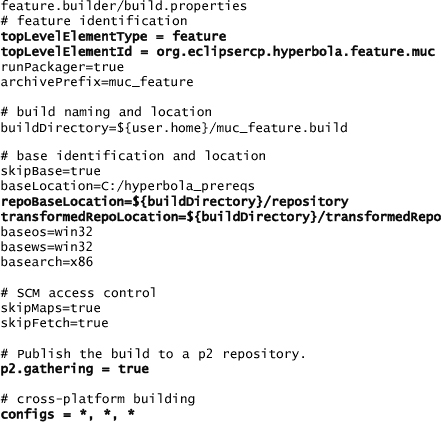
PDE Build can also be configured to check out the source for the plug-ins and features being built from an SCM system, such as CVS or SVN. It uses the notion of map files to map feature and plug-in IDs onto SCM repository locations and tags. This allows you to identify the top-level product or feature and let PDE Build figure out that you really mean “check out a particular location in a particular repository using a particular SCM tag.” A map file contains a series of lines, each of which takes the following form:
![]()
CVS is an Example
In this discussion we use CVS as the example SCM system. The syntax and concepts are equivalent if you are using SVN or some other SCM system.
If the path in the repository, the last element, is not specified, PDE Build assumes that the element to fetch is at the root of the repository and has the same name as the element. If your artifacts are in a different location in the repository, you must specify the complete path from the root of the repository to the directory containing the contents of the element, that is, the full path of the parent directory of the feature.xml or plugin.xml. Note that this path must not start with a “/”.
In your ${buildDirectory} create a maps directory, and in that directory create a hyperbola.map file that contains the following entries. Be sure to replace the repository information and the tag. You can use HEAD for the tag if you only ever want to build from HEAD.
![]()
To save space, we have included only one feature and one plug-in in this map file. In practice, you must add an entry for each plug-in and feature that needs to be built. All other elements are assumed to be in the base and do not need to be fetched or built.
Enable fetching by commenting out the skipFetch property in build.properties. Leave skipMaps=true for now. Delete the plugins and features directories from the ${buildDirectory} and run the build. Notice that the source listed in the map is checked out and built.
Fetching the Product File
In the case of a product build there is a bit of a catch-22 situation. The .product file drives the list of features and plug-ins to be built. This file is typically in a plug-in or feature project in the SCM, but the map file mechanism does not have a way of indicating which project or where it is. Since the .product file drives the fetch phase of the build and the fetch phase cannot fetch it, it must be checked out explicitly.
This can be accomplished using a custom build step early on in the build, for example, by adding the following Ant instructions to the postSetup target in customTargets.xml:

See Section 24.5.1, “Customizing the Build Scripts,” for more information on the customTargets.xml file.
24.5.4 Fetching the Maps
Sharing the map files in the SCM repository is the next logical step. There may be many map files, for example, each controlled by different teams. The simplest structure is to have a directory in the repository that holds the map files. Different teams then update their map files, and the build automatically picks up their changes.
During the build process, the getMapFiles target in customTargets.xml is called to download all the map files. The behavior of getMapFiles is controlled by setting various properties in build.properties, as shown here:

If skipMaps is commented out, getMapFiles checks out the contents of ${mapsRoot} from ${mapsRepo} using ${mapsCheckoutTag} and puts it into a maps area in ${buildDirectory}.
Set this up in the build.properties, check your map files into a repository, and delete the entire contents of ${buildDirectory}. Now run the builder and watch that first the maps are checked out, then the features and plug-ins. Then the build should continue as normal.
24.5.5 Auto-substitution of Version Numbers
Deployed features are full of version numbers—included plug-ins and features are all identified by precise versions. Listing and managing these specific version numbers at development time is challenging, to say the least. If the version of a plug-in changes, all referencing features have to be updated. This is cumbersome and error-prone.
To simplify the process, PDE Build includes support for automatically substituting version numbers during the build. You saw this in Chapter 9, “Packaging Hyperbola,” where included plug-ins and features were identified as version 0.0.0. The use of 0.0.0 tells PDE Build to substitute the version number of the plug-in or feature used in the build. This eliminates the need to change the containing feature definition during development and ensures that the deployed version numbers are always correct. This is the default behavior of PDE Build.
You can lock in version numbers by setting them explicitly in the feature editor. For example, on the Plug-ins page of the feature editor, select Versions... in the Plug-ins and Fragments section. There you can select various policies for managing the version numbers. The options specified in the dialog apply to all plug-ins and fragments. If you want to lock down some plug-in version numbers but leave some to be assigned at build time, you have to use the feature.xml page and edit the file directly.
24.5.6 Qualifying Version Numbers
It is often handy to have output version numbers qualified by a build timestamp or other information. PDE Build supports a mechanism for optionally qualifying select plug-in and feature version numbers during the build process.
Open the org.eclipsercp.hyperbola plug-in’s editor, and on the Overview page set the plug-in Version field to 1.0.0.qualifier. Do the same for the org.eclipsercp.hyperbola.feature. During the build process, the qualifier segment of the version is replaced with a user-selected value. This should be done for all plug-ins and features.
By default, the qualifier is derived from the context of the build. For example, if the build is based on checking out particular CVS tags using the map files described earlier, the qualifier for each plug-in or feature is the CVS tag used to check out the source for the plug-in. This way, the plug-in’s full version number is based on its source.
If the build is not based on SCM tags or is using some sort of default tag—for example, the CVS HEAD tag used in continuous integration builds—the qualifier for the version is the millisecond clock time at which the plug-in or feature was built.
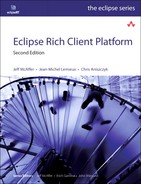
You can force the value of the qualifier to be uniform across the build by setting the forceContextQualifier property in the builder’s build.properties, as shown below. You should take care to use qualifier strings that are valid for file and folder names as the qualifier shows up in the build output disk content. You should also take care to ensure that qualifiers are monotonically increasing so that successive builds have larger version numbers.
hyperbola.builder/build.properties
forceContextQualifier=someQualifierString
It is also possible to control the qualification of plug-ins and features on an individual basis by setting the qualifier property in the relevant build.properties, as shown here:
org.eclipsercp.hyperbola/build.properties
qualifier=<arbitrary string value here>
24.5.7 Identifying and Placing Root Files
In product scenarios it is often required that various files be included in the root of the product distribution. This commonly includes various licenses and legal files and perhaps even a JRE. The PDE Build root files mechanism allows you to do this.
The root files mechanism is actually part of the feature build structure. Like plug-ins, features have their own build.properties file that maps the development-time structure onto the runtime structure. This is where you describe the set of files to copy to the root of the final build output. The snippet below shows a typical feature build.properties file. The bin.includes property behaves exactly as described for plug-ins. The remainder of this section details the setup for root files. See the PDE Help for a full list of feature build properties.
![]()
The program launcher and related configuration files—for example, hyperbola.exe, hyperbola.ini, and config.ini—do appear at the root of an install but are not technically root files if you are building products. Products inherently identify and include the executable and these various configuration files, so they should not be specified again in a feature root file list.
The Product Definition and Export wizards do not give you full control, however. For example, arbitrary root files such as licenses and legal files cannot be directly identified. These files must be enumerated in the build.properties for a feature included in the product. The properties relevant to defining the root files are listed here:
root—Files listed here are always copied to the root of the output. If a directory is listed, all files in that directory are copied to the root of the output.
root.<os.ws.arch>—There should be one of these lines for each OS, window system, and processor architecture combination that has unique root files. For example, if you need to include compiled libraries or executables, you should identify them on the root lines for the appropriate configurations.
Each property value is a comma-separated list of files to copy to the root of the output. The files are identified using one of the following techniques:
• The contents of a directory structure are included by listing the parent directory itself. For example, root=rootfiles copies the entire contents of the rootfiles directory in the feature to the root of the build output. This is the most common setup seen in features.
• Individual files must be identified by prefixing their location with file:. For example, the line root.linux.gtk.x86=file:linux/special_executable copies just the special_executable file to the root. Note that the given path is relative to the feature and the containing directory structure is not copied.
• Absolute paths can be specified by prefixing the location with absolute:.
Root File Precedence
Many features can contribute to the root files for a build. The feature root files in parent features overwrite those of their children.
Executable files and libraries often need to have special permissions set when they are placed in the final archive so that when end users unpack the archives, the product is ready to run. You can control the permissions of the root files by defining a property of the form
root[.os.ws.arch].permissions.<perm_pattern>=<files>
The os.ws.arch configuration identification is optional. The <perm_pattern> is a UNIX file permissions triple, such as 755, which should be familiar to chmod users. The value of the property is a comma-separated list of files to which the permissions should be applied. Ant patterns are supported for identifying files. Since permissions are applied once the files have been copied to their position in the root directory, all paths to permission files should be relative to the output root. Nonexistent files are silently skipped, and folders must be indicated with a trailing “/”.
24.6 Building Add-on Features
So far this chapter has focused on building stand-alone RCP applications using Eclipse product definitions. The true utility of a pluggable architecture, however, is the ability to extend a system with additional plug-ins. Here we show how to build and package some additional plug-ins, such as multiuser chat support, that can optionally be installed into Hyperbola.
In Chapter 21, “Installing and Updating with p2,” we showed you how to export features independently. Here we do basically the same thing but this time using PDE Build in a release engineering context.
24.6.1 Setting Up a Feature Builder
To try this out, let’s set up a managed build process for the Hyperbola MUC feature. Overall the process is very much like the product builds done previously. As in Section 24.3, “Setting Up a Builder,” set up a build project primed with files from PDE itself:
• Start by creating a simple project called feature.builder using File > New... > Project > General > Project and prime it with template build scripts from your IDE.
• In the file system, navigate to the install location of your Eclipse IDE and go to org.eclipse.pde.build. For example, look in c:ideeclipsepluginsorg.eclipse.pde.build_3.5.1 if your IDE is installed in c:ide.
• From there copy build.properties and build.xml from the templatesheadless-build directory into your new builder project.
24.6.2 build.properties
The build.properties file used to control the building of a top-level feature is similar to the one used to build a product. The most significant properties are highlighted in the next code snippet, and we describe the differences between the product build.properties and the file we need here.
Let’s look at each of these properties and how they affect the build. In particular, we focus on how these properties differ from those specified in a product build.
topLevelElementType—This property indicates the type of the top-level element being built—feature or plugin. It is not used when building products.
topLevelElementID—This indicates the ID of the feature or plug-in to build.
repoBaseLocation—This is the parent folder of the repository locations specified when building the client. The contents are used to compile and assemble the result.
transformedRepoLocation—The contents of the repositories used may need to be converted into a runnable form. Runnable components are put in this location. Notice that baseLocation contents may still be needed if the feature being built brings in functionality that is not yet part of Hyperbola.
p2.gathering—Features that are built should be published to a repository from which clients can install the MUC feature. In a feature build, unlike product builds, specifying the repository location in p2.metadata.repo and p2.artifact.repo is optional. If not specified, the repository is in the build output location.
configs—Since there is no platform-specific code in the MUC feature, we can simply state that we are building for all platforms by setting the configs property to *, *, *.
24.6.3 Running the Feature Build
Feature builds are invoked in the same way as the product build in Section 24.4, “Running the Builder”; that is, you must
• Create ${buildDirectory}/plugins
• Create ${buildDirectory}/features
• Copy the required plug-ins and features to the plugins/ and features/ directories as shown in Figure 24.5
Figure 24-5 Feature build layout

• Invoke org.eclipse.ant.core.antRunner as shown here:

build.xml Not productBuild.xml
When invoking a feature build, the -buildfile argument is build.xml as opposed to productBuild.xml.
The build produces a structure as shown in Figure 24-6. The content goes in the ${buildDirectory}/${buildLabel} directory or, in our example, in ${user.home}/muc_feature.build/I.TestBuild. This directory contains an archive that consists of a fully built multiuser chat feature. Because the p2.gathering property was specified, the archive is also a p2 repository.
Figure 24-6 Feature build output

To install the multiuser chat support into your Hyperbola client, simply launch Hyperbola, select Help > Install New Software ... > Add ... > Archive ..., and select the archive file produced from the build. You can then select Hyperbola MultiUserChat Support. Note: If you don’t see any software listed when you select the repository, ensure that you deselect Group items by category.
24.7 Assembling Multiple Configurations
Up to now you have seen how to build a single product or feature; however, in practice you may want to assemble multiple configurations from the same build. You may assemble a basic and a professional version of the product, or configure some versions to ship with source code. If these different configurations are constructed by running a series of product builds in succession, you will build the same artifacts multiple times with possibly different plug-in qualifiers.
This section demonstrates how to build a single repository and use that repository to assemble two different configurations. One configuration will be identical to the Hyperbola product built in Section 24.4, and the other one will be a Hyperbola SDK—a Hyperbola product with source code and developer documentation.
24.7.1 What Is an SDK?
When working on a large project in a team environment, it is often undesirable (or not practical) for each developer to check out the entire project from source control. Many developers work in unrelated areas of the system and simply need to “use” or extend the existing functionality with no intention of changing it. While you can easily make use of a binary plug-in bundle, often having the source code available makes development much easier. To support this, you can create and deploy SDK features, that is, features that contain both the binary bundles and the source code. By shipping an SDK feature you are assured that the source code you ship is synchronized with the binary artifacts your clients are building against.
24.7.2 Building an SDK Feature
To build an SDK feature that includes both binary and source bundles, create a new feature project (File > New... > Project > Plug-in Development > Feature Project). Call it org.eclipsercp.hyperbola.sdk.feature. Under the Included Features tab add the org.eclipsercp.hyperbola.feature, and under the feature.xml tab manually add org.eclipsercp.hyperbola.feature.source as an included feature. Your feature.xml should contain the following lines:
Eclipse will likely report a warning that the org.eclipsercp.hyperbola.feature.source reference cannot be found. This warning can be safely ignored since the source feature will be generated at build time. The source feature will contain the source bundles for the Hyperbola feature.
To instruct the build system to generate this feature, open the build.properties file for the Hyperbola SDK feature and add the following:
[email protected]=
org.eclipsercp.hyperbola.feature
From here you can follow the same steps as you did in Section 24.6, “Building Add-on Features,” to build the SDK feature.
Building Individual Source Bundles
It is highly recommended that you build a single source plug-in for each binary plug-in. By default, PDE Build will create a single plug-in containing all the source. To instruct PDE Build to create a single source plug-in for each binary plug-in, set individualSourceBundles=true in your top-level build.properties file.
24.7.3 Simultaneously Assembling Multiple Configurations
To build and assemble multiple configurations simultaneously, you first build a top-level feature that contains all possible features. This master build is then sliced into a variety of different configurations through subsequent product builds. However, instead of pointing to an SCM system (or unbuilt plug-ins on disk), you simply point to the results of the master build. Since the master build contains all your binary features and plug-ins, PDE Build will use these in the final packaging step.
To set this up for Hyperbola, first create a top-level feature (called org.eclipsercp.hyperbola.toplevel.feature) that contains all the Hyperbola features in your workspace. At a minimum, this top-level feature should contain both org.eclipsercp.hyperbola.feature and org.eclipsercp.hyperbola.sdk.feature. If you have created other add-on features, feel free to include them here, too.
Once you have created the top-level feature, following the steps from Section 24.6, “Building Add-on Features,” create and run a feature build. Ensure that your topLevelFeature is org.eclipsercp.hyperbola.toplevel.feature and set p2.gathering=true. This will instruct PDE Build to publish the results of this build to a p2 repository which can then be used to assemble a variety of configurations.
In order to assemble different configurations, simply craft .product files composed of the top-level features you wish to build. To build the Hyperbola product, for example, change the following lines in the build.properties file from Section 24.3.2, “build.properties”:

Ensure that skipMaps and skipFetch are both set to true, and remove all the plug-ins and features in your build directory. Finally, copy the hyperbola.products project to your plug-in directory and run a product build as outlined in Section 24.4, “Running the Builder.” This will produce a series of Hyperbola SDK products for each platform specified in your build.properties file. To assemble other configurations, simply change the included features in the product and rerun the build.
24.8 Summary
Here we covered the basics and got you started using PDE Build to compile and assemble the plug-ins, features, and products related to Hyperbola. Regular and repeatable automated builds are a critical part of the development process. Without these, teams cannot integrate and have no idea if the system works.
PDE Build offers comprehensive tooling for building RCP and Eclipse-related artifacts. It is highly sophisticated and extensible. It is also very specialized. It is not a general-purpose build system. Since it is based on Ant, however, it can be integrated with one of the many build choreographing systems such as Hudson or CruiseControl. We strongly recommend setting up such a build process as early as possible in the life of your project.