Chapter 7:
Editing Film on Avid NLEs with FilmScribe
Avid’s FilmScribe™ software is integrated with Media Composer or Xpress software and does not require separate databasing of telecine information outside of the NLE application. Telecine logs are imported directly into the Avid bins after conversion to the Avid Log Exchange (ALE) format. The information from the logs is stored in the Avid bins and doesn’t require further conversion to create a cut list.
Avid makes NLEs in both NT and Mac flavors. The instructions in this chapter work for both platforms. but I use the more common Mac systems in the examples. Whenever Command is mentioned, NT users should use Control, and whenever Option is mentioned, NT users should use Alt.
Converting Telecine Files
The process begins with the conversion of telecine logs to Avid Log Exchange format. Avid Log Exchange isn’t a telecine log format, but it is widely used as a conversion tool. Many telecine databases can now output in ALE format, eliminating the need for this procedure.
Telecine logs are primarily in one of three formats: flex files, Evertz files or Aaton files. Any of these formats can be converted to ALE format using the Avid Log Exchange application. The ALE application comes bundled with Film Composer but is not serialized or copy protected by Avid. I suppose this was done to promote wider use of the format. The strategy succeeded, because ALE is commonly used in almost all log conversion and matchback applications. The Avid Log Exchange program is normally found in the Utilities folder of Media Composer or Xpress. Frequent users of ALE put an alias or shortcut to the program on their desktop. When the application is launched, a window opens with two columns, one for input format, the other for output. When converting to an Avid usable format, the output should be ALE. For input, several different formats can be selected. There is also a selection for Automatic. This is the easiest method of running the program. When Automatic is selected, ALE determines which format the file was created in by reading its file extension. In Table 7.1, all of the acceptable telecine log formats for ALE are shown, along with their file extensions. ALE can output logs in the formats shown in Table 7.2.
File Type | Extension |
Aaton | .flx or agxxx.Txx |
CMX | .cmx |
EditDroid | .log |
Evertz | .ftl |
Flex | .flx |
Quantel Harry | .vtr |
Keyscope | .ksl |
Log Producer | .llp |
OSC/R | .asc |
Skycode | .ale |
Table 7.1 ALE Import Formats
File Type | Extension |
Avid Log Exchange (ALE) | .ale |
Quantel Harry | .vtr |
Flex | .flx |
Table 7.2 ALE Export Formats
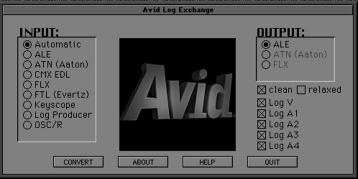
Figure 7.1 Avid Log Exchange Interface
After ALE has been set up, quit the program and drag and drop telecine log files onto the icon or alias for automatic conversion. In order to preserve the original logs, it is strongly suggested that the log is copied from its original media (normally a floppy or Zip disk) to a folder on the desktop. In this way, it ensures that the original data won’t be corrupted, lost, or destroyed. Another reason to copy the logs is that ALE will place converted logs onto their originating volume. If it’s a floppy disk and the disk is full, it won’t convert them. Instead, it will return a Disk Full error.
Setting up the Project
Now that the files have been converted to an Avid readable format, it’s time to bring them into the project. But first, a project must be created.
Film and Matchback options are not available on all Avids, so it must be determined if any of these are supported on the system. The easiest way to do this is to launch the application.When the project selection screen appears, create a new project. If the film options are available on the system, they’ll appear at the bottom of the new project screen. There are two types of film options available. The first, Film Options is used when a 24 fps project is desired. The second, Matchback Options, is used if the editor wants to work in 30 fps but match the EDL back to original film numbers. If any of these options is grayed out on the project screen, that option isn’t available for that particular Avid. if none of the options is selected, the application will assume that the project is a video project and will not be able to create a cut list. Entering key numbers and ink numbers will be impossible. This may seem obvious, but many editors ignore this in haste. Film and matchback options come in three gauges: 16mm, 35mm, and 65mm. After choosing between 24 fps or Matchback, choose the film gauge and open the project. .

Figure 7.2 Avid Project Window: Note Settings files are alphabetical
Table 7.3 Avid Film Settings
Adjusting Film Settings
Now that the project is created, it is necessary to tell the Avid how to gauge the film numbers and time code. The film settings are accessed through the setting files.in the project window. Film settings are only necessary on 24 fps projects. If a matchback project is created, these settings are not accessible.
Double click on the Film settings in the project window. The Film Settings menu contains several pulldown items that need to be resolved. Avid’s nomenclature for edge numbering can be a little confusing. For example, the menu item Ink Number Displayed As refers to both key numbers and ink numbers. Ink numbers are also referred to as edge code, which normally could refer to either ink or key numbers.
Importing ALE Files
To import ALE files into an Avid project, it is first necessary to create a bin in which to store them. I highly recommend creation of a bin for each cam roll. From this bin, scene bins can be created, one for each scene in the film, and clips can be copied for each scene to those bins from the original cam roll bins by option-dragging them over.
This organizational idea isn’t new, but it is very efficient. By creating and archiving cam roll bins, the original information remains intact. When the clips within the cam roll bins are copied to specific scene bins, a workspace is created where effects, imported picture files, and scenes can be combined for editing.
Once the cam roll bin is created (by selecting New Bin in the project window), select Import from the File menu. The import screen allows users to import everything from graphics to information. In this case, shot log should be selected. When Shot Log is selected, three options appear on the right of the screen.
Combine events based on scene number and automatically create subclips
Combine events based on the camera roll and automatically create subclips
Merge events with known sources and automatically create subclips
These three items create a powerful array of viewing and subclipping options and allow scenes and clips to be divided in the manner that best fits the editor’s and director’s style.
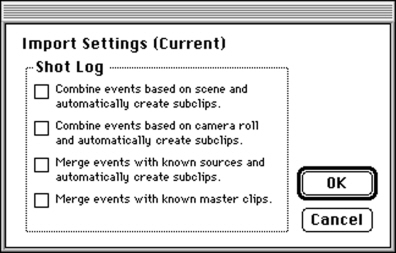
Figure 7.3 Import Shot Log Options
Combining Events Based on Scene Number
Combine events based on scene number makes one large clip of all of the elements within a scene in the log, and then creates subclips of each individual clip recorded in telecine. In order to use this option, the telecine log must contain scene and take information.
Combining Events Based on Camera Roll
Combine events based on the camera roll will produce a large clip for each camera roll and divide individual takes into subclips.
Merging Events with Known Sources
Merge events with known sources creates subclips from a log with sources already inside of the bin. For example, if an entire cam roll is already logged in the bin as one clip, this will take the individual events recorded in telecine and create subclips for that cam roll.
After importing the telecine logs into bins, the material can be batch digitized on the Avid, just like a regular video project. Once the batch digitizing is done, check the key numbers to make sure that everything was recorded correctly. When working in a 24 fps project, digitizing on the fly won’t work. All materials must be logged or imported from telecine logs prior to digitization. This is to prevent pulldown errors.
In the time code menu above the source monitor, select EC. This displays the edge code instead of time code. Load each clip and scroll through it, making sure that the EC in the display matches the key numbers burned into the video source. There are a few things in particular that should be detected.
A one-frame delay, which occasionally occurs in telecine.
A frame miscount, which occurs when the film gauge doesn’t match the telecine log file.
A completely different set of key numbers, usually caused by incorrectly labeling reels or having two reels with the same name.
One Frame Delays
Occasionally telecine burn-ins encounter a one-frame delay, where the number burned onto the screen is one frame behind the actual key number recorded into the telecine database. Most telecine houses don’t have this problem, but it can occur. It originates because the burn-in is created by a key number and time code reader/character generator. During transfer, running the video signal through the reader/generator and then to a VTR can delay the image, thus the burn-in is off by a single frame. If this occurs, the videotape can be sent back with a request for an accurate burn-in or the neg cutter can be notified that the burn-in is behind a frame. Most neg cutters have heard this story before, and though they don’t like the inaccuracies, they can deal with it. As long as the database is accurate, there shouldn’t have any problems.
But films by nature have problems, and the more that are created, the more difficult it is to keep track of them all. A retransfer is far more desirable and it eliminates concerns over the memory of all of the human beings who will be interacting with the film. If a retransfer is made, be sure to remove all of the “bad” clips and their associated media files from the NLE. Also rename the retransfer reel. For example, reel 001 becomes reel 001R. I use this convention because, though there may be 001B and 001C reels, chances are very unlikely that the reel count extends to R. R is strictly used for retransfer. Ask the telecine logger to rename the new videotape to this in the database as well, which should save a lot of remodification time. Be sure to mark the original transferred reel as “DO NOT USE”. I recommend a red thick permanent marker for this purpose, writing on several locations on the tape box and on the labeled tape itself.
Frame miscounts are not as common as one frame delays, but they do happen. Miscounts are usually caused by either an error in telecine databasing or an error in setting up the project on the Avid. I have encountered other odd situations where data was logged incorrectly, but those occurrences are extremely rare.
If it is noticed that the database numbers in the EC display and the burn-in numbers gradually become mismatched, stop everything. Any editing will become worthless. There is a serious problem.
Usually, frame miscounts can be detected right away. The easiest way to troubleshoot a miscount is by looking at the EC display. The EC display is accessible through one of the two time code registers above both the source and record monitors. One of the best features of an Avid is its ability to show the current numbers through the EC display. This allows any frame to be checked at any time for consistency in the numbers. The key number count in the EC display ends with either a “+” or “&” followed by two numbers. If it has a “+,” the database assumes that the film is 35mm. If it has a “&,” it assumes that it is 16mm. This is a standard for gauging film, although not every NLE application adheres to it.
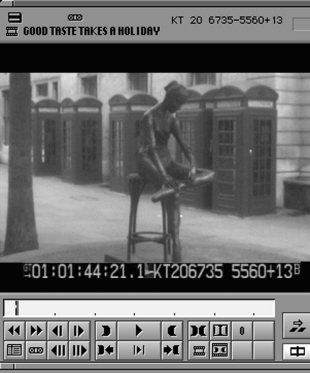
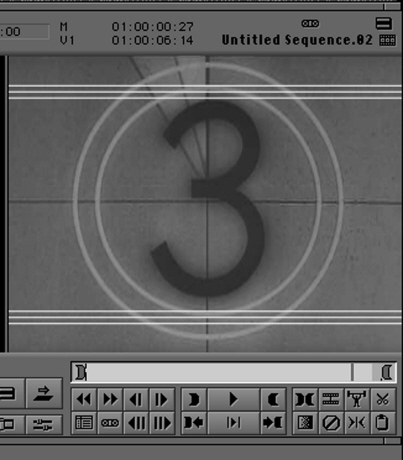
Figure 7.4 The EC displayed above the sequence monitor on an Avid.
For example, let’s say that the film is 16mm but the EC column displays key numbers with a “+”. In this instance, the header information in the telecine log may have erroneously been set up as a 35mm project, but the key numbers on the burn-in could be correct. The telecine log could be opened, the information could be changed in the header from 35mm to 16mm and the log could be reimported. The numbers should match. Be sure to destroy the incorrect media files and bins. This problem can be detected when importing the log. A message stating that the log format does not fit the project type will occur. This is the first sign of trouble.
The problem can also be detected by inspecting numbers both in the EC column and burn-in. 35mm film does not count key numbers beyond “+15”. If 16, 17, 18, or 19 appears in the EC, the project is set up for 16mm.
Mislabeled or Duplicate Numbered Tapes
One last problem that might occur with checking key numbers is when two separate reels are given the same number. This can occur for a variety of reasons which are too numerous to discuss here. Simply put, if the key numbers in the database or those displayed in the EC column don’t look even remotely like the numbers on the screen, chances are that the wrong reel was digitized with the wrong database. This problem occurs frequently, particularly with films that have high shooting ratios. In this case, one could renumber one of the errant reels and modify its name in the database.
Using Autosync
After the log is imported and digitized, key numbers are checked and the project is organized appropriately, sound and picture can be synched together. If the sound was already transferred in sync with picture at telecine, this step is unnecessary.
Avid’s syncing mechanism is called Autosync and it works very simply. First, select a picture clip and find the slate. Mark in where the clap boards meet. Then, select the corresponding audio clip. Scrub through the beginning until the frame where you hear the clapper impact is located. Mark in on that frame.
In the bin, select the picture clip, then shift-select the sound clip. Under the Bin menu, select Autosync. A menu appears on the screen. Dailies can be synched by in point, out point, source time code or auxiliary time code. Choose In points and select OK.
A new subclip will appear in the bin, with the extension “.sync.01.” Load this clip into the source monitor and play it back. One of the best ways to check that it’s synced correctly is to scrub through the slate at the beginning and make sure that the clap sound is in the right place. If the new clip isn’t quite right, delete it and re-mark the sound and picture elements until the correct combination is made. In time, you’ll gain confidence and will be able to do this very quickly.
There is one limitation to Autosync; the synced subclip ends where the picture stops. If the film is a documentary and the camera stopped but sound continued to roll, it is necessary to add sound separately to the sequence without using the synced clip.
In addition to Avid’s regular effect palette, there are a variety of effects that can aid filmmakers, including mattes, blow-ups, film dissolves and film fades.
Film Dissolves
Film dissolves are not the same as a standard video dissolve. The two sources, which are dissolved “from” and “to” have intensities that are calculated differently during the effect. The result is that if a standard video dissolve on an NLE is used, it looks or “feels” different when an optical print is made on film. During the course of a video dissolve, the intensity of the “from” source declines at the same rate as the “to” source increases. Thus, halfway through this type of dissolve, each source is at 50 percent intensity. That rate remains consistent as “from” becomes more transparent and “to” becomes less transparent.
But an optical dissolve is different. The “from” source remains at full intensity until it is halfway through the effect. The “to” source increases to full intensity at the halfway point. Thus, halfway through the effect, both are at full intensity. During the second half of the effect, the “from” source decreases in intensity until it has disappeared. The “to” source remains at full intensity. So for the second half of the effect, the only thing that is happening is that the “from” source vanishes from the screen.
Depending on the two elements used, the resulting differences between a video and a film dissolve could appear as subtle or completely different, but use of the Avid film dissolve effect is a far more accurate rendition of how the effect will look when screened on film.

Figure 7.5 Optical dissolve (left) and video dissolve (right)
In like manner, a film fade effect combines black or darkness with the picture element at full intensity halfway through the effect. For the second half of the effect, the picture slowly vanishes. Again, it might be a matter of minor nuance, but it is truer to what you’ll see when screening the effect on film.
Mattes
If the film was shot full frame with the intention of adding a matte, Avid’s film mattes are a great tool. The mattes vary in format and are located in the Effects Palette. The following mattes are supported:
16:9
1:1.66 (European Standard)
1:1.85 (American Standard)
1:2.35 (Anamorphic/ Super)
The mattes work just like any other Avid effect. Drag one from the Effect Palette and drop it to its intended location. If the matte is to be applied to an entire sequence, create a new video track and drag the effect to the top track. Any realtime effects underneath the matte will need to be rendered in the sequence.
There is also a way to view what a matte will look like before it is applied. Above the sequence monitor is a Fast Menu. Click on the menu and choose Grid. The title safe and action safe borders will appear on the screen in the form of bright white lines. In the Project Settings window, open the Grid settings. Set the grid to show film aspect ratios, and they will appear superimposed over the sequence as white lines. These lines signify the matte sizes. Although they can be seen in the sequence monitor, they do not show up on the NTSC monitor and will not appear in the output.
Blow-ups
Although many NLEs have resizing options and effects, the most accurate one to use in the case of film is a blow-up. The reason for this is that a blow-up is not just an effect, it is also a method of conveying information to the optical house that will do the blow-up. For example, if the intention is to increase the screen size by 200 percent and pan the picture slightly left, a blow-up effect can convey the proper information to the opticals house in an optical list. Instead of percentages, the optical house uses fields to define expansion. Instead of left, right, up, and down, they use west, east, north, and south to define orientation of the frame. So if the size or orientation of a frame is changed, blow-up is the best effect to use.
Script Integration
Before I get to the business of creating cut lists, I should mention one of the more brilliant options available on Avid NLEs known as Script Integration. Script Integration allows the editor to import a script into the NLE and use it much like the standard lined script that editors are used to using to diagram the coverage on a given scene. The script is treated much like a regular bin, but the editor has the ability to mark it with straight or squiggly lines to indicate dialog and coverage in the same way as a lined script and can record information about the relationship between dialog and the actual clip.
To begin, a script is required. It can be in a text file, but a rich text format (RTF) is better. A rich text format looks pretty much like any script would on paper. When the script is imported and opened in the script bin, it appears in the bin monitor like a word processing document as shown in Figure 7.7. Usually the production office has the script in a word processor format, so it’s fairly easy to obtain. To open the script, select Open Script under the File menu. Then double click on the script name in the bin menu.
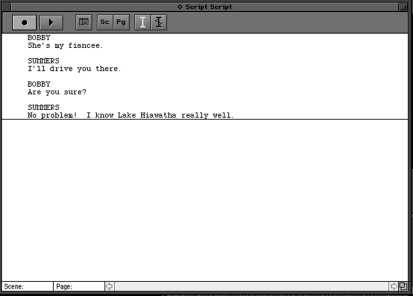
Figure 7.7 The Script Integration Interface
Note that there are several tools unobtrusively placed above the script. There is a straight line (to indicate dialog spoken on camera), a squiggly line (to indicate dialog spoken off camera), a record button, and play button.
When a scene in the script is located, the corresponding scene bin with clips in it can be opened. Drag the clips and place them appropriately before dialog or the scene description in the script. When the clip is placed in the script, a color thumbnail image of the scene appears with the clip name on it. If there is more than one take of the same shot, drag it on top the original. The end result will be a single thumbnail from the first clip, but the numbers will change below the thumbnail, indicating more than one take. When one of the take numbers is double clicked, that take is loaded into the source monitor. The scene can be played back with coverage or even line-to-line correspondence between the clip and the script recorded.
To record script line correspondence, select a take by double clicking its number, then click on the record button in the script monitor. As the take plays back, click on each line of script as the actor delivers it. When the scene is finished playing, click the stop button. The result is that when any line in the script is clicked, the clip cues to that point. This is really helpful when looking for a best performance or delivery of a line. It enables the editor to click on the takes, then the line, and play them back to back, which is difficult to do with a standard NLE bin.
It is also possible to choose between a straight or squiggly line to mark the script to indicate whether the dialog appears on or off camera. Just like a printed lined script, coverage can be determined at a glance without the need to open or play any clips.
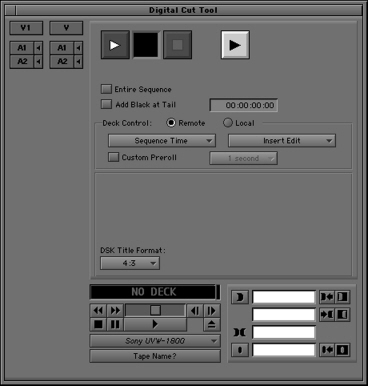
Once the cut is completed on the Avid, it’s time to create a cut list. As described in Chapter 5, there are many types of cut list. To begin, from the Output Menu, select FilmScribe.
FilmScribe™ is integrated with Avid editing software but is a separate application that can be launched with or without the Media Composer or Xpress running. If FilmScribe is launched while the editing application is running, plenty of memory is needed. 256 MB is a good minimum. Most v.10 Avids come equipped with 384 MB.
If the Media Composer is pre version 8.0 or pre Xpress 3.0, FilmScribe probably isn’t available. In this case, Cut List can be used. Cut List is located under the Output menu. The Cut List tool is very similar to FilmScribe, but not as robust. FilmScribe adds a little versatility and a lot of templates to the tool that make it easier to configure and create cut lists. There was also a significant change from Media Composer 5.x to 6.x with the Cut List Tool. For these examples, FilmScribe is used, but the same results can be achieved with any Avid Cut List tool. If some of the options mentioned in this chapter are missing from the Cut List tool, it’s probably an earlier version.
After launching FilmScribe, bins can be opened directly from the File menu. In earlier versions of the Cut List tool, this is done by dragging the sequence directly from a bin in the Media Composer or Xpress, which must stay open in order for the cut list tool to work.Because FilmScribe can work as a standalone or modular application, it can be launched separately with the bins opened from FilmScribe or launched from within the Media Composer/Xpress application, where sequences can be dragged directly from the bins into the tool.
Once the sequence bin is opened, bring up the cut list tool. From the File Menu, select New Cut List. After dragging the sequence into the Sequences window of the cut list tool, select the video track where the cut exists. If a matte has been added on a higher track, don’t use it. This will only make the list confusing. Every edit should be on a single track in order to maintain a uniform cut list. Normally, a cut list for audio wouldn’t be created unless ink numbers are used. In a later section, we’ll discuss various methods of audio export.
On the bottom right underneath the Sequences panel is a menu of the various types of list that can be generated with the tool. Global, when selected, opens a list of global options used when generating any of the lists (see Table 7.4). To output each type of list, click on the box located to the left of the list name. To choose options for that particular list, double click on the name.
Table 7.4 Global Cut List Options
There are numerous types of lists that can be generated in the tool. These include
Assemble
Optical
Dupe
Pull
Optical pull
Scene pull
Optical scene pull
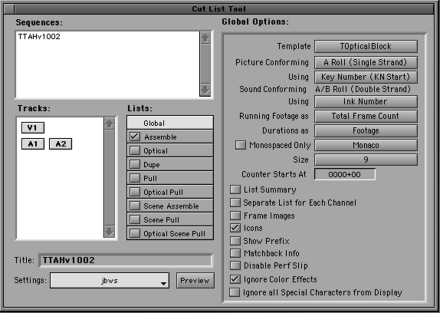
Figure 7.8 The FilmScribe Cut List Tool
Unique Items for Individual Types of Cut Lists
Each list type has several individual options. The individual options for these lists determine which items will be displayed in the final output. Depending on the project, some are important and some are not. For example, if key numbers are used as a source of reference for the film, ink numbers and auxiliary ink wouldn’t normally be necessary in the list. Any options that do not have corresponding information in the bins will not have any information in the list. In addition to the common options shared by other lists in Table 7.5, the individual types of cut list have the options shown in Table 7.6, Table 7.7, Table 7.8, and Table 7.9.
Table 7.5 Common Cut List Options
Option Name | Description |
Key Numbers | Reference numbers based upon KN Start and KN End in the bins. |
Ink Numbers Aux. Ink Numbers Lab Roll Camera Roll Sound Roll Reel Slate Comments Scene & Take Locators | All of these items can be listed, but are dependent upon whether or not each was noted in the bins. Locator and comment information in the sequence, such as special music or sound effects cues, color correction, or other important data, can also be included. Of special import to the neg cutter are Camera Roll and Scene & Take. |
Clip Name | This places the designated name for the clip in the cut list. Normally, this isn’t necessary if Scene & Take are included, as the clip name in a film is normally the same. |
Custom Column from Bin | This option allows placement of information from a customized column into a bin. For example, if a custom column were created that contained sound notes, it could be included in the list. Be careful not to go overboard with this item, as the list will end up overrunning the printed page. If this item is chosen, be sure to use the same spelling and case that was used for the original name in the bin. |
Record TC | This places the time code from the master sequence into the list. It is especially helpful if a videotape digital cut of the sequence is included with the list so that the neg cutter can cross reference it. |
Address TC Film TC Sound TC Aux TC 1-Aux TC 5 24 TC 25p TC 25 TC 30 TC | These are other time code types that can be used when digitizing that might be necessary for generating a cut list. For example, if time code from a sound source was generated on audio track 2 and then read by the Avid, it would normally be input as an auxiliary TC. If a list is needed for this source, the cut list can generate it. If Film Time Code was used, it could be used as an alternative source for cutting the film rather than using Key Numbers. |
Table 7.6 Unique Assemble List Options
Option Name | Description |
LFOA | Last Frame of Action. Determines duration of a reel at the LFOA. You can subtract footage at the head or tail of the reel to determine the proper duration. Head would normally be on the picture start frame, tail would be after the LFOA. |
Mark Short Cuts Shorter Than | If this item is checked, the list will flag cuts shorter than a specified number of frames with a comment. This can be helpful to the person conforming. |
Mark Jump Cuts Shorter Than | In this case, a jump cut is defined as where a short piece of material is missing between adjacent cuts of the same material. When selected, the list will flag jump cuts shorter than a specified number of frames with a comment. |
Show Trans Effects As Cuts | This item is especially useful for conforming workprint, so that instead of leaving blank space for an optical, the list will tell where the optical goes so that it can marked with a grease pencil or tape. |
Table 7.7 Unique Optical List Options
Option Name | Description |
Key Frames | This determines whether the optical keyframes are taken from the composition itself. If any changes might be made to the optical keyframes of an effect, it’s a good idea to choose this option. |
Optical Footage | Shows footage relative to the beginning of an optical |
Page Break Between Opticals | Creates a separate page for each optical in the list. |
Table 7.8 Unique Dupe List Options
Option Name | Description |
Tolerance/Assume Handles | Tolerance sets the size of handles during dupe checking, but calculates the handles to each side of the clip internally, rather than putting the handles into the list |
Print w/ Handles | This sets the size of handles after checking for dupes in the list. The given number of frames selected with this option is added to the beginning and end of each clip in the list. |
Table 7.9 Unique Pull and Scene Assemble List Options
Option Name | Description |
First Sort By Then Sort By Then Sort By |
Establishes a hierarchy of how the list is to be configured, a pecking order of which criteria is most important in how it is displayed. It can be sorted by the following criteria: Lab Roll Camera Roll Sound Roll Scene & Take Clip Name After the first order of sorting is selected, there is also the option of “none” for the second and third order of sorting. For example, if you only wanted the list sorted by Camera Roll, select it as the First Sort By item and then select None in the other two items. |
Sort Order | Choose how the clips will be sorted, either heads out (ascending edge numbers) or tails out (descending edge numbers) This is dependent upon how the person conforming, either neg cutter or assistant editor, stores the rolls. |
Table 7.9 Unique Pull and Scene Assemble List options
Option Name | Description |
Place Separators | Creates a horizontal separator in the list, which can make it easier to access specific information at a glance. Choose where the separator is placed from the following options: First Sort Field Second Sort Field Key code or Ink Prefix Prefix or every 1000 feet (no separators) |
Include Opticals Include Headers | Specifies whether or not opticals and headers are to be included in the list. |
Change Lists
In addition to standard cut lists, FilmScribe allows users to create a change list. A change list relates to an original cut and a revised cut. It compares the two lists and outputs only change-specific information. This makes the list easier to conform because the person conforming doesn’t have to search two entire lists to make a few changes. Change lists work on 24 fps projects only. FilmScribe will generate change lists, change pull lists, and change discard lists. A change pull list determines the clips necessary to pull for creation of the changes. A discard list does the opposite.
All of the global options previously mentioned apply as well to change lists. Common options are identical as well. Table 7.10 shows a list of specific options available on change lists.
Table 7.10 Change List Options
Option Name | Description |
Show Only Changes | Selecting this option shows only insertions, deletions, trims and moved clips. When deselected, the list will elicit details about unchanged sections as well. |
Combine Deletions | Allows groups of adjacent deletions to be included in one event. However, selecting this option disables generation of discard lists, which specifically list each deletion as a separate event. |
Preview Code | Displays preview code numbering. (See below details) |
Counter Starts At | Determines the footage count where the change list begins. Default would be 00000+00. |
Preview Code
If you’ve conformed a workprint and are going through the process of making some changes, it is wise to create preview code on the previously conformed print. Preview code consists of ink numbers that are placed on the workprint before changes are made. Preview code information can be included in a change list to simplify the process of making changes to the workprint. If ink numbers were used to complete the original conform, preview code can be generated in another ink color directly on the cut workprint to distinguish between the two.
Quicktime Options
One of the features of FilmScribe is its ability to show Quicktime movies of the sequence from within the list. This works handily for verification. In order to show the Quicktime movies, they’ll need to be exported from the Avid. It’s something of a time consuming process. Still, if FilmScribe is used as a standalone application, it works well and allows viewing of burn-in numbers as the list is browsed.
Exporting Audio
Audio can be exported from the project by digital cut, OMF file conversion or EDL.
Digital Cut
If the audio is exported via digital cut to tape, keep in mind that somewhere along the line, the audio will have to be conformed to its proper speed. If the audio is exported directly to tape from a matchback project and played at speed with a cut film, it wouldn’t work. The audio has to be resolved at +.01 percent faster. For further details on sound sync issues, see Chapter 4.
OMF
Audio media and sequences can be exported through the use of OMF, also called OMFI, or Open Media Framework Interchange. OMFI is ambitious; it is a common format allowing media to be shared not only cross-application but also crossplatform. OMFI is supported on most digital audio workstations and is frequently used for exporting audio media files between computers. Conversion to a proper format requires the OMF tool, which is available on most workstations and also is downloadable through Avid and Digidesign’s websites. OMF will export cuts, dissolves, level information, time code, track numbers and clip names. It does not export pan information or automation gain.
OMF files consist of two items: compositions, which are the framework of the edited sequence, and media. The OMF composition can be exported by itself if the media is already on a workstation. Most OMF compositions and media files from feature-length films can be exported onto high capacity removable format drives, including Iomega Jaz or Castlewood Orbs. For short films, Zips might be used, but, depending on the complexity of the audio tracks, they might not fit.
Before exporting the audio into OMF, some preparations must be made. First, make a copy of the master sequence and place it in a separate new bin. Load the duplicate sequence in the record monitor and delete any video tracks. This can be done by clicking on the video track selectors and pressing the delete button on the keyboard. The system will verify that this is being done intentionally. Click on Yes. Render any audio effects, including dissolves, mix downs, etc. before exporting.
The next step is to consolidate the media to a drive. It can be a removable media or an empty drive that can be moved to the sound department. In any case, I highly recommend that the drive be completely empty, to allow the necessary space. There is nothing worse than the near completion of consolidation that is interrupted by a “not enough room on this drive” message. The Avid does not precompute the amount of space necessary to make the consolidation ahead of time, so good planning is the best solution.
In its bin, click on the duplicate sequence. From the Clip menu, choose Consolidate. When the Consolidate menu appears, deselect the first two items. Select the proper disk where the consolidated media will be placed. Be sure to give each clip some handles so that the sound department can adjust the audio as necessary. Click OK. It takes a while to consolidate, so be patient.
The OMF Export
With the consolidated audio-only sequence highlighted in the bin, click on the File menu and choose Export. When the export menu appears, choose OMFI Audio and Composition.
If specifically exporting to a Pro Tools system, choose OMFI Composition Only and check the SD2 Format Audio items. This will allow a simpler export to Pro Tools. The audio can then be converted from OMF to Pro Tools/SD2 using the OMF Tool.

Figure 7.9 The Consolidate menu
If Media Composer version 6 or lower is used, there is a choice of OMFI versions. Most systems use OMFI 2.0, but it is wise to check with the sound department ahead of time to see which they will require.
Click the OK button on the Export menu and the audio exports to the drive.
An EDL, or edit decision list, tells the tale of every cut made in a sequence. For films, EDLs are commonly used for audio. EDLs contain information about the audio, including source and record time codes, but unlike OMFI, they cannot contain media. EDLs are an excellent way of exporting sound information to workstations that do not use OMFI. They are also a good reference source for audio spotting sessions and mixes.
To export an Avid EDL, use EDL Manager, Avid’s EDL generating standalone application. This application is bundled on most Avid systems. It also works in tandem with Media Composer and Xpress, so it can be launched through the Output menu in those applications. Warning: Before launching EDL Manager from Media Composer or Xpress, make sure the system has enough memory to do it. Some systems have too little memory for both applications to run at the same time, particularly if the sequence is long and complicated.
To begin the EDL export, launch EDL Manager. The EDL Manager screen appears, shown in Figure 7.10. If EDL Manager was launched from within the Media Composer or Xpress application, click and drag the sequence into the EDL tool. If EDL Manager was launched separately, select Open from the File menu. Select the bin where the sequence is located. A window will open with all of the sequences in the bin listed. Choose the correct sequence and open it.

Figure 7.10 EDL Manager Screen
Select the tracks that are needed to generate the EDL. Below the tracks are Format and Sort Mode. Unless instructed otherwise by the sound department, choose CMX 3600 as the format and A (Record In) as the sort mode. CMX 3600 is the most universally readable format and almost every audio workstation has a method of reading and sorting CMX lists. A Mode sorting lists the sound in the order that it appears in the sequence.
Additional options for the list can be chosen by clicking on the Options button in the EDL Manager. More information can be added to the EDL by selecting items in the Comments column. Select Optimize EDL from the optimization menu and be sure to choose NTSC or PAL in the Standards column.

Figure 7.11 EDL Manager Options Window
Saving the EDL
An EDL can be saved to a floppy disk or removable media. If a floppy disk is chosen, format the disk to DOS format. All Apple computers made today are capable of reading DOS formatted disks, so this makes it more universal for audio workstations that read DOS.
From the File Menu, choose Save EDL. Make sure it is saved to the correct disk. The EDL is saved.
Some Important Notes about Saving EDLs
It is better to use eight characters or fewer when naming the EDL. If the name for the EDL is too long, the EDL Manager will truncate it for the proper format and add the proper extension to the name file. Do not change the name after this point, or it might not read properly when imported.
Using EDL Manager, a disk can be formatted specially for Grass Valley Group (GVG) or CMX editing systems in RT-11, a DOS derivative format. In most cases, this is unnecessary, however, because modern GVG and CMX systems can read DOS.
Outputting Video
Video and audio can be directly output from Media Composer and Xpress. There is one particular option that is very helpful for conforming; when Digital Cut is selected from the Output menu on a 24 fps project, there are options of outputting at Film Speed (100%) or Video Speed (100+%). If film speed is selected, the output will proceed at the standard frame rate with pulldown for video playback. However, if video speed is selected, the output will proceed with no pulldown and a frame-to-frame correspondence of video to film. Playback of this output would produce sped up sound. The purpose of Video Speed output is to make a lok box for conforming, not for playback. Pulldown fields tend to hinder using videotape for conforming, but with a frame-to-frame correspondence, the person conforming knows that the cut should be frame accurate. This is especially helpful if conforming a workprint is bypassed with the intention of conforming straight to neg.