

IPv6/VSE
This chapter provides an overview of Internet Protocol version 6 (IPv6) and its support in z/VSE through the IPv6/VSE product. IPv6/VSE is being developed by Barnard Software, Inc. (BSI).
While the product is named IPv6/VSE, it supports IPv4 and IPv6 communications. IPv6/VSE provides a full-function IPv4 stack and applications and a full-function IPv6 stack and applications. Both TCP/IP stacks (IPv4 and IPv6) can be run together (dual stack mode), individually, or as stand-alone stacks.
In this chapter, we describe how to set up IPv6/VSE for IPv4, IPv6, and dual-stack environments. We then show how to configure and use TCP/IP applications, such as TN3270, FTP, and TN3270E printing. Finally, we provide detailed information about how to set up and use SSL in various scenarios.
This chapter includes the following topics:
3.1 Overview
IPv6/VSE is part of z/VSE since z/VSE 4.2.2. It is designed to provide an IPv6 solution for z/VSE to perform the following tasks:
•Allow z/VSE users to participate in an IPv6 network.
•Bring the benefits of IPv6 functionality to z/VSE users.
•Help z/VSE users to meet the requirements of the commercial community and governmental agencies. This fulfills the statement of direction in IBM Software Announcement 209-319, dated October 20, 2009.
For more information about BSI, see this website:
IPv6/VSE not only provides an IPv6 TCP/IP stack. It also includes a full-function IPv4 TCP/IP stack, which does not require the IPv6 TCP/IP stack to be active.
The IPv6 stack includes the following components and features:
•Provides support for the IPv6 protocol
•IPv6 application programming interfaces (APIs)
•IPv6-enabled applications
•Supports IPv6 only, not IPv4
The IPv4 stack includes the following components and features:
•Provides support for the IPv4 protocol
•IPv4 application programming interfaces (APIs)
•IPv4-enabled applications
•Supports IPv4 only, not IPv6
To allow applications to use IPv4 and IPv6 at the same time, the following criteria must be met:
•Run both stacks (in separate partitions)
•Run the COUPLE command to join the two stacks
The two coupled stacks act as one (dual) stack, which supports IPv6 and IPv4.
3.2 Obtaining and activating a license key
A license key for IPv6/VSE can be obtained by using one of the following methods:
•When IPv6/VSE is licensed from IBM, you get the key from the IBM Key Center in Copenhagen, Denmark.
•When IPv6/VSE is licensed directly from Barnard Software, Inc., you get the key from BSI.
A license key is generated from the CPU ID; therefore, it is different for each processor and for each LPAR on a system.
The key data consists of three lines (COMPANY, CPUID, and LICENSE) that must be copied into the BSTTPARM.A member in the IPv6/VSE installation sublibrary (default is PRD2.TCPIPB).
Example 3-1 shows the contents of a sample BSTTPARM member.
Example 3-1 IPv6/VSE license key in BSTTPARM.A
* * * * * * * * * * * * * * * * * * * * * * * * * * * * * * * * *
* *
* TCP/IP-TOOLS COMMON PARAMETERS *
* *
* * * * * * * * * * * * * * * * * * * * * * * * * * * * * * * * *
*
COMPANY IBM DEUTSCHLAND R&D
CPUID 3B0B82 MODEL 2097
LICENSE IPV6/VSE ABCDEFGHIL6Z 2029365 3736856
*
IPV6/VSE ENABLE
Copy the BSTTPARM.A member to PRD2.CONFIG and make the changes there.
3.3 Stack setup
In this section, we describe how to set up IPv6/VSE for IPv4, IPv6, and a mixture of both.
The IPv6/VSE stack requires a minimum 20 MB partition. This amount of storage allows for stack startup and storage for a few users. It is enough for basic testing, but 20 MB is too small for production usage.
The basic formula is 20 MB + 108 KB per TCP connection. For example, a system with 100 TCP (TN3270E) connections plus 10 FTP (client and server) connections requires 20 MB + 108 x 110 (11880 KB) = ~32 MB.
The maximum number of TCP connections that is supported is 4095. To support the maximum number of connections, the stack must to run in a 460 MB partition.
|
Note: Many z/VSE users still have small batch partition sizes. IPv6/VSE applications all require an 8 MB minimum partition size, unless there is a specific formula in the manual.
|
The following sections show the basic steps to set up an IPv4 stack, an IPv6 stack, and a mixed environment with a gateway between IPv4 and IPv6. We then describe how to couple IPv4 and IPv6 to get a dual stack environment.
3.3.1 IPv4 stack setup
Having both sides in an IPv4 network, the setup is simple, as shown in Figure 3-1.

Figure 3-1 IPv4 stack setup
In the job in the following section, the BSI IPv4 stack has SYSID=44.
IPv4 stack startup job
The JCL that is shown in Example 3-2 was used in our test environment to start the IPv4 stack.
Example 3-2 JCL for starting an IPv4 stack
* $$ JOB JNM=BSI44,CLASS=S,DISP=L
* $$ LST CLASS=S,DISP=D
// JOB BSI44
// OPTION LOG,PARTDUMP,NOSYSDUMP,SADUMP=1
// LIBDEF *,SEARCH=(PRD2.CONFIG)
// ASSGN SYS000,SYSLST
// SETPFIX LIMIT=(2M,1M)
// EXEC BSTTINET,SIZE=BSTTINET,OS390,TASKS=ANY
ID 44
INTERVAL 120
*
DEVICE OSAXD10 OSAX D10 IPV4TST D12
*
LINK OSAXD10 0 9.152.85.64 255.255.252.0 1492
*
ROUTE OSAXD10 9.152.85.0 255.255.252.0 0.0.0.0 0
ROUTE OSAXD10 0.0.0.0 0.0.0.0 9.152.84.1 1
*
DNS 9.152.120.241
DNS 9.152.64.172
*
HOST LOCALHOST 127.0.0.1
HOST VSEC01 9.152.85.64
HOST VSEC03 9.152.85.67
HOST VSEC09 9.152.86.16
HOST VSEP15 9.152.85.126
HOST VSEP16 9.152.85.165
*
ATTACH TCP/IP
/*
/&
* $$ EOJ
3.3.2 IPv6 stack setup
The network setup of a plain IPv6 network looks similar to plain IPv4, as shown in Figure 3-2.
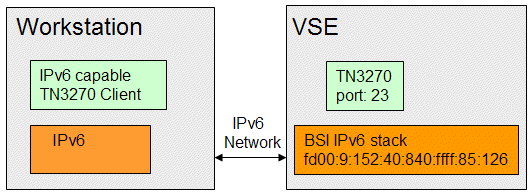
Figure 3-2 IPv6 stack setup
Many Telnet clients (for example, IBM Personal Communications V5.9) are not IPv6-capable. Therefore, we used Open Text Exceed as the TN3270 client with IPv6. The full setup for IPv6 requires some configuration on the Windows side before we can establish a sample TN3270 session.
Setting up IPv6 in Windows XP
In this section, we provide a brief overview of configuring IPv6 for Windows XP. IPv6 is not preinstalled on Windows XP; therefore, you must install and configure the IPv6 protocol manually. IPv6 cannot be fully installed and configured by using a GUI. Instead, the netsh command must be used here. On Windows Vista and Windows 7, all steps are supported in the GUI.
Installing IPv6
Complete the following steps to install the Windows IPv6 protocol:
1. Open the Windows Control Panel.
2. Open the Windows Network Connections.
3. Open the properties window of your LAN connection and click Install.

Figure 3-3 Network Component Type
5. In the Select Network Protocol window, select the IPv6 protocol and click OK, as shown in Figure 3-4.
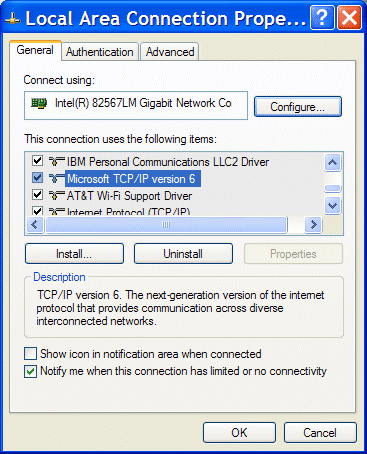
Figure 3-4 Local Area Connection Properties window in MS Windows
The Microsoft TCP/IP version 6 item should be visible in the LAN Connection Properties window.
|
Note: Figure 3-4 was taken from a Windows XP SP3, so the Properties button is not available. Instead, the netsh command was used for configuring IPv6.
|
Configuring IPv6
First, you must determine the index of your IPv6 interface, as shown in Example 3-3.
Example 3-3 Using netsh to display the network interfaces
D:>netsh interface ipv6 show interface
Querying active state...
Idx Met MTU State Name
--- ---- ----- ------------ -----
6 2 1280 Disconnected Teredo Tunneling Pseudo-Interface
5 0 1500 Connected Local Area Connection
4 0 1500 Disconnected Wireless Network Connection
3 1 1280 Connected 6to4 Tunneling Pseudo-Interface
2 1 1280 Connected Automatic Tunneling Pseudo-Interface
1 0 1500 Connected Loopback Pseudo-Interface
In this example, it is index 5 (Local Area Connection).
Then, use the following netsh commands to configure a static IPv6 address. Make sure to use the correct interface number from the output that is shown in Example 3-3 on page 53:
netsh interface IPv6 add address interface=5 address=fd00:9:152:40:840::1001
netsh interface IPv6 add prefixpolicy prefix=fd00:9:152:40:840::/80 5 6
netsh interface IPv6 add route fd00:9:152::/48 interface=5 nexthop=fd00:9:15
2:40:840::1
You can now test the connection to VSE.
Testing the connection
On Windows, you can use ping -6 or ping6 to test if a computer is reachable in an IPv6 network. Example 3-4 shows the output from our test setup.
Example 3-4 Testing the IPv6 connection
D:>ping6 fd00:9:152:40:840:ffff:85:126
Pinging fd00:9:152:40:840:ffff:85:126
from fd00:9:152:40:840::1001 with 32 bytes of data:
Reply from fd00:9:152:40:840:ffff:85:126: bytes=32 time=4ms
Reply from fd00:9:152:40:840:ffff:85:126: bytes=32 time<1ms
Reply from fd00:9:152:40:840:ffff:85:126: bytes=32 time<1ms
Reply from fd00:9:152:40:840:ffff:85:126: bytes=32 time<1ms
Ping statistics for fd00:9:152:40:840:ffff:85:126:
Packets: Sent = 4, Received = 4, Lost = 0 (0% loss),
Approximate round trip times in milli-seconds:
Minimum = 0ms, Maximum = 4ms, Average = 1ms
You can use the netsh command to display more information; for example, showing neighbors (VSE is shown in bold), as shown in Example 3-5.
Example 3-5 Using netsh to display IPv6 interface information
D:>netsh interface ipv6 show neighbors
Interface 5: Local Area Connection
Internet Address Physical Address Type
--------------------------------------------- ----------------- -----------
fd00:9:152:40:840::1 00-0a-8b-bf-71-80 Stale (router)
fd00:9:152:40:840::1001 00-24-7e-e0-72-4a Permanent
fe80::224:7eff:fee0:724a 00-24-7e-e0-72-4a Permanent
fe80::20a:8bff:febf:7180 00-0a-8b-bf-71-80 Stale
fd00:9:152:40:840:ffff:85:126 00-11-25-bd-98-c2 Stale
...
If you cannot reach VSE, see 3.9.1, “VSE cannot be reached” on page 119.
IPv6 stack startup job
The JCL that is shown in Example 3-6 is used in our test environment to start the IPv6 stack. The BSI IPv6 stack has SYSID=66.
Example 3-6 IPv6 stack startup job
* $$ JOB JNM=BSI66,CLASS=S,DISP=L
* $$ LST CLASS=S,DISP=D
// JOB BSI66
// OPTION LOG,PARTDUMP,NOSYSDUMP,SADUMP=1
/. LIBDEF *,SEARCH=(PRD2.CONFIG,PRD2.BSI)
// LIBDEF *,SEARCH=(PRD2.CONFIG)
// ASSGN SYS000,SYSLST
/. SETPFIX LIMIT=(3M,32M)
// SETPFIX LIMIT=(2M,1M)
// EXEC BSTT6NET,SIZE=BSTT6NET,OS390,TASKS=ANY
ID 66
INTERVAL 120
*
DEVICE OSAXD00 OSAX D20 IPV6TST D22
*
LINK OSAXD00 0 FD00:9:152:40:840:FFFF:85:64 /80 1492
*
ROUTE OSAXD00 FD00:9:152:40:840::1 /80 ::0 0
ROUTE OSAXD00 ::0 ::0 FD00:9:152:40:840::1 1
DNS FD00:9:152:41:2422:FFFF:4:230 PRI
*
HOST LOCALHOST ::1
HOST IP6GW fd00:9:152:40:840::1
HOST IP6DNS1 fd00:9:152:41:2422:ffff:4:230
HOST IP6DNS2 fd00:9:152:48:2522:ffff:5:231
HOST VSEC01 fd00:9:152:40:840:ffff:85:64
HOST VSEC03 fd00:9:152:40:840:ffff:85:67
HOST LINXLFP fd00:9:152:40:840:ffff:86:237
HOST LINR01 fd00:9:152:40:840:ffff:84:13
HOST LINR02 fd00:9:152:40:840:ffff:84:171
*
ATTACH TCP/IP
/*
// EXEC LISTLOG
/&
* $$ EOJ
Starting a TN3270 server
You can use the same JCL for starting the TN3270 server with IPv6 as is used with IPv4 with one change: specify the SYSID of the IPv6 stack, as shown in the following example:
// EXEC BSTTVNET,SIZE=BSTTVNET,DSPACE=3M,TASKS=ANY,OS390
ID 66
OPEN VSEC01 1023
*
The daemon startup is shown on the VSE console, as shown in Example 3-7.
Example 3-7 BSTTVNET startup on VSE console
S1 0045 // JOB BSITELR
DATE 11/09/2010, CLOCK 13/23/16
S1 0045 BSTT000I INITIATED BSTTWAIT Ver 2.46 04/01/09 18.08 EP=00520078
S1 0045 BSTT003I COPYRIGHT (C) 1998-2010 BARNARD SOFTWARE, INC.
S1 0045 BSTT001I TERMINATED BSTTWAIT
S1 0045 BSTT000I INITIATED BSTTVNET Build248 02/15/10 16.24 EP=00520078
S1 0045 BSTT003I COPYRIGHT (C) 1998-2010 BARNARD SOFTWARE, INC.
S1 0045 BSTT004I CB=TTLA A=00569000 L=000013FC
S1 0045 BSTT019I VSE 8.20 MODE 31-BIT
S1 0045 BSTT004I CB=COMR A=0033D4F0 L=00000108
S1 0110 BSTT000I INITIATED BSTTXVNC Build249 04/29/10 08.27 EP=005FB000
S1 0110 BSTT671I BSTTVNET VTAM FEATURE IS AVAILABLE
S1 0110 BSTT701I IPv6/VSE BUILD 249
S1 0110 BSTT695I CONNECTING TO PORT 23 IP fd00:9:152:40:840:ffff:85:126
S1 0111 BSTT000I INITIATED BSTTVSRV Build248 03/22/10 20.41 EP=00668000
S1 0110 BSTT042I ATTACH OF BSTTVSRV COMPLETED
Connecting with Open Text Exceed
As shown in Figure 3-5, enter the IPv6 address and TN3270 port of the VSE system in the Edit Host Info window to connect directly to VSE by using IPv6.
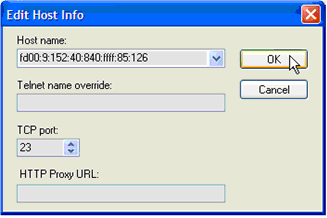
Figure 3-5 Edit Host Info window in Open Text Exceed
3.3.3 Mixed IPv4 and IPv6 network setup
Having the TN3270 client and server in different network types requires a gateway that can handle IPv4 and IPv6 traffic, as shown in Figure 3-6.

Figure 3-6 Mixed IPv4 and IPv6 network setup
In our test setup, a C program was used as the gateway. Here, the middle-tier platform is Linux, but it might be any platform with a dual stack, including Windows. For an example of a Transmission Control Protocol (TCP) forwarding program, see this website:
|
Note: z/VSE 4.3 and later can be used as the gateway when the EZA socket interface is used. With EZA, you can access IPv4 and IPv6 sockets in the same program. However, a C interface is not yet available.
|
Connecting with a TN3270 client
As with the IPv4 setup, we can use IBM Personal Communications as the TN3270 client. For Host Name or IP Address, enter the IP address of the middle-tier platform: 9.152.86.58 with port number 1023, as shown in Figure 3-7. The gateway program forwards traffic to the VSE system in the IPv6 network, where the TN3270 daemon listens on port 23.

Figure 3-7 Telnet3270 window in IBM Personal Communications
After a connection is made to VSE, the IPv6/VSE VTAM selection window that is shown in Figure 3-8 opens.

Figure 3-8 VTAM selection window for IPv6/VSE
Select DBDCCICS and press Enter to open the VSE sign-on window. You can use the same setup with any other TN3270 client, such as Open Text Host Explorer.
3.3.4 Setting up a dual-stacked system
In this section, we describe the setup of a dual-stacked system with an IPv4 stack coupled to an IPv6 stack. This setup has the advantage that your applications work transparently on IPv4 and IPv6 networks, as shown in Figure 3-9.

Figure 3-9 Dual-stacked system setup
All types of requests are first routed to the IPv6 stack, which recognizes IPv4 packets and sends them to the IPv4 stack for processing.
For more information about the COUPLED command, see IPv6/VSE User's Guide, SC34-2618.
For more information about configuring a dual-stacked system, see IPv6/VSE Installation Guide, SC34-2616.
Example 3-8 shows an example of how to start a dual-stacked system.
Example 3-8 Sample job for a dual-stack system
* $$ JOB JNM=BSI02V6,CLASS=S,DISP=D
* $$ LST CLASS=S,DISP=D
// JOB BSI02V6
// OPTION LOG,PARTDUMP,NOSYSDUMP,SADUMP=1
// LIBDEF PHASE,SEARCH=(PRD2.BSI)
// LIBDEF SOURCE,SEARCH=(PRD2.CONFIG,PRD2.BSI)
// SETPFIX LIMIT=(2M,1M)
// ASSGN SYS000,SYSLST
// EXEC BSTT6NET,SIZE=BSTT6NET,OS390,TASKS=ANY
ID 02
COUPLE 03
*
INTERVAL 120
DEVICE OSA OSAX D60 TRLHF9 D62 LAYER2 020000000006
*
LINK OSA 0 FD00:9:152:40:840:FFFF:85:126 /80 8192
*
ROUTE OSA FD00:9:152:40:840::1 /80 ::0 0
ROUTE OSA ::0 ::0 FD00:9:152:40:840::1 1
*
ATTACH TCP/IP
/*
/&
* $$ EOJ
3.3.5 UDPv4 in a coupled stack environment
While the IPv6/VSE stack supports “dual-listens” for TCP sockets in a coupled stack environment, it does not support “dual-binds” for UDP sockets. This means that if you use an application that uses UDP for communication (such as, the SNMP Monitoring Agent), the application is reachable only with IPv6. The SNMP Monitoring Agent answers requests from IPv6 only.
If you want to use your application for IPv4 and IPv6, you must start two instances of your application and bind one instance to the IPv6 stack and the other to the IPv4 stack. You do this by using SYSPARM OPTION in the startup job of your application. A sample SNMP Monitoring Agent startup job is shown in Example 3-9.
Example 3-9 SNMP Monitoring Agent startup job
* $$ JOB JNM=STARTMAS,DISP=L,CLASS=R
// JOB STARTMAS STARTS THE SNMP MONITORING AGENT
* ****************************************************** *
* This Job starts the SNMP MONITORING AGENT. *
* Please change the ID and the SYSPARM card if necessary *
* ****************************************************** *
// ID USER=VCSRV,PWD=VCSRV
// LIBDEF *,SEARCH=(PRD2.CONFIG,PRD1.BASE,PRD2.SCEEBASE)
// OPTION SYSPARM='02'
// EXEC IESMASNM,PARM='DD:PRD2.CONFIG(IESMASCF.Z)'
/*
/&
* $$ EOJ
Sample JCL is provided in skeleton SKSTMAS in ICCF library 59.
3.3.6 Connectivity considerations
In this section, we provide some tips for resolving connectivity issues by using a printer as an example. Consider the situation where the printer no longer responds.
The first issue that we must consider is the difference between pinging an IP address and connecting to an IP address. Pinging an IP address means only that there is a host of some kind that is responding at that IP address. It does not mean that there is a printer at that IP address or that there are any applications that are running at that IP address.
When you receive an RC=4 on an OPEN, this indicates that the application did not establish a connection on the specified port. The next issue to consider is how to determine what is happening.
One way to tell if the printer is accepting connections is to use telnet (rather than ping) to attempt to connect to the printer. In a Windows or Linux command prompt, enter the following command:
telnet ip-address 9100
You might see output that is similar to the following three cases:
•Telnet did not find the host at all, as shown in the following example:
jcb@dv9500t:~> telnet 10.1.1.16 9100
Trying 10.1.1.16...
telnet: connect to address 10.1.1.16: No route to host
•The host exists, but is not accepting connections on port 9100, as shown in the following example:
jcb@dv9500t:~> telnet 10.1.1.2 9100
Trying 10.1.1.2...
telnet: connect to address 10.1.1.2: Connection refused
•An application (for example, a printer) is answering the attempt to connect, as shown in the following example:
jcb@dv9500t:~> telnet 192.168.1.103 9100
Trying 192.168.1.103...
Connected to 192.168.1.103.
Escape character is '^]'.
^]
telnet> quit
Connection closed.
3.4 Setting up FTP
In this section, we describe how to set up FTP with z/VSE acting as server or client.
3.4.1 Security
The following methods are available for controlling FTP security:
•Set up the BSTTSCTY.T security member.
A default security member is provided with the stack. However, the default member provides open access to the FTP server. Any user ID and password are accepted.
•Use the IBM provided security exit BSSTISX.
The BSI FTP server security exit routine BSTTFTS1.PHASE calls the BSSTISX security exit to verify user ID and password. All other security is controlled by using the BSTTSCTY.T member.
To enable the BSTTFTS1.PHASE security exit, complete the following steps:
a. Copy the BSTTFTS1.PHASE to a configuration lib.slib as BSTTFTSX.PHASE.
b. In a LIBDEF statement, reference this configuration lib.sublib in the BSTTFTPS PHASE,SEARCH chain.
c. Add the following BSSTISX command to your BSTTFTPS startup commands:
BSSTISX <data>
<data> is [anonym_uid][,[anonym_pwd][,[preproc][,[postproc][,[mode]]]]]
For more information about configuring security for IPv6/VSE, see the IPv6/VSE IPv4 User’s Guide, SC34-2618, and IPv6/VSE Migration Guide. SC34-2624.
3.4.2 VSE as a server
You can start an FTP server by using the BSTTFTPS utility. The FTP server partition must be 24 MB or larger. BSI recommends running BSTTFTPS in the largest possible partition with no 31-bit storage.
The JCL that is shown in Example 3-10 starts an FTP server on VSE that is listening on port 21.
Example 3-10 FTP server JCL
* $$ JOB JNM=FTPDIPV6,CLASS=S,DISP=D
// JOB FTPDIPV6 - FTP SERVER FOR BSI STACK
// LIBDEF PHASE,SEARCH=(PRD2.CONFIG,PRD2.TCPIPB)
// LIBDEF SOURCE,SEARCH=(PRD2.TCPIPB)
// EXEC BSTTFTPS,SIZE=BSTTFTPS,OS390
ID 02
*
OPEN 9.152.86.91 21
*
* USE THE IBM PROVIDED BSM SECURITY EXIT
BSSTISX
*
* DEFINE THE DEFAULT FILE SYSTEM TO USE
SMNT POWER
*
ATTACH SERVER-1
ATTACH SERVER-2
ATTACH SERVER-3
*
/*
/&
* $$ EOJ
|
Notes: Up to four ATTACH commands can be used in each FTP Server partition to attach FTP Server subtasks.
When the IBM provided security exit BSSTISX is used, make sure that you copy phase BSTTFTS1 as phase BSTTFTSX into a configuration lib.sublib.
|
BSTTFTPS uses the SMNT command to mount a particular file system. The following supported file systems are available:
•SMNT POWER (mounts VSE/POWER)
•SMNT SAM (mounts SAM file system)
•SMNT VSAM <catalog.name> (mounts a VSAM catalog)
•SMNT LIBRARY <libname> (mounts a library)
•SMNT NULL (mounts a null filesystem)
The following example is for using a Windows FTP script to retrieve an LST queue member. For more information about scripting with the MS command line FTP client, see this website:
In a Windows command prompt, you start an FTP script, as shown in the following example:
ftp -s:ftptest.txt
The ftptest.txt file contains the commands that are shown in Figure 3-11.
Example 3-11 MS Windows FTP script
open 9.152.86.91
userid
password
cd smnt-power
cd lst
ascii
get class.number.name
quit
|
Note: BSTTFTPS allows specifying generic values, such as the use of wildcards. For example, if you want to download the first queue entry with a name in class A, you write A.0.name.
|
For more information about setting up FTP clients for use with BSTTFTPS, see 6.2.2, “FTP clients” on page 199.
3.4.3 VSE as a client
An FTP client is provided by the BSTTFTPC utility. Example 3-12 shows typical JCL that uses BSTTFTPC.
Example 3-12 FTP client JCL
// JOB BSTTFTPC - FTP CLIENT FOR BSI STACK
// LIBDEF PHASE,SEARCH=(PRD2.CONFIG,PRD2.TCPIPB)
// LIBDEF SOURCE,SEARCH=(PRD2.TCPIPB)
// EXEC BSTTFTPC,SIZE=BSTTFTPC,OS390
ID 02
OPEN 9.152.222.71
USER myuser
PASS mypasswd
*
QUIT
/*
/&
While FTP of ICCF members is not supported by using the BSTTFTPS server, you can do this with BSTTFTPC. The technique is to read from SYSIPT and use SLI to include the ICCF member with JCL, as shown in Figure 3-13.
Example 3-13 FTP client JCL showing how to FTP an ICCF member
// EXEC BSTTFTPC,SIZE=BSTTFTPC
ID ..
USER ...
PASS ...
*
INPUT SYSIPT
TYPE A
STOR file.name
*
QUIT
/*
* $$ SLI ICCF=...,LIB=...
/*
3.5 Setting up TN3270
In this section, we describe how to set up TN3270, which involves configuring VTAM and setting up the JCL for the BSI Telnet server. We then provide examples of using various Telnet clients, such as, IBM Personal Communications, Open Text Exceed, and wc3270.
3.5.1 Setting up VTAM
In this section, we describe the VTAM setup for a TN3270 server. The following steps must be performed:
•Add VTAM applications to ATCCON00.B
•Catalog the new VNETAPPL B-book
•Activate the modified setup
Changing the ATCCON00.B book
You must add the following VTAM application to the ATCCON00.B member:
VNETAPPL
Cataloging the VNETAPPL.B book
You can use a job that is similar to what is shown in Example 3-14 to catalog the VNETAPPL B-book.
Example 3-14 JCL to catalog a VNETAPPL B-book
* $$ JOB JNM=VNETAPPL,CLASS=0,DISP=D
* $$ LST CLASS=0,DISP=D
// JOB VNETAPPL
// EXEC LIBR,SIZE=256K,PARM='MSHP'
ACCESS S=PRD2.CONFIG
CATALOG VNETAPPL.B REPLACE=YES
VNETAPPL VBUILD TYPE=APPL
BSTTVNET APPL
BSTTUSST APPL AUTH=(PASS,ACQ)
VNETTRM GROUP MODETAB=IESINCLM,DLOGMOD=SP3272QN
T001 APPL AUTH=(ACQ),EAS=1
T002 APPL AUTH=(ACQ),EAS=1
T003 APPL AUTH=(ACQ),EAS=1
T004 APPL AUTH=(ACQ),EAS=1
T005 APPL AUTH=(ACQ),EAS=1
T006 APPL AUTH=(ACQ),EAS=1
T007 APPL AUTH=(ACQ),EAS=1
T008 APPL AUTH=(ACQ),EAS=1
T009 APPL AUTH=(ACQ),EAS=1
T010 APPL AUTH=(ACQ),EAS=1
/+
/*
/&
* $$ EOJ
The APPL names must match with the TERMINAL names in the BSTTVNET JCL, as shown in Example 3-15.
Activating the changed VTAM book
To activate the changed VTAM book, enter the following command:
V NET,ACT,ID=VNETAPPL
3.5.2 Starting a TN3270 server
The JCL that is shown in Example 3-15 starts the TN3270 server that uses the IPv4 stack.
Example 3-15 JCL to start a TN3270 server in a IPv4 stack
* $$ JOB JNM=BSITN44,CLASS=S,DISP=D
* $$ LST CLASS=S,DISP=D
// JOB BSITN44
// OPTION LOG,PARTDUMP,NOSYSDUMP
// LIBDEF *,SEARCH=(PRD2.CONFIG)
// OPTION SYSPARM='44'
// EXEC BSTTWAIT,SIZE=BSTTWAIT
// EXEC BSTTVNET,SIZE=BSTTVNET,DSPACE=3M,TASKS=ANY,OS390
ID 44
OPEN VSEC01 1023
*
APPLID DBDCCICS CICS/TS AND ICCF
APPLID BSTTVNET PRINTER SHARING APPLICATION
*
TITLE *** *** Welcome to vse C01 test system *** ***
*
TERMINAL T001 GENERIC
TERMINAL T002 GENERIC
TERMINAL T003 GENERIC
TERMINAL T004 GENERIC
TERMINAL T005 GENERIC
TERMINAL T006 GENERIC
TERMINAL T007 GENERIC
TERMINAL T008 GENERIC
TERMINAL T009 GENERIC
TERMINAL T010 GENERIC
*
ATTACH TN3270E
/*
/&
* $$ EOJ
When you have many terminals, it is more convenient to include the list of TERMINAL statements by using * $$ SLI. This way, the actual BSTTVNET commands are stored in ICCF or a z/VSE library member. You can change the BSTTVNET startup command without changing the POWER JCL. You can use an editor to duplicate the TERMINAL commands and modify only the LUNAME for each line.
|
Note: BSTTVNET supports up to 2000 sessions per BSTTVNET partition. BSI recommends defining printer sessions in a separate BSTTVNET partition.
Generally, BSI suggests dividing many sessions between multiple BSTTVNET partitions. After you define over 1,000 sessions in one BSTTVNET partition, it is suggested that a new BSTTVNET partition is used for more new sessions.
|
3.5.3 Controlling the terminal type
The terminal type is controlled by when a terminal session is opened. The session is installed automatically or the session (terminal) is defined in RDO (DFHCSD file).
If the session is installed automatically (this is often the case), the auto-install process selects the TYPETERM from a CICS table. If the session is defined in RDO, the CICS TYPETERM that is used is specified in the RDO entries for the terminal.
For more information about the CICS TYPETERMs that are used in the DFHTERM group for auto installation (TYPETERM definitions in group DFHTYPE), see CICS Resource Definition Guide, SC33-1653.
The BSTTVNET server passes the VTAM logmode to CICS. This logmode is used to select a TYPETERM in the CICS auto installation routines. Because all BSTTVNET TERMINAL sessions are non-SNA, the DFH3270 TYPETERM is normally used.
If the VSESPG RDO group is used for automatic installation, the VSE3278Q TYPETERM often is used. This is the appropriate TYPETERM because it queries the TN3270(E) client to determine the correct configuration.
|
Note: Unless you have a specific need for a true TN3270E session, BSI recommends the use of TERMINAL sessions. There is less processor usage for TERMINAL sessions when compared to TN3270E.
|
3.5.4 Connecting with IBM Personal Communications
In our plain IPv4 setup, we used IBM Personal Communications as the TN3270 client. For Host Name or IP Address, enter the IP address of the VSE system (9.152.85.64) with port number 1023, as shown in Figure 3-10.

Figure 3-10 Telnet 3270 window in IBM Personal Communications
After you connect to VSE, the VTAM selection window opens, as shown in Figure 3-11.
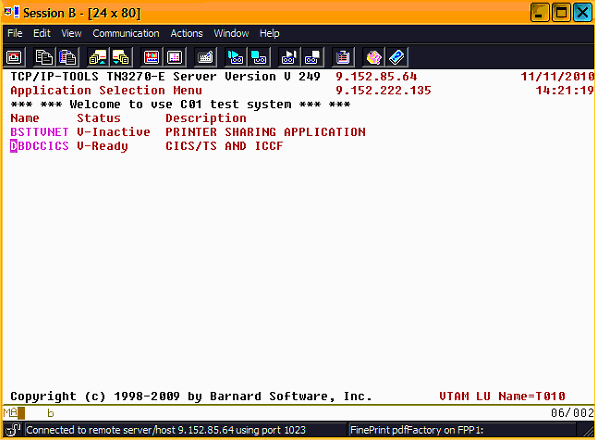
Figure 3-11 VTAM selection window of IPv6/VSE
Move the cursor to DBDCCICS and press Enter to open the VSE sign-on window.
3.5.5 Connecting with Open Text Exceed
The Open Text Exceed product was formerly known as Hummingbird Exceed and provides various connectivity tools. In the Hummingbird Neighborhood folder, double-click a Default 3270 icon and configure the session to VSE.
In the 3270 session window, select Options → Session Properties, then specify the VSE IP address and TN3270 port, as shown in Figure 3-12.

Figure 3-12 Configuring the Session properties in Open Text Exceed

Figure 3-13 VTAM selection window in IPv6/VSE
3.5.6 Connecting with wc3270
The wc3270 emulator is a IBM 3270 terminal emulator for the X Window System and Windows available at no extra cost. It is available at this website:
By using the wc3270 session wizard, you can create wc3270 sessions. Because we are not using SSL, choose SSL Tunnel = NO when you are creating your wc3270 session, as shown in Example 3-16.
Example 3-16 Setting up a wc3270 session
1. Host ................... : vsessl
2. Logical Unit Name ...... : (none)
3. TCP Port ............... : 23
4. Model Number ........... : 4 (43 rows x 80 columns)
5. Oversize .............. : (none)
6. Character Set .......... : bracket (CP 37*)
7. SSL Tunnel ............. : No
8. Proxy .................. : (none)
11. wpr3287 Printer Session : No
15. Keymaps ................ : (none)
17. Font Size .............. : 12
18. Background Color ....... : black
19. Menu Bar ............... : Yes
Double-click the session icon to start the TN3270 session, as shown in Figure 3-14.
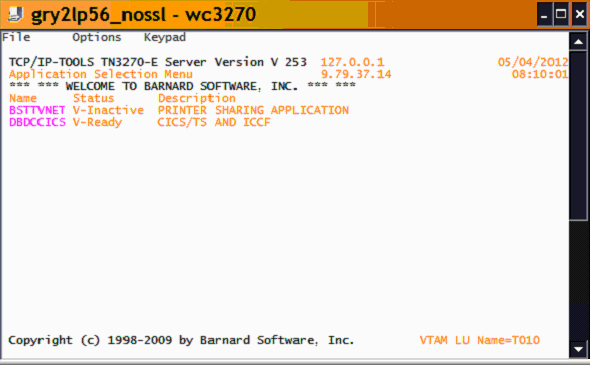
Figure 3-14 VTAM selection panel that uses the wc3270 terminal emulator
3.5.7 Recovering from broken connections
IPv6/VSE provides two commands for recovering from interrupted connections.
•REACT luname
The REACT command forces a termination by closing the VTAM ACB for the luname and then issues a VTAM OPEN again. Effectively, this forces the application connected to the ACB to release it and the TCP socket is also closed.
•KILL luname
Terminates a session normally. The KILL command posts a session termination ECB. On the VTAM side, a TERMSESS is issued. On the TCP side, the socket is closed.
Closing the VTAM ACB for the luname being used forces CICS to clean up the session and release the resource. A proper DFHZNEP phase is also helpful here. IPv6/VSE provides three samples (source) for a ZNEP phase.
3.6 Setting up TN3270E printing
In this section, we describe how to set up TN3270E printing.
3.6.1 TN3270E setup
Example 3-17 shows a simple BSTTVNET startup for printers. BSTTVNET accepts connections that use port 5023 for the three defined TN3270E printer sessions. The DIRECT/LPR/FTP/FTPP sessions are non-SNA. For more information, see the chapter that is titled “Printing without using a TN3270E Client” in IPv6/VSE User's Guide, SC34-2618. The DIRECT and LPR type printer session are widely used.
Example 3-17 BSTTVNET JCL for printers
// OPTION SYSPARM='10'
// EXEC BSTTWAIT,SIZE=BSTTWAIT
/*
// EXEC BSTTVNET,SIZE=BSTTVNET,DSPACE=3M
ID 10
OPEN 127.0.0.1 5023
*
APPLID BSTTVNET PRINTER SHARING APPLICATION
*
PRINTER P001 BSTTVNET
PRINTER P002 BSTTVNET
PRINTER P003 BSTTVNET SCS
*
DIRECT DIR BSTTVNET 192.168.1.101 9100 *
LPR LPR BSTTVNET 192.168.1.60 * * hp2505
FTP FTP BSTTVNET 192.168.1.60 * * tstuser tstpswd
FTPP FTPP BSTTVNET 192.168.1.60 * * tstuser tstpswd
*
ATTACH TN3270E
/*
BSI recommends running a separate BSTTVNET partition for TERMINAL and PRINTER/DIRECT/LPR sessions.
Table 3-1 shows the CICS typeterms and VTAM log modes to be used for particular printers.
Table 3-1 CICS Typeterms and VTAM Logmodes for printers
|
Printer
|
CICS Typeterm
|
VTAM Logmode
|
|
CICS printer
|
VSEDSCP
|
SPDSCPRT
|
|
SNA LU1 SCS printer
|
VSESCSPA
|
SPSCSPRT
|
For more information, see the chapter that is titled “Using the TN3270E Server” in the IPv6/VSE User's Guide, SC34-2618.
3.6.2 BSTTVNET JCL
The JCL that is shown in Example 3-18 starts an IPv6/VSE printer server to use the sample printers. This server setup is only for printers and should be connected through the IP4 stack.
Example 3-18 JCL for a IPv6/VSE printer server
* $$ JOB JNM=BSITELNP,CLASS=H,DISP=D
* $$ LST DISP=H,CLASS=Q
// JOB BSITELNP Printer Server for TELNET ACCESS FROM PCOMM V6
// LIBDEF *,SEARCH=(PRD2.CONFIG,BARNARD.IPV6)
// OPTION SYSPARM='44'
/*
// EXEC BSTTVNET,SIZE=BSTTVNET,DSPACE=3M,OS390,TASKS=ANY
ID 44
OPEN 192.168.1.61 2023
SBCS DN_03
*
APPLID BSTTVNET PRINTER SHARING APPLICATION
*
PRINTER TADV3 BSTTVNET
PRINTER TADV4 BSTTVNET SCS
PRINTER TADV5 BSTTVNET SCS
PRINTER TADV6 BSTTVNET SCS
PRINTER TADV7 BSTTVNET
PRINTER TADV8 BSTTVNET
PRINTER TADV9 BSTTVNET
ATTACH TN3270E
/*
/&
* $$ EOJ
3.6.3 Node error program
Example 3-19 shows a sample node error program. In our setup, the ZNEP example from BSI caused a loop in IESX (highlighted in bold text).
Example 3-19 Sample node error program
// JOB IESZNEP ASSEMBLE
// LIBDEF *,CATALOG=PRD2.CONFIG
// LIBDEF SOURCE,SEARCH=(PRD1.BASE,PRD1.MACLIB)
// OPTION ERRS,SXREF,SYM,CATAL,NODECK
PHASE DFHZNEP,*
INCLUDE DFHEAI
// EXEC ASMA90,SIZE=(ASMA90,64K),PARM='EXIT(LIBEXIT(EDECKXIT)),SIZE(MAXC
-200K,ABOVE)'
* $$ END
// ON $CANCEL OR $ABEND GOTO ENDJ2
// OPTION NOLIST,NODUMP,DECK
// EXEC DFHEAP1Å,SIZE=512K
*
PUNCH ' CATALOG IESZNEP.OBJ REP=YES'
DFHSNEP TYPE=INITIAL,NAME=DFHZNEP
*
NEPBASE EQU 10 ERROR PROCESSOR BASE REGISTER
*
DFHSNEP TYPE=ERRPROC, X
CODE=(10,11,D1,A7,61,57,49),GROUP=01
USING NEPROC01,NEPBASE DEFINE BASE
LR NEPBASE,EPBAR LOAD BASE REGISTER
ST 14,NEPEPRS SAVE RETURN REGISTER
*
* CATCH POWER OFF AT SNA TERMINALS
CLI TWAEC,X'61' IS ERRORCODE=61 ?
BNE NOT61 ..NO
CLC TWASENSR(2),=X'0831' IS SENSECODE=0831 ?
BNE RETURN ..NO
OI TWAOPT3,TWAONCN SET CLSDST BIT
B ACTION
*
NOT61 DS 0H
ACTION DS 0H
*
EXEC CICS LINK PROGRAM('IESCLEAN') COMMAREA(NEPCABEG) ,
*
* The two lines below from the Barnard example caused a loop in IESX.
* Removing these lines solved the problem.
* CLI TWAEC,X'10' EC=10?
* BE YESD1 NO.
CLI TWAEC,X'11' EC=11?
BE YESD1 NO.
CLI TWAEC,X'D1' EC=D1?
BNE NOTD1 NO.
*
YESD1 DS 0H
OI TWAOPT3,TWAOINT SET CREATE
NI TWAOPT3,X'FF'-TWAONINT RESET NOCREATE
NOTD1 DS 0H
*
* Link to a vendor Znep
EXEC CICS LINK PROGRAM('MENUNEP') *
COMMAREA(DFHNEPCA) LENGTH(=AL2(NEPCALEN))
*
RETURN DS 0H
L 14,NEPEPRS RESTORE REGISTER
BR CSVTBAR RETURN TO NEP
LTORG
DFHSNEP TYPE=FINAL
END DFHNEPNA NEP ENTRY POINT
/*
/. ENDJ2
// EXEC IESINSRT
/*
// IF $MRC GT 4 THEN
// GOTO NOLNK
// EXEC LNKEDT,SIZE=256K,PARM='MSHP'
/. NOLNK
/&
* $$ EOJ
* $$ END
/&
3.7 Setting up SSL
In this section, we describe how to set up SSL for the IPv6/VSE stack. SSL requires service level 253pre03-ibm or later and OpenSSL support in z/VSE 5.1 (z/VSE Cryptographic Services, 5686-CF9-17, CLC=51S). Check for phase IJBSSL in PRD1.BASE.
The full support is provided in the following PTFs:
•DY47414 / UD53863: VSE/AF update for HW crypto support
•DY47499 / UD53983: OpenSSL, upgrade to version 1.0.1e
•PM98875 / UK98397: IPV6/VSE, support of TLSV1.2 parameter
3.7.1 Installing the prerequisite programs
You can create the OpenSSL keystore by using the Keyman/VSE tool or OpenSSL on a workstation platform. Install both programs on your system so that they are available.
OpenSSL-Light
OpenSSL-Light for Windows is available at this website:
This website features the following links:
•Win32 OpenSSL v1.0.0d Light
•Visual C++ 2008 Redistributable package (you need these runtime components for OpenSSL)
First download and install the Visual C++ Redistributable package, then install OpenSSL Light.
Keyman/VSE
Download and install the latest version of the Keyman/VSE tool from the VSE, which is available at this website:
|
Note: The Keyman/VSE tool needs the VSE Connector Client that can be downloaded and installed from this website:
|
3.7.2 Creating the keystore
With the latest version of Keyman/VSE (build date January 2013 or later), you can create a .pem file and upload it to VSE with a few mouse clicks.
In a test environment, you might want to use self-signed certificates. In a production environment, you should use certificates that are issued by a certificate authority (CA).
Complete the following tasks to create a .pem file that is used on VSE by OpenSSL by using Keyman/VSE and OpenSSL on a workstation.
Creating the keystore using Keyman/VSE
Complete the following steps to create and upload your .pem file by using Keyman/VSE:
1. Create an RSA key, SSL, and SSL root certificate, as shown in Figure 3-15.

Figure 3-15 Keyman/VSE main window

Figure 3-16 Keyman/VSE local keyring file properties window
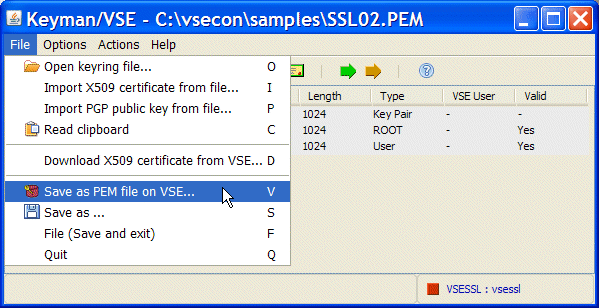
Figure 3-17 Keyman/VSE upload .pem file to VSE

Figure 3-18 Keyman/VSE upload as .pem window
In the next section, we describe another method that can be used to create an OpenSSL keystore by using OpenSSL on your system. Other keystore-related issues also are described.
Creating the keystore using OpenSSL
In this section, we describe how to create your .pem file by using OpenSSL that is installed on MS Windows. This process is more complicated than the use of Keyman/VSE; however, it might give you more flexibility. In this case, we use the Keyman/VSE tool as a CA for signing the certificate request that was created by using OpenSSL.
Complete the following steps:
1. Create an RSA key and certificate request by using OpenSSL-Light on your system.
The following command can be used to create a .pem file that contains an RSA key pair with OpenSSL-Light on Windows:
openssl req -x509 -nodes -days 365 -newkey rsa:2048 -keyout ssl01.pem
-out myreq.pem
The -nodes parameter stands for “no DES encryption” and causes the .pem file to be created without a password. Password-protected .pem keystores are not supported by the IPv6/VSE stack.
2. Create a self-signed root certificate, as shown in Figure 3-19.
Open the Keyman/VSE tool and create a self-signed root certificate. We use this certificate later for signing the certificate request that was created in the previous step.
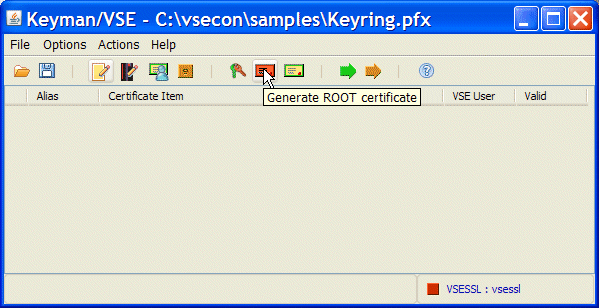
Figure 3-19 Keyman/VSE generate self-signed root certificate
3. Sign the certificate request.
Open the previously created .pem file that contains the certificate request (myreq.pem) with a text editor and copy the request to the clipboard. Copy the entire text, including the BEGIN/END delimiter lines, as shown in Figure 3-20.

Figure 3-20 Editor window that shows the contents of myreq.pem
In the Keyman/VSE window, right-click the root certificate and select Sign certificate request. Paste the certificate request into the text area in the Sign certificate request window, as shown in Figure 3-21.

Figure 3-21 Sign certificate request window in Keyman/VSE
4. Click Generate cert. You now have two certificates in the Keyman/VSE main window, as shown in Figure 3-22.

Figure 3-22 Keyman/VSE main window
In the Keyman/VSE main window, copy and paste both certificates into the .pem file by right-clicking a certificate and selecting Copy to clipboard.
|
Important: The VSE certificate must be placed before the root certificate in the .pem file so that the order is: key - vsecert - rootcert.
|
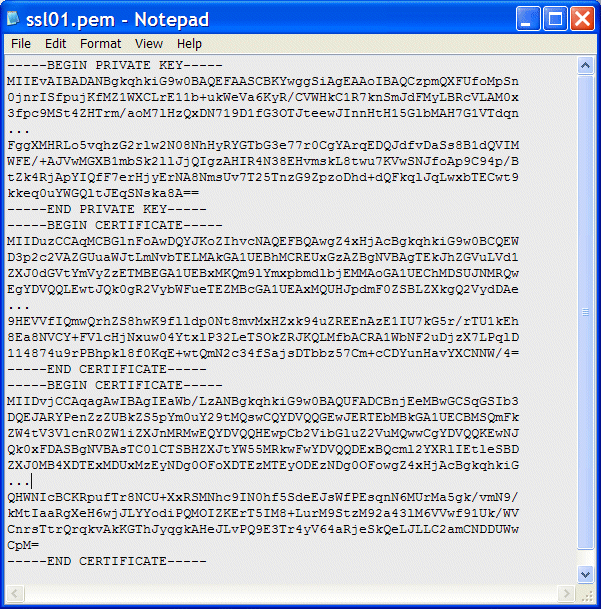
Figure 3-23 Editor window that shows a .pem file
The .pem file now contains the key and two certificates.
6. Save the .pfx and .pem files. The .pfx file is used on the client side; the .pem file must be uploaded to VSE and then used by BSTTATLS.
7. Upload the .pem file to VSE.
After the .pem file is created, it must be uploaded to VSE with ASCII to EBCDIC translation, either as a VSE library member or as a VSAM file.
When the .pem file is created on Windows, there is a problem with the line-end characters. The openssl.exe creates UNIX style line breaks with only “line-feed” (hex 0A). On Windows, we usually have “carriage-return/line-feed” CRLF (hex 0D0A).
Without having CRLF line endings, FTP or VSE Connector Server cannot transfer the file to VSE with ASCII to EBCDIC translation. Therefore, this issue must be fixed before the .pem file is uploaded to VSE.
On Windows, line endings can be converted by using the WordPad editor.
|
Note: On Windows XP, the notepad.exe cannot read UNIX style text files correctly. To convert the line endings with WordPad, edit the .pem file and save it back to disk.
|
After the .pem file is uploaded (see Figure 3-24) as a VSE library member SSL01.pem in CRYPTO.KEYRING, you can configure the SSL proxy server.

Figure 3-24 z/VSE DITTO display of a .pem file in VSAM
When the file is uploaded correctly, its contents are readable Base64-encoded text.
Verifying the keystore
OpenSSL provides a verify function to check a .pem file for correctness. When we verified our .pem file we received the following error:
C:vseconsamples>openssl verify test.pem
test.pem: emailAddress = [email protected], C = DE, ST = Baden-Wuerttemberg, L = B
oeblingen, O = IBM, OU = Development, CN = 9.152.131.189
error 20 at 0 depth lookup:unable to get local issuer certificate
The error 20 is issued because we are using a self-signed root certificate and OpenSSL cannot decide whether to trust it. In our case, we can ignore this error.
If the order of the two certificates is not correct, that is, the SSL certificate does not appear before the root certificate, you receive the following error:
C:vseconsamples>openssl verify test.pem
test.pem: emailAddress = [email protected], C = DE, ST = Baden-Wuerttemberg, L = B
oeblingen, O = IBM, OU = IBM Germany, CN = Test CA Certificate
error 18 at 0 depth lookup:self signed certificate
OK
OpenSSL now finds the self-signed root certificate first, which is incorrect. By using this .pem file, connections fail.
3.7.3 Removing the private CA key from the client keyring file
There is an important point regarding how the client certificate is selected during the SSL session establishment.
With IBM Personal Communications 5.9 and 6.0, we observed that the first certificate in the keyring file with a private key is selected as the client certificate. In many cases, this is the CA root certificate and not the client certificate we created for this purpose.
The reason for this is that when the SSL certificate is obtained from an external CA, you never receive a private key from the CA. Instead, you receive a “public” CA certificate that contains only a public key. No one ever distributes a private key.
Based on our environment with Keyman/VSE, this means that we must store our self-signed CA root certificate in a safe place, remove the private key from the certificate, and then save the .pfx file.
Removing the private key from a certificate can be easily done by copying the certificate to the clipboard as Base64 test form. This process removes the private key. Reading the clipboard again pastes the root certificate in its “public form” without a private key into Keyman/VSE.
For example, double-clicking the root certificate in Keyman/VSE opens the Properties window, which shows a private and public key pair, as shown in Figure 3-25.
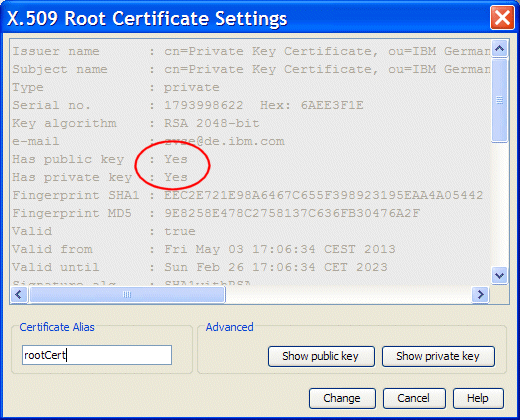
Figure 3-25 Root certificate settings in Keyman/VSE
After the certificate is copied to the clipboard and it is read back, the private key is removed, as shown in Figure 3-26.

Figure 3-26 Root certificate settings in Keyman/VSE
Save the original root certificate that contains a private key in the Keyman/VSE window in another .pfx file, change the file name to SSL01.PFX by using the Local File properties window, and then save the file, as shown in Figure 3-27.
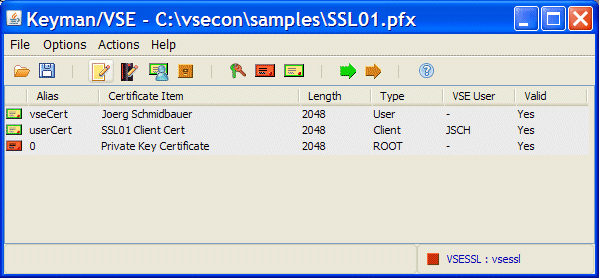
Figure 3-27 Keyring file that contains an SSL client certificate
The file now contains a public root certificate (without a private key), an SSL certificate that is signed by this root certificate, and an SSL client certificate, which also is signed by this root certificate.
The next steps involve configuring a BSI SSL proxy server (BSTTATLS or BSTTPRXY).
3.7.4 Deciding whether to use the SSL proxy server or AT-TLS
The IPv6/VSE stack provides the following two servers that provide SSL for VSE server and client applications. Both servers provide SSL/TLS transparently to the application. They support batch and CICS applications that are written in any supported API, including applications that use the ASM SOCKET macro, EZASMI, EZASOKET, and LE/C APIs:
•SSL proxy server (BSTTPRXY)
BSTTPRXY is a simple proxy server. It allows only a single PROXY command. To proxy multiple connections, you must run multiple BSTTPRXY partitions. BSTTPRXY performs IPv4-to-IPv6 or IPv6-to-IPv4 translation.
•AT-TLS server (BSTTATLS)
Automatic Transport Layer Security is a facility that is similar to the z/OS Application Transparent - Transport Layer Security (AT-TLS) facility. BSTTATLS does much more than BSTTPRXY. It allows many ATTLS definitions and monitors incoming and outgoing connections and intercepts and converts sockets from clear text to SSL or vice versa, as necessary. However, BSTTATLS does not perform IPv4-to-IPv6 or IPv6-to-IPv4 translation.
There are advantages to each application. BSTTPRXY is a proxy server application whereas BSTTATLS is an extension of the APIs to handle intercepting and converting of sockets to or from SSL.
The BSTTPRXY or BSTTATLS servers must be started before any of the applications they are servicing. The serviced applications should be shut down before the proxy or AT-TLS servers are terminated.
|
Note: BSTTPRXY requires a minimum 20 MB partition.
BSTTATLS requires a minimum 20 MB partition and 72K for each possible socket to be handled.
Ensure that the BSTTATLS/BSTTPRXY partition has a higher priority than the application partition. Otherwise, application hangs might occur.
|
3.7.5 Specifying parameters
When parameters are specified for BSTTPRXY and BSTTATLS, be aware that some parameters are global (specified only once), while others can be specified separately for specific connections. This is especially important for BSTTATLS, which handles multiple connections.
Consider the following parameter characteristics and tips:
•The SECTYPE, KEYRING, and KEYFILE are global parameters that set the default values. These parameters are specified only once.
•The SECTYPE and KEYRING must always be specified.
•The KEYFILE command can be omitted; however, if it is omitted, you must specify the keyring file on each ATTLS command. On the ATTLS command, KEYFILE is a positional parameter. That is, you do not specify the keyword; only the file name as the last parameter is specified, as shown in the following example:
ATTLS 23 AS 992 SSL TEST51
•Use the KEYFILE command for specifying the default value. If you want to change the KEYFILE for an ATTLS connection, you specify the KEYFILE on the ATTLS command.
|
Note: The KEYFILE parameter on the ATTLS command was not working correctly before APAR PM98875/PTF UK98397.
|
For more information about parameters, see IPv6/VSE SSL Installation, Programming, and User's Guide, SC34-2676.
3.7.6 Configuring the SSL proxy server
The SSL proxy server BSTTPRXY can be started with a JCL similar what is shown in Example 3-20. This example proxies a TN3270 server connection. Secure clients that are connecting to port 992 are forwarded to clear port 23.
We assume that you uploaded your .pem file as VSE library member SSL01.pem in PRD2.CONFIG.
Example 3-20 JCL for a BSTTPRXY server
* $$ JOB JNM=BSTTPRXY,CLASS=S,DISP=D
// JOB BSTTPRXY - BSI SSL PROXY SERVER
// OPTION PARTDUMP,NOSYSDUMP,NOLOG
// OPTION SYSPARM='02'
// SETPARM IPTRACE='YYNYNNNN'
/* SETPARM IPTRACE='NNNNNNNN'
// SETPARM SSL$DBG='YES' OR 'NO' (DEFAULT = NO)
// SETPARM SSL$ICA='NO' OR 'NO' (DEFAULT = YES)
// LIBDEF *,SEARCH=(PRD2.CONFIG,PRD2.TCPIPB,PRIMARY.JSCH,PRD2.SCEEBASE)
// EXEC BSTTPRXY,SIZE=BSTTPRXY,PARM='TRAP(OFF)/'
ID 02
*
KEYRING CRYPTO.KEYRING
KEYFILE SSL01
SECTYPE TLSV1
*
OPTION SERVER
PROXY TCP V4 992 SSL * TO V4 23 TXT * 127.0.0.1
/*
// EXEC LISTLOG
/*
/&
* $$ EOJ
The PROXY command is different if VSE is the client; for example, when an FTP client is used on VSE, as shown in the following example:
OPTION CLIENT
OPTION FTP
PROXY TCP V4 21 TXT * TO V4 990 SSL * 9.152.131.28
Here, the VSE FTP client connects to localhost (127.0.0.1), where BSTTPRXY converts the clear connection to SSL and forwards the traffic to the server at 9.152.131.28.
The parameters SSL$ICA and SSL$DBG are evaluated by the IJBSSL phase that is part of z/VSE 5.1 Advanced Functions and provides an SSL implementation that is based on OpenSSL.
When SSL$ICA is YES, cryptographic hardware (crypto cards and CPACF) is used to perform cryptographic operations. SSL$DBG controls debugging of the IJBSSL phase.
For more information about how cryptographic hardware is supported by z/VSE, see Security on IBM z/VSE, SG24-7691, which is available at this website:
3.7.7 Configuring the AT-TLS server
The AT-TLS server BSTTATLS can be started with JCL, as shown in Example 3-21.
Example 3-21 JCL for a BSTTATLS server
* $$ JOB JNM=BSTTATLS,CLASS=S,DISP=D
// JOB BSTTATLS - AUTOMATIC TRANSPORT LAYER SECURITY
// OPTION PARTDUMP,NOSYSDUMP,NOLOG
// OPTION SYSPARM='02'
// SETPARM IPTRACE='YYNYNNNN'
/* SETPARM IPTRACE='NNNNNNNN'
// SETPARM SSL$DBG='YES' OR 'NO' (DEFAULT = NO)
// SETPARM SSL$ICA='YES' OR 'NO' (DEFAULT = YES)
// LIBDEF *,SEARCH=(PRD2.CONFIG,PRD2.TCPIPB,PRIMARY.JSCH,PRD2.SCEEBASE)
// EXEC BSTTATLS,SIZE=BSTTATLS,PARM='TRAP(OFF)/'
ID 02
*
KEYRING CRYPTO.KEYRING
KEYFILE SSL01
SECTYPE TLSV1
*
OPTION SERVER
ATTLS 23 AS 992 SSL
*
OPTION CLIENT
OPTION FTP
ATTLS 21 TO 9.152.222.71 AS 990 SSL
/*
// EXEC LISTLOG
/*
/&
* $$ EOJ
|
Note: The KEYRING parameter can be specified only once, assuming that customers want to have all .pem files at the same place. KEYFILE and SECTYPE can be specified for each connection separately.
|
3.7.8 Considerations on SSL performance
BSTTATLS and BSTTPRXY provide a new performance-related parameter to use multiple subtasks for the SSL handshake process.
When you add
// SETPARM SUBTASK=nn
to your BSTTATLS/BSTTPRXY JCL, multitasking is enabled for the gsk_secure_soc_init API function (refer to “gsk_secure_soc_init” on page 222). This provides better performance handling multiple concurrent SSL sockets.
You can specify up to 16 (nn=01, 02, ... 16) subtasks be used.
3.7.9 Considerations on blocking clear ports
In the previous sections of this chapter, we described how to proxy clear connections to secure connections and vice versa. The question remains how to effectively block the clear port against connections from outside.
|
Note: A first try might be to block the clear port by using the following PORT SUSPEND command:
MSG BSTTINET,D=PORT 21 SUSPEND
This command blocks port 21 until a PORT 21 RESUME is issued. While the port is suspended, no connections are accepted. However, the use of the PORT command also stops BSTTATLS from connecting on port 21 and this result is not what we want.
|
The BSTTSCTY.T FTP server security member provides IP address security. The use of the following FTP-IP/FTP-IP6 commands ALLOW access from the BSTTATLS or BSTTPRXY facility that uses the loopback address and DENY access for any other IP address:
*
FTP-IP ALLOW 127.0.0.1 255.255.255.255
FTP-IP6 ALLOW ::1 /128
FTP-IP DENY 0.0.0.0 0.0.0.0
FTP-IP6 DENY ::0 ::0
*
Because the BSTTATLS and BSTTPRXY facilities can be set up to use the loopback address, this provides the access protection that you want. Complete the following steps:
1. Configure and start BSTTPRXY or BSTTATLS by using loopback.
2. Define FTP-IP/FTP-IP6 IP address security in BSTTSCTY.T.
3. Start the BSTTFTPS FTP server on port 21 (standard).
At this point, the only access to BSTTFTPS is through the loopback address on port 21. Local (or remote) users that attempt to connect directly to port 21 have their connection ended.
When a local (or remote) FTP client attempts to connect to the FTP server on port 21, they see the following messages:
jcb@z930-bt9300:~> ftp vse51b
Connected to vse51b.
421 Service not available, remote server has closed connection.
ftp> quit
jcb@z930-bt9300:~>
While on the z/VSE console, you see the following message:
S2 0491 BSTT053I USER DEFAULT LOGOFF RC= 4 03/26/2013-15:30:38-01EB
The USER DEFAULT indicates that the FTP client never logged on and RC=4 indicates a security issue.
You can still connect to the BSTTFTPS FTP server by using an SSL connection on port 990 (or whatever port you chose to use).
|
Note: Check for the latest IPv6/VSE version. It provides a firewall mechanism that allows enabling and blocking single ports. Foe example:
IN TCP DENY PORT 21
IN TCP DENY PORT 23
IN TCP ALLOW PORT 0
|
The following sections show how to set up different Telnet clients for SSL:
•wc3270 for Windows
•IBM Personal Communications
3.7.10 Configuring wc3270 for SSL
There are two versions of each of the Windows emulators, one with SSL support and one without. An option in the setup program defines which set is installed.
The secure versions of wc3270, s3270, and wpr3287 do not function without OpenSSL DLLs installed on your workstation. These DLLs are not part of the wc3270 installation; installing them is a separate process.
For more information, see the wc3270 documentation, which is available at this website:
Adding your root certificate to wc3270
You must add your root certificate to the wc3270 root_certs.txt file in the wc3270 ApplicationData folder. On Windows XP, this is this folder is in the following directory:
C:Documents and SettingsAdministratorApplication Datawc3270
Edit your .pem file and paste the ASCII text form of your root certificate into the root_certs.txt file, as shown in Figure 3-28.
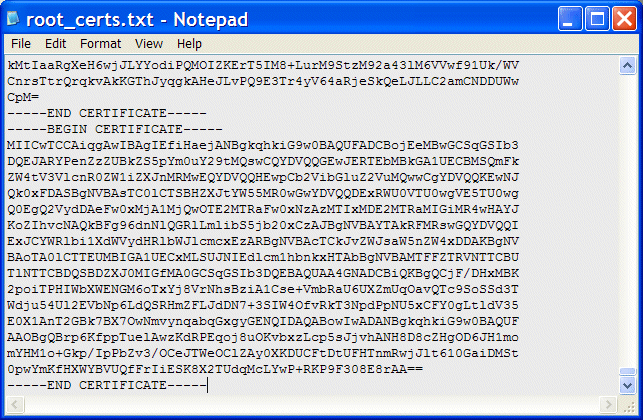
Figure 3-28 Adding your root certificate to the .pem file
Creating a secure wc3270 session
In the wc3270 session wizard, choose SSL Tunnel = YES. Also, change the port number to the secure TN3270 port as defined in the BSTTPRXY JCL, as shown in Example 3-22.
Example 3-22 Configuring a secure wc3270 session
1. Host ................... : vsessl
2. Logical Unit Name ...... : (none)
3. TCP Port ............... : 992
4. Model Number ........... : 4 (43 rows x 80 columns)
5. Oversize .............. : (none)
6. Character Set .......... : bracket (CP 37*)
7. SSL Tunnel ............. : Yes
8. Proxy .................. : (none)
11. wpr3287 Printer Session : No
15. Keymaps ................ : (none)
17. Font Size .............. : 12
18. Background Color ....... : black
19. Menu Bar ............... : Yes
Starting BSTTPRXY and BSTTVNET
You can now start BSTTPRXY and BSTTVNET. When SSL is used, BSTTPRXY or BSTTATLS must always be started before the application that they are servicing, as shown in Example 3-23.
Example 3-23 Starting BSTTPRXY
S1 0045 // JOB BSTTPRXY - BSI SSL PROXY SERVER
DATE 05/03/2013, CLOCK 15/53/58
S1 0045 * // OPTION PARTDUMP,NOSYSDUMP,NOLOG
S1 0045 BSTT000I INITIATED BSTTPXY Build253 07/05/12 16.30 EP=004201B0
S1 0045 BSTT003I COPYRIGHT (C) 1998-2012 BARNARD SOFTWARE, INC.
S1 0045 BSTT700I IPv6/VSE BUILD 253PRE11
S1 0045 BSTT719I 2: 1 Listening on port 992 SSL
After BSTTPRXY is started and listening on the secure port, start BSTTVNET, as shown in Example 3-24.
Example 3-24 Starting BSTTVNET
R1 0046 // JOB BSTTVNET - TN3270 WITH BSI STACK
DATE 05/03/2013, CLOCK 15/58/21
R1 0046 BSTT000I INITIATED BSTTWAIT Ver 2.46 04/01/09 18.08 EP=00420078
R1 0046 BSTT003I COPYRIGHT (C) 1998-2012 BARNARD SOFTWARE, INC.
R1 0046 BSTT001I TERMINATED BSTTWAIT
R1 0046 BSTT000I INITIATED BSTTVNET Build248 02/15/10 16.24 EP=00420078
R1 0046 BSTT003I COPYRIGHT (C) 1998-2012 BARNARD SOFTWARE, INC.
R1 0046 BSTT004I CB=TTLA A=00469000 L=000013FC
R1 0046 BSTT019I VSE 0.10 MODE 31-BIT
R1 0046 BSTT004I CB=COMR A=002D0518 L=00000108
R1 0121 BSTT000I INITIATED BSTTXVNC Build249 04/29/10 08.27 EP=004FB000
R1 0121 BSTT671I BSTTVNET VTAM FEATURE IS AVAILABLE
R1 0121 BSTT701I TCP/IP-TOOLS BUILD 253
R1 0121 BSTT695I CONNECTING TO PORT 23 IP 9.152.131.189
R1 0113 BSTT000I INITIATED BSTTVSRV Build250 12/14/10 17.49 EP=00569000
R1 0121 BSTT042I ATTACH OF BSTTVSRV COMPLETED
Connecting by using SSL
Double-clicking the SSL session icon connects to BSTTPRXY by using SSL, as shown in Figure 3-29.

Figure 3-29 VTAM selection panel in wc3270 that uses SSL
The green S at the bottom of the wc3270 window indicates that this is a secure session. You might also check the SSL session properties (as shown in Example 3-25) by clicking File → Status.
Example 3-25 wc3270 session properties
[wc3270]
wc3270 v3.3.12ga7 Wed Aug 24 09:36:34 CDT 2011 pdm
Model 3279-4-E: 80 columns x 43 rows, color, extended data stream
Terminal name: IBM-3279-4-E
EBCDIC character set: bracket (SBCS)
Host code page: 37+
Host SBCS CGCSGID: GCSGID 697, CPGID 37
Windows code page: OEM 1252 ANSI 1252
Connected to: vsessl
Port: 992
using TLS/SSL
3270 mode, 7 minutes 35 seconds
Sent 58 bytes, 0 records
Received 2007 bytes, 1 record
Press <Enter> to resume session.
wc3270>
3.7.11 Configuring IBM Personal Communications for SSL
For more information about configuring IBM Personal Communications for SSL with the IP stack from Connectivity Systems, Inc, see the following resources:
•White paper that is available at this website:
•Security on IBM z/VSE, SG24-7691, which is available at this website:
The following sections are based on PCOM 5.9/6.0 for Windows. There are two major changes with PCOM 5.9 and later:
•The Microsoft Windows CryptoAPI (MSCAPI) can now be used. This allows importing your certificate (or certificates) into the Windows certificate store (click Control Panel → Internet Options).
•PCOM 5.9 and later now supports the so-called “Telnet-negotiated security”, which is not supported by the TLSD.
Adding your root certificate to the MSCAPI on Windows
Using the Microsoft Windows CryptoAPI is an alternative method to the use of the PCOM key database.
|
Note: A previously created PCOM key database can be migrated to MSCAPI by using the Certificate Migration utility. This utility can be accessed by clicking Start → All Programs → IBM Personal Communications → Administrative and PD Aids.
|
Adding your root certificate to PCOM
PCOM wants the certificates in PFX form, so you must convert your previously created .pem file into the PFX format. This can be done, for example with OpenSSL on Windows, as shown in the following example:
openssl pkcs12 -export -out ssl01.pfx -in ssl01.pem
During this process, you are prompted to specify an export password. This password also must be entered later when the PFX is added to the PCOM key database.
For more information about this process, see Security on IBM z/VSE, SG24-7691, which is available at this website:
Creating a secure PCOM session
On the Host Definition tab, specify the secure Telnet port, as shown in Figure 3-30.

Figure 3-30 Telnet3270 window in IBM Personal Communications
|
Note: As shown in Figure 3-31, there is a new option in the Security Setup window that is call Telnet-negotiated. Do not select this option because BSTTATLS/BSTTPRXY do not support Telnet-negotiated security.
|

Figure 3-31 Telnet-negotiated option in IBM Personal Communications
Depending on whether you imported your certificates into the PCOM key database or the Windows certificate store, select the related Security Package.
Connecting using SSL
You can directly connect to the BSTTATLS or BSTTPRXY application on VSE, as shown in Figure 3-32.

Figure 3-32 Secure PCOM session
The lower left corner of the PCOM window shows the encryption grade. In this example, the connection was established by using AES-128.
3.7.12 Configuring secure FTP
In this topic, we describe the setup of secure FTP by using the BSTTATLS server. We also provide an overview of different secure FTP connection types. These types are relevant when FTP clients are configured for use with BSTTATLS.
File transfer connection types overview
Secured FTP connections are one important part of every company network. There are several kinds of secure FTP connection types, but only a subset is supported on z/VSE. Unfortunately, their naming is not consistent through various FTP products.
In general, all terms that are used by the different products can be mapped to the following four types of secured FTP connections:
•FTPS Explicit
An extension to the FTP standard that allows clients to request that the FTP session is encrypted. The login and the data are encrypted. Explicit FTPS currently is not supported on z/VSE.
•FTPS Implicit
A standard for FTP that requires the use of an SSL or TLS connection. It was specified to use different ports than FTP. This is the supported connection type by TCP/IP for VSE/ESA and IPv6/VSE. As with Explicit, the login and the data are encrypted.
•SSH File Transfer Protocol (SFTP)
This type uses a different protocol. Standard FTP clients cannot be used to talk to an SFTP server, nor can one connect to an FTP server with a client that supports only SFTP. SFTP currently is not supported on z/VSE.
•FTP over SSH
This type refers to the practice of tunneling a normal FTP session over an SSH connection. The login is encrypted, but data is not. This connection type also is not supported on z/VSE.
Table 3-2 shows some examples of how these connection types are named by some FTP clients that we used in our tests.
Table 3-2 Examples of secure FTP connection types
|
Connection type
|
FileZilla
|
Core FTP Language Environment®
|
Total Commander
|
|
FTPS explicit
|
Explicit FTP over TLS
|
AUTH_SSL
AUTH_TLS
|
N/A
|
|
FTPS implicit
|
Implicit FTP over TLS
|
FTPS (SSL DIRECT)
|
SSL/TLS
|
VSE as a server
The JCL that is shown in Example 3-26 starts an FTP server on VSE that is listening on port 21.
Example 3-26 JCL to start an FTP server
* $$ JOB JNM=FTPDIPV6,CLASS=S,DISP=D
// JOB FTPDIPV6 - FTP SERVER FOR BSI STACK
// LIBDEF PHASE,SEARCH=(PRD2.CONFIG,PRD2.TCPIPB)
// LIBDEF SOURCE,SEARCH=(PRD2.TCPIPB)
// EXEC BSTTFTPS,SIZE=BSTTFTPS,OS390
ID 02
*
OPEN 9.152.86.91 21
*
* USE THE IBM PROVIDED BSM SECURITY EXIT
BSSTISX
*
* DEFINE THE DEFAULT FILE SYSTEM TO USE
SMNT POWER
*
ATTACH SERVER-1
ATTACH SERVER-2
ATTACH SERVER-3
*
/*
/&
* $$ EOJ
BSTTATLS now listens on the default secure FTP port 990 with the following AT-TLS definitions:
KEYFILE SSL01
SECTYPE TLSV1
OPTION SERVER
OPTION FTP
ATTLS 21 AS 990 SSL
The following topics provide examples of how to use different FTP clients for connecting to BSTTPRXY/BSTTATLS. In our tests, we used some popular freeware clients, such as FileZilla, Core FTP Language Environment, and Total Commander.
|
Note: The FTP clients do not need a client keyring file if you do not use SSL client authentication. When you are connecting the first time, a client usually displays a window in which the user must accept or reject the SSL server certificate. Some clients allow importing the SSL server certificate into their client keystore, which makes this check obsolete when you are reconnecting.
|
The following sections show how to set up different FTP clients for SSL:
•FileZilla client
•Core FTP Language Environment
•Total Commander
Using FileZilla client
When FileZilla client is used, you configure a secure connection by using the Site Manager. On the FileZilla client main window, click the Site Manager toolbar button, as shown in Figure 3-33.

Figure 3-33 FileZilla client main window
For more information about FileZilla, see this website:
In the Site Manager window (see Figure 3-34), configure a new site. For Encryption, you must select Require implicit FTP over TLS. For the user and password, enter a valid VSE user ID and its password. Port 990 is the default value for the secure FTP port and does not need to be specified.

Figure 3-34 FileZilla client Site Manager window
If you are using a firewall, you should switch to passive mode. Select Transfer Settings and then click Passive, as shown in Figure 3-35.
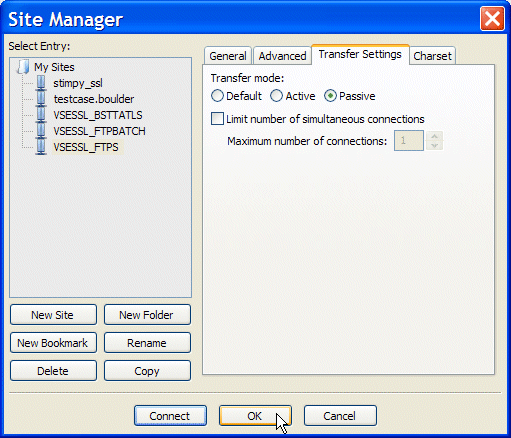
Figure 3-35 Selecting passive mode in FileZilla client.
In the next section, we describe how different FTP clients sometimes require different SSL settings.
Using Core FTP Language Environment
The freeware FTP client Core FTP Language Environment has a similar concept of defining connections as does FileZilla.
For more information about Core FTP Language Environment, see this website:
Open the Site Manager and specify the credentials for your VSE system. For Connection, you must select FTPS (SSL DIRECT), as shown in Figure 3-36.

Figure 3-36 CoreFTP Language Environment Site Manager window
You can now connect immediately to VSE.
|
Note: For BSTTATLS/BSTTPRXY, you must select FTPS (SSL DIRECT). In contrast, when TCP/IP for VSE is used, you must use AUTH SSL or AUTH TLS.
|
Using Total Commander
Total Commander is a Shareware file manager for Windows. You can download a test version from this website:
For SSL support, Total Commander must have access to the OpenSSL DLLs on Windows. In our tests, we copied the following three DLLs into the Total Commander installation directory:
•LIBEAY32.DLL
•LIBSSL32.DLL
•SSLEAY32.DLL
By using Total Commander, you can configure SSL by clicking Net → FTP Connect. In the Connect to ftp server window, create a connection to your host, as shown in Figure 3-37.
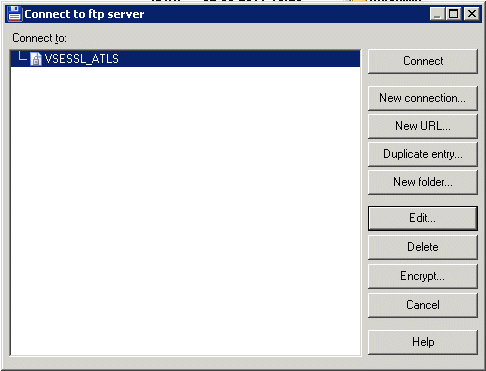
Figure 3-37 Total Commander Connect to ftp server window
In the FTP: connection details window, select SSL/TLS. Also, enter ftps://VSESSL:990 in the Host name field, as shown in Figure 3-38.

Figure 3-38 Total Commander FTP: connection details window
There are no other options to distinguish between the different SSL connection types.
In our tests, it was important not to use passive mode. However, this might be different in your network.
The next section describes examples when VSE acts as the FTP client.
VSE as a client
The BSTTFTPC utility can be used with BSTTATLS and BSTTPRXY for connecting to a remote FTP server by using SSL. However, you cannot use the same JCL because BSTTATLS and BSTTPRXY work differently. BSTTATLS intercepts outbound connections and converts them to SSL. BSTTPRXY creates a proxy connection to the remote FTP server address with the SSL port.
These examples are described next.
Using BSTTATLS
Example 3-27 shows an example for an FTP client that is connecting to a remote FTP server address. This connection is intercepted by BSTTATLS and converted to SSL.
|
Note: The user ID and password might be case-sensitive, depending on which FTP server is used. PBSZ 0 and PROT P are necessary to encrypt any transferred data.
|
Example 3-27 JCL for BSTTFTPC using BSTTATLS for SSL
// EXEC BSTTFTPC,SIZE=BSTTFTPC,OS390
ID 02
OPEN 9.152.222.71
PBSZ 0
PROT P
USER myuser
PASS mypasswd
QUIT
/*
/&
With the following AT-TLS definitions, BSTTFTPC connects to the secure port 990 of the FTP server with the IP address, as shown in Example 3-28.
Example 3-28 BSTTATLS JCL
// EXEC BSTTATLS,SIZE=BSTTATLS,PARM='TRAP(OFF)/'
ID 02
KEYRING PRD2.CONFIG
KEYFILE SSL01
SECTYPE TLSV1
*
OPTION CLIENT
HANDSHAKE_CLIENT 0
OPTION FTP
ATTLS 21 TO 9.152.222.71 AS 990 SSL
*
/*
/&
The HANDSHAKE_CLIENT parameter controls whether the server certificate is verified by the client. Specifying 0 causes the server certificate to be verified by using the public key in the keyring file. This means that the CA root certificate must be in the KEYFILE. The default value is 3, which means that no checking is made.
Using BSTTPRXY
Example 3-29 shows an example for BSTTFTPC that uses BSTTPRXY for SSL. BSTTFTPC connects to port 21 on localhost, where BSTTPRXY creates a proxy connection to the remote FTP server.
|
Note: You can run BSTTPRXY on another z/VSE system and specify this system’s IP address instead of localhost.
|
Example 3-29 JCL for BSTTFTPC that uses BSTTPRXY for SSL
// EXEC BSTTFTPC,SIZE=BSTTFTPC,OS390,TASKS=ANY
ID 02
OPEN 127.0.0.1
PBSZ 0
PROT P
USER myuser
PASS mypasswd
QUIT
/*
/&
With the following BSTTPRXY definitions, BSTTFTPC connects to the remote FTP server by using SSL, as shown in Example 3-30.
Example 3-30 BSTTPRXY JCL
// EXEC BSTTPRXY,SIZE=BSTTPRXY,PARM='TRAP(OFF)/'
ID 02
*
KEYRING PRD2.CONFIG
KEYFILE SSL01
SECTYPE TLSV1
*
OPTION CLIENT
HANDSHAKE_CLIENT 0
OPTION FTP
PROXY TCP V4 21 TXT * TO V4 990 SSL * 9.152.222.71
The following examples show FTP servers that are running on MS Windows and Linux platforms.
Using FileZilla server
When the FileZilla FTP server is used, complete the following steps to configure SSL:
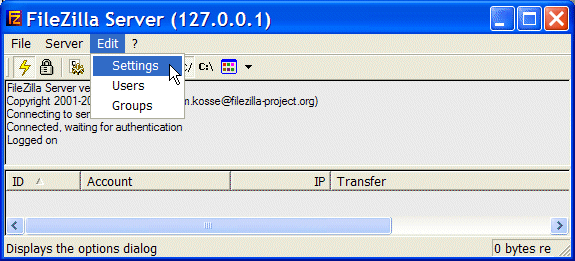
Figure 3-39 FileZilla Server interface window
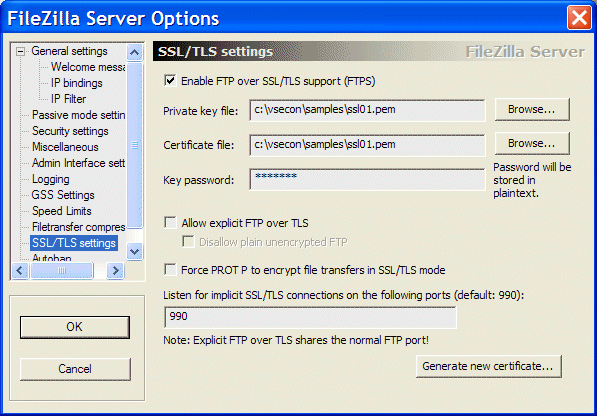
Figure 3-40 FileZilla server options window
3. Select the Enable FTP over SSL/TLS support option and specify your .pem file in the fields for Private key file and Certificate file.
Also, ensure that the SSL/TLS listening port matches the number that is specified in the BSTTATLS JCL.
|
Note: By clicking Generate new certificate, you can create a .pem file with a private key and a second .pem file with a self-signed certificate. You also can create a .pem file with both items. However, this .pem file is not usable because the server certificate is missing. You must complete the steps that are described in 3.7.2, “Creating the keystore” on page 71 to create a working .pem file.
|
When you are installing FileZilla server on Windows 7, the server interface usually starts automatically when Windows is started. However, while the server interface can be configured for manual startup by using the Windows Services on Windows XP, this configuration is not possible on Windows 7. Instead, you must open the registry editor and browse to the following key:
HKEY_LOCAL_MACHINESOFTWAREWow6432NodeMicrosoftWindowsCurrentVersionRun
Then, you delete the FileZilla Server Interface entry.
Using VSFTPD server
VSFTPD is a GPL licensed FTP server for UNIX like systems, including Linux. It is reported to be secure and fast.
In our tests, we used VSFTPD 3.0.2. Example 3-31 shows the relevant parameters from the vsftpd.conf file.
Example 3-31 VSFTPD configuration file
# Limit passive ports to this range to assist firewalling
pasv_min_port=30000
pasv_max_port=30100
#
anon_mkdir_write_enable=NO
anon_root=/srv/ftp
anon_upload_enable=YES
chroot_local_user=NO
ftpd_banner=Welcome message
idle_session_timeout=900
local_enable=YES
log_ftp_protocol=NO
max_clients=10
max_per_ip=3
pasv_enable=YES
ssl_sslv2=NO
ssl_sslv3=YES
ssl_tlsv1=YES
write_enable=YES
ssl_request_cert=NO
rsa_cert_file=/etc/vsftpd/FILEZ01.PEM
listen_port=990
implicit_ssl=YES
ssl_ciphers=AES256-SHA256
Parameter ssl_ciphers specifies the SSL cipher suites to be used. Because VSFTPD uses OpenSSL internally, the parameter values are the same as those values that are used by OpenSSL.
For more information about how to use VSFTPD in a z/VSE environment, see Security on IBM z/VSE, SG24-7691.
3.7.13 Configuring VSE Connector Server
The VSE Connector Server can use OpenSSL with the BSTTPRXY or BSTTATLS utilities that are provided by BSI.
In this topic, we describe the scenario in which BSTTATLS is used to provide SSL for the VSE Connector Server, as shown in Figure 3-41. BSTTPRXY also can be used in the same way.

Figure 3-41 Overview of connectivity that uses BSTTATLS
In this case, the VSE Connector Server runs in non-SSL mode. SSL configuration is only required for BSTTATLS and any VSE Connector Client.
|
Note: The VSE Connector Server partition must have a lower priority than the BSTTATLS partition. Otherwise, your system might hang.
|
Setting up BSTTATLS
In Example 3-32, the VSE Connector Server listens on its default port 2893. BSTTATLS listens for secure connections on port 2894.
Example 3-32 BSTTATLS setup for VSE Connector Server
// EXEC BSTTATLS,SIZE=BSTTATLS
ID 02
*
KEYRING PRD2.CONFIG
KEYFILE SSL01
SECTYPE TLSV1
*
OPTION SERVER
ATTLS 2893 AS 2894 SSL
*
/*
/&
After changing the JCL, start the BSTTATLS application.
Setting Up BSTTPRXY
The JCL that is shown in Example 3-33 shows the same setup that uses BSTTPRXY instead of BSTTATLS.
Example 3-33 BSTTPRXY setup for VSE Connector Server
// EXEC BSTTPRXY,SIZE=BSTTPRXY
ID 02
*
KEYRING PRD2.CONFIG
KEYFILE SSL01
SECTYPE TLSV1
*
OPTION SERVER
PROXY TCP V4 2894 SSL * TO V4 2893 TXT * 127.0.0.1
*
/*
/&
|
Note: BSTTPRXY can proxy one connection only.
|
Setting up VSE Connector Server
As described in the previous section, the VSE Connector Server runs in non-SSL mode. Therefore, there is no SSL configuration necessary for the VSE Connector Server.
Setting up keyring file
If you did not save the keystore in .pfx format when you were creating the .pem file, the following methods can be used to copy your certificates from the .pem file to a PFX or JKS keyring file that can be used by the VSE Connector Client:
•Edit or browse the .pem file directly on VSE with DITTO (see Figure 3-42 on page 104), VSE Navigator, or VSE Librarian and paste the certificates one after the other into Keyman/VSE. Select and copy each certificate, including the BEGIN CERTIFICATE and END CERTIFICATE lines, as shown in Figure 3-42 on page 104.

Figure 3-42 z/VSE DITTO display of a .pem file in VSAM
•You can use the same method by using a local copy of the .pem file.
•Use Openssl-Light on Windows to convert the .pem file into a PFX. For more information, see 5.4, “Keystore considerations” on page 158.
You do not need the private key on the client side. In Keyman/VSE, click File → Read clipboard, as shown in Figure 3-43.
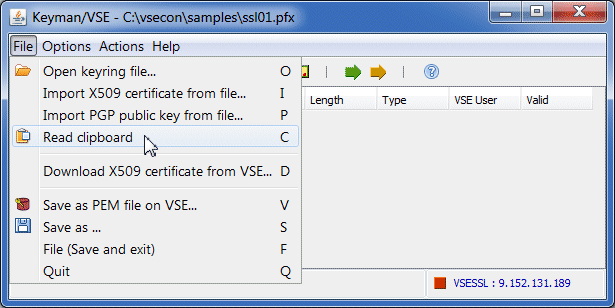
Figure 3-43 Keyman/VSE read clipboard function
After the two certificate.s are copied, save the two items into a .pfx or .jks file, as shown in Figure 3-44

Figure 3-44 Keyman/VSE local keyring file properties window
Click OK and save the keyring file.
Setting up VSE Navigator
Modify your existing VSE definition or define a new VSE host with the IP address of your VSE system. Specify the following port number where BSTTATLS forwards the SSL traffic to (see 3.7.6, “Configuring the SSL proxy server” on page 82):
ATTLS 2893 AS 2894 SSL
As shown in Figure 3-45, the VSE Navigator connects to port 2894 on VSE by using SSL. BSTTATLS forwards the traffic to port 2893 where the VSE Connector Server listens for non-SSL connections.
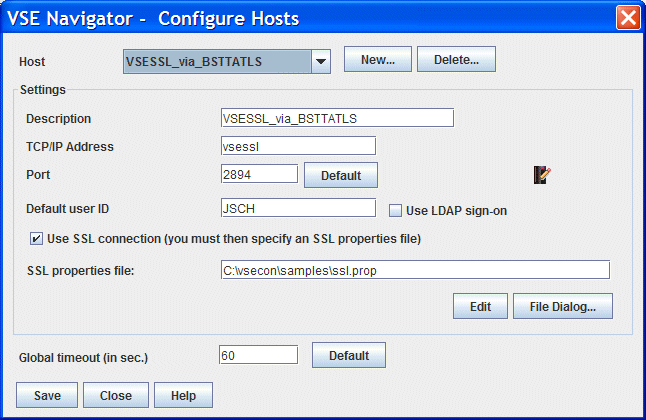
Figure 3-45 VSE Navigator Configure Hosts window
Now start the BSTTATLS server.
Click Edit to edit the Navigator’s SSL properties file and change the SSL parameters as shown in the following example:
KEYRINGFILE=c:\vsecon\samples\ssl01.pfx
KEYRINGPWD=mypasswd
SSLVERSION=SSL
CIPHERSUITES=TLS_RSA_WITH_AES_128_CBC_SHA,SSL_RSA_WITH_3DES_EDE_CBC_SHA
Now start the VSE Connector Server.
Connect to BSTTATLS
You can now directly connect to the VSE Connector Server through BSTTATLS, as shown in Figure 3-46.

Figure 3-46 VSE Navigator main window that is connected to BSTTATLS
3.7.14 SSL client authentication
SSL client authentication is a server-side feature that requires an SSL client certificate to be sent from the client to the server during the SSL handshake process. When a server is configured for SSL client authentication, any client must have a valid client certificate.
The client certificate contains information about the user and a unique private-public key pair. It is signed by the same CA root certificate as the SSL server certificate that the server sends to the client. Although SSL client authentication is more secure than server authentication, more configuration is necessary for SSL clients.
Configuring BSTTATLS for client authentication
BSTTPRXY and BSTTATLS provide the following parameters to enable and control SSL client authentication:
HANDSHAKE_SERVER [1 | 2 ]
CA_AUTH [YES | NO ]
CA_AUTH_TYPE [ 0 | 1 | 2 | 3 ]
HANDSHAKE_SERVER enables client authentication when the value is set to 2. CA_AUTH and CA_AUTH_TYPE control how the client certificate is verified by the server.
For more information about these parameters, see IPv6/VSE SSL Installation, Programming, and User's Guide, SC34-2676.
In our test, we used a BSTTATLS job, as shown in Example 3-34.
Example 3-34 Using BSTTATLS with SSL client authentication
* $$ JOB JNM=BSTTATLS,CLASS=S,DISP=D
// JOB BSTTATLS - AUTOMATIC TRANSPORT LAYER SECURITY
// OPTION PARTDUMP,NOSYSDUMP,NOLOG
// OPTION SYSPARM='02'
// SETPARM IPTRACE='YYNYNNNN'
// UPSI 011
// SETPARM SSL$DBG='YES' OR 'NO' (DEFAULT = NO)
// SETPARM SSL$ICA='YES' OR 'NO' (DEFAULT = YES)
// LIBDEF *,SEARCH=(PRD2.CONFIG,PRD2.PROD,PRD2.TCPIPB,PRD2.SCEEBASE)
// EXEC BSTTATLS,SIZE=BSTTATLS,PARM='TRAP(OFF)/'
ID 02
*
KEYRING PRD2.CONFIG
KEYFILE SSL01
SECTYPE TLSV1
*
OPTION SERVER
HANDSHAKE_SERVER 2
CA_AUTH YES
CA_AUTH_TYPE 0
ATTLS 2893 AS 2894 SSL
*
/*
// EXEC LISTLOG
/*
/&
* $$ EOJ
With SSL$DBG='YES', the trace output shows the OpenSSL and gsk-interface trace.
Configuring VSE Navigator for client authentication
Open your previously created .pfx file with Keyman/VSE. Select the root certificate and click Generate user certificate, as shown in Figure 3-47.

Figure 3-47 Keyman/VSE, generate user certificate
A certificate is created that is signed by your root certificate. This is the criteria that must be fulfilled for an SSL client certificate; it has its own key but is signed by the root certificate that also was used when the SSL server certificate was signed, as shown in Figure 3-48.

Figure 3-48 Keyman/VSE main window
Save the updated keyring file. You are now ready to connect to BSTTATLS by using SSL client authentication.
Connecting to BSTTATLS
In VSE Navigator, you cannot see whether you are connected through SSL server or SSL client authentication. However, the BSTTATLS trace shows some internal details about the SSL connection. In the output, search for gsk_secure_soc_init. Example 3-35 shows some parts of the output.
Example 3-35 Debug output from BSTTATLS
...
-> ijbslgsk.c, gsk_secure_soc_init ...
...
*** Info: Now entering SSL handshake ...
*** Info: we are running as server with client auth. A valid client certificate is required.
...
---------------------------------------------------
We are server with client auth ...
Client certificate info:
cert_body_len = 0
current session ID = [8855B332D9F4333B888BC1C60AD5B4C49CAE4F88CEB1E691BFA4D60AB04626E4]
new session? = 1
serial number = [63526DF6]
Subject:
common name = [SSL01 Client Cert]
locality = [Boeblingen]
state or province = [Baden-Wuerttemberg]
country = [DE]
organization = [IBM]
org unit = [Development]
Issuer:
common name = [Private Key Certificate]
locality = [Boeblingen]
state or province = [Baden-Wuerttemberg]
country = [DE]
organization = [IBM]
org unit = [IBM Germany]
----------------------------------------------------
Summary:
fd = 0x00000005
hs_type = 2 (GSK_AS_SERVER_WITH_CLIENT_AUTH)
DName = [SSL01]
keyring type = LIBR
keyring = DD:PRD2.CONFIG(SSL01.PEM)
sec_type = [TLSV1]
cipher_specs (V2) = []
v3cipher_specs = [05043538392F32330A161309151203060201]
skread = 0x00512400
skwrite = 0x0051C308
cipherSelected (V2) = []
v3cipherSelected = [2F]
size of public key = 256 Bytes (2048 bits)
failureReasonCode = 0
gsk_data = 0x0047C9B0
----------------------------------------------------
<- ijbslgsk.c, gsk_secure_soc_init, ok
...
Client authentication with FTP
We could not set up SSL client authentication with the following FTP clients that we tested:
•FileZilla client
•Total Commander
•Core FTP Language Environment
If you are trying to set up authentication by using a specific client, first check if this client allows the configuration of a keyring file (.pem, .pfx, and so on) that contains the client certificate. This is the prerequisite for any further setup steps.
Client authentication with Telnet
For more information about how to set up SSL client authentication with IBM Personal Communications and Attachmate Extra emulators, see Security on IBM z/VSE, SG24-7691.
3.7.15 Using TLSv1.2
TLSv1.2 is the newest SSL protocol version. It introduces new SSL cipher suites that use the SHA-256 hash algorithm instead of the SHA-1 function. This adds significant strength to the data integrity. TLSv1.2 is described in the memo The Transport Layer Security (TLS) Protocol Version 1.2, RFC 5246, which is available at this website:
The following new SSL cipher suites and their related hexadecimal values are available:
•0x3B TLS_RSA_WITH_NULL_SHA256
•0x3C TLS_RSA_WITH_AES_128_CBC_SHA256
•0x3D TLS_RSA_WITH_AES_256_CBC_SHA256
|
Note: TLSv1.2 is supported by OpenSSL 1.0.1e, which is the current code level on z/VSE with APAR DY47499 / PTF UD53983 and later. TLSv1.2 is used by IPv6/VSE with APAR PM98875 / UK98397 and later.
|
There are only a few SSL servers and clients that support TLSv1.2. The following topics describe the scenarios in which TLSv1.2 can be used with IPv6/VSE.
Using VSE Java-based connector
TLSv1.2 is supported by Java 7 from IBM and Sun/Oracle. Therefore, any Java application that uses the VSE Connector Client can use TLSv1.2. Complete the following steps to set up VSE Navigator for TLSv1.2:
1. Set up the VSE Navigator SSL properties file (ssl.prop), as shown in the following example:
#---------------------------------------------------
# SSL Version: SSL (3.0) or
# TLS (TLS 1.0) or
# TLSv1.2
#---------------------------------------------------
SSLVERSION=TLSv1.2
2. Specify at least one of the TLSv1.2 cipher suites in ssl.prop, as shown in the following example:
#----------------------------------------
# TLS 1.2 cipher suites
#----------------------------------------
CIPHERSUITES=TLS_RSA_WITH_AES_128_CBC_SHA256,TLS_RSA_WITH_AES_256_CBC_SHA256,TLS_RSA_WITH_NULL_SHA256
|
Note: The use of TLS_RSA_WITH_AES_256_CBC_SHA256 requires the unlimited security strength files for Java. You can download these files from the following website:
|
No special definitions are required to set up BSTTATLS. Because we configured the client for TLSv1.2, you can use standard settings, such as the settings that are shown in the following example:
KEYFILE nnnn
OPTION SERVER
SECTYPE TLSV1
ATTLS 2893 AS 2894 SSL
3. Start VSE Connector Server. No change is required. After the connection is made, right-click the VSE host icon in the VSE Navigator main window and select menu Show server certificate, as shown in Figure 3-49.

Figure 3-49 VSE Navigator Show server certificate box
Using secure FTP
We tested the following scenarios for FTP:
•VSE as the server. FileZilla client or Total Commander FTP client connect to BSTTATLS.
•VSE as the client. BSTTFTPC connects to FileZilla server by using BSTTPRXY.
VSE as the server
For this scenario, we must configure BSTTATLS and FileZilla client. Complete the following steps:
1. Configure and start BSTTATLS. You can specify SECTYPE TLSv1.2 to force all clients that are using TLSv1.2. However, in our tests, both clients (FileZilla and Total Commander) were using the highest available protocol version, even when TLSV1 was specified, as shown in the following example:
KEYFILE nnnn
SECTYPE TLSV1.2
OPTION SERVER
OPTION FTP
ATTLS 21 AS 990 SSL
2. Configure and start BSTTFTPS. No special definitions are required.
3. Configure and start FileZilla client.
a. In our tests, we received error “GnuTLS error -53: Error in the push function” immediately after the FileZilla client switched to passive mode. We resolved this issue by consulting the FileZilla Network Configuration page, which is available at this website:
After we switched to active mode and specified the port range as 50000 - 60000, the error was corrected, as shown in Figure 3-50.
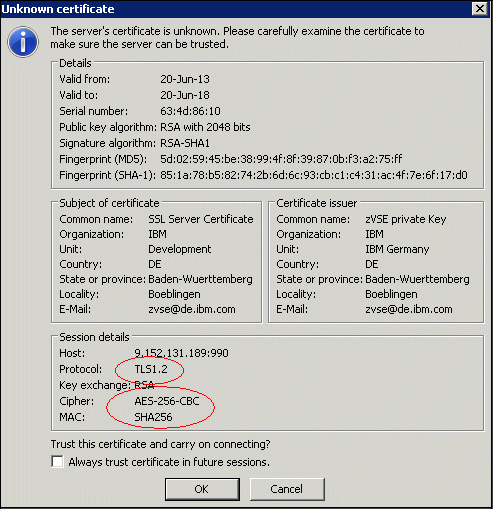
Figure 3-50 FileZilla connecting to BSTTATLS that uses TLSv1.2
Not all FileZilla client versions support TLSv1.2. In our tests, we used FileZilla client 3.7.0.2.
b. Configure and start Total Commander. We also had to use active mode here. In our tests, Total Commander selected cipher suite 3D (AES256-SHA256). The SSL configuration was identical to what is shown in Figure 3-38 on page 97.
VSE as the client
In our tests, we used FileZilla server and Cerberus FTP Server (http://www.cerberusftp.com) on Windows. We also made a test with secure FTP daemon (VSFTPD), which runs on Linux. It appeared that FileZilla server (0.9.41 beta) does not support TLSv1.2. VSFTPD and Cerberus FTP Server support TLSv1.2. Complete the following steps to configure and use VSFTPD:
1. Configure and start BSTTPRXY or BSTTATLS. The use of SECTYPE TLSv1.2 is important here. BSTTPRXY is used in the following example:
KEYRING PRD2.CONFIG
KEYFILE FILEZ01
SECTYPE TLSv1.2
OPTION CLIENT
HANDSHAKE_CLIENT 0
OPTION FTP
PROXY TCP V4 21 TXT * TO V4 990 SSL * 9.152.131.28
2. Configure and start VSFTPD server. You can enforce the use of TLSv1.2 cipher suites by using the ssl_ciphers parameter in the vsftpd.conf file, as shown in the following example:
ssl_ciphers=AES256-SHA256:AES128:SHA256
Because VSFTPD uses OpenSSL internally, the ssl_ciphers parameter must be in OpenSSL syntax. The original OpenSSL documentation is available at this website:
From this documentation, it appears that keywords also can be specified for groups of cipher suites, such as “all ciphers with SHA256”. Here, you specify ssl_ciphers=SHA256.
3. Start BSTTFTPC. No special setup is necessary. For more information, see Example 3-29 on page 99.
TN3270
Most of our known TN3270 emulators do not support TLSv1.2, according to our research, including the following emulators:
•IBM Personal Communications. The latest PCOM version 6.0.7 supports up to TLSv1.1.
•Attachmate Extra. We could not find any information about TLSv1.2 in their documentation.
•The wc3270 emulator. Because this emulator uses openssl internally, support for TLSv1.2 depends on the installed openssl version on your workstation. It worked with openssl 1.0.1e installed.
The following setup was used for wc3270:
KEYFILE SSLCA
SECTYPE TLSV1
OPTION SERVER
ATTLS 23 AS 992 SSL
With these BSTTATLS definitions, wc3270 automatically connected with TLSv1.2. Therefore, wc3270 appears to always use the highest possible protocol version. You also can explicitly specify SECTYPE TLSV1.2 to enforce TLSv1.2 for all clients.
We are not aware of any wc3270 log file; therefore, you must check the BSTTATLS trace to see which protocol version is used.
Example 3-36 shows an extract from the BSTTATLS trace that shows the list of cipher suites that are sent by the client. It appears that wc3270 sent the TLSv1.2 cipher suites AES128-SHA256 and AES256-SHA256.
Example 3-36 List of SSL cipher suites that are sent by wc3270
Client sent 69 from 53B910:
...
AES256-SHA256
AES256-SHA
...
AES128-SHA256
AES128-SHA
...
The summary information from gsk_secure_soc_init() in Example 3-37 shows the used cipher suite.
Example 3-37 Summary from gsk_secure_soc_init() in BSTTATLS trace
Summary:
fd = 0x00000005
hs_type = 1 (GSK_AS_SERVER)
DName = [SSLCA]
keyring type = LIBR
keyring = DD:PRD2.CONFIG(SSLCA.PEM)
sec_type = [TLSV1]
cipher_specs (V2) = []
v3cipher_specs = [3C3D05043538392F32330A161309151203060201]
skread = 0x00514400
skwrite = 0x0051D908
cipherSelected (V2) = []
v3cipherSelected = [3D]
size of public key = 256 Bytes (2048 bits)
failureReasonCode = 0
gsk_data = 0x0047C9B0
For this connection, cipher suite 3D (TLS_RSA_WITH_AES_256_CBC_SHA256) was used.
CICS Web Support
When we review the most popular web browsers, we see the following restrictions:
•Mozilla Firefox
Firefox supports TLSv1.2. For more information, see this website:
•Microsoft Internet Explorer
You can turn on TLSv1.2 by using the Internet Options window. However, we had a problem with latest browser versions and our self-signed certificates. For more information, see “Connect by using SSL” on page 119.
•Google Chrome
Although we did not test Chrome, Chrome 30 is reported to support TLS 1.2.
3.8 Setting up CICS Web Support
An overview of setting up CICS Web Support based on TCP/IP for VSE/ESA is provided in Security on IBM z/VSE, SG24-7691. In the following section, we describe the differences for IPv6/VSE only.
3.8.1 Modifying the CICS startup job
In the CICS startup job, you must specify the SYSID of the BSTTINET partition and put the lib.slib of the IPv6/VSE installation into the LIBDEF chain, as shown in the following example:
// JOB CICSBSI CICS/ICCF STARTUP
// OPTION SYSPARM='02'
// SETPARM LOCALGT=YES
...
// LIBDEF *,SEARCH=(PRD2.CONFIG,PRD1.BASED,PRD2.TCPIPB,PRD1.BASE, ...
The LOCALGT parameter is used only for performance. For more information, see IPv6/VSE Programming Guide, SC34-2617.
3.8.2 Defining the TCP/IP host name
The TCP/IP host name is defined by using the HOST command in the IPv6/VSE stack startup job, as shown in the following example:
ID 02
HOST VSESSL 9.152.131.189
3.8.3 Considerations for SSL
The use of SSL within CICS TS CWS directly is not possible because of the restriction of OpenSSL on z/VSE that requires an LE/C runtime environment. For more information, see Chapter 5, “OpenSSL” on page 151.
As of this writing, CICS directly uses the CSI SSL functions when a TCP/IP service is used with SSL enabled.
However, when the BSTTPRXY or BSTTATLS facilities are used, SSL connections to CICS TS CWS by using OpenSSL are supported. The BSTTATTLS facility automatically converts the SSL browser connection to a clear text socket as with any other connection.
In the next topics, we describe how to set up a non-SSL TCP/IP service, configure BSTTATLS to proxy the clear connection to SSL, and connect to a web browser by using SSL.
Setting up a TCP/IP service
For this example, you set up a TCP/IP service without SSL, as shown in Example 3-38.
Example 3-38 TCP/IP service for CWS
TCpipservice : NOSSL
Group : EXTRACT
Description ==>
Urm ==> DFHWBADX
Portnumber ==> 01080 1-65535
Certificate ==>
STatus ==> Open Open | Closed
SSl ==> No Yes | No | Clientauth
Attachsec ==> Verify Local | Verify
TRansaction ==> CWXN
Backlog ==> 00001 0-32767
TSqprefix ==>
Ipaddress ==>
SOcketclose ==> No No | 0-240000
Before you continue, ensure that TCP/IP and the TCP/IP service are open.
Configuring BSTTATLS
Now we must configure BSTTATLS to proxy clear port 1080; for example, to secure port 1180, as shown in Example 3-39. For information about blocking the clear port against connections from outside, see 3.7.9, “Considerations on blocking clear ports” on page 84.
Example 3-39 BSTTATLS setup for CWS
// EXEC BSTTATLS,SIZE=BSTTATLS,PARM='TRAP(OFF)/'
ID 02
*
KEYRING PRD2.CONFIG
KEYFILE SSL01
SECTYPE TLSV1
*
OPTION SERVER
ATTLS 1080 AS 1180 SSL
*
Configuring Firefox
In our tests, we experienced the problem that latest browser versions, such as Firefox 20, Internet Explorer 8, and Chrome, could not connect to CWS by using SSL. However, with early browsers, like Firefox 3.6, it worked. This behavior was the same whether we imported the keyring file (.pfx) into the browser or not.
Finally, we found out that it works when you import your certificates by using a .pem file rather than by using a .pfx file. To show this, we prepared two keyring files with the same content: One .pfx file and one .pem file.
First, we try to import the .pfx file in Firefox. At the time of writing this, we used Firefox 27.
Step 1: Open the Firefox Options box by clicking Help → Options.
Step 2: Open the Certificates tab and click View Certificates.
Step 3: On the Your Certificates tab, click Import.
Step 4: Select the .pfx file on the Open window. Note that the file filter shows “PKCS12 Files (*.p12;*.pfx)”.
Step 5: You are prompted to enter the .pfx file password.
In our tests. we now get an error shown in Figure 3-51. Obviously, Firefox cannot import the certificates for any unknown reason.

Figure 3-51 Error message from Firefox 27 when importing a .pfx file
However, when importing the same set of certificates by using a .pem file, the process works and we are able to connect to CWS.
Repeat steps 1 to 2. Then select the Servers tab and press Import. Note that the file filter on the Open window shows “Certificate files (.crt;*.cert;*.cer;*.pem;*.der)”.
Select the .pem file and press Open. Firefox issues a warning message that the self-signed certificate is not trusted and can therefore not be imported, but the VSE server certificate is imported under Servers as shown in Figure 3-52.
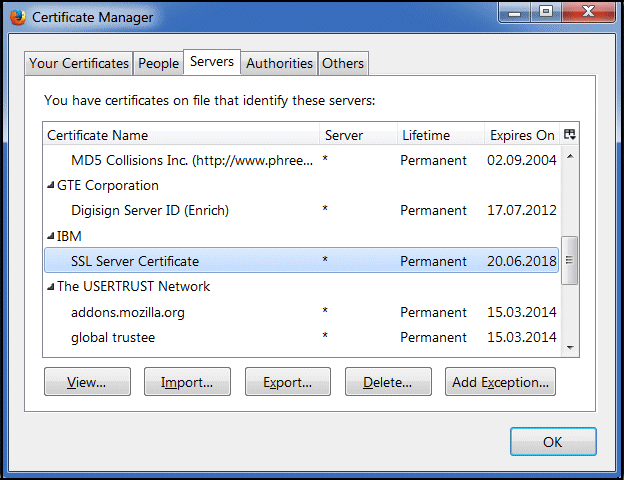
Figure 3-52 Imported self-signed VSE server certificate in Firefox 27
Firefox 27 is now enabled to connect to CWS by using SSL.
Connect by using SSL
Before we can connect by using SSL, you must close and reopen the TCP/IP service to give BSTTATLS control. When you are reopening the TCP/IP service, you should see the following line on the console:
BSTT719I 4: 4 Listening on port 1180 SSL
You can now connect to the secure port 1180 as shown in Figure 3-53. In this test, we used following URL:
https://vsessl:1180/CICS/CWBA/DFHwbtta/cemt
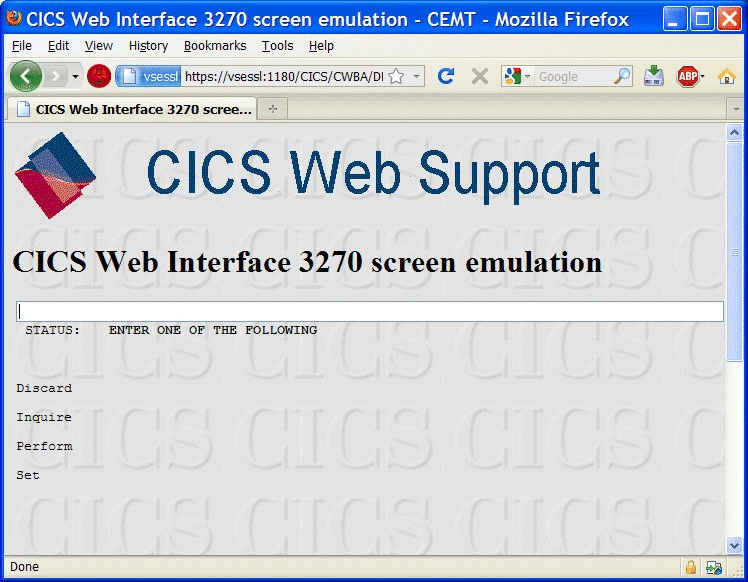
Figure 3-53 HTTPS connection to CICS Web Support
3.9 Known problems
In this section, we describe some of the issues and insights we had in our test setup.
3.9.1 VSE cannot be reached
A problem in reaching VSE was reported.
Symptom
Your workstation cannot reach your VSE system in the IPv6 network.
Possible reason
Check whether your workstation can reach other IPv6 hosts in your network. In our test setup, we found that a workstation program negatively influenced IPv6 on Windows XP.
3.9.2 BSTT075E LUNAME NOT AVAIL
A problem with BSTT075E LUNAME NOT AVAIL was reported.
Symptom
Message BSTT075E is issued repeatedly on console.
Possible reasons
This error occurred for the following possible reasons:
•Printer sessions are closed without disconnecting first.
•The same printer session is started twice. The problem can be solved by using the REACTIVATE command; for example, reactivate PRTA.
•You are not using parm OS390 on // EXEC BSTTVNET (for more information, see 3.2, “Obtaining and activating a license key” on page 48).
•VNETAPPL is not activated correctly (for more information, see 3.5.1, “Setting up VTAM” on page 62). Check ATCCON00.B.
3.9.3 SSL connect error with wc3270
A problem concerning SSL connecting with wc3280 was reported.
Symptom
We received the following error messages when wc3270 was started.
[wc3270]
SSL_connect: error in SSLv3 read server certificate B error:14090086:SSL routines:SSL3_GET_SERVER_CERTIFICATE:certificate verify failed
SSL_read: unknown error
wc3270>
Possible reason
You did not add your self-signed root certificate to the wc3270 root_certs.txt file.
3.9.4 Other SSL connect errors
An SSL connect error was reported.
Symptom
SSL connection cannot be established.
Possible reasons:
Check the SYSLST output of BSTTATLS or BSTTPRXY for errors. The following errors are typical:
•*** Error: DName is invalid.
Check whether the KEYFILE parameter points to the correct .pem file
•*** Error: Cannot load key file [DD:PRD2.CONFIG(SSL01.PEM)]
Check whether the .pem file is in the specified place.
•*** Error setting key stuff.
Your certificates might be in the wrong order in the .pem file. The order must be: key - vsecert - rootcert.
These errors are issued from the IJBSSL phase.
3.9.5 Hang situation with BSTTATLS/BSTTPRXY
A problem concerning a hang issue with BSTTATLS/BSTTPRXY was reported.
Symptom
The SSL client and BSTTATLS/BSTTPRXY hang.
Possible reasons
The BSTTATLS/BSTTPRXY partition has a lower priority than the application partition.
You can also add a // SETPARM SENDALL='YES' to the connector server JCL. For more information about this parameter, see IPv6/VSE Programming Guide, SC34-2617.
Your client is the VSE Connector Client, you are using a local .pem file, and this .pem file contains Diffie-Hellman (DH) parameters. In this case remove the DH parameters from your local .pem file. DH parameters should only be contained in the server .pem file.
3.9.6 Return codes 3100 / 1700 from IJBCRLIB
A problem concerning return codes 3100 / 1700 from IJBCRLIB was reported.
Symptom
Trace messages that are similar to the following example are displayed on the console:
IJBCRLIB.CrInit: CRYINITI, rc = 1701
Reason
The IJBSSL trace is activated (// SETPARM SSL$DBG='YES'). These return codes are issued from phase IJBCRLIB when its internal crypto environment is started in the following cases:
•rc = 1700 - Phase IPCRYPTO (which is part of the CSI stack) cannot be loaded. This is not an error when the IPv6/VSE or Linux Fast Path (LFP) stack is used, for example.
•rc = 3100 - Function CRYINITI, which is part of the CSI crypto API, returned this code. This often means that the CSI stack is installed (that is, phase IPCRYPTO can be loaded), but the stack is inactive. This is not an error when the IPv6/VSE or LFP stack is used, for example.
Phase IJBCRLIB cannot determine which IP stack is used and always tries to CDLOAD the IPCRYPTO phase and call CRYINITI.
3.9.7 BSTTFTPC fails to connect to Windows Server 2008
A problem with BSTTFTPC failing to connect to Windows Server 2008 was reported.
Symptom
Running an FTP script on Windows Server 2008 and newer fails to connect for data connection.
Reason
By default, ftp.exe on Windows Server 2008 (and newer) is blocked. You must go into the firewall and unblock ftp.exe.
3.9.8 Batch email cannot relay mail
A problem with batch email’s ability to relay mail was reported.
Symptom
Customers who try using batch email for the first time can encounter an error that indicates that they cannot relay mail.
Reason
For MS Exchange 2010, fixing this error includes the following steps:
1. Ensure that z/VSE is a trusted host.
2. Define a receive connector with the IP address of z/VSE, including the following information:
– Allow Relay from: Give z/VSE a name (such as, z/VSE)
– In Network tab: Use z/VSE’s IP address, port 25
– In Permission Groups tab: Select Anonymous users
– In Authentication tab: Select Externally Secured
3.9.9 LDAP sign on by using SSL does not work
A problem with LDAP sign on by using SSL that does not work was reported.
Symptom
LDAP sign on by using SSL does not work with IPv6/VSE.
Reason
LDAP sign on by using SSL uses the GSK SSL API through the TCP/IP sockets phase as configured in the Language Environment multiplexer (skeleton EDCTCPMC in ICCF library 59). The GSK SSL API that is provided by OpenSSL cannot be accessed by using the Language Environment multiplexer. Therefore, LDAP SSL requires CSI SSL.
3.9.10 GnuTLS error -53: Error in the push function
A problem with GnuTLS error -53: Error in the push function was reported.
Symptom
When FileZilla client is used to connect to BSTTATLS / BSTTFTPS, the GnuTLS error -53 is issued directly after FileZilla switches to passive mode.
Reason
This is a firewall issue. We resolved the problem with the information from the FileZilla Network Configuration page, which is available at this website:
When active mode is used and the port range in FileZilla is restricted to 50000 - 60000, the connection worked.
..................Content has been hidden....................
You can't read the all page of ebook, please click here login for view all page.
