
4.1. Client Storage
The first and most visible type of client storage holds your users' shared files and folders; the second is used to synchronize or store users' home directories (which are similar to profiles in Microsoft Windows). For the purpose of this chapter, we'll call the former file storage and the latter home-folder or home-directory storage.
Whichever you're dealing with, for file sharing, AFP is the Mac's native language and will perform the best from the client perspective. Though other protocols also enjoy wide adoption in enterprises, for the most part, if you can provide your Mac clients with storage over AFP, they'll get the best performance and you'll have the fewest issues to troubleshoot on the client side. That said, if you already have a NetApp, EMC, or Isilon Systems setup providing storage over SMB or NFS, then you can definitely use it. You can also reshare existing SAN or NFS solutions using Mac OS X Server, ExtremeZ-IP, or Helios. In the next few sections we'll cover manually connecting to storage over these three main protocols (AFP, SMB and NFS).
4.1.1. AFP
As we mentioned, AFP is the native file sharing protocol for Mac OS X. It's important to note that AFP is not AppleTalk and is based on the TCP/IP stack. Mac clients can connect to AFP volumes easily using the Finder or the mount_afp command. If an AFP server has Bonjour enabled and exists on the same subnet as the client, the node will automatically discover the running service and appear in the Finder's sidebar. In this chapter, though, we'll assume that your environment is too large to locate services reliably over Bonjour or that you have a centralized Bonjour service, so we'll only look at using AFP to manually mount volumes.
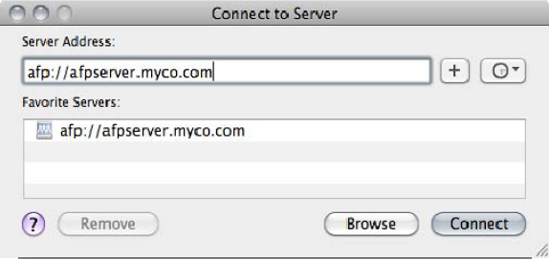
To do so from Mac OS X, click on the Go menu in the Finder, and select Connect to Server. In the Server Address field of the resulting dialog box, you'd normally enter <protocol name>:// followed by the address of your server—for example, smb://seldom.kryped.com. (Note that the OS defaults to AFP, so although we enter the protocol name in Figure 4-1, we could have just typed in the server address.) Now click the Connect button.
Figure 4.1. Connecting to an AFP server

If your system has already obtained a single sign-on ticket from Kerberos (discussed in Chapter 1), you won't be prompted for a user name or a password, you'll just see a dialog box in which you can choose the share points to connect to. In Microsoft Windows you can do the same by using the run dialog box and entering the address of a server, but the Mac dialog lets you select multiple servers using the Shift or Command keys. Once you're satisfied with what you've selected, click OK. You'll see the appropriate shares available under the Shared section in the Finder sidebar. You can also find mounted shares by selecting Computer in the Finder's Go menu (Command+Shift+C) as shown in Figure 4-2.
Figure 4.2. Mounted shares. To make multiple selections, hold down the Shift or Command key while choosing.

If you use the mount_afp command to connect to file-sharing volumes, you must provide the command with a lengthy string that contains a number of items embedded in the URL. The afp:// URI, like others, allows you to specify authentication credentials directly in the URL, which you do via standard conventions following the format:
afp://username:password@server/mount
This format extends to numerous protocols including HTTP, FTP, and SMB. For example, afp://admin:[email protected]/outerrim will connect to the share point outerrim that's hosted on the server seldon.krypted.com using the user name admin and the password daneel. You can optionally specify a path on the local system that the volume will be mounted to, rather than using /Volumes as is the default. Therefore, the syntax to mount the AFP volume from the command line (assuming you were to mount it in the standard directory, which is /Volumes) would be:
mkdir /Volumes/outerrim
mount_afp afp://admin:[email protected]/outerrim /Volumes/outerrim
Notice that we must first create the destination folder, otherwise mount_afp will fail. In addition to specifying a password on the command line, you can instruct the mount_afp command to use an existing single sign-on ticket:
mount_afp "afp://;AUTH=Client%20Krb%[email protected]/outerrim"/Volumes/outerrim
You may want to specify an alternative user in some cases—for instance, if you'll be logging in using an administrative account. This is handy for certain operations. You can do so with a statement such as:
mount_afp "afp://username;AUTH=Client%20Krb%[email protected]/outerrim"/Volumes/outerrim
For this to work, you need a valid, active TGT (Ticket Granting Ticket) (which will be recognized via klist). This won't always be available, but it's possible to use an active TGT obtained by another local user. To do so, run sudo from root as follows:
sudo -u username mount_afp"afp://;AUTH=Client%20Krb%[email protected]/outerrim"/Volumes/outerrim
In this case, you don't need to specify the user name in the afp:// URL, because the sudo command will execute as user name.
You can also perform an automount with guest access, as in this example:
mount_afp "afp://;AUTH=No%20User%[email protected]/outerrim"/Volumes/outerrim
In addition to mount_afp, you can use the mnthome command to mount an AFP home folder from a command-line session. However, this requires the configuration of a home directory automount, as described in Chapter 7.
4.1.2. SMB
To manually connect to an SMB volume from Mac OS X, select the Go menu from the Finder, and choose Connect to Server. In the dialog box that appears, enter smb:// followed by the address of your server, then click the Connect button and submit your user name and password in the resulting prompt dialog. Just as when you follow this process using AFP, you'll get a list of share points you can access.
You can also mount SMB shares with the mount_smbfs command, using pretty much the same syntax as you would with mount_afp. Follow the command itself with the options (if any—the example below shows none) and the path. You won't need to prepend the protocol name to the URL, though. So, for example, to mount the same volume as shown in the AFP section, you'd type this:
mount_smbfs //admin:[email protected]/outerrim/Volumes/outerrim
NOTE
There is also an SMB client, appropriately named smb_client that's similar to the ftp client, if you wish to use SMB interactively from the command line.
4.1.3. NFS
As with the previous protocols, you can manually connect to an NFS volume from Mac OS X by selecting the Go menu in the Finder and picking Connect to Server. In the resulting dialog box, enter nfs:// followed by the address of your server, a slash, and then the full path of the export. Click the Connect button.
If you're unsure about what should follow the slash, you can get the information from the exports file found in the /etc folder on the NFS server. The sample exports file that follows was built in the Mac OS X Server Admin tool. To match your environment, yours may have been created manually, so it may not look exactly the same, but it should be similar to this:
### [ Begin Server Admin managed exports. Do Not Edit.
/Volumes/SharedData/Mule -maproot=nobody -sec=sys 192.168.210.201
### ] End Server Admin managed exports.
In the previous example we're exporting a share point of the folder Mule to the IP address 192.168.210.201. Volumes/SharedData/Mule, the full path of the export, is the information you're looking for. The Mule directory, in our installation, is hosted on seldon.krypted.com and we can access the directory (but only from 192.168.210.201) using nfs://seldon.krypted.com/Volumes/SharedData/Mule. This is what you enter into the Server Address text box of the Connect to Server dialog, as shown in Figure 4-3.
Provided you're using the system at this IP address, when you click the Connect button you'll instantly connect to the volume. Notice the lack of a password. This is because NFS relies on IP addresses rather than user-namepassword combinations to determine who can access data stored on the shares it provides.
NOTE
You can leverage Netgroups through YP/NIS (discussed further in Chapter 2). If you're more confident with using local BSD files to manage users and groups, you can also enable the BSD local node entry in Directory Utility as described in Chapter 2.
Figure 4.3. Mounting an NFS share through the Finder

You can also use mount_nfs to make remote NFS volumes available locally. To do so, follow the command with the name of the server, the characters :/ (a colon followed by a slash), and the path to the mount point, as in this example:
mount_nfs seldon.krypted.com:/innerrim /innerrim
The mount_nfs command has a number of options, which you can view using the man mount_nfs command. You can see all of the mounted NFS volumes for the host with showmount.
4.1.4. Automounts
To avoid issuing a command every time a client system needs access to remote storage, you can set up automounts. OS X lets you configure them either globally, through directory services, or on individual hosts. The latter requires you to use NFS. Before you create an automount, we recommend using the procedure in the NFS section just covered to connect to the volume manually and verify that you know the correct settings.
The process to set up a local automount depends upon the system that you are running. In 10.4 and 10.5, automounts are configured using Directory Utility (found in /Applications/Utilities). Once the app is opened, click the lock to authenticate to allow changes. Next, click on the button "Show Advanced Settings." From here, click on the Mounts Tab, and press the plus icon (+) at the bottom-left side of the Remote NFS URL list to create a new mount, as shown in Figure 4-4.
Figure 4.4. Creating a Remote Mount with Disk Utility

In that dialog, enter the parameters you used to establish a manual connection, then click Verify. Back at Directory Utility (Figure 4-5), click the Apply button, then test to insure you can browse to the directory-mount location as configured; in this case, our NFS mount can be found locally in the /mule directory.
Figure 4.5. Directory Utility NFS Mount List (10.4 and 10.5)

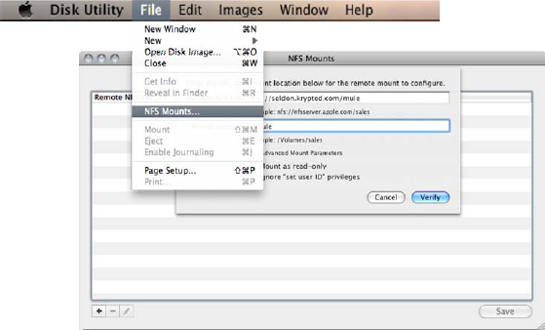
In 10.6, the process is extremely similar; however, the automount GUI is now hidden inside of the Disk Utility application, found in /Applications/Utilities. Once opened, access the automount GUI by selecting NFS mounts under the File menu. From here, the interface is pretty much identical to that found in Directory Utility, as can be seen in Figure 4-6.
Figure 4.6. Configuring NFS Mounts using Disk Utility in 10.6
4.1.5. Home-Directory Storage Provisioning
Automounts can serve a purpose beyond what the name implies—they can provide storage for the home directory given to Mac OS X clients. When located on a server, the home directory is known as a Network Home Directory. When stored on a client and synchronized to a server, it's called a Mobile Home Folder (also referred to as a portable home directory). We'll cover home directory implementation more exhaustively in Chapter 7.