
5.1. Exchange Integration
Mac OS X can communicate with Microsoft Exchange in a variety of ways; most notable is its support for Outlook Web Access (OWA) from a web browser. But if you use Microsoft Exchange 2003 or earlier, you need to consider Entourage, an e-mail client and personal information manager from Microsoft. You can use POP or IMAP mail accounts with other solutions, or you can use Mail.app, iCal, and Address Book in an Exchange 2007 environment that you may already be leveraging. While not the only option, Entourage is a mature product for Exchange integration and the most widely adopted for such environments.
Exchange 2007 consists of a number of roles, each controlling the functionality that a server is able to offer to clients and to other Exchange servers. Most of the integration that will be done with Exchange will be done through the Client Access Server (CAS) role. For the most part, the technologies included in the CAS role existed in Exchange 2003 and earlier, but the idea of breaking Exchange into predefined roles, and the CAS role specifically, is new in Exchange Server 2007. One component of Exchange 2007 that does not exist in previous versions is the Exchange Web Services (EWS) API, which opens up a number of options, including Entourage for Exchange EWS (an Exchange 2007/EWS-optimized Entourage app), or using Mail.app to interface with Exchange. However, as yet adoption of Exchange 2007 has been relatively limited. In an Exchange 2003 environment, in many cases you will be able to leverage WebDAV, an extension to the http protocol, when connecting from an OS X client.
5.1.1. Entourage
Microsoft Entourage is a part of the Microsoft Office family of products that most environments have already deployed. Microsoft Entourage client licensing is not necessarily bundled with Exchange. Exchange 2003 and earlier do provide a license for a standalone Microsoft Entourage client; however, Exchange 2007 does not and so will require additional licensing.
If licensing is not an issue (for example, you already own Microsoft Office for your Mac clients), then Entourage should be considered as an option for your clients to connect to Exchange. Entourage has a look and feel that is fairly similar to Microsoft Outlook, and it has much of the same features (although not all), so a user coming to a Mac from a PC will find it easier. While Entourage 2004 supports Exchange, 2008 is highly recommended. It is worth noting that Microsoft has officially announced the death of Entourage and will be releasing Outlook for Mac (release date unknown).
NOTE
Microsoft Office 2008 for Mac Home, Student, and Teacher Editions do not contain Exchange support. You must connect over IMAP (and thus lose most groupware functionality).
5.1.1.1. Paths
One of the very first tasks to undertake when integrating Mac OS X into Microsoft Exchange is to log into Outlook Web Access. If you can log into OWA without issue, you should also be able to set up Entourage integration or even configure an iPhone or iPod Touch (as we describe further in Chapter 10).
In order to authenticate into WebDAV, you should be able to access the server over http or https. These are the same general paths (often dubbed virtual paths) you will use with Entourage. In Exchange 2003, the /exchange path handles mailbox access for both OWA and WebDAV, so it may appear as though they're the same protocol stack (they're not). In Exchange 2003, there are two other paths to consider: the /public path handles requests for public folders; the /exchweb path has resources that are used by OWA and WebDAV (and so still need to be accessible even if you don't typically type them in). You can also follow the paths with usernames in the form of the fully qualified e-mail addresses if you're receiving errors that you can't authenticate when you haven't yet been prompted for a password. The following are paths you may need to use to access OWA (which, in an Exchange 2003 environment, typically means you can also access WebDAV). In this example, we are accessing an Exchange server at the address exchange.krypted.com:
Mailbox access:
Public Folder Access:
In Exchange 2007 there can be even more paths, because Exchange 2007 has a lot more features. This is not to say that the paths mentioned above have been deprecated; in most cases they have not. Exchange provides support for these using legacy virtual directories (made possible by davex.dll) that should be able to handle Exchange WebDAV requests. However, the following are the mailbox-access URLs you may run into:
Overall, WebDAV integration is a safe bet, but there is a newer and better way: EWS. EWS leverages SOAP (Simple Object Access Protocol) to exchange data through XML, allowing for more developers to interact with Exchange. EWS is faster and chews through less bandwidth, adding synchronization support for categories and tasks (not otherwise provided by WebDAV). If you will be using Entourage for EWS or Mail.app, you will instead want to check for EWS connectivity, which is different from the paths previously mentioned. Possible URLs that you will see include:
https://exchange.krypted.com (more than likely an administrator used a virtual directory to help shorten the path)
https://exchange.krypted.com/ews (Exchange should throw a Directory Listing Denied error)
https://exchange.krypted.com/ews/Exchange.asmx (the default setting)
https://exchange.krypted.com/ews/Serivces.wsdl (a redirect to a blank page)
Once you have confirmed your paths you can move on to setting up the client application.
|

5.1.1.2. Troubleshooting Exchange 2007 Virtual Directories
In a number of deployments Entourage simply will not work, even though Outlook Web Access will authenticate users. To resolve this, we often use a series of Windows PowerShell commands. PowerShell is the command-line scripting language used for Windows Server 2008 and Exchange Server 2007 environments. To start off, we'll get a list of all of the virtual directories using the Get-OwaVirtualDirectory cmdlet without any operators:
Get-OwaVirtualDirectory
If you are having an issue with a specific virtual directory, you can delete it using this command:
Remove-OwaVirtualDirectory "owa (Default Web Site)"
The preceding command uses the owa virtual directory, but it could have used Exchange, Public, Exchweb or Exadmin as well. To re-create the directory, use the following command (again replacing owa in the quoted portion of the command with the specified virtual directory you are re-creating:
New-OwaVirtualDirectory -OwaVersion "Exchange2007• -Name "owa (Default Web Site)"
Because a virtual directory is just that, virtual, you will not encounter any problems from deleting it, except that while it is offline your clients who use it will not be able to connect to the server. Note that when you re-create the virtual directory, you will need to go into IIS and customize the permissions as defined by your organization's security policy before using the virtual directory again. The ability to delete virtual directories or, more importantly, to create new ones is a great help when troubleshooting connectivity issues. After you've created a new virtual directory, before you customize permissions, test Entourage. Then, after you customize the permissions, test Entourage again. Or, you may want to create an entirely new virtual directory without deleting the existing one during testing.
Because Exchange, Public, Exchweb and Exadmin are not native to Exchange 2007, you would actually replace Exchange2007 with Exchange2003or2000 for those directories. So if you wanted to re-create Exadmin, for example, you would use the following command
New-OwaVirtualDirectory -OwaVersion "Exchange2003or2000"-Name "Exadmin (Default Web Site)"
5.1.1.3. Entourage Setup
First, install Entourage, and feel free to accept the default values during installation. Once the application has been fully installed, proceed to updates, an option available through the Entourage Help menu, until the software is running the latest revision. If you will be automating the installation, read further for more information on doing so.
With the software installed, you can set up your first account. Though there is an account setup wizard that launches when you first open Entourage, we will walk through configuring an account manually (without having Entourage "locate" the server). If you do run the Entourage wizard, you will have to provide your domain. Note that Entourage does not automatically supply all of the different settings. Microsoft can attempt to autopopulate all the data it wants, but the fact is that in real world environments, very few DNS servers have the perfect records to do this. It's nothing that Microsoft has done wrong, just that some Active Directory environments have years of cruft hiding in their bowels. In some cases, you might see no other symptoms in your environment, except that Entourage would not automatically complete setup. That is, until you go to prep your domain for 2010 server.
To manually setup an account, click on the Tools menu and select Accounts to bring up the Accounts window, shown in Figure 5-1. Now click on the disclosure triangle to the right of the New icon and click on Exchange... You will see the Account Setup Assistant. Click on the Configure Account Manually button.
Figure 5.1. The Entourage Accounts pane

You should now see the Edit Account screen shown in Figure 5-2. Here, you can provide the most important Exchange account settings, which configure basic access to the server, as follows:
Account Name: A name displayed within Entourage for keeping track of different accounts you install on the system.
Name: The name displayed on outgoing messages.
E-mail Address: The "reply-to" email address used in the message headers.
Use my account information: Configure account settings for an account on the Exchange Server using information entered into Entourage.
Account ID: The unique username from Active Directory, used to, for example, authenticate into Outlook Web Access.
Domain: The Active Directory domain for your organization.
Password: The Active Directory password for the Account ID that resides on the domain.
Save My Password in My Mac OS Keychain: Saves the password to the Mac OS X keychain so the user doesn't have to enter it each time she initiates a session to the server.
Use Kerberos authentication: Uses a Kerberos service principal to the Exchange Server to track account information. (Because it leverages single-sign on, it does not require a username and password.) Be careful using this type of authentication if your users travel and will not have VPN access; unless your key distribution center (KDC) is publicly accessible, clients will not be able to authenticate from remote networks.
Kerberos ID: Allows the user to select a previously joined Kerberos realm (which should be present if the node is bound to Active Directory and the user is authenticated into the local host as an Active Directory account) or to authenticate into a new realm.
Exchange Server: The IP address or FQDN (fully qualified domain name) of the Exchange Server that houses the OWA role (that is, the front-end server in Exchange 2003 or the server with the CAS Role installed in Exchange 2007).
This DAV service requires a secure connection (SSL): This option forces an SSL connection. It is important to note that Entourage 2008 still uses the now deprecated X509Anchors keychain found at /Library/Keychains. Any custom CA certificates you add will need to be added to that keychain for Entourage to properly resolve the CA chain.
Override default DAV port: Use a port other than the defaults (which are 80 for standard http and 443 for https).
Figure 5.2. Entourage Exchange account settings

Once you are satisfied with your entries, click on the Advanced tab where you can configure access to public folders, directory services, such as the global address book, and certificates (see Figure 5-3).
Public Folder settings:
Public Folders server: The IP address or host name of the server, sometimes followed by the path to the public virtual directory.
This DAV service requires a secure connection (SSL): The public folder virtual directory requires SSL for access.
Override default DAV port: Use a custom port number (if you had to append a : at the end of a URL to log into the web portal).
Directory Settings
LDAP server: The IP address or host name of the server. LDAP is used for Global Address List (GAL) lookups. In some cases the Exchange server can be used, although you may need to use a domain controller instead. If lookups are slow for branch offices, consider using a localized global catalog server for that office.
This server requires me to log on: If checked, Entourage will authenticate to the LDAP servers when performing lookups against the LDAP database.
This LDAP server requires a secure connection (SSL): The server requires communication over an SSL port.
Override default LDAP Port: Use a custom port number for LDAP access.
Maximum number of results to return: The maximum number of results for a given LDAP query. This is similar to how the Active Directory plug-in returns a maximum number of objects, as described in Chapter 3. If you increase this number, lookups for addresses in the GAL could take longer, but you may need to increase it in large organizations if users have search issues.
Search base: The search base of the domain. For most environments, this is not required. If the search base is needed, you should be able to obtain it from Active Directory. You can usually determine this value by performing an ldap search against one of your global catalogs:
ldapsearch -h myglobalcatalog.myco.com -x -a never -s base namingContexts
Client Certificate-based Authentication

One of the great features of Exchange is that users can configure who has access to their information and rights to perform actions on their behalf. This is called delegation, which Entourage supports. Once you have configured the initial account settings, as required by your organization, you can go ahead and configure delegation. This is where you can configure Entourage to allow you to send email as another user of the organization or provide other users with access to send mail as the account being configured. To configure access, as shown in Figure 5-4, select the Add button and then select each user for whom access should be provided (or added to your send as options).
Figure 5.4. Entourage account delegation user selection

Finally click on the Mail Security tab to configure the digital signing and encryption options of Entourage (see Figure 5-5). Be sure to have any digital signatures you need (whether supplied by a public CA or by your own signing environment). Digitally signing objects allows for non-repudiation (the objects definitely came from you because only you have your private key). Encryption lets you encrypt all mail, so users who receive your mail will need a predefined web of trust with your e-mail in order to be able to view the contents of the message.
Figure 5.5. Entourage Exchange account security options

5.1.1.4. Automatic Client Configuration
In a large organization, you need to automate as much of the installation process as possible. Part of this automation might involve deploying the actual software, another part might be to customize the settings for the software, and finally, you may want to automate the account configuration for a user. These three tasks need to be viewed as three separate automations.
5.1.1.5. Deploying the Package
Microsoft Office comes with a built-in package installer. The installer is actually a metapackage (a collection of multiple packages bundled together) that can be installed automatically using the following command (assuming that the package is stored in a directory called /installers/ on your computer):
installer -applyChoiceChangesXML /installers/scripts/officeanswer -package"/installers/Office Installer.mpkg" -target /
If you have a volume license, the media should contain the serial numbers for your organization and you will need to do nothing more in regard to licensing. After installation, you no longer see the serial numbers but they do update a file called SetupInfo.plist that is stored in the /Applications/Microsoft Office 2008/Office directory. The contents of this file are as follows (substituting the character 1 to obfuscate my serial information):
<?xml version="1.0" encoding="UTF-8"?> <!DOCTYPE plist PUBLIC "-//Apple Computer//DTD PLIST 1.0//EN""http://www.apple.com/DTDs/PropertyList-1.0.dtd"> <plist version="1.0"> <dict> <key>SetupInfo</key> <array> <string>11111</string> <string>111-11111</string> <string></string> <string>Office 2008 for Mac</string> <string>111111</string> <string>0</string> <string></string> <string>1</string> </array> </dict> </plist>
You can take this file and add it to a target desktop as a postflight task, even on systems not installed with the original volume-keyed media, thus separating your Microsoft Office installation into two automations (one to deploy the package and another to establish the serial number). Alternatively, you could embed the serial number into the Office Installer package (.mpkg) file. To do so, you would place it into the Contents/PlugIns/ProductKey.bundle/Contents/Resources/Office/ subdirectory of the metapackage in the form of a file called SetupInfo.plist.
5.1.1.5.1. Custom Package Installation
While all of the components of the Microsoft Office package are installed by default, it doesn't have to be that way. You can deploy Microsoft Office using a custom set of items to be installed.
Microsoft Office has a number of choices you select from when you are going through the graphical installation process. These include the applications to install, the language packs, fonts, automator actions, and the Dock items that get placed into the Dock on installation.
To remove various options, you can use the installer command as before, only this time the -applyChoiceChangesXML option is followed by an answer file. The answer file contains a number of keys that, when included, will tell the Office package what not to install. The contents of the answer file can contain the following keys (although you don't want to use them all):
<array>
        <string>word</string>
        <string>excel</string>
        <string>powerpoint</string>
        <string>entourage</string>
        <string>messenger</string>
        <string>proofing-tools</string>
                <string>danish</string>
                <string>dutch</string>
                <string>finnish</string>
                <string>french</string>
                <string>german</string>
                <string>italian</string>
                <string>japanese</string>
                <string>norwegian</string>
                <string>portuguese</string>
                <string>brazilian</string>
                <string>spanish</string>
                <string>swedish</string>
        <string>fonts</string>
        <string>automator</string>
        <string>dock</string>
</array>
Running the Microsoft Office installer package with all of the items disabled (as would the above file would do, would be a fairly pointless venture. Therefore, we'll disable only the non-English options in proofing tools and Microsoft Messenger. To do this, you would first build an appropriate XML file containing each of the items you wish to deactivate from the preceding list. Disabling the non-English proofing tools and Messenger would mean a file with the following contents:
<array>
        <string>messenger</string>
        <string>proofing-tools</string>
                <string>danish</string>
                <string>dutch</string>
                <string>finnish</string>
                <string>french</string>
                <string>german</string>
                <string>italian</string>
                <string>japanese</string>
                <string>norwegian</string>
                <string>portuguese</string>
                <string>brazilian</string>
                <string>spanish</string>
                <string>swedish</string>
</array>
Once the file is built you can save it. (For this example, the file was saved as /installers/scripts/officeanswer.) You can then use the following command to run the installer, taking into account the "choices" defined earlier:
installer -package "/installers/Office Installer.mpkg" -target /
5.1.1.6. Account Setup
You can also automate the setup of the actual Exchange account by leveraging AppleScript. To do so, you could have a login item that checks whether the AppleScript has been run and runs it if it has not, or you could add that logic into the script. However you choose to push out the AppleScript, it is worth noting that you can control Entourage to a large degree using AppleScript events. To get started, open the AppleScript editor of your preference and enter the following:
tell application "Microsoft Entourage"
make new Exchange account with properties {name:"My Exchange Account", Exchange  ID:"jdoe", domain:"myco.com", full name:"John Doe", email address:"[email protected]", search
  base:"dc=myco,dc=com", Exchange server
settings:{address:"https://mail.myco.com/exchange",
base:"dc=myco,dc=com", Exchange server
settings:{address:"https://mail.myco.com/exchange",  requires SSL:true, port:443}, public folder server settings:{address:"
  https://mail.myco.com/public", requires SSL:true, port:443}, LDAP server
  settings:{address:"ldap.myco.com", LDAP requires authentication:true, requires SSL:true,
  port:636, maximum entries:1000}}
end tell
port:636, maximum entries:1000}}
end tellThis AppleScript could be set up to launch when a user logs in and then to self-destruct. You can even add some code to pull data from the environment using the shell command whoami, or continue with AppleScript using the following:
tell application "System Events"
        set shortName to name of current user
        set fullName to full name of current user
end tell
Using these values, you can then properly set the display name for the account, the user's short name (used for authentication), as well as populate the user's Full Name record, which is used for displaying a friendly From: name when sending emails (such as John Doe rather than [email protected]). Instead of a login item, you can also call the AppleScript using the osascript command. However, because this AppleScript is configuring a userland application, it requires an active user session to run. Because of this, a login item is generally the best avenue for this type of deployment. Alternatively, a LaunchAgent could be used (discussed in Chapter 8).
5.1.1.7. Postflight Tasks
Assuming the serial number was deployed with the initial package, there should be only a few things remaining to complete your Office for Mac deployment and allow you to use Entourage effectively. The first is to suppress the Microsoft First Run dialog box, present by default following an installation (and usually causing a great number of calls to support teams unless suppressed).
The Office Setup Assistant will present you with a number of questions as part of the Microsoft First Run process. In order to suppress this you will need to add a key to the com.microsoft.office property list stored in ~/Library/Preferences/com.microsoft.office.plist. Here, we'll provide a key of 2008FirstRunSetupAssistCompleted with an integer of 1 as the value for the key, which indicates that the Setup Assistant has been completed. To do so, we'll use the defaults command and write the key information into the com.microsoft.office defaults domain as follows:
defaults write com.microsoft.office "2008\FirstRun\SetupAssistCompleted" -int 1
We could also have added the com.microsoft.office.plist into the Managed Client environment in Workgroup Manager, as we describe doing in Chapter 7. Once done, keys can be pushed out to these property lists quickly and easily from the centralized directory service. In addition to managing the FirstRun process with com.microsoft.office.plist, you can also use preference files com.microsoft.Excel.plist, com.microsoft.Powerpoint.plist, com.Microsoft.Word.plist and com.microsoft.autoupdate2.plist to customize various settings for Microsoft Office, including autoupdates, toolbars, default file formats, and providing a means for users to have their unique information placed into the file by default.
Once you have deployed Microsoft Entourage, there will likely be times when you need to alter the settings for the client. For example, you might want to supply a Name to the registration information. For this, you can deploy a custom plist file to all of your users. To do this, you need to set up your admin client with the configuration you'd like to push out. Click on the plus (+) sign in Workgroup Manager and browse to a configured user's Library folder. From here, navigate into Preferences, folder, Microsoft, and then finally Office 2008. Inside of this folder resides the Microsoft Office 2008 Settings.plist file. Once you've imported this file, change Manage import preferences to Often, double-clicking on Microsoft Office 2008 Settings. Open the disclosure triangle for Often and then change the string for the 1000 value to what you want the 'Registered To' name to be. Then save and test, logging in as the user to see if the managed setting was applied. See Chapter 7, Client Management, for more information on deploying preference files.
|
5.1.1.8. AutoUpdate
Microsoft Office includes Office AutoUpdate, which runs independently of Software Update. Many environments will control patch deployment to users, in order to proactively keep help desk calls from rolling in as patches are applied (user questions about why Office is asking for update, plus potential support issues arising from a deployed update can be lethal). Additionally, all Microsoft patches for Office for Mac are now bundled with previous patches, so many of the updates are fairly substantial in size, which can chew through your bandwidth.
If you have another vehicle to deploy the Microsoft patches (like Jamf or ARD), you can disable AutoUpdate using the defaults command to write the HowToCheck key into the com.microsoft.autoupdate.plist file as follows:
defaults write com.microsoft.autoupdate HowToCheck -string "Manual"
Similarly, you can push out the com.microsoft.autoupdate domain prefs through MCX, Apple's built in client management system (discussed further in Chapter 7). You'll find this preference file at ~/Library/Preferences/com.microsoft.autoupdate.plist
5.1.1.9. Disable Sync Services
Microsoft Entourage's Sync feature can be a bit problematic for certain environments. While administrators can disable the feature, users often simply turn it back on. But you can turn it off programmatically if you wish. The settings are stored in ~/Library/Preferences/com.microsoft.entourage.syncservices.plist. To read the contents of the com.microsoft.entourage.syncservices domain, use the following command:
defaults read com.microsoft.entourage.syncservices
Your results will be similar to the following:
{
"sync calendar" = 1;
"sync contacts" = 1;
"sync notes" = 1;
"sync tasks" = 1;
}
The above is an array with boolean values for each item. Changing the 1's to 0's will disable syncservices. To do this, you would use the following command:
defaults write com.microsoft.entourage.syncservices '{"sync calendar" = 0;"sync
contacts" = 0;"sync notes" = 0;"sync tasks" = 0;}'
|
5.1.1.10. Archiving Mail
Microsoft Entourage does not provide a built-in mechanism for archiving mail. Microsoft Exchange does and one of the best ways to effectively implement mail archiving for users is to leverage the built-in Exchange functionality. However, for one reason or another, a number of sites are unwilling or unable to do so.
In a Microsoft Outlook environment, you may have automated archival to .pst files and possibly saved those .pst files onto a network share where they could be backed up. In Entourage, you can move mail to the local database, but this can be problematic as the database can't be backed up while open, it becomes bloated over time, and the file is not readable by non-Apple-based client computers. If you want to archive within Entourage but not on the server-side, look into the shareware application Entourage Email Archive X, found at http://www.softhing.com/eeax.html. Alternatively, Apple provides a mirror of the software:
http://www.apple.com/downloads/macosx/email_chat/entourageemailarchivex.html.
5.1.2. Native Groupware Support
OS X traditionally has not had a strong first-party groupware presence. Traditionally groupware inherent-apps, such as Address Book, iCal, and Mail, were largely consumer-oriented and, as such, did not participate well in groupware-oriented environments. This statement holds a little less true for Apple's Mail app, which does support prominent email protocols. With 10.5, Apple began to show its intention to address the issue with the introduction of iCal server and iCal's support of the CalDAV standard.
Let's face it though, when talking groupware the 800 lb. Gorilla in the room is Microsoft Exchange, and in 10.5, more often than not, that will mean you will be using Entourage to leverage these services. 10.5's native toolset just didn't cut it when Exchange was in the picture. With the introduction of 10.6, Apple has made some significant strides toward addressing this issue. Native Exchange support in 10.6 includes full support for Exchange email, calendaring, contact, and GAL access. Each respective function in 10.6 is provided via a dedicated app: Mail, iCal, and Address Book. Each application leverages Exchange Web Service (EWS) for integration, which provides excellent feature compatibility, but it also comes burdened with a very significant gotcha: EWS is a relatively new technology, one which is only supported in Exchange 2007 or later. If Exchange 2003 or earlier powers your environment's groupware presence, have your Entourage installers handy as you will likely find OS X's native support lacking even in 10.6. When Exchange 2007 is in the picture however, Apple's solutions are certainly worth a look.
5.1.2.1. Manual Setup
Mail.app includes support for, well, email, and does the job adequately, though it does lack support for some fringe features, such as setting out-of-the-office status. For these, users will regrettably need to take a trip to webmail. Notably, it includes support for separate internal and external servers, with the ability to specify custom paths for each, a boon for any environments that utilize a private internal domain namespace.
To configure Mail.app to connect to an Exchange Server, startup the app and open its Preferences, found under the Mail menu. With the preferences window open, select the accounts tab and click the plus button in the bottom-left corner to create a new account. As shown in Figure 5-6, in the resulting window, enter the full name, email address, and password for the desired account. In the next window, also shown in Figure 5-6, specify the account description, the incoming mail server, and the account credentials. This dialog also includes two checkboxes, allowing you to also set up Address Book and iCal. Because of this capability, it is desirable to configure Exchange accounts from Mail.app, unless you are looking to implement only a particular service.
Figure 5.6. Configure Exchange in Mail.app

Once the account has been set up, it will be listed in the Mail accounts list. From here, you can highlight the account and edit further details, such as configure a separate server and path for internal vs external access, as shown in Figure 5-7.
|
Figure 5.7. Configure Separate Internal and External Servers in Mail.app

As previously mentioned, new to iCal in 10.6 is Exchange support (see Figure 5-8), and the app sports decent capabilities, including support for free/busy schedules, to-dos, invitations, file attachments, and delegation.
Figure 5.8. Exchange Support in iCal

Address Book provides support for Exchange contacts and allows for searching of the Exchange GAL. When an Exchange account is configured in Address Book, the account will be listed in the left-hand pane. Additionally, the configured account will have a new entry placed under the "Directory" group, which allows for searching of the GAL, as shown in Figure 5-9.
Figure 5.9. Searching the GAL in Address Book

As mentioned, it is possible to configure Exchange accounts both in iCal or Address Book without configuring a mail account. To perform this operation in either program, open up Preferences from the application's menu (the iCal and Address Book menu) and select the accounts tab. Similar to the procedure show in Figure 5-6 for mail, click on the plus button in each respective app's accounts pane to add a new account. In each case, select Exchange 2007 as the account type and enter the appropriate settings. Similar to the account setup in Mail.app, when configuring Exchange accounts in Address Book or iCal you have the option to automatically configure the Exchange account for all groupware apps, similar to how the Mail.app process can set up Address Book and iCal. Figures 5-10 and 5-11 show configured accounts in both apps, respectively. Similar to Mail.app's support, both Address Book and iCal support separate entries for internal and external servers. In Figure 5-11, shown also is the delegation tab, which is where users can configure delegate calendars to display or can also control which users can see their own.
Figure 5.10. Exchange Accounts configured in Address Book
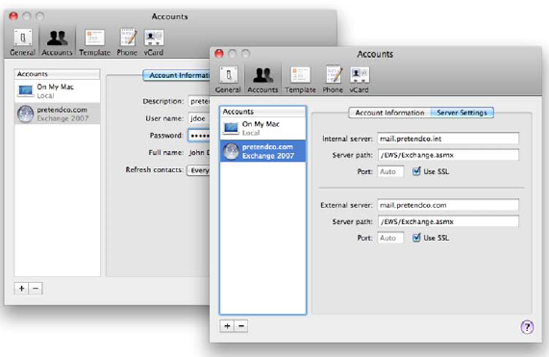
Figure 5.11. Exchange Accounts Configured in iCal
