
10.2. Email
The iPhone's built-in mail client, Mail, supports numerous services and protocols. Compatible with industry standard IMAP, POP, and SMTP protocols, the device also has support for Microsoft Exchange, Mobile Me, Gmail, Yahoo! Mail, and AOL. Of these services, push notifications are available for Exchange, Mobile Me, and Yahoo!. Configuring the email client is a very straightforward process, and an email account likely will have been setup by iTunes during the sync setup.
Email account creation is handled on the iPhone through the Mail, Contacts, Calendars setting pane. To access this, from the iPhone home screen, click on the Settings app. Once the Settings app has launched, scroll down to Mail, Contacts, Calendars, found directly below General.
Tap Add Account. At the Add Account screen, you have to select which type of account that you will be setting up, as seen in Figure 10-2. Read on for information on configuring the app for your specific account type.
Figure 10.2. Create a new Mail Account

|

10.2.1. IMAP, POP, and SMTP
To setup an IMAP or POP account, from the Add Account screen, tap Other to bring up the interface for manually setting up an Email, Contact, or Calendar account, as seen in Figure 10-3. If you have already setup an account, then use the Settings icon at the home screen of the device and tap on the Mail, Contacts, Calendars entry. Then click on the Add Account... option and tap.
Figure 10.3. Manually create an Account

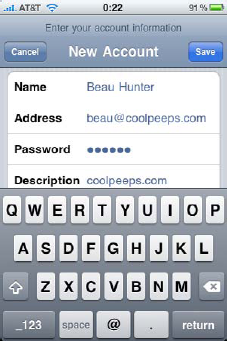
Tap Add Mail Account. At the New Account screen, enter the full name of the user whose email you are configuring in the Name field. This will represent the name shown in the From field when sending emails. After specifying a full name, enter the user's email address in the Address field. Next, enter the Password and a short description of the account into the Password and Description fields respectively, as shown in Figure 10-4. Click Save when you are finished entering the settings into the device.
Figure 10.4. Enter basic account information
At the second New Account screen, select whether the account should be POP or IMAP by using the top bar to select the desired protocol, as seen in Figure 10-5. Then enter the settings:
Provide the server name in the Host Name field.
Enter the userID from your mail host in the User Name field.
Type the password used to access your email account in the Password field.
For Outgoing server, provide the appropriate information, in many cases mirroring the fields from above. For the vast majority of configurations, you will need to supply authentication credentials for your outgoing (SMTP) server as well.
Figure 10.5. Select IMAP or POP account type.

When you are satisfied with your settings, tap on the Save button in the top-right hand corner of the screen. The Save button will only be available once you have entered all of the required fields. The New Account screen should then verify your account information. Once complete, open Mail and test sending and receiving.
10.2.2. Setting Up the Exchange Client
The iPhone and iPod touch natively support exchange via the ActiveSync protocol and is officially supported by the Mail app when hosted by Exchange 2003 SP2 or Exchange 2007 SP1. However, the client should work with most third party ActiveSync implementations, such as Kerio MailServer. Configuring ActiveSync access on an iPhone is a very straightforward process. As mentioned, Exchange accounts are configured by adding a new account under the Mail, Contacts, Calendars pane in the Settings app. From the New Account screen, the very first item in the list is Microsoft Exchange (see Figure 10-2). Select it to create a new Exchange account.
Next, you will see some fields to enter your specific user account data, shown in Figure 10-6. Enter the Email address, the Domain, the Username, and the Password. Also, provide a short description of the account that is being added. Click next after you have entered all of your appropriate settings. The iPhone or iPod touch will now verify the Exchange account information you previously provided and often return back to the same screen, but with the addition of a server field. From here the device will try to configure for the environment. If the Exchange server cannot be determined from the provided domain information and DNS, you will be presented to manually specify the DNS name of the Exchange server. Provided that the device can synchronize with the Exchange server, you will now see a list of items to potentially synchronize. These include Mail, Contacts, and Calendars, also shown in Figure 10-6. You can move any of the three to an off slide position in order to disable synchronization for each specific option. When you're satisfied with the options that will be synchronized, tap on the Next button.
Figure 10.6. Exchange Service Configuration

You should now have an Exchange client configured and synchronized on the iPhone or iPod touch. If your organization supports Outlook Web Access, configuring synchronization with a Microsoft Exchange environment should occur without much fanfare. Having said this, ActiveSync requires Outlook Web Access to function. If you are in a 2003 environment then this is simple enough, but in 2007 you will need to point your account settings at the server that houses the CAS Client Access Service (CAS) role for the mailbox in question.
Once your initial synchronization has completed, verify that mail, contacts, and calendars work as they should.
NOTE
You can only have one active ActiveSync account configured on an iPhone or iPod touch at any given time.