Chapter 10
Testing Ethereum Apps
IN THIS CHAPTER
![]() Planning to test your application
Planning to test your application
![]() Deploying your application to a test blockchain
Deploying your application to a test blockchain
![]() Fixing bugs
Fixing bugs
![]() Managing source code
Managing source code
In Chapter 9, you learn about writing smart contract software in Solidity. Although writing source code is the most visible phase in the software development lifecycle, it is only one part of the complete process. Of course, before you write any code, you should spend time planning and designing your application. Those phases should leave you with a clear specification document that contains the requirements your software must satisfy. After you have an application that compiles, you're ready to test it to see whether it does what it's supposed to do.
Testing software is more than just seeing whether it runs without obvious errors. Testing software ensures that it does what it is supposed to do, doesn’t do what it isn’t supposed to do, and fulfills the requirements set for the software in the first place.
All too often, a customer agrees to pay for software that does tasks A, B, and C, but ends up getting a different program that carries out tasks C, D, and E. It may be somewhat similar to what was intended, but software developers have a tendency to augment customer requests or at least interpret the needs differently. Software testing doesn’t alter or control the scope of a software project, but it does help validate that the software meets its design goals. Meeting design goals ensures that all stakeholders in the software development process are satisfied with the result of the development process. Testing is the only way to see if your software really does what it’s supposed to do. In this chapter you learn how to test your smart contracts in a blockchain environment.
Understanding Ethereum dApp Testing
Testing software that runs in a blockchain environment is a little different from testing traditional software applications. Because smart contract code runs in the EVM, you must have an EVM running first. Then you compile your smart contracts and deploy them to your blockchain. After that, you create transactions that call your smart contracts and cause them to carry out tasks. With careful planning, your tests should be able to simulate how your smart contracts will operate in a production environment.
Writing tests from the beginning
The smart contract testing process must start even before you write any software. Waiting to develop tests until after you write the code will take longer and leave more potential gaps in your test coverage. The best time to design tests for your software is when you define the requirements for your software because it makes you think through the code execution and boundaries, which results in better code design. For example If you know you’ll be testing to see if you can overflow a variable, you’ll likely be more apt to write the code up front that doesn’t overflow.
Choosing the right test blockchain
You have several blockchain options for testing your smart contracts, and each one has advantages and disadvantages. Table 10-1 lists the smart contract test blockchain options and the pros and cons of each one.
TABLE 10-1 Smart contract test blockchain options
Type of blockchain |
Pros |
Cons |
Live, public |
The environment is live — no simulations |
Slow transactions; costly |
Test, public (for example, Ropsten) |
Similar to a live environment, but far less costly |
Somewhat slow transactions; little or no mining activity |
Local, private (for example, Ganache) |
Fast, free transactions; easy to reset to a new blockchain |
No mining activity; difficult to simulate the effect of many network nodes |
Most smart contract developers test their software first using a local private network and then using a public test network. Then they finally deploy to the live blockchain. Using this graduated approach makes it possible to find and fix many of the bugs found in smart contracts before deploying the code to networks, where many users can see it and you have to pay for transactions.
Learning the steps in the testing lifecycle
The process of testing smart contracts is the same, regardless of the type of network you choose. You’ll follow these steps over and over again to test your smart contracts running on the Ethereum blockchain:
- Write smart contract code and test cases.
- Compile code.
- Deploy code to a blockchain.
- Run test cases.
- Identify failure causes and propose changes to address failures.
- Go to Step 1.
Although most software developers think that the code they write the first time is correct, testing often finds bugs. These bugs can be the result of sloppy programming, a lack of understanding of what was requested, or simply oversights. Regardless of the cause, bugs allow software to operate in ways that do not meet its design goals.
Testing should be thorough enough to execute software in a manner that validates how it operates in a variety of situations. These situations should simulate the activities of both benevolent and malicious users. For every bug encountered, you must try to determine the cause of the flaw, and then return as much information as possible to developers so that they can change the application to remove all flaws found in testing. This process often iterates multiple times, until all tests complete successfully, at which point your software is ready for production.
Testing for software quality
Test cases can be simple commands to check how well functions work or elaborate sets of programs and scripts that run automatically to exercise your smart contract functions. Either way, the point is to run your software in a way that lets you validate that it works as intended and helps you identify any gaps in functionality.
Don’t skimp on testing your smart contract code. Any code that you deploy to the live blockchain is immutable — and so are any bugs. The only way to mitigate bugs in smart contract code is to just stop using that code.
If you do deploy smart contracts with bugs, you’ll have to tell your clients to stop using the bad code and use the new, fixed code that you deployed to a new address. You’ll need to do this in a way that ensures that all old data written to the blockchain (before you fixed your bug) is still valid and accessible, and that the old buggy smart contract code is never used again. In short, it is much easier to find all bugs in testing before you deploy to a live blockchain.
Deploying a dApp to a Test Ethereum Blockchain
Before you can test your smart contracts, you must deploy them to the blockchain. In the last section, you learned that you can use multiple blockchains to test your smart contracts. In Chapter 5, you downloaded and installed the Ganache personal blockchain. You’ll use that blockchain for your initial smart contract tests. Ganache makes it easy to set up and launch your own personal blockchain, which works well as a live blockchain simulator.
Telling Truffle to use the Ganache blockchain
The first step in setting up tests on a private local blockchain is to let Truffle know how to connect to the blockchain network. In Chapter 7, you set up a new project and modified the truffle-config.js file to tell Truffle to use the Ganache blockchain. You’ll need to edit the truffle-config.js file for each project you use to write smart contract code, including the supplyChain project you used in Chapter 9 and will continue to use in this chapter.
Follow these steps to hook up Truffle and Ganache:
Get the blockchain address from the Ganache settings window.
Launch Ganache, and then click or tap the gear (Settings) icon, in the upper-right corner of the Ganache window. Note the hostname, port number, and network ID values. Figure 10-1 is the Ganache settings window with default values. You can also get the host name and port number from the main window. The RPC SERVER value displays the host name and port number separated by a colon.
Launch Visual Studio Code (VS Code) for your project (SupplyChain).
Open a Windows Command prompt or PowerShell (my favorite) and navigate to your project directory (SupplyChain.) From here, just enter the following command:
code .The
codecommand launches VS Code, and the period tells VS Code to use the current directory as the current project.Modify your Truffle project configuration file to reference the Ganache blockchain.
Click or tap truffle-config.js on the left side of your VS Code window to open the file. Add the sections shown in Figure 10-2. Then save the file (choose File ⇒ Save or press Ctrl+S).
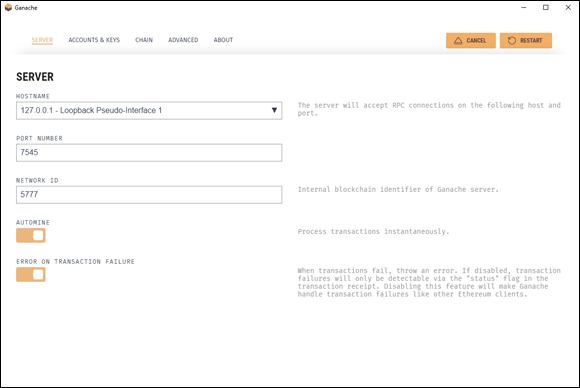
FIGURE 10-1: Ganache settings window.

FIGURE 10-2: Modified Truffle project configuration file.
When you finish editing the truffle.js file, the uncommented lines (lines that don't start with /*, *, or */) should look like this:
module.exports = {
networks: {
development: {
host: "127.0.0.1",
port: 7545,
network_id: "*" // Match any network id
}
}
};
Deploying your code to the Ganache blockchain
After Truffle knows to use the Ganache blockchain, you can deploy your smart contract code to the Ganache test blockchain. Truffle will deploy your smart contracts based on JavaScript instruction files you place in the migrations folder.
Make sure that you have a file in your migrations folder named 2_contracts_migrations.js with the following contents:
var erc20Token = artifacts.require("./erc20Token.sol");
var SupplyChain = artifacts.require("./SupplyChain.sol");
module.exports = function(deployer) {
deployer.deploy(erc20Token, 10000, "MGS Token", 18, "MGS");
deployer.deploy(SupplyChain);
};
Although you can enter the following commands from any Windows command prompt or PowerShell, you can also use the Terminal tab in VS Code (which gives you access to Windows PowerShell from within VS Code.) All three options let you type operating system commands. (Make sure that your SupplyChain project folder is your current folder.)
 If you don't see a terminal tab at the bottom of your VS Code window, choose Terminal ⇒ New Terminal from the menu bar.
At the command prompt, type the following to compile your code and deploy it to the Ganache blockchain:
truffle deploy --reset
This command returns the addresses of each newly deployed smart contract. The --reset option tells Truffle to replace your smart contracts if they have already been deployed. After you deploy each of your smart contracts, you're ready to start testing them.
Writing Tests for Ethereum dApps
You have three common options for writing tests for Solidity smart contracts:
- Command line interaction
- Solidity smart contracts
- JavaScript
To define tests, command line interaction and Solidity smart contracts use the Solidity language, and the third option uses the JavaScript language. In this section, you learn how to write tests using Solidity at the command line and JavaScript. The main advantage of using Solidity is that you'll be using the same language for testing that you used to develop your code.
The third option, JavaScript, is also a popular option for writing tests. The JavaScript approach provides many more options for writing complex test cases.
Testing using the command line
If you need to carry out a simple test of a smart contract, command line testing may be sufficient. It's quick and flexible but not easily repeatable. You should be writing formal test cases for each smart contract as you develop the smart contract. You’ll learn about how to do that in the next section. However, you will commonly need to create a quick test to see if some aspect of your smart contract is doing what it should be doing. Command line testing may be the easiest way to create a simple, one-time test.
The first step in creating a command line test is to get the smart contract’s address. You need that address to access any of the smart contract’s public data or functions. Take a look at the output you saw when you deployed your smart contracts. Figure 10-3 shows the output of deploying the SupplyChain contracts.

FIGURE 10-3: Deployment output.
Note the two Saving artifacts… messages. Those messages tell you that Truffle saved the addresses and other descriptive information related to each deployed smart contract. If you want to find the address of any deployed contract, you only have to ask Truffle for it.
You can interact with your smart contracts from the Truffle console. From your operating system command prompt, type the following command to start the Truffle console:
truffle console
From here, you’ll enter your commands to test smart contracts.
 Remember that you can enter commands at the Windows command prompt, at the Windows PowerShell, or by using the Terminal tab in VS Code. As long as your current folder is your project folder, you can enter commands in any of these three shells.
At a truffle console prompt, enter the following command:
supplyChain.deployed().then(function(instance) {return instance })
This command tells Truffle to search the artifacts for deployed smart contracts and return the address of the smart contract named supplyChain in the variable named instance. After you know the address of your smart contract, you can access its data and functions.
The next step is to access your smart contract's data and functions to see if your code is operating properly. In general, you want to write tests that ensure that your code is doing what it should be doing and doesn’t do anything it shouldn’t do. The second goal is much harder to accomplish. You need to think of all the things users could try that could cause your code to do things it shouldn’t do.
Here is a brief list of things you should test for with each smart contract:
- Overflows and underflows: Make sure that your code doesn’t allow numbers to become larger than the largest valid value or smaller than the smallest valid value. Either situation will cause an error.
- Valid return values: Ensure that each function returns values that are valid for the caller. In some cases the return value is calculated. Your tests should ensure that any calculated return values are always valid.
- Boundary conditions: Always test that your code handles data that meets or exceeds expected limits.
- Iteration limits: Test each looping structure to ensure that it doesn’t iterate more times than you intend and burn up all your gas.
- Input and output data formats: Test your code to make sure that it handles data provided or returned in unexpected formats.
- Input and output data validation: Ensure that your code either sanitizes or rejects invalid characters or sequences of characters.
After you know the objectives for testing your code, you can invoke your smart contract’s functions and examine the return values. If you need to provide different Ethereum account addresses, remember that Ganache provides you with ten addresses by default. Figure 10-4 shows the main Ganache window with the first seven accounts listed.

FIGURE 10-4: Ganache accounts list.
 Note in the figure that the balance of the first account is lower than the rest. You used the first account by default to deploy your smart contracts. The cost of deploying those smart contracts was deducted from that account’s ETH balance.
You’ll use the account addresses from Ganache to define supplyChain participants. Enter the following three commands at the Truffle console prompt to create three supplyChain participants:
supplyChain.deployed().then(function(instance) {return instance.createParticipan t("A","passA","0x436f6e677261747320796f7520666f756e642045", "Manufacturer") });
supplyChain.deployed().then(function(instance) {return instance.createParticipan t("B","passB","0x6173746572206567672120452d6d61696c20676d", "Supplier") });
supplyChain.deployed().then(function(instance) {return instance.createParticipan t("C","passC","0x61726b40676d61726b2e636f6d20746f2077696e", "Consumer") });
You can look at the details returned from each of these commands to see what happened, but you don’t need to read through everything at this point. The easiest way to see if your functions worked as planned is to ask your smart contract to tell you. You wrote a function to return to you the details of a participant, so you can use that function to see if your data was stored. Type these commands to get the participant details for the three participants you just created:
supplyChain.deployed().then(function(instance) {return instance. getParticipantDetails(0)});
supplyChain.deployed().then(function(instance) {return instance. getParticipantDetails(1)});
supplyChain.deployed().then(function(instance) {return instance. getParticipantDetails(2)});
Figure 10-5 shows the output from these three commands. The output isn’t pretty, but you can see that the three participants you created are all there.

FIGURE 10-5: Results of getParticipantDetails().
You can use the syntax of these commands to write your own simple tests to see how your smart contracts function. Before you learn about more complex tests, you’ll need to know one important feature of command line testing. Enter these commands to add a product, and then transfer that product to participant B (the supplier):
supplyChain.deployed().then(function(instance) {return instance.createProduct(0, "prodABC", "100", "123", 11) });
supplyChain.deployed().then(function(instance) {return instance.transferToOwner (0, 1, 0) });
Now you want to transfer product 0 from the supplier (participant 1) to the consumer (participant 2). But the transferToOwner() function allows only the product's owner to transfer ownership to another owner. By default, all commands you enter at the Truffle console run as the first Ganache account. If you want to run a test command as another account (and you do), you have to tell Truffle. Enter the following command to transfer product 0 from the supplier (participant 1) to the consumer (participant 2):
supplyChain.deployed().then(function(instance) {return instance.transferToOwner (1, 2, 0, {from: "0x6173746572206567672120452d6d61696c20676d" }) });
Adding the from: clause allows you to use a different address as the transaction’s sender.
Writing test cases in JavaScript
You can test your smart contracts from the command line, but your options are limited. Every time you test your code, you have to either type each command or copy it from a saved file. A much better way to test code is to write test cases for each contract as you write the contract. If you do this, Truffle will help you organize your test cases and run them at the same time. That way, you can run comprehensive tests any time you make changes to your smart contracts.
Note that your project folder includes a subfolder named test, which is where you’ll put your test code. But you don’t have to create any script files to test your code on your own. Truffle will help you get started. Enter the following commands at the operating system command prompt (with your project folder as the current folder) to create initial test files for the ERC-20 token and supplyChain smart contracts:
truffle create test erc20token
truffle create test supplyChain
Click or tap the test folder in VS Code Explorer. You should see two new files, erc20token.js and supply_chain.js. These two new files are the starting JavaScript test cases that Truffle created for you. You enter your test case statements into each of these files to test your smart contracts. Open each of these JavaScript files in VS Code. The default files don’t do much. They just fetch the deployed address of the smart contract and then return. You can add code in these files to run functions, access blockchain data, and run your smart contracts through their paces.
The first step in making these test cases functional is to import the smart contract you’re testing. Open the supply_chain.js file and add the following line of code to the top:
var SupplyChain = artifacts.require('./SupplyChain.sol');
This line of code fetches the address of the deployed smart contract and stores it in the SupplyChain variable. After the test case has the smart contract address, you can automate many of the tests you ran at the command line. Replace the remaining lines in the supply_chain.js file with the following lines of code to carry out the same tests from the previous section:
contract('SupplyChain', async accounts => {
it("should create a Participant", async () => {
let instance = await SupplyChain.deployed();
let participantId = await instance.createParticipant("A","passA","0x436f6e677261747320796f 7520666f756e642045","Manufacturer");
let participant = await instance.participants(0);
assert.equal(participant[0], "A");
assert.equal(participant[2], "Manufacturer");
participantId = await instance.createParticipant("B","passB","0x6173746572206567672120 452d6d61696c20676d","Supplier");
participant = await instance.participants(1);
assert.equal(participant[0], "B");
assert.equal(participant[2], "Supplier");
participantId = await instance.createParticipant("C","passC","0x61726b40676d61726b2e63 6f6d20746f2077696e","Consumer");
participant = await instance.participants(2);
assert.equal(participant[0], "C");
assert.equal(participant[2], "Consumer");
});
it("should return Participant details", async () => {
let instance = await SupplyChain.deployed();
let participantDetails = await instance.getParticipantDetails(0);
assert.equal(participantDetails[0], "A");
instance = await SupplyChain.deployed();
participantDetails = await instance.getParticipantDetails(1);
assert.equal(participantDetails[0], "B");
instance = await SupplyChain.deployed();
participantDetails = await instance.getParticipantDetails(2);
assert.equal(participantDetails[0], "C");
})
});
One of the advantages of using JavaScript over command line tests is that you can not only run functions and access blockchain data, but also test data to see if it matches expected values. That's what the assert() function does. You can see that both the participant mapping and the getParticipantDetails() function returns structures of data. JavaScript can access individual data items as if they were in an array. That's why participant[2] refers to the participantType from the participant data structure.
You can carry out many more complex types of tests using JavaScript. This brief introduction just scratches the surface.
After you have you test cases written using JavaScript, Truffle will run them all with one command. Enter the truffle test command at the operating system command prompt to run all your test cases. Figure 10-6 shows the output of a successful run of the tests just listed.

FIGURE 10-6: Truffle test results.
Each time you change a smart contract, you can run your test cases to ensure that your application meets its design goals and runs without errors. If your tests do encounter errors, you'll see which test failed, along with information that helps you determine why it failed and what you need to do to fix the problem.
Logging and Handling Errors
Unlike many other languages, Solidity doesn’t provide a direct way to output messages to a log file that you can use to test your code and follow along with its execution. Most languages let you at least output messages to a console or local file, but not in an Ethereum environment.
If Solidity allowed you to write to a local file, you could write to the filesystems of every EVM — outside the blockchain. Writing to every EVM’s local filesystem would increase the workload and decrease the security of participating nodes and make running a blockchain node less desirable. Because you can’t just write messages to local files, you have to carefully design your smart contracts to report errors and status to clients in other ways.
Handling errors in Solidity
Client software can determine if any return data was sent back from the EVM, and what the return code was. If a smart contract returns as a result of a revert() or a failed require(), the EVM can send a string, but your smart contract code has to send something that makes sense and the client UI has to use it to determine what happened. Following is an example of a simple smart contract and test code that uses a try/catch block to handle errors:
Here is the code for the basicMath smart contract, which is stored in the contracts/BasicMath.sol file:
pragma solidity ^0.4.24;
contract basicMath {
uint256 constant private MAX_UINT256 = 2**256 - 1;
function add(uint256 _numberA, uint256 _numberB) public pure returns(uint256) {
return _numberA + _numberB;
}
}
Here is the code for the JavaScript test case code to test the basicMath smart contract, which is stored in the test/basic_math.sol file:
contract('BasicMath', function(accounts) {
it('the sum should not overflow', async () => {
try {
// Try to add 2^256 and 5 (should overflow and throw an exception)
const addResult = contractInstance.add((2**256 - 1), 5)
assert.ok(false, 'Threw an exception instead of overflowing.')
} catch(error) {
assert.ok(true, 'Caught the exception.')
}
})
});
In the preceding example, the try/catch structure can catch errors from the EVM and determine what to do with them. It is important that client software handle errors, but it is even more important that your smart contracts handle as much as possible without resorting to generic error conditions. As much as possible, your code should use the revert() and require() functions, which means your code is anticipating problems and handling them in a way that you have thought through and included in your application design. That's why writing test cases while you write smart contracts makes sense. The more you plan for errors, the better your smart contracts will be in handling those errors.
Logging activity in smart contracts
Although Ethereum does not have a traditional logging facility, the event feature comes pretty close. In fact, some careful planning can give you good execution information without having to pay full price for storage access. Every time you emit an event, that event and its parameters are stored in a blockchain block. You can query the blockchain for events, and even get a list of all events in an address range. You can use that information as a lightweight application logging feature.
In Chapters 11 and 12, you learn about integrating your smart contracts with other software. You’ll always need some external software, generally some type of client software, to invoke smart contract functionality. One of the things client software can do is wait for events to occur.
Recall that you created a single event for your supplyChain smart contract. That event triggers every time your transfer a product from one participant in the blockchain to another. You could write the following JavaScript code to do that:
var transferEvent = SupplyChain.Transfer({_prodId});
transferEvent.watch(function(err, result) {
if (err) {
console.log(err)
return;
}
// return result.args to UI
})
This code responds only to transfers that occur after the code runs. But if you want to see any prior transfers for a product, you can use the event indexing feature of Ethereum. You first have to change your event definition. In the SupplyChain.sol file, change the Transfer event definition to this:
event Transfer(uint32 indexed productId);
Adding the indexed keywork tells Ethereum that this event should be stored in a way that is easy to find. You can index up to three arguments for each event. Your JavaScript code can use the indexed arguments to fetch ranges of event data. Just change the first line of your event watcher code to the following to fetch all prior Transfer events:
var depositEvent = cryptoExContract.Deposit({_prodId, {fromBlock: 0, toBlock: 'latest'});});
Adding the fromBlock and toBlock modifiers tells the EVM to search multiple blocks for Transfer events and returns the details of each event. Using events this way can provide valuable runtime logging. And, as an added feature, event data is far less costly than storage.
Fixing Bugs in a dApp
You test your code so you can identify flaws in it. Software flaws, or bugs, are any bits of code that do not function the way they are supposed to. Bugs that cause errors are generally easy to spot, but silent bugs — those that do not cause compiler or runtime errors — can be much harder to find.
The first step in removing bugs from your smart contracts is getting all of your smart contracts to compile. That step should fix syntax errors, which are errors in the way you write statements in the language itself that the compiler can find and report. A syntax error could be a mistyped line of code or a missing parenthesis. The Solidity compiler will find obvious errors as well as code that might cause a future error. For example, if you define a variable but never use it, the compiler will generate a warning. You could ignore the warning, but it is poor practice or a mistake to define a variable that is not used. The best approach is to modify your code to remove all compiler warnings.
The other type of bug is a semantics error, in which a line of code is syntactically correct and does not generate compiler warnings, but the code doesn’t generate the result you expect. Many times, this type of error shows up only under certain conditions. Successfully finding semantic errors is the main reason testing is crucial to the development process. You don’t want bad code to make it to production, especially in a blockchain environment. Testing should be as extensive as possible to find as many of the bugs in your code as possible before you deploy that code to a live blockchain. The quality of your smart contracts is directly related to the quality of your testing.