
SQL Server includes useful features for managing the enterprise that allow you to run queries and policies against multiple instances and run SQL Server Agent jobs on multiple instances. These features are key to your automation efforts, as they provide a mechanism for scheduling and running your scripts across the enterprise.
Using Central Management Servers
A central management server is an instance of SQL Server that has been registered as a controller that will store the connection details for groups of servers. This allows a DBA to run a query or evaluate a policy against multiple instances. Servers must also be registered before they can form part of an SQL Server Agent multi-server environment. The following sections will discuss how to register a central management server and how to create server groups and register servers. You will also learn how central management servers can reduce your administrative overhead.
Note
Central management servers are a very useful feature, but their greatest limitation is that they are integrated into SSMS (SQL Server Management Studio) and, therefore, can only be used interactively and cannot be referenced in scripts. To script queries that run against multiple servers, you should either use SQL Server Agent multi-server jobs or PowerShell, to orchestrate the process. Using PowerShell to run a script against multiple instances is discussed and demonstrated in Chapter 4.
Registering a Central Management Server
To register a central management server, you will have to navigate to the Registered Servers window in SSMS. This can be found by drilling through View ➤ Registered Servers. Once in the Registered Servers window, select Register Central Management Server from the context menu of the Central Management Servers node. This will cause the New Server Registration dialog box to be displayed. This General tab of the dialog box is illustrated in Figure 3-1.
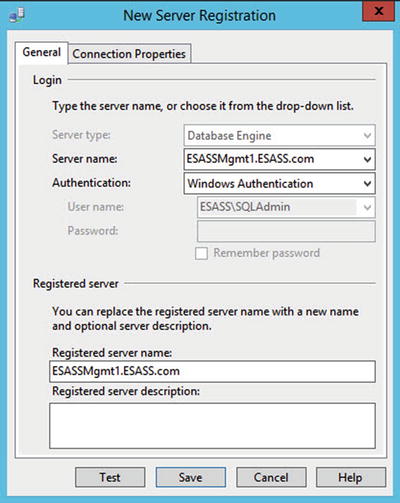
Figure 3-1. New Server Registration window—General tab
Here, we have entered the server/instance name of the instance that we want to register as the central management server, in the Server name field, and selected the appropriate authentication method. The Registered Server name column will be automatically populated, but we have the option of changing this name, if we so wish. We can also add a description, which is useful in a large topology, in which multiple central management servers are required.
On the Connection Properties tab of the dialog box, which is illustrated in Figure 3-2, you are able to configure the properties of the connection string that will be used to connect to the central management server. For slow connections, the connection and query time-outs may be extended. An initial catalog (or landing database) can be specified in the Connect to database drop-down, and in the Network section of the tab, you can configure the protocol and packet size to use. Custom colors can be useful when you are working with a mix of production and development or test servers, as you can color coordinate your environments, to avoid the risk of accidently running a test script against production—a mistake you tend never to make more than once in your career! The Encrypt connection check box is selected by default and will cause data to require encryption in transit. The Trust server certificate forces the certificate of the server to be trusted, even if it was not issued by a trusted authority.

Figure 3-2. New Server Registration window—Connection Properties tab
The Test button at the bottom of the dialog box will test the authentication details that you have selected to connect to the central management server. It always makes sense to do this before saving the connection.
Creating Server Groups
If you plan to register many servers under your central management server, it is sensible to organize these servers into logical groups. For example, you will likely create different groups for Production, UAT, and Development. You may also choose to create groups per region or data center. A more granular grouping makes it easy to run a query or evaluate a policy against a targeted group of servers.
It is also possible to nest groups, which adds even more flexibility. For example, you may create a group called Production and then create further groups underneath the Production group, to further organize servers by region. This would allow you to evaluate a policy that checks that xp_cmdshell is disabled against all Production servers in the enterprise. At the same time, if you have a policy that checks the collation of your databases, you could evaluate this policy at the level of region, as each region may require a different standard collation.
To create a group, select New Server Group from the context menu of the central management server. This will cause the New Server Group Properties dialog to be invoked, as displayed in Figure 3-3. To create a nested server group, select New Server Group from the context menu of the server group you wish them to be nested under.

Figure 3-3. New Server Group Properties dialog box
Registering Servers
To register an instance, select New Server Registration from the context menu of the server group that will contain the instance. If you are not using server groups, or if you wish the instance to be registered directly under the central management server, select New Server Registration from the context menu of the central management server.
Figure 3-4 shows that we have created a server group called Production. Within this group, two nested groups have been created. NTAMwill contain our production servers that reside in America, and EMEA will contain our production servers that reside in Europe.

Figure 3-4. Server group hierarchy
We will register our ESPROD1 and ESPROD2 instances under the Production ➤ NTAM server group. As shown in Figure 3-5, the dialog box used to specify the connection details is the same as the dialog box we used to register the central management server.
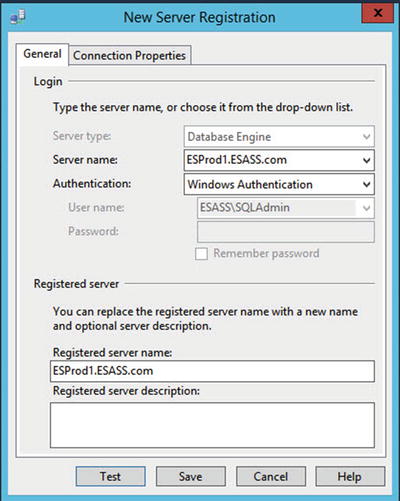
Figure 3-5. Registering a server
Using Central Management Servers
After both of our production servers are registered, we can begin to look at the advantages that central management servers can bring. The following sections will demonstrate how central management servers can be used with administrative queries and policies.
Running Queries with Central Management Servers
Imagine a scenario in which you have a number of SQL Server instances, wherein the database files are hosted on a SAN (Storage Area Network). You come into work one morning to find that there has been an issue with the production SAN, and you have to check all databases, on all instances, for corruption. This can be easily achieved, using central management servers.
Because you have a separate SAN for each environment, in each data center, you will only want to check the servers in the NTAM server group , as this is where the SAN issue occurred. Therefore, select New Query from the context menu of the NTAM server group. This will cause a new query window to be displayed, and we will use DBCC CHECKDBto check the consistency of all databases on both instances. This is demonstrated in Listing 3-1.
Listing 3-1. Checking Database Consistency
EXEC sp_MSforeachDB 'DBCC CHECKDB (?)' ;This command executes the undocumented sp_MSForeachDB system -stored procedure. We pass the command that we want to run against each database into this procedure and use ? as a placeholder for the database name. This is automatically populated by sp_MSForeachDB for each database, in turn.
Figure 3-6 shows a partial output. You can easily see which results relate to each server, along with the execution context. You may also notice that the query status bar is pink instead of yellow and displays the name of the server group that we can pass the command against.

Figure 3-6. DBCC CHECKDB results
If you have discovered issues, you may decide to restore some databases. Because the integrity issues are caused by disk problems, you may want to check that all databases have been backed up with a checksum. To do this, we will query the sys.databasescatalog view , as demonstrated in Listing 3-2.
Listing 3-2. Checking Backup Page Verification Option
SELECTname,recovery_model_desc,page_verify_option_descFROM sys.databases ;
As you can see from the results, which are illustrated in Figure 3-7, an additional column has been added to the results set, so that the server that the row was generated from can be easily identified.

Figure 3-7. Results of checking page verification option
Evaluating Policies with Central Management Servers
Note
I will assume that you understand the concepts of policy-based management (PBM) in SQL Server and how to create a policy. If you require a refresher, however, full details can be found in Apress Pro SQL Server Administration, which can be purchased at www.apress.com/9781484207116?gtmf=s .
To evaluate a policy against a server group, you will have to select Evaluate Policies from the context menu of the server group that you wish to evaluate the policy against. This will cause the Evaluate Policies dialog box to be displayed. Here, we can use the ellipse next to the Source field, to invoke the Select Source dialog box, which is illustrated in Figure 3-8.

Figure 3-8. Select Source dialog box
In this dialog box, you can either connect to an SQL Server instance, or you can select a policy that is stored in the file system. For this demonstration, we will evaluate the Last Successful Backup Date policy, which is stored in the file system.
Tip
The Last Successful Backup Date policy is part of the best practice policies that are supplied by Microsoft. They will be added to your server when the database engine is installed.
Once we have navigated back to the Evaluate Policies dialog box (Figure 3-9) we can use the Evaluate button to evaluate the policy or policies that we have selected. The results will then be displayed on the Evaluation Results page of the dialog box.

Figure 3-9. Evaluate Policies dialog box
The Evaluation Results tab, which is illustrated in Figure 3-10, shows that our backups are not currently in a good way. The policy has discovered issues on both servers, and drilling through the View link to ESPROD2 displays the Results Detailed View dialog box. Here, we can see that the AdventureWorksDW2016 database has never been backed up. We should, of course, resolve this situation immediately, by taking backups of all affected databases.

Figure 3-10. Evaluation results
PowerShell is a fantastic tool for creating scripts that loop around multiple servers and running commands against each. It even has dedicated cmdlets for working with policies. If you have an ad-hoc requirement, however, and if the script you require can be written entirely in T-SQL, it is much more time efficient to use central management servers as a method of script execution.
Note
Please refer to Chapter 4 for details of how to iterate through servers and databases, using PowerShell.
Configuring Server Agent for Multi-Server Environments
Tip
This section will assume that you are familiar with the concepts of Server Agent and experienced in using it on a local machine. If you require a refresher, full implementation details of SQL Server Agent can be found in Apress Pro SQL Server Administration, which can be purchased at www.apress.com/9781430239154?gtmf=s .
Multi-server jobs provide a great framework for automated administration, which provides a mechanism for executing your regular maintenance routines across the enterprise. An alternative to using multi-server jobs is to include the server agent jobs in your automated build (if you have one). Using multi-server jobs is a much more maintainable approach, however, because if you have to add, remove, or change a job, you can do so in a central location, as opposed to on every individual instance.
Conceptually, SQL Server Agent multi-server environments have the architecture detailed in Figure 3-11. The diagram shows that a master server stores the master copy of all jobs. Here, you can enlist target servers and configure which jobs will run on which servers. The target servers will periodically poll the master server and download the jobs that they should process. By default, the master and target server use SSL (Secure Socket Layer) encryption and Certificate validation, however, this can be turned off for reasons of performance or manageability. A master server is often referred to as an MSX server, and a target server is often referred to as a TSX server.

Figure 3-11. Multi-server environment architecture
MSDB Roles
As with local jobs, multi-server jobs are secured through database roles in the MSDB database . Table 3-1 provides a permissions matrix for SQL Server Agent roles in MSDB that pertain specifically to multi-server jobs. Tasks that are not possible through any of the roles can only be performed by a member of the sysadmin server role.
Table 3-1. Multi-Server Permissions Assigned to MSDB Roles
Permission | SQLAgentUserRole | SQLAgentReaderRole | SQLAgentOperatorRole |
|---|---|---|---|
CREATE/ALTER/DROP multi-server job | No | No | No |
View list of multi-server jobs | No | Yes | Yes |
Enable/disable multi-server jobs | No | No | No |
View multi-server job properties | No | Yes | Yes |
Start/stop multi-server jobs | No | No | No |
View multi-server job history | No | Yes | Yes |
Delete multi-server job history | No | No | No |
Configuring Master and Target Server
In this section, we will configure the ESASSMGMT1 instance as a master server , and we will enlist ESPROD1 and ESProd2 as target servers. Before we can begin, however, we will have to configure the environment.
Prerequisite Tasks
The first step in this configuration is to edit the registry of the target server(s), to allow jobs on target servers to download and match the name of the Proxy account(s) used to run the job’s steps, along with the job itself, from the master server. Failure to follow this step will mean that a Proxy account name cannot be matched, resulting in an error. We will configure this by setting the AllowDownloadedJobsToMatchProxyName REG_DWORD key to 1. This key can be found in the HKLMSoftwareMicrosoftMicrosoft SQL ServerMSSQL[VERSION NUMBER].[YOUR INSTANCE NAME]SQL Server Agent key, and we can change the value from within SQL Server, using an undocumented stored procedure called xp_regwrite, as demonstrated in Listing 3-3.
Caution
The use of undocumented features is not supported by Microsoft, and you may not be able to raise a support case against their usage.
Listing 3-3. Configuring Target Jobs to Match Master Proxy Name
USE MasterGOEXEC xp_regwrite@rootkey = N'HKEY_LOCAL_MACHINE',@key = N'SoftwareMicrosoftMicrosoft SQL ServerMSSQL13.MSSQLSERVERSQLServerAgent'-- If you have a default instance, the instance name is MSSQLSERVER by default,@value_name = N'AllowDownloadedJobsToMatchProxyName',@type = N'REG_DWORD',@value = 1 ;
Tip
xp_regwrite will execute under the context of the database engine service account, as opposed to your own security context. Therefore, you must ensure that the account that is running the SQL Server Service has sufficient permissions to modify the registry.
Next, we will have to decide if we wish to use SSL encryption for the communication between the MSX and TSX servers. Encryption is enabled by default, so if it is not required, it will have to be turned off. This means another change to the registry on the target servers. This time, we will set the MsxEncryptChannelOptionsREG_SZ key to 0. This key can be found in HKLMSOFTWAREMicrosoftMicrosoft SQL ServerMSSQL[VERSION NUMBER].[INSTANCENAME]SQLServerAgent key. To turn encryption off, you should run the script in Listing 3-4 on each of the target servers.
Tip
Running a script against multiple servers can be achieved efficiently through the use of a PowerShell script. Chapter 4 demonstrates how to create such a script.
Listing 3-4. Disabling Encryption
EXEC xp_regwrite@rootkey='HKEY_LOCAL_MACHINE',@key = N'SoftwareMicrosoftMicrosoft SQL ServerMSSQL13.MSSQLSERVERSQLServerAgent'-- If you have a default instance, the instance name is MSSQLSERVER by default,@value_name='MsxEncryptChannelOptions',@type='REG_DWORD',@value= 0 ;
Our next task will be to configure a Proxy Account on each instance. This will be used for accessing resources outside of the database engine and to allow us to reduce the security footprint of the account running the SQL Server Agent service. A proxy account maps to a credential, so we will create a credential that maps to a domain user named WinServiceAccount on ESSASMGMT1, by using the script in Listing 3-5. The credential should then be created on ESPROD 1 and ESPROD2.
Listing 3-5. Creating a Credential
USE masterGOCREATE CREDENTIAL WinUserCredentialWITH IDENTITY = 'ESASSWinServiceAccount', SECRET = 'Pa$$w0rd'GO
This script uses the CREATE CREDENTIAL command . The arguments that can be used with the WITH clause are described in Table 3-2.
Table 3-2. CREATE CREDENTIAL Arguments
Argument | Description |
|---|---|
IDENTITY | The name of the security principle to which the credential will be mapped |
SECRET | The password or secret that is used to authenticate the security principle |
FOR CRYPTOGRAPHIC PROVIDER | If you are using Extensible Key Management (EKM), use this argument to provide the name of the EKM provider. |
We will now create the Proxy account, which can be used by the PowerShell subsystem, by using the script in Listing 3-6. The script should be run against the MSX server and all TSX servers. This script uses the sp_add_proxy and sp_grant_proxy_to_subsystem system-stored procedures, which are located in the MSDB database. The sp_add_proxy procedure is used to create the proxy and accepts the parameters listed in Table 3-3.
Table 3-3. sp_add_proxy Parameters
Parameter | Description |
|---|---|
@proxy_name | Defines the name that will be assigned to the new proxy account |
@enabled | Specifies if the proxy should be enabled on creation • 0 indicates disabled • 1 indicates enabled |
@description | Optionally, provides a textual description of the proxy account |
@credential_name | The name of the credential that the proxy will map to. If @credential_id is NULL, this parameter must be specified. |
@credential_id | The ID of the credential that the proxy will map to. If @credential_name is NULL, this parameter must be specified. |
@proxy_id | An output parameter that provides the ID of the newly created proxy |
The sp_grant_proxy_to_subsystem system-stored procedure is used to assign the proxy account permissions to use specific subsystems and accepts the parameters detailed in Table 3-4.
Table 3-4. sp_grant_proxy_to_subsystem Parameters
Parameter | Description |
|---|---|
@proxy_id | The ID of the Proxy account to assign permissions to. If @proxy_name is NULL, this parameter must be supplied. |
@proxy_name | The name of the Proxy account to assign permissions to. If @proxy_id is NULL, this parameter must be supplied. |
@subsystem_id | The ID of the subsystem that the proxy should be assigned permissions to. If @subsystem_name is NULL, this parameter must be supplied. |
@subsystem_name | The name of the subsystem that the proxy should be assigned permissions to. If @subsystem_id is NULL, this parameter must be supplied. |
The mapping of subsystem IDs to subsystem names can be found in Table 3-5.
Table 3-5. Subsystem ID to Subsystem Name Mappings
Subsystem ID | Subsystem Name | Description |
|---|---|---|
2 | ActiveScripting | Runs ActiveX commands. This subsystem is deprecated and should not be used. |
3 | CmdExec | Runs operating system commands |
4 | Snapshot | Runs job steps for the snapshot replication agent |
5 | LogReader | Runs job steps for the replication log reader agent |
6 | Distribution | Runs job steps for the replication distribution agent |
7 | Merge | Runs job steps for the replication merge agent |
8 | QueueReader | Runs job steps for the replication queue reader agent |
9 | ANALYSISQUERY | Runs queries against an SSAS (SQL Server Analysis Services) instance |
10 | ANALYSISCOMMAND | Runs commands against an SSAS instance |
11 | Dts | Runs SSIS (SQL Server Integration Services) packages |
12 | PowerShell | Runs PowerShell commands |
Listing 3-6. Creating a Proxy
USE msdbGOEXEC msdb.dbo.sp_add_proxy@proxy_name = 'WinUserProxy', @credential_name = 'WinUserCredential', @enabled = 1 ;GOEXEC msdb.dbo.sp_grant_proxy_to_subsystem@proxy_name = 'WinUserProxy', @subsystem_name = 'PowerShell' ;GO
Configuration Tasks
Now that our prerequisite tasks are complete, we can begin to configure the ESASSMgmt1 instance as the MSX Server. We will first look at how to achieve this through the GUI, before reviewing the system-stored procedures that can be used to achieve the same results.
Selecting Multi Server Administration ➤ Make this a master server, from the context menu of SQL Server Agent in Object Explorer, will cause the Master Server Wizard to be invoked. After passing through the Welcome page of the wizard, you will be presented with the Master Server Operator page, where you will be prompted to enter an e-mail address, pager address, or NET SEND address that will be used to notify an operator of the success or failure of multi-server jobs. It is important to note that multi-server jobs can only have a single operator, so it makes sense to use a distribution list or group mailbox, as opposed to an individual. Pager and NET SEND notifications are deprecated and should not be used. The Master Server Operator page is illustrated in Figure 3-12.

Figure 3-12. Master Server Operator page
Note
SQL Server Agent notifications via e-mail rely on Database Mail. This feature should be configured before you test your multi-server topology.
The Target Servers page of the wizard is illustrated in Figure 3-13. On this page, you will specify the instances that will be enlisted as TSX servers. Because both of the servers that we want to register are in the NTAM server group, we can select the NTAM server group and use the right arrow to move all servers within that group.
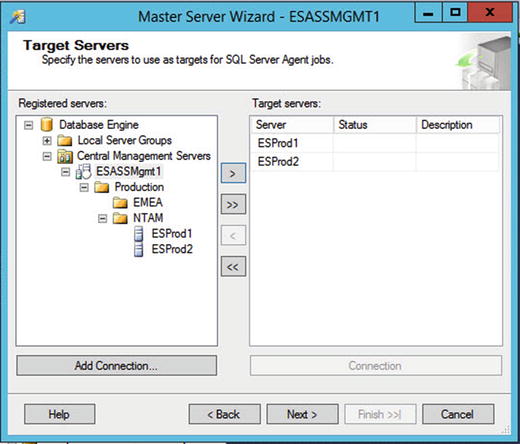
Figure 3-13. Target Servers page
At this point, the compatibility of the target servers will be checked. Once this is complete, the Master Server Login Credentials page will be displayed, as shown in Figure 3-14. On this page, we will specify if an account should be created that will be used to log in to the MSX server, to download jobs. If you do not select this option, you must ensure that the service account that runs the SQL Server Agent service on the TSX servers has appropriate permissions to the MSX server.

Figure 3-14. Master Server Login Credentials page
The complete Wizard page will provide a summary of the actions to be performed. After choosing Finish, the progress of each task will be displayed in real time.
To perform the tasks with T-SQL, we will enlist the server with the sp_msx_enlist and sp_add_operator system-stored procedures, which are located in the MSDB database. The parameters accepted by the sp_msx_enlist stored procedure are detailed in Table 3-6.
Table 3-6. sp_msx_enlist Parameters
Parameter | Description |
|---|---|
@msx_server_name | The name of the instance that will become the MSX server |
@location | Optionally, specifies the location of the MSX server |
The sp_add_operator stored procedure accepts the parameters detailed in Table 3-7.
Table 3-7. sp_add_operator Parameters
Parameter | Description |
|---|---|
@name | Specifies the name of the operator |
@enabled | Specifies if the operator should be enabled on creation • 0 indicates disabled. • 1 indicates enabled. |
@email_address | Specifies the e-mail address that the operator uses |
@pager_address | Specifies the pager address the operator uses |
@weekday_pager_start_time | The time at which the operator starts receiving pager notifications on weekdays |
@weekday_pager_end_time | The time at which the operator stops receiving pager notifications on weekdays |
@saturday_pager_start_time | The time at which the operator starts receiving pager notifications on Saturdays |
@saturday_pager_end_time | The time at which the operator stops receiving pager notifications on Saturdays |
@sunday_pager_start_time | The time at which the operator starts receiving pager notifications on Sundays. |
@sunday_pager_end_time | The time at which the operator stops receiving pager notifications on Sundays |
@pager_days | An integer representation of the bitmap that specifies which days the operator receives notifications. The following values represent each day: • 1 indicates Sunday • 2 indicates Monday • 4 indicates Tuesday • 8 indicates Wednesday • 16 indicates Thursday • 32 indicates Friday • 64 indicates Saturday When an operator is active for multiple days, these values should be added together. For example, if an operator should only receive notifications on Saturdays and Sundays, the value 96 should be passed to this parameter. |
@netsend_address | The network address used by the operator |
@category_name | Optimally, specifies a category to which the operator belongs |
Note
Table 3-7 includes details of pager and NET SEND–related parameters. Both of these notification methods are deprecated, however, so you should avoid using them.
The sp_msx_enlist procedure is also used to bring TSX servers under management, after the MSX server has been enlisted. Listing 3-7 demonstrates how these system-stored procedures can be used to configure the ESASSMgmt1 instance as an MSX Server and enlist ESProd1 and ESProd2 instances as TSX servers.
Tip
The script in Listing 3-7 must be run in SQLCMD mode, as it connects to multiple servers. If you have many servers that you must enlist, you could create a PowerShell script that loops around each required instance. This methodology is discussed in Chapter 4.
Listing 3-7. Enlisting the MSX Server
:connect ESASSMgmt1USE MSDBGOEXEC msdb.dbo.sp_add_operator@name = 'MSXOperator2', @enabled = 1, @email_address = '[email protected]' ;EXEC sp_msx_enlist@msx_server_name = 'ESASSMgmt1', @location = 'NTAM - MGMT network block' ;:connect ESProd1USE MSDBGOsp_msx_enlist@msx_server_name = 'ESASSMgmt1', @location = 'NTAM - PROD network block' ;:connect ESPROD2USE MSDBGOsp_msx_enlist@msx_server_name = 'ESASSMGMT1', @location = 'NTAM - PROD network block' ;
Creating Multi-Server Jobs
Multi-server jobs are created much like normal jobs, with the exception of specifying a list of target servers on which they should run. For example, imagine that we want to create a job that will run a PowerShell script on each target server, to ensure that all SQL Server–related services are running. The job should alert the MSXOperator if any services are not in a running state. The job will consist of a single job step, which runs a PowerShell script, shown in Listing 3-8.
Listing 3-8. CheckSQLServices.ps1
# Return SQL Server services to a variable, if they are not running$services = Get-Service | where{$_.Name -like "*SQL*" -and $_.Status -ne "Running" }# If the variable is non-empty, write a list of services that are not running and force the script to failIF ($services.Length -gt 0){write-warning "Warning! The following Services are not running"foreach ($service in $services){write-warning $service.Name}write-error "Please check services and start as required" -EA stop}
Tip
Passing stop to the -EA parameter forces the error to terminate the script.
Creating the Job in Object Explorer
We will create the job using the New Job dialog box, which can be accessed by selecting New Job, from the context menu of SQL Server Agent, then Jobs ➤ Multi-Server Jobs in Object Explorer . On the general page of the wizard, which is illustrated in Figure 3-15, we will provide a name and owner for the job, as well as specifying the category. Because we are creating a multi-server job, the category will default to Uncategorized (Multi-server). We will also ensure that the Enabled check box is selected, so that our job will be enabled on creation.
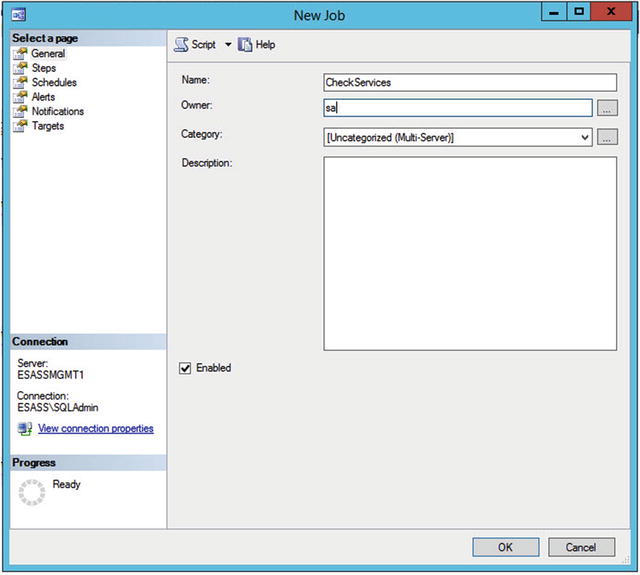
Figure 3-15. General page
On the Steps page of the wizard, we will use the New button to invoke the New Job Step dialog box. The General page of the New Job Step dialog box is illustrated in Figure 3-16. On this page, we have provided a name for the job step, specified the subsystem that will be used in the job step, selected the account that will be used to run the job step, and, finally, pasted our PowerShell script into the Command window.

Figure 3-16. New Job Step—General page
Tip
Selecting the job step type causes the page to be dynamically refreshed, revealing the appropriate options for the selected subsystem.
The Advanced page of the New Job Step dialog box allows you to define the flow control of your job, which is useful when you have multiple steps, especially if some steps perform error handling for previous steps. Essentially, configuring the options on the Advanced page for each job step allows you to create a decision tree for your job steps.
As our job will have a single step, our requirements on this page are minimal. As shown in Figure 3-17, we have specified that if the step succeeds, the job will quit, returning success, and if it fails, the job will quit with failure. Because our PowerShell script generates a terminating error if any SQL Server–related services are not running, the job will also fail. We can then configure the MSXOperator to be notified. We have also specified that the output of the job step should be recorded in the job history.

Figure 3-17. New Job Step—Advanced page
On the Schedules page of the New Job dialog box, we will use the New button to invoke the New Job Schedule dialog box and create a new schedule, which will run on a daily basis. As illustrated in Figure 3-18, we will name the schedule Daily and configure it to run at midnight every night.

Figure 3-18. New Job Schedule dialog box
Tip
Changing the schedule frequency will cause the dialog box to be dynamically updated with the appropriate options.
As shown in Figure 3-19, we will use the Notifications page of the New Job dialog box to configure the MSXOperator operator to be notified in the event that the job fails. This makes managing service checks easy, as the operator will only be notified in the event of a service not being in a running state.

Figure 3-19. Notifications page
On the Targets page of the New Job dialog box, we will specify which of our TSX servers we want the job to run against. We would like this specific job to run against both of our target servers, so we will select both of them, as shown in Figure 3-20.

Figure 3-20. Targets page
Creating the Job with T-SQL
To use T-SQL to create the CheckServices job , we will have to use the sp_add_job, sp_add_jobserver, sp_add_job_step, and sp_add_job_schedule system-stored procedures. All of these procedures can be located in the MSDB database.
The sp_add_job procedure accepts the parameters detailed in Table 3-8.
Table 3-8. sp_add_job Parameters
Parameter | Description |
|---|---|
@job_name | Specifies a name for the job |
@enabled | Specifies if the job should be enabled on creation • 0 indicates disabled • 1 indicates enabled |
@description | A textual description of the job |
@start_step_id | The job step ID of the step that should be the first step executed |
@category_name | Specifies the name of the category in which the job should be included |
@category_id | Specifies the ID of the category in which the job should be included |
@owner_login_name | Specifies the login that will own the job |
@notify_level_eventlog | Specifies when the job status should be written to the Windows Application Event Log: • 0 indicates Never • 1 indicates On Success • 2 indicates On Failure • 3 indicates Always |
@notify_level_email | Specifies when the job status should be sent as an e-mail notification: • 0 indicates Never • 1 indicates On Success • 2 indicates On Failure • 3 indicates Always |
@notify_level_netsend | Specifies when the job status should be sent as a NET SEND notification: • 0 indicates Never • 1 indicates On Success • 2 indicates On Failure • 3 indicates Always |
@notify_level_page | Specifies when the job status should be sent as a pager notification: • 0 indicates Never • 1 indicates On Success • 2 indicates On Failure • 3 indicates Always |
@notify_email_operator_name | The name of the operator that should be notified via e-mail |
@notify_netsend_operator_name | The name of the operator that should be notified via NETSEND |
@notify_page_operator_name | The name of the operator that should be notified via pager |
@delete_level | Specifies what status should result in the job being deleted: • 0 indicates Never • 1 indicates On Success • 2 indicates On Failure • 3 indicates Always |
@job_id | An OUTPUT parameter that returns the ID of the job |
Note
For completeness, Table 3-8 details parameters used for configuring NET SEND and Pager notifications. These notification types are deprecated and should not be used.
We will use this procedure to create the CheckServices job , using the script in Listing 3-9.
Listing 3-9. Creating the Job
USE msdbGOEXEC msdb.dbo.sp_add_job@job_name = 'CheckServices', @enabled = 1, @notify_level_email = 2, @category_name = '[Uncategorized (Multi-Server)]', @owner_login_name = 'sa', @notify_email_operator_name = 'MSXOperator' ;GO
The sp_add_jobserver system-stored procedure accepts the parameters detailed in Table 3-9.
Table 3-9. sp_add_jobserver Parameters
Parameter | Description |
|---|---|
@job_id | The GUID of the job. If omitted, @job_name must be specified. |
@job_name | The name of the job. If omitted, @job_id must be specified. |
@server_name | The name of the server on which you are registering the job |
We will use the sp_add_jobserver procedure to target our job against the two TSX servers. The procedure has to be executed for every server the job will be targeted against. This is demonstrated in Listing 3-10.
Listing 3-10. Targeting the Job
USE msdbGOEXEC msdb.dbo.sp_add_jobserver@job_name = 'CheckServices', @server_name = 'ESPROD1' ;GOEXEC msdb.dbo.sp_add_jobserver@job_name='CheckServices', @server_name = 'ESPROD2' ;GO
The sp_add_job_step system-stored procedure accepts the parameters detailed in Table 3-10.
Table 3-10. sp_add_jobstep Parameters
Parameter | Description |
|---|---|
@job_id | Specifies the GUID of the job. If omitted, the @job_name parameter must be specified. |
@job_name | Specifies the name of the job. If omitted, the @job_id parameter must be specified. |
@step_id | The sequential ID of the job step within the job. This is used to define the order of the steps. |
@step_name | Specifies a name for the job step |
@subsystem | Specifies the subsystem to use for the job step. Table 3-4 lists the acceptable values. |
@command | The command that should be executed |
@cmdexec_success_code | The success code expected to be returned from the operating system |
@on_success_action | Specifies the action that should be performed if the step succeeds: • 1 indicates Quit With Success • 2 indicates Quit With Failure • 3 indicates Go To Next Step • 4 indicates that the next step to be executed is specified by @on_success_step_id |
@on_success_step_id | The step ID of the next step to be executed if a value of 4 has been passed to @on_success_action |
@on_fail_action | Specifies the action that should be performed if the step fails: • 1 indicates Quit With Success • 2 indicates Quit With Failure • 3 indicates Go To Next Step • 4 indicates that the next step to be executed is specified by @on_success_step_id |
@on_fail_step_id | The step ID of the next step to be executed, if a value of 4 has been passed to @on_fail_action |
@database_name | If the subsystem is T-SQL, specifies the database name in which to execute the command |
@database_user_name | If the subsystem is T-SQL, specifies the database user to use as the security context for executing the command |
@retry_attempts | Specifies how many times the step should be retried in the event of failure |
@retry_interval | Specifies an interval between retries in the event of failure |
@output_file_name | Specifies the fully qualified file name of a file in which the output of the step should be saved |
@flags | Controls the behavior of the step output: • 0 indicates that the output file should be overwritten • 2 indicates that the output should be appended to the output file • 4 indicates that T-SQL job step output should be written to the step history • 8 indicates that the log should be written to a table and overwrite existing entries • 16 indicates that the log should be appended to the log table • 32 indicates that all output should be written to the job history • 64 indicates that a Windows event should be created to use as an abort signal when the subsystem is cmdexec |
@proxy_id | The ID of the proxy that should run the job step |
@proxy_name | The name of the proxy that should run the job step |
We will use the sp_add_jobstep procedure to add our PowerShell job step, by using the script in Listing 3-11.
Listing 3-11. Creating the Job Step
USE msdbGOEXEC msdb.dbo.sp_add_jobstep@job_name = 'CheckServices', @step_name = 'CheckServicesRunning', @step_id = 1, @on_success_action = 1, @on_fail_action = 2, @subsystem = 'PowerShell', @command = ' # Return SQL Server services to a variable,#if they are not running$services = Get-Service | where{$_.Name -like "*SQL*" -and $_.Status -ne "Running" }# If the variable is non-empty, write a list of services# that are not running and force the script to failIF ($services.Length -gt 0){write-warning "Warning! The following Services are not running"foreach ($service in $services){write-warning $service.Name}write-error "Please check services and start as required" -EA stop}', @flags = 32, @proxy_name = 'WinUserProxy' ;GO
The sp_add_jobschedule procedure accepts the parameters detailed in Table 3-11.
Table 3-11. sp_add_jobschedule Parameters
Parameter | Description |
|---|---|
@job_id | The ID of the job to which the schedule will be attached. This must be specified if @job_name is NULL. |
@job_name | The name of the job to which the schedule will be attached. This must be specified if @job_id is NULL. |
@name | Specifies a name for the schedule |
@enabled | Specifies if the schedule should be enabled on creation: • 0 indicates disabled. • 1 indicates enabled |
@freq_type | Specifies the type of schedule to use: • 1 indicates it should run once • 4 indicates it should run daily • 8 indicates weekly • 16 indicates monthly • 32 indicates it should run monthly, relative to @freq_interval and @freq_relative_interval—for example, every first Tuesday of the month • 64 indicates it should run when SQL Server Agent starts • 128 indicates that it should run when the server is idle |
@freq_interval | Specifies when the schedule should run relative to the type of schedule used. Table 3-12 contains details of how to calculate this value. |
@freq_subday_type | Specifies how frequently, within a day, the schedule should run, in relation to the subday interval |
@freq_subday_interval | The frequency, within a day, that the schedule should run. For example, if @frequency_subday is configured as hours and @frequency_subday_interval is configured as 2, the schedule will run every two hours. |
@freq_relative_interval | When a schedule is monthly, relative (32), this parameter is used in conjunction with @freq_interval to calculate the day of the month that it runs: • 1 indicates the first day of the month • 2 indicates the second • 4 indicates the third • 8 indicates the fourth • 16 indicates the last For example, if @freq_type is 32, @freq_relative_interval is 1, and @freq_interval is 4, the schedule runs on the first Tuesday of the month. This is because 1 for @freq_relative_interval implies “the first,” and 4 for @freq_interval implies Tuesday. |
@freq_recurrence_factor | For schedules that run weekly and monthly (relative to frequency interval), this specifies the number of weeks or months between executions. |
@active_start_date | Specifies the date that the job is first scheduled to run |
@active_end_date | Specifies the date that the job stops being scheduled |
@active_start_time | Specifies the time that the job is first scheduled to run |
@active_end_time | Specifies the time that the job stops being scheduled |
@schedule_id | An OUTPUT parameter that returns the ID of the schedule |
Table 3-12 describes how to calculate the value for @frequency_interval, based on the value supplied for @frequency_type.
Table 3-12. @frequency_interval Values
@frequency_type value | Usage of @frequency_interval |
|---|---|
4 | Specifies the number of days that should elapse before the schedule repeats. For example, 5 would mean the schedule runs every five days. |
8 | Specifies the day(s) of the week: • 1 for Sunday • 2 for Monday • 4 for Tuesday • 8 for Wednesday • 16 for Thursday • 32 for Friday • 64 for Saturday The value is a bitmask converted to an int, so if multiple days of the week are required, combine the values with a bitwise OR operator. For example, to run every weekday, the value would be 62. The math here is 2 (Mon) + 4 (Tue) + 8 (Wed) + 16 (Thur) + 32 (Fri) = 62. |
16 | Specifies the day (number) of the month |
32 | Specifies the day of the week: • 1 for Sunday • 2 for Monday • 3 for Tuesday • 4 for Wednesday • 5 for Thursday • 6 for Friday • 7 for Saturday • 8 for day • 9 for weekday • 10 for weekend day |
We will use the sp_add_jobschedule procedure to create our Daily schedule and attach it to our job. The script in Listing 3-12 demonstrates this.
Listing 3-12. Creating the Job Schedule
USE msdbGOEXEC msdb.dbo.sp_add_jobschedule@job_name = 'CheckServices', @name = 'Daily', @enabled = 1, @freq_type = 4, @freq_interval = 1, @freq_subday_type = 1, @freq_subday_interval = 0, @freq_relative_interval = 0, @freq_recurrence_factor = 1, @active_start_date = 20160101, @active_end_date = 99991231, @active_start_time = 0, @active_end_time = 235959 ;GO
Limitations of the PowerShell Job Step
The PowerShell subsystem is very powerful and allows your SQL Server Agent jobs to interact with external resources in a cleaner way than using the cmdexec subsystem . It does have limitations, as compared to using PowerShell interactively, or via scheduling scripts via alternative means.
Firstly, cmdlets such as write-host and write-debug cannot be used. This is because SQL Server Agent uses the SQLPS.exe stub to execute the commands, and this does not use a console. To return information to the job step, you have to use write-output or write-error.
Assemblies are not pre-loaded. Therefore, if you have to use an assembly, such as Microsoft.AnalysisServices or Microsoft.SharePoint.PowerShell, they must be manually loaded.
If your job step uses the sqlps module, a process will be spawned that consumes around 20MB of memory. Therefore, you should limit the number of concurrent jobs that run PowerShell job steps, to avoid performance issues.
Additionally, there is no scripting environment provided. This, combined with the limitations mentioned, means that you should create and test your scripts using the PowerShell ISE before testing them again inside your SQL Server Agent job.
Summary
Central Management Servers allow you to simplify administration, by registering servers, within groups, so that queries can be run or policies evaluated across a number of related servers at the same time. Servers must also be registered to allow an SQL Server Agent multi-server topology to be created.
Multi-server jobs are an important part of your overall automation strategy, as they provide the framework for running SQL Server Agent jobs across the enterprise. Just as with local jobs, a variety of subsystems are available, including T-SQL, operating system commands (cmdexec), SSIS packages (DTS), and PowerShell.
The ability to run PowerShell scripts from an SQL Server Agent job provides great power and flexibility. There are limitations, however, when compared to running PowerShell scripts by other methods. These limitations include the inability to use commands that require a console, such as write-host, and the potential performance implications caused by many concurrent jobs using the sqlps module.