
Chapter 8
Finding Facebook Friends
IN THIS CHAPTER
![]() Understanding what friending someone means
Understanding what friending someone means
![]() Finding friends on Facebook
Finding friends on Facebook
![]() Organizing and controlling your Friend List(s)
Organizing and controlling your Friend List(s)
Hundreds of sayings abound about friendship and friends, and most can be boiled down into one catch-all adage: friends, good; no friends, bad. This is true in life and also true on Facebook. Without your friends on Facebook, you find yourself at some point looking at a blank screen and asking, “Okay, now what?” With friends, you find yourself at some point looking at photos of a high school reunion and asking, “How did that last hour go by so quickly?”
Most of Facebook’s functionality is built around the premise that you have a certain amount of information that you want your friends to see (and maybe some information that you don’t want all your friends to see, but that’s what privacy settings are for). So, if you don’t have friends who are seeing your posts, what’s the point in sharing them? Messages aren’t that useful unless you send them to someone. Photos are made for viewing, but if the access is limited to friends, well, you need to find some friends.
On Facebook, the bulk of friendships are reciprocal, which means if you add someone as a friend, he has to confirm the friendship before it appears on both of your Timelines. If someone adds you as a friend, you can choose between Confirm and Delete Request. If you confirm the friend, Congrats! You have a new friend! And if you don’t, the other person won’t be informed.
If you’re low on friends at the moment, don’t feel as though you’re the last kid picked for the team in middle-school dodge ball. There are many ways to find your friends on Facebook. If your friends haven’t joined Facebook, invite them to join and get them to be your friends on Facebook as well as in real life.
What Is a Facebook Friend?
Good question. In many ways, a Facebook Friend is the same as a real-life friend (although, as the saying goes, “You’re not real friends unless you’re Facebook friends”). These are the people you hang out with, keep in touch with, care about, and want to publicly acknowledge as friends. These aren’t people you meet on Facebook. Rather, they're the people you call on the phone; stop and catch up with if you cross paths at the grocery store; or invite over for parties, dinners, and other social gatherings.
In real life, there are many shades of friendship — think of the differences between acquaintances, a friend from work, an activity buddy, and best friends. Facebook gives you a few tools for negotiating these levels of friendship, which I cover in the “Managing How You Interact with Friends” section of this chapter. But by default, most friendships are lumped into a blanket category of “friend.”
Here are the basics of what it means to be friends with someone on Facebook, though you’ll notice that each of them comes with a few caveats on how it can be adjusted by either person in the friendship.
They can see all the stuff on your Timeline (like your posts and other information) that you have set to be visible to Friends.
Remember, this is what happens by default. You can control which friends can see which posts more specifically by learning about your privacy options (which you can do in Chapter 6), and about Friend Lists, which I go over later in this chapter.
They see new posts you create in their News Feeds on their Home pages.
Again, the information your friends see in their News Feed depends on the audience you’ve chosen to share each post with. It may also depend on your friends' News Feed settings.
You can see their posts and other information on their Timelines.
This, of course, depends on their own privacy settings, but in general, you’ll be able to see more as a friend than you did before you became friends.
You see new posts from them in your News Feed on your Home page.
This depends on your friend’s sharing settings, but more importantly, you can control whose posts you see in your News Feed by managing your own News Feed settings and preferences. See Chapter 4 for more information on News Feed settings.
You’ll be listed as friends on one another’s Timeline.
This is a small detail, but it’s important in understanding the difference between becoming friends with someone and simply following someone. Lots of people, especially public figures or people who have a business of some sort, allow you to subscribe to their posts without becoming friends. In these cases, you see their posts in your News Feed, but they won’t see your posts unless they choose to subscribe to you.
Adding Friends
Over time, Facebook has created some unique lingo. One of the most important Facebook terms is the verb “to friend.” Friending is the act of adding someone as a friend. You may overhear people use this casually in conversation: “You won’t believe who finally friended me!” And now, you too, will be friending people.
Sending Friend Requests
Now that you know what a friend is, it’s time to send some requests, and maybe even accept some pending ones. For the purposes of this example, I searched for the Timeline of Amy Karasavas using the search box in the blue bar on top. I cover using Search to find friends later in this chapter, so for now just remember that as you type, Facebook tries to auto-complete what you're looking for, meaning search results will appear below the search box as you type, as shown in Figure 8-1.

FIGURE 8-1: The search results for Amy Karasavas.
Click the name of the person you think you want to add. You will see a page with search results for that person’s name. When you locate the correct person, click the gray Add Friend button to the right of their search result to send your friend request. Another option is to click the person’s name to go to her Timeline. Within her cover photo, toward the bottom, is a gray Add Friend button. Click this button to send your request. There may also be a green Add Friend button below her cover photo that you can click to send a request. You can see both buttons in Figure 8-2. No matter which method you use, when she accepts the request, you’ll become friends.

FIGURE 8-2: A Timeline before I become a friend.
If you decide after the request is sent that you in fact did not want to send it, navigate back to her Timeline and locate the Friend Request Sent button (previously the Add Friend button). Click it to open a menu and choose Cancel Request from the menu. Click Cancel Request again in the pop-up window and presto, it’s like the request never happened.
 Depending on people’s settings, you might not see an Add Friend button. If you can’t send a friend request, you can usually send the person a message or follow her public posts without becoming friends first.
 You won’t be friends with someone until she confirms your Friend Request. After she confirms, you’re notified by a red flag appearing above the Friend Requests icon in the blue bar on top.
So what does your potential friend see after you send a request? That is a brilliant segue into the next topic, accepting Friend Requests.
Accepting Friend Requests
When you receive a new request, a little red flag appears over the Friend Requests icon in the blue bar on top of each page. You may also be notified in your email or on your phone. Figure 8-3 shows an example. The number in the red flag indicates how many Friend Requests are waiting for you.

FIGURE 8-3: Someone wants to be your friend!
Clicking this icon opens the Friend Requests menu, as shown in Figure 8-4.
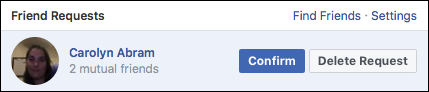
FIGURE 8-4: Click Confirm or Delete Request.
To accept the Friend Request, click the Confirm button. You now have a friend. To reject the request, click Delete Request. When you click Delete Request, you will have the option to mark that request as Spam if you suspect it’s from a fake profile.
Some people worry about clicking that Delete Request button. If you’re not sure what you want to do, you can always leave the request untouched. But never hesitate to click Delete Request for someone you really just don’t want to be friends with. Facebook won’t notify her that you ignored her request.
Choose your friends wisely
Generally, you send Friend Requests to and confirm Friend Requests only from people you actually know. If you don’t know them — random Friend Requests — click Delete Request. Accepting a Friend Request from unknown people has a tendency to ruin the Facebook experience — it puts random content in your News Feed, exposes your own content to people you don’t know, and is generally a bad practice. Remember the lecture you got about choosing good friends when you were in high school? It’s every bit as true now.
If there are people you don’t know personally but find interesting (such as a celebrity or public figure), you may be able to subscribe to their posts without becoming friends with them (more on that in the “Following” section near the end of this chapter). If that’s not a possibility, you could add them as friends and then add them to your Acquaintances or Restricted Friend List, if you use these lists to control your privacy.
It’s quality, not quantity
Another common misconception about Facebook is that it’s all about the race to get the most friends. This is very, very wrong. Between the News Feed and privacy implications of friendship, aim to keep your Friend List to the people you actually care about. Now, the number of people you care about — including the people you care about the most and those you care about least — may be large or small. It doesn’t matter how big or small your list is as long as the people you care about most are on it. In fact, one of the reasons for the Friend List management tools that I cover in this chapter is because, over time, people’s Friend Lists tend to bloat.
As you change jobs or cities or start a new hobby, you add more and more friends, but that doesn’t displace the fact that you care about friends from your past. The Friend List management tools aim to help you keep track of the people you care about most, and not get distracted by the more distant friends.
If looking at the number of Friends in the Friends box on your Timeline gets you down, you can always choose to hide that number from other people in your privacy settings. See Chapter 6 for details.
Finding Your Friends on Facebook
How do you get to the people you want to be your friends? Facebook is big, and if you’re looking for your friend John, you may need to provide some more detail. Facebook has a couple of tools that show you people you may know and want as your friends, as well as a search-by-name functionality for finding specific people.
Import your friends
If you’re someone who uses email to communicate with your friends and family, an easy list of people you’d probably want to add as Facebook friends already exists — your email address book. Facebook has a tool, which I refer to as Friend Finder, that matches email addresses from your email address book to people’s Timelines on Facebook. Because each email address can be associated with only one Facebook account, you can count on such matches finding the right people.
With your permission, when you import your address book, Facebook also invites people who don’t have a Facebook account but whose email addresses match those in your address book to join Facebook. Sending invites this way causes Friend Requests to automatically be sent to those people. If they join based on an invite you send, they find a Friend Request from you waiting when they join.
To add your email contacts, you need to give Facebook your email address and email password. Facebook doesn’t store this information. It just uses the information to retrieve your contacts list that one time.
Chances are that you came across the opportunity to add your personal contacts when you first set up your account. The following steps make several assumptions — namely, that you use web-based email (Hotmail, Yahoo! Mail, and so on), that you haven’t already imported your contacts, and that the address book for the email has a bunch of your friends in it.
Here's how to add your email contacts to your Friend List:
Click the Friends icon on the blue bar on top.
The Friend Request menu opens.
At the top-right corner of the menu, click the Find Friends link.
Figure 8-5 shows the Add Personal Contacts section of the Find Friends page. It’s usually on the right side of the page.
Select the email or instant message service you use by clicking its icon.
Some examples are Outlook.com, Hotmail, Gmail, AOL, or Yahoo! Mail.
- Enter your email address in the Your Email field.
Enter your email password (not your Facebook password) in the Email Password box and then click Find Friends.
These instructions are meant for first-time users of the Friend Finder. If you’ve used it before, or if you’re currently logged in to your webmail client, you may see some fields prefilled or additional pop-up prompts asking you for your permission to send information to Facebook. Don’t worry if what you see on the screen doesn’t match the figures here at the beginning.If Facebook finds matches with the emails in your address book, you see a list of people Facebook thinks you might know.
Click the check box to the right of anyone’s name and photo to add him as a friend.
Everyone you select receives a Friend Request from you.
After you click either Add as Friends or Skip, you land on the Invite Friends portion of Friend Finder. Here you find a list of contact names and email addresses. These emails or phone numbers are those that don’t have matches on Facebook.
(Optional) Invite people to join Facebook and become your friends.
Any of your contacts who have not yet joined Facebook can be invited to join. If they do join, when they sign up they will receive a friend request from you. By default, all the contacts on your list are selected. You can:
- Invite all these contacts: Make sure the Select All/None box is checked and click Send Invites.
- Invite none of these contacts: Make sure the Select All/None box is unchecked and click Skip.
- Invite some of these contacts: Uncheck the Select All/None box and then use the check boxes to the left of their email addresses to choose which ones you want to invite to join Facebook. Selected check box = invite sent; deselected check box = no invite sent.
After you make your selections, click Send Invites or Invite to Join. If you don’t want to send any invitations, click Skip.

FIGURE 8-5: An unfilled Friend Finder.
After taking these steps, I hope you manage to send at least a few Friend Requests. Don’t be shy about adding people you know and want to keep up with; it’s not considered rude to add people as your friends. Your friends need to confirm your requests before you officially become friends on Facebook, so you may not be able to see your friends’ Timelines until those confirmations happen.
If the whole experience yielded nothing — no friends you wanted to add, no contacts you wanted to invite — you have a few options. You can go through these steps again with different email addresses. You should probably use any email address that you use for personal emails (from where you email your friends and family). If that’s not the problem, you have more ways to find friends.
People you may know
After you have a friend or two, Facebook can start making pretty good guesses about other people who may be your friends. Facebook primarily does this by looking at people with whom you have friends or networks in common. In the People You May Know box, you see a list of people Facebook thinks you may know and, therefore, may want as friends. People You May Know boxes appear all over the site — on the Find Friends page, on your Home page, and sometimes on your Timeline. Usually the boxes include a list of names, profile pictures, and some sort of info like how many mutual friends you have or where the other person attended school. These little tidbits are meant to provide context about how you might know that person.
Anytime you find yourself looking at the People You May Know list and you do, in fact, know someone on the list, simply add that person as a friend by clicking the Add Friend button. If you’re not sure, you can click a name or picture to go to that person’s Timeline and gather more evidence about if and how you know that person. Then you can decide whether to add that person as a friend. If you’re sure you don’t know someone, or if you do know someone but are sure you don’t want that person as your Facebook friend, mouse over the person’s picture and click the X that appears in the upper-right corner. After you do that, she stops appearing in your People You May Know list. As you remove people from the list, more pop up to take their places. This fun can last for hours.
Find classmates, co-workers, neighbors, and mutual friends
Especially when you are just getting started on Facebook, it can be helpful to look for large groups of people you might want to become friends with. A common assumption is that you are likely to be friends with your friends’ friends, as well as with people you’ve gone to school with and worked with over the years. To find these people, use the Search for Friends box, located beneath the Add Personal Contacts box on the right side of the Find Friends page.
The Search for Friends box, shown in Figure 8-6, lets you isolate potential friends along a variety of criteria. You can mix and match these criteria or just use one at a time.
- Name: You can search for an individual by entering their name into the Search for Someone box.
- Mutual Friend: You can browse for friends by looking at your existing friends’ friends. Facebook displays the names of three friends, and you can view their friends by selecting the check box next to their name. You can also enter a friend’s name into the Enter Another Name box in order to add him to this list. One good way to home in on the people you most likely want to be friends with is to select at least two names from your Mutual Friend List. If two (or three, or four …) of your friends are friends with the same person, the chances are even greater that you want that person to be your friend.
- Hometown: If you’ve previously listed your hometown on your Timeline, you can select it here to view people with the same hometown. If you haven’t, or if you have another city you consider a hometown, you can enter a city name into the Enter Another City box to view potential friends from the old stomping grounds.
- Current City: If you’ve previously listed your current city on your Timeline, you can select it here to view other people who live there. If you haven’t, or if you have another place you consider to be where you really live, you can enter a city name into the Enter Another City box to view potential friends from the current stomping grounds.
- High School: If you’ve previously listed any high schools you attended on your Timeline, you can select them here to view other people who went there. You can also use the Enter a High School box to enter a high school name and look for people who went there.
- College or University: Any colleges you listed as having attended appear here. Select any of them to see people who went there as well, or enter a college name into the text box to search for people who went there.
- Employer: Any employers you’ve listed on your Timeline appear here. Click the check boxes to select or use the text field to search for a different employer.
- Graduate School: If you’ve listed a graduate school you attended on your profile, you can click here to select it. You can also enter any school’s name into the text field to see people who went there.

FIGURE 8-6: Use the check boxes to find your friends.
When you select more than one check box, it actually shows you fewer people because now Facebook is looking for people who both worked at Mom’s Pizza and went to Hamilton High School. To find more people, select only one check box at a time.
Find what you’re looking for: Search
When you’re just starting on Facebook, you want to find everyone you know as quickly as possible and build out your Friend List. After you build it, though, what if you find other people who may want to be your friends? Facebook Search offers you the capability to seek out certain friends by name.
 The search box in the blue bar on top lets you search a whole lot of things on Facebook: Pages, Groups, Events, even things your friends have posted. But most of the time, you use it to search for people. It may be people you're already friends with and you just want to go to their Timelines. Sometimes it will be people you aren’t friends with yet but whom you want to reach out to.
Basic Search can be a little confusing because Facebook autocompletes the names that you type and assumes you’re trying to get to your friends’ Timelines. If you’re the type of person who is used to pressing the Enter key to begin a search, this can lead you to friends’ Timelines when you meant to search for someone else named Waldo.
You’ll wind up using Search two basic ways. The first way is if the name of the person you’re looking for (or at least someone with the same name) appears in the autocomplete menu. You can accomplish that sort of search following these steps:
Begin typing the name you're looking for in the search box.
Pay attention to the people who appear in the autocomplete menu. Facebook displays first your friends and then friends of friends. There’s a good chance that you may find the person you’re looking for in this menu.
- If you see the name in the autocomplete menu, use your mouse or arrow keys to highlight the person you're looking for.
Click the name or press Enter.
This brings you to the person's Timeline, where you can verify that you know the person and add him as a friend.
If you don’t see the person you’re looking for, don’t despair; you can get more results by typing the person’s full name into the search box and selecting “See all results for <person’s name> at the bottom of the auto-complete menu. This brings you to a search results page, where you can see all matches for the name you just searched for.
If you know you have the right name but there are too many search results, try going to the Find Friends page and using the Name field in the Search for Friends box. When you get the results, you will then be able to add more details like where that person is from or where they went to school to help you find your friend.
Managing How You Interact with Friends
After you do all the work of finding and adding your friends, at some point, you may find that things are feeling a little out of control. Chances are you may be seeing posts from someone you find uninteresting; you might not be sure who, exactly, can see your own posts anymore; or you may just want to tidy up your Friend List. At this point, it’s a good idea to get acquainted with the way Facebook automatically helps you end the madness, as well as some of the specific actions you can take.
Friend Lists
Friend Lists are subsets of your master list of friends. Friend Lists are a way of organizing your friends into lists to make your Facebook experience even easier and more personalized to you and your types of friends. Organizing your friends into lists allows you to share different types of information with different sets of friends. For example, your best friends may get to see your party photos while your family may get to see your wedding photos. This is a custom privacy setting you can use all over Facebook.
Pre-fab lists
Facebook creates three lists for you when you join that you can choose to add people to:
- Close Friends: You can add your best friends to your Close Friends list. Adding them to this list signifies to Facebook that you want to see a lot more of them in your News Feed. You can then select this list as a custom privacy setting when you are posting something to Facebook.
- Acquaintances: The opposite of the Close Friends list. This list is meant to be a place where you can cordon off the people you don’t know as well. They may be perfectly nice people, but they aren’t necessarily the people you want to share everything with. Anyone you add to this list won’t appear as often in your News Feed.
- Restricted: This list is for people you want to add as friends but don’t want to see posts that are visible to friends. In other words, people on this list only see posts that you choose to make public.
By default, these lists will be empty. In other words, Facebook creates lists that get special treatment for certain parts of Facebook, but it’s up to you to let Facebook know who belongs on any of them. To learn how to add and remove people from these lists, you can skip ahead to the “Managing lists” section.
Smart Lists
Smart Lists are the lists that Facebook both creates and populates on your behalf. These lists are created automatically based on shared characteristics of your friends. Here are some common Smart Lists:
- Family: Based on information you've entered about your family, they may show up on this Smart List.
- <Your High School>: If you’ve caught up with a lot of old friends on Facebook, a Smart List might be created so you can post photos from the reunion or share memories just with them.
- <Your college/university/workplace>: Similar to a high school list, depending on the information your friends have listed on their profiles, additional Smart Lists may be created for these groups. For example, I have Smart Lists for Boston University (where I was an undergraduate) and Facebook (where I used to work).
- <Your current/former city> area: Depending on the info you and your friends have listed on their profiles, Facebook creates a list of people who live in or near your current city.
You can change the radius on a location-based list. Click Friend Lists from the Explore section of the left-side menu on your Home page and select the list you’d like to adjust. From that list’s page, click the Manage List button and then select Edit Radius from the menu that opens. You will be able to change the radius of who is included from as small as 5 miles to as large as 200 miles.
Facebook is smart, but it’s not perfect. Although these lists will be mostly accurate, you may find that you have to edit them. The accuracy of the lists may also depend on how you want to use your lists. For example, you may want your Family list to make it easy to share with just your immediate family and, therefore, need to remove the more distant members. Or you want it to be a giant family reunion all the time, in which case, you need to add some of the third and fourth cousins once removed to the mix.
Creating your own Friend Lists
Smart Lists can help you figure out whom you want to share your own posts with. But sometimes you may want a specific list that Facebook can’t figure out. This might be a sub-sub-group, like all the people who belong to your book club. In these cases, you can create your own list.
To create a Friend List, follow these steps:
From the Home page, click on Friend Lists under the Explore section of the left-side menu.
This brings you the Friend Lists page, which displays every list of your friends, both Smart Lists and lists you’ve created yourself.
Click the Create List button at the top of the page.
The Create New List window appears, as shown in Figure 8-7.
In the List Name box, type the name of your list.
Maybe something like Study Group for your Calculus class.
Add friends who belong on this list by typing their names in the Members box.
Facebook autocompletes as you type. Press Enter when you highlight the correct friend’s name.
Click Create.
Now, wherever Friend Lists appear on Facebook, including where you set privacy for posts, you have access to the new list you just created.

FIGURE 8-7: Creating a Friend List.
Friend Lists you create are private, so even if the list you’re messaging is known in your mind as Annoying Co-Workers, all that your annoying co-workers see is a list of names. Members of Smart Lists are able to see the name of a list they’ve been added to.
Managing lists
Regardless of the type of list, adding and removing people from a list follows the same steps:
Click Friend Lists in the left-side menu.
The Friend Lists page appears.
Click on the list you want to manage.
For example, clicking on Close Friends opens the Close Friends page. If you already have friends on this list, you will see a feed of stories only from friends on this list. If you don’t have any friends on this list yet, you’ll see a big blank space where a feed would normally appear. On the right side of the page is an On This List box, shown in Figure 8-8.
To add people to a list, enter their names in the text box in the On This List section.
Facebook autocompletes as you type. Select your friends' names when you see them.

FIGURE 8-8: Adding people to a list.
To remove people from a list (starting from the list’s page), follow these steps.
- Click the Manage List button in the upper-right corner of the list’s page.
Choose Edit List from the menu.
A pop-up window displays the names and pictures of all members of the list.
Hover over the person you want to remove.
A small X appears in the upper-right corner of the person's picture.
- Click the X.
- Repeat Steps 3 and 4 for each person you want to remove.
- Click the Finish button when you’re done.
Updating lists on the go
After you create and start using your lists, you can continuously add people to them at the same time you add them as friends.
When you’re the one sending a Friend Request, follow these steps to also add the person to a particular Friend List:
From his Timeline, after you’ve added him as a friend, click the Friend Request Sent button.
A menu appears asking you if you want to add that person to any of your Friend Lists. By default, your most commonly used lists will appear at the top.
Click the list you want to add your friend to.
You may need to select Add to Another List to see your full menu of lists.
If you’re the one receiving the Friend Request, you can follow these steps to add someone to a list as you accept the request:
From the Friend Request menu, click Confirm.
This adds the person as a friend. The blue Confirm button changes to a gray Friends button.
Click the Friends button that appears.
A drop-down menu with options related to becoming this person’s friend appears.
If you don’t see the list you want, click Add to Another List.
You can check off as many lists as you want. For example, if someone is a member of your family and they also live in your current town, you may want them on both lists.
If you realize you don’t currently have a fitting list for this person, click +New List at the bottom of the menu and create a list right on the spot.
If at any point you remember, Hey, I meant to add So-and-So to the Book Club list, simply visit that person’s Timeline and click the button that says Friends at the lower right of the cover photo. The menu covered in the preceding steps appears, which you can use to add So-and-So to the right list.
Deleting lists
You can delete lists you create that you no longer use (for example, a list of ex-coworkers). To do so, follow these steps:
- Click Friend Lists from the Explore section of the left-side menu of your Home page.
- Hover your mouse over the list you want to delete and click the gear icon that appears in the upper-right corner.
- Choose Delete List from the drop-down menu that appears.
- A pop-up window confirms that you want to delete the list and reminds you that past posts available to this list will remain visible to those people.
- Click Delete List to confirm.
You can’t delete Smart Lists, but you can archive them by following the preceding steps and clicking Archive List. This way, the list no longer appears in your privacy settings menu. You won’t be able to archive or delete a Pre-Fab list, but you can remove all of the people you added to that list so it’s empty.
Groups
Groups are, in many ways, a more public version of Friend Lists. Instead of your friends not knowing which list they’re on, friends are always notified when they're added to a group. Depending on the group’s privacy settings, they may be able to add their friends to the group if they think the information shared there is relevant to them. Groups are extremely useful for sharing information that only a specific group of people might care about. For example, a funny video from a family gathering that perhaps only members of your crazy family will understand is a good candidate to be shared in a family group. We cover Groups in great detail in Chapter 10.
News Feed options
In addition to News Feed views, you can use News Feed options to help you control which friends’ posts you see when you log in to Facebook. For example, if one of your friends changes her profile picture back and forth between two photos all week long, it might start to clutter up your News Feed. Chapter 4 covers controlling your News Feed and which posts you see from which people in great detail.
Following
Following is a way of saying you really really want to see someone’s posts. On some social media sites, following is the primary way of interacting with other people. On Facebook, following is baked into friending someone or liking a Page. However, you can follow someone you are not friends with. In fact, by default when you add a friend, you follow them, even before they’ve accepted your friend request. The catch here is that following someone without becoming their friend means you only see their public posts in your News Feed.
Certain people (often public figures) allow people to follow their public posts without requesting friendship. Following someone is as easy as — actually, it’s easier than — adding someone as a friend. Navigate to that person’s Timeline and click the Follow button at the bottom right of their cover photo. To unfollow her, click that same button (it now says Following) to open a menu of options. Select the Unfollow option (the last item on the menu).
If you’re someone who plans on posting lots of public updates or are a public figure (locally or nationally), you can allow people to follow you instead of becoming your friend (they’ll also be able to add you as a friend, but you won’t have to accept their requests for them to see your posts). Follow these steps to allow people to follow you:
Click the Account Menu (down arrow) in the upper-right corner of the blue bar on top.
A menu of options appears.
Select the Settings option.
The Settings page appears, which has a menu running down the left-hand side.
Select Public Posts from the left menu.
The Public Posts Settings page appears.
Use the privacy menu in the Who Can Follow Me section to determine who can follow you.
You can toggle between Public and Friends. If you choose Public, congrats! People can now follow your public posts. Once you opt into this feature, more settings appear on the page. These settings allow you to specify how followers can find and interact with your Timeline. This is also where you can connect a Twitter account so your tweets will also be imported to Facebook.
Unfriending
It happens to everyone: After a while, you start to feel like a few people are cluttering up Facebook for you. Maybe you feel like you have too many friends, or maybe you and a friend have drifted apart. Don’t worry; Facebook friendships are not set in stone. You can unfriend just like you friend people.
To unfriend someone, do the following:
- Go to the person's Timeline.
Click the Friends button.
A menu appears that is for assigning people to Friend Lists. The last item in this list is Unfriend.
Click the Unfriend link.
Take a moment of silence. Okay, that was long enough.
People aren’t notified when you unfriend them, but people who care about you (that is, family, close friends) have a tendency to notice on their own that, hey, you’re not in their list of friends anymore. This can sometimes lead to awkwardness, so it might be worth using your privacy settings to further limit these people’s knowledge of your life before you unfriend them.
Lots of people go through periodic friend-cleaning. For example, after changing jobs or moving, you may notice that you want to keep in touch with some people from that chapter in your life; others, you just don’t. Unfriend away.