

A motion path is a drawing of the shape of the movement that you would like the symbol you are animating to take. You can draw these on guide layers in Flash. Guide layers can also be used to add lines and shapes that you are only using for layout and reference purposes. When you render your final movie, you won't see anything that has been created on a guide layer.
1 Draw a shape that you would like to animate and turn it into a graphic symbol. Make sure that it is on it's own layer. Create a second keyframe in frame 30 and create some motion tweening between these 2 frames. You need to do this so that you have more than one keyframe to place on your motion path.

Two Motion Tweened Keyframes
2 Now to create a motion path. Make sure the layer you want to effect is selected. Select Insert > Timeline > Motion Guide or more simply click on the Add Motion Guide icon at the bottom of the timeline. This will create a new layer called Guide: (name of layer effected). The layer underneath, which will be effected by the motion guide, should be indented.
3 A guide layer won't show up in your final movie. You could also use it to write little notes and reminders to yourself or your co-workers while you are working.
4 Click on guide layer's name to make it active. Select the Pencil tool and the Smooth modifier. Draw a curved path on frame 1. If it is not smooth enough, double click on the path (using the Arrow tool), then click on the Smooth modifier again and again until you achieve the desired result. You can draw a motion path with the pencil or pen tools.

Motion Guide that we Want to be the Flight Path of the Bird
5 Your motion guide layer should have been automatically extended to a length of 30 frames. If for some reason it hasn't, insert blank frames to extend it, by selecting the frames up to frame 30 and then Insert > Timeline > Frame or F5.
6 Turn on snap in the properties inspector. Then, making sure that you are in frame 1, drag your character/shape by its center point until it snaps to the starting point of the path you just drew.

The Center Point of the Bird Symbol Snapping to the Motion Path
7 Go to frame 30 and drag to the end of the motion path as above. Check that in frames 5 and 25 your object is also snapping to your path.

The Visibility of the Guide Layer is Turned Off, but Onion Skinning Shows that the Bird Symbol is now Following the Motion Path
8 Once everything is working for you, click the eye icon to the right of the Motion Path layer and select Hidden.
9 Save and press ENTER to preview.
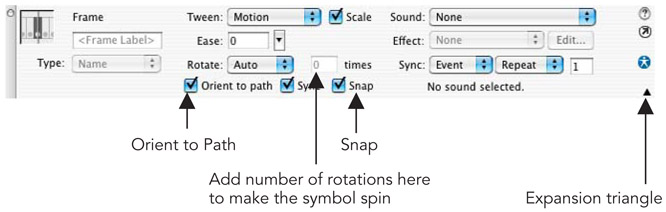
Frame Properties Inspector
10 In order to change the symbol's orientation as it progresses along the path, access the Properties Inspector by clicking in between two keyframes on the timeline. This is now showing you the frame properties with different options for tweening.
11 Now select orient to path. You might need to expand your Properties Inspector view in order to see this option. You can do this by clicking on the small downward pointing triangle in the bottom right hand corner of this panel.

The Same Bird Example with Onion Skin Outline and Orient to Path Applied
12 You could also opt to have your symbol rotating by selecting Rotate > CW (Clockwise) or (CCW) Counter Clockwise and specifying the number of rotations.
Easing
1 When you motion tween between two keyframes, the changes that take place happen at a constant speed. In the real physical world, however, changes don't take place at a constant speed. If you were to kick a football, the initial force of the kick would mean that the ball would start off moving fast and then as friction, gravity etc acted on it, it would start to slow down. Flash can enable you to add a certain amount of acceleration and deceleration to tweens. This is done through easing.
2 Click in between two keyframes on the timeline and then look at your frame Properties Inspector. One of the options is called easing. This controls the amount of acceleration or deceleration in the changes between two keyframes. If you drag the slider down to get a negative number – this adds acceleration. Moving the slider up to get a positive number adds deceleration.
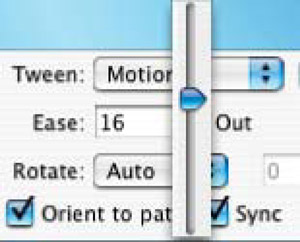
Easing in the Properties Inspector
Shape Tweening
So far we have looked at animating symbols with motion tweening so that the software creates the ‘inbetweens’ for you. Flash can also transform one drawing or graphic shape into another and create the ‘inbetweens’ that describe the changes from the first drawing to the second. This process is called shape tweening. You do not use symbols when you are shape tweening.
First off, the basics:
1 Start a new file. Draw a circle on frame 1. Insert a blank keyframe into frame 30.
2 Turn on onion skinning so that you can see where the circle you just drew was positioned.
3 Select the rectangle tool. Change the fill color, stroke color and line style and draw a rectangle roughly over the position of the circle. Turn off onion skinning.

Draw a Rectangle in one Keyframe and a Circle in Another. Use Onion Skinning to Align Their Positions
4 On the timeline, click on the frames that are in between the 2 keyframes you just created so that you can see the frame Properties Inspector. Select Shape from the Tween menu.
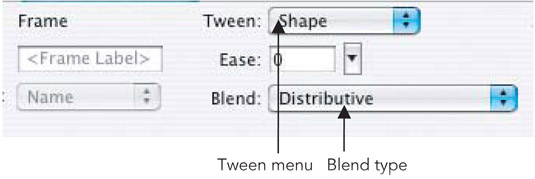
Frame Properties Inspector
5 Note that in the Properties Inspector panel you can apply easing to a shape tween just as you can to a motion tween. This will allow you to have more of the starting or ending shape shown. Blend refers to how the morphing will be applied: distributive emphasizes curves and angular emphasizes angles.

A Successful Shape Tween
6 The frames that you clicked in on the Timeline should now be green and there should be an arrow from keyframe to keyframe. This indicates that your tween has worked with no problems.

An Unsuccessful Shape Tween
7 If you have a dotted line between the 2 keyframes, this indicates that something has gone wrong with your tween. The most common reasons are that you tried to shape tween (a) a symbol, (b) a group or (c) editable text (more on how to shape tween text next). None of these will work.
8 Press ENTER to preview.
Now let's look at shape tweening text and how to control a shape tween. This doesn't work with standard editable text. You have to break the text apart first. As the software is creating the ‘inbetweens’ for you, the results may be unpredictable. However, you do have a certain amount of control over this process through the use of easing, blend type and shape hints.
1 Type your name onto a new layer with a size of 72 points.
2 Insert a keyframe on frame 30. Change the font that is used on this keyframe.
3 Shape tweening doesn't work for standard text so you have to turn them into editable vectors by selecting them and then Modify > Break Apart or CMND/CTRL + B. You have to do this twice and the second time you are changing the letters from editable text into a vector graphic.

The First Time You Select Break Apart you are Ungrouping the Letters

The Second Time You Select Break Apart the Letters Become Graphic Objects
4 Make sure that the text is also broken apart in the other keyframe. Select the frames between the keyframes and select shape for the tweening type from the frame panel.
5 Save and press ENTER to preview.

The Result May Look Quite Strange in the Middle
6 Flash may need more information about which points in the letters correspond to the same points in the second style of letters. Shape hints can rectify the tween.

Adding Shape Hints
7 Look at the animation carefully and work out in which places Flash becomes confused. In frame 1 select the required letter and Modify > Shape > Add Shape Hint. You may have to zoom out to find it and then zoom in again to place it accurately.
8 Go to frame 30 and move the shape hint to the corresponding place on the letter.
9 Keep saving, previewing and adding more shape hints until you achieve a smooth morph from one letter to another. Unfortunately, sometimes shape hints don't untangle your shape, so don't be disappointed if it doesn't work as expected.
Note: Shape tweening is an entirely different process to motion tweening.
Motion tweening refers to an original symbol. The copies or instances that you are working with have a relationship with the original.
On the other hand, shape tweening is the process whereby one image turns into another entirely unrelated image. To create a shape tween, therefore, you do not use symbols, because you are not simply modifying an original but morphing it into something totally new.
Shape tweening can be useful for animating gradients and for changing one facial expression into another.
Animated Highlights
Creating masks allows you to mask out areas of the screen. When you create a mask layer it hides part of the layer underneath. Your mask can be animated. You could use a mask layer to give the impression of looking through a keyhole or through a pair of binoculars. Beware though, spotlight effects are seen by some as a Flash cliché.
In this example, we will create an animated gradient and then put a mask in the shape of a word over it. This will give the impression that light is moving across the text.
1 First, create the text that the effect will show through.
2 Select the text tool, click somewhere on the stage, and type < FLASH > or another word of your choice. Use a big, bold, chunky font so that the text looks dramatic and clearly seen. Don't spend time trying to perfect the color of your text, as it will be used as a mask later, and you won't be able to see its color.
3 This should be the top layer as it will be masking the layer underneath. Name this layer < text mask >.
4 Next to create the effect which will be showing through your text. Insert a new layer. Drag this new layer underneath the layer you just created the mask on. Name this new layer <gradient>.
Animating Gradients
5 Select the Rectangle tool, make sure that there will be no outline on it by clicking in the Stroke Color Control and clicking the white box with a red line through it. Draw the rectangle so that it stretches off screen. Then click the rectangle you just made and open the Color Mixer panel. If you can't see it, choose Window > Design Panels > Color Mixer.
6 Select Linear from the Fill Style drop down menu. Make a linear gradient that goes from gray to white to gray, dragging in the two outer tabs to make the white portion narrow compared to the rest of the gradient.

Create a Narrow Gradient for the Rectangle
7 First making sure now that your rectangle is not selected, choose the Transform Fill tool to rotate the ‘glint’ to a 45° angle. You might need to choose a magnification of 50% or even 25% in order to see the Transform Fill handles, which you use to rotate and re-scale fills with.


Drag the Gradient Fill to the Left
8 Next drag the gradient fill all the way to the left so that the central white stripe is at the back to the left-hand side of the text.
9 We want to make it look as if the effect is moving across the text, which will stay stationary. Make a keyframe on the gradient layer at frame 30 and use the Transform Fill tool again to drag the gradient over to the right hand side. Next choose shape tween from the Properties Inspector so that the gradient moves from one side of the stage to the other.

Drag the Gradient Fill to the Right
10 Select frame 30 of the text layer and insert frame so that the text layer exists for the same amount of frames as the rectangle. This will make sure that the text stays on the stage while the effect rolls along.
Mask Layers
11 Make sure your gradient layer is beneath your mask layer. Making sure that the mask layer is the active layer CTRL/RIGHT-CLICK on the text layer and choose Mask from the pop up. Your text should now be filled by the rectangle that you made.
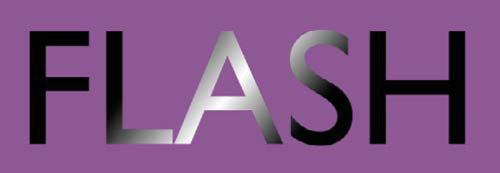
The Highlight Travels Across the Text
12 Press ENTER to preview – the highlight should travel across the text.
13 Both layers are now locked. If you want to remove the masking, unlock the layer and CTRL/RIGHT-CLICK on the text layer and choose Mask from the pop up a second time.
14 Be creative and experiment with this basic idea, for example, import a bitmap and animate it moving behind some text, fade the ‘gleam’ in and out, create an animation which shows through some text.
15 You can soften the edge of the mask with the use of gradients. The mask itself can also be animated. Horizontal stripes and circles can be used to get the effect of film transitions. Finally, masks can apply to more than one layer if these are indented underneath the mask layer.