
Chapter 6. Putting Python Projects Online

With a connection to the Internet and the slew of GPIO pins available to you, the BeagleBone makes a fantastic platform for building Internet of Things projects. That is, physical projects that interact with the Internet in some way. It could be as basic as sending email alerts when a physical thing happens, sending sensor data to the cloud, or even controlling a robot via a web-based interface.
In the project at the end of Chapter 2, I mention that you can change your router settings so that you can use SSH to switch the light or change its timing settings from wherever you are in the world. While using SSH to log into your BeagleBone may raise your geek cred, it’s not an elegant solution for Internet-connected projects. What if your less tech-savvy house mates want to make changes to the settings? Hopefully you don’t expect them to fire up a terminal and edit the BeagleBone’s crontab file.
In this chapter, I’ll show you a few ways to make an elegant interface to Internet-connected projects. You’ll start off by setting up email notifications for physical events. Then you’ll get into setting up a web server with Python so that you can have a web-based interface for reading the status of the pins. Finally, you’ll set up a simple data log that can be accessed from the Web.
Sending an Email Alert
Let’s say the kids in your family have a tendency to leave the back door open and you’d like to get an email alert any time the door has been left open for more than a minute. Using Adafruit’s BeagleBone IO Python Library (Installing Adafruit’s BeagleBone IO Python Library) along with Python’s built-in email libraries, you can achieve this without a lot of code. Before I jump into how to connect these two resources together with code, I want to explain a Python fundamental, the function.
A function is a way of encapsulating a block of code meant to accomplish a single task. For instance, there are a few lines of code involved in reading a temperature sensor and printing its value in degrees Fahrenheit. You can write all that code in a function called printTemperatureInF() so that you can execute that code in just one command. You can also create a function that takes an input value in Celsius and outputs the converted value in Fahrenheit. Inputs to a function are called parameters and outputs are called return values.
Since there will be a few lines of code needed in order to connect to our mail server and send the email, we may want to encapsulate that code into its own function. If our project expands to alert us to other events, such as if the dog’s water bowl is low, we don’t have to have two different sets of code in order to take care of connecting to the mail server and sending the message. In other words, it’s like we’re saying to Python, “Here’s how to send me an email.” And then when we need to, we can say to Python, “OK, send me an email with the subject line ‘Alert!’ and the body ‘The back door is still open!’”
Functions in Python
You may not have known it, but you were already using functions in Chapter 5. They were all part of Python’s basic set of functions or in Adafruit’s BeagleBone IO Python Library. For instance, the line of code GPIO.setup("P8_12", GPIO.OUT) calls a function written by Adafruit to make it easy to set pin 12 on header P8 as an output pin. There are a few steps involved in setting the mode of a GPIO pin and therefore a few lines of code. Adafruit’s library makes it easy for us to do it in just one line of code. Writing your own function is actually pretty easy as seen in Example 6-1.

Define a function called
greetthat takes an input calledname.
Print a greeting message to the console with the value of
name.
Call the function with the name “Andrew”.
When you put the code from Example 6-1 into a file and execute it, you should see the greeting printed. Try calling greet() multiple times with different names in the same script. You’ll see that you can to reuse the same code with different names quite easily.
All function definitions start with the keyword def and then the name of the function that you want to make. Inside the parentheses, you can name each of the parameters, or inputs, that you want the function to take. In the example above, the function greet takes a single parameter, name. Within the function, we can use that parameter’s value by referencing it like we do in the print statement.
The Email Function
Let’s get started writing the function that takes care of sending an email. We can test this function by itself, before getting into working on the physical side of the project. It’s a good idea to compartmentalize the different parts of your project and be able to test them individually before connecting them all together.
Warning
Be careful to not send dozens of email messages in quick succession, or you may find that your email provider slows down your access to email, or worse, suspends it temporarily. You may want to set up a separate email account for testing so you don’t disrupt access to your personal email. If you need to send hundreds or thousands of emails, check out SendGrid, which offers volume email services starting at $10/month.
You’ll need to find the details of your mail provider’s SMTP server, which is what you connect to in order to send email. Since Gmail is a popular email service, I included their server name in Example 6-2. The code below is based on the examples found on Python’s site. Create a file called emailer.py and put the code from Example 6-2 in it (see Figure 6-1 for a visual representation).
importsmtplibfromemail.mime.textimportMIMETextdefalertMe(subject,body):myAddress="[email protected]"
msg=MIMEText(body)
msg['Subject']=subject
msg['From']=myAddress
msg['Reply-to']=myAddress
msg['To']=myAddress
server=smtplib.SMTP('smtp.gmail.com',587)
server.starttls()
server.login(myAddress,'my_password')
server.sendmail(myAddress,myAddress,msg.as_string())
server.quit()
alertMe("Alert!","Garage door is open!")
-
Import the functions needed to connect to the SMTP mail server.
-
Import the functions needed to create an email.
-
Create a function called
alertMethat takes two inputs: the email’s subject and body.-
Create an object called
myAddressand store your address as a string (replace[email protected]with your own address).-
Create an object called
msgand store the body in it in the MIME format (the body is passed as an input to this function).-
Set the subject of the message from the input of the function.
-
Set the from address of the email to what you set in <4> .
-
Set the reply-to address of the email to what you set in <4> .
-
Set the to address of the email to what you set in <4>.
-
Connect to SMTP server smtp.gmail.com on port 587 (replace these with your server details if not Gmail).
-
Start encrypting all commands to the SMTP server (you may need to remove this line for some email providers).
-
Send login credentials to the server (replace these with your login and password).
-
Send the email.
-
Close the connection to the SMTP server.

Call the function
alertMewith the subject line “Alert!” and the body “Garage door is open!”

If you execute emailer.py (you can run it with the command python emailer.py) and don’t see any errors, check your email for the alert. If you have it, you know you have a working function that you can execute within your code to send you any kind of email alert you’d like. If you’re having trouble, double check your provider’s email settings.
After you’ve got it working, remove the test line alertMe("Alert!", "Garage door is open!") and save the file. Now this function definition can be imported into other Python files as long as emailer.py is in the same directory.
The Door Sensor
Now that you have the email part of the project working, it’s time to work on the physical side. Detecting whether or not a door is open is pretty simple. A door security sensor will act like a digital switch and can connect directly to the BeagleBone. These sensors can be found in a hardware store or in your local RadioShack.
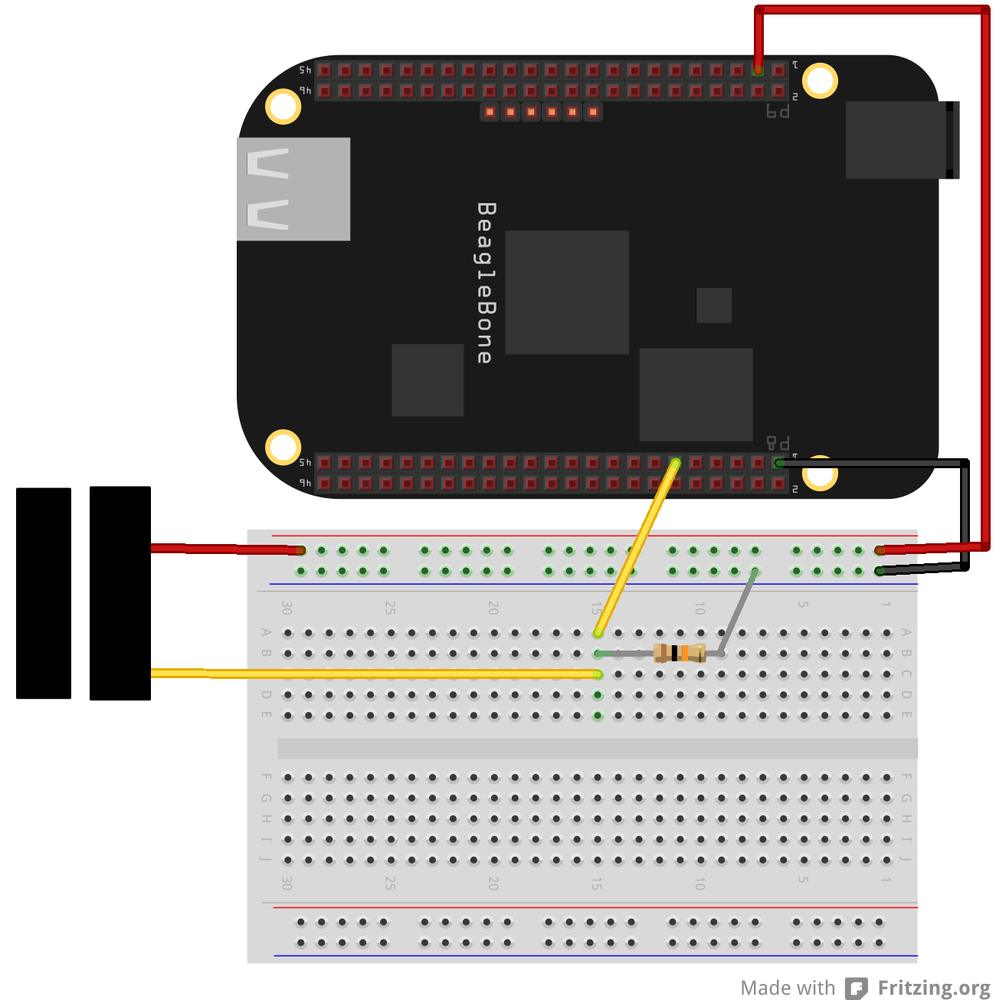
The sensors typically come in two varieties: normally open (denoted N/O) or normally closed (denoted N/C). A normally open sensor will disconnect the two terminals when the door is opened and the sensor is separated from the magnet. Conversely, a normally closed sensor will connect the two terminals when the door is opened. Some door sensors will work both ways and will have a common terminal, a normally open terminal, and a normally closed terminal, like the one in Figure 6-2. Any version will work in this project because we can use code to check for either a high or low signal.

For the code below, I’ll be using a normally closed sensor so that an open door will send a high signal and closed door will send a low signal. In the code, I will indicate where the logic should be changed in case you have a normally closed sensor.
- Connect one terminal of the door sensor to pin 11 on header P8. (See Figure 6-3.)
- Connect the other terminal of the door sensor to one of the 3.3 volt pins.
- Connect a 10K pull-down resistor between pin 11 on header P8 and ground. (See Input for a refresher on pull-down resistors.)
The Code
It can be a bit confusing when you start working with lots of nested loops and if statements, so let’s first map out the logic in pseudocode, a way of using plain language to describe what code is going to do.
- Set the value of alertTime to 0.
Loop forever:
- Check if the door is open.
If the door is open:
- Check if alertTime is 0.
If alertTime is 0:
- Set the value of alertTime to the current time plus 60 seconds.
If alertTime is not 0:
- Check if the current time is past alertTime.
If the current time is past alertTime:
- Send the alert email.
- Wait here until the door is closed.
If the current time is not past alertTime:
- Do nothing.
If the door is not open:
- Set the value of alertTime to 0.
The main loop constantly checks if the door has been opened. When it senses that the door has gone from being closed to being opened, it saves a time value into alertTime. That time is 60 seconds in the future. For every subsequent check, if the door is still opened, it checks if 60 seconds has passed. If so, it sends an email alert. If the door has been closed, it clears the value of alertTime, ensuring that the next time the door is open, it will start tracking a full 60 seconds again.
There’s also a loop after the email alert is sent to ensure that only a single email is sent if the door has been open for more than a minute. Example 6-3 shows how that logic is converted into Python.
importtimeimportAdafruit_BBIO.GPIOasGPIOfromemailerimportalertMeGPIO.setup("P8_11",GPIO.IN)alertTime=0whileTrue:ifGPIO.input("P8_11"):ifalertTime==0:alertTime=time.time()+60"Door opened. Alerting in 60 seconds if left open."else:iftime.time()>alertTime:alertMe("Alert!","The door has been left open!")"Door has been open for 60 seconds. Sent email alert!"whileGPIO.input("P8_11"):time.sleep(.1)else:alertTime=0time.sleep(.01)
-
Import the alertMe function from emailer.py.
-
Set the value of alertTime to 0 initially.
-
If the door is opened, execute the indented code below (If using a normally open sensor, this line should read
if not GPIO.input("P8_11"):).-
If the time to send the alert has not yet been set as the value of
alertTime…-
…then take the time now, add 60 seconds and store that in
alertTime.-
If the time to send the alert has been set, execute the code indented below.
-
If the current time is past
alertTime…-
Call the
alertMefunction from emailer.py with the subject and body of the email.-
Wait here until the door is closed again to prevent multiple emails being sent (If using a normally open sensor, this line should read
while not GPIO.input("P8_11"):).-
If the door is closed, set alertTime back to 0.
The doorAlert.py file must be in the same directory as emailer.py in order to import the alertMe function from that file.
Note
You must remove the line from emailer.py that sends the test email otherwise you will receive an email each time you start doorAlert.py.
Next you’ll want to set up doorAlert.py to execute in the background after your BeagleBone starts up. If you want to do that now, jump ahead to Appendix B.
Web Interface
Back in the early days of the Web, every page you visited was represented by a HTML file on the web server. When you sent a request for a particular URL, the server found that file in its directory structure and transmitted it to you. While many web servers still operate in that fashion, there’s a new generation of web servers out there. When you request a URL, they dynamically generate the HTML and transmit it to you based on rules found within the code.
One of the things I absolutely love about embedded Linux platforms like the BeagleBone is that they can run many modern web application frameworks. You can use these frameworks along with the GPIO libraries to make web interfaces for physical projects. For instance, let’s say that instead of an email alert when the door is left open, you just want to be able to view a web page to see if the door is open or closed.
First Steps with Flask
For this project, you’ll use the Flask framework for Python to serve the web page. And since you’re still working in Python, you’ll continue to use Adafruit’s BeagleBone IO Python Library. Before you get into creating your own dynamic site, you’ll have to install Flask and its dependencies using pip:
root@beaglebone:~# pip install flask
To test out Flask, you’ll create a simple web server that replies “Hello, world!” to the request it receives. Start by creating a new file called hello-flask.py with the code from Example 6-4.
-
Import the Flask library’s functions.
-
Create a flask object called “app”.
-
When Flask gets a request for / (the web root), run the function beneath.
-
Send the text “Hello, world!” to the web browser.
-
If this file itself is being executed (and not imported by another file), execute the code indented beneath it.
-
Have the flask server run on port 81 and report and log requests and errors to the console.
After saving hello-flask.py and executing it, you should see the following on the terminal:
root@beaglebone:~# python hello-flask.py
 * Running on http://0.0.0.0:81/
 * Restarting with reloader
Then try opening your web browser and navigating to http://beaglebone.local:81. If everything worked, you should see “Hello, world!” in your browser window. If you look back at your BeagleBone terminal, you’ll see the following:
10.0.1.5 - - [16/Jul/2013 12:32:20] "GET / HTTP/1.1" 200 -
10.0.1.5 - - [16/Jul/2013 12:32:20] "GET /favicon.ico HTTP/1.1" 404 -
The first line represents the GET request from the browser for /. The server responded with a code 200, which means OK. This response appeared when the text “Hello, world!” was transmitted to the browser. The second line is another GET request for /favicon.ico, to which the server responded with code 404, meaning “file not found”. Browsers request a small graphic icon when visiting a site to represent it in the location bar and in the bookmarks menu. Your site does not have a favicon.ico file, so you can ignore this error. It won’t cause any problems.
To terminate the server and get back to the command line, type Control-C.
Templates with Flask
Example 6-4 sent only text to the web browser, none of the HTML formatting that you’d normally expect from a web page. You could write the code yourself to send this formatting along with the return statement in that example, but including all that code in the Python script would get unwieldy very quickly. Luckily for us, Flask uses a template engine called Jinja2, which takes care of combining HTML formatting with the data that our application will provide.
With the capabilities of Jinja2, you can create HTML files that have placeholders for data that comes from our web application. This means that the code that controls the look of the page is kept separate from the actual logic of the application. Flask’s render_template function will take in the data and HTML template filename, pass it to Jinja2, which will return the properly formatted HTML to Flask to return to the user.
To try it out yourself, create a new file called flask-template.py and place the code from Example 6-5 in it. Then create a subdirectory called templates and create a file in there called main.html. Use Example 6-6 as the contents for that file.
fromflaskimportFlask,render_templateapp=Flask(__name__)importdatetime@app.route("/")defhello():now=datetime.datetime.now()timeString=now.strftime("%Y-%m-%d%H:%M")templateData={'title':'Hello!','time':timeString}returnrender_template('main.html',**templateData)if__name__=="__main__":app.run(host='0.0.0.0',port=81,debug=True)
-
Import the
render_templatefunction.-
Store the current time into
now.-
Create a human-readable string of the date and time.
-
Create a dictionary of values to pass to the template (in key:value format).
-
Render the template HTML from
templates/main.htmlusing the values from thetemplateDatadictionary.
-
Take the value of the key
titleand replace it here.-
Take the value of the key
timeand replace it here.
In Example 6-5, the line that says return render_template('main.html', **templateData) instructs Flask to use the Jinja2 template engine to prepare the page. It will look in the folder templates and find the specified file, in this case, main.html. Flask also gives Jinja2 the values stored in the dictionary templateData, which was created a few lines above. These values can be placed in the template by name in between two curly braces, as you see in Example 6-6.
After saving flask-template.py and templates/main.html, execute the script from the command line:
root@beaglebone:~# python flask-template.py
 * Running on http://0.0.0.0:81/
 * Restarting with reloader
Now when you navigate to to http://beaglebone.local:81, you should see the BeagleBone’s time in the browser.
Combining Flask and GPIO
Using the same circuit that you did in The Door Sensor, you can create a web interface with Flask to check the status of the door (see Examples 6-7 and 6-8). Every time a request is made from the server, it will check the state of the GPIO pin and pass “open” or “closed” strings into the template, which is then sent to the browser making the request.
fromflaskimportFlask,render_templateapp=Flask(__name__)importAdafruit_BBIO.GPIOasGPIOGPIO.setup("P8_11",GPIO.IN)@app.route("/")defhello():ifGPIO.input("P8_11"):doorStatus="open"else:doorStatus="closed"templateData={'doorStatus':doorStatus,}returnrender_template('main-door.html',**templateData)if__name__=="__main__":app.run(host='0.0.0.0',port=81,debug=True)
-
Import the GPIO functions from Adafruit’s library.
-
If the door is open, set the
doorStatusstring to “open”.-
Otherwise, set the
doorStatusstring to “closed”.-
Store the
doorStatusstring in a dictionary with the keydoorStatus.-
Be sure that this references the correct template HTML file, in this case
main-door.html.
-
When the HTML is generated by the BeagleBone, it will substitute
{{ doorStatus }}with the string determined inflask-door.py
Going Further with Flask
Following the code from Example 6-7, you can use the BeagleBone to host web services for additional digital inputs. You can also use Flask to control digital outputs, pulse the PWM pins, and get readings from analog sensors connected to the analog-to-digital converter.
Another powerful feature of Flask is that it can process variables within URLs. For instance, you can set the brightness of an LED based on what URL you request from your browser. You can set up Flask so that the address http://beaglebone.local:81/ledLevel/100 would set the LED to be fully bright and http://beaglebone.local:81/ledLevel/50 would set it to be half dim. All this can be done with just a little bit of code as shown in Example 6-9.
fromflaskimportFlask,render_templateapp=Flask(__name__)importAdafruit_BBIO.GPIOasGPIOimportAdafruit_BBIO.PWMasPWMPWM.start("P8_13",0.0)@app.route("/")defhello():ifGPIO.input("P8_11"):doorStatus="open"else:doorStatus="closed"templateData={'doorStatus':doorStatus,}returnrender_template('main-door.html',**templateData)@app.route('/ledLevel/<level>')defpin_state(level):PWM.set_duty_cycle("P8_13",float(level))return"LED level set to "+level+"."if__name__=="__main__":app.run(host='0.0.0.0',port=81,debug=True)
-
Pass the variable
levelfrom the URL into the function.-
PWM pin 13 on header P8 according to the level in the URL.
After adding the route above to your web application, your server will respond to requests made to http://beaglebone.local:81/ledLevel/50 and will PWM the LED at 50% duty cycle so that it’s dim.
Data Logging with Xively
Since it has a traditional filesystem built right in, using the BeagleBone makes a lot of sense at the core of of data logging projects. The data it collects can be saved to a file and then accessed via SFTP, viewed via the Web, or emailed to you directly. You can also have the BeagleBone push data to a cloud service like Xively, which makes it easy to view current and historical data from sensors via the web (see Figure 6-4).

In this section, you’ll learn how to hook up an analog temperature sensor to the BeagleBone, use Python to calculate the temperature from the voltage readings, and then upload the data to Xively.
Connecting the Temperature Sensor
In addition to an Internet-connected BeagleBone, you’ll need the following to prototype this project:
- Solderless breadboard
- Jumper wires
- TMP35 analog temperature sensor (This component is available from vendors like Digi-Key or Mouser. You can also use a TMP36. See Using a TMP36 Sensor for more information.)
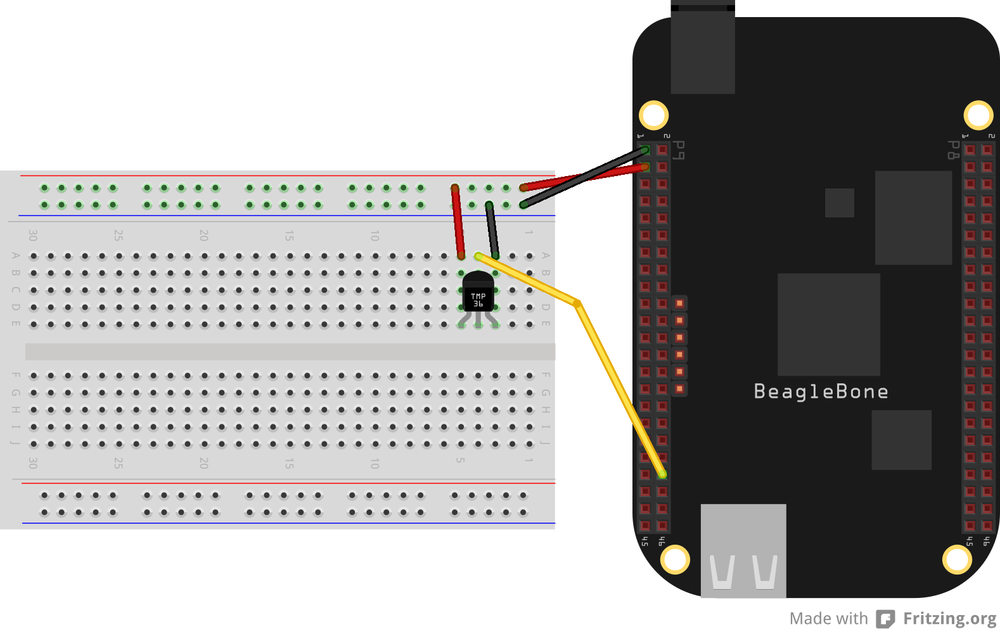
Since it’s an analog sensor, you’ll connect the TMP35 to one of the analog input pins on the BeagleBone. Pin 1 of the TMP35 connects to 3.3 volts, pin 2 connects to analog in at pin 40 on header P9 (or any of the other analog input pins) and pin 3 connects to ground, as shown in Figure 6-5. The TMP35 will output 0.1 to 1.2 volts for temperatures from 10 to 120 degrees Celsius. In fact, the formula to determine the temperature is:
degrees celsius = output voltage in mV / 10
To test the circuit, use the code in Example 6-10 in a new file called tmp35.py.
-
Store the analog reading from pin 40 on header P9 into
reading(converting it to millivolts).-
Convert from the milivolts measurement to Celsius.
-
Convert from Celsius to Fahrenheit.
-
Print the Fahrenheit value, rounded to a single decimal place.
When you execute this Python script, you should see a Fahrenheit value printed every second. Try warming the sensor with your fingers. The value should go up! Let go and watch the value drop again.
Connecting to Xively
Xively is an Internet of Things platform that takes in data from sensors all over the world and stores that in a database. It can then serve the data via their web interface or via an API for your own applications. It was previously known as Cosm, and before that, Pachube. While it’s possible to configure the BeagleBone to store and serve the data itself, the advantage to using Xively is that you can access the data wherever you have an Internet connection without needing to do any special network configuration.
Additionally, their developer libraries make it very easy to connect to their services in many different programming languages. In this section, you’ll use their Python library to push analog sensor data to Xively.
- Create an account at the Xively signup page. A free developer account will be sufficient for personal use.
- Log in to your account and click “Develop” on the top of the page.
- Click “Add Device”
- Give your device a name and choose whether you want the data to be public or private. You can change these settings later, if you wish. After clicking “Add Device,” you’ll be taken to the device’s page.
- From the device’s page, click “Add Channel” to create a new sensor channel such as “office_temp.” The other fields are optional.
- Take note of the auto-generated API key, the Feed ID, and your channel’s name on the device’s page. You’ll need to put those in your Python code.
-
On your BeagleBone, use
pipto install the Xively Python library:
root@beaglebone:~# pip install xively-python
- Create a new file called xively-temp.py with the contents of Example 6-11. Be sure to replace the API key, feed ID, and channel name with information from your own account.
- When you execute xively-temp.py, it will take the temperature reading and send it to Xively every 20 seconds. Check the device’s page on Xively.com to see the data start coming in!
importAdafruit_BBIO.ADCasADCimporttimeimportdatetimeimportxivelyfromrequestsimportHTTPErrorapi=xively.XivelyAPIClient("API_KEY_HERE")feed=api.feeds.get(FEED_ID_HERE)ADC.setup()whileTrue:mV=ADC.read('P9_40')*1800celsius=mV/10fahrenheit=(celsius*9/5)+32fahrenheit=round(fahrenheit,1)now=datetime.datetime.utcnow()feed.datastreams=[xively.Datastream(id='office_temp',current_value=fahrenheit,at=now)]try:feed.update()"Value pushed to Xively: "+str(fahrenheit)exceptHTTPErrorase:"Error connecting to Xively: "+str(e)time.sleep(20)
-
Import
HTTPErrorso that we can gracefully process possible errors when connecting to Xively to send data.-
Enter your API key within quotation marks here.
-
Enter your feed ID within parenthesis here.
-
Store the current time in the variable
now.-
Enter your channel ID here.
-
Push the data to the Xively server.
-
If there’s an error contacting the Xively server, print a message to the terminal, but try again in 20 seconds.
Using a TMP36 Sensor
Example 6-11 contains code to convert the analog output from the TMP35 to the temperature in degrees Celsius. It’s also possible to use the popular TMP36 temperature sensor, but you’d have to adjust the conversion to celsius = (mV - 500) / 10. Be aware that the TMP36 outputs values greater than the ADC’s limit of 1.8v at temperatures above 130 degrees Celsius (266 degrees Fahrenheit).
Under a single device within Xively, you can also add more channels to send multiple sensor values. After storing a second value from the analog-to-digital converter, add the value to the feed.datastreams list following this pattern:
feed.datastreams=[xively.Datastream(id='office_temp',current_value=fahr,at=now),xively.Datastream(id='outdoor_temp',current_value=outside_fahr,at=now)]
As it stands, Example 6-11 will only run when you execute it from the command line and it will stop when you terminate it, when you log out, or when you reboot the BeagleBone. Clearly, this isn’t the desired mode of operation for most projects. To set up this project so that it launches automatically, flip ahead to Appendix B.
Taking it Further
It would be difficult to cover all of the possible ways your BeagleBone could communicate over the Internet. However, since Python is such a widely used language, it’s not difficult to find a way of doing things such as sending tweets, checking the weather, or pulling data from Google Maps. Here are a few additional resources for using Python online:
- Requests Library
- This is a popular library helps you build HTTP requests and process their responses.
- Temboo
- Temboo makes it easy to connect to hundreds of different APIs.
- Pusher
- Pusher is a cloud service and API that helps you send real-time information to web pages. For instance, you can create a web page that always shows a live-updating temperature reading from the BeagleBone.