
Appendix C
Advanced Group Policy Management
Let’s start with the bad news…because there’s a lot of good news in this appendix, and I don’t want anyone to say, “Hey! I’m 30 pages into this and he didn’t tell me [this very important fact I’m about to tell you].”
That is, to use the stuff we’re going to talk about in this appendix, you have to pay Microsoft a little extra. That’s right. Everything we’ve talked about in this book so far is “free,” inasmuch as it’s in the box when you buy Windows and spin up an Active Directory, install your Windows clients, perform some downloads, and so on.
But this appendix is different. We’re going to talk about a Microsoft tool called Advanced Group Policy Management (AGPM). Its goal is to help bigger companies with the challenge of GPO management. There’s no “Are you sure you really want to do this?” inside the GPMC and Group Policy Object Editor. Everything happens in real time. If you make a mistake, there’s no “Group Policy Undo” short of disabling or deleting the GPO and hoping you only have a few desktops to clean up.
AGPM puts a “Change Management” system around Group Policy within the GPMC. Change Management is the art of “not screwing things up.” The idea is that some people request changes, others make editing choices, and others approve their changes. AGPM is involved with ensuring that your overall philosophy of Group Policy management is embraced. Here are the main things it’s meant to do:
- Ensure that GPOs are configured correctly—before they’re placed into production
- Reduce risk of Group Policy deployment errors
- Ensure that Group Policy management is done securely
- Track usage (that is, know what’s going on, who made the change, and what was changed)
And it’s a really cool tool. Which is why Microsoft is making you pay extra for it.
How do you get this tool? You must be a Microsoft Software Assurance (SA) customer. Being an SA customer means you pay a little extra insurance money up front hoping that Microsoft produces updates that you want to install. A misconception is that SA customers must be big companies. They don’t have to be. You can be an SA customer with as few as 50 seats. You can learn more about becoming an SA customer here: www.microsoft.com/licensing/sa/.
Then inside of SA is also a bundle offering of programs called the Microsoft Desktop Optimization Pack (MDOP). You can see all the stuff in MDOP at www.microsoft.com/mdop.
This appendix isn’t for everyone, because it assumes you’re an SA customer and that you got a hold of MDOP. But AGPM is a great addition to the possibilities in Group Policy-land, so we’ll explore what it has to offer.
The Challenge of Group Policy Change Management
Group Policy offers a huge amount of power. (That’s why our logo at www.GPanswers.com looks like a deity hurling a lightning bolt.) Actually, some could argue that Group Policy has too much power. Not too much power in the hands of someone skilled in the ways of Group Policy kung fu. But rather, it can be too much power for someone who’s a mere white belt.
With that in mind, Microsoft’s AGPM product seeks to fill in several gaps within the GPMC when it comes to who can do what to Group Policy. In Chapter 2, “Managing Group Policy with the GPMC and via PowerShell,” you learned about the Group Policy delegation model. Sure, it’s possible to say, “Carl can create GPOs,” “Ed can edit these GPOs,” and, “Larry can link GPOs to the Sales OU.” But that’s not good enough for environments that have multiple administrators who need more granular levels of control.
The other challenge is that, sure, Ed can edit the GPOs. But does he know what he’s doing? Wouldn’t it be better if Alice approved the GPO that Ed edited? And what if Edward (a different dude than Ed) wanted to edit the same GPO that Ed just edited?
Additionally, with all this creating, editing, and linking, it can be hard to figure out what’s happened over time if a problem occurs. If you really wanted to know, could you tell which Ed (Ed or Edward) had edited it, what the edit was, and which Ed edited it last?
So, with that in mind, AGPM brings several change control functionalities to the table to help solve these issues:
- Check In/Check Out workflow management
- Version control
- Difference reporting
- Role-based delegation
- Offline editing of GPOs
- GPO templates (super-stud cousin to Starter GPOs, which we learned in Chapter 2)
The best part is that once it’s loaded, AGPM fits right into the GPMC. This means it’s not another whole tool to learn (although it does have its ins and outs). In this appendix, we’ll explore these major features of AGPM so you can get a feel for how you might use it in your environment.
Architecture and Installation of AGPM
Actually, the first part of installing AGPM is downloading it. As an SA customer, ask your salesdude or salesdudette, or your Microsoft Technical Accounts Manager (TAM) if you have one, for a copy if you’re entitled to it.
When you decide to make the leap to AGPM, be sure to read the Readme file and guidance about which is the latest version and what operating systems it can be installed on. AGPM is a little weird in that it works best when the operating system it is installed upon is the latest, and therefore AGPM itself must also be updated to suit.
Make sure you’re getting the right (latest) version (whatever it is). Note that sometimes the latest AGPM will also ship with the older versions of AGPM, just to be confusing. Be sure to get off on the right foot and install the right version!
AGPM Architecture
The AGPM architecture is, in a word, elegant. It doesn’t require any wacky schema extensions. You don’t have to touch every DC. You just install two pieces: a server piece and a client piece.
The AGPM server piece should be installed on the latest version of Windows Server possible. This is because the server piece (and archive that lives within it) leverages the Group Policy client-side extensions registered within the machine it’s run on. So, though you can install the AGPM server on an old server, or even a client system in a pinch, that’s not really a hot idea. It’s best to install the latest AGPM on the latest version of Windows Server, because the latest version of Windows Server has the most Group Policy extensions available, so it’s the best place to house the archive.
The client part is a misnomer. It’s not a client that needs to be installed on every desktop, just a little management piece that needs to be installed on your management stations where you run the GPMC. Since you’re likely to use Windows 10 as your management station, this is where you would load your AGPM client.
Indeed, if you want to use Windows 7 as your AGPM client (that is, the client from which you manage AGPM), then you positively need to have Windows Server 2008 R2 to run the AGPM server piece. That’s because their GPMCs “match” and will cause no errors in their interaction (as could happen with mismatched pieces, it’s assumed). Additionally, it should be noted that AGPM 3.0 clients are prevented from connecting to AGPM server archives, for a similar reason.
A little later, we’ll discuss how to use the AGPM world as the exclusive place to create new GPOs and then manage them. But that means that soon after deployment of the AGPM server, you’ll want to get the AGPM client piece out to all your administrators so they can continue managing GPOs (albeit in a new way).
Installing AGPM
Again, you’ll get AGPM from your Microsoft contact if you’re an SA customer. As of this writing, the installation of AGPM is contained within MDOP, but that should change soon. Again, the one we’re concerned with is Advanced Group Policy Management, within the MDOP launcher seen in Figure C-1.

Figure C-1: The MDOP splash and installation screen
Installing the AGPM Server Service
AGPM performs much of its Check In/Check Out workflow management because it installs a simple service on the server of your choice. There are no schema changes, no Active Directory back-end changes, and no touching all of your Domain Controllers.
It’s recommended that you install the AGPM server on a regular server (not a Domain Controller), but it appears to install and run just fine on a DC.
However, here’s the trick (as previously stated): In order to make use of AGPM, you’ll need to install the AGPM server piece on a Windows Server. That’s because AGPM will track 100 percent of the Group Policy settings only when the server service is installed on the latest server operating system.
Again, AGPM is a little strange: it relies on the machine it’s loaded on as the “backbone” for the CSEs it supports in the archive. So, then, you need to ask yourself, “Which Windows machines have the most (and latest) CSEs?” And the answer to that is easy: Windows Server 2016 and Windows 10. And, well, Windows Server 2016 is a server. So, it is the ideal candidate (though my understating is that it is possible to load the AGPM service on a Windows client if you need to, in a pinch, but I haven’t tried it).
The first piece you’ll install is the server, and you can do this by clicking Install Server (64-Bit), as seen in Figure C-2.

Figure C-2: Start out by installing the AGPM server.
At this point, you’ll see a wizard-driven Server Setup screen. You’ll need to accept the license terms and give it a directory in which to install the AGPM server (the default is usually A-OK). The tricky question is when you’re asked about the Archive Path, as seen in Figure C-3. The default for this is a little baffling to me, as it puts the Group Policy archive underneath the ProgramDataMicrosoftAGPM directory (also seen in Figure C-3), and on Windows Server, it puts the path as C:ProgramDataMicrosoftAGPM (which is a little better). The files that AGPM puts here are just regular files. And, although you shouldn’t need to poke directly around the archive (like, ever), if you did need to, it might be nice to have the archive set in a place that’s obvious. So, I like to change the default to C:AGPM-ARCHIVE (as seen in Figure C-4) or something similar, where I know I can easily get to it.

Figure C-3: The original path for storing AGPM data is a little obtuse.
Next, you’ll be asked about the AGPM service account, as seen in Figure C-5. If you have one domain and you install AGPM on a Domain Controller as a last resort, because you have no other servers in your environment that you can install it on, I suggest you choose Local System. If you have multiple domains or install on a member server, then select User Account and provide an account that you trust. This account will have rights over the AGPM system.

Figure C-4: This is my suggested path for storing AGPM data.

Figure C-5: If you’re installing on a Domain Controller, choose Local System.
The next screen is the initial Archive Owner account, as seen in Figure C-6. You can choose a regular user account here or a security group (such as AGPM-OWNERS). This account doesn’t need to have Domain Administrator rights. But note that this person will initially own all the material inside the archive. Later, this person will be able to delegate the stuff contained within the archive to other users of the AGPM system. More users or groups can be delegated these rights later.

Figure C-6: If installing AGPM on a member server, choose an Active Directory user account with a name reflective of what you’re using. I suggest AGPM-OWNER or AGPM-SERVICE or something similar. In my examples, I’ll use AGPM-OWNER.
I suggest using a new, neutral, non-Administrator account. I’m calling mine AGPM-OWNER. I created this account in Active Directory Users and Computers, then selected it, as seen in Figure C-6.
You’ll then be asked which port to communicate on. The default port is 4600. Because Windows Server has the firewall enabled by default, you will need to also open the Windows Server firewall to enable client-to-server communication. This wizard page allows you to do that. Note that this screen is not shown.
You’ll also be able to specify which languages the server is available in. All languages are selected by default. I usually uncheck all and specify only my language. Note that this screen is not shown.
Finally, you’ll be at the final screen and can click Install to install AGPM.
Right now, the AGPM service could be considered a “single point of failure.” That is, if the computer that the service is running on dies (or the service dies), the AGPM system will obviously fail to work. However, AGPM is not an officially “clusterable” service, meaning you cannot (right now) officially spin up Microsoft Cluster Services and get failover if the primary server dies. However, the “regular” method of manipulating GPOs (that is, directly and not through the AGPM system) will still work and can be used as an alternative until the AGPM system or service is back up and running.
When finished, you can install the next piece: the “client” piece that installs within the GPMC.
Installing the AGPM Client
Since we learned that the best management station is a Windows Server 2016 machine or, more likely, a Windows 10 client machine, that’s precisely where we’ll load our AGPM client.
You load the AGPM client on the machine from which you typically manage your Group Policy.
You saw the AGPM client installation option back at Figure C-2, so we’ll select it now. Again, I recommend you do this both on the server on which you installed AGPM as well as on WIN10MANAGEMENT, the machine from which you do all your Group Policy manipulations. I’ll only show (and talk about) installing it once, but again, I’m suggesting you install it in both places.
After you accept the license terms, you’ll be prompted for the installation directory. The defaults are fine for this. You’ll then have to tell the AGPM client which server the AGPM server is running on, as well as the communication port, as seen in Figure C-7.
You’ll then need to select which languages you want to install.
At this point, the client will install and you’ll be done. You’ll need to install the AGPM client on each Group Policy administrator’s computer or that individual won’t be able to participate in the Check In/Check Out system.

Figure C-7: Specify the server and the server port for AGPM clients.
What Happens after AGPM Is Installed?
Once AGPM is installed, you might want to start it up. But you’ll notice there isn’t any AGPM icon anywhere on the server. The server is just silently running the AGPM service, waiting as a “storage vault” for GPOs we’re about to feed it.
GPMC Differences with AGPM Client
Now, if you start to plunk about in the GPMC, you’ll see some subtle, but powerful, changes. First, note that if you click on a GPO or a link to a GPO, there’s now a new tab, called History, as seen in Figure C-8. Indeed, you might also get an error similar to what’s also seen in Figure C-8.
We’ll get to that error in a second. But for now, let’s finish the quick tour. You’ll also notice a whole new node underneath Group Policy Objects called Change Control.

Figure C-8: By default, anyone without rights will be denied access to the archive.
And within Change Control, there are four tabs: Contents, Domain Delegation, AGPM Server, and Production Delegation, as seen in Figure C-9. Indeed, if you click the Contents tab, you might get a similar error to what we just saw (basically, another type of Access Denied, as seen in Figure C-9).

Figure C-9: Access is denied for those without rights to the AGPM system.
What’s With All the Access Denied Errors?
So, why are you being denied? Because, even though you might be logged in as Administrator of Active Directory, you’re not logged in as the person you designated to have the initial ability to own the stuff contained within the archive.
It’s easy to clear this up. On your management station, log on as that user (in my case, I chose AGPM-OWNER).
Once you’re logged in with that account (in my case, as AGPM-OWNER) on your management station (which already has the AGPM client installed), fire up the GPMC by selecting Start and typing GPMC.MSC in the Search box. Then, see if you still get those Access Denied errors.
You won’t, because you’re logged in as the person who owns the AGPM archive.
Does the World Change Right Away?
The goal of AGPM is to help you get a better handle on the way you create, approve, and manage GPOs. But installing the AGPM server component doesn’t prevent you (immediately) from administrating Group Policy the way you always did. That is, by default, if you’ve got the ability to create GPOs, you can still create them. And if you’ve got the ability to link GPOs, you can still link them. Those powers don’t go away until they’re expressly taken away by the AGPM archive owner (in my example, AGPM-OWNER). By default, every GPO is considered Uncontrolled.
What we’ll learn about next is the delegation model and how to make existing GPOs Controlled.
Understanding the AGPM Delegation Model
Again, each GPO can be either Controlled or Uncontrolled. The goal is to move from your current chaotic environment (Uncontrolled) to one that is orderly and neat (Controlled). To that end, we need to understand the roles that are available to us—who can do what. Once we understand that, we’ll have a better chance of maintaining order going forward.
The point is to bring order from chaos. To do that, we need an ongoing process to manage our GPOs. You can start to think of the AGPM archive as a big library system. It’s been years since I stepped into a public library (sorry, but I like the cappuccinos and lemon squares at book stores). But I remember the basic procedure:
- Find a book I want to read.
- Show my library card (which is my credential to “do something” with this book).
- Borrow the book by “checking it out” of the library. At this point, I have sole possession of this book. No one else can use it.
- Utilize the book.
- When I’m done, return it to the library in the drop slot. This doesn’t mean the book immediately goes back on the shelf; it’s just pending in the holding pen. The librarian will examine the book to make sure I didn’t bend the pages or scribble in the book’s margins. The book goes into the “book depository” or “book vault” or “book archive,” or whatever that particular library calls it.
- If someone had requested this book while I had it checked out, it wouldn’t go back on the shelf. The librarian would call the next book user and let her know the book was waiting for her behind the counter.
- If no one wanted the book, the book is put back on the shelf, sometimes called being “checked in.” That way, it’s ready to be leveraged by the next person.
So, neat, orderly, and systematic. That’s your good ol’ public library system. And that’s the same idea you’ll use when dealing with GPOs in AGPM. Here’s the basic framework when dealing with GPOs once you get the hang of AGPM:
- Create a new GPO and put it under control (or Control a GPO that was previously uncontrolled).
- Check out the GPO so it cannot be modified by anyone else.
- Edit the GPO (again, only you have access right now).
- Return the GPO to the library by “checking it in.” This doesn’t mean the GPO is “live” and actively modifying clients. It’s pending in the “holding pen” until it’s approved.
- At this point, others might choose to “check out” the GPO to make more changes.
- Once all changes are made, someone Reviews the changes and makes comments.
- Finally, once all Reviews are made, someone Approves the changes and the GPO goes “live.”
AGPM Delegation Roles
Because you can be one administrator in a larger company with dozens of administrators, you can have different roles for different people. You can assign different Active Directory groups to various AGPM roles, or you can assign specific people (without groups) to specific roles. Here are the AGPM roles:
- Reviewer You can see the GPO and what’s been done to it. Think of this as Read-Only access to the history and settings of the GPO.
- Approver This role should have been called Approver/Reviewer, because you automatically get Reviewer rights when you get Approver rights. Approver rights allow you to “check in” GPOs from the archive into the real world. Ultimately, it’s the Approver who can take offline GPO copies and make them “live” to affect the user population.
- Editor This role should be called Editor/Reviewer, because you automatically get Reviewer rights when you get Editor rights. This allows you to make changes to GPOs. But these changes aren’t happening in the real world—they’re being changed in an offline archive copy of the GPO, until an Approver performs a “check in,” which takes the copy of the GPO and plunks it back down into the live-production GPO.
- Full Control You have full ability over all GPOs (and, of course, rights to Review all GPOs). You can dictate which GPOs are Controlled and Uncontrolled and can perform all roles with any GPOs. By default, only the named account during setup (in my world, AGPM-OWNER) is set up as Full Control.
The AGPM permissions can be a wee bit mysterious underneath the hood. There are various new levels of security within the AGPM system. On the surface, AGPM adds the following roles: Reviewer, Editor, Approver, and Full Control. In the following table, you can see the default permissions for these roles:
| Reviewer | Editor | Approver | Full Control | |
| List Contents | X | X | X | X |
| Read Settings | X | X | X | X |
| Edit Settings | X | X | ||
| Create GPOs | X | X | ||
| Deploy GPOs | X | X | ||
| Delete GPOs | X | X | ||
| Modify Options | X | |||
| Modify Security | X | |||
| Create Templates | X | X |
However, occasionally, you need to know exactly which actions a specific role is able to do. In other words, if someone is a Reviewer, Editor, Approver, or AGPM Administrator, which tasks are they able to perform (because of the permissions they have)? In the following tables, you can see the cross reference of the AGPM roles, the tasks they can perform, and the required permissions needed to perform that task.
This table shows the required permissions needed to perform domain-level tasks:
| Roles | ||||
| Domain-Level Tasks | Reviewer | Editor | Approver | Admin (Full control) |
| Delegate domain-level permissions | X | |||
| Configure e-mail notification | X | |||
| View mail notification settings | X | X | X | X |
| Create a GPO or approve creation | X | X | ||
| Request creation of a GPO | X | X | ||
| Control an uncontrolled GPO | X | X | ||
| Request control of an uncontrolled GPO | X | X | ||
| Create a template | X | X | ||
| Set default template for creating new GPOs | X | X | ||
| List GPOs | X | X | X | X |
X—This task requires this permission.
1—Delegating GPO-level permissions requires List Contents permission at the domain level.
2—This task requires at least one of these permissions.
This table shows the required permissions needed to perform Group Policy–level tasks:
| Roles | ||||
| GPO-Level Tasks | Reviewer | Editor | Approver | Admin (Full Control) |
| Delegate GPO-level permissions | X | X | ||
| Deploy a GPO or Approve deployment | X | X | ||
| Change GPO links during deployment | X | X | ||
| Request deployment of a GPO | X | |||
| Delete a GPO archive (move to Recycle Bin/uncontrol) or Approve deletion | X | X | X | |
| Delete a deployed GPO or Approve deletion | X | X | ||
| Request deletion of a deployed GPO | X | |||
| Delete a template | X | X | ||
| Destroy a GPO | X | X | ||
| Restore a GPO | X | X | X | |
| Archive a GPO | X | X | X | |
| Check Out a GPO | X | X | X | |
| Edit a GPO | X | X | X | |
| Rename a GPO | X | X | X | |
| Label a GPO | X | X | X | |
| Check In a GPO/undo Check Out | X | X | X | |
| View GPO history | X | X | X | X |
| View reports or GPO links | X | X | X | X |
3—This task requires at least one of these permissions. To perform this task, an individual who has only this permission must be the Editor who checked out the GPO.
4—Only the individual who checked out the GPO or an AGPM Admin can perform this task.
AGPM Common Tasks
In the following sections, we’re going to conquer the big tasks that AGPM can do.
And we’re going to do it as if we were the only administrator in the world. This isn’t how AGPM is meant to be used. Indeed, it’s meant to be used in a multi-domain-administrator environment—that’s the point. But to get a grip on what’s possible in the AGPM world, for now, anyway, we’re going to leverage the AGPM-OWNER account and not one of our already-created OU admins from previous chapters.
We’ll get to multiple-administrator environments just a little later in the section “AGPM Tasks with Multiple Admins.” That way, you’ll be able to see 100 percent of what’s possible with the power of AGPM now. Then, in that section, we’ll add others to the AGPM system so you can see how multiple administrators might interact with the system as a whole.
But since we know we want to use multiple administrators later, let’s get set up for that and become forward-thinking. In those examples, we’ll use the Human Resources OU with our trusty admin Frank Rizzo. In previous chapters, Frank was delegated the ability to create GPOs and also link them to the Human Resources OU. Figure C-10 shows what it might look like if Frank created and linked three GPOs to the Human Resources OU.

Figure C-10: Three example GPOs created outside of the AGPM system
Before we go further, one key point bears repeating: only GPOs that are managed with AGPM can be checked out and checked in. GPOs that were created before AGPM was installed will continue to act as if AGPM wasn’t installed. We’ll see in a minute how to get these GPOs under Control.
Now, here’s the kicker: Even with AGPM installed, it’s still possible to shoot yourself in the foot. Using AGPM does not mean you’ve suddenly invested in a fail-safe method to prevent screw-ups. That’s because, as we’re about to learn, the only time GPOs cannot be edited (the original way) is when they’re Checked Out via AGPM. We’re about to work through these examples, so don’t worry if you’re a little confused.
Understanding and Working with AGPM’s Flow
The point of AGPM is that it provides a way to wrap “history” around the birth, life, and death of a GPO. The AGPM system doesn’t care as much about live GPOs as it does about GPOs that it has in its archive. Once AGPM has Control of a GPO (which really means a GPO has the ability to be manipulated by AGPM), that’s when the magic happens. With Control, you’re basically saying, “I give in, O great and powerful AGPM system!”
Once you Control a GPO with AGPM, you’re ripping ownership away from the original creator. In this way, the original owner can no longer modify the live GPO, thereby affecting the GPO and making inadvertent changes everywhere it’s linked. This, to me, is the biggest change between older generations of AGPM and current generations of AGPM. Again, as soon as you Control a GPO, it is no longer accessible outside of AGPM (by default).
Figure C-11 and Figure C-12 help express the flow of the birth and life of a GPO. Note that there are two paths to a GPO being “born”—outside of AGPM control (topmost circle) and inside AGPM control (leftmost circle).
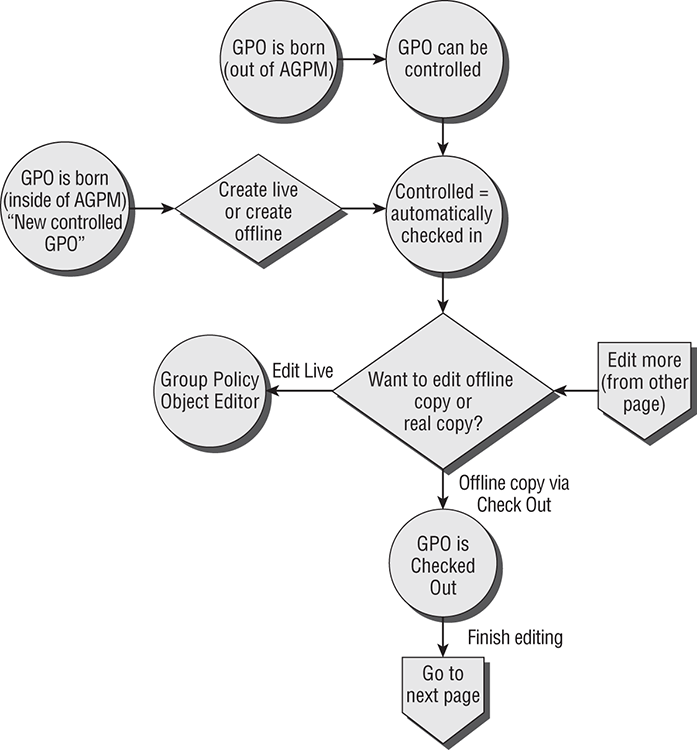
Figure C-11: The first part of the AGPM “flow”

Figure C-12: The second part of the AGPM “flow”
We’re going to go over all the points of this flowchart now, but if you have 120 seconds, really read the flowchart to get a feel for where we’re going before you continue.
At this point, if you’d like to run through these procedures with me, my suggestion is to be logged into the AGPM-OWNER account. That way, you have Full Control rights to everything we’re about to try. Then, a little later, we’ll see how to deal with multiple admins with various rights to the system.
Controlling Your Currently Uncontrolled GPOs
After AGPM is loaded, all GPOs are considered Uncontrolled. That just means that copies of the GPOs haven’t been made into the archive for offline editing. And that’s an important point to drive home here: the point of AGPM is to allow you to create a copy of your GPOs offline and edit the offline copies. Controlling those original uncontrolled GPOs is the first step in that process.
So, to that end, I can’t see any reason not to control all GPOs. That way, you’ve got the ability to use the AGPM system to then Check Out GPOs (which will then prevent people from editing them) and do all sorts of awesome things.
However, for our examples, let’s Control the three GPOs within Human Resources that we saw earlier in Figure C-10. To do that, we’ll click the Change Control node, make sure we’re on the Contents tab (at the top), and then click the Uncontrolled tab in the middle. All the GPOs in the domain should appear here. Find HR GPO1, HR GPO2, and HR GPO3. Then multi-select (by using the Ctrl key and left-clicking with the mouse) the three GPOs. Finally, right-click over them and select Control, as seen in Figure C-13.

Figure C-13: To get started with GPOs within AGPM, you need to take Control.
When you do, you’ll be asked for a comment. You can put in anything you like here; it’s just a comment for this point in time. Perhaps, “Taking control on [insert date here] by [your name].” When you do, you’ll be presented (hopefully) with a Succeeded message, similar to what’s seen in Figure C-14.
Now, click on the Controlled tab within the Change Control node. You’ll see that these three GPOs are now Controlled. And because they’re Controlled, they’re automatically Checked In. You can see this status in Figure C-15.

Figure C-14: You can see the GPOs you just controlled.

Figure C-15: Checked-In GPOs are now active within AGPM.
Now that they’re Controlled and Checked In, you have the ability to make offline copies; it’s the offline copies you can edit using AGPM.
Again, here’s a big difference between older versions of AGPM and the current AGPM. That is, Frank Rizzo, who originally created these GPOs outside of the AGPM system, now cannot edit them. That’s because they’re Controlled by AGPM now. This is a major “hole” with previous versions of AGPM, and one I’m glad is now closed.
You can prove this in one of two ways (or you can try both). First, you can log onto another management station with the GPMC loaded and see if Frank can edit HR GPO1. Believe me, he can’t. And the reason he can’t is that the owner of the live GPO is changed to SYSTEM from Frank. You can see the owner by clicking the GPO, then clicking the Details tab and checking out the Owner field, as seen in Figure C-16. There, you can see that, indeed, the owner has changed to SYSTEM.

Figure C-16: Now that the existing GPO is Controlled, the original owner cannot modify it.
Creating a GPO and Immediately Controlling It
We just learned how we can take existing live GPOs and Control them. It’s also possible to create brand-new GPOs directly within the AGPM system and immediately Control them. To do so, right-click over Change Control and select New Controlled GPO. When you do, you’ll be prompted with what you see in Figure C-17.
Next, you can add a comment, and select “Create in archive and production” or “Create in archive only.”
“Create in archive and production” will create the GPO in the archive and also put it in the Group Policy Objects node (the swimming pool). It’s not linked anywhere, which means it’s not affecting any levels of Active Directory yet. Note that GPOs created in this way are automatically protected from harm in the same way that other Controlled GPOs are. That is, GPOs created directly via AGPM are created with the owner as SYSTEM (or, depending on install options, the AGPM service account), as seen in Figure C-18. Again, this means only administrators who are part of the AGPM system can eventually edit them. That’s because AGPM is now “in charge” of this GPO and it cannot be edited in the old (regular) way.

Figure C-17: Creating a new, Controlled GPO

Figure C-18: The owner of new, Controlled GPOs will automatically be either SYSTEM or the AGPM service account.
And this is what you want to strive for: ensuring that all administrators in your domain are consciously using the AGPM system for all Group Policy creation and editing functions (instead of the “live” native way directly). We’ll see how to forcefully require compliance of your administrators a little later to ensure that they’re using AGPM and not the native tools to manage your Group Policy universe.
Check Out a GPO
At this point, let’s take AGPM for a real test-drive. Our goal is to take an original live GPO and then make a copy of it to work with offline, via Check Out. Then, we’ll work with it offline.
Again, as soon as it’s Controlled, only administrators within the AGPM system can manipulate it. Once it’s Checked Out, then it’s editable.
Let’s get started. In the Change Control node, select the Contents tab (top), select the Controlled tab (middle), right-click over a GPO (like HR GPO1), and select Check Out, as seen in Figure C-19.

Figure C-19: You can work on a copy of a GPO if you perform a Check Out.
When you do, you’ll be prompted for a comment. Perhaps you want to specify why you checked it out, say, to add Control Panel settings. The state now changes to Checked Out, a red outline surrounds the GPO, and a red check mark is added, as seen in Figure C-20.

Figure C-20: Checked-Out GPOs can be seen by the outline in the GPO icon (and a little check mark). This is a lot easier to see in color. The GPO is surrounded by a red border, noting that it’s checked out.
At this point, you’ll be ready to edit the offline copy of the GPO that was just created.
Viewing Reports about a Controlled GPO
Now that you’ve got the GPO in Control, you can examine it a bit. One of the key things you’ll likely want to do is to make sure it has the settings you think it has. By right-clicking over the GPO within Change Control ⇒ Controlled (or other nodes within Change Control), as shown in Figure C-21, you’ll be able to get a quick report of what’s going on.

Figure C-21: You can report on GPOs in the archive in multiple ways.
The HTML report is the most useful report here, though there might be some call for an XML report as well. Knowing where the GPO is linked is useful too, of course, and the report is a graphical demonstration of where the GPO is currently linked.
Editing a Checked-Out Offline Copy of a GPO
Again, the person who did the checking out (in our case, the AGPM-OWNER) will be able to Edit the offline copy of the GPO. But before we do that, let’s understand why that’s possible, and also what’s happening to the “real Group Policy world” when we Check Out a GPO and make a copy of it in the archive.
What’s Happening under the Hood during a Check Out
We know that when we Check Out a live GPO, we’re really only creating an offline copy to work with. But where does that copy “live”? Turns out, it lives in exactly the same place all other GPOs live—the Group Policy Objects node (the swimming pool).
Here in Figure C-22, you can see that a copy of the original GPO (HR GPO1) was created and put in the archive for our editing. This is what we’re about to manipulate: the Checked Out copy of HR GPO1 (the one labeled [AGPM] HR GPO1), not the live HR GPO1 itself.

Figure C-22: A copy of a GPO is created when it’s Checked Out.
And now that the GPO is Checked Out, only the person who Checked Out the copy of the GPO can edit that offline copy.
And, looking at the Details tab of “[AGPM] HR GPO1,” you can see who owns the GPO: SYSTEM or the AGPM service account. This really means that AGPM is in control of the GPO. And only those people with access rights, like AGPM-OWNER or Editors of the GPO, would have the ability to use AGPM to get to this offline copy.
And again, just to make sure we have it in our heads, let’s click on the live version of the HR GPO1 and see who owns that. Back in Figure C-16, we can see that the SYSTEM also owns the live HR GPO1. This happened as soon as we Controlled it.
What’s Not Controlled During a Check Out
When Check Out of a GPO is performed, an offline [AGPM] copy is made. But the following is still true:
- No one except AGPM participants can edit the real live GPO or the Checked-Out copy.
- Anyone, anywhere with link rights can still link or unlink to the real GPO where and when they want.
- Anyone, anywhere with link rights can Enforce or Un-Enforce the link to the GPO (in the place where they have link rights).
Therefore, don’t be lulled into thinking, “Oh, if it’s Checked Out, it can’t do any harm to anyone.” That’s just not true. The Checked-Out copy is simply an offline copy used for editing and is not related to the live GPO until it’s checked back in. Even though we’re prevented from making changes to the GPO, others can still link that existing GPO and utilize it just the same.
Performing Your Offline Edit
Now that you know what’s going on under the hood, let’s perform an Offline Edit of the copy we made of HR GPO1. To do this, find the Checked-Out GPO in Change Control ⇒ Contents ⇒ Controlled, right-click over it, and select Edit, as seen in Figure C-23.

Figure C-23: Editing a GPO in the archive
When you do, you’ll see the usual Group Policy Editor (or Group Policy Management Editor). Here, let’s add some settings for later use. Let’s Enable the User Configuration ⇒ Policies ⇒ Administrative Templates ⇒ Control Panel ⇒ Display ⇒ Screen Saver timeout and set it to 100 seconds.
When you’re finished, exit the Group Policy Object Editor.
Again, at this point, you’ve edited only the offline copy of the GPO, not the live GPO. This is the point of AGPM—it allows you to perform your proposed changes offline before doing potential harm to the live GPOs.
Performing a Check In of a Changed GPO
Remember that the point of performing a Check Out of a copy of a GPO was to make sure no one else could modify that copy while I had it out. But to do anything else with this GPO (except additional editing), I have to perform a Check In.
Do this by finding the GPO within Change Control ⇒ Contents ⇒ Controlled, right-clicking over the GPO, and selecting Check In. When you do, you’ll be able to make a comment about what you did to the GPO, like “Enabled Hide Settings Tab.”
When you Check In a GPO, the little red band around the GPO icon in the Controlled tab will disappear, because it’s no longer Checked Out.
Deploying a GPO into Production
Once the GPO you just edited is Checked In, you can potentially Deploy this (modified) copy into production.
The question is, are you ready? This is where you need to take a deep breath and say, “Okay, I’m ready to overwrite what’s currently live in production with the changes I made offline.” If you’re ready to rock, just right-click over the Controlled GPO and select Deploy, as seen in Figure C-24.

Figure C-24: When you’re ready, you can Deploy your GPO’s changes into the live network.
At this point, you’ll be asked if you want to Deploy the GPO, as seen in Figure C-25. Clicking Yes will Deploy it immediately, maintaining the link state the links were in at the time that the archive was created.

Figure C-25: You can choose to restore original links if you so desire.
You can click Advanced to get granular control over link restoration if you’d like.
When the deployment is completed, you should get a message similar to Figure C-26.

Figure C-26: The output from a GPO Deploy command
At this point, your GPO and its changes are in production, live, working hard for you!
Making Additional Changes to a GPO and Labeling a GPO
At this point, you’ve got the ability to keep going back and forth. That is, you can Check Out a GPO to make an offline copy. Then, you can edit the offline copy. You can make some changes to that copy, then check it back in. You can then Deploy it on top of the live GPO.
Indeed, to continue with the next exercises, we’ll need to have done that so we can inspect some additional features that AGPM provides. We’ll be checking out some features like performing a rollback based on older GPOs and doing a comparison of GPOs over time.
With that in mind, let’s edit the HR GPO1 by first using Check Out to create an offline copy. Then, we’ll use AGPM to edit a change to the GPO copy. For instance, Enable User Configuration ⇒ Policies ⇒ Administrative Templates ⇒ Control Panel ⇒ Display ⇒ Prohibit access to Control Panel and PC settings.
When you’re ready, check in the GPO and then Deploy it into production, overwriting the live HR GPO1. Be sure to make comments so you’ll know what you did during each step! You can make a comment at any time, without even making any changes to a GPO, by right-clicking the GPO and selecting Label (Figure C-27).

Figure C-27: You can always add a label to make your actions more clear.
By creating a label, you get the added benefit of being able to roll back a GPO from when the label is created, a concept similar to other source control systems. We’ll talk about Roll Back, well, right now.
Using History and Differences to Roll Back a GPO
So, at this point, you’ve modified your HR GPO1 twice. Once to Enable the Screen Saver Timeout policy setting and another time to Enable the Prohibit access to Control Panel and PC settings policy setting. You did this in three steps: Checking Out (creating a copy), Checking In the copy, and re-Deploying the copy of the GPO on top of the live GPO. So, now, the GPO is changed and live in the real world.
Now, the boss walks into your office and says he wants the Control Panel settings returned.
What are you going to do?
You’re going to Roll Back the HR GPO1 GPO back to before you enabled the Prohibit access to Control Panel and PC settings policy setting. But lots of changes could have transpired since then. Your job now is to compare GPOs that have passed through the archive and determine which one is the right one. To get started, right-click over the GPO, select Change Control ⇒ Controlled, and select History, as seen in Figure C-28.

Figure C-28: You can look back in time and see a GPO’s history.
Inside the History View
The History view shows when the GPO was created and each time it was Checked In or Deployed plus the comments you added during those steps. Additionally, if you decided to label your check-ins and check-outs while working with the GPOs and their copies within AGPM, you would see an unchanged GPO with a new comment. You can see examples of the History view in Figure C-29.
Performing a Difference Report
Assuming the comments weren’t clear, this would be the perfect opportunity for you to leverage the History tab to see Difference information. To do that, hold down the Ctrl key, then click two “points in time” to compare. Right-click over one of them, and select Differences ⇒ HTML Report, as seen in Figure C-30.

Figure C-29: A GPO’s history contains time stamps, an indication of who owned the GPO, and comments. If you click on a history item, you can see its settings.

Figure C-30: You can create a History Differences report.
The report is displayed in a browser window as an HTML document, as seen in Figure C-31.

Figure C-31: History reports are color-coded to make differences easy to spot.
When you’re comparing two GPOs, you’ll see different symbols and corresponding colors to help you decipher the differences between them. Table C-1 has the breakdown of the meaning of each symbol along with its corresponding color.
Table C-1: AGPM reporting symbols, colors, and their meanings
| Symbol | Meaning | Color |
| None | Same settings in both GPOs | Varies |
| [#] | Item in both GPOs, settings different between them | Blue |
| [-] | Item exists in first GPO (missing from second GPO) | Red |
| [+] | Item exists in second GPO (missing from first GPO) | Green |
Performing a Rollback Based on a Difference
Now you’ve got a handle on which GPO in the history you want to Roll Back to (the one that was Checked In after the Screen saver timeout policy setting was Enabled but before the Prohibit access to Control Panel and PC settings was Enabled). Just right-click over the GP you want to Roll Back to in the History view and select Deploy, as seen in Figure C-32.

Figure C-32: You can use the Deploy command, which will perform a GPO Roll Back based on a History item.
The newest History view should show that archived copy of the GPO as deployed. Just to be safe, inspect the settings of the (now live) GPO to make sure what’s deployed is what you expected!
Using “Import from Production” to Catch Up a GPO
What happens if the AGPM server or service itself fails? In that instance, you would have to make live changes using the Domain Administrator account (which can always get into all live GPOs).
Now, when AGPM is restored (or the server comes back up, or whatever else fixes the problem), you’ve still got a little issue. The information in the archive is different (older) than what is live in production (newer).
If this should happen, you might want to suck the live version into the archive and compare it to one of the archived GPOs. Then, you can use the History tab to do your comparisons as you did earlier and figure out which GPO should live or die: the last known archive copy or the currently live GPO.
To bring a live GPO into the archive, you would select the controlled GPO and select “Import from Production,” as seen in Figure C-33.

Figure C-33: Use the “Import from Production” command if the archive goes offline for a time.
Note that we’ll talk about “Import from File” a little later, and it is not related to this situation.
Uncontrolling, Restoring, and Destroying a GPO
If, for some reason, you want to take a GPO out of AGPM’s universe, you need to delete it, although that’s kind of a misnomer. I like to call it “Uncontrol” instead. Let’s explore how to delete, I mean, Uncontrol it (and also bring it back into the archive, if we want to).
Uncontrolling a GPO (Deleting It from the Archive)
To do this, locate the controlled GPO in the Controlled tab and select Delete, as seen in Figure C-34.

Figure C-34: Deleting a controlled GPO doesn’t really delete it.
When you do, you’ll be prompted with the choice you see in Figure C-35. That is, you can “Delete GPO from archive only” (uncontrol) or “Delete GPO from archive and production.”

Figure C-35: You can choose what kind of deletion to perform.
If you select the “Delete GPO from archive only” option, the GPO moves from Controlled to Uncontrolled. All previous history is maintained; it’s just not managed (right now) through the AGPM system. Interestingly, the History tab will not show all the history until the GPO is re-Controlled.
If you later want to Control it, just find the GPO (now within the Uncontrolled tab) and re-Control it.
If you select “Delete GPO from archive and production” (the second option in Figure C-35), the GPO doesn’t move to Uncontrolled. This option unlinks it from anywhere it’s currently deployed in the live, real world, then moves the archived GPO and its history to the Recycle Bin.
Restoring from the Change Control Recycle Bin
If you use AGPM’s facility to Delete archived GPOs or to delete the GPOs from production, you’re never far away from a backup. That’s because the deleted archives of GPOs (or deleted GPOs themselves) end up in the AGPM Recycle Bin. If you want to recover a deleted GPO from the AGPM universe, just right-click it within the Recycle Bin tab, and select Restore, as seen in Figure C-36.

Figure C-36: You can use the AGPM Recycle Bin to recover old GPOs.
Restored GPOs from AGPM are always automatically set to Controlled.
Permanently Deleting a GPO and Its History
In the Recycle Bin, you can also right-click a deleted GPO and select Destroy. This really does delete the GPO and any surrounding history. There is no undo from this operation.
After you perform this, it’s dead.
Searching for GPOs Using the Search Box
One AGPM feature is the “Search Group Policy objects” box seen anytime you’re visiting the Contents tab (a good example appears in Figure C-15).
This box enables you to do a full text search across all columns for any data. For instance, if you wanted to search for “All Uncontrolled GPOs that have the word OUCH in them,” then just click on the Uncontrolled tab, and in the “Search Group Policy objects,” type OUCH.
Or, if you wanted to see which GPOs were in the Recycle Bin because of a certain person, then just click on the Recycle Bin tab and type in the person’s name.
Again, the default behavior is to search across all text fields in all columns at once. If you want to get fancy and specify just one column for search, you can do things like entering name:GPO, which will show only the GPOs with “GPO” in the actual name.
For more help on this feature and more advanced search queries, click in the “Search Group Policy objects” box and hit F1 for detailed help.
AGPM Tasks with Multiple Admins
At this point, you’ve got a grip on all the major AGPM features. Between Check In/Check Out, offline editing, comparison reports, and so on, you’re ready to use AGPM.
Well, that would be true if you worked on an island. But you don’t. You work with other administrators.
In our previous example in this chapter, we assumed Frank Rizzo, who’s in charge of the Human Resources OU, originally created three GPOs: HR GPO1, HR GPO2, and HR GPO3. Let’s look at the whole (theoretical) gang within Human Resources):
- Eddy Cox: Eddy works for Frank. Eddy is the desktop engineer who knows the Human Resources users best. He is a good candidate for the Editor role, so he could request a new GPO (which Frank can create) and then edit the offline copy. He can then request it to go live. But, again, only Frank can Approve the GPO and put it in play. (These users weren’t created in other exercises; they’re new for these examples.)
- Reva Ewer: Reva is the IT department manager and is also in charge of quality assurance. She knows her way around GPOs enough to know what she’s doing. Reva’s a good candidate to be a Reviewer. So, Reva can see the copy of the GPO that’s created and what’s been done to it that makes it different from the live GPO. So, basically, we want to give her Read-Only access to the history and settings of the archived GPO. And, of course, because Reva can see what’s changed, she can make recommendations to Frank if she thinks the GPO choices made within the Human Resources OU are unacceptable.
- Frank Rizzo is the Approver. Since it’s the Approver who finally makes GPOs live, Frank will be the guy in trouble if something is put into production that wasn’t sanctioned.
E-mail Preparations and Configurations for AGPM Requests
Requests for Reviewing and Editing are sent to Approvers to say yea or nay. This happens via e-mail. Exchange Server isn’t directly supported as a transport medium. That is, you can’t just say, “Here’s my Exchange server,” and have AGPM do all the under-the-hood connection stuff for you. But standard SMTP is, and Exchange Server can be (and is usually) set up to be an SMTP server. So, if you have an SMTP server set up already, you’re almost there. Consult your Exchange admin to see if your Exchange server is honoring SMTP requests.
For our purposes, just fill in the blanks in the Change Control ⇒ Domain Delegation node. You can see some example values in Figure C-37. Just be sure to replace your SMTP server and username with valid names and passwords or no mail will make it to the server.

Figure C-37: You can specify where AGPM e-mails are sent. Note that in my testing, semicolons (not commas) were required for multiple recipients on the To e-mail address: line.
The most important line is the To: line. Only the people on the To: line will get the e-mails that the system generates (though the Requester can add people via an optional Cc:). But you’ll want to be sure all Approvers are listed (or create an e-mail alias that contains the entire list of Approvers) as well as Editors and perhaps Reviewers. In my example in Figure C-37, I’m specifically listing the e-mail addresses of the AGPM participants. However, in the real world, you might want to simply have an e-mail alias for anyone participating in the AGPM system named something like “[email protected],” which would contain Eddy, Reva, and Frank.
Adding Someone to the AGPM System
Anyone dealing with the AGPM system needs to be expressly granted access to it. And they also need to have the AGPM client installed. Let’s review those pieces now.
Setting Permissions within the AGPM System
The best way to get started is to do what we did earlier. That is, map out who will use the system and which roles they will have. We’ve decided on the following roles for the following people:
- Frank: Approver
- Eddy: Editor
- Reva: Reviewer
Now, in this chapter, we’re going to be dealing with these three people. But you could just as easily create three Active Directory groups, like these:
- AGPM_APPROVERS
- AGPM_REVIEWERS
- AGPM_EDITORS
Then use those groups and just add users to them. We’re not going to do that here, but in real life, you might want to.
To add people to the AGPM system, you need to go to the Change Control node, and in the Domain Delegation tab, click Add. Once you do, you can add the three user accounts: Frank, Eddy, and Reva. Give them the permissions specified in the previous paragraph: Frank—Approver, Eddy—Editor, Reva—Reviewer.
You might also want to add the actual domain administrator as Full Control to the system, which would make it equivalent to the AGPM-OWNER. It’s just a good idea in case the AGPM-OWNER is unavailable.
Right now, be sure you’re using the Add button and not the Advanced button.
In Figure C-38, I’ve added all three users to the system, and their initial permissions are displayed under Roles.
As stated, each user is to get different permissions. And, what’s more, the AGPM system doesn’t automatically propagate the permissions you set (in the Domain Delegation tab) down to every GPO in the archive.
This is something we need to do manually (and it’s a little tedious, so stay with me).
Click on each user, say, Frank Rizzo first, and then click the Advanced button.
You can granularly dictate the settings for Frank. Even though we’re saying that Frank Rizzo is an Approver, it’s likely best, in this case, to ensure that Frank has Editor rights (and also Reviewer rights) as well. You can see my suggested rights for Frank in Figure C-39. That way, if Eddy edits a copy of a GPO (offline, of course) that Frank later wants to modify, he can do so.

Figure C-38: These aren’t the final permissions required. You’ll need to click each user and select Advanced to fine-tune their security.

Figure C-39: Here, you can see Frank Rizzo and his permissions.
Eddy’s account is fine as is, but double-check that he has only Editor rights (and Reviewer rights). You can see Eddy’s rights in Figure C-40.

Figure C-40: Here, you can see Eddy and his permissions.
Reva’s account should also be okay, but ensure that she has only Reviewer rights. You can see Reva’s rights in Figure C-41.

Figure C-41: Here, you can see Reva and her permissions.
When you’re finished, click OK. The total rights will be seen in Figure C-42.

Figure C-42: The finished permissions should look like this.
Maybe, in real life, granting Frank, Eddy, and Reva access across all GPOs isn’t what you want. In that case, stay tuned for the section “Changing Permissions on GPO Archives,” where we show you how to get even more granular if you have a situation where some AGPM users should have permissions to only some GPOs within the archive.
Installing the AGPM Client on Management Stations
It’s likely that the AGPM system was installed by some domain administrator. And the intention, of course, is to start using AGPM as the focus point for all Group Policy management.
Therefore, all parties involved, Frank, Eddy, and Reva, have to install the AGPM client piece as we did earlier in Figure C-7. Again, the AGPM client needs to be the right one to match the operating system and match the version of the AGPM server. Usually, if you’re using the latest AGPM, you want the latest client operating system, like Windows 10.
Once the AGPM client is installed on all necessary management stations, Frank’s, Eddy’s, and Reva’s GPMC will change so they all have the Change Control node (showing they have the potential ability to use AGPM).
Now that Frank, Eddy, and Reva all have access to the AGPM system, they should no longer get AGPM Access Denied messages as we saw in Figures C-8 and C-9.
Setting Up Mail Accounts for Each AGPM User
This step has likely already been done in the real world. But if you’re following along with the examples, don’t forget to also set up e-mail accounts on your SMTP server for Frank, Eddy, and Reva.
Again, be sure e-mail is working between Frank, Eddy, and Reva before continuing. If mail isn’t flowing correctly, your AGPM administrators won’t get the signals that anything is waiting for them.
Requesting the Creation of New Controlled GPO
Eddy knows he wants to enable the Remove Search link from Start Menu policy setting to affect all the computers in Human Resources.
It’s time for Eddy to request a new GPO.
After Eddy logs into his account, he can right-click the Change Control node and select New Controlled GPO. You can see what happens in Figure C-43.
But now that the request is coming from Eddy, who’s a requestor, really an Editor, he gets prompted (again, check out Figure C-43).
At this point, Eddy can put in some comments that will go to all the people on the To: line; the most important person being the Approver (Frank Rizzo). You can see this in Figure C-43.
When Eddy clicks Submit, he’ll see something similar to Figure C-44. That is, the request for a GPO gets sent into the system and an e-mail is sent of pending requests.
Even though Eddy requested a live (but Controlled) GPO, he didn’t get that. He got the request submitted for that GPO. Now, it’s time for the Approver to verify and Approve or Reject the request.
All he needs to do is to first check his e-mail’s inboxes.

Figure C-43: Eddy is requesting a new GPO.

Figure C-44: Here’s what Eddy’s e-mail looks like when sent to the gang.
Approving or Rejecting a Pending Request
A pending request is Approved or Rejected in (generally) two steps. First, the Approver (Frank) receives the e-mail notifying him about a request. Then, the Approver can use the AGPM console to tend to the actual request.
E-mail Notifications from AGPM
AGPM sends notifications to everyone in the To: line. The e-mail looks like Figure C-44. It contains the following information:
- Who is doing the requesting (Eddy)
- What he wants (requested creation of a GPO)
- That he doesn’t want to use a template (more on this later)
- What he wants to name the GPO
- Any comments left in the request
Tending to the Pending Request
At this point, Frank can log onto the GPMC, go to the Change Control node, and click Contents ⇒ Pending to see any pending requests. Because Frank is an Approver, he can Approve or Reject the request (as seen in Figure C-45) and leave comments for Eddy in return (which will be logged in the GPO history). Some common comments can be seen in Figure C-46.

Figure C-45: Use the Pending tab to handle pending requests.

Figure C-46: Include a note during your approval (or rejection) of a pending request.
What’s odd is that the original requester, Eddy, doesn’t get an automatic e-mail response that this request has been tended to. This is just not something AGPM is capable of right now. So, unfortunately, Frank has to manually e-mail Eddy and tell him his request is done. This isn’t the ideal workflow, and it’s something you have to teach your AGPM admins to do right now.
Note that Frank could also Reject Eddy’s request. The GPO is never created, and there is nothing added to the GPO’s history.
Editing the GPO Offline via Check Out/Check In
As you’ll recall, with AGPM, editing the actual GPO never happens live, online. To make proposed changes to the GPO, it must be Checked Out of AGPM first, where a copy is made. Then, during that time, no one else can edit the Checked-Out GPO.
This procedure is similar to what we just did. Except, this time, Eddy is performing the Check Out, since he was the one who requested the new GPO and who wants to edit the offline copy.
You can see a screen shot showing how to Check Out a GPO earlier in the chapter, Figure C-19. Once the GPO is Checked Out, Eddy can right-click it and select Edit. Eddy can now Enable the policy setting called Remove Search link from Start Menu as he wanted to in his request.
Once the policy setting is enabled, Eddy can then close the Group Policy Object Editor, return to the GPMC ⇒ Change Control node, right-click over the GPO, and select Check In. He can leave comments about what he did for others to read, as seen in Figure C-47.
Requesting Deployment of the GPO
Now that Eddy has made his proposed changes to the GPO, he can request deployment. He simply right-clicks over the GPO and selects Deploy. You can see how to Deploy a GPO earlier in the chapter, in Figure C-24.

Figure C-47: You can add comments when Checking In a GPO.
When he does this, he can put comments in for the Reviewers, as seen in Figure C-48—though, again, the e-mails always go to everyone on the To: line. The system just isn’t granular enough to send the e-mail only to Reviewers.

Figure C-48: AGPM users can submit deployment requests.
When Eddy clicks Submit, the e-mails go out. The example e-mail can be seen in Figure C-49. Reva, the quality-assurance (QA) person, reads the e-mail, so she knows she has something to do.

Figure C-49: Deployment requests get sent to all AGPM users via e-mail.
At this point, it’s up to someone with Reviewer, Editor, or Approver rights to ensure that Eddy did what he was supposed to in the GPO.
Analyzing a GPO (as a Reviewer)
Eddy’s e-mail made it to all Editors, Reviewers, and Approvers. Who’s going to deal with Eddy’s request? Well, that depends on who has the ability as a Reviewer over the GPO copy that Eddy has in the archive.
Reva, the QA person, is going to ensure that the Group Policy settings are valid before they go into production.
Earlier, we made Reva a Reviewer of all GPOs in the archive, and therefore, Reva should be able to review Eddy’s changes. Reva can now right-click over a GPO that Eddy created and view the HTML report of the settings contained inside, as seen in Figure C-50.
Reva cannot Approve or Reject Eddy’s work. But she could shoot an e-mail to the team expressing concern if need be. Only Approvers (like Frank) can ultimately Approve (Deploy) a GPO into production.
Deploying a GPO into Production
At this point, Frank can log on, find the GPO that Eddy created on the Pending tab, and choose to Approve or Reject it, as seen in Figure C-51. Approving will redeploy the GPO into production. Rejecting it will leave it Controlled but not put it into production.

Figure C-50: Reva can review the changes via an HTML report.

Figure C-51: Frank can Approve the GPO that was created.
Advanced Configuration and Troubleshooting of AGPM
AGPM is a big place with some big power. In the following sections, we’ll examine some less-often-used features, like templates and forest-to-forest migration, and also learn how to set up specific permissions within AGPM, perform some AGPM troubleshooting, and other odds and ends.
Production Delegation
This section, seen in Figure C-52, has a weird name. It’s called “Production Delegation” but, in my opinion, should have been called “Permissions after Deployment.”

Figure C-52: You can specify that you want to stamp these additional permissions upon a GPO when it’s deployed.
Because that’s what this section does.
Remember, when the GPO is Controlled, the service account (seen as SYSTEM in the GPO’s Owner field) owns the account and strips permissions away so that people in the live world cannot manipulate the GPO. Makes sense.
But when a GPO is Deployed from the archive into the real world, you may want to have certain rights upon that GPO stamped down. For instance, you might want certain people to be able to Edit the GPO, live, in production, even outside of AGPM. Usually not—but you can do it, here, using the Production Delegation tab. The folks listed in this section, with the rights alongside them, are stamped down upon the GPO when it finally goes live.
Auto-Deleting Old GPO Versions
If you have a lot of changes, you’re storing a lot of old data in the archive. Maybe you don’t care that two years ago, three changes were made. You’re concerned about the last five changes, and that’s it.
If you’d like, you can turn on auto-deletion of older archived GPOs, as seen in Figure C-53. This is a new feature of AGPM.

Figure C-53: You can specify how many old copies to keep in the archive before auto-deleting.
Export and Import of Controlled GPOs between Forests and/or Domains
In many bigger companies, having AGPM to be the “gatekeeper” isn’t enough. Some companies want to test their GPOs in a test lab first (good idea) and then bring those GPOs from the test lab into the real world.
Great. But if in the real world you’re using AGPM, how are you going to move those GPOs from the test lab AGPM system to the real-world AGPM system?
Export and Import, of course! (Again, a new feature of AGPM.)
You can Export any Controlled GPO in the archive. Just right-click and select “Export to,” as seen in Figure C-54.

Figure C-54: You can Export to a plain old .CAB cabinet file.
When you have the GPO (now a file) exported, you can then move it via USB stick, network cable, or carrier pigeon from your test lab AGPM setup to your real-world AGPM (or vice versa).
Then, in the target AGPM system, create a new GPO. Specify to Import and select Launch Wizard, as seen in Figure C-55.

Figure C-55: Use the Import Wizard to import an existing .CAB file.
The Import Wizard can use exactly the same migration tables we already created in Chapter 2.
When finished, you’ll have a fully copied (migrated) GPO from the source AGPM system, now in the target AGPM system. Note that you can also use the Import from ⇒ File menu on any Checked-Out (existing) GPO and perform an Import. That way, you don’t have to create a new GPO; you can leverage an existing GPO and wipe out its contents.
Here’s the only “extra bonus” you get from using the AGPM Export and Import processes (as opposed to the “free” built-in migration tables stuff we learned in Chapter 2, specifically in the section “Migrating Group Policy Objects Between Domains.” Group Policy Preferences’ references will be processed by the AGPM migration tables’ Import process. The built-in (free) migration tables process will not do this.
Troubleshooting AGPM Permissions
When setting up AGPM, you can either choose to use the SYSTEM account, if you’re installing it on a Domain Controller, or choose a domain account, like AGPM-OWNER. Picking the latter option can sometimes mean additional headaches, which we’ll solve here.
Trouble Deploying Controlled GPOs
Sometimes, it seems that you can’t deploy controlled GPOs. You’ll get an error stating, “Could not take ownership of the deployed GPO,” like what you see in Figure C-56.
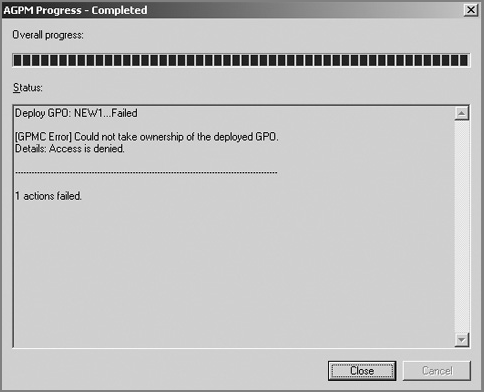
Figure C-56: A GPO permissions problem prevents Controlling GPOs.
To fix this, you can change the permissions on the GPO itself so that the AGPM service account (such as AGPM-OWNER) has “Edit settings, delete, and modify security” on the particular Group Policy Object. You can do this by clicking on the GPO itself and selecting the Delegation tab to edit who has access to the GPO directly. We cover the how tos in detail in Chapter 2.
However, you can also use a script we developed in Appendix A, “Scripting Group Policy Operations with Windows PowerShell,” with a quick trip backward to utilize a cmdlet we learned there.
The cmdlet is named Set-GPPermissions and can be executed with the -all, -user, and -permission switches together. This will append a selected user (the AGPM-OWNER account) to the ACL of all GPOs in the domain, with a chosen permission level: Full Control (also known as the fun-to-type GpoEditDeleteModifySecurity).
Here is how to use the GPO cmdlet (and you can see the run of the cmdlet in Figure C-57):
Set-GPPermissions -all -TargetName "CorpAGPM-OWNER" -TargetType
User -PermissionLevel GpoEditDeleteModifySecurity
Figure C-57: Use a cmdlet from our scripting chapter to affect all exiting GPOs so the AGPM-OWNER account has rights to the “live” GPOs.
And voilà, the PowerShell script modifies the permissions of all GPOs in the domain, appending the selected user account.
After this, you will be able to Deploy your controlled GPOs using AGPM because the AGPM-OWNER account now has permissions to the real GPO.
Trouble Creating New Controlled GPOs
Similarly, you might encounter a situation where you cannot create new Controlled GPOs within AGPM. You might get an error similar to the one you see in Figure C-58, which is “Access is denied.”

Figure C-58: An error you might see when creating new Controlled GPOs within AGPM.
If you encounter this, you likely need to delegate the AGPM service account (such as AGPM-OWNER or AGPM-SERVICE) permissions to Create GPOs in the domain.
Again, this is in the Delegation node within the Group Policy Objects container, within GPMC. I describe how to set these permissions in Chapter 2.
Leveraging AGPM Templates
In Chapter 2, you learned about the concept of Starter GPOs. Starter GPOs are available when your management station has the updated GPMC loaded.
However, Starter GPOs are very limited. They only allow you to preserve the settings within Administrative Templates as the starting point when you’re creating GPOs.
AGPM’s Templates feature goes a lot further. It allows you to preserve just about every possible setting within a GPO. Then, when a new Controlled GPO is requested, a new GPO is stamped out with all those original settings.
Making a GPO into a Template
The first step in making a template is to make a new Controlled GPO. You might want to give it a name that’s indicative of what you want to do with it. In this example, Frank Rizzo, who has Approver rights and therefore can immediately create new Controlled GPOs, can do just that—create a new Controlled GPO as a starting point.
Next, you’ll need to Check Out the new GPO. You can’t Edit a GPO unless it’s Checked Out. Edit the GPO to preserve the template settings. You might want to create templates for all sorts of situations because you can plunk any Group Policy items within the template. Just think about it. You can have templates that consist of the following:
- Administrative Templates
- Security settings
- Deployed printers
- Group Policy Preference Extensions
- Or anything else your heart desires
Before you Check In the GPO, right-click over it and select “Save as Template,” as seen in Figure C-59.

Figure C-59: You can create a template from an existing Controlled GPO.
Then, you’ll be able to give the template a name and add some salient comments, as seen in Figure C-60.

Figure C-60: Adding a comment to a new template
Spawning a New Controlled GPO Based on a Template
At this point, new Controlled GPOs can either be based on no template (or, really, the default template named “<Empty GPO>”) or be based on the template you just created.
People making new requests for creating GPOs can choose the template. They can do this while in the Submit New Controlled GPO Request dialog box, as shown in Figure C-61, or by clicking the Templates tab, locating the template, right-clicking over it, and selecting New Controlled GPO.

Figure C-61: Creating a GPO from an existing template
Setting the Default Template
If you’d like, you can set the default template, which is used whenever anyone creates a GPO, by right-clicking over the template and selecting “Set as Default.” Note that anyone with Editor rights can set the default template.
Editing a Template
Briefly, once you save a template, you cannot edit it. It’s essentially frozen in time forever. However, if you want to, you can do the following procedure, which is almost like editing a template:
- Create a new Controlled GPO from the template.
- Edit the GPO.
- Save it as a template with a darn-similar name (because you can’t have two templates with the same name).
- Put the original template in the Recycle Bin.
- Destroy the original template in the Recycle Bin.
- Rename the new template with the original name.
Finding Differences between a Deployed GPO and a Template
One of the great things about templates is that you can do “spot auditing” for differences between a controlled GPO and a template. Indeed, you could consider some templates to be baseline security, depending on how you use them.
With that in mind, to see how far changed HR GPO1 is from a specific template (for instance, the one that created it), just right-click over the GPO and select Differences ⇒ Template, as seen in Figure C-62; then pick the template you want to compare.

Figure C-62: You can create a Difference report between a GPO and a template to see variations from the original.
The output will be similar to other reports. Blue lines with pound signs (#) designate that the same GPO is in both. Plus signs (+) with green lines designate that some setting was added since the template was made. The minus sign (–) with red lines means that some setting was subtracted since the template was made.
See Figure C-31 for an example report that will be similar to Difference reports.
Changing Permissions on GPO Archives
In Figure C-42, we saw how Frank, Reva, and Eddy all had access to the AGPM system. We did this via the Domain Delegation tab. And adding them using the Add button made sure they received rights that allowed them to travel through the AGPM system Reviewing, Editing, and Approving requests.
However, you can, if you want, add someone else to a single GPO within the archive. This can be performed only on a Controlled GPO. So, for instance, if someone else (not normally part of the AGPM system) needed rights to manage one GPO in the archive, you could grant it to them.
To do this, click on the Controlled GPO, then click the Advanced button in the lower right. This will bring up the permissions for the GPO in the archive. Then, as seen in Figure C-63, I’ve added Nurse1 to the Controlled HR GPO2.

Figure C-63: You can grant permissions to an AGPM user for a single GPO.
By default, when you click Add and select a user, the user gets Reviewer and Editor rights. After that, you can tailor the permissions to specifically what you need (again, seen in Figure C-63).
Backing Up, Restoring, and Moving the AGPM Server
Because AGPM is a single point of failure, you need a backup. And this backup can be moved/restored to any server. But it’s certainly easier to bring up a server with the same name as the original AGPM server and restore it to the same location.
In my original example, I installed the AGPM server on DC01 and put the archive within C:AGPM-ARCHIVE (a change from the defaults, which we talked about earlier). You can see the archive in Figure C-64.

Figure C-64: The GPOs in the archive are just files in directories.
The AGPM archive consists of directories and a handful of files—just plain old regular directories and files, with backups of Group Policy Objects within them and some pointer files (gpostate.xml and manifest.xml) to help keep some order to the place.
Backing Up the AGPM Server
To back up the AGPM server, just copy the whole AGPM-ARCHIVE directory to another safe location for easy access. You can schedule this action.
It’s likely a good idea to stop the AGPM service running on the server, though, to ensure that no users are currently in the middle of making Group Policy Check-Outs/Check-Ins.
Of course, the whole process can be scripted and scheduled to happen, say, nightly, if desired.
Restoring the AGPM Server
Restoring the AGPM server is simple: get a new machine to house the AGPM server. Then, install the server as you did earlier. Again, I suggest you specify a directory like C:AGPM-ARCHIVE for the archive. You can specify the same service account you used earlier and the account that will own the AGPM archive (AGPM-OWNER).
Then, once it’s fully installed, stop the AGPM service.
Traverse to the directory, and copy in the backed-up files. Make sure the gpostate.xml and manifest.xml files are in the root of the archive.
Finally, once they’re all copied, start the AGPM service on the server.
Changing the Location of the Clients to the New Server
During this period of restoring (or moving) the AGPM server, your AGPM administrators won’t be able to access it. When they click on the Change Control node, they’ll get a message similar to what’s seen in Figure C-65. Actually, they’ll see this message whenever the AGPM service is stopped for any reason.

Figure C-65: You’ll get an AGPM error if you choose to restore to a different server.
At this point, if you’ve restored back to the same server, your clients should be A-OK and seeing the same data in the archive they saw before the incident.
However, if you changed the name of the server, you’ll need to change the AGPM client to point to the new AGPM server. If you don’t get the updated server name correct, you’ll see what’s in Figure C-66.

Figure C-66: You’ll get an AGPM client error if it cannot find the AGPM server.
Finally, your restore isn’t complete until you set the SMTP and e-mail settings, including spelling out who should be on the From: and To: lines as well as setting the SMTP server name and putting back in the password. Also remember to use semicolons, not commas, between names on the To: line. If you don’t finish these steps, you might see what’s in Figure C-67.

Figure C-67: Another AGPM error regarding SMTP configuration during restore
Once those steps are completed, you’ve successfully restored your AGPM server.
Changing the Port That AGPM Uses
If for some reason after AGPM server installation you need to modify the port that AGPM uses, the procedure is very simple. Just stop the AGPM service, locate the gpostate.xml file (in the root of the AGPM archive), locate the line that says Agpm:port="4600", change the port number, restart the AGPM service, and finally, change the port on the AGPM client to match.
Events from AGPM
I wish I could tell you that AGPM had rich event reporting in the Event Viewer. It doesn’t. Take a look at Figure C-68.

Figure C-68: All AGPM events seem to be the same Event 2005, and they all seem to be about successful restores of GPOs.
With AGPM, you’ll see events from the source named “Group Policy Management.” These events are not actually being generated by AGPM but instead are the results of actions taken by AGPM. You might also see events if you manually back up and restore Group Policy Objects via the Group Policy Management Console.
If you want detailed reports of what’s transpiring between the AGPM client and AGPM server, you need to turn on AGPM tracing. See the section “AGPM Tracing Clients and Servers” a little later.
Leveraging the Built-in AGPM ADMX Template
In Chapter 6, “Managing Applications and Settings Using Group Policy,” you learned about ADM and ADMX files and how ADMX files are the newer technology to control an application’s settings. When you load the AGPM client, it also puts an ADMX file on your system in the WindowsPolicyDefinitions directory. This file can help you manage both your AGPM servers and your AGPM clients. (Again, an AGPM client means a management station that has the AGPM management piece installed.)
To use the AGPM ADMX template, simply create a new GPO and link it to the location you want to manage. To leverage the policy settings on the User side, you might want to create an OU called People who can manage GPOs via AGPM and link the GPO there.
Or, to leverage the policy on the Computer side, you might want to create an OU called Our AGPM clients and/or Our AGPM servers and link the GPO there.
You can see the AGPM settings in Computer Configuration ⇒ Policies ⇒ Administrative Templates ⇒ Windows Components ⇒ AGPM and in User Configuration ⇒ Policies ⇒ Administrative Templates ⇒ AGPM and also another node parallel to AGPM called Microsoft Management Console.
Let’s run down the things the ADMX template is capable of performing.
ADMX Template Settings That Tell Your AGPM Client Which AGPM Server to Use
There are two curiously named settings within User Configuration ⇒ Policies ⇒ Administrative Templates ⇒ Windows Components ⇒ AGPM, as seen in Figure C-69. They’re named AGPM: Specify AGPM Servers and AGPM: Specify default AGPM Server (all domains).

Figure C-69: The two AGPM settings on the User side
You can choose to use one, both, or neither of these settings.
Let’s say you had OU administrators who all needed to use the same AGPM server. No problem—you might link a GPO to the domain level (therefore ensuring that every OU administrator got the GPO) and use agpm.corp.com as your AGPM server.
That’s great. Except for a small handful of OU admins contained within an OU named AGPM Testers. In this OU, they need to use another AGPM server (testagpmserver.corp.com), which is online just for testing purposes.
So, you’ve got two policy settings. One policy setting, AGPM: Specify default AGPM Server (all domains), would be used to tell the AGPM client which server to use normally (agpm.corp.com). Buuut you might consider linking a GPO containing settings within the policy setting named AGPM: Specify AGPM Servers, which overwrites any defaults that might be set via the AGPM: Specify default AGPM Server (all domains) setting.
You can see how to use the AGPM: Specify AGPM Servers policy setting in Figure C-70.

Figure C-70: Setting the AGPM: Specify AGPM Servers policy setting
It’s a little counterintuitive, I know. So, here it is in a nutshell: if you have a conflict between AGPM: Specify AGPM Servers and AGPM: Specify default AGPM Server (all domains), then AGPM: Specify AGPM Servers is meant to be the more specific setting, so it will win.
And, a quick warning: In my tests, if the setting was already set locally, this policy setting didn’t always apply. So be sure not to set up the AGPM client manually if you’re planning on using these Group Policy ADMX templates and their settings.
Honing the AGPM Client View
Dive down into User Configuration ⇒ Policies ⇒ Administrative Templates ⇒ Windows Components ⇒ Microsoft Management Console ⇒ Restricted/Permitted snap-ins ⇒ Extension Snap-ins and there are three policy settings that let you further restrict who can do what within the AGPM client. You can see them in Figure C-71.
So, without further ado, here’s the breakdown.

Figure C-71: You can further refine which snap-ins and tabs are shown within the GPMC and AGPM.
AGPM: Show Change Control Tab
If this policy setting is Disabled (yes, Disabled), the Change Control node will not be shown. Might be useful if anyone except the people part of the AGPM cabal in your company inadvertently installs the AGPM client. That way, they won’t be tempted to click on the Change Control node and get an Access Denied error message.
AGPM: Show History Tab for Linked GPOs
If this policy setting is Disabled (yes, Disabled), the History tab goes away within the GPMC. This occurs for the History tab over linked GPOs and makes History unavailable within the Change Control node.
Might be useful when someone’s job is just to request GPOs and they shouldn’t see any history of past GPO implementations.
AGPM: Show History Tab for GPOs
If this policy setting is Disabled (yes, Disabled), the History tab is removed from GPOs that are not linked (just in the swimming pool). That is, you’ll see the History tab only on GPOs that are linked.
AGPM Tracing Clients and Servers
In Figure C-72, you can see the setting for AGPM logging.

Figure C-72: You can set AGPM logging (for both server and client) using Group Policy.
What’s interesting about this policy is that the same policy (when Enabled) can affect either AGPM clients or AGPM servers. So, just create the GPO and link it over to the OU containing either AGPM clients or AGPM servers.
Enabling the policy setting and affecting an AGPM client turns on tracing and puts a log in %LocalAppData%MicrosoftAGPMagpm.log.
Enabling the policy setting and affecting an AGPM server turns on tracing and puts a log in %ProgramData%MicrosoftAGPMagpmserv.log.
You can experiment with this to see the logging levels. Indeed, I recommend you do this before there’s an AGPM problem, so you can get a feel for what’s possible when logging is enabled.
Final Thoughts
AGPM is neat. But it’s an investment. Not only is it an investment in terms of money, it’s also an investment in terms of time.
Remember that, by default, just because AGPM is deployed doesn’t mean that the original owners can’t modify the original live GPOs. To prevent that, you’ll need to take Control of the GPO. When you do that, the original owner is changed to SYSTEM or the AGPM-OWNER account (or whatever you called it during setup). So in this way, the previous owner is prevented from manipulating that GPO, and that’s a good thing.
AGPM doesn’t care if you use technologies like the Central Store, ADM files, custom ADM files, or custom ADMX files (all within Chapter 6) or Group Policy Preference Extensions (Chapter 5).
When it comes to third-party Group Policy extensions and AGPM, not every Group Policy add-on is compatible. That’s because the way those tools store their data could be outside of the way AGPM knows how to back it up and restore it. For the record, PolicyPak (Chapter 6) and AGPM work perfectly together, and there’s a video on the PolicyPak website at
http://www.policypak.com/integration/policypak-group-policy-change-management-utilities.html
to help demonstrate them working together.
Remember the key point: you want install AGPM on the latest Windows Server machine because that archive power relies on the underlying server host.
Also, before I forget, I also wrote an AGPM “Myths and Facts” article, which Microsoft picked up on their website. You can find it here:
One final note: If AGPM isn’t affordable or available to you, there are other non-Microsoft ways to accomplish similar tasks. Tasks such as working together as a team, checking out a GPO, deploying, roll-back, and so on.
If you look at the video link I gave you regarding AGPM and PolicyPak, I demonstrate several other AGPM-like systems which are available in the marketplace for you to check out.