
Chapter 9. Deploying HBase
By now, you’ve learned a lot about HBase as a system and how to use it. As you’ve read the chapters, we hope you’ve set up HBase in standalone mode and played around with client code. A single-node standalone HBase install is only meant for basic access, which you typically do either while learning how to use the system or while developing an application. It can’t handle any real workload or scale.
When planning a fully distributed HBase setup, you have to think about all the individual components: HBase Master, ZooKeeper, RegionServers, and HDFS DataNodes. Sometimes this list also includes the MapReduce framework. Each of these has different requirements in terms of hardware resources. This chapter will teach you in detail about the requirements for all the components and how you should choose hardware for a fully distributed HBase install. We’ll then talk about the different HBase distributions available and considerations you should take into account when choosing one over the other. We’ll also discuss deployment strategies and what you should consider when architecting your deployment system.
Remember the cloud? We shied away from talking about it in the preceding chapters, but we’ll discuss it now. Once you have everything set up and the HBase components deployed, you have to configure the system too. We’ll cover the important configuration parameters and what each means.
Note
If you’re looking to build out a production system, you’ll most likely have to work with your system administrator and involve them in the deployment process.
9.1. Planning your cluster
Planning an HBase cluster includes planning the underlying Hadoop cluster. This section will highlight the considerations to keep in mind when choosing hardware and how the roles (HBase Master, RegionServers, ZooKeeper, and so on) should be deployed on the cluster. Choosing the right hardware for your deployment is crucial. Hardware will probably be your single largest investment in your Hadoop and HBase deployment, outside of hiring engineers to build the application that will use the systems. Hadoop and HBase run on commodity hardware. Commodity doesn’t mean low-end configuration. It means nonexotic parts that are easily available from several manufacturers. In other words, you don’t need to buy top-of-the-line, enterprise-grade servers to have a successful deployment.
When choosing hardware for any application, you have to make choices such as the number of CPUs, the amount of RAM, the number and size of disks, and so on. For an HBase deployment, it’s important to have the right ratio of all these resources in order to maximize the performance and minimize costs. You don’t want to have a cluster with lots of CPU but not enough RAM to hold the cache or the MemStore. A slightly lower CPU but more RAM would probably be a better choice, but the cost would remain the same.
As you’ve learned by now, there are multiple roles in an HBase deployment. Each has specific hardware requirements, some more extensive than others.
The hardware selection and what is deployed to which location is governed by the size of the cluster. In clusters up to 25 nodes, having a single node running the Hadoop JobTracker and NameNode isn’t uncommon. You can put the Secondary NameNode there too, but it’s generally recommended that you keep it separate. Clusters larger than 25 nodes typically have dedicated hardware for each of the Hadoop NameNode, JobTracker, and Secondary NameNode. Don’t think that 25 is a magic number; it’s a general guideline to give you an idea about the direction to consider when planning your cluster.
Let’s add HBase to the picture now. The HBase RegionServers are almost always collocated with the Hadoop DataNodes. When planning a cluster, SLAs come into the picture, and planning carefully becomes crucial. As a blanket rule, don’t collocate HBase RegionServers with the Hadoop TaskTrackers if HBase is being used for low-latency workloads. If your use case doesn’t contain any MapReduce jobs, it’s a good idea to not set up the MapReduce framework at all—that is, don’t install the JobTracker and the TaskTrackers. If you have MapReduce as well as real-time workloads, use two separate clusters—one for MapReduce and one for HBase. Your MapReduce jobs can read from the remote HBase cluster. Yes, you do lose data locality and will be transferring data over the network for every job, but that’s the only way to reliably guarantee SLAs for the real-time workloads.
We typically don’t recommend serving MapReduce and real-time workloads at the same time from the same HBase cluster. If you absolutely have to, make sure you tune the number of tasks way down so as to not overwhelm the HBase RegionServers. Having a higher number of disks also helps alleviate I/O contention issues by distributing the load across the disks. Get more RAM, because your tasks will need resources too.
If the primary use case is doing MapReduce jobs over the data in HBase, collocating RegionServers and TaskTrackers is fine.
Now, let’s look at some common deployment scenarios and how you should plan them. It generally helps to think in terms of the kind of cluster you’re looking to deploy. Some of the common kinds of cluster types are listed next.
9.1.1. Prototype cluster
If you’re building a simple prototype cluster, you can collocate the HBase Master with the Hadoop NameNode and JobTracker on the same node. If those already reside on separate nodes, you can collocate the HBase Master with either of them and call it a day. ZooKeeper can be hosted on any of these nodes too.
Given that you’ll have the Hadoop NameNode, JobTracker, HBase Master, and ZooKeeper on the same node, it helps to have a node with sufficient memory and disks to sustain this load. A prototype cluster would most likely be less than 10 nodes, which limits the capacity of your HDFS. Having a machine with 4–6 cores, 24–32 GB RAM, and 4 SATA disks should be okay. There is no need to get redundant power supplies, SAS disks, and so on; you don’t need a lot of high availability in a prototype cluster, so save yourself some money that you can invest in the production cluster when your application becomes a hit!
Tl;dr:[1]
1 Tl;dr (too long; didn’t read). We know that some readers jump straight to the bullet points!
- A prototype cluster is one that doesn’t have strict SLAs, and it’s okay for it to go down.
- It typically has fewer than 10 nodes.
- It’s okay to collocate multiple services on a single node in a prototype cluster.
- 4–6 cores, 24–32 GB RAM, and 4 disks per node should be a good place to start. This assumes you aren’t collocating MapReduce with HBase, which is the recommended way of running HBase if you’re using it for low-latency access. Collocating the two would require more cores, RAM, and spindles.
9.1.2. Small production cluster (10–20 servers)
Generally, you shouldn’t have fewer than 10 nodes in a production HBase cluster. Again, 10 isn’t a magic number. It’s hard to operate a small cluster with performance guarantees and tight SLAs (this statement is more anecdotal than logic based).
In a small production cluster, the Hadoop NameNode and JobTracker can remain collocated. There isn’t enough load on either of them to warrant extra hardware. But given that you need a reliable system, you want to consider better quality hardware than you did for a prototype cluster. We cover typical hardware for each of the role types later.
The HBase Master should be on its own hardware, but not because it’s doing a lot of work. The reason to separate it from the NameNode and JobTracker is to reduce the load on the node hosting those roles. The HBase Master node can have a lower-grade hardware profile than the other two. You can get by with a single Master, but given that it’s a production system, it’s a good idea to have redundancy. Thus you should have multiple HBase Masters, each deployed on dedicated hardware.
A single ZooKeeper instance is usually enough in a small production cluster. Zoo-Keeper doesn’t do resource-intensive work and can be hosted on modest hardware as well. You can also consider hosting ZooKeeper and HBase Master together on the same host, as long as you give ZooKeeper a dedicated disk to write its data to. Having multiple ZooKeeper nodes increases availability; but on a small cluster, you most likely won’t expect high traffic, and maintaining availability with a single ZooKeeper instance is doable. Also, having the NameNode act as a single point of failure is a problem even if you have multiple ZooKeepers.
The downside of having a single ZooKeeper and HBase Master instance hosted on the same node is that it limits serviceability. Things like kernel upgrades, minor reboots, and so on become impossible to do without downtime. But in a small cluster, having more than one ZooKeeper and HBase Master means the cost goes up. You need to make an informed choice.
Tl;dr:
- Fewer than 10 slave nodes is hard to make operationalize.
- Consider relatively better hardware for the Master nodes if you’re deploying a production cluster. Dual power supplies and perhaps RAID are the order of the day.
- Small production clusters with not much traffic/workload can have services collocated.
- A single HBase Master is okay for small clusters.
- A single ZooKeeper is okay for small clusters and can be collocated with the HBase Master. If the host running the NameNode and JobTracker is beefy enough, put ZooKeeper and HBase Master on it too. This will save you having to buy an extra machine.
- A single HBase Master and ZooKeeper limits serviceability.
9.1.3. Medium production cluster (up to ~50 servers)
Things change as you scale up to a greater number of servers than in a small deployment. The cluster has more data, more servers doing work, and more processes to manage. Separate out the NameNode and JobTracker, and give them dedicated hardware. Keep the HBase Masters and ZooKeeper on the same hardware, as in a small deployment. The work the Master will do doesn’t scale up linearly with the size of the cluster; in fact, the Master’s load doesn’t increase much.
You could get by with a single ZooKeeper instance in a small deployment. As the deployment scales, you’ll probably have more client threads as well. Increase the number of ZooKeeper instances to three. Why not two? Because ZooKeeper needs an odd number of instances in order to have a quorum of servers to make decisions.
Tl;dr:
- Up to 50 nodes, possibly in production, would fall in this category.
- We recommend that you not collocate HBase and MapReduce for performance reasons. If you do collocate, deploy NameNode and JobTracker on separate hardware.
- Three ZooKeeper and three HBase Master nodes should be deployed, especially if this is a production system. You don’t need three HBase Masters and can do with two; but given that you already have three ZooKeeper nodes and are sharing ZooKeeper and HBase Master, it doesn’t hurt to have a third Master.
- Don’t cheap out on the hardware for the NameNode and Secondary NameNodes.
9.1.4. Large production cluster (>~50 servers)
A large cluster can be approached almost like a medium-sized cluster, except that we recommend increasing the number of ZooKeeper instances to five. Collocate the HBase Masters with ZooKeeper. This gives you five HBase Masters, too. Make sure you give ZooKeeper a dedicated disk for it to write its data to.
The hardware profiles of the Hadoop NameNode and Secondary NameNode change as you look at larger-scale deployments; we’ll talk about that shortly.
Tl;dr:
- Everything for the medium-sized cluster holds true, except that you may need five ZooKeeper instances that can also collocate with HBase Masters.
- Make sure NameNode and Secondary NameNode have enough memory, depending on the storage capacity of the cluster.
9.1.5. Hadoop Master nodes
The Hadoop NameNode, Secondary NameNode, and JobTracker are typically referred to as the Hadoop Master processes. As you read earlier, depending on the size of the cluster, these are either deployed together or on separate nodes of similar hardware configuration. All of these are single processes and don’t have any failover strategy built in. Because of this, you need to ensure that the hardware you deploy is as highly available as possible. Of course, you don’t want to go overboard and get the most expensive system. But don’t be cheap either!
For the nodes hosting these processes, it’s recommended that you have redundancy at the hardware level for the various components: dual power supplies, bonded network interface cards (NICs), and possibly RAID disks. It’s not uncommon to find RAID 1 disks on the NameNode and Secondary NameNode for metadata storage, although JBODs[2] serve the purpose because the NameNode can write metadata to multiple locations. If the disks holding the metadata on the NameNode go down and you don’t have redundancy or backups built into your deployment, you’ll lose the data in the cluster, and that’s something you don’t want to experience when running in production. Either get RAID 1 and write to a single location, or get multiple disks and configure the NameNode to write to multiple locations. It’s also not uncommon to use an NFS mount as one of the metadata directories for the Name-Node in order to write the metadata to storage outside of the NameNode server. The OS on any of these nodes needs to be highly available too. Configure RAID 1 for the disk hosting the OS.
2 JBOD stands for Just a Bunch of Disks. You can read more about non-RAID drive architectures at http://mng.bz/Ta1c.
The NameNode serves all the metadata from main memory, and, therefore, you need to ensure that there is enough RAM to be able to address the entire namespace.[3] A server with 8 cores, at least 16 GB DDR3 RAM, dual 1 GB Ethernet NICs, and SATA drives should be enough for small clusters. Medium and large clusters can benefit from additional RAM, with the rest of the hardware configuration remaining the same. Typically, add another 16 GB RAM for the medium clusters and another 16 GB RAM for the large clusters to accommodate more metadata owing to a higher capacity.
3 Here’s a great article on NameNode scalability and how much RAM you need by Konstantin Shvachko, an HDFS committer: “HDFS scalability: the limits to growth,” April 2010, http://mng.bz/A5Ey.
The Secondary NameNode should have the same hardware as the NameNode. Apart from doing its job of checkpointing and backing up the metadata, it’s also typically the server you fall back on if the NameNode server goes to lunch and doesn’t come back.
9.1.6. HBase Master
The HBase Master doesn’t do much heavy-duty work, and you can have multiple Masters for failover purposes. Because of these two factors, having expensive hardware with redundancy built in is overkill for the HBase Master. You won’t gain much.
A typical hardware configuration for the HBase Master nodes is 4 cores, 8–16 GB DDR3 RAM, 2 SATA disks (one for the OS and the other for the HBase Master logs), and a 1 GbE NIC. Build redundancy into the system by having multiple HBase Masters, and you should be good to go.
- HBase Master is a lightweight process and doesn’t need a lot of resources, but it’s wise to keep it on independent hardware if possible.
- Have multiple HBase Masters for redundancy.
- 4 cores, 8–16 GB RAM, and 2 disks are more than enough for the HBase Master nodes.
9.1.7. Hadoop DataNodes and HBase RegionServers
The Hadoop DataNodes and HBase RegionServers are typically referred to as the slave nodes in the system. They don’t have fancy hardware requirements like the Master nodes because of the built-in redundancy in the architecture. All slave nodes are alike, and any one of them can replace the function of any other. The job of the slave nodes is to store the HDFS data, do MapReduce computation, and serve requests from the HBase RegionServer. To do all that work well, they need ample RAM, disk storage, and CPU cores. Remember, commodity doesn’t mean a low-end configuration but instead modest-quality hardware. No single hardware configuration is optimal for all workloads; some workloads can be more memory intensive and others can be more CPU intensive. And then there are archival storage workloads, which don’t need a lot of CPU resources.
HBase RegionServers are memory hogs and will happily consume all the RAM you give them. That doesn’t mean you should allocate 30 GB of heap to the RegionServer process. You’ll run into stop-the-world garbage collectors (GCs), and that will bring down your system in no time. Remember, HBase is latency sensitive, and stop-the-world garbage collection is the bane of its existence. Anecdotally, a 10–15 GB heap for the RegionServer performs well, but you should test it against your workload to find the optimal number. If all you’re running is HBase (and of course HDFS), the slave nodes need a total of 8–12 cores for the DataNode, RegionServer, OS, and other processes (monitoring agents and so on). Add to that 24–32 GB RAM and 12x 1 TB drives, and you should be good to go. Extra RAM on the box never hurts and can be used up by the file-system cache.
Note that no MapReduce is running here. If you choose to run MapReduce as well on the same cluster,[4] add another 6–8 cores and 24 GB to that configuration. Generally, each MapReduce task needs about 2–3 GB memory and at least 1 CPU core. Having a high storage density per node (like 12x 2 TB disks) leads to suboptimal behavior such as too much data to replicate if a node fails.
4 We generally recommend keeping TaskTrackers and HBase RegionServers separate unless your primary workload is MapReduce over HBase tables and you don’t expect a guaranteed low-latency response from HBase all the time.
Tl;dr:
- DataNodes and RegionServers are always collocated. They serve the traffic. Avoid running MapReduce on the same nodes.
- 8–12 cores, 24–32 GB RAM, 12x 1 TB disks is a good place to start.
- You can increase the number of disks for higher storage density, but don’t go too high or replication will take time in the face of node or disk failure.
Tip
Get a larger number of reasonably sized boxes instead of fewer beefy ones.
9.1.8. ZooKeeper(s)
Like the HBase Master, ZooKeeper is a relatively lightweight process. But ZooKeeper is more latency sensitive than the HBase Master. Because of that, we recommend giving ZooKeeper a dedicated spindle to write its data to. ZooKeeper serves everything out of memory, but it persists its data onto the disk as well; and if that is slow (because of I/O contention), it can degrade ZooKeeper’s functioning.
Other than that, ZooKeepers don’t need many hardware resources. You can easily have the same hardware configuration as the HBase Master and call it a day.
Tl;dr:
- ZooKeepers are lightweight but latency sensitive.
- Hardware similar to that of the HBase Master works fine if you’re looking to deploy them separately.
- HBase Master and ZooKeeper can be collocated safely as long as you make sure ZooKeeper gets a dedicated spindle for its data persistence. Add a disk (for the ZooKeeper data to be persisted on) to the configuration mentioned in the HBase Master section if you’re collocating.
9.1.9. What about the cloud?
We’ve talked about the various components of HBase and what kind of hardware you need to provision for them to function optimally. Recently, the cloud is becoming popular because of the flexibility it offers users. In the context of HBase, we consider the cloud to be just another set of hardware choices with a different cost model. This may be a restrictive view, but let’s start with that. It’s important to understand the various properties the cloud has to offer and what the implications are from the perspective of deploying a production-quality HBase instance.
The biggest (and oldest) player right now in the cloud infrastructure space is Amazon Web Services (AWS). Some of the other players are Rackspace and Microsoft. AWS is the most popular, and several people have deployed HBase instances in AWS. We haven’t come across many instances deployed in Rackspace or in Microsoft. It’s possible that those deployments are just top-secret ones and haven’t been shared openly, but we’ll never know! For this section, we’ll focus more on what AWS has to offer, and most of what we talk about will hold true for other providers as well.
From the context of planning your HBase deployment, AWS offers three services that are relevant: Elastic Compute Cloud (EC2), Simple Storage Service (S3), and Elastic Block Store (EBS; http://aws.amazon.com/ebs/). As you’ve probably realized by now, you need plain servers for an HBase deployment, and EC2 is the service that provides virtual servers to work with. Configuration options (called instance types: http://aws.amazon.com/ec2/#instance) are available, and AWS keeps adding to the list. We recommend using instances with at least 16 GB RAM and ample compute and storage. That’s keeping it a little vague, but given the dynamic nature of the landscape, chances are that by the time you get your hands on this book to read this section, there will be something new out there that’s better than the best we mention here.
In general, adhere to the following recommendations:
- At least 16 GB RAM. HBase RegionServers are RAM hungry. But don’t give them too much, or you’ll run into Java GC issues. We’ll talk about tuning GC later in this chapter.
- Have as many disks as possible. Most EC2 instances at the time of writing don’t provide a high number of disks.
- A fatter network is always better.
- Get ample compute based on your individual use case. MapReduce jobs need more compute power than a simple website-serving database.
Some EC2 instances are full machines, and the physical server isn’t shared by multiple instance types. Those are better fits for HBase and even Hadoop for the most part. When a single physical server is being shared by multiple instances, chatty neighbors can cause a significant performance impact. If your neighbor is doing heavy I/O, you’ll be seeking more and possibly getting much lower I/O performance in your instance than you would with a quieter neighbor instance.
You’ll often hear people talk about S3 and EBS when discussing Hadoop or HBase in the cloud. Let’s put those in context too. S3 is a highly durable and reliable file store. It can be used to back up your HBase instance by running export jobs on your table and writing the output to S3. EBS, on the other hand, can be attached as remote disk volumes onto your EC2 instances and provides storage that persists outside of your EC2 instances. This can come in handy if you want to look at starting and stopping your HBase cluster pretty often. You could possibly store your HDFS purely in EBS and shut down the EC2 instances when you want to stop the HBase instances and save some money. To resume the HBase instances, provision new EC2 instances and mount the same EBS volumes to them, and start Hadoop and HBase. This will involve complicated automation scripting.
Now that you know about your options in the cloud and how to think about them, it’s important that you’re aware of the arguments in favor of and against deploying HBase in the cloud. You’ll hear strong opinions from people, and we’ll try to limit this discussion to pure facts and their implications:
- Cost—The cloud offers a pay-as-you-use cost model. This can be good and bad. You don’t have to invest a bunch of money and buy the hardware up front before you can start using HBase. You can provision a few instances, pay per hour, and deploy the software on them. If you’re running 24x7 clusters, do the math on the cost. Chances are that the instances in the cloud will work out to be more expensive than having hardware in your own data center or even a shared data center.
- Ease of use—Provisioning instances in the cloud can be done with just a couple of API calls. You don’t need to go through a hardware-provisioning cycle that your company most likely adheres to in order to get those first few instances on which to deploy HBase. If nodes go down, spin up some more. It’s as simple as that.
- Operations—If you have to buy your own hardware, you also have to buy racks, power, and network equipment. Operating this equipment will require some human resources, and you’ll need to hire for that purpose. Operating servers, racks, and data centers might not be your core competency and might not be something you want to invest in. If you’re using AWS, Amazon does that for you, and the company has a proven track record.
- Reliability—EC2 instances aren’t as reliable as dedicated hardware you’ll buy. We have personally seen instances go down randomly without any degradation in performance that could have hinted at an issue. Reliability has increased over time, but it isn’t comparable to the dedicated boxes you’ll buy.
- Lack of customization—You have to choose from the instance types that AWS provides and can’t customize for your use case. If you’re buying your own hardware, you can customize it. For instance, you need denser storage but not much compute power if you’re only storing large amounts of data in an archival manner. But if you want to do a lot of computation, you need to flip it around and get more compute with less storage density per node.
- Performance—Virtualization doesn’t come free. You pay with a hit in performance. Some virtualization types are better than others, but none come without an impact on performance. The impact is more on I/O than other factors, and that hurts HBase most.
- Security—Look into the security guarantees that the cloud provider has in place. Sometimes this can be an issue for sensitive data, and you may want to get hardware that you manage and can guarantee security on.
Make your hardware decisions keeping all this in mind. At the end of the day, it’s all about the cost of ownership, and we recommend looking at the cost in terms of dollars per amount of data stored or dollars per read/write operation. Those are difficult numbers to calculate, but they will give you the insight you need if you’re trying to choose between dedicated on-premises hardware and the public cloud. Once you’ve made up your mind, bought the hardware, or provisioned the instances, it’s time to deploy the software.
9.2. Deploying software
Managing and deploying on a cluster of machines, especially in production, is nontrivial and needs careful work. There are numerous challenges in doing so, and we’ll list a few of the major ones here. It’s not an unsolvable problem or one that people haven’t already solved, but it’s one that shouldn’t be ignored.
When deploying to a large number of machines, we recommend that you automate the process as much as possible. There are multiple reasons for this. First, you don’t want to repeat the same process on all the machines that need to be set up. Second, when you add nodes to the cluster, you don’t want to have to manually ensure that the new node is set up correctly. Having an automated system that does all this for you is desirable, and most companies have it in some form or other. Some companies have homegrown scripts, whereas others have adopted an open source solution such as Puppet (http://puppetlabs.com/) or Chef (www.opscode.com/chef/). There are some proprietary tools as well, such as HP Opsware. If you’re deploying in the cloud, Apache Whirr (http://whirr.apache.org) is a framework that can come to your rescue and make spinning up and configuring instances easy. With any of these frameworks, you can create custom manifests/recipes/configurations that the frameworks can use to configure and deploy on the servers you run them on. They’ll set up the OS and install and manage various packages, including Hadoop and HBase. They can also help manage configurations from a centralized place, which is what you want.
Specialized tools like Cloudera Manager are specifically designed to manage Hadoop and HBase clusters. These tools have a bunch of Hadoop-specific management features that are otherwise not available in general package-management frameworks.
Going into the details of all these options is beyond the scope of this book; our intent is to introduce you to all the ways you can think about deployments. Invest up front in one of these frameworks, and operating your cluster over time will be much easier.
9.2.1. Whirr: deploying in the cloud
If you’re looking to deploy HBase in the cloud, you should get Apache Whirr to make your life easier. Whirr 0.7.1 doesn’t support HBase 0.92, but you can spin up clusters with CDH3 using the recipe shown in the following listing. The recipe shown is for clusters in AWS EC2 and assumes that you set your access key and secret key as environment variables (AWS_ACCESS_KEY_ID and AWS_SECRET_ACCESS_KEY). Put this recipe into a file that you can pass as a configuration to the Whirr script, such as my_cdh_recipe.
Listing 9.1. Whirr recipe (file named my_cdh_recipe) to spin up a CDH3 cluster
$ cat my_cdh_recipe

whirr.cluster-name=ak-cdh-hbase
whirr.instance-templates=1 zookeeper+hadoop-namenode+hadoop-jobtracker+hbase-
     master,
5 hadoop-datanode+hadoop-tasktracker+hbase-regionserver
hbase-site.dfs.replication=3
whirr.zookeeper.install-function=install_cdh_zookeeper
whirr.zookeeper.configure-function=configure_cdh_zookeeper
whirr.hadoop.install-function=install_cdh_hadoop
whirr.hadoop.configure-function=configure_cdh_hadoop
whirr.hbase.install-function=install_cdh_hbase
whirr.hbase.configure-function=configure_cdh_hbase
whirr.provider=aws-ec2
whirr.identity=${env:AWS_ACCESS_KEY_ID}
whirr.credential=${env:AWS_SECRET_ACCESS_KEY}
whirr.hardware-id=m1.xlarge
# Ubuntu 10.04 LTS Lucid. See http://cloud.ubuntu.com/ami/
whirr.image-id=us-east-1/ami-04c9306d
whirr.location-id=us-east-1
You can use these recipes and spin up the cluster like this:
bin/whirr launch-cluster --config my_cdh_recipe
Once you’ve spun up a cluster, you can use the list command to list the nodes that form the cluster:
bin/whirr list-cluster --config my_cdh_recipe
us-east-1/i-48c4e62c    us-east-1/ami-04c9306d  23.20.55.128    10.188.69.151
RUNNING us-east-1a      zookeeper,hadoop-namenode,
hadoop-jobtracker,hbase-master
us-east-1/i-4ac4e62e    us-east-1/ami-04c9306d  50.17.58.44
     10.188.214.223
RUNNING us-east-1a      hadoop-datanode,
hadoop-tasktracker,hbase-regionserver
us-east-1/i-54c4e630    us-east-1/ami-04c9306d  107.21.147.166  10.4.189.107
RUNNING us-east-1a      hadoop-datanode,
hadoop-tasktracker,hbase-regionserver
us-east-1/i-56c4e632    us-east-1/ami-04c9306d  107.21.77.75
     10.188.108.229
RUNNING us-east-1a      hadoop-datanode,
hadoop-tasktracker,hbase-regionserver
us-east-1/i-50c4e634    us-east-1/ami-04c9306d  184.72.159.27    10.4.229.190
RUNNING us-east-1a      hadoop-datanode,
hadoop-tasktracker,hbase-regionserver
us-east-1/i-52c4e636    us-east-1/ami-04c9306d  50.16.129.84     10.4.198.173
RUNNING us-east-1a      hadoop-datanode,
hadoop-tasktracker,hbase-regionserver
When you’re done with your cluster and want to kill it, use the destroy-cluster command like this:
bin/whirr destroy-cluster --config my_cdh_recipe
9.3. Distributions
This section will cover installing HBase on your cluster. This isn’t a reference guide to building out a full-fledged production deployment but is instead a starting point for setting up a fully distributed install that you can use for your application. Making HBase operational requires a little more work than that, and we cover various aspects in the next chapter.
Numerous distributions (or packages) of HBase are available, and each has multiple releases. The most notable distributions currently are the stock Apache distribution and Cloudera’s CDH:
- Apache—The Apache HBase project is the parent project where all the development for HBase happens. All the code goes there, and developers across multiple companies contribute to it. As with any other open source project, the release cycle depends on the stakeholders (that is, the companies that hire the developers who work on the project) and what features they want to put into a particular release. The HBase community in general has been consistent with their releases. Some of the notable releases are 0.20.x, 0.90.x, 0.92.x and 0.94.x. This book is written with a focus on 0.92.x.
- Cloudera’s CDH—Cloudera is a company that has its own distribution containing Hadoop and other components in the ecosystem, including HBase. This distribution is called CDH (Cloudera’s distribution including Apache Hadoop). CDH builds off the Apache code base by taking a particular release and adding patches to it that haven’t yet been included in any official Apache release. Cloudera does this to put extra features into CDH that customers demand. All the patches are in the Apache code base but not necessarily in the same base branch that CDH is based on.
We recommend using Cloudera’s CDH distribution. It typically includes more patches than the stock releases to add stability, performance improvements, and sometimes features. CDH is also better tested than the Apache releases and is running in production in more clusters than stock Apache. These are points we recommend thinking about before you choose the distribution for your cluster.
The installation steps provided assume that you have Java, Hadoop, and Zoo-Keeper already installed. For instructions on setting up Hadoop and ZooKeeper, refer to their documentation for the distribution you’re choosing.
9.3.1. Using the stock Apache distribution
To install the stock Apache distribution, you need to download the tarballs and install those into a directory of your choice. Many people create a special user that runs all the daemons and put the directory into the home directory of that user. We generally recommend installing into /usr/local/lib/hbase and keeping that as your HBase home so all users can access the files.
Detailed installation instructions are available on the HBase home page and sometimes change with different releases. In general, the steps to follow are listed next. These are specific to the 0.92.1 release, but you can adapt them to whatever release you’re working with:
- Download the tarball from one of the Apache mirrors. For 0.92.1, the name of the tarball is hbase-0.92.1.tar.gz:
cd /tmp
wget http://mirrors.axint.net/apache/hbase/hbase-0.92.1/
hbase-0.92.1.tar.gz
mv /tmp/hbase-0.92.1.tar.gz /usr/local/lib - As root, untar the tarball into /usr/local/lib and create a symlink from /usr/ local/hbase to the newly created directory.
This way, you can define the $HBASE_HOME variable as /usr/local/lib/hbase, and it will point to the current install:
tar xvfz hbase-0.92.1.tar.gz
cd /usr/local/lib
ln -s hbase-0.92.1 hbase
That’s all. Now you need to do the various configurations, and you’re good to go!
9.3.2. Using Cloudera’s CDH distribution
The current release for CDH is CDH4u0 which is based on the 0.92.1 Apache release. The installation instructions are environment specific; the fundamental steps are as follows:
- Add the CDH repository to your system. If you’re using a Red Hat-based system, you use the yum package-management tool:
cd /etc/yum.repos.d
wget http://archive.cloudera.com/cdh4/redhat/6/x86_64/cdh/
cloudera-cdh4.repo If you’re using a Debian/Ubuntu-based system, you use the apt package-management tool:
wget http://archive.cloudera.com/cdh4/one-click-install/precise/amd64/
cdh4-repository_1.0_all.deb
sudo dpkg -i cdh4-repository_1.0_all.deb You can find detailed environment-specific instructions on Cloudera’s documentation site at http://mng.bz/ukS3. - Install the HBase packages. The names of the packages in CDH4 are hbase, hbase-master, and hbase-regionserver. The hbase package contains the binaries for HBase. The other two packages contain init scripts that help you start and stop the Master and RegionServer processes, respectively.
The following commands install the HBase binaries on Red Hat-based systems:
sudo yum install hbase
sudo yum install hbase-master
sudo yum install hbase-regionserver And these commands install the HBase binaries on ebian/Ubuntu-based systems:
sudo apt-get install hbase
sudo apt-get install hbase-master
sudo apt-get install hbase-regionserver Installing these packages lays down the libraries in /usr/lib/hbase/ and the configuration files in /etc/hbase/conf/. The init scripts to start and stop the Master and RegionServer processes are /etc/init.d/hbase-master and /etc/ init.d/hbase-regionserver, respectively.
Note that you won’t be installing the Master and RegionServer scripts on all the nodes. Install the hbase-regionserver package on the slave nodes and the hbase-master package on the nodes that will run the HBase Master process. The hbase package needs to be installed on all the nodes because it contains the actual binaries.
9.4. Configuration
Deploying HBase requires configuring Linux, Hadoop, and, of course, HBase. Some of the configurations are straightforward, and recommendations are available based on experience from multiple production deployments. Some configurations are more iterative and depend on the use case and SLAs the HBase deployment will be serving. No single set of configurations will work for everyone, and chances are you’ll make several configuration changes before you finalize what you’ll run in production serving your application.
In order to configure the system in the most optimal manner, it’s important that you understand the parameters and the implications of tuning them one way or another. This section gives you some insight into the important configuration parameters you’ll most likely be working with while deploying your HBase instance. It covers the HBase-specific configurations first and then goes into the relevant Hadoop and Linux configurations that impact the HBase installation.
9.4.1. HBase configurations
Like Hadoop, there are two aspects of HBase configurations. One is the Linux-specific configuration (or environment configurations), which is different from the OS-level configuration we’ll explain later. The other set is the configuration for the HBase daemons, which are read by them at start time.
On the HBase cluster, the location of the configuration files depends on the installation path you followed. If you used the Apache distribution, the configuration files reside in $HBASE_HOME/conf/; and if you used CDH, they reside in /etc/hbase/ conf/. In general, we recommend that you keep permissions and file locations consistent with the best practices at your company. CDH follows the standard Linux directory architecture and lays out configuration files accordingly. This is acceptable to most system administrators and IT departments.
Environment Configurations
The environment configuration is put into the file hbase-env.sh. This file is sourced by the script running the HBase processes (Master and RegionServer), and therefore things like the Java heap size, garbage-collection parameters, and other environment variables are set here. A sample file is shown next.
Listing 9.2. A sample hbase-env.sh file
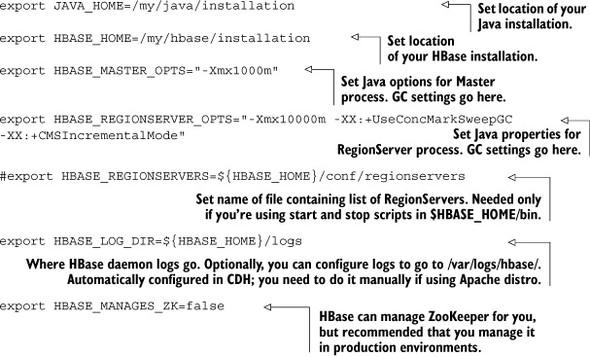
This isn’t a complete file. You can set other parameters here, such as the niceness of the HBase processes. You can look at the default hbase-env.sh file from your installation to see the other available options. Listed here are the ones you’ll work with 95% of the time. You won’t need to configure the others in most cases.
Two of the important things configured here are the memory allocation and GC. It’s critical to pay attention to these if you want to extract decent performance from your HBase deployment. HBase is a database and needs lots of memory to provide low-latency reads and writes. The word real-time is commonly used as well—the idea is that it doesn’t take on the order of minutes to find the contents of the one row you want to read. Indexing, albeit by rowkey only, enables you to quickly find the location where the row should be read from or written to. Indexes are held in memory, and so are the write buffers. Remember the read and write paths we described in chapter 2? To provide this functionality and performance, HBase needs RAM—a lot of it! But you don’t want to give it too much, either.
Tip
Too much of anything isn’t good, even if it’s RAM for your new large-scale database deployment.
We don’t recommend that you give the RegionServers more than 15 GB of heap in a production HBase deployment. The reason for not going over the top and allocating larger heaps than that is that GC starts to become too expensive. It will happen less frequently because you won’t hit memory limits soon enough, and every time it happens, it will last for a longer period of time because it will be working through a much larger amount of memory. That doesn’t mean 15 GB is a magic number and the maximum you should configure your RegionServer heap to; it’s just a good place to start. We recommend that you experiment with heap sizes in your environment and see what works best for you and delivers performance that enables your application to meet its SLAs.
Allocating an optimal amount of heap doesn’t solve all problems. You need to tune the GC as well. That’s a little trickier than coming up with a number for your heap allocation to the RegionServers.
The HBase RegionServers don’t perform well with the default Java GC configuration and need careful tuning on many occasions if you want to serve much load off them. This configuration goes into the hbase-env.sh file on all the nodes in the cluster. A good place to start is setting the HBase Java options to the following:
-Xmx8g -Xms8g -Xmn128m -XX:+UseParNewGC -XX:+UseConcMarkSweepGC
-XX:CMSInitiatingOccupancyFraction=70
In Java programs, you create new objects mostly by using the new operator. These objects are created in the JVM’s heap. When these objects are freed up, the Java GC clears up the memory they were occupying by removing the unreferenced objects. The default configuration with which the GC runs makes certain assumptions about what your program is doing in terms of creating and deleting objects, which isn’t necessarily optimal for all use cases.
Let’s look at what the various options mean:
- -Xmx8g—Sets the maximum heap for the process. 8 GB is a decent place to start. We don’t recommend going beyond 15 GB.
- -Xms8g—Sets the starting heap size to 8 GB. It’s a good idea to allocate the maximum amount of heap when the process starts up. This avoids the extra overhead of increasing the heap as the RegionServers want more.
- -Xmn128m—Sets the young/new generation to 128 MB. Again, it’s not a magic number that is always correct but a good place to start. The default new generation size is too small, and the RegionServer will start to GC aggressively as you put load on it. This will increase your CPU utilization. Setting the new generation to be much bigger puts you at risk of not GCing enough and thereby moving objects into the old/tenured generation as well as causing much larger pauses when the GC happens. Once the MemStore is flushed, which happens frequently when you insert data into an HBase table, the objects will be dereferenced and need to be GCed. Letting them move to the old generation causes the heap to become fragmented when objects are cleared out.
- -XX:+UseParNewGC—Sets the GC for the new generation to use the Parallel New Collector. This collector pauses the Java process and does the GC. This mode of working is acceptable for the new generation because it’s small and the process isn’t stopped for a long period (usually a few milliseconds). The pauses are sometimes also referred to as stop-the-world GC pauses, and they can be lethal if they’re too long. If the GC pause exceeds the ZooKeeper-RegionServer session timeout, ZooKeeper will consider the RegionServer lost and will remove it from the cluster because ZooKeeper didn’t get a heartbeat from it.
- -XX:+UseConcMarkSweepGC—The Parallel New Collector is okay for the new generation but doesn’t work well for the old generation because of the larger size of the old generation. A stop-the-world GC for the old generation would last seconds and cause timeouts. Enabling the concurrent-mark-and-sweep (CMS) GC mitigates this issue. The CMS garbage-collects in parallel with other things happening in the JVM and doesn’t pause the process until it fails to do its job and gives a promotion error. At that point, the process needs to be paused and GC has to be performed. The CMS incurs a load on the CPU because it’s doing GC in parallel while the process is still running.
- -XX:CMSInitiatingOccupancyFraction—The CMS collector can be configured to start when a certain percent of the heap is utilized. This parameter is used to set that. Setting the percentage too low causes the CMS to kick in often, and setting it too high causes the CMS to kick in late, leading to more promotion errors. A good place to start is 70%; you can increase/decrease this value as required once you do benchmarking on your system. The RegionServer heap consists of the block cache (20% of total heap by default) and the MemStore (40% of the heap by default), and setting the occupancy fraction to 70% keeps you just slightly above the total of those two.
Logging the GC activity can be useful in debugging issues when they happen. You can enable logging by adding the following to the GC configs:
-verbose:gc -XX:+PrintGCDetails -XX:+PrintGCTimeStamps
-Xloggc:$HBASE_HOME/logs/gc-$(hostname)-hbase.log
HBase heap and GC tuning are critical to the performance of the system, and we encourage that you test your setting heavily while planning a production system. The tuning can vary based on the kind of hardware on which you’re running HBase and the kind of workload you’re looking to run. For instance, a write-heavy workload needs a slightly larger new generation size than a read-heavy workload.
HBase Configurations
The configuration parameters for HBase daemons are put in an XML file called hbasesite.xml. The XML configuration file can also be used by your client application. You keep it in the classpath of the application; when the HBaseConfiguration object is instantiated, it reads through the XML config file and picks up the relevant bits.
Now that you know where the configuration file is, let’s look at its contents and how the parameters are specified. A sample configuration XML file is shown in the next listing. This isn’t a complete file and contains only a single parameter to show you the format. We’ll list the parameters and their meanings later.
Listing 9.3. Format of the hbase-site.xml configuration file
<?xml version="1.0"?>
<?xml-stylesheet type="text/xsl" href="configuration.xsl"?>

<configuration>
  <property>
    <name>hbase.rootdir</name>
    <value>file:///tmp/hbase-${user.name}/hbase</value>
    <description>The directory shared by region servers and into
        which HBase persists.
        </description>
    </property>
 </configuration>
The configuration file is a standard XML file with each <property> tag representing a configuration parameter. You’ll likely work with several parameters. The most important ones to configure are as follows:
- hbase.zookeeper.quorum—All the components in your HBase cluster need to know the servers that form the ZooKeeper quorum. This is the configuration
parameter where you put that information. The XML tag looks like this:
<property>
<name>hbase.zookeeper.quorum</name>
<value>server1ip,server2ip,server3ip</value>
</property> - hbase.rootdir—HBase persists its data in HDFS, and the location is explicitly configured using this property. The XML tag looks like this:
<property>
<name>hbase.rootdir</name>
<value>hdfs://namenode.yourcompany.com:5200/hbase</value>
</property> 5200 is the port on which your NameNode is configured to listen. It’s configured in hdfs-site.xml while setting up Hadoop. - hbase.cluster.distributed—HBase can be run in standalone mode, pseudo-distributed mode, or fully distributed mode. Standalone and pseudo-distributed
modes are only for testing and playing around; they aren’t intended for use in a production environment. Fully distributed
mode is designed for production use; the hbase.cluster.distributed property must be set to true for HBase to run in fully distributed mode. Here’s the XML tag:
<property>
<name>hbase.cluster.distributed</name>
<value>true</value>
</property>
These three configuration parameters in the hbase-site.xml file absolutely have to be set to run HBase in a distributed fashion. Other configuration parameters are generally used to optimize the cluster’s performance; you’ll probably tackle them while tuning the system based on your use case and SLA definitions. These are shown in table 9.1. This isn’t a complete list of all the configurations you can put in hbase-site.xml; these are the configurations you’re likely to want to tweak. If you want to see the whole list, we recommend looking at the hbase-default.xml file in the source code.
Table 9.1. HBase configuration parameters
|
Description |
|
|---|---|
| hbase.client.scanner.caching | Defines the number of rows that will be fetched when the next method is called on a scanner. The higher the number, the fewer remote calls the client needs to make to the RegionServer during scans. A higher number also means more memory consumption at the client side. This can be set on a per-client basis in the configuration object as well. |
| hbase.balancer.period | The region balancer runs periodically in the HBase Master. This property defines the time interval at which you want it to run. The default is 5 minutes set in milliseconds (300,000). |
| hbase.client.write.buffer | The write buffer in the HTable instance on the client side, configured in bytes. A larger buffer means fewer RPCs during writes but higher memory consumption. |
| hbase.hregion.majorcompaction | Major compactions can be configured to take place periodically. This configuration parameter specifies that time period in milliseconds. The default value is 1 day (86,400,000 milliseconds). |
| hbase.hregion.max.filesize | Maximum size of the underlying store files (HStoreFile). The region size is defined by this parameter. If any store file of any column family exceeds this size, the region is split. |
| hbase.hregion.memstore.flush.size | Maximum size of the MemStore, configured in bytes. The MemStore is flushed to disk when it exceeds this size. A thread that runs periodically checks the size of the Mem-Store. The frequency with which that thread runs is defined by hbase.server.thread.wakefrequency. |
| hbase.hregion.memstore.mslab.enabled | MemStore-Local Allocation Buffer is a feature in HBase that helps prevent heap fragmentation when there are heavy writes going on. In some cases, enabling this feature can help alleviate issues of long GC pauses if the heaps are too large. The default value is true. |
| hbase.hstore.blockingStoreFiles | If the number of store files in a particular column family in a region exceeds this number, the writes are blocked until a compaction is completed or the blocking times out. The timeout is configured using hbase.hstore.blockingWaitTime in milliseconds. |
| hbase.hstore.compaction.max | Maximum number of files to compact in a single minor compaction. The default value is 7. |
| hbase.hstore.compactionThreshold | HBase runs compactions on a particular region when the number of store files in a particular column family reaches this number. Setting a high value for this parameter results in infrequent compactions that take longer when they do occur. |
|
hbase.mapreduce.hfileoutputformat .blocksize |
The HFile block size is set at a per-column-family level for each table. This dictates the granularity at which the HFile is indexed. A smaller block size results in better random reads but a larger block index, which means more memory consumption. When you use the HFileOutputFormat in a MapReduce job to write directly into HFiles, the block size must be defined using this property so the MapReduce code doesn’t have access to the table definition and doesn’t know how the column families are configured. |
| hbase.master.info.port | The HBase UI, which we’ll talk about shortly, is exposed on this port. The address of the web UI is http://master.yourcompany.com:<hbase.master.info.port>. The default value is 60010. |
| hbase.master.port | This is the port at which the Master process listens. The default value is 60000. For the most part, you don’t need to change the default ports unless you need to close certain ports, including the default HBase port. |
| hbase.regionserver.port | This is the port that the RegionServer listens on. |
|
hbase.regionserver.global.memstore .lowerLimit hbase.regionserver.global.memstore .upperLimit |
upperLimit defines the maximum percentage of the heap on a RegionServer that the MemStores combined can use up. The moment the upperLimit is hit, Mem-Stores are flushed until the lowerLimit is hit. Setting these values equal to each other means the minimum amount of flushing happens when writes are blocked due to the upperLimit being hit. This minimizes the pauses during writes but also causes more frequent flushing. |
| hbase.regionserver.handler.count | Number of RPC listeners that are spun up on RegionServer and Master processes. |
|
hbase.regionserver .optionallogflushinterval |
How often the HLog must be flushed to the file system, regardless of the number of edits in it. The parameter is configured in milliseconds. The default value is 1 second (1,000 ms). |
| hbase.regionserver.regionSplitLimit | Maximum number of regions that a system should have. The default value is MAX_INT (2,147,483,647). |
| hbase.tmp.dir | Temporary directory that HBase uses on the local file system. |
| hfile.block.cache.size | Maximum percentage of heap that the block cache can use. The block cache is the read cache (LRU). |
| zookeeper.session.timeout | HBase daemons/clients are clients to ZooKeeper. This is the session timeout for their sessions with ZooKeeper. The parameter is configured in milliseconds. |
| zookeeper.znode.parent | Root znode for HBase in ZooKeeper. The default is /hbase. All of HBase’s ZooKeeper files are configured keeping this as the parent path. |
9.4.2. Hadoop configuration parameters relevant to HBase
As you’re aware, Hadoop and HBase are tightly coupled. HBase uses the HDFS, and the way Hadoop is configured impacts HBase. Tuning HDFS well can significantly improve the performance you can extract from HBase. Some of the important configuration parameters are described in table 9.2.
Table 9.2. Important HDFS configuration parameters from HBase’s perspective
|
Configuration parameter |
Description |
|---|---|
| dfs.support.append | HBase needs durable sync on HDFS so the write-ahead log is persisted when edits are written. Without durable sync, HBase can lose data if RegionServers go down without the data being persisted to disk. This configuration parameter has to be explicitly set to true to enable syncs on HDFS. This feature is available in Hadoop 0.20.205 and later versions. With HBase 0.92, you’re most likely using Hadoop 1.0.x or later versions, and they support sync. |
| dfs.datanode.max.xcievers[a] | The max xcievers on DataNodes is an important configuration parameter and often not understood well by Hadoop administrators. It defines the maximum number of sockets/threads per DataNode that HDFS clients can use to read/write data. Lars George wrote one of the most comprehensive descriptions,[b] and we recommend reading it to get a good understanding of what’s going on. For the most part, you’re okay setting this number to 4,096. The default of 256 is low, and you’ll see IOExceptions in the RegionServer logs if you have even slightly heavy I/O. |
a Yup, this is how it’s spelled. Not xceivers.
b Lars George, “HBase + Hadoop + Xceivers,” March 14, 2012, http://mng.bz/Fcd4.
Not only the HDFS configurations but also MapReduce framework configurations have an impact on HBase if you’re doing MapReduce jobs over HBase tables. If your use case doesn’t include running MapReduce jobs against HBase tables, you can safely turn off the MapReduce framework: that is, stop the JobTracker and TaskTracker processes, and give more resources to HBase. If you’re planning to run MapReduce jobs with HBase tables as the source or sink, tune the number of tasks per node to a lower number than you would on a standard MapReduce cluster. The idea is to give ample resources to HBase. Cutting down on the heap you allocate to the RegionServer processes will impact the performance you’ll extract from HBase during those Map-Reduce jobs.
In general, mixing workloads that involve running MapReduce jobs with workloads that have relatively low-latency random reads and writes isn’t recommended. You won’t be able to extract good performance in either of those. If you’re running MapReduce against HBase, the random read/write performance will be impacted, and the latencies will go up. The total throughput you can extract from a single HBase instance remains constant. You’ll end up sharing that among the two workloads. Also, it’s relatively more difficult to run HBase stably if you mix it with heavy MapReduce on the same cluster. It’s not impossible, but it requires a little more careful resource allocation (heap to RegionServers, number of tasks per node, heap to tasks, and so on) than if you kept them separate.
9.4.3. Operating system configurations
In most production systems running HBase and Hadoop, Linux is the underlying OS. You don’t need to tune much except the ulimits for the number of open files. HBase is a database and needs to keep files open so you can read from and write to them without incurring the overhead of opening and closing them on each operation. In a system under any real load, you can quickly hit the limits on the number of open files. We recommend that you increase this limit, especially if you’re deploying in production. You don’t have to increase it as a system-wide setting and can only do it for the DataNode and RegionServer processes. To keep it simple, you can increase it for the user under which you’ll be running these processes.
To increase the open-file limit for the user, put the following statements in your /etc/ security/limits.conf file for the user that will run the Hadoop and HBase daemons. CDH does this for you as a part of the package installation:
hadoopuser                 nofile          32768
hbaseuser                  nofile          32768
hadoopuser  soft/hard      nproc           32000
hbaseuser   soft/hard      nproc           32000
You’ll need to log out and log back in to your box for these to take effect. These configuration parameters increase the limit on the number of open files and the number of processes that the hadoopuser and hbaseuser can run.
Another important configuration parameter to tune is the swap behavior. Swapping on HBase RegionServers is lethal and will degrade performance drastically, if not entirely kill the RegionServer process because of ZooKeeper timeouts. Ideally, you should disable swap on the RegionServer nodes. If you haven’t done that, you can use the kernel tunable parameter vm.swappiness (/proc/sys/vm/swappiness) to define how aggressively memory pages are swapped to disk. The higher the value, the more aggressive the swapping. Tune this parameter down to 0 like this:
$ sysctl -w vm.swappiness=0
9.5. Managing the daemons
There’s a fair bit to operating a production HBase deployment, and the next chapter will focus on the details. Successfully deploying and bringing up the various services is one of the first steps in making a system operational. Until now, we’ve been talking about deploying the right components, configuring the OS, configuring Hadoop, and configuring HBase. Now that all that is done, you’ll start the system and get the machine ready to take some writes and reads. The HBase distribution you installed comes bundled with scripts that can handle the starting and stopping of services. The Apache distribution uses the hbase-daemon.sh script from the $HBASE_HOME/bin/ directory, whereas CDH comes bundled with init scripts.
The relevant services need to be started on each node of the cluster. You probably already have a scheme for doing that, because you had Hadoop installed prior to HBase. If you don’t have a method yet, here are some of the options:
- Use the bundled start and stop scripts. Both Hadoop and HBase come bundled with start and stop scripts that can remotely log in to all the machines in the cluster and start the correct processes. The downside is that they need passwordless SSH, which some IT departments don’t allow because of security concerns. You may argue that you can enter the password every time the script is logging on to a node to start/stop a process. Sure, but think of entering the password over and over again for each start/stop action across hundreds of nodes. Sometimes you don’t even have the password to the accounts—you can only su into it from your own account. That’s more common than you may think.
- Cluster SSH (http://sourceforge.net/projects/clusterssh) is a useful tool if you’re dealing with a cluster of machines. It allows you to simultaneously run the same shell commands on a cluster of machines that you’re logged in to in separate windows. You can start the daemons on all the slave nodes by running the same command simultaneously on all the nodes. This is neat, but it’s hairy to manage on a large number of machines.
- Homegrown scripts are always an option. Combine them with Chef/Puppet or your favorite deployment system, and you can put a script onto each host that starts the appropriate services.
- Use management software like Cloudera Manager that allows you to manage all the services on the cluster from a single web-based UI.
The basic idea is to start the appropriate daemons on each node. You can start an HBase daemon on a node by using the $HBASE_HOME/bin/hbase-daemon.sh script, as follows:
$HBASE_HOME/bin/hbase-daemon.sh --config $HBASE_HOME/conf/ start master
$HBASE_HOME/bin/hbase-daemon.sh --config $HBASE_HOME/conf/ start regionserver
$HBASE_HOME/bin/hbase-daemon.sh --config $HBASE_HOME/conf/ start master-
     backup

$HBASE_HOME/bin/hbase-daemon.sh --config $HBASE_HOME/conf/ stop master
$HBASE_HOME/bin/hbase-daemon.sh --config $HBASE_HOME/conf/ stop regionserver
$HBASE_HOME/bin/hbase-daemon.sh --config $HBASE_HOME/conf/ stop master-backup
Not all daemons are started everywhere. As we discussed earlier in this chapter, they’re all on separate servers.
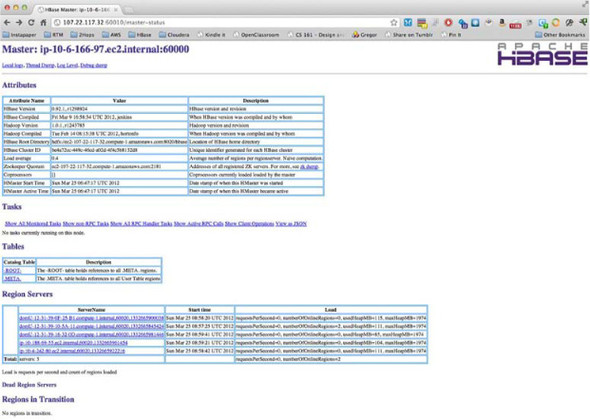
Once you’ve started the RegionServer processes on all the slaves and the Master process on the Master nodes, you can see the status of the system using the HBase shell and also the HBase Master web UI. A sample UI is shown in figure 9.1.
Figure 9.1. HBase Master UI of a working HBase instance
9.6. Summary
In this chapter, we covered the various aspects of deploying HBase in a fully distributed environment for your production application. We talked about the considerations to take into account when choosing hardware for your cluster, including whether to deploy on your own hardware or in the cloud. We next discussed installing and configuring the various distributions, followed by managing your cluster.
This chapter gets you ready to think about putting HBase in production. There is a lot more to it in terms of monitoring the system, and that’s what the next chapter is all about.