
Chapter 6

Turbulenz
6.1 Source Code
All of the source code and examples are available at the website http://HTML5GameEnginesBook.com/. All the code, graphics, and sound are licensed free for personal and commercial use (MIT and CC-BY-3.0). Turbulenz is MIT licensed.
6.2 Introduction
Turbulenz is an MIT-licensed open-source (as of version 0.26+) HTML5 JavaScript/TypeScript game engine developed by Turbulenz Limited [91]. It is the only game engine featured that is powered by WebGL. Though some engines may allow WebGL to be used as an alternative choice for rendering, Turbulenz is WebGL at its core. This aspect has pros and cons which will be addressed in this chapter. Turbulenz is large, complex, and very powerful. The SDK (software development kit) encompasses many aspects of game development. Beyond the normal libraries developers would expect from a large HTML5 game engine, such as image, sound, animation, and physics, it also contains API to save games, generate stats, and even a payment system that connects to the Turbulenz services [94]. These extra services will not be covered.
6.3 WebGL
All our HTML5 game demos thus far were 2D and powered by HTML5 Canvas. However, not technically part of HTML5, but often included when discussing, many browsers offer 3D support in the form WebGL. WebGL is based on OpenGL ES 2.0 and is maintained by the Khronos Group, the same maintainers of OpenGL [72]. OpenGL ES is a mobile-optimized subset of the normal OpenGL standard that has been available on desktop computers for decades [73]. OpenGL ES 2.0 is the most popular revision because it is available on Android and iOS devices since 2009. However, up until recently, accessing the OpenGL features did not occur in the browser. The function calls were only available in that platform’s native development environment (such Java, Obj-C, C++).
With WebGL, we can now have a hardware-accelerated 3D API available directly in the browser. As of this writing, WebGL availability is sparse and only within 2012+ versions of the Firefox and Chrome (not IE 10) desktop web browsers and limited support in Chrome/Firefox for Android. Still, 3D hardware acceleration is a welcome addition, and support should only improve. For now, if you as a developer wish to use WebGL, then you must accept that your audience will be limited to mostly non-IE desktop users. That is still a massive audience for your game, and mobile (and IE) will eventually catch up. Microsoft has already announced IE11 will support WebGL [95], so IE may be included in your test cases by the time you read this book.
This chapter bypasses direct WebGL to let Turbulenz handle the heavy lifting. If you want to dive deeper with a lower-level API, take a look at the popular “three.js” library located at http://threejs.org/.
6.4 Installation
Because this project is developing very quickly, be sure to look at http://docs.turbulenz.com/installing.html for the latest instructions. As of this writing, the best way to get Turbulenz is to download and install their SDK installer directly from the source located at GitHub (https://github.com/turbulenz/turbulen_zengine). They perform regular releases of the SDK, but personal development has shown that it leaves out a couple useful features, such as the python scripts found in “manage.py”. Installation from source is long and tedious. Both methods will be detailed here. Try the official installer first. Note that if you are only looking for game engine libraries (Protolib), the official SDK releases are more than sufficient.
6.4.1 Official Installer
Official installers are located at http://hub.turbulenz.com/. It requires free registration. Follow the registration procedure and download and install their SDK. The version in Windows uses a standard executable. The Mac version uses an install script. There are several noteworthy points about the Turbulenz SDK:
- It will install 32-bit Python 2.7 (if on Windows). Note that this is not the latest version of Python. Python 2.x is a legacy support branch and is the version bundled with Mac (particularly version 2.6 for Mountain Lion, though 2.7 is made available [96]). The reason for 2.x is because Python 3.x breaks some backwards compatibility for various structural enhancements [92].
- Microsoft Visual Studio is optional. The from-source version requires it. Note that Visual Studio Express is a free version (with Microsoft account registration) that can be downloaded from the web.
- For Mac, Xcode is required. You do not need an iOS or Mac dev license. Turbulenz needs the command line tools from it. This can be found by going to Xcode → Downloads → components and then install “Command Line Tools”. Xcode can be downloaded from the Mac App Store.
- Turbulenz installs a web server for you (called the “Local Development Server”). It is running on port 8070. You can use XAMPP/MAMP/WAMP instead, but the official development server is highly desirable to be able to test against Turbulenz back-end services. You do not need to move your www directory. The local development server is capable of serving any Turbulenz project local to your machine. The local development server is also preconfigured with lots of helpful samples.
- It will ask to install the Turbulenz plugin. Turbulenz operates in Canvas mode and Plugin mode. The plugin is a browser extension used to enhance performance for browsers that happen to have the plugin installed. The game will fall back to Canvas mode if the plugin is not available.
After installing:
- For Windows, find “Run Local Server” in your Start menu. It should launch a console web server. See Figure 6.1.
- For Mac, execute “your_install_directory/start_local.sh” in your terminal.
- Go to http://127.0.0.1:8070/ in a recent web browser.

There are lots of samples running on the local server. Flip through and take a look at them. Note that some of the engine was written in TypeScript. TypeScript is an open-source superset of JavaScript developed by Microsoft [93]. One of the pitfalls of flexible interpreted languages, such as JavaScript, is that optimization is tedious. TypeScript introduces classes, interfaces, modules, and optional static typing. This allows easier development for large-scale projects as well as the ability to detect problems at compile time (thus, saving tedious hand-testing development time). Because TypeScript compiles to JavaScript, the language choice is seamless to the end user. TypeScript has often been compared to Dart and CoffeeScript because they also compile to normal JavaScript [97, 98].
This book does not dive into TypeScript. However, it is a nice language, and you may find yourself needing to look at it or wanting to use it for more serious Turbulenz (or other large web app) development. Regardless, at minimum, you will probably want syntax highlighting. Microsoft offers official TypeScript support for Visual Studio (Windows only) or Sublime Text 2 (for Windows and Mac).
6.4.2 Protolib
Protolib is the JavaScript object that encompasses a large portion of the Turbulenz SDK. You will be using protolib (and jslib) a lot to develop your game. If you do not wish to connect to Turbulenz’s backend services and want only a nice game library, then these libraries are what you need. You can copy them off the sample apps and build a respectable game with just them (like the rest of Turbulenz, they are MIT licensed). However, we are going to continue on and use standard Turbulenz build procedures.
6.5 From Source
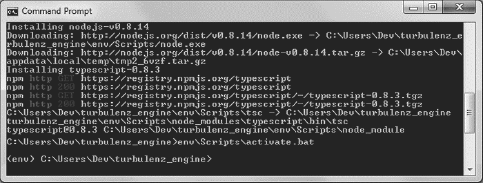
Installing from source is an involved process, but it guarantees you will have everything. Clone the GitHub project located at https://github.com/turbulenz/turbulen_zengine. These are the commands you need to run:
git clone git :// github . com / turbulenz / turbulenz_engine . git
cd turbulenz_engine
git submodule update --init
This clones the Git repo, navigates to the directory, and initializes the submodules. This will take a few minutes. Once it completes, close your Git shell if you are using Git Bash. It is no longer needed. The following commands will be with a normal command prompt. If you do not have the Visual Studio compiler, you should get it now. Also, the next steps require virtualenv. It is possible that you already have virtualenv because it is common to bundle it along with Python. However, it is not bundled with the official Python installer from python.org. First check to see that you have virtualenv installed. To do this, run
C: Python27 python . exe -m virtualenv -- version
That should output a version number. If you do not have virtualenv installed, run this next set of commands to install it:
- Download http://python-distribute.org/distributesetup.py
- C:Python27python.exe yourdownloadpath odistribute setup.py
- Download https://raw.github.com/pypa/pip/master/contrib/get-pip.py
- C:Python27python.exe yourdownloadpath oget-pip.py
- C:Python27Scriptspip.exe install virtualenv
This will install pip, a handy python installer tool. Then, it uses pip to install virtualenv. Test your virtualenv again with:
C: Python27 python . exe -m virtualenv -- version
With virtualenv ready, continue the installation with:
C: Python27 python . exe manage .py env
env Scripts activate
This will fetch and set up and activate your local environment. After you are finished, you should see “env” next to your command prompt. See Figure 6.2.
You are now in the development environment. Python should be available locally. Next, we need to build all the tools and samples. Run these commands to build the remaining tools, apps, docs, and samples. This is the portion where the Visual Studio compiler will be called. The tools are smart and should detect which version you have installed (2008, 2010, or 2012 with update 2 installed).
python manage .py jslib
python manage .py tools
python manage .py docs
python manage .py samples
python manage .py apps
local_server --init
Setup has been completed. Launch the local development server with:
local_server --launch
You may want to use a second window to leave the local development server running. Note that whenever you launch a command prompt, you need to navigate to the Turbulenz source directory and run “envScriptsactivate” to activate the development environment. This includes launching the web server.
Launch your web browser and go to http://127.0.0.1:8070/. You should see the Turbulenz dashboard and sample apps and games. You have now replicated the setup from the installer in the previous section. The rest of this chapter assumes you installed from source.
6.6 Hello Turbulenz App
With the installation steps out of the way, it is time for some code. Buried in your installation SDK under “apps” is a directory called “protolibtemplateapp” (If you wish to use an even deeper base, you could copy “protolibsampleapp” instead.) Make a copy of the directory in the same location of the other samples. Rename the directory to something reasonable, such as “helloworld”. Next, build the app with this command (from the virtual environment; always use the virtual environment.):
python manage .py apps apps helloworld
Turbulenz will invoke the build script. If you wish to add your app to the standard build list used during installation, open “manage.py”, jump to around line 250, and add your game to this python list:
app_dirs = ['samples ',
'apps / inputapp ',
'apps / multiworm ',
'apps / sampleapp ',
'apps / templateapp ',
'apps / viewer ',
'apps / helloworld ',
'apps / protolibsampleapp ']
Now, the “build all” command, “python manage.py apps” will build yours along with all the others. Next, we need to add this game to the local Turbulenz server. Assuming you left the local server running, navigate to http://127.0.0.1:8070/.
- Click on plus button.
- Paste the absolute path of helloworld in “Game Directory” (such as C:UsersDevhelloworld engineappshelloworld).
- Change the title and the slug to the name of your game, such as “Hello World”. The slug will auto-update. The slug is the unique web path, such as “localhost/helloworld”.
- Save your game. You should see your new app.
- Click your app. Click play. Click “canvas.debug.html”.
Congrats! You have Turbulenz running a game. The game does nothing, so let’s fix that. Open scripts/app.js and modify “initFn” and “updateFn” with these lines in Listing 6.1:
init: function initFn ()
{
var protolib = this . protolib ;
var mathDevice = protolib . getMathDevice ();
protolib . setClearColor (mathDevice . v3Build (0, 0, 0));
// Intialization code goes here
whiteV3 = mathDevice . v3Build (1, 1, 1);
},
update : function updateFn ()
{
var protolib = this . protolib ;
// Update code goes here
if (protolib . beginFrame ())
{
// Render code goes here
protolib . drawText ({
text : " Hello World !",
position : [protolib . width / 2,
protolib . height / 2],
scale : 10,
alignment : protolib . textAlignment . CENTER ,
v3Color : whiteV3
});
protolib . endFrame ();
}
},
Listing 6.1. Turbulenz Hello World.
With this bit of code, we cleared the screen (using setClearColor) and added a draw routine (drawText) into the Tubulenz game loop. Refresh the page (if you are using the release version, you will need to recompile). You should see a white “Hello World!” centered on the screen in big font. The result is in Figure 6.3.

We are now ready to begin development of a real app.
6.7 Turbulenz Game Structure
Like all the previous game engines reviewed, Turbulenz has its own way of doing things. These are the key directories and files to be kept at the front of your mind:
deps.yaml
This contains the listing of assets used by your game. If you want to include any graphics, audio, etc, reference it in this file. The build script will give it a hash in mapping_table.json and copy it to the staticmax/directory. The “staticmax” directory contains files told by the browser to very aggressively cache, which is why the file names are hashed.
The deps.yaml file also is used by the build script when running “python manage.py apps appsmygame”. If the build sees a missing file, it will look in your turbulenz_engineassets for a copy to bring forward.
manifest.yaml
This contains all the game’s meta information used by the Turbulenz server. Most of the time, you will be configuring this file via the Turbulenz web interface. This is where the changes are saved. It contains path, slug, cover art file, deployment information, etc.
templates
This directory contains the HTML and script logic to build the header and footer, and says which JavaScript to include for your game. Once it is configured, it should not need to be touched except when another JavaScript library needs to be included or surrounding HTML structure is changed.
scripts/app.js
This file contains your game logic. You will spend most of your time here.
app.canvas.debug.html and app.canvas.release.html
“app.canvas.debug.html” points to the external “scripts/app.js” to allow simply refreshing the page file to test changes. “app.canvas.release.html” uses the packed and minify version for distribution. You need to recompile to test changes against app.canvas.release.html.
That is the bird’s-eye view of the files most edited when working with Turbulenz. For more information, the docs are an invaluable resource. They are located at http://docs.turbulenz.com/.
6.8 Sky Marble Implementation
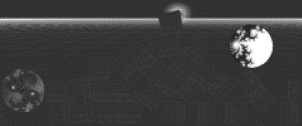
In this chapter, we will develop our final example game called “Sky Marble.” Here is the problem statement:
“Sky Marble is a marble drop game that requires dropping boxes to center falling marbles on the screen without losing any.”
See the screenshot in Figure 6.4. Sky Marble is quite complex. It contains a 3D mesh, 3D rotations, 2D physics, sprites, build scripts, a game loop, and more. This implementation has been reduced for clarity and will be described by its major functions.
6.8.1 Init Function
Protolib represents a large slice of the SDK, and it is the go-to object for declaring and configuring game-wide globals (not site-wide globals; Turbulenz is very careful to not leak globals). Because there is no clear-cut place to store game globals, I devised my own method of following Turbulenz’s pattern of attaching to the Protolib object. See the code below.
init : function ()
{
var protolib = this . protolib ;
protolib . globals . gamevars = {};
protolib . getGameVar = function (ref)
{
return this . globals . gamevars [ref];
};
protolib . setGameVar = function (ref , obj)
{
this . globals . gamevars [ref] = obj ;
};
protolib . setGameVar (" score ", 0);
protolib . setGameVar (" gameover ", false);
// get example
var score = protolib . getGameVar (" score ")
Turublenz already has “protolib.globals”. Furthermore, I reserved myself “protolib.globals.gamevars”. Many developers attach their semi-globals to “this”, but I sometimes find “this” hard to track when deep inside a function. By attaching to protolib, I just need to keep track and fetch protolib, which is quite often needed anyway. The rest of the initialization is very Turbulenz boilerplate. See Listing 6.2.
var mathDevice = protolib . getMathDevice ();
var graphicsDevice = protolib . getGraphicsDevice ();
var floor = Floor . create (graphicsDevice , mathDevice);
var soundDevice = protolib . getSoundDevice ();
var darkV3 = mathDevice . v3Build (51/255 ,51/255 ,51/255);
protolib . setClearColor (darkV3);
// Intialization code goes here
var phys2D = Physics2DDevice . create ();
protolib . globals . draw2D . configure ({
viewportRectangle : [0, 0, viewPort .width , viewPort . height],
scaleMode : 'scale '
});
var world = phys2D . createWorld ({
gravity : [0, 2]
});
protolib . setPreDraw (
function ()
{
floor . render (graphicsDevice , protolib . globals . camera);
}
);
Listing 6.2. Turbulenz initialization.
Here is what is happening block-by-block:
setClearColor accepts a Vector3 object with x, y, z representing R, G, B in the range of 0 through 1. Web developers are used to thinking in terms of 0 through 255 for our colors. This is simple enough to fix. Just take your normal decimal value and divide by 255.
mathDevice provides 3D vector and matrix operations. Without getting into too much detail, a matrix is a series of numbers arranged in rows and columns. They are used all over 3D graphics for positioning, movement, and rotation. In this example, we are using 2D Physics with just a splash of 3D for some nice effects.
graphicsDevice contains all the methods related to managing the rendering of the game to the screen. In the above code, it was set to the viewport width and height and told to scale with the browser. It is not used directly except in this example to render the floor to create a nice effect.
soundDevice is based on the Open Audio Library and supports a plethora of variables, effects, filters, etc. This is beyond the scope of the book. For our purposes, soundDevice provides an easy way of detecting whether “ogg” or “mp3” should be loaded. See below:
var soundExt = ". mp3 ";
if (soundDevice . isSupported (" FILEFORMAT_OGG "))
{
soundExt = ". ogg ";
}
protolib . setGameVar (" winsound ",
" sounds / win_effect " + soundExt);
// play the sound
protolib . playSound ({
sound : protolib . getGameVar (" winsound ")});
The choices are FILEFORMAT_MP3, FILEFORMAT_OGG, or FILEFORMAT_WAV.
Physics2DDevice This creates our “World”, the root object that holds all our other objects. This is identical to the notion of a “stage” used in EaselJS.
For Turbulenz, instead of adding objects to our stage, we are now adding them to our 2D “World”. We also pass a 2D gravity parameter that states a vector of X = 0 and Y = 2. Our objects will fall downward. The gravity vector could point anywhere to make some interesting games.
protolib.setPreDraw() is the place to put objects to be drawn below everything else (the bottom layer when thinking of 2D). We are putting the floor here. The floor serves no real purpose except as a nice visual effect (and as an excuse to demonstrate this function). Displaying the floor is normally used for debug/development.
Our game features a 3D rotating torus (a 3D donut-shaped object) for a nice effect. Below is the code that creates it:
var torusMesh = {};
torusMesh . meshPosition = mathDevice . v3Build (0, 2, 0);
torusMesh . meshPositionForward = mathDevice . v3Build (0, 0, -0.05);
torusMesh . meshPositionBackward = mathDevice . v3Build (0, 0, 0.05);
torusMesh . meshPositionDirection = torusMesh . meshPositionForward ;
torusMesh . meshRotationMatrix = mathDevice . m43BuildIdentity ();
torusMesh . meshRotateX = Math .PI * 2 - Math .PI / 2;
torusMesh . xAxis = mathDevice . v3BuildXAxis ();
torusMesh . mesh = protolib . loadMesh ({
mesh : " models / torus_ .dae ",
v3Position : torusMesh . meshPosition ,
v3Size : mathDevice . v3Build (10 , 10, 10)
});
protolib . setGameVar (" torusMesh ", torusMesh);
Turbulenz is the only featured game engine in this book that can handle 3D objects exported with 3D graphics animation software, such as Autodesk Maya or Blender. It accepts a translated COLLADA formatted scene/object, usually represented as a “.dae” file. COLLADA is an open 3D format maintained by the Khronos Group, the same maintainers as OpenGL and WebGL [99]. It was designed to be a transition format between other 3D systems. Turbulenz does not load COLLADA files directly. It converts it to a JSON (JavaScript Object Notation) format as part of the build process and then puts it in “staticmax”. Loading and processing 3D objects is a fairly expensive browser operation, so keep that in mind when using 3D objects.
The above code simply sets up a 3D Torus, a primitive ring shape in 3D designs. It then sets up a rotation matrix around the X axis. This will cause the mesh (a collection of vertices and edges that represents a 3D object) to rotate as time passes creating a nice effect. Try changing “v3BuildXAxis” to “v3BuildYAxis” to see a different rotation. The meshPositionDirection variable tracks the movement direction inside the game loop.
Next, the game floor is set up as 0.1 tall (just enough to add a little texture) and 2 * viewport-wide box at the bottom of the screen:
var solidFloor = {};
solidFloor . width = viewPort . width * 2;
solidFloor . height = 0.1;
solidFloor . position = [0, viewPort . height ];
solidFloor . phys2DPolygon = phys2D . createPolygonShape ({
vertices : phys2D . createBoxVertices (solidFloor .width ,
solidFloor . height)
});
solidFloor . phys2DBody = phys2D . createRigidBody ({
type : 'static ',
shapes : [solidFloor . phys2DPolygon],
position : solidFloor . position
});
world . addRigidBody (solidFloor . phys2DBody);
Turbulenz supports three rigid bodies, and they are each featured in the game. They are “static”, “kinematic”, and “dynamic” [100]. Static bodies cannot move, which is why it was chosen for our floor. Kinematic bodies are like static, except they can be moved around the screen. They are appropriate for player-controlled entities. Dynamic bodies react to the world’s physics. They are used for the marbles and bricks.
Developers familiar with the Box2D physics engine should recognize the terms “static”,“kinematic”, and “dynamic”. Box2D uses the exact same terms for its bodies [101] and they have the same meaning. Turbulenz’s 2D physics engine is not Box2D, but it follows many Box2D patterns.
Next, to set up the 3D camera:
protolib . setNearFarPlanes (0.1 , 100);
protolib . setCameraPosition (mathDevice . v3Build (0, 2, -4));
protolib . setCameraDirection (mathDevice . v3Build (0, 0, 1));
protolib . setAmbientLightColor (mathDevice . v3Build (1, 1, 1));
This sets up the player’s view of the 3D scene. The camera is offset a little bit and looking directly in the center at our torus. This allows the floor to show. Play with these variables to see how very useful the floor can be in development. The ambient color is white. Changing this value will affect the glow color of the torus.
The last initialization step is our event listener. We are only using desktop mouse clicks. Turbulenz supports a “touchstart” event, and it is set up in a similar fashion, but as of this writing, mobile support is extremely limited. Only the desktop mouse version is presented below. By the time you get this book, you may be ready to investigate mobile support.
inputDevice . addEventListener (' mousedown ',
function (mouseCode , x, y)
{
protolib . setGameVar (" eventPositionX ", x);
protolib . setGameVar (" eventPositionY ", y);
if (mouseCode === mouseCodes . BUTTON_0)
{
protolib . setGameVar (" mouseClicked ", true);
}
if (mouseCode === mouseCodes . BUTTON_1)
{
// right mouse for testing
}
}
);
Like in our other games, the mouse location is saved and put in a variable so it can be used later during the game loop. With this, the game has been initialized. Other than spinning and moving the torus around, the rest of the game is 2D physics with marbles and bricks. These functions are presented in the next sections.
6.8.2 dropBrick/dropMarble/updateTorus Functions
See below for dropMarble(x,y). marbleArray is the array that holds all the marbles.
marbleArray [i] = Object ();
marbleArray [i]. width = 3;
marbleArray [i]. height = 1.75;
marbleArray [i]. marblecolor = " textures / redmarble .png ";
marbleArray [i]. position = [x , y];
marbleArray [i]. phys2DPolygon = phys2D . createCircleShape ({
radius : 1,
origin : [0, 0]
});
marbleArray [i]. phys2DBody = phys2D . createRigidBody ({
type : 'kinemetic ',
shapes : [marbleArray [i]. phys2DPolygon],
velocity : [0.8 * ((marbleArray . length % 2) ? -1 : 1), 0],
position : marbleArray [i]. position ,
angularVelocity : Math . floor (Math . random ()*11)
* ((marbleArray . length % 2) ? -1 : 1)
});
world . addRigidBody (marbleArray [i]. phys2DBody);
This is initialized similar to the floor, except an array is used because the game is tracking multiple marbles. Also, we are creating rigid kinemetic circles (createCircleShape instead of createPolygonShape) to add to our world. Width, height, and position are self-explanatory. The velocity alternates left and right. The marble comes out spinning with a strong random angular velocity and also alternates direction. We also save the red marble texture (used later).
Like most 3D engines, Turbulenz is particular about texture dimensions. The image has to be square and a power of two (32 × 32, 64 × 64, 128 × 128, etc) [102].
dropBrick(x,y) is nearly identical. brickArray holds all the bricks. The relevant part is presented below:
brickArray [i]. phys2DPolygon = phys2D . createPolygonShape ({
vertices : phys2D . createBoxVertices (1, 1)
});
brickArray [i]. phys2DBody = phys2D . createRigidBody ({
type : 'dynamic ',
shapes : [brickArray [i]. phys2DPolygon],
mass : 50,
position : brickArray [i]. position ,
angularVelocity : Math . floor (Math . random ()*11)
* ((brickArray . length % 2) ? -1 : 1)
});
world . addRigidBody (brickArray [i]. phys2DBody);
A1 × 1 kinemetic box is being created in the same way as the floor. It has the same spin as the marble. The biggest difference is the mass is huge at 50. This makes the drop effects very splashy.
Next, we need to rotate and move the torus using updateTorus():
torusMesh . meshRotateX += (Math .PI * 4 / 360);
torusMesh . meshRotateX = (torusMesh . meshRotateX % (Math .PI * 2))
mathDevice . m43SetAxisRotation (torusMesh . meshRotationMatrix ,
torusMesh .xAxis , torusMesh . meshRotateX);
torusMesh . mesh . setRotationMatrix (torusMesh . meshRotationMatrix);
torusMesh . meshPosition = mathDevice . v3Add (torusMesh . meshPosition ,
torusMesh . meshPositionDirection);
torusMesh . mesh . setPosition (torusMesh . meshPosition);
This is just adding 2 degrees to the rotation. If the accumulation exceeds 360 degrees (PI * 2), the modulus operator resets it by taking the remainder. Note that JavaScript’s modulus operator works for floating point. The other line adds “torusMesh.meshPositionDirection” to the position. Later in the code (not shown), boundaries are checked to make the torus fly the other direction when it passes the camera. The important piece of logic is below:
if (Math . round (torusMesh . meshPosition [2] * 100) == -400) {
for (var i=0; i< marbleArray . length ; i ++) {
if (marbleArray [i]. marblecolor
== " textures / bluemarble .png") {
continue ;
}
var pos0 = Math . round (marbleArray [i]. position [0] * 10);
var pos1 = Math . round (marbleArray [i]. position [1] * 10);
if (pos0 > 95 && pos0 < 105 && pos1 > 45 && pos1 < 55) {
marbleArray [i]. marblecolor = " textures / bluemarble . png ";
protolib . setGameVar (" score ", score + 1);
this . dropMarble (Math . random () * (16 - 2) + 2 ,1);
protolib . playSound ({
sound : protolib . getGameVar (" winsound ")});
}
For the very brief moment as the torus flies over, if there is a red marble in the center of the screen, it will turn the texture blue and add a point to the score. It then plays a sound and drops another marble. This is the core piece of game logic. From trial and error, these hard-coded values made for the best user experience. Hard numbers are sufficient for a tech demo, but further abstraction would use percentages based on screen width, height, and marble size.
This method of moving the torus by directly manipulating position values is essentially teleporting it around and is not recommended. For a smoother animation, a 3D physics simulator could be used and the torus could be given a Z velocity. This also would allow the engine to handle collision detection for us if needed. However, our physics is 2D, and the torus is not colliding with anything anyway. Thus, we move it manually because the code is easier (for us and the browser).
That concludes the helper functions. Next is the actual game loop.
6.8.3 Update Function
Our game loop takes place between physics frames. Inside it, we look for events, such as input and gameover. We also draw our scene. Turbulenz, like our other examples, uses immediate mode rendering [103], so we need to draw our scene every frame. This update function has been reduced for clarity.
update : function ()
{
if (protolib . beginFrame ())
{
if (mouseClicked && ! gameover) {
var x = eventPositionX / protolib . width * viewPort . width ;
var y = (eventPositionY / protolib . height)
* viewPort . height ;
protolib . playSound ({
sound : protolib . getGameVar (" hit1 ")});
protolib . setGameVar (" mouseClicked ", false);
this . dropBrick (x, y);
}
gameTime += protolib . time .app. delta ;
protolib . setGameVar (" gameTime ", gameTime);
while (world . simulatedTime < gameTime && ! gameover)
{
world . step (1/60);
this . updateTorus ();
}
The first section looks to see if a mouse button is pressed (the mouseClicked flag was set during the actual event). The math is scaling the mouse click location to the in-game coordinates. The viewport width is 20 while the mouse click can range from 0 to whatever the browser size may be. Thus, it needs to be scaled.
The next bit of code is tricky. After adding all the objects to the physics world, we need to tell the simulator to perform its calculations. This is done with the step() function. The function is locked in a while loop with the total simulation time compared to the total real time (by accumulating time deltas). If the physics is behind, the while loop will cause it to catch up with the current time (at a simulated rate of 60 FPS). Looping to catch up is a very common task with physics simulations.
This technique allows the game flexibility to run at 60 FPS on strong hardware and smoothly scaled down to a slower speed (such as 30 FPS) if that is all that can be handled.
Next, we need to draw the bricks, marbles, and floor. The bricks and marbles code look nearly identical, so only the marble is presented because it has a twist.
for (var i=0; i< marbleArray . length && ! gameover ; i ++)
{
marbleArray [i]. phys2DBody . getPosition (marbleArray [i]. position);
protolib . draw2DSprite ({
texture : marbleArray [i]. marblecolor ,
position : [marbleArray [i]. position [0]
- marbleArray [i]. height / 2 -0.1 ,
marbleArray [i]. position [1]
- marbleArray [i]. height / 2 -0.1] ,
width : marbleArray [i]. height +0.2 ,
height : marbleArray [i]. height +0.2 ,
rotation : marbleArray [i]. phys2DBody . getRotation ()
});
if (marbleArray [i]. position [0] < -2
|| marbleArray [i]. position [0] > (viewPort . width + 2))
{
protolib . setGameVar (" gameover ", true);
}
}
We are drawing a 2D texture on top of a 2D body. Note that the function being named Sprite is a bit misleading. As stated before, this function draws a texture that must have dimensions in the powers of 2. The -0.1 and +0.2 sprinkled around the widths and positions are fudges to make the square peg (brick) fit inside the round hole (marble).
The other point to consider is the gameover event. Our circle has a radius of 1. If it rolls to a position of -2 or a viewPort.width+2, then it has gone off the screen. That is gameover.
The solid floor (not shown) is identically placed. The difference is that there is only one floor, so there is no loop.
With that, our game is complete.
6.9 Other Turbulenz Tips
6.9.1 Debugging
Chrome’s debugger allows executing functions directly from the console. This is very handy. However, if you properly scoped your variables to not leak globals, then you may be at a loss on how to access this functionality.
Turbulenz has its own method of debugging. Take a look at this code:
protolib . addWatchVariable ({
title : " Score ",
object : protolib . globals . gamevars ,
property : " score ",
options : {
min : 0, max: 100 , step : 1
}
});
Assuming you are using the default template, this will put a slider in the debug area to let you dynamically modify the score variable of the object protolib.globals.gamevars. Slide the bar left and right to see the score change. Any variable can be exposed to a slider like this. This is a very useful debugging tool.
6.9.2 Templates
To customize the surrounding HTML, the layout is located in “templates”. The app is currently loading the default built-in template. To extract this default template and make it your own, run this command (from the virtual environment):
(env) C: Users dev turbulenz_engine > makehtml -D
-o default_modified . html
Put that file in the same directory, and tell templatesapp.js to import your own template:
/*{% extends "default_modified.html" %}*/
The app should load identical as before, but you can now fully customize the surrounding HTML by modifying default modified.html.
6.10 Summary
In this section, we built a 2D game using a 3D engine and 2D physics. Though our game was structurally 2D, we leveraged the 3D engine to sprinkle some visual enhancements that would not have been possible with the other engines. This allowed us to touch a bit on 3D game development topics, such as textures, meshes, and matrix transformations.
We learned about WebGL and its pros (impressive graphics) and cons (very limited support). Fortunately, the main detriment, limited support, will eventually go away.
Turbulenz has a very high learning curve, and it will probably take until late 2014 before a large mobile audience has the hardware available for it. However, the performance of Turbulenz is top notch, and the price (free and open source) can’t be beat. Eventually, all the browsers will catch up with it, and your games can be ready for them to use it.
This concludes the tour through the different game engines. In Part III, you will learn how to package an HTML5 game for distribution. The promise of HTML5 as an app can be written once and run anywhere. Right now, that is true if they are online and using a web browser. What if the player wants to play offline? What if we want the player to find our app in Google Play or iTunes? How about allowing it to be played outside of a browser?
These distribution scenarios will be covered in Part III.