4
Morse code transmitters
In the 19th century, people used Morse code to transmit messages by telegraph, a device that creates an audible tone in a receiver. To send a message in Morse code, you encode letters and numbers by using a combination of short tones (called dots) and long tones (called dashes). Numbers are composed of five tones, and letters are composed of no more than four tones. Figure 4-1 lists the codes for every letter and number.
While telegraphy has long passed from daily communications, people still use Morse code in certain emergencies or on occasions when sophisticated communication technology fails. To send a Morse code message, a person can blink a flashlight, raise flags in either hand, or tap on pipes. Famously, Jeremiah Denton, a captured US Navy officer, revealed that he was being tortured by blinking his eyes in Morse code during a forced television interview. You might want to learn Morse code for your own emergency preparedness.
This chapter will help you become proficient at Morse code by showing you how to build a Manual Message Transmitter, which uses lights and tones to transmit a Morse code message that you tap out on a sensor. You’ll then build an Automated Message Transmitter that you can program to transmit the same Morse code message in a loop. In both cases, you’ll be able to read the messages by recording the dots and dashes displayed on the EV3 Intelligent Brick’s front panel lights or played on its built-in speaker.

FIGURE 4-1: Morse code characters
what you’ll need
Figure 4-2 summarizes the parts needed for the Morse code projects in this chapter.
You can find all the parts in the MINDSTORMS EV3 #31313 set.

FIGURE 4-2: Parts used to build the Morse code projects
building a manual message transmitter
A good way to build Morse code proficiency is to practice keying in letters and messages. The Manual Message Transmitter you’ll build in this section, shown in Figure 4-3, uses a Touch Sensor, as well as the EV3 Intelligent Brick’s speaker and lights.
You’ll hold the Touch Sensor down briefly to produce a dot and at length to produce a dash. The EV3 Intelligent Brick should make a corresponding sound and light up its status lights.

FIGURE 4-3: The Manual Message Transmitter is built from a Touch Sensor attached to the side of the EV3 Intelligent Brick.
attaching the sensor and Intelligent Brick
To make the Manual Message Transmitter, you’ll attach the Touch Sensor to the side of the EV3 Intelligent Brick with an L-shaped liftarm. You’ll add a wheel on top of the sensor to press down. Use the following instructions to attach the Touch Sensor.


writing the manual message transmitter software
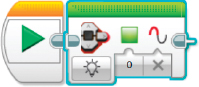
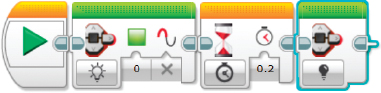
You’ll need to program the EV3 Intelligent Brick to translate presses of the Touch Sensor into Morse code signals. The software should continuously monitor whether the Touch Sensor is being pressed. When someone presses the sensor, a light should go on and a tone should play. The program, composed of five blocks, is shown in Figure 4-4.
To build the program, use the following blocks:
Loop block This infinitely repeats the block that checks for input from the Touch Sensor.
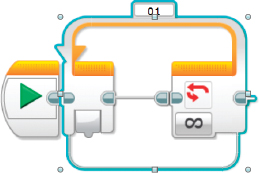
Click the Loop block in the Flow Control tab at the bottom of the screen and drag it to the right of the Start block.
Switch block This creates true and false paths based on whether someone presses the Touch Sensor. If someone presses the Touch Sensor, the true path runs. Otherwise, the false path runs.

Place the Switch block inside the Loop and set Switch-Touch Sensor to Touch Sensor–Compare–State, Port to 1, and State to 1.
Brick Status Light block This turns on the light on the front panel of the EV3 Intelligent Brick. This light will stay on as long as the Touch Sensor is pressed.


FIGURE 4-4: The Manual Message Transmitter is based on a Touch Sensor Switch block.
Select the Brick Status Light block from the Action tab and place it inside the true path of the Switch block. Set Brick Status Light to On, Color to 2, and Pulse to False.
Sound block This emits a tone from the EV3 Intelligent Brick’s speaker for as long as the Touch Sensor is pressed.

Place the Sound block after the Brick Status Light block and select the drop-down options for Sound to Play Tone, Frequency to 261.626, Duration to 0.01, Volume to 10, and Play Type to 1.
Brick Status Light block This begins the false path of the Switch block by turning off the light on the EV3 Intelligent Brick front panel.
Place a Brick Status Light block into the false branch of the Switch block, setting its drop-down menu option for Brick Status Light to Off.
using the manual message transmitter
Learning Morse code by keying in letters by hand will help you memorize the characters much more easily than just studying a list. Practice keying in letters on the Touch Sensor until you get the hang of it. Then use it to type messages to friends. You may notice that when you press the Touch Sensor, the Manual Message Transmitter generates a musical static rather than a clean tone. This altered tone occurs because the EV3 Intelligent Brick is set up to play only one sound at a time, whereas you’re continuously playing a sound. This shouldn’t affect your Morse code messages.
building an automated message transmitter
You may sometimes want your Morse code message to repeat continuously. For example, you might want to send a message to someone who walks by at a random time. The Automated Message Transmitter lets you write a Morse code message as part of the software, and then repeats that message forever.
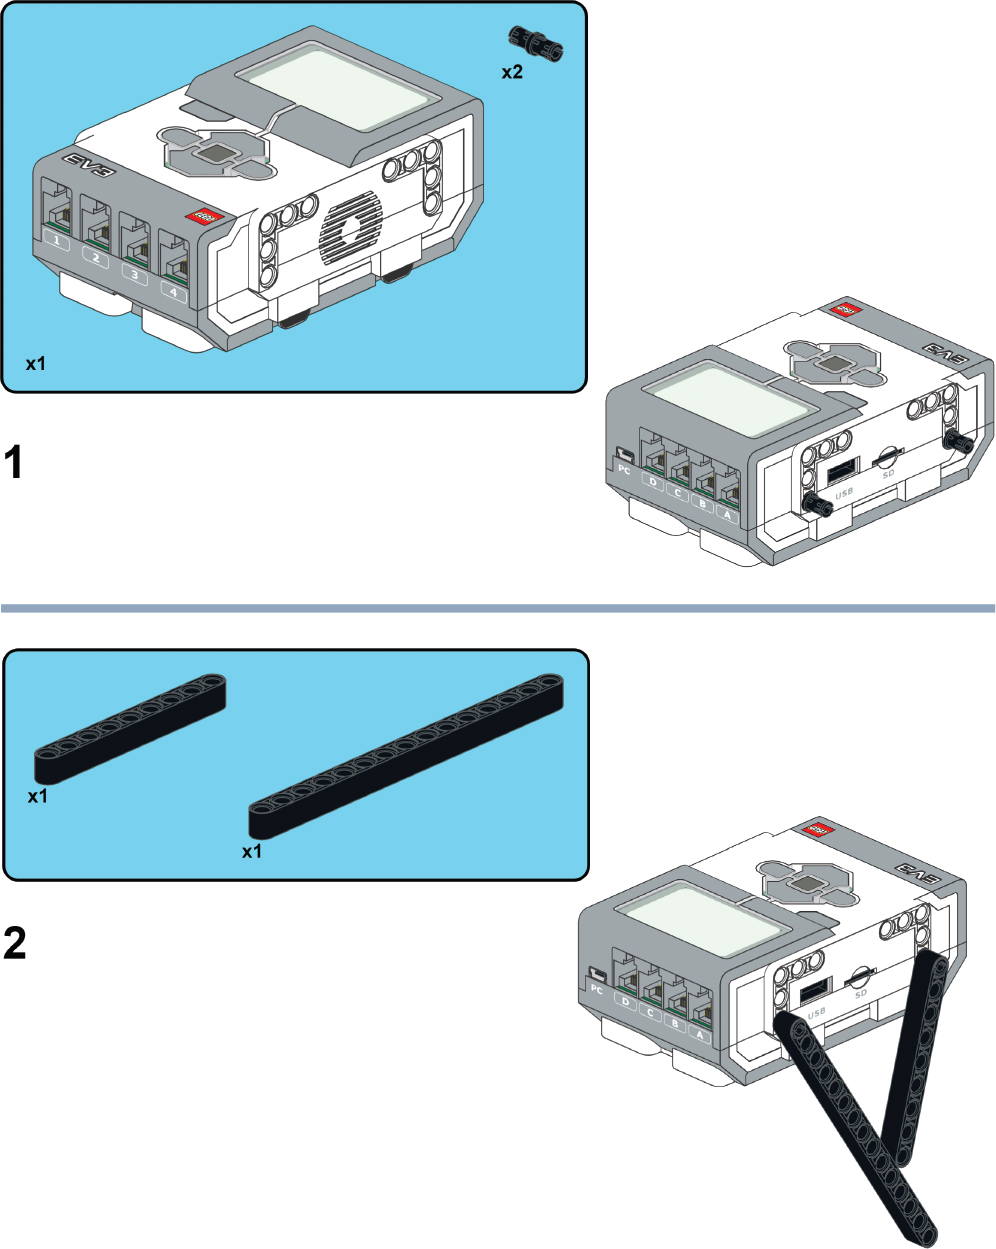
This project uses the EV3 Intelligent Brick and a stand to keep the EV3 Intelligent Brick from falling over. The EV3 Intelligent Brick’s status lights will blink out the message in green (Figure 4-5). They’ll also blink a red light to signify the end of a letter and a yellow light to signify the beginning of the message.
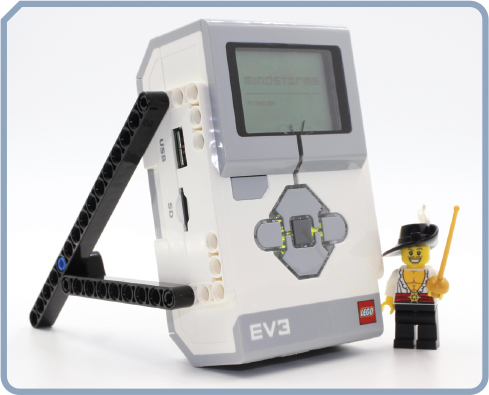
FIGURE 4-5: The Automated Message Transmitter blinks out messages on the EV3 Intelligent Brick’s status lights.
Use the following building instructions to build the stand.


writing the dot and dash programs
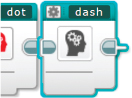
Instead of sounding a tone and flashing a light when it receives outside input, the Automated Message Transmitter must generate signals of the appropriate length based on a message you write as part of the code. That means you’ll have to create two programs to represent a dot and dash and then collect each of these programs within a My Block, a programming feature in the MINDSTORMS EV3 environment that lets you collect the blocks of a program into a single block.
Using My Blocks keeps you from having to repeat long sequences of blocks every time you want to reuse sections of code. In this project, you’ll be making My Blocks for a dot and dash, and then using the dot and dash My Blocks to create a My Block for each letter of the alphabet. Finally, you can write your message by stringing together letter My Blocks.
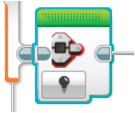
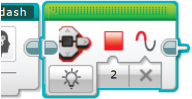
Let’s start by writing the dot and dash programs, shown in Figure 4-6. The two programs are identical except for the length of time that the status light stays on.
The program uses the following blocks:
Brick Status Light block This turns on the EV3 Intelligent Brick status light in the color green.
Select a Brick Status Light block from the Action tab at the bottom of the screen and place it after the program start. Set Brick Status Light to On, Color to 0, and Pulse to False.
Wait block This keeps the green status light on for 0.2 seconds for a dot and 0.75 seconds for a dash. The dot version is shown here.
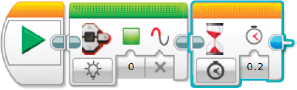
Select a Wait block from the Flow Control tab and place it after the Brick Status Light block. Set Wait to Time and Seconds to 0.2 for a dot or 0.75 for a dash.
Brick Status Light block This turns off the green status light.
Attach a Brick Status Light block after the Wait block and set Brick Status Light to Off.
Wait block This creates a pause of 0.5 seconds before moving on to the next dot or dash.

Place the Wait block after the Brick Status Light block. Set Wait to Time and Seconds to 0.5.

FIGURE 4-6: The upper block set creates a dot, and the lower block set creates a dash.
creating dot and dash blocks with My Blocks
Once you’ve completed the dot and dash programs, make a My Block of each program. First, left-click the first block in each program. Then, hold the SHIFT key and click the other three blocks to highlight the entire program. Don’t include the Start block that begins the program. With all blocks of the program highlighted, go to the toolbar at the top of the screen and select Tools ▸ My Block Builder. The My Block Builder menu should appear on your screen, as shown in Figure 4-7.
Your custom block will perform the same function as the program you highlighted. My Block Builder allows you to assign a name, description, and icon to your block. You can load a personalized drawing to use as the My Block’s icon or choose one of the icons already provided. Make sure you’ll be able to distinguish the dot block from the dash block.
When you’ve entered your My Block information, click Finish on My Block Builder. Your new My Block will appear under the My Blocks tab at the bottom of the screen. You can use these My Blocks as you would any other programming block in the MINDSTORMS EV3 programming environment.
creating letter blocks
Use the dot and dash blocks to create programs for every number and letter in the alphabet. Figure 4-8 shows programs for the letters A and B.

FIGURE 4-7: The My Block Builder menu allows you to assign names, icons, and properties to your custom-made block.

FIGURE 4-8: The programs for the letters A and B
To create the A program, use the following six blocks:
Dot block This blinks a dot. (Remember that A in Morse code is represented by a dot and a dash.)

Select the dot block from the My Blocks tab at the bottom of the screen and drag it next to the Start block.
Dash block This blinks a dash to complete the letter A.
Add the dash block after the dot block.
Blocks 3 through 5 blink a red light to indicate the end of a letter, which should help viewers decode the message:
Brick Status Light block This turns on the red status light on the front of the EV3 Intelligent Brick.
Place the Brick Status Light block after the dash block. Set Brick Status Light to On, Color to 2, and Pulse to False.
Wait block This pauses for 0.3 seconds to keep the red light on.

Place a Wait block after the Brick Status Light block. Set Wait to Time and Seconds to 0.3.
Brick Status Light block This turns off the red end-of-letter indicator after the Brick Status Light has been on for 0.3 seconds.
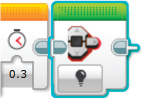
Join a Brick Status Light block to the Wait block and set Brick Status Light to Off.
Wait block This creates a pause of 0.5 seconds before the next letter. This pause gives the message reader time to get ready to interpret the next letter.

Conclude the program by adding a Wait block and setting Wait to Time and Seconds to 0.5.
Follow this procedure to write a program for every letter and number. Replace the dot and dash of the A block with the combination of dots and dashes that forms each letter and number. Then turn each program into a My Block. Be sure to clearly label each letter so you can tell them apart.
writing a message
To write your automated message, assemble a string of My Block letters. For example, the program in Figure 4-9 signals the word LEGO. The program includes two blocks that flash a yellow light at the beginning of the program to indicate that the message is starting over. This indicator is optional but helps recipients decode the message.
This final program, which uses layers of My Blocks to make the program quick and efficient, includes the following:
Loop block This repeats the Morse code message infinitely.

Attach a Loop block after the Start block.
Brick Status Light block This sets a yellow flashing light to indicate the beginning of a message. Every time the loop begins the message, the yellow light lets the recipient know that the message is repeating.

Place the Brick Status Light block inside the loop. Set Brick Status Light to On, Color to 1, and Pulse to True.
Wait block This flashes the yellow light for 3 seconds before the message starts.

Place the Wait block after the Brick Status Light block. Set Wait to Time and Seconds to 3.
4–7. Letter My Blocks These spell out letters in Morse code.

The My Blocks you created earlier for all the letters in the alphabet appear under the My Blocks tab at the bottom of the screen. The letter each block produces appears in the block’s upper-right corner. Use the letter blocks to spell out the message you want to display.

FIGURE 4-9: A program for repeatedly flashing Morse code for LEGO
using the automated message transmitter
Your Automated Message Transmitter is ready to put into action. Try using it as a holiday decoration that hangs in a window of your home. Display greetings such as TRICKORTREAT for Halloween, LETSEATTURKEY for Thanksgiving, and HAPPYNEWYEAR to celebrate New Year’s Day. Wait and see which of your neighbors figures it out. Or you can add a LEGO touch to your holiday table setting, as in Figure 4-10, where I’ve added the Morse code greeting HAPPYEARTHDAY to a table centerpiece composed of my mineral collection.
Which of your guests can figure out the program?
what you learned
In this chapter, you learned how to use Morse code to send messages, an especially useful skill in certain emergencies. You built both manual and automated signaling devices from the MINDSTORMS EV3 Intelligent Brick. You worked with My Blocks in the MINDSTORMS programming environment, an advanced technique for creating efficient software programs. In Chapter 5, you’ll continue to use Morse code to send messages, this time with infrared light to mask your communications.

FIGURE 4-10: An automated message adds interest to tabletop decorations, such as this collection of minerals displayed for Earth Day.