
This chapter discusses how developers can sometimes mistakenly trust data received from a client in sever-side code and how an attacker can take advantage of these mistakes. Here, we discuss the general approach for sending malformed data using arbitrary protocols and the tools that can assist in sending malicious data. Because HTTP is so widely used, the second half of the chapter details malicious client attacks over this protocol. This chapter also discusses several bugs specific to sending malformed requests; however, you should consider the sending of these requests as an entry point to server applications. You can apply the techniques used to send these requests when searching for other bug types. For example, malicious requests often result in information disclosure (see Chapter 7), buffer overflows (see Chapter 8), script injection (see Chapter 10), SQL injection (see Chapter 16), and many other types of bugs. Chapters discussing these bugs build on the information presented in this chapter.
Today many applications use the network for some or all of their functionality. These applications can act as clients that connect to servers, which can provide additional functionality. Some examples of these clients include the following:
Web browsers. Connect to Web servers to display Web content
E-mail clients. Connect to mail servers to send and receive e-mail
Media players. Connect to video and audio streaming servers
Word processors. Connect to Web and file servers to retrieve and store documents
In these examples, server-side code processes requests from the client. For example, the mail server contains code to process sending and retrieving e-mail messages. Often, well-defined specifications describe how clients should form requests and how servers should respond to these requests. Well-written server code assumes any data can be sent to the server. However, some server developers mistakenly think that only legitimate requests, requests that conform to specifications, will be sent to the server. Other developers acknowledge the possibility that a malicious client will send malformed requests, but they believe that the difficulty of forming such requests—especially if public documentation on how to make requests to the server does not exist—will deter making such requests.
It is the security tester’s job to violate these assumptions and find these sets of security vulnerabilities before attackers do. First, it is necessary for the security tester to know what kinds of requests the server accepts before attempting to send malicious requests to the server.
Following are three ways you can discover the format of legitimate server requests:
Read the documentation. Usually, well-established open protocols are documented in Requests for Comments (RFCs). RFCs are available from the Internet Engineering Task Force (IETF) at http://www.ietf.org. However, documentation isn’t always available, and when it is, you cannot assume that the code you are testing is written to specification and that no additional requests are supported.
Read the source code. If you have access to the source code for a client that connects to the server, you can see exactly how requests are normally made to the server. However, if the source code is not available, you can still see how the process works by reverse engineering either the client or server code. Reverse engineering a server binary is very time-consuming but can provide a definitive list of the types of requests the server accepts. For more information about reverse engineering, see Chapter 17.
Watch network traffic. Another way to discover the format of normal requests is to use the client against a server and monitor the network traffic. Many client applications make network requests without the end user’s knowledge: sometimes programs phone home to their creator to check for updates, report to the vendor how the program is used by the user, and for other reasons. It is important for security testers to know how to use a network monitor (also called a sniffer) to identify which applications make network requests and how these requests are formed.
Tip
Sometimes it might not be obvious to the end user that an application is connecting to the network. This chapter explains how security testers must violate the server’s trust of the client by making malicious unexpected requests, but sometimes the content of the network traffic is a security problem in itself. For example, if passwords are sent across the network in plain text, people who monitor, or sniff, can easily obtain the passwords. Disclosing information on the network like this is discussed in more depth in Chapter 7.
Many tools can be used to sniff network traffic. One of the most common free sniffers is Ethereal (http://www.ethereal.com). By using a sniffer, you can easily determine whether specific actions in the application send network requests.
For example, to see whether Microsoft Windows Media Player (WMP) version 10 makes any network requests when the application is loaded, you could set up a sniffer, load the application, and then examine the data the sniffer captures. In this example, many network requests are made when the WMP application loads. Some of these network requests are shown in Figure 4-1. By sniffing the application’s network traffic, you can see how WMP communicates with the server over HTTP and which specific requests are made. The WMP privacy policy notes that this application makes network requests such as this, but many other applications make network requests without the user’s knowledge or permission.

Once you have determined that a program makes a network request to the server you are testing, you need a way to manipulate the requests. Manipulated requests can contain information not normally sent by legitimate clients. Some common ways to manipulate network requests include the following:
Use a program that contains a user interface to construct single network requests. For less complex network requests, you might be able to construct single requests by hand in a program that allows you to enter exactly what you want to send over the network and to specify where to send it. Hooking and proxying (discussed later) require triggering the functionality in the client application so that the data can be modified and sent, which can become time-consuming. To test formatting data quickly in many different ways, a program that allows custom packet construction often is efficient. A tool that enables you to construct hand-crafted Web traffic is the Microsoft WFetch tool (http://download.microsoft.com/download/iis50/Utility/5.0/W9XNT4/EN-US/wfetch.exe). One drawback of this approach is that sometimes the network request being tested requires the server to be in a certain state. To put the server in the correct state, several specific network requests first need to be made. Depending on how complex these requests are, it might be easier for you to write a custom client.
Write a client to send custom requests. One way to send malformed requests is to write your own client, which isn’t limited to sending legitimately formed data the way the normal client is. Often, writing a client is a time-consuming effort and requires a good understanding of the details of the protocol used. However, writing the entire client from scratch often isn’t necessary because you might have access to the source code of a legitimate client (including open source clients) that could be modified to send malformed requests. Because the goal is to test the server, not write a custom client, alternative approaches should be considered first.
Tip
To write a custom client to send a few requests, you can use sniffers in conjunction with a scripting language such as Perl, Tcl, or Python to quickly create a fake network client using just a few lines of code. If scripting languages don’t suit you, both Java and the Microsoft .NET Framework family of languages also offer rich standard libraries to make network programming simpler. The sniffer can be used to determine what the request normally looks like, and your code can be used to create permutations of that request.
Hook the legitimate client’s network requests. Hooking a program is when some part of the normal program’s runtime is caught (or hooked), allowing for modification of the flow of execution or of the program’s data. For example, hooking the WSASend function included in the Winsock code library (used to send data over the network) would enable you to call custom code of your choice instead of the normal Winsock code. If you hooked Winsock, you would have access to the data that the legitimate client application is attempting to send. You could then modify that data as desired before sending it over the network. Several libraries are available to assist you in hooking system library calls. A popular one is the Microsoft Detours package (http://research.microsoft.com/sn/detours/). Hooking certainly can save a lot of time compared to writing a malicious client from scratch; however, it is sometimes a bit of work to do right.
Use proxy requests. Similar to hooking, you can use a network proxy to force existing clients into creating malformed requests. Security-testing proxies receive network traffic normally sent between a client application and server and allow the traffic to be modified before forwarding it to its original destination. This approach can save a tremendous amount of time compared to the two preceding approaches. Tools in this category include Imperva Inc.’s Interactive TCP Relay (ITR) (http://www.imperva.com/application_defense_center/tools.asp) and Jiri Richter’s Man in the Middle tool (included on this book’s companion Web site) for generic TCP proxying. For Web-specific traffic, Paros (http://www.parosproxy.org) and Web Proxy Editor (also included on the companion Web site) are useful tools.
As discussed, one of the fastest ways to begin altering network traffic is to proxy requests. Generic TCP proxies need to obtain the following configuration information:
Remote server. The server IP address or name to which requests are normally sent
Remote port. The port on which the remote server expects to receive requests
Local port. The port on which the proxy tool should listen for requests
Jiri Richter has written a generic TCP proxy named MITM (available on this book’s Web site) that can be used to modify arbitrary TCP traffic. In addition to allowing modification of existing traffic, this tool allows you to inject additional hand-crafted packets sent to either the server or the client.
If you want to test a telnet server using the proxy approach, set the test server as the remote server and set 23 as the remote port. If you don’t already know the port, you can determine it by using a sniffer when the client is directly connected to the server. Figure 4-2 shows MITM configured to proxy telnet traffic. Once configured, use a telnet client, such as telnet.exe included in the Windows operating system, and connect to the proxy server instead of connecting directly to the test server. When the client is connected to the proxy server, it is possible to view and modify the data normally sent to the server.

For example, when you proxy traffic between telnet.exe and a test FreeBSD server, the client sends the terminal emulation that it would like the server to use, as shown in Figure 4-3. telnet.exe can be configured to send ansi, vt100, vt52, or vtnt as the terminal emulation. Using the proxy, the terminal emulation value in the network request can easily be modified to anything, including values that telnet.exe would never send.
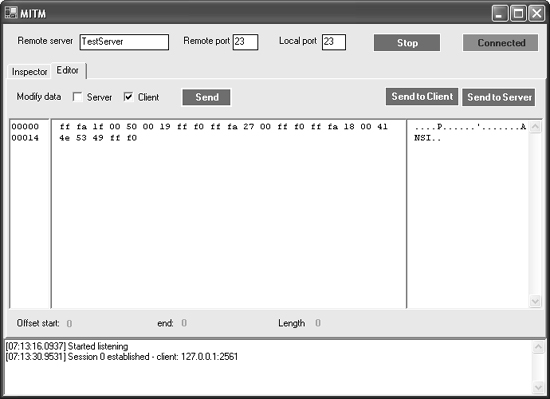
Figure 4-3. Changing the terminal emulation specified in the network request from ansi to anything in MITM
What if developers write code under the assumption that the part of the client request that specifies the terminal emulation will contain only a value that telnet.exe sends? They will be surprised when attackers modify the value to specify something else. Although it sounds like a silly mistake, it is actually a somewhat common assumption. For example, Microsoft FrontPage Server Extensions (FPSE) contained a bug similar to this that eEye Digital Security (http://www.eeye.com) found. FPSE normally can perform a number of operations that the FrontPage client requests. eEye testers made a request similar to a normal FrontPage client request, except they changed the operation to a bogus value. The server did not handle this well: it crashed the entire Web server process. This flaw allowed an attacker to make an anonymous Web request and take down the entire Web site! Microsoft patched this issue in Microsoft Security Bulletin MS00-100 (http://www.microsoft.com/technet/security/bulletin/MS00-100.mspx).
Important
Programmers need to write code that properly handles bogus data sent to it. Part of a security tester’s job is to send malicious data and test how the code handles that data.
After the network data is intercepted by the proxy, modifications can be made to it blindly, but it would be better to decide intelligently which modifications to make. Many times traffic contains unfamiliar hexadecimal data. You can use the techniques described in the section titled Finding Requests the Server Normally Accepts earlier in this chapter to better understand the data. Figure 4-4 shows the decoded telnet traffic in the Ethereal network sniffer. The offset 0x39 is the value 00 50 and is used to specify that the window width should be set to 80 (00 50 is hexadecimal for decimal 80). Suboptions begin with FF FA and end with FF F0, as shown in the figure.
Important
Even if the client validates input, the server needs to revalidate that data. Because sending requests outside of the normal client is possible, the server should not assume that the client has previously validated the data.

Figure 4-4. The Ethereal decoder, which shows the hex data 00 50 in the request is the client requesting a width of 80
Tip
Even if the client making the requests doesn’t allow the server to be specified (the server is hard-coded), client requests can still be proxied. By editing the file %WINDIR%system32driversetchosts, you can define the IP address that will be used for a server’s name. The IP address can point to the security proxy (likely on the local machine, so 127.0.0.1 would be the IP address). In the security proxy, the IP address of the remote destination server would be specified.
The telnet example demonstrates a generic way to proxy TCP traffic. Similar but easier ways to proxy Web traffic are covered in this section. HTTP (used for Web traffic) is a commonly used protocol for network applications. Because it is so widely used, it is worthwhile for you to invest in understanding specific tools and attacks that can be applied to this protocol.
More and more often, applications are written that target a Web browser as the thin client of choice. Examples of Web applications include search engines, online banking, and Web-based e-mail. Often, these Web-based applications are susceptible to malicious client attacks because Web applications contain some of the most vulnerable code for three reasons: their very nature is to accept network requests from untrusted sources over the Internet, the application code is developed and deployed quickly, and many Web developers are not familiar with secure coding practices. This section discusses how these Web applications actually work.
Unlike many TCP protocols, HTTP is stateless, which means that each request is an independent transaction. Although Web developers might expect requests to come in a certain order, this is not guaranteed with a stateless protocol. For example, a Web site might ask the user to fill out a registration form before presenting the user with the link to download a file. However, HTTP does not guarantee that requests are sent in this order. In this example, if the user knows the URL of the file to download, the user could specify the URL in the browser and download the file without filling out the registration form. Attacks in which the URL is requested directly are known as forceful browsing.
Like most applications, Web applications accept input from the user, process that input, and provide output to the user. Following are four common sources of input for Web applications:
URL query string
HTTP POST data
HTTP cookies
HTTP headers
Before we address how you can test Web application input sources, let’s discuss a related topic of HTML forms. Because HTML forms accept input directly from the user, they can become specific targets of attackers, who will probe them for weaknesses while they attempt to send malicious data to a server.
HTML forms are a common format in which applications accept direct user input that is later sent URL query string data or POST data. Figure 4-5 shows a sample form. Example 4-1 shows the HTML for this form:
Example 4-1.
<HTML>
<HEAD>
   <META http-equiv="Content-Type" content="text/html; charset=utf-8">
   <TITLE>Example Form</TITLE>
</HEAD>
<BODY>
<FORM name="myForm" action="http://www.example.com/register.cgi" method="GET">
<TABLE>
<TR><TD>Name</TD><TD><INPUT name="Name" type="text"></TD></TR>
<TR><TD>Age:</TD><TD><SELECT name="age">
<OPTION value="0">Under 21</OPTION>
<OPTION value="1">21-30</OPTION>
<OPTION value="2">31-40</OPTION>
<OPTION value="3">41-50</OPTION>
<OPTION value="4">51-65</OPTION>
<OPTION value="5">Over 65</OPTION>
</SELECT>
</TD></TR>
<TR><TD>Email:</TD><TD><INPUT name="email" type="text"></TD></TR>
</TABLE>
<INPUT type="submit" value="Register">
</FORM>
</BODY>
</HTML>

In Example 4-1, a few key items should be noted:
action. This property of the form specifies where the form data will be sent when it is submitted by the browser. Line 7 of the code listing specifies that data be sent to http://www.example.com/register.cgi. If an action is not specified, the form will submit data to the same URL that was used to load the form.
method. This property specifies how the data should be sent to the form’s action. The sample form uses GET. The method can be either GET or POST:
GET method. The GET method sends all of the form data as part of the form action URL. This is accomplished by appending a question mark to the end of the form action followed by the form data in key/value pairs. Ampersands separate the elements of the key/value pairs. For example, if the sample form is filled out using Rob Barker as the name, Under 21 as the age, and [email protected] as the e-mail address, the form would be sent to the server as http://www.example.com/register.cgi?Name=Rob+Barker&age=0&[email protected]. The question mark and everything following it is known as the URL query string.
One advantage of using the GET method is that it enables the user to save the results of the form submission. For example, most search engines use the GET method when performing searches. This enables the user to bookmark and/or send other users the URL of the search results.
One disadvantage of using the GET method is that any personal information included in the form data might be stored in unsecure places, such as in the browser Favorites list or History file or in proxy logs, and this might not be obvious to the user. For example, if a user logs on to an e-commerce site and then decides to e-mail a link to a friend, the link might include a session identifier for the currently logged-on user. If others use this URL, they will be logged on to the site under the first user’s account. Another disadvantage of using the GET method is that the length of form data is limited to the maximum URL length because the form data is sent as part of the URL. The maximum URL length is not defined in the HTTP specification and varies in different applications.
POST method. The POST method sends form data in the same key/value pair format delimited with ampersands as does the GET method. But instead of using the URL to send the form data, the POST method sends the data at the end of the HTTP request. This has the following advantages and disadvantage.
One advantage is that data is not stored as part of the URL, so it won’t be stored wherever the URL is saved. Also, there is no limit on the length of the form data.
One disadvantage is that the form data is not included as part of the URL, so form submissions, such as the result of a search query, cannot be stored and shared as a URL can be.
Omitting the method property in the form means the form will use the GET method.
Many controls can be used to collect input from the user, including text boxes, password boxes, list and combo boxes, and radio buttons. None of the controls encrypt data entered by the user.
The password input control does mask the data entered by displaying asterisks or bullets instead of the characters entered by the user. This only prevents a password from being revealed to someone looking at the screen as or after the password is entered. Sensitive data should be encrypted before it is sent over the network. Secure Sockets Layer (SSL) is the most common way to encrypt data for Web traffic. The password form control includes HTML like the following:
<INPUT name="userPasswd" type="password">
Important
Using SSL doesn’t make an application secure. SSL is used to encrypt network traffic so that third parties cannot see or tamper with the data (known as a man-in-the-middle attack). It can also guarantee that the client is talking to the correct server (if the client does the validation). However, it does not protect data from being viewed or tampered with at either the client or server end of the communication. For this reason, applications that use SSL can still be attacked. Attackers like when SSL is used because only the server receiving the data can see the request data, and that makes an attack a little more difficult to notice.
Another form control of interest is the hidden input control. A hidden control is just like the text box input control except the hidden control doesn’t have any visual representation on the HTML page. It is hidden from the user. Web developers can use hidden controls to pass information without showing the information to users or giving users a way to modify the information through the Web page. Hidden form controls include HTML similar to the following:
<INPUT name="myState" type="hidden" value="someValue">
As discussed in the section titled Understanding HTML Forms, you can append data by adding a question mark to the end of the URL. The question mark and everything following it are considered the query string. In addition to HTML forms, data is sent in the query string by JavaScript in a Web page, by client-side applications, as part of hyperlinks, and from many other places.
As discussed earlier, data in the query string often is sent as part of the URL. It is common to see URLs like this one: http://example.com/displayOrder.cgi?trackingID=103759. As a tester, you likely recognize this as an opportunity to perform some tests using the trackingID part of the URL. What might be an interesting trackingID value? Adding to or subtracting 1 from the valid trackingID would be a good place to start. This might show another customer’s order information; performing this test on many shopping sites really works. In February 2005, someone reported that by adding 1 to the identifier in the URL used to view his W-2 form (U.S. wage and tax statement) he was able to see other people’s income statements (http://news.zdnet.com/2100-1009_22-5587859.html). A properly designed order tracking system would require users to log on and would allow users to see only their own orders, or it would ensure the tracking identifier has a significant degree of entropy so that the ID is not easily guessed or manipulated with brute force to view someone else’s identifier.
Tip
HTTP contains a header named Referer, which contains the URL of the page that referred the browser to load the current URL. If the URL is loaded directly in the browser, the Referer header is not sent. To stop attacks in which attackers generate their own URLs, some developers check the value of the Referer header to verify that the referring URL is their page. However, this isn’t very effective protection because the Referer is sent by the client and its value can be forged by the sender. Also note that the original HTTP design specification misspelled the header’s name as “Referer.” Client and server programmers implemented this header as documented in the specification, and so it is necessary to misspell it for the server to evaluate the header’s value.
As mentioned earlier, the POST data is formed in the same fashion as query string data, but isn’t sent as part of the URL. So, unlike tampering with URL query string data, you cannot simply modify parts of the URL to modify POST form data. POST data is used for HTML forms, Simple Object Access Protocol (SOAP) and Asynchronous JavaScript and XML (AJAX) requests (discussed in more detail in Chapter 11), custom solutions, and many other purposes. Following is an example of how to modify POST data.
Load the order form example (TicketFormPost.html) from the book’s companion Web site into your Web browser. This Web page, as shown in Figure 4-6, is similar to what you might see on a ticket order Web site. You can purchase concert tickets, but there is a limit of four tickets maximum per customer. The Web page allows you to choose the number of tickets to purchase with the largest choice being 4. Customer selections are submitted using an HTTP POST, so values cannot be modified through the URL.

Think maliciously—how can you change the number of tickets to purchase to a quantity greater than 4? One option is to save the Web page locally and modify it so that the option to order more than four tickets is available, and then make the modified page submit the order to the ticket order Web site. This approach works in most cases; however, sometimes pages are complicated and contain JavaScript that validates data before it is submitted. Although these issues can be worked through, an easier way to submit an order larger than four tickets exists: you can use an HTTP proxy that allows modification of data before it is sent to the server.
The Web Proxy Editor HTTP proxy listens on the port specified in its startup options. This port should be set as the proxy port in the Web client proxy settings used to send requests. By default Web Proxy Editor automatically sets Microsoft Internet Explorer proxy settings, so no additional configuration is needed.
To use the Web Proxy Editor HTTP proxy to modify the POST data from the ticket order form, load the Web Proxy Editor tool and click the Listen button (it looks like a Play button). After Web Proxy Editor has begun to listen for requests, fill out the ticket form to order four tickets, and then click Check Availability And Reserve. The form data sent is displayed in Web Proxy Editor, as shown in Figure 4-7.

Figure 4-7. Using Web Proxy Editor to modify the number of tickets to reserve to exceed the allowed maximum value
Look closely at the data submitted: the Ticketcount form variable has the value of 4, which reflects the number of tickets selected on the order form. Perhaps you have many friends that would like to attend the concert with you, so change the Ticketcount value from 4 to 12 and send the modified data to the server.
The server doesn’t validate the number of tickets requested and instead confirms that 12 tickets are reserved, as shown in Figure 4-8. The server code should have verified that the ticket count was 4 or less but didn’t because an option for more than 4 tickets wasn’t available on the Web page.

A cookie is a piece of information specified by a Web site that the Web browser or other Web client are directed to store for a period of time. The Web site tells the browser the information to store either through the HTTP header or through client-side script, such as JavaScript or Microsoft Visual Basic, Scripting Edition (VBScript). Once the cookie is issued by the server, all subsequent requests made by the browser to that server include the cookie. (This is a slight generalization and will be clarified in a moment.)
Each cookie has a name, value, and several other properties. Cookies are used for many purposes, including storing information such as logon names and passwords and maintaining state over the stateless HTTP protocol. In this section, we discuss how cookies can be used and some of the possible dangers in their use.
When issuing cookies, the server and client-side script can set several properties that can be used to expire, secure, and control the scope of the cookie:
name/value. The name/value pair is used to store arbitrary information with the specified name.
expires. The expires property is used to specify the lifetime of the cookie. The value of expires should be in the format DD-MMM-YYYY HH:MM:SS GMT. If the expires property is not set, the cookie will expire at the end of the browser session and is known as a session cookie. The expires property is also used to delete a cookie by setting the expires value to a date in the past. When it stores authentication information, a cookie should be valid only for a relatively short amount of time (a few hours or less).
path. The path property is used to limit when the cookie should be sent. The value is the directory that should access this cookie. For example, if the path is set to /folder/, all pages (including subdirectories) under the directory named folder will have access to the cookie; however, this is the only directory that will have access to the cookie. It is important to note that path limits the cookie only to pages with paths that begin with the value specified. If the path is set to /folder, pages in the directory folder will have access, but so will pages in a directory named folder2. To specify an exact directory, the path value should end with a forward slash (/).
domain. This property is also used to control when a cookie is sent. Sometimes it is useful to share cookies across several machines in the same domain. For example, site1.example.com might set a cookie that site2.example.com would like to access. This functionality can be achieved by setting the domain property to .example.com. The domain value must begin with a period and must contain at least two periods. The two-period requirement is to prevent someone from setting a cookie to be accessible to all .com domains, .net domains, .edu domains, and so forth. The domain value must also be the domain used to issue the cookie. Setting this property is optional. The default domain value is the fully qualified domain name that issued the cookie.
Important
A Web site on one domain should never be able to read cookies from or set cookies for another domain. For example, www.example.com should not be able to read a cookie from www.alpineskihouse.com. If cross-domain cookie access is allowed, you have found a security bug. A common vulnerability that allows for this is cross-site scripting, which is discussed in more detail in Chapter 10.
secure. The secure property is a Boolean value used to specify whether the cookie should only be sent over a secure channel. This property is optional. The default value is false.
Important
It is important to test to see whether the secure property is set on cookies containing sensitive information that should be sent only over secure channels. A Web site could issue a cookie only over a secure channel, but if the secure flag is not set, an attacker often can trick the target user to browse over an unsecure channel to the site that issued the cookie. For example, attackers can convince a target user to click an http link to the site instead of an https link. The request to the server over the unsecure channel discloses the sensitive cookie information over the network. If the attacker can sniff the target user’s traffic, the attacker will know the contents of the cookie.
HTTPOnly. If this property is set, client-side script is prevented from reading the cookie. This property is useful in helping protect against cookie theft as a result of a cross-site scripting attack (discussed in more detail in Chapter 10). Currently, this property is supported only in Internet Explorer 6 Service Pack 1 (SP1) and later and is not set by default.
Servers usually send cookies to clients in the headers of HTTP responses. Figure 4-9 shows a network capture of a cookie named rootCookie that has a value of Issued by / that was issued by the server. A path (the forward slash [/] in this case) is also associated with this cookie. This cookie could also be issued through client-side script contained in the HTML returned in the document instead of through the Set-Cookie header.

The Web client checks its cookies, including the domain, path, and secure properties, against any page that it is about to request. If the cookie exists and the domain, path, and secure properties apply to the requested document, the client includes the cookie in the request sent to the server. Figure 4-10 shows a network capture of Internet Explorer requesting a Web site and sending the two cookies set in the previous example (Figure 4-9).
It is important to test cookies for the same tampering problems that could be used on query string and POST data. To test cookies, first determine whether the target accepts cookies, and then manipulate the values the Web application expects. Although browsers store many cookies in files, only persistent cookies (cookies with an expiration date sometime in the future) are stored on disk. If you test cookies simply by changing the cookie values in the file, you will miss session cookies. For this reason, use an HTTP proxy as an efficient way to manipulate all cookies.

Figure 4-10. Ethereal showing two cookies were sent to the server: rootCookie and ASPSESSIONIDAABSATRT
Note
Noam Rathaus discovered a security bug in PlaySMS (http://playsms.sourceforge.net/) through which he was able to run arbitrary SQL statements (called SQL injection) against the backend database simply by modifying the value of the cookie PlaySMS to contain his SQL statement. More information about this vulnerability is available at http://www.securityfocus.com/bid/10970. SQL injection attacks are discussed in detail in Chapter 16.
Cookies are one piece of data passed in HTTP headers, but several other headers are important to test. These include the following:
User-Agent. Contains information about the browser and operating system the user is using to connect to the Web site.
Referer. Contains the URL of the page that referred to the current URL.
Accept-Language. The language in which the client would prefer the server send the response.
Modifying headers can be done easily by using an HTTP proxy. For example, a bug hunter known as “Carbonize” found that he could perform a script injection attack against Advanced Guestbook (http://proxy2.de/scripts.php) by modifying the User-Agent header sent to the Web server to include HTML script tags. For more information about this bug, see http://www.securityfocus.com/bid/14391. Script injection attacks are discussed in detail in Chapter 10.
You have seen how the proxy testing approach can easily be used to intercept client network requests, manipulate them, and send them to the server. As mentioned earlier, this works well for making a single change, but testing many different manipulations of a single network request one at a time requires triggering the client to make the network request each time so that the modification can be made in the proxy. Sometimes getting the client to make the desired network request requires many steps. This can quickly become time-consuming. A more efficient approach for testing multiple manipulations of a specific network request is to use a program that sends the desired modified network request directly to the test server.
WFetch is a tool that enables you to make custom HTTP requests. To exert the most control over the request, you can use Raw Request mode. For example, in the ticket-ordering example discussed earlier, to make modified versions of the ticket reservation request capture the normal request in Web Proxy Editor (as shown in Figure 4-7), copy the request, and paste it into the large Raw Request text box, as shown in Figure 4-11.

Figure 4-11. Making custom HTTP requests in WFetch to test many variations of a single request quickly
Then, any part of the request can be modified. What happens when the alphabetic string abc is sent as the Ticketcount instead of the expected numeric value? To test this, change to the last few characters of the raw request from 4 to abc (see Figure 4-12). Because the request is now longer by two characters, update the Content-Length header from 27 to 29. (WFetch doesn’t update the Content-Length header in Raw Request mode but does in the other modes available.)
Tip
HTTP requests can be made without specifying the Content-Length. Often, it is easiest to remove this header when you make many modifications in WFetch so that it isn’t necessary to recalculate the value manually for each request. However, it is sometimes interesting to test by using correct and incorrect values to exercise additional code paths.
Figure 4-12. Changing the numeric Ticketcount value to an alphabetic value, which results in a server-side VBScript runtime error
After sending the request to the server, the WFetch log output window shows the server’s response. In this case, a VBScript error occurred on the server. The input abc doesn’t cause the server to crash, but does cause an information disclosure bug that shows that VBScript is being used on the server and that there was a type mismatch on line 21 of ticketProcessor.asp. Information disclosure bugs are discussed in more detail in Chapter 7.
The following tips can assist you in testing a server application when sending malicious requests.
Find all network traffic that can be sent to the server component you want to test. This can be accomplished by reading documentation, talking with the server architects and programmers, reading client and server source code, and/or by using a sniffer to capture network traffic between the client and server.
Understand how that traffic is formatted. Sniffers often include built-in decoders that detail each part of the network packet. RFCs, other documentation, and talking with other testers and developers often is helpful. The better understanding you have of how each part of a request is interpreted and used, the better your test cases will be.
Start with one modification per request. Often, several fields within a network request should be tested. It is tempting to test multiple fields in the same request, but this usually isn’t a good idea. Often, the server validates certain fields, and if one of the fields you modified is checked by the server and invalidated, you might be misled into believing that the other modification in the request didn’t result in a security bug. If you test the fields separately, you can more easily uncover bugs in specific fields. After you test using one modification, it can be interesting to make multiple modifications the same request to hit additional code paths.
Send requests out of order. Many server components expect network requests to arrive in a certain order. When you send requests out of order, you might be able to bypass authentication and validation, or cause the server to crash, or put the server into a bad state, and so forth.
Send requests with lower privileges than should be allowed. For applications that require a certain level of permission to invoke certain functionality, send requests to invoke that functionality as a lower-privileged user. Sometimes the only thing blocking the request is client-side validation.
Remove fields. Just as modifying the value of fields is important, it is also worthwhile to remove fields of a request entirely.
Determine what client-side validation of data is done, and send data that violates the validation. For example, if the client prevents sending data containing a space, it is important to try that case without using the legitimate client.
Use a fuzzer. Fuzzing is sometimes dismissed because its goal is to send random junk to the component being tested. People often think that this won’t yield great results and that targeted testing will cover these cases. Surprisingly, fuzzing can find bugs that aren’t discovered through code review and targeted testing. Fuzzing is a worthwhile activity that shouldn’t be overlooked.
Send malicious requests. Malicious requests allow more thorough coverage of input validation security bugs (including cross-site scripting, SQL injection, denial of service, etc.). When you send malicious requests, it is important to include tests in these areas.
Server code sometimes assumes that only legitimate clients will send well-formed requests. These assumptions often cause security problems and should not be made. By writing a custom client, using a security proxy, or using a program that allows sending custom requests, you can send requests that violate these assumptions. These techniques can be used as a starting point to find bugs such as information disclosure, buffer overflows, script injection, SQL injection, design flaws that take advantage of the program’s logic, and other types of bugs in the server.