Every professional application must have stable and easy-to-implement security features. An environment must be reliable wherein every user is free of worries about security. IBM Cognos BI provides an environment that is trustable. By the end of this chapter, you should be able to secure the IBM Cognos BI environment, recognize security policies, define authentication and authorization in Cognos, and identify the Cognos BI security model. To do this, we will discuss the following topics in detail:
- Security architecture
- Managing authentication providers
- Overcoming the initial security
- Permissions management
- Secured features, functionalities, and capabilities
- Cognos firewall and logging
- Single Sign-on (SSO)
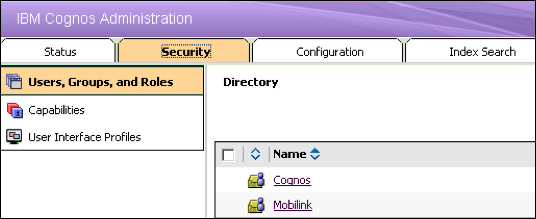
The following screenshot shows the area we will be focusing on in this chapter. The Security tab is highlighted.
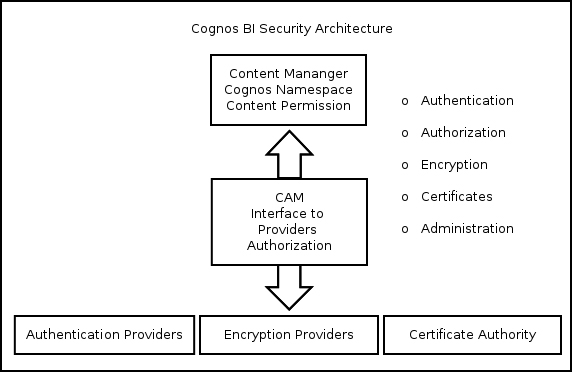
The IBM Cognos BI Security architecture involves authentication, authorization, encryption, certificates, and of course, administration. Every area focuses on its unique subject, for example, encryption deals with encrypting the data that flows between different machines. Both encryption and decryption algorithms are selected and implemented when Cognos is started on the Content Manager machine. The following diagram shows the architecture of security in IBM Cognos BI:
To manage users in IBM Cognos BI, it must be linked with a third-party authentication provider. An authentication provider defines users, groups, and privileges/roles. Authentication providers store the basic information of a user, for example, username, password, e-mail ID, preferences, and group settings. Once an authentication provider is linked with the IBM Cognos BI environment, the entries of authentication providers and their basic information can be used by IBM Cognos BI for authentication, e-mail ID, and so on. Furthermore, the entries (users, groups, and roles) are not copied to the Cognos BI environment; rather, they are referred.
Cognos BI supports a vast range of third-party authentication providers, which may be configured using the IBM Cognos BI Configuration window. Every authentication provider has its own set of rules for mapping the different fields of Cognos BI with those of authentication providers. The following authentication providers are supported:
- LDAP
- Custom Java provider
- IBM Cognos Series 7
- eTrust SiteMinder
- SAP
- RACF
- Microsoft Active Directory
The following screenshot shows the security settings where an authentication provider (using LDAP) has been added in the IBM Cognos Configuration window:
One or multiple authentication providers can be used by performing the respective configurations in the IBM Cognos BI Configuration window. A list of authentication providers is available on the IBM Cognos BI login page if multiple providers have been configured. If no authentication provider is configured, the Cognos BI environment is used anonymously. An inactive namespace can be made active by reconfiguring it in the IBM Cognos BI Configuration window with the original (old) settings.
An authentication provider if deleted from the IBM Cognos BI Configuration window becomes inactive in the Administration portal under the Security tab. Users with the System Administrator role can even delete it from the content store. The following diagram shows a built-in Cognos namespace and a third-party LDAP authentication provider namespace:

It must be noted here that all the contents of the My Folders area will be lost for all users who belong to this authentication provider. The authentication process is shown in the following diagram:

The IBM Cognos BI authorization process gives permissions to users, allowing them to perform the actions assigned to them. Authorization is a mechanism of giving or revoking access to information.
The permissions are assigned based on Cognos content. Data in the content store is stored in the form of a hierarchy. Therefore, the read, write, execute, traverse, and set policy permissions are available. Each of these permissions may either be allowed or denied. The deny action overrides the allow action wherever specified. Due to the hierarchy factor, the permissions may be granted to the object and all its child objects. Every new content will get the default permissions from its parent. If overriding is required, the Override option in the Permissions tab of Content Properties may be used.
When Cognos BI services are started for the first time, content store initialization takes place and many default features are created. IBM Cognos BI provides a built-in, ready-to-use namespace for managing almost all functions of security in particular. The namespace also contains functions of other areas, for example, data sources, contacts, and DLs. This namespace cannot be removed; however, it may be renamed. The implementation of security policies is made very easy by using this namespace. It also supports the creation of folders, new groups, and roles. For example, if different groups of organizations require different permissions and capabilities, all that needs to be done is to create groups in the Cognos namespace and add the DLs or groups from the authentication provider to this newly created group.
The Cognos namespace also contains a default user profile that contains all preferences and settings that will apply to all new users when they log in for the first time as shown in the following screenshot:

If a company requires using a set of preferences and a default company skin (CSS or style) for its Cognos BI users, this feature may be used. If any user is logged in to Cognos BI before the implementation of this setting, the profile will not acquire the new settings. This is done by launching the Administration Portal, navigating to the Security tab, and clicking on Cognos Namespace under Users, Groups and Roles. Click on the Edit default profile option in the toolbar to set the default user's profile.
Users can also change the default settings that are set by the company administrators later on if required, and the permission is then allowed.
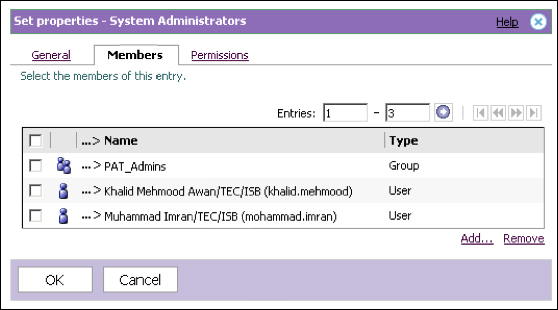
Once Cognos BI has been installed and configured with the basic options and one or multiple authentication providers, it is vulnerable to the end users because every user is by default an administrator of the IBM Cognos BI environment. This is because the built-in role Everyone is added to the members list of the built-in System Administrators role/group. It must be removed from the unwanted built-in roles available in the Cognos namespace of the Security tab in the IBM Cognos BI Administration portal. Trusted users (from any authentication provider) must be added to the System Administrators role before removing Everyone from the System Administrators role. As in the following screenshot, custom members have been added. One role has been added from the Cognos namespace and two users added from the third-party authentication provider:
A few configurations also need to be done in the IBM Cognos BI Configuration window as shown in the following screenshot. Unwanted users from authentication providers may be blocked by setting the Restrict access to members of built-in namespace property to true.

If the setting shown in the following diagram is kept to True, users can log in to Cognos without providing any credentials.

You must make sure that proper permissions have been given to all users, especially when authentication providers are added to Cognos BI. The Everyone role is also a member of a few other built-in roles; it may be removed if required.