In this chapter we will discuss IBM Cognos configurations in detail. This will also familiarize administrators with the IBM Cognos Configuration window. The administration team will be the only team accessing this window. End users (consumers, authors, analysis users, or query users) are never allowed to access Cognos configurations due to security reasons. Using the Configuration window, administrators can add new namespaces (objects). By the end of this chapter, a power user (administrator) will be able to perform all configurations related to the configurations window that includes, but is not limited to, editing services, logging, security authentication providers, cryptographic features, content manager data stores, and so on.
The major topics to be covered in this chapter are:
- Explaining the Cognos Configuration window
- Global configurations
The IBM Cognos BI Configuration window requires Java to be configured before it is started. By now you have already configured Java since the Cognos setup requires Java to be installed. Once all required components have been selected and installed, the next step is to configure Cognos BI to either run all components on a single machine, or on multiple machines in the case of distributed installation.
To open the Cognos Configuration window, log in as the Cognos user or the user with which Cognos BI was installed. After logging in, open a terminal session, navigate to the directory, and execute the command as shown in the following screenshot:

This will open the Cognos BI Configuration window, a part of which is shown in following screenshot, where major configurations can be done. We will discuss each of them later in this chapter. Certain configurations have already been discussed earlier in the book. As you can see, all the configurations have been divided into three major sections: Environment, Security, and Data Access. We shall start with Environment first.
The Configurations window has four major sections/areas: the explorer pane, the details pane, the description pane, and the menu along with a toolbar containing some basic icons bound towards actions.

Once we click on Environment, all the related options are shown in the details pane on the right-hand side. If any option on the right-hand side is clicked, its detailed description is displayed in the bottom pane. The following screenshot shows environment-related options. Each of these options may be carefully set depending on the type of installation (single or distributed). In case some component (an application tier, a gateway, or a content manager) was not installed, its options will not be available in this window. Mentioning port numbers in URIs of the Configuration window is mandatory, even if it's a default port; for example, 80 or 1521 in the case of the Oracle database connectivity configuration. Once any option is changed from the default value to a custom value, a yellow icon will indicate the change, and the option may also be reverted to the default value with the same icon shown in the toolbar.
The fields that are mandatory are marked with an orange asterisk sign in the following screenshot:

Most of the options available in the Cognos Configuration window can be tested before starting a Cognos service, such as Cognos service itself, the authentication provider, the content manager, and the notification service; hence, this is a great feature to have.
Cognos BI also comes with a built-in content store option if a separate content store (to SQL Server, Oracle, DB2 and so on) is not required. The following screenshot shows the options for the IBM Cognos content database.
This option appears if the IBM Cognos content database was selected during installation.

Logging is a key feature that helps in troubleshooting, auditing, and monitoring system performance. Most of the logging-related options are available in the Configuration window. The general options that apply to all logging sections (File, Database, Event Log, and so on) can be seen in on the right-hand side of the following screenshot:

Under the Logging section, File appears with more options. The number of full files that can be stored can be specified here by setting the size of each file.

In order to audit the reports, user sessions, jobs, and login history and monitor many other sections of Cognos BI in terms of usage, trend, history, performance. Logging is extended to a relational database (for example, Oracle). After adding a logging namespace and enabling an appropriate logging level, for example, basic, request or debug, the database starts to populate with logging- and audit-related data. An audit package (available in the Cognos Samples folder) may be published to the Cognos connection. The Samples folder is located at c10_locationwebcontent.
It also contains some very useful built-in reports. These reports help administrators to monitor and troubleshoot the Cognos Environment node. They also help in capacity planning. The following screenshot shows the audit logging namespace and its detailed option:
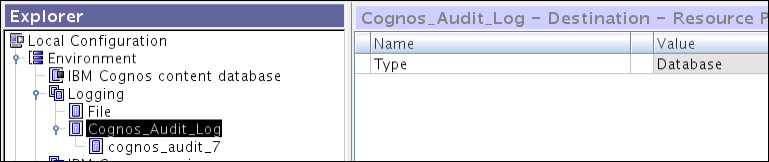
Let us assume that we have selected an Oracle database as our RDBMS (Relational Database Management System) for saving audit logs.
The following screenshot displays detailed configuration-related options for an Oracle database. These options are almost similar to the content store database configuration options (provided it is an Oracle database).

The basic steps to configure Cognos audit logging include configuring the audit database, setting up the logging levels in the administration portal, and deploying the audit package and audit reports. The audit package and audit reports are available in the Cognos Samples folder.
The next main entry under the Cognos Environment node is IBM Cognos services. When it is clicked on, all the Cognos-related services, which this IBM Cognos server has, appear along with their status. Any service may be disabled or enabled from this window's detailed section. By default, the IBM Cognos service section has a Cognos Service of the type Tomcat. The following screenshot shows the available options for Cognos Service. Depending on the available system memory, the memory for Cognos Service may be configured in MBs.

It is possible to deliver the IBM Cognos contents using another portal by configuring Portal Services. The following screenshot shows more options related to Portal Services:

The second main section in the Explorer pane is Security, which covers Authentication, Cryptography, and IBM Cognos Application Firewall. Each section has detailed options available. Considering the general options for Authentication, Cognos BI has certain options that apply to all the security authentication providers. The following screenshot explains all these options:

Each one of these options plays a vital role towards security. For example, restricting access to the members of the Security namespaces option will allow only users from configured authentication providers to log in to Cognos BI portal.
When the Cognos namespace under Authentication is clicked on, it shows a very important option related to anonymous users' access to the Cognos connection and web interfaces. When the Cognos BI components are installed and configured with basic options, all users can access the Cognos connection with full permissions. This needs to be fixed before sharing the URL with end users. Before disabling anonymous access to Cognos BI, you must ensure that an authentication provider has been configured and tested, and at least one user from the configured authentication provider is a member of the built-in Cognos namespace system administrators group.

Configuring a third-party authentication provider, such as LDAP (Lightweight Directory Access Protocol), requires detailed configurations. For this, the Cognos manual can be referred as it gives step-by-step and detailed procedures for configuring a third-party security namespace.
Data is very important to every organization; even more important is the protection of data so that in case it is moved from one organization to another, it should be in a format that cannot be used. Once the cryptographic settings have been configured, passwords and data can be encrypted as per the scheme selected during encryption (cryptography). The following screenshot shows the general options for Cryptography:

Once the Cognos namespace under Cryptography (it is a built-in namespace) is clicked on, more details are shown in the following screenshot. Note, the password must be kept in a safe place.

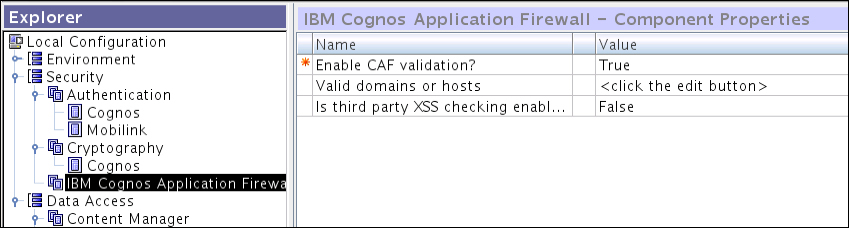
IBM Cognos Application Firewall helps the Cognos BI environment to secure any unwanted access to the system. Its task is to validate XML and web requests. The options related to the firewall are visible in the following screenshot:
The third section under the Explorer pane is Data Access. The services and features related to Content Manager (if installed on this server) appear when Content Manager clicked on. There is also another option to save the report outputs to a filesystem. The following screenshot shows the options:

The content store database settings will appear as soon as the user clicks on the entry under Content Manager. These options are similar to the audit RDMBS section. The following screenshot shows the DB content store and its options:

To configure the Notification service (e-mail), options may be noted down from the following screenshot where the SMTP outgoing e-mail is being configured:
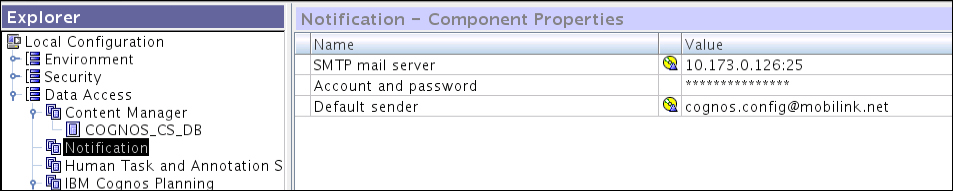
To configure the Notification service, you need to get the SMTP outgoing e-mail sending permissions for your Cognos server IP address from your mail server administration team. They will provide an IP address and a port number that need to be entered in the SMTP mail server field. The credentials must also be supplied in the next field and the default e-mails to be sent from the e-mail that is supplied in the last field.
Once all the fields are updated, the administrator can test the notification service by right-clicking on Notification and then clicking on the Test option. If all goes well, the test will be successful and an e-mail will be generated and sent to the default e-mail (default sender e-mail ID).