[A.10.1, A.10.2] Turnkey solutions are usually not the end of your deployment efforts; they require further work to refine, extend, and integrate them in order to meet your specific company needs. Then again, just because you can integrate two systems doesn’t mean you should integrate them. Thomas Edison was famous for pointing out to visitors of his summer residence the estate’s many labor-saving inventions. On the way back to the house, Edison carefully guided his guests to a point in the yard where they had to walk through a curious turnstile that took considerable effort to turn. On a tour of the grounds one day, a guest asked Edison why he had produced such an awkward and cumbersome device. “Well, you see,” Edison replied, “everyone who pushes the turnstile around pumps eight gallons of water into the tank on my roof.”
While Edison’s water tank extension and integration of a turnstyle pumping method may have met his personal lavatory needs, it’s often important to take into account all of your user needs when considering ClearQuest integrations and custom development. What makes sense for your own internal operations may not be the best solution for external users. Integrating ClearQuest with other software gives you the ability to deliver a seamless development environment to your user. Of course, IBM Rational provides several integrations with its own products, such as ClearCase and RequisitePro. However, many other companies supply products that may also be a good match for ClearQuest integration.
To understand how to integrate products with ClearQuest, you need to understand some basic concepts. Some ClearQuest integrations are independent, meaning they require only adding the appropriate package to your deployment. Other integrations are dependent, which means they require you to add not only one or more packages in a specific order but also additional configurations to ClearQuest.
Note:
ClearQuest integrations are not available to the web client. Therefore, fields, forms, reports, scripts, and other functionality added to the ClearQuest client by an integration package are not available to the web client. Therefore, you must plan before adding packages to your schema. After you add a package to a schema, you cannot remove the package. You must delete all schema versions in which the package exists. You can delete schema versions only if you have not applied them to a user database. If you are going to allow use of the web client, you need to consider how integrating ClearQuest with another tool will work when someone uses ClearQuest with the web interface.
The following is a list of independent integrations. Remember: You can use the same installation process for independent integrations as for a standard ClearQuest installation.
[A.10.3] Rational ClearCase and ClearQuest: Associates one or more ClearQuest change requests with one or more ClearCase versions.
Rational Purify and ClearQuest: Allows you to submit data to a ClearQuest database and track it.
Rational PurifyPlus and ClearQuest: Allows you to submit code coverage and performance data to a ClearQuest database and track it.
Your e-mail system and ClearQuest: Enables ClearQuest to communicate with users through their e-mail systems. An e-mail system integration involves configuring Rational E-Mail Reader and adding the e-mail notification package.
The following is a list of dependent integrations. They require adding more than one package to the schema in a specific order and typically require changes to your ClearQuest configuration.
Rational Administrator and ClearQuest: Associates Rational projects with ClearQuest databases.
Rational ClearQuest Project Tracker and ClearQuest: Enables data exchange between ClearQuest and Microsoft Project.
Rational RequisitePro and ClearQuest: Associates RequisitePro requirements with ClearQuest records.
Rational TestManager and ClearQuest: Allows you to submit defects found through TestManager to ClearQuest databases and to track them.
[A.10.4] Rational Unified Change Management (UCM) and ClearQuest: Links ClearCase UCM projects and activities to ClearQuest records.
Microsoft Visual SourceSafe and ClearQuest: Associates Visual SourceSafe information with ClearQuest records.
In order to use the available integrations or packages just described, you will need to add them to your schema. The best way to accomplish this task is to use the Package Wizard.
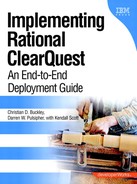
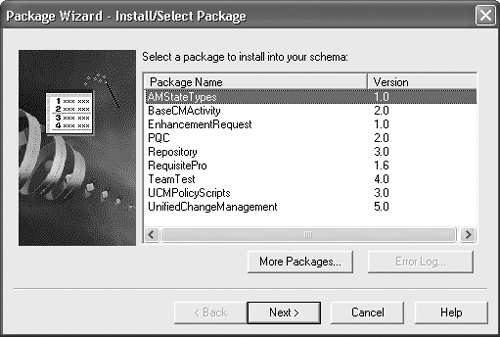
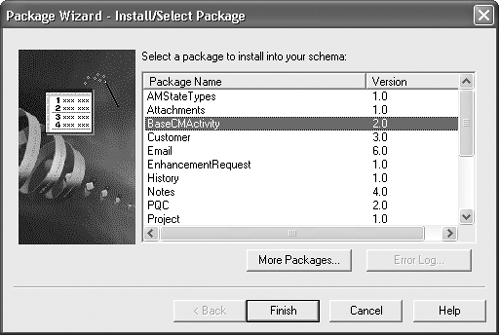
To start the Package Wizard, open your schema in ClearQuest Designer and select Package → Package Wizard. The dialog box shown in Figure 10-1 will appear.
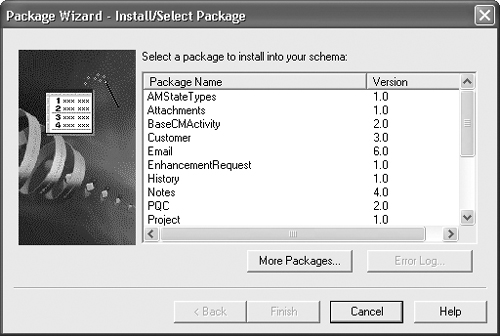
This dialog shows the latest versions of the packages that are available and that need to be added to the schema. If a package has aspects that can be applied to a record, then a Next button will appear. For example, look at the AMStateTypes package in Figure 10-2.

Click on the Next button, and then select the records to which the package should be applied. As shown in Figure 10-3, the Enhancement and Defect records will have the AMStateTypes package applied to it.
In general, some packages require additional steps. Basically, you should follow the wizard through the steps to install all of the necessary packages. It’s fairly straightforward.
Sometimes you may find that you have installed a package and added additional records by mistake, or you forgot to apply a package to a specific record. Don’t worry: You can always apply the package to the record after the fact. To enable package functionality for a new record type, click Package → Setup Record Type for Packages in the ClearQuest Designer with a schema open (Figure 10-4).

[A.10.5, A.10.6] Several packages can be added to a schema. These packages include functional and data elements that allow for integration with other tools in your change management system and with other critical back-end systems. However, you may find these packages useful even without integration to other tools.
Table 10-1 outlines several different package types and describes whether they add or modify record fields and which fields they impact.
Table 10-1. Common ClearQuest Packages
Description | Added or Modified | Fields | |
|---|---|---|---|
AMBaseActivity | Provides additional support for Rational ClearQuest Project Tracker. | Adds the Main tab to the forms of the enabled record type. | Headline Owner Description |
AMStateTypes | Provides additional support for Rational Unified Change Management (UCM) and its state types. | Does not add any record types. | am_statetype |
Requires you to map schema states to the following state types: Waiting Ready, Active, Complete. | |||
AMWorkActivitySchedule | Provides scheduling attributes needed to integrate Rational ClearQuest and Microsoft Project 2000 using Rational ClearQuest Project Tracker. | Defines and adds the AMSchedule record type family to the enabled schema. Record types being enabled with this package are added to this record type family. | am_planned_start_date am_planned_end_date am_planned_work am_planned_rem_work am_planned_duration am_planned_rem_duration am_actual_start_date am_actual_end_date am_actual_work |
With the AMWorkActivitySchedule record type family, you can query records being created and updated with Rational ClearQuest Project Tracker. | Adds the Schedule tab to the enabled record type. | ||
Attachments (read-only) | Lets you add and remove attachments related to a record. | Adds an Attachments tab to the enabled record type. | Attachments |
BaseCMActivity | Provides support for the BaseCMActivity record type, which is included in the UCM and Enterprise schemas as a lightweight activity record type. You can use this alternative to the Defect record type as is, enable it for UCM, or develop it into a new record type. | Adds the BaseCMActivity record type. | Owner Description Headline |
For more information, see Managing Software Projects with Rational ClearCase. | |||
Prevents data corruption by validating that all data entered into a record from the native client is from the same code page as the ClearQuest data code page of the schema repository. | Adds two Perl hooks for all nonstateless record types: the access control hook checkCodePageMismatch and the base validation hook CharacterSetValidation. | — | |
You can apply the CharacterSet Validation package with the Package Wizard and with the apply_character_set_validation_package command. | Adds a new stateless record type called _ratl_data_code_ page. | ||
ClearCase (read-only) | Provides basic support for the Rational Base ClearCase integration. | Adds the cc_change_set and cc_vob_object record types. | Fields included in cc_change_ set record type: objects |
Note that this package does not set up ClearQuest to use predefined ClearCase policies; they must be set up by the ClearCase administrator. | Adds the ClearCase tab to the enabled record type. | Fields included in cc_vob_object record type: Name object_oid vob_family_uuid | |
Fields added to enabled record type: cc_change_set | |||
ContentStudio | Provides support for integration with Rational Suite ContentStudio. | Adds the ContentChangeRequest record type. | Fields included in ContentChangeRequest record type: Description Headline Note_Entry Notes_Log Owner vgnAssignee vgnCMS vgnDueDate vgnManagementD vgnProjectPath vgnTaskName |
Note: ContentStudio has been end-of-lifed. The ContentStudio package is merely for backward compatibility for customers who still use it. | |||
Supports the integration of customer data with your defect- and change-tracking system. | Adds a Customer stateless record type. | Fields included in the Customer record type: Attachment CallTrackingID Company Description Email Fax Name Phone | |
Adds reference fields for customer information to the record type you select. | |||
Fields added to enabled record type: Customer Customer_Severity | |||
Email (read-only) | Supports automatic e-mail notification when records are modified. | Creates an Email_Rule stateless record type. | Fields included in Email_Rule record type: Actions Action_Types CC_Actioner CC_Addr_fields CC_Additional CC_Groups CC_Users Change_Fields Display_Fields Entity_Def From_Addr Include_Defect Is_Active_ Rule Filter_Query Name Operator_Value Show_Previous Source_States Subject_Fields Target_States To_Additional To_Addr_Fields To_Groups To_Users |
Adds a base action to the enabled record type called Send_Email_Notif. This base action runs the e-mail rule whenever any action is invoked. | |||
Supports an additional record type for product enhancement requests. | Adds the Enhancement Request record type. | Customer_Company Customer_Email Customer_Name Customer_Phone Customer_Priority Description Headline Keywords Owner Priority Product Product_Area Request_Type Submit_Date Submitter Target_Release | |
History (read-only) | Lets you keep a historical account of all actions taken on a record. | Adds a History tab to the enabled record type. | No fields added |
Lets you keep a historical account of all notes entered on a record, according to date and user. | Adds a Notes tab to the to enabled record type. | Fields added enabled record type: Note_Entry Notes_Log | |
Adds a base action called Init_ Note_Entry in the enabled record type, which deletes the Note_Entry value. | |||
PQC (read-only) | Provides support for integration with Rational PurifyPlus. | Adds a PQC tab to the form of the enabled record type. | Fields added to enabled record type: PQC_DiagnosticTool PQC_Executable PQC_TestCommand PQC_TestTool PQC_Stack PQC_StackID |
Project | Lets you track records according to project. | Creates a Project stateless record type. | Fields included in Project record type: Name Description |
Note: This is not related to the UCM package Project concept. | |||
Fields added to enabled record type: Project | |||
Repository (read-only) | Provides support needed for Rational RequisitePro, Rational Administrator, and Rational TeamTest. | Creates an RAProject stateless record type. | Fields included in RAProject record type: Name TT_Repo (refers to the TeamTest Repository) RA_Project_Path |
Fields added to enabled record type: RAProject | |||
Provides support for integration with Rational RequisitePro. | Adds the Requirement and RequirementMap stateless record types. | Fields included in Requirement record type: Name Project_Name Req_GUID Req_ID Requirement Tag | |
Adds the Requirements and the ASCQIBase base actions to the enabled record type. | |||
Fields included in RequirementMap record type: CQBackReqListAttName CQDatabase CQDatabasePath CQDialogTitle QEntityDefName CQHelpContextID CQModifyAction CQReqListAttName CQRepoProjectAttName HelpFileName RPAttrGUID RPHelpContextID RPProjectName RPProjectPath RPReqTypeGUID | |||
Fields added to enabled record type: Requirements_List | |||
Resolution | Adds support for tracking how a record was resolved. | Adds a Resolution tab to the enabled record type. | Fields added to enabled record type: Resolution Resolution_Statetype (read-only) |
Note: This requires you to map schema states to the state types Not_Resolved and Resolved. | |||
Provides support for integration with Rational TeamTest. | Adds Test Data and Environment tabs to the record type you specify. | Fields added to enabled record type: Build Company Computer Contact Custom1 (modifiable) Custom2 (modifiable) Custom3 (modifiable) Fixed_In_Build Hardware Log Log_Folder old_internal_id Operating_System Other_Environment Resolution_Description Requirement Requirement_ID Test_Case Test_Case_UID Test_Script Test_Script_ID Test_Source_UID Test_Input_List Verification_Point | |
Adds a TestInput stateless record type. | |||
Fields added to the TestInput record type: Test_Input_Name Test_Input_ID Source_UID | |||
UCMPolicy Scripts | Provides support for the UCM package by adding three global scripts. | Does not add any record types. | — |
Provides support for the UCM process by enabling integration with Rational ClearCase 4.0 and higher; links a ClearCase Project versioned object base (VOB) with a ClearQuest user database. | Adds the UCMUtilityActivity and UCM_Project stateless record types. | Fields included in UCMUtilityActivity record type: am_statetype Description Owner Headline ucm_vob_object ucm_stream_object ucm_stream ucm_view ucm_project | |
Adds UCM queries to the client workspace in Public Folders. | |||
Note: Using this requires the UCMPolicy Scripts package. You can also use this with the BaseCMActivity package. It also requires you to map schema states to the following state types: Waiting, Active, Ready, Complete. | Adds the ucm_base_synchronize action to the enabled record type. | ||
Fields included in UCM_Project record type: Name ucm_vob_object ucm_chk_before_deliver ucm_chk_before_work_on ucm_chk_mstr_before_dlvr ucm_cq_act_after_deliver | |||
Fields added to enabled record type: am_statetype ucm_vob_object ucm_stream_object ucm_stream ucm_view ucm_project | |||
Visual SourceSafe (read-only) | Provides support for integration with Microsoft Visual SourceSafe. | Adds SSObject and SCSnapObject stateless record types. | Fields added to enabled record type: VSSChangeSet |
Adds the SourceSafe tab to the form of the enabled record type. | Fields added in SSObject record type: CQDefects VSSCheckOutState VSSFileName VSSSpec VSSUser VSSVersion | ||
Fields added in SCSnapObject record type: CreatedBy CreatedOn Label SnapElements |
[A.10.7] The integration between ClearQuest and Unified Change Management (UCM) enables ClearQuest to display information about a UCM activity (such as its change set, its stream, and whether it is currently set in any view). It also enables policies governing when delivery of an activity in ClearCase can occur and when a record can be closed in ClearQuest. Here’s a quick description of UCM from the IBM Rational website.
Managing the ongoing process of change is important for any development team. However, the issue is further complicated as specialized, distributed teams strive to build high-quality software in less time. Rational has responded with a model that simplifies the process of change by raising the level of abstraction so development teams can focus on activities rather than individual physical changes to files. Unified Change Management (UCM) integrates asset and activity management.
[T.10.1, T.10.2] UCM is delivered through an integration of Rational ClearCase®, for software asset management, and Rational ClearQuest® for defect and change tracking. UCM provides out-of-the-box workflow for automating change across the software lifecycle and across distributed multi-functional development teams.
UCM helps managers reduce risk by coordinating and prioritizing the activities of developers and by ensuring that they work with the right sets of assets. Extending across the lifecycle to accommodate all project domain information—requirements, visual models, code, and test artifacts, UCM helps teams effectively “baseline” requirements together with code and test assets. The result: accelerated team development in which quality standards are met or exceeded on time and on budget.[1]
For a more extended discussion of UCM, you may also want to check out Software Configuration Management Strategies and IBM Rational ClearCase—Second Edition by David E. Bellagio and Tom Milligan (IBM Press, 2005).
At any point in a project, your ClearQuest database may contain UCM-enabled records that aren’t linked to a UCM activity object. For example, a newly created record might not be linked to a UCM activity. You must explicitly complete an action (e.g., by clicking on Action → Work On) to link a UCM-enabled record to a UCM activity.
However, the opposite is not true: Each UCM activity in a project enabled for ClearQuest must be linked to a ClearQuest record. You can’t create a UCM activity object without linking it to a UCM-enabled record in a ClearQuest database.
So why would you use the UCM integration? This is basically the integration of two of IBM Rational’s most powerful tools. Although not a seamless integration between defect tracking and version/change control, once configured, the combination makes for a very powerful tool that helps your engineers become more productive in their day-to-day activities.
[A.10.8] To understand the integration, you need to understand both tools. The following is a brief overview of UCM concepts. This will help you to better understand the integration between UCM and ClearQuest.
The term project refers to a group of people working on a single development effort. This can be a product release, a subsystem that’s part of a complete system, or a collection of products to form a suite.
A project contains one integration stream and several development streams (see the next subsection). This is where you—as the change management guru—must start planning. However, before you start creating projects all over the place, you need to sit down with marketing, your software development team, QA, and your technical writers to determine how you want to work together.
A stream can be compared to a development branch: It basically groups specific versions of elements. The key differentiator between a generic branch and a stream is the additional information stored in the stream. For example, a stream contains a baseline and a set of activities. It also contains relationships with other streams, such as a parent stream. The baseline plus the set of activities determine what versions of the elements the stream contains.
In Figure 10-5, Activity 1 and Activity 2 have been added to the stream. The baseline is defined by the versions of the elements represented by the bold circles in the diagram. The two activities have versions of elements that represent different patterns.

There are two basic types of streams: an integration stream and a development stream. The integration stream is where all of the development streams come together to be shared, as shown in Figure 10-6.
A baseline represents versions of elements used to start or rebase a stream. (Developers use the rebase operation to synchronize their streams with the new, recommended team baseline.) A simplistic way of looking at baselines is to compare them to labels, the difference again being that there is additional information and relationships stored with baselines. Baselines are typically the starting point for many of your activities.
An activity is the basic unit of work that your team members perform. It has a headline (ID), a creator, a change set (a list of versions of elements that have been changed as a result of performing this activity), and a parent stream with which it corresponds. An activity must be created before you can create a version of an element in a ClearCase UCM project.
If you’re using Rational ClearQuest, an activity is usually tied directly to a defect or enhancement. All work performed in your development stream must be done in concert with an activity.
A component allows you to group a set of related directories and file elements and then tie them to a UCM project. A component is developed and then integrated, and then all of its parts are released together. All projects must have one or more components, and components can be shared between projects. However, a component cannot span multiple versioned object bases (VOBs), and the largest a component can be is the size of its VOB. Here are some other things to consider about components.
Elements cannot be moved from one component to another.
An element can exist in only one component.
Once you create a component, you can’t reorganize it into subcomponents.
Planning your components up front is extremely important. One strategy is to put any elements that will be shared with other projects into the same component or into groups of components.
ClearQuest comes with two schemas that help in the integration of UCM: the UnifiedChangeManagement schema and the Enterprise schema. It also contains several packages used for the integration if you have your own schema that you want to enable for UCM: AMStateTypes, UCMPolicy Scripts, UnifiedChangeManagement, and BaseCMActivity. Additionally, you must set up Rational UCM to use ClearQuest integration. You can either use the schema that’s been provided or add these packages to your current schema. The following sections walk through each of these approaches.
Before you do anything here, you need to make sure that you have your schema checked out and that you have a plan. Don’t follow these steps until you are sure what records you want in the UCM integration and what policies you want to enforce, and also that you have the use case model defined. Again, planning up front will save you lots of time and heartache later. See Chapters 5 and 6 on analysis and design for some pointers on designing your system and taking the necessary steps for preparation.
Okay, now that you are back from reading those chapters and you have created a plan on how to move forward, we can begin by adding the necessary packages to the schema.
Before you add the first package, make sure that you have your states and transitions defined for your records. It’s much easier to add packages to an existing state net than it is to go back and add them later.
It’s important that you follow the steps in order. Don’t try to cut corners here. The package application to a schema is very order-dependent, and doing things out of order can cause heartburn.
The following subsections explain the steps you need to follow.
First, make sure that you’ve checked out your schema. Then go to the Package Wizard, using Package → Package Wizard within the ClearQuest Designer. You will see the packages that you can add to your schema (Figure 10-7).
Select the AMStateTypes package and click Next. You will see the records in your schema. Select all of the records that need to have AMStateTypes applied to them (Figure 10-8). This includes everything you identified in your design.

In this example, the ChangeRequest record is being applied to the integration. If you click Next here, you will see all of the states that are part of the ChangeRequest record. As you can see in Figure 10-9, this allows you to map the AMStateTypes package to the states you have in your record. These state types refer to the state types in UCM activities (Waiting, Ready, Active, and Complete).

You need to set the state type for each state in the record. When you have completed this for every state, you can click the Finish button.
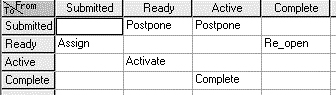
Note that each state type has a state net of its own and that all states assigned to a state type must follow the same transition rules as the state type. For example, Submitted belongs to the state type Waiting. This means that all transitions from Submitted must move to a state with the state type of Active or Ready. This is true for all states and state types. Figure 10-10 shows the state net for the state type and the valid transitions.

To ensure that you have your state types and states set up properly, validate the schema using the File → Validate menu option.
You may find Figure 10-10 important when setting up the default actions described in the next subsection.
The State Transition Matrix associated with your schema must provide at least one path through the state type model for the Unified-ChangeManagement package, from the Waiting state type to Ready, to Active, and to Complete.
For each state in your schema (except the state mapped to the Complete state type), you must assign a default action that moves the record from that state to the next state type in the UCM state type model.
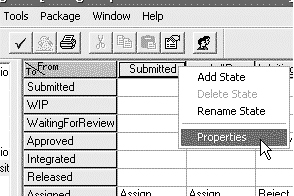
To set the default action, you need to select the state’s property by right-clicking on the state and selecting the Properties item from the context menu, as shown in Figure 10-11.
A property dialog will pop up (Figure 10-12). Choose the Default Action tab, and then select one of the actions to be the default action.
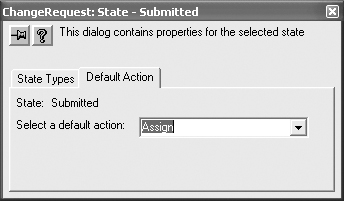
You need to do this for each of your states. If you don’t define a default action, you’ll receive errors when you validate the schema. You must also have a default action path that flows from Waiting → Ready → Active → Complete, or a validation error will result. Once your schema validates with no errors, move to the next step.
This package contains UCM policy scripts that will be used in the integration to change the state of records and to enforce behavior in UCM-enabled Rational ClearCase. You can see the new scripts that have been added to your schema by looking at Global Scripts within the browser (Figure 10-13).

There are Perl and Basic versions of these files. The names of these scripts start with UCU_<OperationName>. The name of a given operation gives you a clue as to its use.
The following list offers brief explanations of each script.
UCU_ChkBeforeDeliver implements the check before delivery policy for UCM.
UCU_ChkBeforeWorkOn implements the check before work on policy for UCM.
UCU_CQActAfterChact implements the perform action after changing activity policy for UCM.
UCU_CQActAfterDeliver implements the perform action after delivery policy for UCM.
UCU_CQActBeforeChact implements the perform action before change activity policy for UCM.
A default policy is automatically written in the scripts, but you can change it using one of the provided scripting languages. If your design requires changes to these policies, this is where you would make the changes.
Now you need to add the UnifiedChangeManagement package to your schema. This contains more state types, fields, and records specific to UCM. To do this, go to the Package → Package Wizard menu item to open the Package Wizard (Figure 10-14).
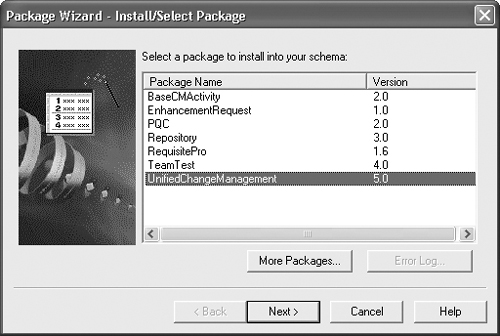
Then select the UnifiedChangeManagement package and click Next. ClearQuest will present the record types against which you could apply the package. In our example in Figure 10-15, we have selected the ChangeRequest record. Again, look at your design to see what records you want to be part of the UCM integration.

The records you choose to apply to this package must have, at minimum, values in the Headline and Owner fields. They must also have a Modify action defined, and they cannot have a WorkOn action defined. You’ll receive an error if either of these conditions doesn’t hold true.
Click Finish when you’re done applying records to your package. You will see a new record name: UCMUtilityActivity. This record stores information about the UCM activity. You will also see additional fields added to the record that you chose to be enabled with this package. As you can see in Figure 10-16, these fields include ucm_vob_object, ucm_stream_object, ucm_stream, ucm_view, and ucm_project. If you don’t see these fields, then ClearQuest didn’t apply the given package to the record you are viewing.

Additionally, two actions are added to the record: WorkOn and ucm_base_synchronize. These help with the integration. Additional scripts are added at this time, as well.
This package is optional, and we don’t recommend using it unless you don’t already have a record to handle basic change management activities. It adds a record named BaseCMActivity with fields, states, forms, and so forth. This could be a good starting point if you are creating your own schema from scratch that you want to be UCM-enabled. To do this, go to the Package → Package Wizard menu item. A popup will allow you to select the BaseCMActivity package (Figure 10-17).
Now click Finish. ClearQuest will add the new record to your schema. The record will have the following fields:
Owner
Description
Headline
The state net for the record will have the basic steps defined for the UCM integration. The State Transition Matrix will look like Figure 10-18.
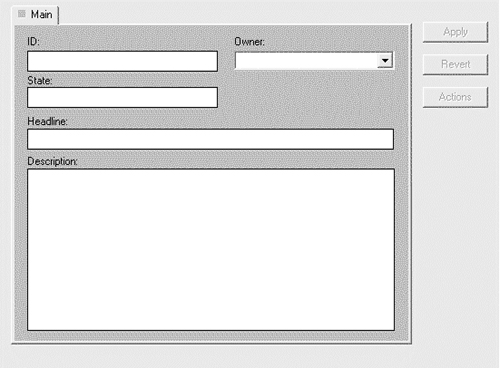
Some basic forms are also available for Submit and Modify actions. They look basically the same. Figure 10-19 is an example of how these forms look.
Now that ClearQuest is set up, you will need to set up UCM-enabled Rational ClearCase to talk with ClearQuest. For that, keep reading.
[A.10.9] In order to have UCM and ClearQuest integrated, you must have a UCM project that has been enabled for ClearQuest. To do this, you need to make sure that you have ClearCase and ClearQuest installed on the same system. Once this is completed, you can enable the integration using the Project Explorer. Here are the steps.
[S.10.2] Right-click on the project shortcut in the UCM Explorer, then click on Properties.
Click on the ClearQuest tab, and then select the Project Is ClearQuest-Enabled check box. Then, select the user database that you want to link to the project. The first time you enable a project to ClearQuest, it will prompt you for a ClearQuest login and the database to which the project will be connected.
Select the UCM policies that you want the project to enforce, and then click OK.
[A.10.10] Now you are ready to start using the integration. A great resource for the UCM/ClearQuest integration can be found in the ClearCase documentation in the Managing Software Projects manual.
[S.10.3] Before starting your integration with other tools, you need to look closely at your use case analysis and design. Look for the software actors in your system to see what kinds of communication channels need to be established between the two applications. Remember that these were only predictions; you are allowed to change your design as needed. Sometimes you can get stuck on your original design, and the implementation becomes unattainable. So, just remember to stay flexible throughout your deployment, and be prepared to make changes.
Tool integration requires an in-depth knowledge of the tools that you’re integrating. Most tools have some kind of API or import/export mechanism. Keep in mind that the integrations need to run on the client side of ClearQuest, and therefore the API to the integrated system needs to exist on the same platform and/or system. Of course, transport mechanisms can be used to make things more platform-independent, such as e-mail or XML, but both systems must understand them. Realizing the limitations of tool integration is the first step to making a useful integration.
You also need to realize that the tools you will be integrating will have an overlap of information. The key is to limit this overlap as much as possible and also to determine which tool has the “golden” information (the information that will be considered correct all the time). All of the others, then, are copies of the information; they can be reconstituted as needed.
Once you have determined where your golden information is and what kind of integration APIs you can use, you should look next at how the information will be synchronized or obtained from the external tool or from ClearQuest. There’s a great article by Mike Exum on ClearQuest integration at IBM developerWorks,[2] in which he describes integrations as inbound, outbound, or a combination of both. The following subsections offer some definitions to help you understand these concepts.
With outbound integrations, ClearQuest will push information to an external tool for integration. It’s natural to use a ClearQuest hook to interact with the other application. However, this is not as easy or straightforward as you might think.
First, you need to realize where the hook will be executed and whether the other application’s API can be accessed from the same machine. Hooks are run on the ClearQuest client machine—both UNIX and Windows—and on the web server in the case of the web client. So, you need to make sure that your integrated application is available on these hosts. (Keep in mind that this may require installation of the application on these hosts.)
Second, you need to decide where the hook should be placed. When the hook runs, should it be run by the user, should it be automatically run when a record changes state, or should it be run periodically? These decisions can make your integration easier or harder. For example, if you choose to send information to an application and that takes a long time, then attaching the hook to a change state of a record will probably be painful for the user.
Finally, you need to consider security. Do the applications require different users and user authentication? Does the authentication require user interaction? What other restrictions and/or security rules might prevent some or all of the actions needed by the integration?
Inbound integrations are those in which ClearQuest will receive information from another application. Basically, the issues are very similar to those surrounding outbound integration, but the roles are reversed. ClearQuest has a COM interface that makes several languages available to the integrator, including Visual Basic, VBScript, Visual C++, and Perl. ClearQuest also comes with its own customized version of Perl, which you can use directly. For more information on the ClearQuest API, see the ClearQuest API guide. There are several different aspects to the API, but we can’t cover the API in this book. There is also a command-line interface for support on UNIX and Linux clients.
[A.10.11] Again, you need to consider the same things as with outbound integration. ClearQuest does offer several different options for its API, but you should remember that you will need to install the ClearQuest client on all of the machines that need to run the integration.
Many times, tools have different names for the same concept, or at least different values for the same concept. A typical example of this is when ClearQuest uses one name and set of values to represent the severity of a defect while an integrated CRM system uses a completely different name with different values. Table 10-2 is an example of a translation table between the defect severity values in a CRM system and in the ClearQuest Defect record.
Therefore, in your integration, you would need to convert from the CRM severity value to the ClearQuest defect severity value, and vice versa.
[1] From IBM Rational marketing information on the website, http://www-306.ibm.com.
[2] “A Primer on ClearQuest Integrations,” http://www.ibm.com/developerworks/rational/library/1051.html.