5
Task Automation with RPA
Remote Process Automation (RPA) is a typical on-ramp for automating business tasks and processes, especially for small to medium businesses, as well as enterprise departments. The RPA software market remains the fastest-growing enterprise software segment that Gartner tracks, growing at a rate of 38.9% in 2020 (see the Further reading section).
RPA is perhaps the most understandable automation technology because of how the technology interacts with systems to perform automation – by emulating precisely what a human does, using the same interfaces humans do – sometimes called desktop automation. As the RPA field has matured, vendors have sophisticated control centers for team sharing and automation management, rich features for specific desktop applications and linking to enterprise APIs, developing chatbots, and providing dashboards for business insight derived from these automations. RPA technology is rapidly becoming an integrated component of various automation technologies (such as integration platforms, business process platforms, and AI) as vendors focus on holistic automation capabilities.
In this chapter, we’re going to cover the following main topics:
- Let’s understand the business problem
- IBM RPA client/server topology
- RPA automation
- Reading from Microsoft Excel
- Using RPA to interact with SAP UI
- Packaging and deployment
- Advanced topics – exception handling and troubleshooting
We’ll need Windows 10 to run IBM RPA automations.
Let’s understand the business problem
Among the daily tasks of a sales enablement department in a large enterprise is to create an SAP sales order from entries noted in a spreadsheet that is sent from various field offices. It takes a sales assistant a few minutes per entry since the work is tedious and error-prone – from mistakes in data entry to missing orders, it seems our sales assistant can do no right. The business is expanding quickly and the number of spreadsheets needing data entry is growing. RPA is well-suited for providing automations to address the sales assistant’s pain points, allowing them to focus on higher-value business contributions [2].
IBM RPA client/server topology
Before we start creating robots, we need to understand the arrangement of RPA software and its relationships. IBM RPA is offered in two on-premises deployments:
- Windows installable
- Red Hat Open Shift Operator
However, for this chapter, we’ll simplify the discussion by leveraging the IBM RPA SaaS cloud offering:

Figure 5.1 – IBM RPA SaaS
The RPA tools installed on the Windows client are those needed to build new automation (IBM RPA Studio) and launch automations for business users (IBM RPA Launcher), while the IBM RPA SaaS Control Center manages those automations. The robots we will create with IBM RPA are executed on the Windows client, not in the cloud.
The RPA client software package includes a launcher to launch robots interactively, a credential vault for robots to secure access to credentials, an RPA agent that communicates with the server, a bot runtime that is in charge of executing the robots on this computer, and an optional studio for developing bots.
RPA automation
Now that we have a simple understanding of the topology of the RPA software, we need to understand a key concept of RPA automations. There are three types of robots:
- Attended: An attended bot is launched by the business user using the IBM RPA launcher and may prompt the user to provide input, such as a password.
- Unattended: An unattended bot can be scheduled to Windows clients automatically without intervention from any user.
- Chatbot: A bot which can orchestrate a conversation with a human user. (We'll explore chatbots in the next chapter.)
We are now ready to look at a practical example.
Reading from Microsoft Excel
We are ready to start understanding how to create a new robot to read data from an Excel spreadsheet. IBM RPA provides a rich integrated development environment (IDE) for developing and debugging robots. Let’s get going!
IBM RPA Studio
The IBM RPA IDE is used to author, develop, and debug robots. The IDE shown in the following screenshot is displaying the designer view of the robot that we’ll develop step by step over the next few subchapters. The Designer view tab shows a detailed English description of the specific logic used to implement the script, with the highlighted command being Open Excel File. To the left of the Designer tab is a context-sensitive textual editor, for those advanced programmers who are comfortable with programming languages:

Figure 5.2 – IBM RPA SaaS
Traditional file controls such as Open, New, Save, and Save As are provided to save robot scripts in progress and open files from the local client’s filesystem. In a subsequent part of this book, we’ll learn how to upload the script to IBM RPA’s code repository so that we can make it available for the sales assistant to execute whenever they have a robot to process.
Like most IDEs, there is a run, step, and debug control, visible in the middle-top toolbar, and a comprehensive toolbox of WDG Automation Language (WAL) script commands.
WAL command language
IBM RPA Studio offers over 600 unique robot commands that are categorized as follows:
- Base Commands: Commonly used commands to define variables, program loops, and write output strings.
- Browser Commands: Used to open, find controls, and interact with browser-based websites and applications.
- Terminal and Database Commands: Used for interacting with terminals and databases.
- Artificial Intelligence, Communication, and Natural Language Commands: Used for interacting with a business user using natural languages.
- Windows Commands: Used for interacting with native Windows applications, such as Microsoft Excel.
IBM RPA Studio offers a Toolbox view, which can be used to explore possible commands needed to use in your automations, as shown here:
- Let’s search for commands related to Microsoft Excel since our first robot automation will be to interact with and read values from a spreadsheet:

Figure 5.3 – IBM RPA Studio Toolbox – Excel
- As we can see, there is a comprehensive array of commands for interacting directly with Excel spreadsheets. Now, let’s take a peek at the spreadsheet we’d like to read and process:

Figure 5.4 – Sales details
The SalesOrder.xls file is a typical data spreadsheet on the first sheet. In our example, we’ll open the file from a shared folder on our Windows client. However, IBM RPA can read the file from an email, Dropbox, Google Drive, or Microsoft OneDrive, based on how the sales assistant receives the spreadsheet.
- Our automation will open the Excel spreadsheet and read the data on the first sheet into a data table; then, we’ll print out the contents of the spreadsheet. To facilitate a low-code experience, we will click on the new WAL file and then Open Excel File in the toolbar. We’ll get a popup that we can fill out:

Figure 5.5 – Sales details
There is a convention in the command pop-up window for finding files and defining the variables that will be used to contain the values needed by the commands. In the preceding screenshot, we clicked on the ![]() button to locate the shared folder location we want to open, and then we clicked on the
button to locate the shared folder location we want to open, and then we clicked on the ![]() button on the Excel instance field to define the spreadsheet file variable.
button on the Excel instance field to define the spreadsheet file variable.
- Let’s define an Excel salesOrderSpreadSheet variable that we will use in the subsequent commands to work with the spreadsheet. We will add Boolean success and Text reason to complete the fields of the Open Excel File command:

Figure 5.6 – Define Variable
- This results in the following complete textbox:

Figure 5.7 – Open Excel File
- Thus, after saving the command, the designer view of our first WAL command will read as follows:

Figure 5.8 – WAL script
Best practice
Always add a close file command to your robot, along with your open command.
- When we click on the Close Excel command, we get a popup asking us which Excel file to close since the command language can have many files opened simultaneously. One concept demonstrated here is the simple idea that when clicking on the
 button, the variable selection popup filters out possible variables to only those that are of the correct type:

Figure 5.9 – IBM RPA Studio variable selection list
- Click on the salesOrderSpreadSheet variable and then click the Select button. Click on the Save optional parameter and then save the command.
Best practice
As with many applications, frequently save your work to prevent accidental loss of work.
- Let’s go ahead and give the command a name of salesOrder.wal, after clicking the Save button. Technically, we have our first automation that can be executed – it will open the file, remember whether the file was opened successfully, and then close it. Out of curiosity, let’s take a look at what commands comprise our automation. The tool has generated the following script from our textbox fill-in experience:
defVar --name salesOrderSpreadSheet --type Excel
defVar --name success --type Boolean
defVar --name reason --type String
excelOpen --file "\\tsclient\shared\SalesOrders.
xlsx" --comment "Open the Sales Order Spreadsheet"
success=success reason=reason salesOrderSpreadSheet=value
excelClose --file ${salesOrderSpreadSheet} --save--comment "Close Sales Order SpreadSheet"
We don’t need to understand any syntax or the specific structure of the script, just the steps to perform this specific automation.
Reading the Excel table
Now that we have gotten the hang of how to add commands to our evolving automation, we’d like to read the data in the spreadsheet, and for each row in the table, print out the values in the columns in our output window. We are going to leverage the GetExcel Table, For, and Next MapTableRows to assign the variables to specific columns for this loop. The experience for creating these changes is very similar to what we’ve already shown so far – and we’ll go ahead and just show interesting features of IBM RPA Studio as we come across them.
The MapTableRow command provides a dialog that guides the user through the mapping definition, where variables can be defined as you are doing the mapping, meaning they do not need to be done in advance:

Figure 5.10 – Map Table Row
You can leverage either the column name (header) or the column number to map from the Excel column value to the specific robot variable.
Best practice
Usage of column names, if available, in mapping commands tends to result in more stable robots, especially if the spreadsheet changes format over time. Inserting a column between soldToParty and material would break the script command if column numbers were used.
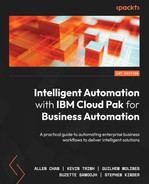
Let’s add an informational output message via the log to make sure we are reading the data from the table properly before we proceed to drive our SAP sales order:

Figure 5.11 – For loop
Since this is the first time we will execute the robot, we’ll go ahead and execute the robot step by step, a common feature of programming IDEs. The Start button has a pulldown. From here, we’ll select Start step by step:

Figure 5.12 – IBM RPA Studio – the Start button
A couple of things to notice is that the debugger runs step by step without stopping, and after execution, we can see the log message we’ve added, displaying that it has read the three lines:

Figure 5.13 – IBM RPA Studio – the Output window
Best practice
Logs from attended and unattended robot executions are stored in the IBM RPA control center for later retrieval and diagnosis. Personal and confidential data, sometimes referred to as PII data, should never be logged via the LogMessage command.
We can add a breakpoint by clicking in the column next to the command step number, asking the IDE to stop at this command line number, like so:
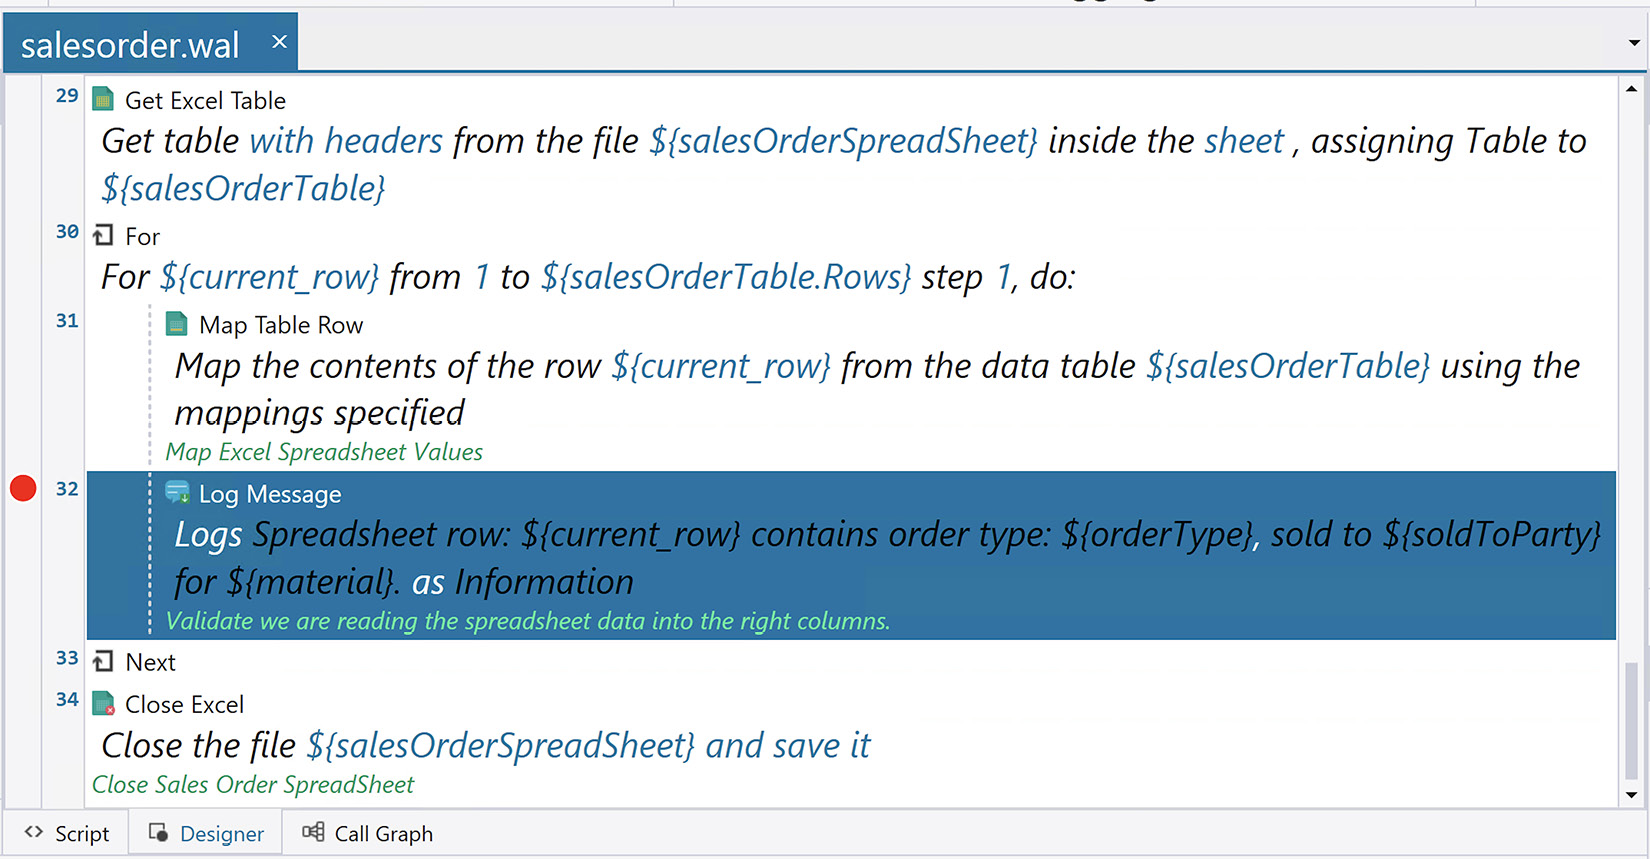
Figure 5.14 – IBM RPA Studio breakpoint
Let’s run the script again and notice some things about the IDE itself. We can direct the continuing execution when we are ready to continue:

Figure 5.15 – IBM RPA Studio – the Debug tab
To the right of the designer, we can see that after hitting the breakpoint before the execution of step 21, the current values of the robot variables are displayed, and those that were changed since the last breakpoint are denoted in red, as shown here:
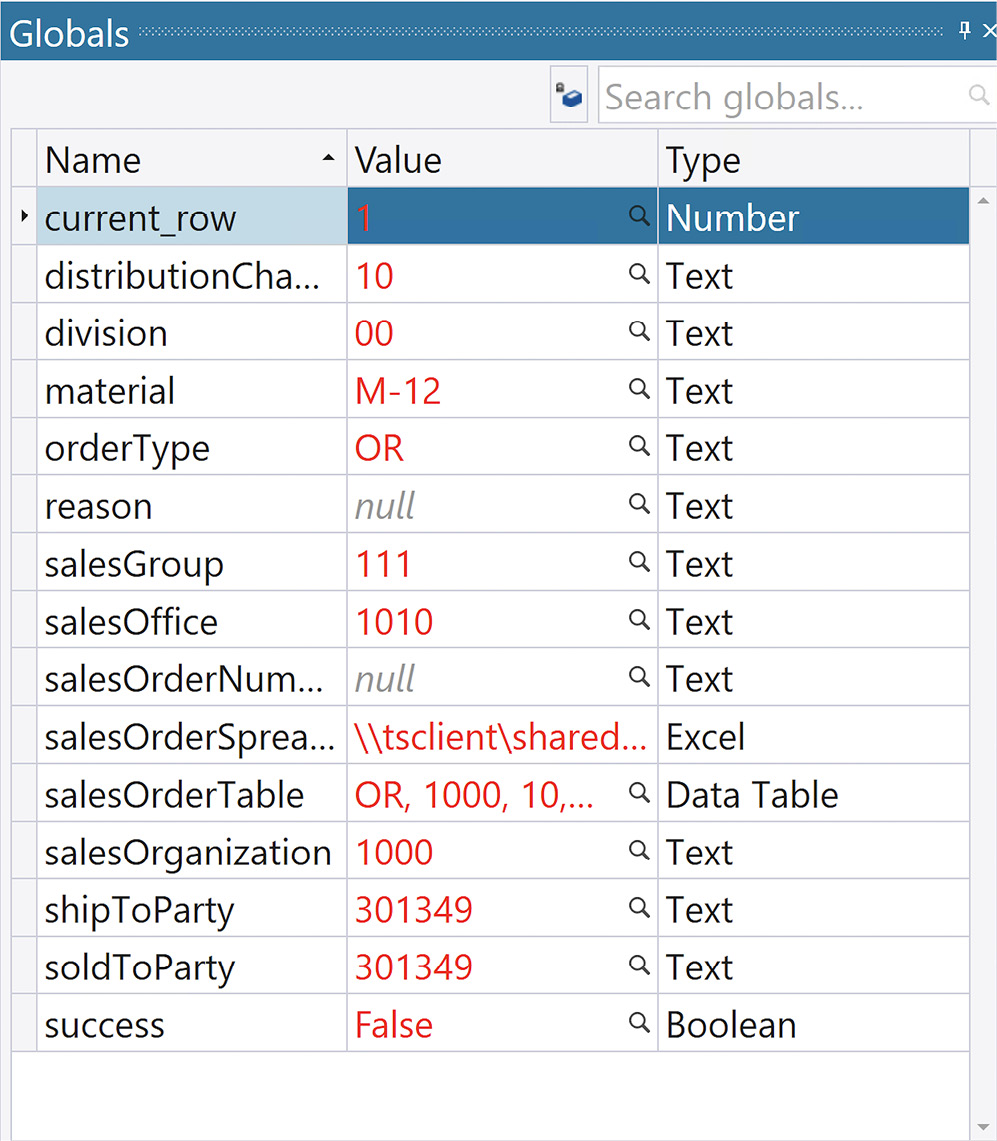
Figure 5.16 – IBM RPA Studio – Globals
As we come to the end of this section, let’s eyeball the current state of our robotic automation:
…
excelOpen --file "\\tsclient\shared\SalesOrders.xlsx"
--comment "Open the Sales Order Spreadsheet" success=success
reason=reason salesOrderSpreadSheet=value
excelGetTable --file ${salesOrderSpreadSheet} --getfirstsheet
--entiretable --hasheaders salesOrderTable=value
for --variable ${current_row} --from 1 --to ${salesOrderTable.
Rows} --step 1
mapTableRow --dataTable ${salesOrderTable} --row ${current_row}
--mappings "name=OrderType=${orderType},
name=SalesOrganization=${salesOrganization},name=
DistributionChannel=${distributionChannel},name=
Division=${division},name=SalesOffice=${salesOffice},name=
SalesGroup=${salesGroup},name=SoldToParty=${soldToParty},
name=ShipToParty=${shipToParty},name=Material=${material},
name=Quantity=${quantity},name=SalesOrderNumber=
${salesOrderNumber}" --comment "Map Excel Spreadsheet Values"
logMessage --message "Spreadsheet row: ${current_row}
contains order type: ${orderType}, sold to ${soldToParty} for
${material}." --type "Info" --comment "Validate we are reading
the spreadsheet data into the right columns."
next
excelClose --file ${salesOrderSpreadSheet} --save --comment
"Close Sales Order SpreadSheet"
A couple of things to notice is the command structure of WAL files. Every line of code is a command – this applies to mathematical and formulaic equations, as well as flow control constructs such as For and Next loops. The interpreter has a very simple interaction with the language, to keep it simple for non-programmers. Any time you see ${value}, the interpreter will convert that into the current value of that variable at the time of execution.
Using RPA to interact with SAP UI
Before we get started on the nitty-gritty of automating our SAP UI for our sales assistant, we should review a best practice when interacting with programmatic logins.
Best practice
Although WAL scripts can contain password strings, it is a best practice to create a managed credential for the robot to log into the remote system. This credential can be stored in the Windows client IBM RPA Vault or prompt the user to give the credentials when the attended robot is launched.
Let’s think about why that might be a best practice:
- Firstly, the password can’t be exposed while reading the WAL script itself.
- Secondly, the automation does not need to change when the password does, just the managed credential. Consideration must be given as to whether the automation is going to be leveraged by many. A functional user should be created in the remote system.
Creating a managed credential
After logging into the IBM RPA Control Center, navigate to the Credentials page (left-hand navigation bar), select the Credentials tab, and click on Create credential:
Figure 5.17 – IBM RPA Control Center – Define credentials
For our purposes, we’ll go ahead and create a functional ID for our sales robot and manage it as a credential. This way, an administrator can change the password periodically as required. IBM RPA also has the notion of credential pools, which allows credentials to be grouped for easier administration:

Figure 5.18 – IBM RPA Control Center – Create credential
Best practice
If there are test and production endpoints, IBM RPA supports the configuration of key-value pairs that can contain the intended destination. In this way, the endpoint can be varied without the need to change the tested automation. The key is to establish the convention your organization will follow early so that you can leverage a consistent process.
Interacting with SAP GUI
SAP is a popular, sophisticated business management software package. SAP users interact with the software while using a graphical user interface (GUI) to run a myriad of specific transactions that the business has with its customers. SAP transactions have code names and, as it happens, the new sales order transaction code is VA01.
SAP GUI has several scripting (that is, automation) controls that any SAP user will need to have enabled before continuing with IBM RPA robot development:
- The SAP administrator will need to enable scripting for any SAP user used by an IBM RPA robot, or the SAP login will fail.
- The SAP GUI options may have user notifications turned on for the GUI attach and connection open events. In this example, we’ve turned them off since we are intending to allow scripting (https://support.winshuttle.com/hc/en-us/articles/360023686491-How-to-Avoid-the-A-Script-is-Attempting-to-Access-SAP-GUI-Message).
In this section, we will do the following:
- Start SAP GUI.
- Start the Sales Order Transaction.
- Attach the SAP window as the current context, which indicates which window the subsequent commands should operate in.
- Map the Sales Order Window fields to variables in the script.
To begin working with the SAP GUI, we’ll leverage the built-in command to start the SAP session. When logging into the SAP system, the WAL command needs the connection details and the username and password we’ve been given. Follow these steps:
Note
Please note that this is essentially the same information any SAP user would need to log in.
- First, let’s save a reference to the SAP session, window, and the window’s process ID in WAL script variables so that we can use them with subsequent commands:

Figure 5.19 – Start SAP Session
- Now, we want to start our Sales Order Transaction (VA01). IBM RPA has a native WAL command to start an SAP transaction:

Figure 5.20 – SAP Transaction

Figure 5.21 – Attach Window
Best practice
When working with unfamiliar WAL commands, it is useful to create a new temporary WAL file to isolate those new things, making debugging much faster and simpler.
- After executing those three commands, the VA01 dialog window should be open and ready for us to make progress:

Figure 5.22 – SAP GUI
IBM RPA Studio Recorder
To build automation that moves the data from the spreadsheet into the order, we’ll start the recorder by clicking the Start Recorder button in the main RPA Studio toolbar:
- Having started the recorder, a recording toolbar will be added to the top of the screen:

Figure 5.23 – IBM RPA Studio Recorder toolbar
The recorder helps us encode the window’s interaction in the WAL script command by using the in-context window controls under the covers. This greatly simplifies the definition of automation and is a valuable (if not necessary) part of any commercial RPA product. The more times you use the recorder, the more comfortable you’ll get with the controls. Note, you can alternatively have the recorder automatically insert a startSAPSession command by clicking on the SAP tab and providing the connection and log in detail.
- To select the Order Type field, for instance, we can use the Studio hotkey – press the left Ctrl key and hover your mouse over the field. IBM RPA will shade the field in purple when it’s been selected:

Figure 5.24 – IBM RPA Studio recorder highlighting a field
We know we want to set the value of Order Type to the variable read from the spreadsheet that we obtained in our For; Next loop in the prior Excel section. Navigate to the Recording toolbar and select Actions | Set Value | By Id:

Figure 5.25 – IBM RPA Studio – Actions | Set Value | By Id
We’ll see that many details are captured and sent by the recorder, which helps us encode the WAL command without any documentation on the specific construction of the SAP GUI Windows application. We can see that the field name in the VA01 dialog is wnd[0]/usr/ctxtVBAK-AUART, which the recorder has filled in for us. All we did was fill the input value by picking the WAL script variable from the For; Next loop:

Figure 5.26 – Set Value
- It is easy to see that we just need to repeat this step for each of the fields on the initial VA01 dialog. Once we’ve mapped this initial dialog, we need to simulate pressing Enter, which we can do by highlighting the
 button:

Figure 5.27 – IBM RPA recorder highlighting the tick button
- Since we want to click on the button, we must select Actions | Click | By Id:

Figure 5.28 – IBM RPA Recorder – Actions | Click | By Id
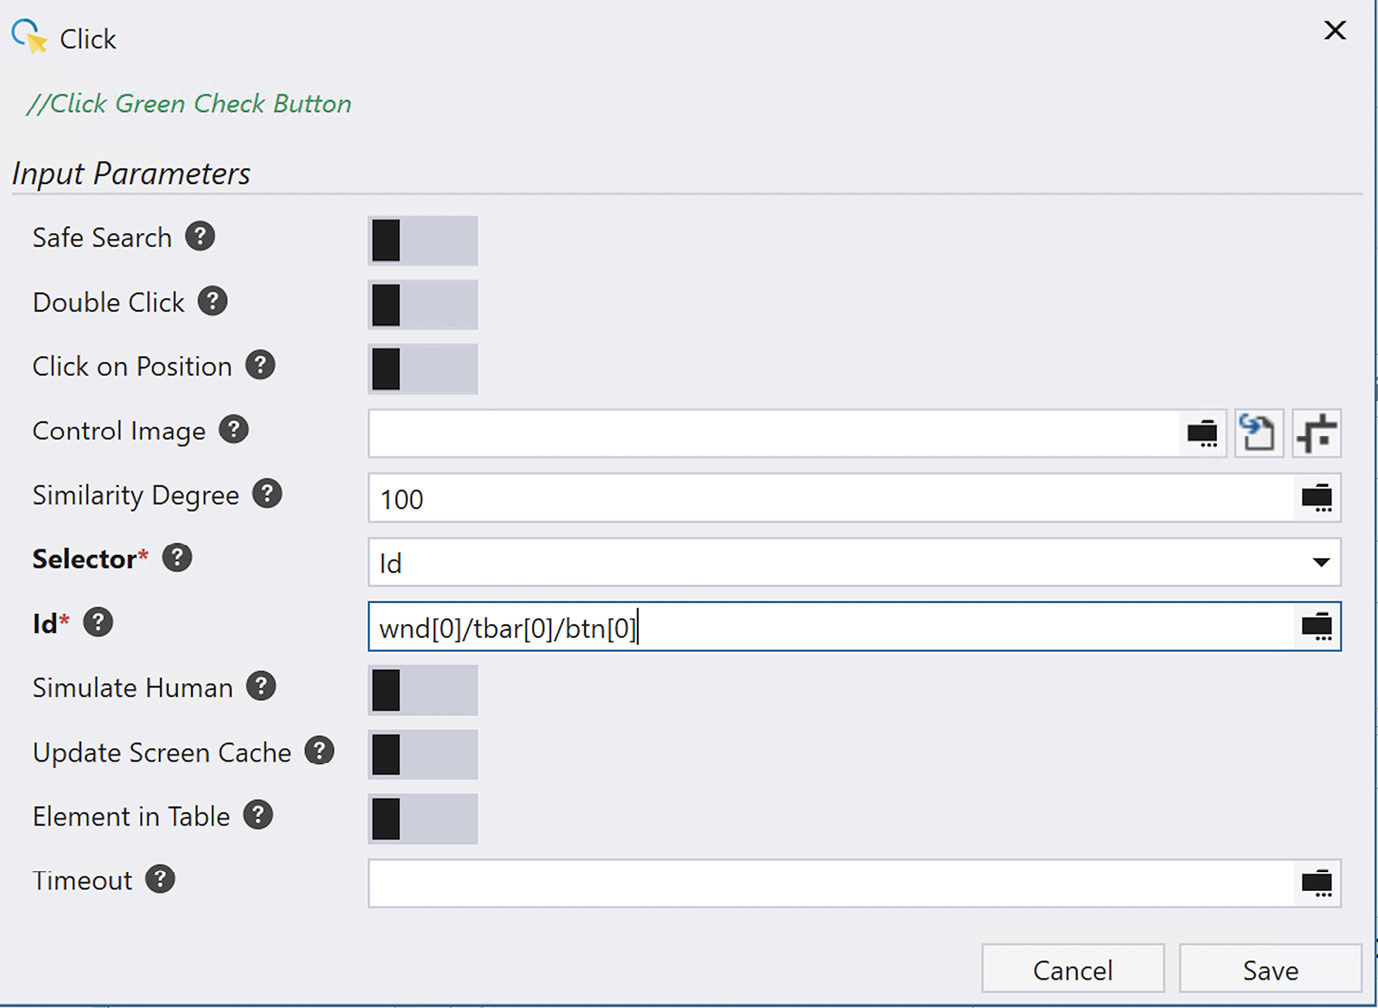
Figure 5.29 – Click
- Once we’ve clicked the green checkbox, the SAP software advances to the second dialog of the VA01 transaction:

Figure 5.30 – SAP VA01 transaction dialog
Best practice
When working with multi-screen dialogs, it is useful to have test transaction data that can be entered manually as you are creating the automation. This allows for an easy transition to the second dialog as you are authoring your robot.
Leveraging the recorder, create the remaining Set Value commands. Remember to close your session, windows, and log out – this is necessary to create a reliable, repeatable script.
Best practice
When testing your script, it is helpful to run the script at least twice, as this will ensure all Windows files, windows, and sessions are in the correct state at the beginning and end of your automation.
WAL command files are not strictly text as they have metadata encoded; when going to and from a foreign repository such as Git, treat the WAL command as binary.
The example script also contains some bonus material to capture the sales order number and store it in the appropriate spreadsheet column. You may also notice we leverage the OCR capability to identify the location of the field we are looking for since this window was dynamically created by the VA01 application.
Packaging and deployment
Okay, so we’ve done the hard work now and automated our sales order task so that our sales assistant can focus on higher-value activities. Now, we need to make that automation available as an attended bot. IBM RPA has a simplified packaging and deployment process; it hosts its own repository and manages versions and whether a version is indicated as production.
Once we’ve published the script to the repository using the Control Center, we’ll need to create a launcher and add the team members who will be using this script. When the launcher object is created, the icon for this robot will show up on the Windows client launcher palette.
Publishing our tested robot
So far, we’ve been working on the sales order automation locally in the developer’s Studio environment. Let’s publish this script using Studio so that it can be managed by the IBM RPA Control Center:
- On the Studio toolbar, there is an icon:
 . With our designer still open with our salesOrder.wal file, let’s publish the team’s repository managed by the Control Center:

Figure 5.31 – IBM RPA Studio – Publishing salesOrder.wal
- Notice that we’ve selected the Set as production option. This option allows us to publish this script to our sales assistant team. After navigating to the Scripts navigation bar and filtering the scripts on salesorder, we will see that the script has been uploaded to the Control Center:

Figure 5.32 – IBM RPA Control Center – Manage scripts
Creating the launcher for our sales assistant
Making the robot available to our sales assistant team is quite simple, but it does require the conceptual notion of the IBM RPA Launcher. The term launcher is used to refer to both the client-side application used by the sales assistants and an object we’ll create in the Control Center to publish the robot to our sales assistants. The launcher object is like a folder for holding related robots.
By selecting Launchers from the left-hand navigation bar, we can create a launcher by clicking the Create launcher + button. Follow these steps:
- First, we will name the launcher SalesAssistentRobots and assign it to our Sales Assistants group.
- Now, we’ll add a button that will be added to the Sale’s Assistant’s launcher palette, which we’ll look at in a minute:

Figure 5.33 – IBM RPA Control Center – Create launcher
- After selecting which script the launcher should run, we can also use a preset (or custom) icon to represent the automation on the client’s launcher palette:

Figure 5.34 – IBM RPA Control Center – Edit launcher
- Upon clicking Save, the launcher folder and its configured robots – in this case just the SAPSalesOrder robot – will be added to the SalesAssistentRobots folder on each sales assistant’s launcher palette.
- On the sales assistant’s desk, the sales assistant can click on the IBM RPA Launcher icon to start the launcher program:

Figure 5.35 – IBM RPA Launcher desktop shortcut
- After logging in, they will be presented with the following screen, where they can see the new icon to launch the SAPSalesOrder attended bot:

Figure 5.36 – IBM RPA Launcher
The sales assistant can now launch the attended robot and have the sales orders created from the spreadsheet by double-clicking the SAPSalesOrder icon.
Going further
This example will be valuable to the sales assistant team – making their job more enjoyable, relieved of the tedium of data entry, and contributing to greater customer satisfaction because of the improved accuracy of the automation.
You can extend this example to open a user’s inbox, search for emails that have a salesorder.xlsx file, detach the file, process the file with the automation we’ve already created, and reply to the field with their new order numbers, and then file the email in a processed folder.
Some other ideas beyond email are as follows:
- Adding OCR robots for processing orders from field agents
- Adding business dashboards to extract key business indicators describing the number of orders processed and computing time saved
- Creating a schedule to periodically perform the automation (moving from an attended bot to an unattended bot)
Best practice
Start small and build reliable, well-tested robots that your team can count on. Your team will be delighted with robots that just work.
Add complexity by leveraging your existing well-working scripts as you go, leveraging good coding practices, isolating common subroutines, and generalizing reuse by leveraging script parameters. IBM RPA offers several techniques for leveraging existing scripts – scripts can call other scripts, subroutines, and processes to reuse code.
Subroutines
One way to reuse code is to create subroutines. In the following example script, we’ll create a subroutine that reverses a string. The IBM RPA WAL language does not have the concept of scoped variables, so all the variables are global to the script. As such, subroutines do not have input or return variables; they are used to manipulate the global variables defined in the main routine:
defVar --name i --type Numeric --value 0
defVar --name lenOfString --type Numeric
defVar --name stringToReverse --type String --value 0123456789
defVar --name reversedString --type String
defVar --name character --type String
getStringLength --text "${stringToReverse}" lenOfString=value
goSub --label reverseChars
logMessage --message "${stringToReverse}
${reversedString}"
--type "Info"
beginSub --name reverseChars
for --variable ${i} --from ${lenOfString} --to 1 --step -1
getSubString --text "${stringToReverse}" --start ${i} --length
1 character=value
concatTexts --text "${reversedString}" --value "${character}"
reversedString=value
    next
endSub
This simple example will reverse a string’s characters. For example, if we have 0123456789 and set reversedString, we get 9876543210.
Advanced topics – exception handling and troubleshooting
Upon creating and deploying the automation, sometimes, things don’t go as well as we’d like and unexpected or error conditions occur. In this section, we’ll discuss some common RPA problems and strategies for diagnosing and correcting them.
Best practice
A well-behaving robot is paramount. The extra effort to harden the robot scripts against failure helps the non-technical folks use the robot’s trust and leverage the automation to improve their daily experience, making them more productive. A badly behaving robot will frustrate users because they will likely have to manually pick up where the robot failed, sometimes even undoing steps. If it becomes harder to use a robot that fails too often, the intended users will just not leverage the automation.
Data validation
The previous example assumes that the data in our spreadsheet has been validated; there are several strategies to validate the data:
- Improving the spreadsheet so that it validates the fields before they arrive. This has the disadvantage of moving the business logic out of the system.
- The robot itself should validate the data – some scripts will validate as they read the rows, while others will validate the entire spreadsheet – to understand how the sales assistant would like to reprocess the corrected spreadsheet. For example, perhaps the script should process valid records and highlight ones that need to be corrected and resubmitted.
- In this case, the VA01 transaction validates some data on the UI and some data during the actual transaction – while this keeps the data validation with the transaction that makes the rules, the robot itself is harder to write. Unlike API automation, the specific response to incorrect or missing data will vary widely and certainly in non-standard, application-specific ways.
Best practice
When developing a script, experiment with the systems you are automating by understanding bad data.
Script logs
Despite our best efforts, bad things can still happen to our scripts. Like most scripting languages, the WAL scripting language offers a LogMessage command to allow the developer to leave the breadcrumbs of the execution. The tried-and-true method of print line is an effective way to leave diagnostic data about the execution of your script in the event of failure.
Each execution of a robot creates a job that can be viewed from the Control Center:

Figure 5.37 – IBM RPA Control Center – the Job dialog
After selecting the Details tab from the right-hand ellipsis, details about the job’s execution and a log explorer dialog will be displayed, with that specific job’s log output rendered. Jobs can be filtered to those that have failed, and you can search for specific messages within the heart of the matter.
Best practice
A well-behaving robot is better than a faster robot that fails frequently. Err on the side of too many log messages than too few, but make sure you are not logging personal or confidential data.
Define an administered key-value pair via the Control Center to change the verbosity of your robot so that you can turn on your advanced diagnostics without having to build a new version of your script.
Exception handling
The IBM RPA WAL language does have some basic exception handling routines, but also many of the WAL script commands themselves have Boolean results.
Best practice
Consider what happens if a command you’ve used does not succeed; a common programming practice is true for robot automations as well: check for results when available and fail gracefully – for attended bots, clearly describe the problem and how to proceed so that the user can instill trust and welcome its usage.
Let’s consider that the WAL language introduces the Handle Error Command, which catches unexpected errors:

Figure 5.38 – Handle Error Command
This command will be inserted into the script and instruct IBM RPA on what to do on an excepted error – that is, whether it should continue to the next command or jump directly to a subroutine.
Leveraging other Cloud Pak for Business Automation features
IBM RPA can send messages to a variety of messaging providers, as well as interacting with various databases. In the preceding example, perhaps the sales associate that encountered the error condition does not have the skills or is not responsible for correcting the condition. IBM RPA WAL scripts can send a message to a queue provider that then triggers a workflow. The workflow then creates a human task, assigned to a team that is responsible for addressing the issue.
Unique Desktop Issues
Using RPA to automate business tasks will result in you running into unique situations due to leveraging desktop controls, which may not be obvious to programmers who are used to the reliability and stability of API coding.
Sleep
Interfaces for humans may not be as responsive as expected to respond to code. There may be delays in refreshing windows, asynchronous browser page refreshes, or the client machine may experience unpredictable periods of CPU and GPU workloads. Client machines are not servers and have fewer compute, memory, and I/O capabilities. It is common to make robots reliable for leveraging periods of sleep to ensure that the actions that the previous commands executed are in a complete known state.
UI changes
Unlike APIs, user interfaces are typically changed often to improve the experience of the user, much to the chagrin of the robot developer. To make your robots more resilient, leverage object names when setting field values or clicking on buttons, which will likely stay the same even under UI change.
Simulate human behavior
Interfaces intended for humans sometimes expect keystrokes to be entered key by key and build behaviors as each key is depressed. The Set Value command typically uses the most optimal way to set the field – that is, cut and paste. You can direct the Set Value command to enter each keystroke to simulate human behavior.
Summary
In this chapter, we took an in-depth look at the IBM RPA experience of automating a common, repetitious task to extract business data from an Excel spreadsheet and input that data into a legacy transactional system. The benefits of speed, accuracy, and the ability to remove a tedious task bring delight to the sales assistant team as they can focus on higher-value activities and deliver a strong return on investment to the business.
We explored low-code development by using the IBM RPA Studio’s command dialogs and recording features. We debugged our automations by executing them step by step and utilizing techniques for building reliable and well-behaved robots so that our sales assistant team can leverage them with confidence.
In the next chapter, we’ll look at the steps for building a chatbot with IBM RPA.
Further reading
- Critical Capabilities for Robotic Process Automation, Gartner, August 18, 2021.
- Some portions of the scenario presented in this chapter were derived from Automate SAP GUI with WDG RPA Bots, Lab, Pacholski, Paul, © 2020 International Business Machines. Used with permission from the author.