
C H A P T E R 12
![]()
WPF
.NET 4.0 introduced a number of nice changes to WPF—a lot of them inspired by Silverlight, such as the Visual State Manager and Easing functions. In addition, there were several controls, such as DataGrid, Calendar, and Datepicker, which were introduced. In contrast, .NET 4.5 brings only one new control of significance to WPF—the Ribbon control—but it is a pretty important one. We start this chapter by introducing you to the Ribbon control. We then discuss some of the changes that have been introduced in WPF 4.5 around databinding—things like the Delay property. We also explore new features for VirtualizingPanel and how to access collections on the non-UI thread. We finish the chapter by talking about some of the changes that have been introduced around events and the new methods that have been added for the Dispatcher class.
Ribbon Control
The Ribbon was introduced with the Office suite of products a while back and has become a standard feature for a number of applications. Support for the Ribbon control is now built into WPF 4.5. (The Ribbon control is available as a separate download for WPF 4.) Although I refer to it like a single control, it is, in fact, made up of a number of controls and these controls are available from the System.Windows.Controls.Ribbons library. A typical Ribbon consists of an application menu, a quick access toolbar, tabs, groups, and controls within the group. Some of the Ribbon's controls are shown in Figure 12-1.
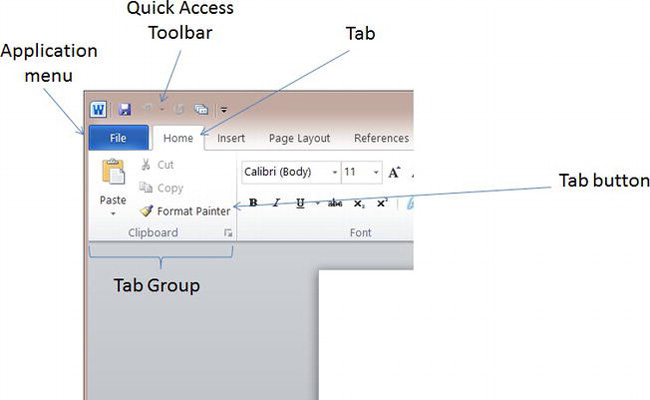
Figure 12-1. Some of the components of a Ribbon
To start using the Ribbon control, you first need to add a reference to this assembly in your project.
After you've added the reference, you may want to create a number of tabs in the Ribbon. To add tabs to the Ribbon, all you need to do is add a bunch of RibbonTab controls to your Ribbon in XAML as shown in the following code snippet:
<Window x:Class="WpfRibbonSample.MainWindow"

        xmlns="http://schemas.microsoft.com/winfx/2006/xaml/presentation"

        xmlns:x="http://schemas.microsoft.com/winfx/2006/xaml"

        Title="MainWindow" Height="350" Width="525">

    <Grid>

        <Ribbon>

            <RibbonTab Header="Home" />

            <RibbonTab Header="Insert" />

        </Ribbon>

    </Grid>

</Window>
To add buttons and group them together, you can create a RibbonGroup and add RibbonButtons to them as shown in the following markup snippet:
           <RibbonTab Header="Home" >

                <RibbonGroup Header="Clipboard">

                    <RibbonButton Label="Paste" LargeImageSource="Images/Paste.png"></RibbonButton>

                    <RibbonButton Label="Cut" SmallImageSource="Images/Cut.png"></RibbonButton>

                    <RibbonButton Label="Copy" SmallImageSource="Images/Copy.png"></RibbonButton>

                </RibbonGroup>

            </RibbonTab>
As their names suggest, LargeImageSource and SmallImageSource are used to display the image either in a large size or small size, and the Label property displays the label for the button in the Ribbon. The XAML snippet will display tabs as shown in Figure 12-2.
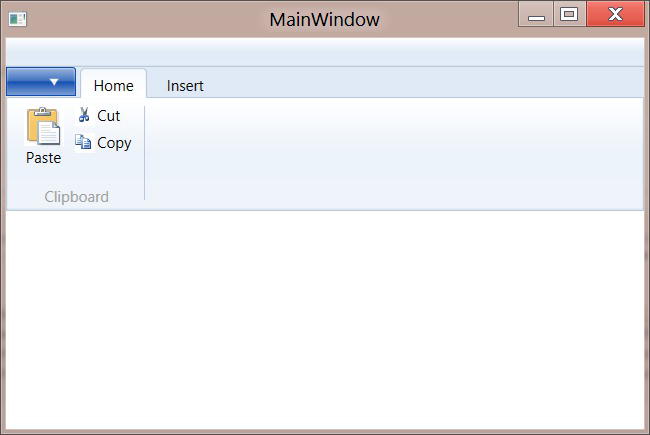
Figure 12-2. Ribbon tab with a group and some buttons
To add items to the quick access toolbar, you can use the RibbonQuickAccessToolbar control as shown in the following code snippet:
<Ribbon>

        <Ribbon.QuickAccessToolBar>

                <RibbonQuickAccessToolBar >

                    <RibbonButton x:Name="SaveButton" SmallImageSource="Images/Save.png" />

                </RibbonQuickAccessToolBar>

            </Ribbon.QuickAccessToolBar>

…
To add items to the application menu bar, you use RibbonApplicationMenu control and RibbonApplicationMenuItem controls as shown in the following markup:
        <Ribbon>

            <Ribbon.ApplicationMenu>

                <RibbonApplicationMenu Label="File" >

                    <RibbonApplicationMenuItem Header="New"  ImageSource="ImagesNew.png"/>

                    <RibbonApplicationMenuItem Header="Open" ImageSource="ImagesOpen.png"/>

                    <RibbonApplicationMenuItem Header="Exit" ImageSource="ImagesExit.png"/>

                </RibbonApplicationMenu>

            </Ribbon.ApplicationMenu>

            …
Figure 12-3 shows both the quick access toolbar and the application menu control in use.
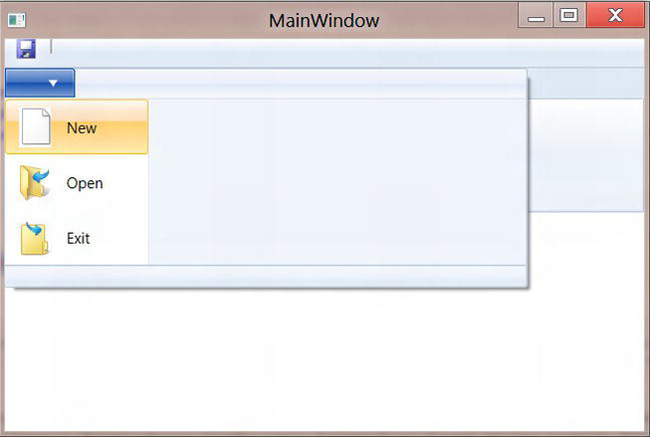
Figure 12-3. Quick access toolbar and the application menu control of a Ribbon
Synchronously and Asynchronously Validating Data
If you wanted to do validation of UI controls in .NET 4, you had to use the IDataErrorInfo interface, which validates your fields synchronously. To implement it, you first needed to implement the IDataErrorInfo on the object that your control was bound to as shown in the following code snippet:
public class Person : INotifyPropertyChanged, IDataErrorInfo

{

    public event PropertyChangedEventHandler PropertyChanged;


    protected virtual void OnPropertyChanged(string propertyName)

    {

        var handler = PropertyChanged;

        if (handler != null) handler(this, new PropertyChangedEventArgs(propertyName));

    }


    private string _name;

    public string Name

    {

        get { return _name; }

        set

        {

            _name = value;

            OnPropertyChanged("Name");

        }


    }


    public string this[string columnName]

    {

        get

        {

            if (columnName == "Name")

            {

                if (string.IsNullOrEmpty(Name))

                {

                    return "Name cannot be empty";

                }

            }

            return String.Empty;

        }

    }


    public string Error { get { return string.Empty; } }

}
In your XAML markup, all you had to do was add ValidatesOnDataErrors=True to your binding:
<TextBox Text="{Binding Name, Mode=TwoWay, ValidatesOnDataErrors= True}" />
This allowed you to synchronously validate your data. However, if your validation routine took time, it would freeze up the user interface, which you did not want. To fix this problem, WPF borrowed the INotifyDataErrorInfo interface from Silverlight to asynchronously validate controls. So, rather than implement the IDataErrorInfo, you needed to implement the INotifyDataErrorInfo interface:
public class Person : INotifyPropertyChanged, INotifyDataErrorInfo

{

    …

    public IEnumerable GetErrors(string propertyName)
    {

        //A very simple implementation…

        if (propertyName == "Name")

        {

            if (string.IsNullOrEmpty(Name))

            {

                Thread.Sleep(5000); //Simulate a long running validation

                HasErrors = true;

                OnErrorsChanged(propertyName);

                return "Name cannot be empty";

            }

        }

        OnErrorsChanged(propertyName);

        HasErrors = false;

        return String.Empty;

    }


    public bool HasErrors { get; private set; }

    public event EventHandler<DataErrorsChangedEventArgs> ErrorsChanged;


    public void OnErrorsChanged(string propertyName)

    {

        var handler = ErrorsChanged;

        if (handler != null) handler(this, new DataErrorsChangedEventArgs(propertyName));


    }

}
You would also have to change the ValidatesOnDataErrors=True binding in your XAML file to ValidatesOnNotifyDataErrors=True.
Databinding Changes
WPF 4.5 introduces a number of databinding-related changes—a new Delay property, the ability to bind to static properties, the ability to retrieve databinding information at runtime, and the ability to check if the DataContext used in binding is still valid. This section covers these changes.
Delay Property
Starting from WPF 4.5, a new Delay property has been added to databinding. This introduces a time delay before the property of the Source object used in databinding is updated. This can be particularly useful when you don't want frequent changes on the UI modifying the value of the property on the source it is bound to.
To see how this works, create a simple class for databinding as shown in the following code snippet:
public class Person : INotifyPropertyChanged

{

    public event PropertyChangedEventHandler PropertyChanged;


    protected virtual void OnPropertyChanged(string propertyName)

    {
        var handler = PropertyChanged;

        if (handler != null) handler(this, new PropertyChangedEventArgs(propertyName));

    }


    private string _name;

    public string Name

    {

        get  { return _name; }

        set

        {

            _name = value;

            OnPropertyChanged("Name");

        }


    }

}
To create a person object and databind this in XAML, you typically would do something like the following:
<Window x:Class="WpfDataBindingWait.MainWindow"

        xmlns="http://schemas.microsoft.com/winfx/2006/xaml/presentation"

        xmlns:x="http://schemas.microsoft.com/winfx/2006/xaml"

        Title="MainWindow" Height="350" Width="525">

    <Window.Resources>

        <WpfDataBindingWait:Person x:Key="PersonObject" Name="John Doe" />

    </Window.Resources>

    <StackPanel DataContext="{StaticResource PersonObject}">

        <TextBox Text="{Binding Name" />

        <TextBlock Text="{Binding Name}" />

</StackPanel>

</Window>
In this example, if you update the text in the TextBox, the text in the TextBlock will automatically be updated as they are both bound to the same property—Name. To introduce a delay of, say, five seconds, all you need to do is change the XAML as shown in bold:
…

<StackPanel>

        <TextBox x:Name="BoundTextBox" Text="{Binding Name,

UpdateSourceTrigger=PropertyChanged, Delay=5000}" />

        <TextBlock Text="{Binding Name}" />

…
Binding to Static Properties
Typically, when a class is used in databinding, it implements the INotifyPropertyChanged interface, which has a PropertyChanged event that the databinding engine uses to recognize any change that occurs on databound properties. This obviously does not work if the property being used is a static property. To cater for static properties, WPF 4.5 introduces static event handlers that can be implemented as shown in the following code snippet:
public class MyClass

{

    private static string _myProperty;

    public static string MyProperty

    {

        get { return _myProperty; }

        set

        {

            _myProperty = value;

            OnMyPropertyChanged();

        }

    }


    public static event EventHandler MyPropertyChanged;


    public static void OnMyPropertyChanged()

    {

        var handler = MyPropertyChanged;

        if (handler != null) handler(null, EventArgs.Empty);

    }

}
Alternatively, the event handlers can also be implemented:
public class MyClass

{

    private static string _myProperty;

    public static string MyProperty

    {

        get { return _myProperty; }

        set

        {

            _myProperty = value;

            OnStaticPropertyChanged("MyProperty");

        }

    }


    private static EventHandler<PropertyChangedEventArgs> StaticPropertyChanged;

    public static void OnStaticPropertyChanged(string propertyName)

    {

        var handler = StaticPropertyChanged;

        if (handler != null) handler(null, new PropertyChangedEventArgs(propertyName));

    }

}
Checking for a Valid DataContext Object
When you use an ItemControl in your WPF application, an item container is generated for each item of the collection the ItemControl is bound to. Each item container will then be associated with a DataContext. This DataContext could become invalid if an item from the collection is removed or if the user starts scrolling and virtualization is enabled for the ItemControl. WPF 4.5 provides a way of testing whether the DataContext is still valid in these scenarios—all you need to do is ensure that the DataContext is not equal to BindingOperations.DisconnectedSource before you use it.
Retrieving Databinding Information from a Binding Expression
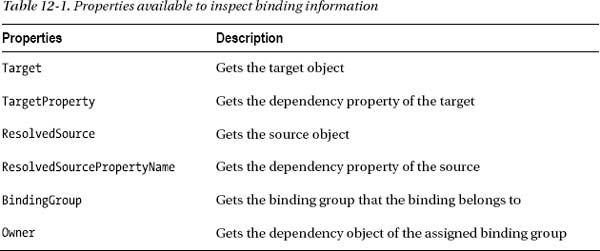
In .NET 4.5, new APIs have been added to retrieve information about a databinding expression. To retrieve a databinding expression, all you need to do is call the static method GetBindingExpression in the BindingExpression class and make use of the newly added methods:
BindingExpression bindingExpression =

    BindingOperations.GetBindingExpression(MyTextBox, TextBlock.TextProperty);


var target = bindingExpression.Target;

target.SetValue("abcd");


var targetProperty = bindingExpression.TargetProperty;

var name = targetProperty.Name;
The new methods that have been added are shown in Table 12-1.
New Features for the VirtualizingPanel
When you have a large number of items to be displayed in controls such as the DataGrid, you do not want all the data to be loaded at once. Virtualizing panels such as the VirtualizingStackPanel allow you to load only a certain amount of data and load other data on demand when you start scrolling.
In WPF 4.5, some new properties have been defined for the VirtualizingPanel. For starters, you can now set the ScrollUnit property to Pixel to display partial items during scrolling. The default value of Item will always display the whole item when you scroll.
You can also now set the cache size by using the CacheLength attached property. The CacheLength is used to specify the number of items, pixels, or pages below or above the viewport that is not virtualized. The CacheLengthUnit property is used to specify the CacheLength's unit—in other words, whether to use number of items, pixels, or pages (a single page is the equivalent of the size of the viewport).
In addition to these properties, a new attached property called IsVirtualizingWhenGrouping has also been added to the VirtualizingPanel to enable virtualization for grouped data.
Accessing Collections on Non-UI Threads
Previously in WPF, if you tried to access or modify a collection that was bound to a control on a thread other than the UI thread, an exception would be thrown. To understand the problem, let's create a simple application.
- First, create the view model that has an
ObservableCollectionof the typePersonand method that modifies the collection on another thread:public class PeopleViewModel
{
private object _lock = new object();
public ObservableCollection<Person> People { get; private set; }
public PeopleViewModel()
{
People = new ObservableCollection<Person>();
}
public void LoadPeople()
{
var seedNames = new string[] { "bob", "ted", "alice", "fred", "anne", "Larry", "Helen", "Cathy", "joe", "Brett" };
Task.Factory.StartNew(() =>
{
foreach (var name in seedNames)
{
People.Add(new Person { Name = name });
Thread.Sleep(1000);
}
});
}
}
public class Person
{
public string Name { get; set; }
} - Next, create a form with a button and list box:
<Window

  xmlns="http://schemas.microsoft.com/winfx/2006/xaml/presentation"

  xmlns:x="http://schemas.microsoft.com/winfx/2006/xaml"

  xmlns:d="http://schemas.microsoft.com/expression/blend/2008"

  xmlns:mc="http://schemas.openxmlformats.org/markup-compatibility/2006"

  mc:Ignorable="d"

  x:Class="CollectionsAccessThreadsExample.MainWindow"

  Title="MainWindow" Height="350" Width="525">
<Grid>
<Button
x:Name="AddPeopleBtn"
Content="Add People"
HorizontalAlignment="Left"
Margin="83,264,0,0"
VerticalAlignment="Top"
Width="115"
Click="PopulateNameBtn_Click"/>
<ListBox
HorizontalAlignment="Left"
Height="274"
Margin="233,10,0,0"
VerticalAlignment="Top"
Width="236"
ItemsSource="{Binding People}"
DisplayMemberPath="Name"/>
</Grid>
</Window> - Finally, in the code behind add the following:
public partial class MainWindow : Window

{

  private PeopleViewModel peopleViewModel = new PeopleViewModel();


  public MainWindow()

  {

    InitializeComponent();

    DataContext = peopleViewModel;

  }


  private void AddPeopleBtn_Click(object sender, RoutedEventArgs e)

  {

    peopleViewModel.LoadPeople();

  }

} - At this point, if you run the application and click the Add People button, you will get the following exception:
“This type of CollectionView does not support changes to its SourceCollection from a thread different from the Dispatcher thread”
There are, of course, workarounds to get this to work, but in 4.5 these aren't necessary since we can instead use the BindingOerations.EnableCollectionSynchronization() method to enable a collection to be accessed across multiple threads.
There are two overloads of this method—one that leaves it up to the system to lock the collection when you access it, and another that allows you to specify a callback to handle locking the collection yourself. We will modify the view model to use the first option in order to get the example to work as expected.
In the view model code, we will add a lock object and modify the constructor to call the EnableCollectionSynchronization() method. The following code extract shows you the changes:
private object _lock = new object();

public PeopleViewModel()

{

  People = new ObservableCollection<Person>();

  BindingOperations.EnableCollectionSynchronization(People, _lock);

}
Now run the application and click the Add People button—everything should work as expected.
Binding to Types That Implement ICustomTypeProvider
The ICustomTypeProvider was part of the Silverlight 5.0 release and has now been included in this release of WPF. Similar to ICustomTypeDescriptor, it provides a more lightweight means for dynamically adding properties to a class at runtime and binding them to a control or controls. The databinding now checks whether an object has implemented this interface and the binding engine uses your custom type rather than System.Type.
The ICustomTypeDescriptor interface is in itself pretty simple, defining only one method, GetCustomType(), which returns an instance of Type, but implementing it requires a bit of work. As outlined by Alexandra Rusina in her blog post on implementing it in Silverlight 5 (http://bit.ly/MkV2Vb), you will need to do the following:
- Create your type by deriving from
System.Type. - Your new type needs to store its properties somewhere; this requires you to create your own
PropertyInfoby deriving fromSystem.Reflection.PropertyInfo. - So that your properties work properly with databinding, you will need to implement the
INotifyPropertyChangedinterface.
Though you don't need to, a common solution is to write a reusable helper class to pull all of the bits together. (See Jonathan Antione's blog post at http://bit.ly/RBFKxD for a WPF implementation of Rusina's Silverlight helper class.) With the helper class, you can then create a base class that provides wrapper methods to call into the helper class. The following code is an example of how this can be done:
public class CustomType :ICustomTypeProvider

{

  CustomTypeHelper<CustomType> helper = new CustomTypeHelper<CustomType>();


  public static void AddProperty(String name)

  {

    CustomTypeHelper<CustomType>.AddProperty(name);

  }


  public static void AddProperty(String name, Type propertyType)

  {

    CustomTypeHelper<CustomType>.AddProperty(name, propertyType);

  }


  public static void AddProperty(String name, Type propertyType, List<Attribute> attributes)

  {

    CustomTypeHelper<CustomType>.AddProperty(name, propertyType, attributes);

  }
  public void SetPropertyValue(string propertyName, object value)

  {

    helper.SetPropertyValue(propertyName, value);

  }


  public object GetPropertyValue(string propertyName)

  {

    return helper.GetPropertyValue(propertyName);

  }


  public PropertyInfo[] GetProperties()

  {

    return helper.GetProperties();

  }


  public Type GetCustomType()

  {

    return helper.GetCustomType();

  }

}
Once this is done, at runtime all you need to do is define the properties that you want by calling one of the overloads of the static method AddProperty() and then for each instance of the class, call SetPropertyValue() to set the property:
CustomType.AddProperty("FirstName", typeof(string));

CustomType.AddProperty("LastName", typeof(string));


var person = new CustomType();

person.SetPropertyValue("FirstName", "Bob");

person.SetPropertyValue("LastName", "Roberts");
To give you a better idea of how this works and to provide an example of a case where this could be used, you can download the example from http://sdrv.ms/PvKh2J. In this example, we take some JSON data, which is an array of a simple object graph, and generate a list of CustomTypes with the properties and property values generated at runtime and displayed in a GridView.
Repositioning Data as the Data's Values Change (Live Shaping)
There are controls in WPF, such as a DataGrid, that bind to a collection of objects. WPF also allows the data in these controls to be grouped, sorted, or filtered. When the data changes in this collection, then the grouping, sorting, and filtering should automatically update the UI based on these changes. To help with this, WPF 4.5 introduces a new interface called ICollectionViewLiveShaping. This interface has the properties shown in Table 12-2.
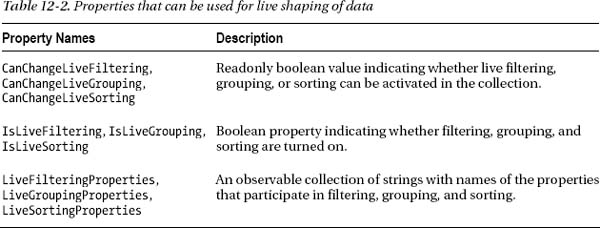
The classes ListCollectionView, BindingListCollectionView, and ItemCollection in WPF already implement this interface, but you can implement a custom collection for your own purposes.
New Methods for the Dispatcher Class
If you've been writing applications in WPF for a while, then you know that you can't update the UI from another thread. To update the UI from a thread that doesn't own the control, you need to use the Dispatcher class. Some new methods have been added to the Dispatcher class in WPF 4.5.
Previously in WPF, the Dispatcher had a number of Invoke methods that took a Delegate as a parameter. In WPF 4.5, you can now pass either an Action or Func<TResult> as parameters instead of a Delegate. In addition, InvokeAsync methods have been added that let you call the same methods asynchronously.
Event-related Changes
One of my favorite features in WPF 4.5 is the introduction of the long-due markup extensions for events. This feature allows you to extend the markup to use methods that are present in the databound object instead of event handlers present in the code behind files. In addition, the introduction of the WeakEventManager in WPF 4.5 also makes it easier to avoid memory leaks that arise out of event handlers that aren't properly unsubscribed. These two features of WPF 4.5 are covered in this section.
Markup Extensions for Events
WPF 4.5 now supports markup extensions that allow you to specify custom events in your markup. This is particularly useful when you want to use the Model View View-Model (MVVM) pattern. In the MVVM pattern, your UI is split up into a view (which is represented in your XAML), a model (which is a representation of your data class—typically these are POCOs, or Plain Old CLR Objects), and a view model, which is a representation of the model that is used by the view for databinding purposes.
In the past, although you could easily bind data to the view, binding events through the view model was not a trivial exercise. By using markup extensions for events, this can now be achieved easily.
To create a markup extension for an event, you need to extend the abstract class MarkupExtension and implement the method ProvideValue. Following is a sample implementation of a markup extension:
public class EventExtension : MarkupExtension

{

    private readonly string _methodToInvoke;


    public EventExtension(string methodToInvoke)

    {

        _methodToInvoke = methodToInvoke;

    }


    public override object ProvideValue(IServiceProvider serviceProvider)

    {

        var targetProvider = serviceProvider.GetService(typeof (IProvideValueTarget))

                                as IProvideValueTarget;


        if (targetProvider != null)

        {

            var methodInfo = GetType().GetMethod("CallExtensionMethod",

                                                    BindingFlags.NonPublic | BindingFlags.Instance);

            var eventInfo = targetProvider.TargetProperty as EventInfo;


            if (eventInfo != null)

            {

                var eventType = eventInfo.EventHandlerType;

                return Delegate.CreateDelegate(eventType, this, methodInfo);

            }


            //If it is not a event, then it is a method

            var targetPropertyMethodInfo = targetProvider.TargetProperty as MethodInfo;

            if (targetPropertyMethodInfo != null)

            {

                var parameterType = targetPropertyMethodInfo.GetParameters()[1].ParameterType;

                return Delegate.CreateDelegate(parameterType, this, methodInfo);

            }

        }


        return null;

    }


    private void CallExtensionMethod(object sender, EventArgs e)

    {

        var target = sender as FrameworkElement;

        if (target != null)

        {

            var dataContext = target.DataContext;

            if (dataContext != null)

            {

                var methodInfo = dataContext.GetType()

                    .GetMethod(_methodToInvoke, BindingFlags.Public | BindingFlags.Instance);

                methodInfo.Invoke(dataContext, new object[] {e});

            }

        }
    }

}
The EventExtension class takes the name of the method on the ViewModel to invoke as a parameter in the constructor. And this method is invoked in the CallExtensionMethod implementation. The ProvideValue method returns a delegate that is created using the target provider's TargetProperty. The TargetProperty can either be an EventInfo or a MethodInfo.
The usage of this extension in your markup will look something like the following (the actual use of the EventExtension is shown in bold):
<Window x:Class="EventBinding.MainWindow"

        xmlns="http://schemas.microsoft.com/winfx/2006/xaml/presentation"

        xmlns:x="http://schemas.microsoft.com/winfx/2006/xaml"

        xmlns:EventBinding="clr-namespace:EventBinding"

        Title="MainWindow" Height="350" Width="525">

    <Window.Resources>

        <EventBinding:MainWindowViewModel x:Key="ViewModel"/>

    </Window.Resources>

    <StackPanel DataContext="{StaticResource ViewModel}">

        <Rectangle Fill="Azure" Height="50" Width="250"

                   MouseDown="{EventBinding:EventExtension MouseDownMethod}" />

        <Button Content="Button" Width="250" Height="50"

                 MouseDoubleClick="{EventBinding:EventExtension MouseDoubleClickMethod}"/>


    </StackPanel>

</Window>
The ViewModel class, which is used in the event binding, will look like the following code snippet:
public class MainWindowViewModel

{

    …

    public void MouseDoubleClickMethod(EventArgs e)

    {

        //Do Something

    }


    public void MouseDownMethod(EventArgs e)

    {

        //Do Something else

    }

}
Improved Support for Establishing a Weak Reference to an Event
When you do not unhook an event handler, you end up with memory leaks. This issue led to the introduction of the Weak Event Pattern (http://msdn.microsoft.com/en-us/library/aa970850.aspx) in WPF. The problem with this pattern is that it required creating a custom subclass of WeakEventManager for each event type and the listener needed to implement the corresponding IWeakEventListener interface. With this release, implementing this pattern has been made easier with the inclusion of a generic version of WeakEventManager.
By using WeakEventManager<TEventSource, TEventArgs> it is no longer necessary to create a custom WeakEventManager or implement IWeakEventListener. Instead, you just need to pass the event to subscribe to, the source of the event, and the event handler to the AddHandler() method.
The following code snippet is an example of how the WeakEventManager can be used to wire up the CollectionChanged event on a view model:
public partial class MainWindow : Window

{

  private PeopleViewModel peopleViewModel = new PeopleViewModel();


  public MainWindow()

  {

    InitializeComponent();

    WeakEventManager<ObservableCollection<Person>, NotifyCollectionChangedEventArgs>

      .AddHandler(peopleViewModel.People, "CollectionChanged", People_CollectionChanged);


  DataContext = peopleViewModel;

  }


  void People_CollectionChanged(object sender, NotifyCollectionChangedEventArgs e)

  {

    Debug.WriteLine(string.Format("Collection changed. Count = {0}", peopleViewModel.People.Count));

  }

}
Though flexible, there are a couple of limitations with this new class. First, the event is identified by name, which could lead to subtle bugs being introduced. Second, under the covers it uses reflection to wire up the event so there is a slight performance hit as compared with the alternatives.
Summary
.NET 4.5 does not bring any radical changes to WPF, and the most important addition is the introduction of the Ribbon control that comes out of the box. There are several other changes that have been introduced to the framework, some of which have had their origin in Silverlight. The INotifyDataErrorInfo is one such change and it lets you validate your data asynchronously. Several changes have also been made in WPF around databinding—the most important of them being the introduction of a Delay property. This chapter has covered each one of these changes in detail, and it finishes up with another one of the most important changes—markup extensions for events. If you are writing applications in WPF and you use the MVVM pattern, you will be very happy with the change as you can write all your event handler code in your View Model and databind them in the view quite easily.