In this chapter, you will learn the following:
What Microsoft Flow is
What is required to work with Flow
How to create a flow using a template
How to create a flow from scratch
What Is Microsoft Flow?
Microsoft Flow is a cloud-based service that allows users to create automated workflows across multiple applications and services. “Work less, do more.” Microsoft Flow provides features that help line-of-business users to improve productivity through automation. Previously, there was no way for these apps to communicate with each other; Flow provides a way to connect with multiple services and automate tasks. Flow allows power users to create flows based on certain triggers and actions on their own, all with zero coding skills. For example, you can save your email attachments to a SharePoint document library. Flow can be accessed via web browsers (it supports Microsoft Edge and the current versions of Chrome and Safari) and mobile apps.
The Flow home page shows the key features that are available such as templates, popular services, an overview of Flow, and more; see Figure 1-1.

Figure 1-1 Featured templates and popular services
Figure 1-2 shows a sample flow overview.

Figure 1-2 Overview of a flow
The menus available in the top navigation bar are shown in Figure 1-3.

Figure 1-3 Top navigation on the Flow home page
My flows: View all of your flows.
Approvals: Create and automate a business approval process. Refer to Figure 1-4 for a sample approval flow.

Figure 1-4 Sample approval flow
Templates: Find many built-in templates to start your flow.
Connectors: Find all available services
Learn: Find documentation, blogs, and more information for learning purposes.
Flow vs. Logic Apps
Microsoft Flow is built on top of Logic Apps and they both have the same workflow designer. The information in Table 1-1 will help you determine when to choose Flow or Logic Apps.
Table 1-1 Flow vs. Logic Apps
Microsoft Flow | Logic Apps | |
|---|---|---|
Users | Can be used by business users, administrators, and power users to automate the business process. Requires zero coding skills. | Can be used by developers and IT pros to mesh with advanced features such as integration with the Azure portal, Azure resource manager, and additional connectors. |
Accessibility | Only through a web browser and the mobile app as the UI. | Can be accessed via web browser, Visual Studio, and code view. |
Application Life Cycle Management | Can be developed and tested directly in a production environment. | Follows DevOps security practice with the appropriate source control, testing, support, automation, and manageability. |
Flow vs. SharePoint Designer Workflows
SharePoint Designer allows you to create automated workflows specific to SharePoint, whereas Flow can be used for SharePoint, OneDrive, Twitter, Office 365 Outlook, and many other services.
SharePoint Designer has only 3 triggers and 7 list actions whereas Flow has 7 triggers and 35 actions for SharePoint.
Note
These counts are accurate at the time of writing. The counts will increase during the course of Microsoft’s updates.
Figure 1-5 shows the available workflow triggers in SharePoint Designer.

Figure 1-5 SharePoint Designer workflow triggers
Figure 1-6 shows the available workflow actions in SharePoint Designer.

Figure 1-6 SharePoint Designer workflow actions
Figure 1-7 shows the available Flow triggers and actions for SharePoint.

Figure 1-7 Flow triggers and actions for SharePoint
Connectors
Connectors provide a way for users to connect to the underlying service using their accounts to create automated workflows. As mentioned, examples of popular services include SharePoint, Office 365 Outlook, OneDrive, Twitter, and more. There are more than 150 connectors; you can see all of the available connectors by navigating to the Flow site, as shown in Figure 1-8.

Figure 1-8 The Connectors page
Connectors consist of two elements: triggers and actions. Triggers are used to initiate a flow when a specific event occurs. For example, the available triggers for OneDrive are displayed in Figure 1-9.

Figure 1-9 OneDrive connector triggers
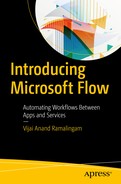
An action is something that should take place once the event is fired. For example, the available actions for OneDrive are displayed in Figure 1-10.
Figure 1-10 OneDrive connector actions
Templates
Microsoft Flow provides many built-in templates to create commonly used solutions more quickly and efficiently. All of the available templates can be seen by navigating to the Flow site. They are categorized as shown in Figure 1-11.
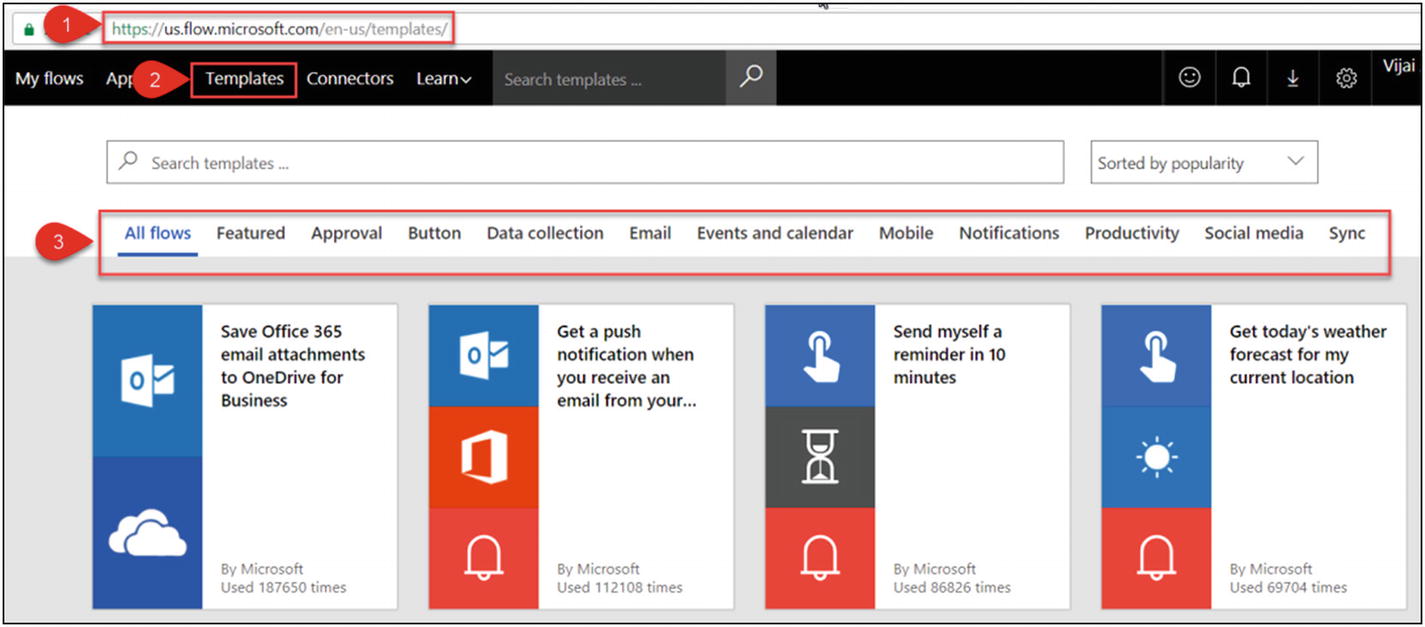
Figure 1-11 The Templates page
Environments
You can group flows and their related resources into separate environments for different scenarios. For example, if you want to create flows for your legal department and you want to make sure only the legal department has access to these flows, you can create a new environment. You must be a Microsoft Flow administrator in order to create environments and provide access to environments.
Mobile App
Flow can be accessed via the mobile app. You can download the app for iOS, Android, and Windows. Then you can create and manage the flows from your phone.
Pricing
Navigate to the Flow site ( https://flow.microsoft.com ) to see pricing information. In the top navigation, click Learn and then click Pricing, as shown in Figure 1-12.

Figure 1-12 Getting to the Pricing page
On the Pricing page, the details related to pricing plans and your current plan are displayed, as shown in Figure 1-13. On the Pricing page, you can also switch plans based on your requirements.

Figure 1-13 Plan information
Note
The default trigger is checked every few minutes and the time interval is based on your plan selection.
Timing of trigger checks:
Microsoft Flow for Office 365 plan: Every 5 minutes
Flow plan 1: Every 3 minutes
Flow plan 2: Every minute
The Microsoft Flow for Office 365 (free) plan is used in this book so the trigger will be checked every 5 minutes.
Prerequisites
As a prerequisite, you need a Microsoft Flow account in order to create automated workflows using Flow. Perform the following steps to get a free Flow account:
Navigate to the Flow site at https://flow.microsoft.com .
If you have used other online Microsoft products, click Sign in, as shown in Figure 1-14.

Figure 1-14 Sign in button location on the home page
Enter an email address and click Next on the Sign in page, as shown in Figure 1-15.

Figure 1-15 Click the Next button
Enter a password and then click Sign in, as shown in Figure 1-16.

Figure 1-16 Click the Sign in button
If you haven’t used other online Microsoft products, click the Sign up free button shown in Figure 1-17.

Figure 1-17 The Sign up free button
Enter an email address and click the right arrow, as shown in Figure 1-18.

Figure 1-18 Sign up
On the Enter password page, enter a password and then click Sign in, as shown in Figure 1-19.

Figure 1-19 Sign up, part 2
Quick Start
In this section, you will learn how to create and test flows two ways: using a built-in template and from scratch.
Creating Your First Flow from a Template
In this section, you will create your first flow by using a built-in template. This example will cover how to share your tweets on Facebook.
Here are the steps involved:
Navigate to the Flow site at https://flow.microsoft.com .
In the top navigation, click My flows. Click the Create from template link shown in Figure 1-20.

Figure 1-20 Create from template
Type the facebook keyword in the search text box and then click Enter. Click the Share my Tweets on Facebook template shown in Figure 1-21.

Figure 1-21 Select a template
As mentioned, connectors provide a way for users to connect to the underlying service using their accounts in order to create automated workflows. Sign into Twitter and Facebook by clicking Sign in, as shown in Figure 1-22.

Figure 1-22 Sign in
Once the flow is connected to your Twitter and Facebook accounts, click Continue, as shown in Figure 1-23.

Figure 1-23 Continue to create the flow
A trigger and an action will be added by default as part of the template, as shown in Figure 1-24.

Figure 1-24 Default trigger and action
Go to the trigger named When a new tweet appears and enter the search text shown in Figure 1-25.

Figure 1-25 Configure the trigger
Go to the Post To My Timeline action and click Edit to view the default values for the parameters, as shown in Figure 1-26.

Figure 1-26 Edit the action
By default, the Status message is set to Tweet text. Click Show advanced settings to see the default values for the other parameters, as shown in Figure 1-27, and update the default values based on the requirements.

Figure 1-27 Configure the action
After you’re done with the changes, enter a name for the flow or leave the default name, as shown in Figure 1-28. Click Create Flow.

Figure 1-28 Save and create the flow
The flow has been created successfully. Click Done, as shown in Figure 1-29.

Figure 1-29 The flow has been created!
Figure 1-30 shows the details of the newly created flow.

Figure 1-30 Flow details
To test your flow, perform the following steps:
Navigate to your Twitter account. Post a new Tweet and add the hashtag #SharePoint, as shown in Figure 1-31.

Figure 1-31 Post a tweet
For this template, the default trigger is every 5 minutes. After 5 minutes, navigate to your Facebook account. You should see a new post, as shown in Figure 1-32.

Figure 1-32 Your new tweet
Thus, in this section, you learned how to create your first flow by using a built-in template.
Creating A Flow from Scratch
In this section, you will learn how to create a flow from scratch. The example will be how to send email to a Gmail account when there is a new Facebook post on your timeline that contains the SharePoint keyword.
Here are the steps involved:
Navigate to the Flow site at https://flow.microsoft.com .
In the top navigation, click My flows. Then click the Create from blank link, as shown in Figure 1-33.

Figure 1-33 Create from blank
Click Search hundreds of connectors and triggers, as shown in Figure 1-34.

Figure 1-34 Search for connectors
Type the facebook keyword in the search text box and then click the Facebook – When there is a new post on my timeline trigger, as shown in Figure 1-35.

Figure 1-35 Add a trigger
Click New Step and then click Add a condition, as shown in Figure 1-36.

Figure 1-36 Add a condition
The condition should be Timeline Feed Feed Item Status Message contains SharePoint. Select the dynamic content Timeline Feed Feed Item Status Message for the first box by clicking Add dynamic content, selecting Contains from the drop-down (second box), and typing SharePoint in the third box, as shown in Figure 1-37.

Figure 1-37 Configure the condition
Go to the If yes action and click Choose an action. Type Gmail in the search text box and then click the Gmail – Send email action, as shown in Figure 1-38.

Figure 1-38 Choose an action
Fill in the To address, Subject, and Body fields, as shown in Figure 1-39.
Note The status message will be displayed in the body (Timeline Feed Feed Item Status Message).

Figure 1-39 Add values to the parameters
Enter the name for the flow and click Create flow, as shown in Figure 1-40.

Figure 1-40 Save and create the flow
The flow has been created successfully. Click Done, as shown in Figure 1-41.

Figure 1-41 Flow created
The details of the newly created flow are shown in Figure 1-42.

Figure 1-42 Flow details
To test your flow, perform the following steps:
Navigate to your Facebook account. Post a new status that contains the SharePoint keyword, as shown in Figure 1-43.

Figure 1-43 Post a status
For this template, the default trigger is every 5 minutes. After 5 minutes, navigate to your Gmail account and you should see a new email, as shown in Figure 1-44.

Figure 1-44 Email received
Thus, in this section, you learned how to create a flow from scratch.
Try It Yourself
Post to Yammer if a new tweet contains a certain hashtag.
Hint
Use a built-in template.