
In this chapter, you will learn how to
Create flows using different connectors, triggers, and actions
Create flows using conditions, switch cases, parallel actions, expressions, and more
Create flows from SharePoint, OneDrive, and Microsoft Teams
You’ll explore the different scenarios via examples.
Save Tweets That Include a Specific Hashtag to a SharePoint List
In this section, you will learn how to create a flow to save tweets that include a specific hashtag to a SharePoint list. A SharePoint Online list named Tweets will be used to save the tweets. It consists of two fields: Title (single line of text) and Tweet (multiline of text), as shown in Figure 2-1.

Figure 2-1 SharePoint custom list named Tweets
Perform the following steps:
Navigate to the Flow site at https://flow.microsoft.com .
In the top navigation, click My flows. Click the Create from template link shown in Figure 2-2.

Figure 2-2 The Create from a template link
Click the Data collection category and type the Twitter keyword in the search text box. Click the Save tweets that include a specific hashtag to a SharePoint list template shown in Figure 2-3.

Figure 2-3 Select the template
Sign into your SharePoint Online and Twitter accounts by clicking Sign in. Once you have successfully connected to SharePoint and Twitter, click Continue, as shown in Figure 2-4.

Figure 2-4 Continue to create the flow
Figure 2-5 shows the trigger and action that will be added by default as part of the template.

Figure 2-5 Trigger and action
Go to the When a new tweet appears trigger and enter the search text shown in Figure 2-6. Note that search text is case-insensitive.

Figure 2-6 The new trigger
Go to the Create item action and select or add values to the Site Address, List Name, Title, and Tweet fields, as shown in Figure 2-7.

Figure 2-7 Create an item action
After you’ve made all of the changes, enter a name for the flow or leave the default name, as shown in Figure 2-8. Click Create Flow.

Figure 2-8 Save and create the flow
The flow has been created successfully. Click Done, as shown in Figure 2-9.

Figure 2-9 Flow created
Figure 2-10 shows the details of the newly created flow.

Figure 2-10 Flow details
To test your flow, perform the following steps:
Navigate to your Twitter account. Post a new tweet and add the hash tag #SharePoint, as shown in Figure 2-11.

Figure 2-11 Post a tweet
For this template, the default trigger is every 5 minutes. After 5 minutes, navigate to your SharePoint Online list and you should see a new item, as shown in Figure 2-12.

Figure 2-12 New SharePoint list item
Thus, in this section, you learned how to create a flow to save tweets that include a specific hashtag to a SharePoint list.
Save Email Attachments to a SharePoint Document Library and Get a Notification
In this section, you will learn how to create a flow to save email attachments to a SharePoint document library and get a notification.
Perform the following steps:
Navigate to the Flow site at https://flow.microsoft.com .
In the top navigation, click My flows. Click the Create from template link.
Click the Notifications category and type save my email in the search text box. Click the Save my email attachments to a SharePoint and get a notification template, as shown in Figure 2-13.

Figure 2-13 Select a template
Sign into your SharePoint Online, Notifications, and Office 365 Outlook accounts by clicking Sign in. Once connected, click Continue, as shown in Figure 2-14.

Figure 2-14 Continue to create the flow
Figure 2-15 shows the trigger and actions that will be added by default as part of the template.

Figure 2-15 Trigger and actions
Go to the On new email trigger and select the Office 365 Outlook folder, as shown in Figure 2-16 and Figure 2-17.

Figure 2-16 Select the Office 365 Outlook folder

Figure 2-17 Inbox folder selected
Go to the Create file action and fill in the Site Address and Folder Path fields, as shown in Figure 2-18.

Figure 2-18 The Create file action
Go to the Send a push notification action. If required, update the default values based on your requirements, as shown in Figure 2-19.

Figure 2-19 Send a push notification
After you’ve made the changes, enter a name for the flow or leave the default name, as shown in Figure 2-20. Click Create Flow.

Figure 2-20 Save and create the flow
The flow has been created successfully. Click Done, as shown in Figure 2-21.

Figure 2-21 Flow created
Figure 2-22 shows the details of the newly created flow.

Figure 2-22 Flow details
To test your flow, perform the following steps:
Send an email with attachments to your Office 365 Outlook account, as shown in Figure 2-23.

Figure 2-23 Email with attachments
For this template, the default trigger is every 5 minutes. After 5 minutes, navigate to the selected SharePoint folder and you should see the Outlook email attachments saved as documents, as shown in Figure 2-24.

Figure 2-24 Email attachments uploaded to a SharePoint folder
Make sure to download the mobile app and connect to receive notifications. Refer to Chapter 4 to learn more about the mobile app.
Thus, in this section, you learned how to create a flow to save email attachments to a SharePoint folder and get a notification.
Send an Email When an Item Is Modified in a SharePoint List
In this section, you will learn how to create a flow to send an email when an item is modified in a SharePoint list. A SharePoint Online list named Project Tracker will be used. It consists of the following fields (also shown in Figure 2-25):
Project Name (single line of text)
Description (multiple lines of text)
Project Type (choice)
Status (choice)

Figure 2-25 Project Tracker SharePoint list
Perform the following steps:
Navigate to the Flow site at https://flow.microsoft.com .
In the top navigation, click My flows. Click the Create from template link.
Click the Email category and type the sharepoint keyword in the search text box. Click the When an item in a SharePoint list is modified send an email template, as shown in Figure 2-26.

Figure 2-26 Select a template
Click Edit in advanced mode, as shown in Figure 2-27.

Figure 2-27 The Edit in advanced mode button
Go to the When an existing item is modified trigger and fill in the Site Address and List Name fields with the information shown in Figure 2-28.

Figure 2-28 Trigger parameters
Go to the Send Email action and enter a value for the To address (to whom email has to be sent), as shown in Figure 2-29.

Figure 2-29 Send an email
After you’ve made the changes, enter a name for the flow or leave the default name, as shown in Figure 2-30. Click Create Flow.

Figure 2-30 Save and create a flow
The flow has been created successfully. Click Done, as shown in Figure 2-31.

Figure 2-31 The flow has been created
Figure 2-32 shows the details of the newly created flow.

Figure 2-32 Flow details
To test your flow, perform the following steps:
Navigate to the SharePoint Online list and modify an existing item, as shown in Figure 2-33.

Figure 2-33 Update an existing list item
For this template, the default trigger is every 5 minutes. After 5 minutes, navigate to your Office 365 Outlook and you should see a new email, as shown in Figure 2-34.

Figure 2-34 Received email
Thus, in this section, you learned how to create a flow to send an email when an item is modified in a SharePoint list.
Add an Event to Google Calendar When an Item Is Added in SharePoint
In this section, you will learn how to create a flow to add an event to Google Calendar when an item is added in SharePoint. A SharePoint Online list named Conference Details will be used for this flow. It consists of following fields (also shown in Figure 2-35):
Title (single line of text)
Description (multiple lines of text)
Start Date (date and time)
End Date (date and time)
Location (location)

Figure 2-35 Conference Details SharePoint list
Perform the following steps:
Navigate to the Flow site at https://flow.microsoft.com .
In the top navigation, click My flows. Click the Create from template link.
Click the Events and calendar category and type the sharepoint keyword in the search text box. Click the Add an event when an item is added in SharePoint template shown in Figure 2-36.

Figure 2-36 Select a template
Sign into your SharePoint Online and Google Calendar accounts by clicking Sign in. Once connected to SharePoint and Google Calendar, click Continue, as shown in Figure 2-37.

Figure 2-37 Continue to create the flow
Go to the When a new item is created trigger and fill in the Site Address and List Name fields, as shown in Figure 2-38.

Figure 2-38 Trigger parameters
Go to the Create an event action and add dynamic content to the parameters, as shown in Figure 2-39.

Figure 2-39 Add dynamic content
After you’ve made the changes, enter a name for the flow or leave the default name, as shown in Figure 2-40. Click Create Flow.

Figure 2-40 Save and create the flow
The flow has been successfully created. Click Done, as shown in Figure 2-41.

Figure 2-41 The flow has been created
Figure 2-42 shows the details of the newly created flow.

Figure 2-42 Flow details
To test your flow, perform the following steps:
Navigate to the SharePoint Online Conference Details list and create a new item, as shown in Figure 2-43.

Figure 2-43 Create a new item
For this template, the default trigger is every 5 minutes. After 5 minutes, navigate to your Google calendar and you should see a new event, as shown in Figure 2-44.

Figure 2-44 New event created in Google Calendar
When you create a date field in a SharePoint list, make sure you select “Date & Time.” Otherwise the flow will fail due to an incorrect date format, as shown in Figure 2-45.

Figure 2-45 Invalid date format issue
Thus, in this section, you learned how to create a flow to add an event to Google Calendar when an item is added in SharePoint.
Create a Flow from a SharePoint Online List
In this section, you will learn how to create a flow from a SharePoint Online list to post a message to Yammer. A SharePoint Online list named Conference Details will be used for this flow. It consists of the following fields (also shown in Figure 2-46):
Title (single line of text)
Description (multiple lines of text)
Start Date (date and time)
End Date (date and time)
Location (location)

Figure 2-46 Conference Details SharePoint List
Perform the following steps:
Navigate to a SharePoint Online list. For example, https://c986.sharepoint.com/sites/Flow/Lists/Conference%20Details/AllItems.aspx .
In the menu, click Flow and then click Create a flow, as shown in Figure 2-47.

Figure 2-47 Create a flow
Click Post a message to Yammer for a selected item template, as shown in Figure 2-48.

Figure 2-48 Select a template
Sign into your SharePoint Online and Yammer accounts by clicking Sign in. Once connected to SharePoint and Yammer, click Continue, as shown in Figure 2-49.
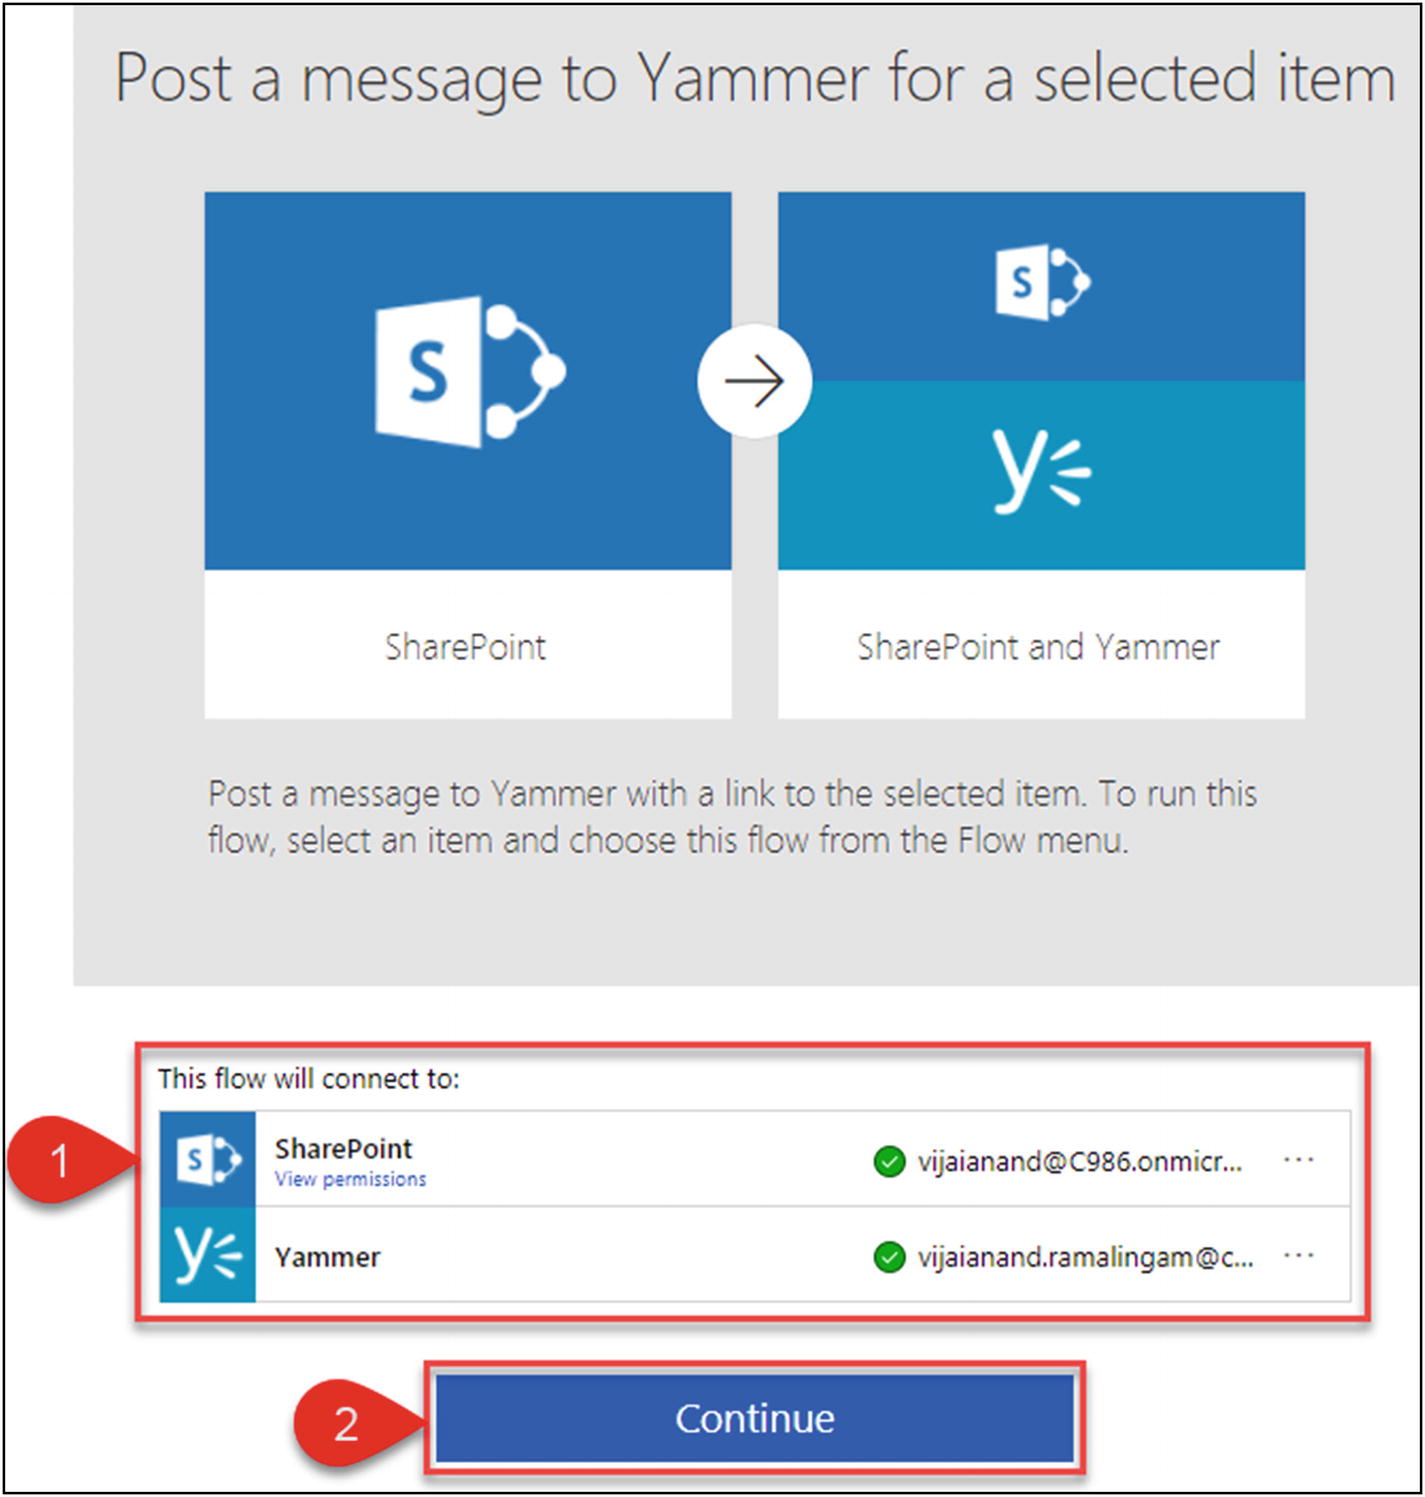
Figure 2-49 Continue to create the flow
Go to the Get item action and leave the default values for the parameters, as shown in Figure 2-50.

Figure 2-50 Action parameters
Go to the Post message action, select the Group ID from the drop-down, and update the message text by adding the dynamic content shown in Figure 2-51.

Figure 2-51 Add dynamic content
Go to the For a selected item trigger, click Edit, and delete the input message, as shown in Figure 2-52.

Figure 2-52 The For a selected item action
After you’re done with the changes, enter a name for the flow or leave the default name, as shown in Figure 2-53. Click Create Flow.

Figure 2-53 Save and create the flow
The flow has been created successfully. Click Done, as shown in Figure 2-54.

Figure 2-54 The flow has been created
Figure 2-55 shows the details for the newly created flow.

Figure 2-55 Flow details
To test your flow, perform the following steps:
Navigate to the SharePoint Online Conference Details list, select an existing item, and click more options. Click Flow and then click the flow that you created, as shown in Figure 2-56.

Figure 2-56 Run a flow for an existing item
Click Continue, as shown in Figure 2-57.

Figure 2-57 Continue to run the flow
Click Run flow, as shown in Figure 2-58.

Figure 2-58 Run flow
Navigate to Yammer and go to the respective group that was selected as Group ID in the Post message action. You should see a new post in Yammer, as shown in Figure 2-59.

Figure 2-59 A message posted in Yammer
Thus, in this section, you learned how to create a flow from a SharePoint Online list to post a message to Yammer.
Create a Flow from OneDrive
In this section, you will learn how to create a flow to copy a file from OneDrive for Business to SharePoint.
Navigate to www.office.com . Click the OneDrive app, as shown in Figure 2-60.

Figure 2-60 The OneDrive app
Click Flow and then click Create flow, as shown in Figure 2-61.

Figure 2-61 Create a flow
Click See more templates, as shown in Figure 2-62.

Figure 2-62 The See more templates button
Click the Copy files between OneDrive for Business and SharePoint template shown in Figure 2-63.

Figure 2-63 Select a template
Sign into OneDrive for Business and SharePoint. Click Continue, as shown in Figure 2-64.

Figure 2-64 Continue to create the flow
Select the OneDrive folder, SharePoint site address, and SharePoint folder path where the file has to be copied and then click Create Flow, as shown in Figure 2-65.

Figure 2-65 Update the parameter values to create the flow
The flow has been created successfully. Figure 2-66 shows the details of the newly created flow.

Figure 2-66 Flow details
To test your flow, perform the following steps:
Navigate to OneDrive and upload a document, as shown in Figure 2-67.

Figure 2-67 Upload a document to OneDrive
For this template, the default trigger is every 5 minutes. After 5 minutes, navigate to the SharePoint folder specified in the flow where the file will be copied and you should see the copied file, as shown in Figure 2-68.

Figure 2-68 Copied file in SharePoint
Thus, in this section, you learned how to create a flow to copy a file between OneDrive for Business and SharePoint.
Create a Flow in Microsoft Teams
In this section, you will learn how to create a flow to post a message in Microsoft Teams when specific documents are uploaded in SharePoint.
Perform the following steps:
Navigate to Microsoft Teams at https://teams.microsoft.com .
In the left navigation, click Store and then click Flow, as shown in Figure 2-69.

Figure 2-69 Select the Flow app
Click Install, as shown in Figure 2-70.

Figure 2-70 Install the Flow app
Open the Flow app, as shown in Figure 2-71.
Figure 2-71 Open the Flow app
You’ll see four tabs (Conversation, Flows, Approvals, and About). Sign into Flow, as shown in Figure 2-72.

Figure 2-72 Sign into Flow
Once you sign into Flow, you should see all of your flows. Click Create from template, as shown in Figure 2-73.

Figure 2-73 Create a flow from a template
Click the Alert the team when specific documents are uploaded template shown in Figure 2-74.

Figure 2-74 Select a template
Once connected to Microsoft Teams and SharePoint, click Continue, as shown in Figure 2-75.

Figure 2-75 Continue to create the flow
Go to the When a file is created trigger and fill in the Site Address and Folder Id fields, as shown in Figure 2-76.
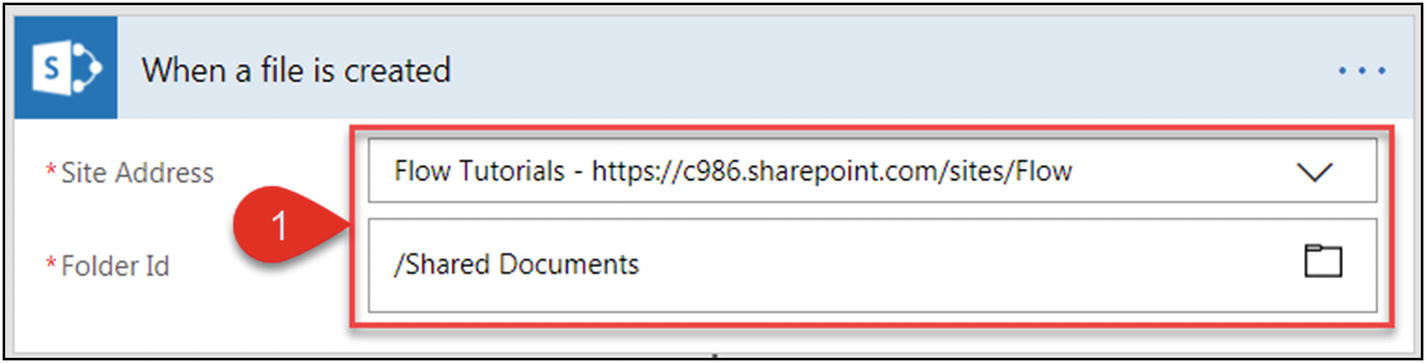
Figure 2-76 Trigger parameters
Go to the Post messageScope condition and check whether the file name contains SharePoint, as shown in Figure 2-77.

Figure 2-77 Check the condition
If the condition is satisfied, alert the team by posting a message. Go to the Alert the team action and select Team Id and Channel Id. If required, update the default values for the parameters by clicking Edit, as shown in Figure 2-78.

Figure 2-78 Action parameters
After you’re done with the changes, enter a name for the flow or leave the default name, as shown in Figure 2-79. Click Create Flow.

Figure 2-79 Save and create a flow
The flow has been created successfully. Click Done, as shown in Figure 2-80.

Figure 2-80 The flow has been created
To test your flow, perform the following steps:
Navigate to the SharePoint Document Library and upload a document with a file name that contains SharePoint, as shown in Figure 2-81.

Figure 2-81 Upload a document
For this template, the default trigger is every 5 minutes. After 5 minutes, navigate to Microsoft Teams and you should see a new message in the respective team and channel, as shown in Figure 2-82.

Figure 2-82 Message posted in Microsoft Teams
Thus, in this section, you learned how to create a flow to post a message in Microsoft Teams when specific documents are uploaded in SharePoint.
Send Reminder Emails for Overdue Tasks in SharePoint
A common requirement in SharePoint is to send reminder emails for overdue tasks. You can achieve this using any of the following approaches:
SharePoint designer workflow
Scheduling console application or PowerShell script
Configuring a retention policy or any other approach
In this section, you will learn how to create a flow to send reminder emails for overdue tasks in SharePoint.
Perform the following steps:
Navigate to the Flow site at https://flow.microsoft.com .
In the top navigation, click My flows. Click the Create from blank link shown in Figure 2-83.

Figure 2-83 Create from blank
Click Search hundreds of connectors and triggers, as shown in Figure 2-84.

Figure 2-84 Search for more connectors
Click the Schedule connector, as shown in Figure 2-85.

Figure 2-85 Schedule connector
Click the Schedule – Recurrence trigger, as shown in Figure 2-86.

Figure 2-86 The Schedule – Recurrence trigger
Leave the default interval as 5 minutes, as shown in Figure 2-87, so that you can test it and update the interval in real time based on your requirements.

Figure 2-87 Recurrence interval
Click Next step and then click Add an action, as shown in Figure 2-88.

Figure 2-88 Add an action
Type the keyword sharepoint in the search text box and then click the SharePoint - Get items action shown in Figure 2-89.

Figure 2-89 Select the SharePoint – Get items action
Select the SharePoint site address and list name and then set the filter query with the filter condition of Due Date less than current date (DueDate lt datetime‘@{utcNow()}’), as shown in Figure 2-90.
Note The tasks list will not be displayed in the List Name drop-down; you need to enter the list name manually by clicking Enter custom value.

Figure 2-90 Update the parameter values for the Get items action
Click Next step and then click More. Click Add an apply to each, as shown in Figure 2-91.

Figure 2-91 The Add an apply to each button
Add the dynamic content value from the Get items output to the Select an output from previous steps parameter, as shown in Figure 2-92. Click Add an action.

Figure 2-92 Add an action
Type office 365 in the search text box and then click the Office 365 – Send an email action shown in Figure 2-93.

Figure 2-93 Select the Office 365 Outlook – Send an email action
Add static and dynamic content, as shown in Figure 2-94:
To: Assigned To Email (dynamic content)
Subject: Reminder – Task Overdue – Task Name (dynamic content)
Body: Complete the task by today – Task Name (dynamic content) Link to Item (dynamic content)
Note In the Send an email action, when the dynamic content Assigned To Email is added to the To field, one more loop named Apply to each 2 is automatically added, as shown in Figure 2-94. This is because by default the Assigned To field in the tasks list has Allow multiple selections set to Yes. You can change or check the column settings by navigating to the list settings.

Figure 2-94 The Send an email action
After you’re done with the changes, enter a name for the flow and click Create Flow, as shown in Figure 2-95.

Figure 2-95 Save and create the flow
The flow has been created successfully. Click Done, as shown in Figure 2-96.

Figure 2-96 The flow has been created
Figure 2-97 shows the details for the newly created flow.

Figure 2-97 Flow details
To test your flow, look for overdue tasks in the tasks list, as shown in Figure 2-98.

Figure 2-98 Tasks list
Every 5 minutes, the flow will be executed and will send emails about all overdue tasks, as shown in Figure 2-99.

Figure 2-99 Overdue tasks emails
Thus, in this section, you learned how to create a flow to send reminder emails for overdue tasks in SharePoint.
Add a Switch Case in a Flow
In this section, you will learn how to use a switch case in a flow. A SharePoint Online custom list named Social Media will be used for this flow. It consists of the following fields (also shown in Figure 2-100):
Title (single line of text)
Post To (choice)

Figure 2-100 Social Media list
A flow will be triggered when a new item is added and it will post a message on Twitter, Yammer, or Facebook based on the Post To field selection in the list item.
Perform the following steps:
Navigate to the Flow site at https://flow.microsoft.com .
In the top navigation, click My flows. Click the Create from blank link, as shown in Figure 2-101.

Figure 2-101 The Create from blank link
Click Search hundreds of connectors and triggers, as shown in Figure 2-102.

Figure 2-102 Search for more connectors
Type the keyword sharepoint in the search text box and then click the SharePoint – When an item is created trigger shown in Figure 2-103.
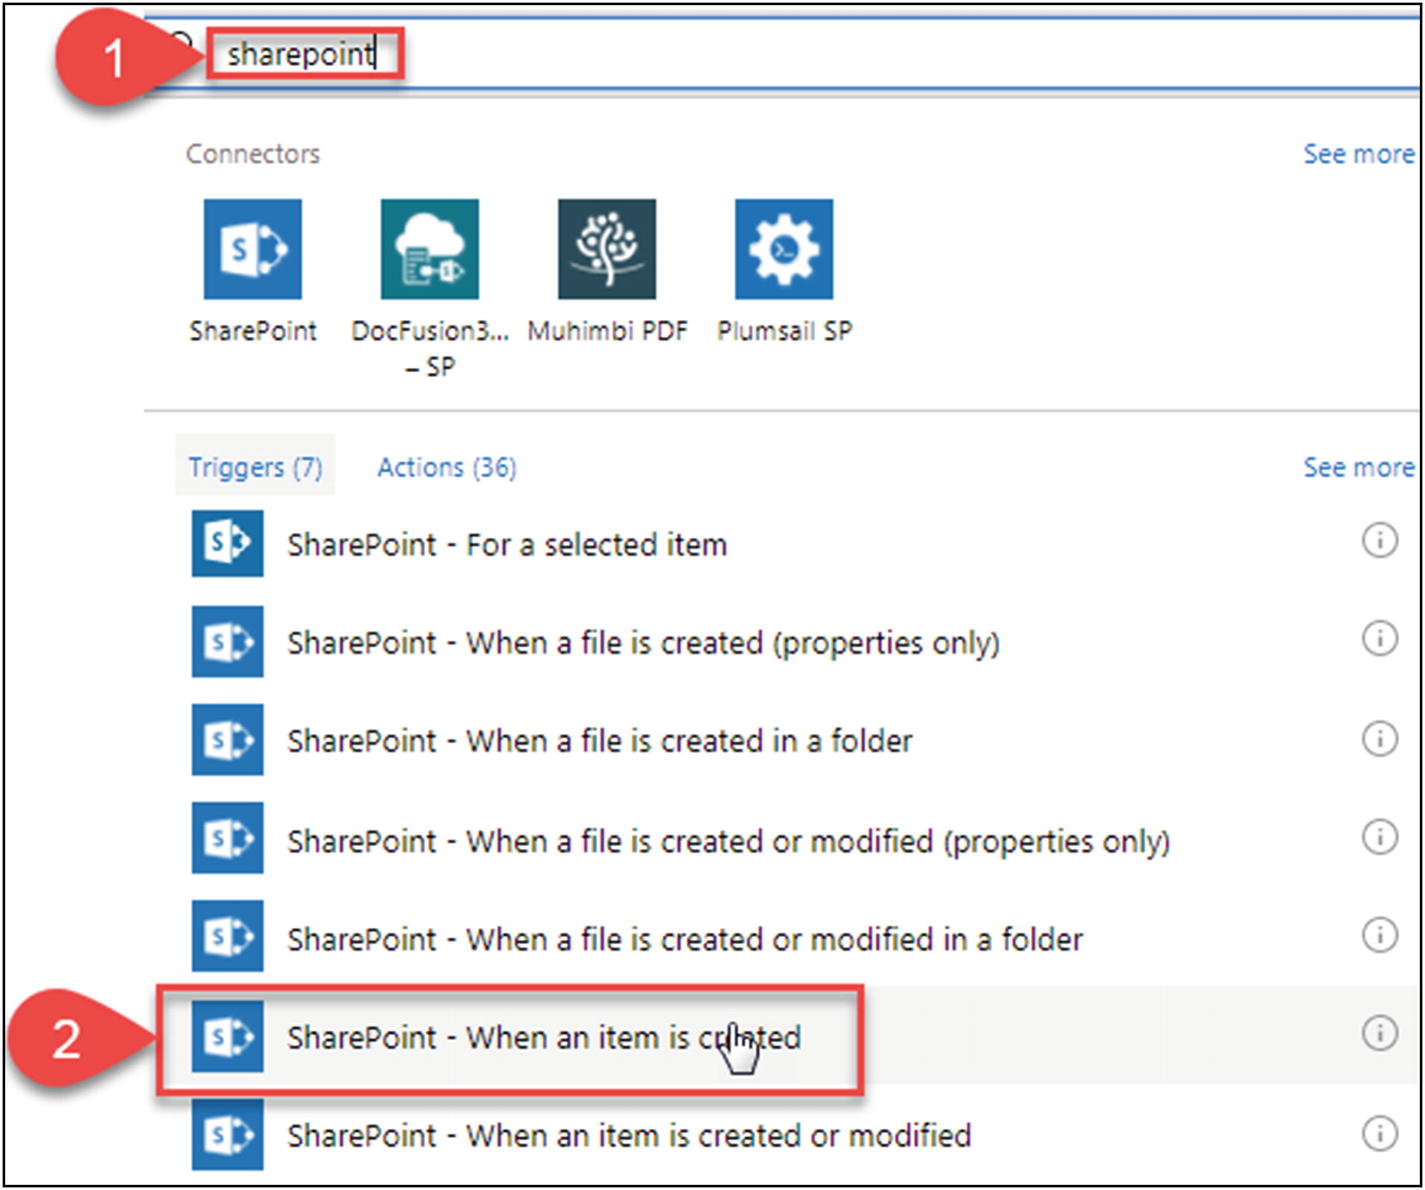
Figure 2-103 Select the SharePoint – When an item is created action
Select the SharePoint Site Address and List Name, as shown in Figure 2-104.

Figure 2-104 Action parameters
Click Next step and then click Add a switch case from more options, as shown in Figure 2-105.

Figure 2-105 Add a switch case
Add the dynamic content Post To Value to the switch case, as shown in Figure 2-106.

Figure 2-106 Add dynamic content to the switch case
Go to Case, enter the value as Twitter, and then click Add an action, as shown in Figure 2-107.

Figure 2-107 Case - Twitter
Type the keyword Twitter in the search text box and then click the Twitter – Post a tweet action, as shown in Figure 2-108.

Figure 2-108 Select the Twitter – Post a tweet action
Add the dynamic content of Title to Tweet text, as shown in Figure 2-109.

Figure 2-109 The Post a tweet action
Click the + sign to add a case, as shown in Figure 2-110.

Figure 2-110 Add a case
Go to Case 2, enter the value as Yammer, and then click Add an action, as shown in Figure 2-111.

Figure 2-111 Case 2 - Yammer
Type the keyword Yammer in the search text box and then click the Yammer – Post Message action shown in Figure 2-112.

Figure 2-112 Select the Yammer – Post Message action
Select the Group ID and Network ID and then add the dynamic content of Title to Message Text, as shown in Figure 2-113.

Figure 2-113 The Post Message action
Go to Default and click Add an action, as shown in Figure 2-114.

Figure 2-114 Add an action
Type the keyword Facebook in the search text box and then click the Facebook – Post to my timeline action shown in Figure 2-115.

Figure 2-115 Select the Facebook – Post to my timeline action
Add the dynamic content of Title to Status message, as shown in Figure 2-116.

Figure 2-116 The Post to my timeline action
Enter a name for the flow and then click Create flow, as shown in Figure 2-117.

Figure 2-117 Create a flow
Figure 2-118 shows the details for the newly created flow.

Figure 2-118 Flow details
To test your flow, perform the following steps:
Navigate to the SharePoint Online custom list. Create a new item with a message that has to be posted and select the Post To value where it has to be posted. A new item will be created with a message and posted to Twitter, as shown in Figure 2-119.

Figure 2-119 Create a new item
For this template, the default trigger is every 5 minutes. After 5 minutes, navigate to the Twitter account and you should see a new tweet, as shown in Figure 2-120.

Figure 2-120 New tweet
Thus, in this section, you learned how to use a switch case in Flow.