
Microsoft Flow allows you to create and manage the approval of documents or processes. For example, whenever a document is uploaded to SharePoint, it can be sent for approval.
Manage Approvals
Microsoft Flow allows approvers to respond to requests from
An approval center
An email inbox
A mobile app
In the approval center, all received and sent requests are available and the approvers have the ability to respond, send emails, and more. Click Received requests to view all of the requests waiting for approval. Upon clicking the request, details will be displayed, as shown in Figure 3-1.

Figure 3-1 Received requests
Click Sent requests to view all the requests sent for approval. Upon clicking the request, details will be displayed, as shown in Figure 3-2.

Figure 3-2 Approved requests
Start an Approval When a New Item Is Added in SharePoint
In this section, you will learn how to create a flow to start an approval when a new item is added in SharePoint.
Perform the following steps:
Navigate to the Flow site at https://flow.microsoft.com .
In the top navigation, click Approvals and then select the Start approval when a new item is added template. Click Add, as shown in Figure 3-3.

Figure 3-3 Select a template
Sign into your Office 365 Outlook and SharePoint accounts. Click Continue, as shown in Figure 3-4.

Figure 3-4 Continue to create the flow
Go to the When a new item is added trigger and select a site address and list name, as shown in Figure 3-5.

Figure 3-5 When a new item is created
Go to the Start an approval action, add an Assigned To value, and leave the default values as is for the other parameters, as shown in Figure 3-6. If required, update the values for the parameters based on requirements.

Figure 3-6 Start an approval
Go to the Condition action. If required, update the default values for the parameters based on requirements, as shown in Figure 3-7.

Figure 3-7 Conditions
After you’re done with the changes, enter a name for the flow or leave the default name, as shown in Figure 3-8. Click Create Flow.

Figure 3-8 Create the flow
The flow has been created successfully. Click Done, as shown in Figure 3-9.

Figure 3-9 The flow has been created
Figure 3-10 shows the details of the newly created flow.

Figure 3-10 Flow details
To test your flow, perform the following steps:
Navigate to the SharePoint Online custom list and add a new item, as shown in Figure 3-11.

Figure 3-11 Add a new item
For this template, the default trigger is every 5 minutes. After 5 minutes, the approver will receive an email in Office 365 Outlook, as shown in Figure 3-12. Click Approve, provide approver comments, and then click Submit.

Figure 3-12 Approval email
Once the approver approves or rejects the request, the requester will receive an email, as shown in Figure 3-13.

Figure 3-13 Requester email
Thus, in this section, you learned how to create a flow to start an approval when a new item is added in SharePoint.
Start an Approval for a New File to Move to a Different Folder
In this section, you will learn how to start an approval to move a new file to a different folder. The high-level design for this flow is shown in Figure 3-14.

Figure 3-14 High-level flow design
Perform the following steps:
Navigate to the Flow site at https://flow.microsoft.com .
In the top navigation, click Approvals and then select the Start an approval for new file to move it to a different folder template. Click Add, as shown in Figure 3-15.

Figure 3-15 Select a template
Sign into your SharePoint account and then click Continue, as shown in Figure 3-16.

Figure 3-16 Continue to create the flow
Go to the When a file is created trigger and select a site address and folder, as shown in Figure 3-17.

Figure 3-17 Fill in the trigger parameters
Go to the Start an approval action, add the Assigned To value, and leave the default values for the other parameters, as shown in Figure 3-18. If required, update the values for the parameters based on the requirements.

Figure 3-18 Start an approval
Go to the Create file action under the Condition – If yes action and select the site address and folder where the file is to be copied, as shown in Figure 3-19.

Figure 3-19 The Create file action
Go to the Delete file action under the Condition – If yes action and select the site address, as shown in Figure 3-20. The file identifier is the dynamic content or output returned from the When a file is created trigger, which will be used to delete the file.

Figure 3-20 The Delete file action
Once you’re done with the changes, enter a name for the flow or leave the default name, as shown in Figure 3-21. Click Create flow.

Figure 3-21 Click the Create flow button
Figure 3-22 shows the details of the newly created flow.

Figure 3-22 Flow details
To test your flow, perform the following steps:
Navigate to the SharePoint Online document library and upload a document, as shown in Figure 3-23.

Figure 3-23 Upload a document
For this template, the default trigger is every 5 minutes. After 5 minutes, the approver will receive an email in Office 365 Outlook, as shown in Figure 3-24. Click Approve, provide approver comments, and then click Submit.

Figure 3-24 Approval email
Once the file is approved, the file will be moved to different folder, as shown in Figure 3-25.

Figure 3-25 The file was moved to a different location
Thus, in this section, you learned how to start an approval for moving a newly created file to a different folder.
Create a Sequential Approval Flow
In this section, you will learn how to create a sequential workflow. The high-level design for this flow is shown in Figure 3-26.

Figure 3-26 Sequential flow overview
Perform the following steps:
Navigate to the Flow site at https://flow.microsoft.com .
In the top navigation, click My flows and then click Create from blank, as shown in Figure 3-27.

Figure 3-27 Create from blank
Click the When an item is created trigger shown in Figure 3-28.

Figure 3-28 Select the trigger
Go to the When an item is created trigger and fill in the Site Address and List Name fields, as shown in Figure 3-29.

Figure 3-29 The When an item is created action
Click Next step and then click Add an action, as shown in Figure 3-30.

Figure 3-30 Add an action
Type the keyword Approvals in the search text box and then click the Approvals – Start an approval action, as shown in Figure 3-31.

Figure 3-31 Select the action and trigger
Select the Anyone from the assigned list approval type, shown in Figure 3-32. If required, select Everyone from the assigned list as the approval type.

Figure 3-32 The Start an approval action
Update the parameter values by adding dynamic content, as shown in Figure 3-33.

Figure 3-33 Add parameters
Click Next step and then click Add a condition, as shown in Figure 3-34.

Figure 3-34 Add a condition
Set the condition to Response is equal to Approve, as shown in Figure 3-35.

Figure 3-35 Set the condition
Go to the If no action and click Add an action. Type the keyword sharepoint in the search text box and then click SharePoint – Update item action, as shown in Figure 3-36.

Figure 3-36 Chose an action
Go to the Update item action and update the parameter values shown in Figure 3-37.

Figure 3-37 The Update item action
Go to the If yes action, click More, and then click Add a condition, as shown in Figure 3-38.
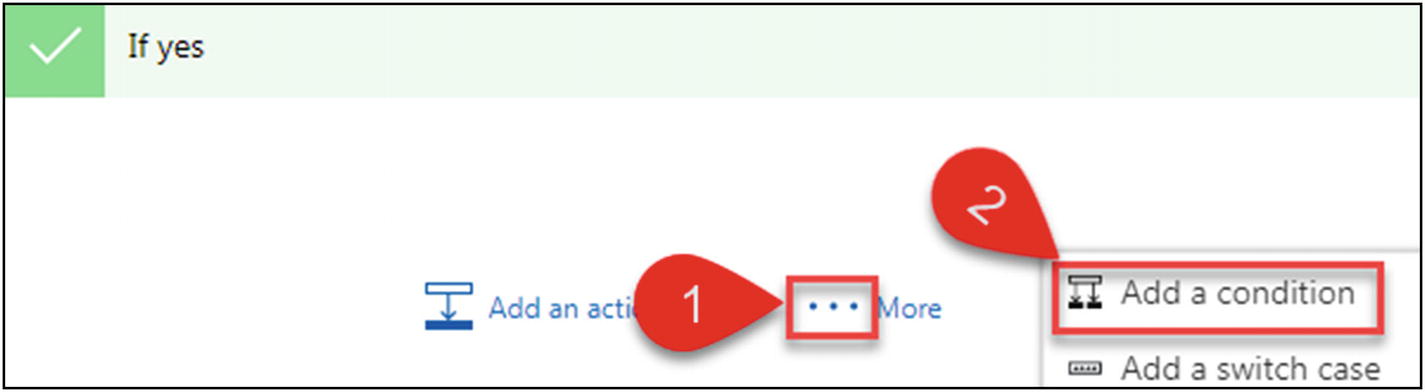
Figure 3-38 Add a condition
Set the condition as Amount is greater than 10000, as shown in Figure 3-39.
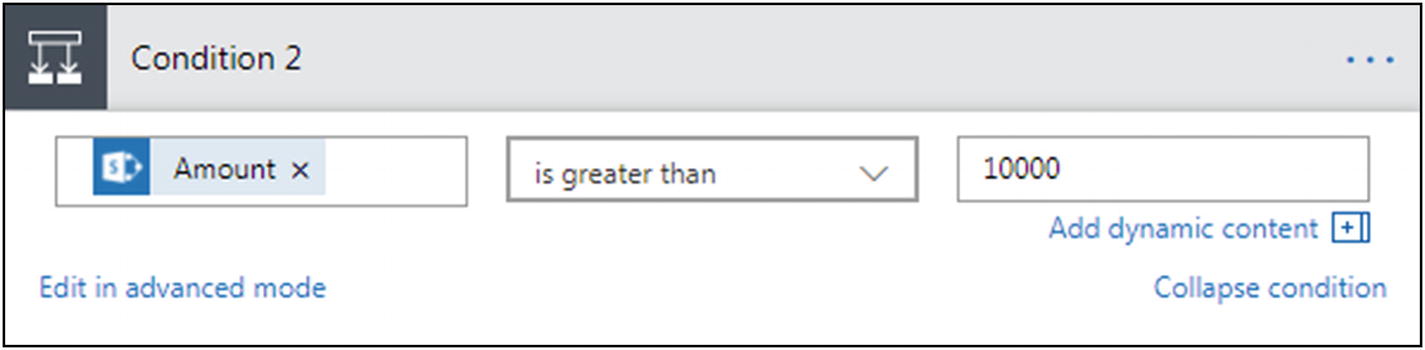
Figure 3-39 Set the condition
Go to the If no (under Condition 2) action and click Add an action. Type the keyword sharepoint in the search text box and then click the SharePoint – Update item action, as shown in Figure 3-40.

Figure 3-40 Chose an action
Go to the Update item action and update the parameter values shown in Figure 3-41.

Figure 3-41 The Update item action
Go to the If yes (under Condition 2) action and click Add an action, as shown in Figure 3-42.

Figure 3-42 Add an action
Type the keyword sharepoint in the search text box and then click the SharePoint – Update item action, as shown in Figure 3-43.

Figure 3-43 Choose an action
Go to the Update item action and update the parameter values shown in Figure 3-44.

Figure 3-44 The Update item action
Click Next step and then click Add an action. Type the keyword approvals in the search text box and then click the Approvals – Start an approval action, as shown in Figure 3-45.

Figure 3-45 Update the action
Update the parameter values by adding the dynamic content shown in Figure 3-46.

Figure 3-46 The Start an approval action
Click More and then click Add a condition, as shown in Figure 3-47.

Figure 3-47 Add a condition
Set the condition as Start an approval 2 Response equal to Approve, as shown in Figure 3-48.

Figure 3-48 Set the condition
Go to the If yes (under Condition 3) action and add an action to update the SharePoint list item. Update the parameter values by adding the dynamic content shown in Figure 3-49.
Similarly, go to the If no (under Condition 3) action and add an action to update the SharePoint list item. Update the parameter values by adding the dynamic content shown in Figure 3-49.
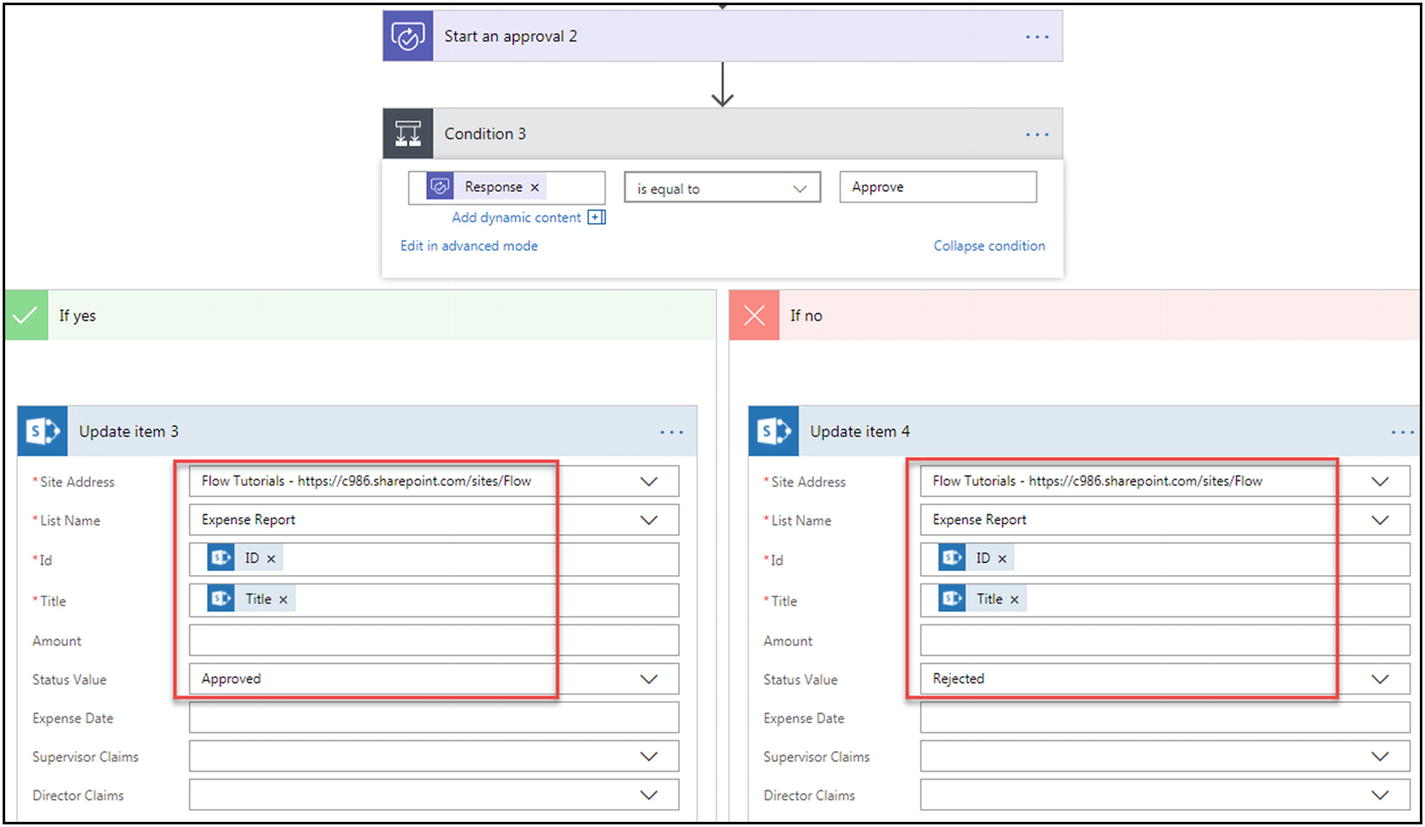
Figure 3-49 Set the condition
Enter a name for the flow and then click Create Flow, as shown in Figure 3-50.

Figure 3-50 Save and create the flow
The flow has been created successfully. Click Done.
Figure 3-51 shows the details of the newly created flow.

Figure 3-51 The details of the new flow
To test your flow, perform the following steps:
Navigate to the SharePoint Online Expense Report list and create a new item, as shown in Figure 3-52.

Figure 3-52 Create a new item
The supervisor will receive an approval email. Click Approve, provide comments, and then click Submit, as shown in Figure 3-53.

Figure 3-53 Request for approval
The amount is greater than 10000 so the status gets updated to Pending with Director, as shown in Figure 3-54.

Figure 3-54 Status updated
The director will receive an approval email. Click Approve, provide comments, and then click Submit, as shown in Figure 3-55.

Figure 3-55 Request for approval
The status gets updated to Approved, as shown in Figure 3-56.

Figure 3-56 Status updated
Thus, in this section, you learned how to create a sequential flow.
Try It Yourself
Create a three-level approval flow when a new item is added in the SharePoint list. Hint: For a third-level approval, everyone must approve.