In this chapter, you will learn how to use the mobile app to create a button and to monitor and manage a flow.
Microsoft Flow is available as a mobile app for Android, iOS, and Windows phones. Navigate to Microsoft Flow site at https://flow.microsoft.com . In the top navigation, click Flow for Mobile, as shown in Figure 4-1.

Figure 4-1 Flow for Mobile
Download the mobile app for Android, iOS, or Windows. You can also email yourself a download link for later, as shown in Figure 4-2.

Figure 4-2 Download options
The Flow mobile app can be used for the following activities:
Create new flows: Use the Flow app to easily create new automated workflows from anywhere.
Discover button: Use buttons to trigger your workflows with a tap, and then share them with your team.
React fast: Get push notifications to stay on top of your flows, grant approvals, monitor flow activity, and more.
Note
The Android version of the app is used in this chapter; the interface on an iOS device or Windows Phone is similar.
Install, Sign In, and Manage an Account
Perform the following steps to install, sign in, and manage your account:
Install the mobile app by clicking Install, as shown in Figure 4-3.

Figure 4-3 Install the app
Open the Flow mobile app and then click Get started, as shown in Figure 4-4.

Figure 4-4 Get started with the app
Enter an email ID and then click SIGN IN, as shown in Figure 4-5.

Figure 4-5 Sign in, part 1
Enter the password and then click Sign in, as shown in Figure 4-6.

Figure 4-6 Sign in, part 2
Click Account to view the account details, as shown in Figure 4-7.

Figure 4-7 Account details
Create a Button Flow from a Template
Perform the following steps to create a button flow from a template to send a push notification with your current location using the mobile app:
Navigate to the mobile app and then click Flows. Click the + sign shown in Figure 4-8.

Figure 4-8 Create a new flow
Click Create from template, as shown in Figure 4-9.

Figure 4-9 Create from template
Click the Send me a push notification with my current location template shown in Figure 4-10.

Figure 4-10 Select the template
Click Use this template, as shown in Figure 4-11.

Figure 4-11 Use this template
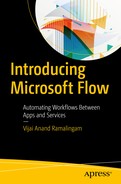
If required, add some input or update the default values. Once done, leave the default name for the flow and then click Create, as shown in Figure 4-12.
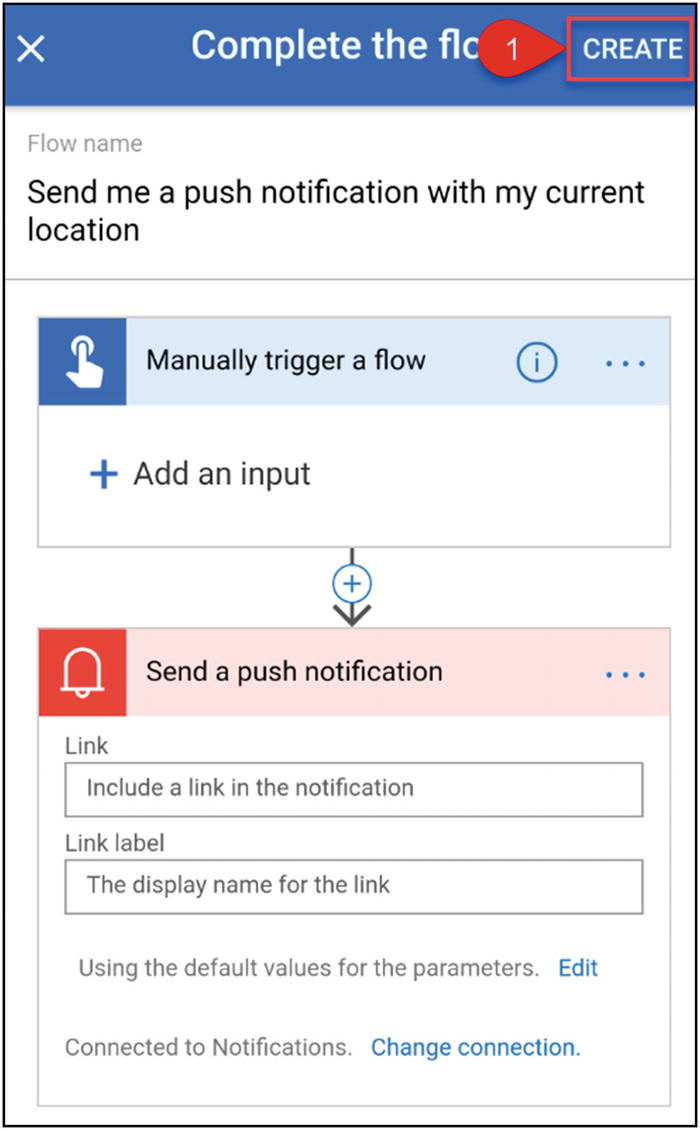
Figure 4-12 Create a flow
You’ll see a message about saving the flow (Figure 4-13).

Figure 4-13 Saving the flow
Once the flow is saved, click Done, as shown in Figure 4-14.

Figure 4-14 The flow has been created
To test your flow, perform the following steps:
Navigate to the mobile app and then click Buttons. Click the Send me a push notification with my current location button, as shown in Figure 4-15.

Figure 4-15 Buttons
This button requires location access, as shown in Figure 4-16. Turn on location services.

Figure 4-16 Turn on location services
Allow Flow to access the device’s location by clicking Allow, as shown in Figure 4-17.

Figure 4-17 Access the device’s location
Go to Activity. You should see the new feed with the current location, as shown in Figure 4-18. You should also see a push notification with the current location.
Figure 4-18 New feed with current location
Share a Button Flow and Link with Others
Perform the following steps to share a button flow and link with others:
Navigate to the mobile app and then click Buttons. Select the flow and then click the three dots in the circle (…), as shown in Figure 4-19.

Figure 4-19 Buttons
Click Invite others, as shown in Figure 4-20.

Figure 4-20 Invite others, part 1
Click Invite others, as shown in Figure 4-21.

Figure 4-21 Invite others, part 2
Search for people or groups and then add the people or groups. Click Send, as shown in Figure 4-22.

Figure 4-22 Add people or groups
Figure 4-23 shows that the button was shared successfully.

Figure 4-23 The button was shared successfully
Navigate to the mobile app and then click Buttons. Select the flow and then click the three dots in the circle (…), as shown in Figure 4-24.

Figure 4-24 Buttons
Click the Share button link shown in Figure 4-25. The button link will be shared with others via Facebook, WhatsApp, Gmail, etc.

Figure 4-25 Share button link
Manage Flows Using the Mobile App
Perform the following steps to manage flows using the mobile app:
Navigate to the mobile app and then click Flows. Click the Send me a push notification with my current location flow, as shown in Figure 4-26.

Figure 4-26 Select the flow
The flow details will be opened. You can enable or disable, edit, create a copy, manage users and connections, and delete the flow, as shown in Figure 4-27.

Figure 4-27 Flow management options
Enable flow: Turn the flow on or off.
Edit flow: Edit or update the flow. Once you’re done with the updates, click Update, as shown in Figure 4-28.

Figure 4-28 Flow details
Users and Connections: Manage the users and connections, as shown in Figures 4-29 and 4-30.

Figure 4-29 Manage users

Figure 4-30 Manage connections
Run history: View all the run details of the flow, as shown in Figures 4-31 and 4-32.

Figure 4-31 Run history
Figure 4-32 Run details
Save as: Create a copy of the flow. If required, update the flow name and then click Done, as shown in Figure 4-33.

Figure 4-33 Create a copy of the flow
Delete flow: Delete the flow, including the history, as shown in Figure 4-34.

Figure 4-34 Delete the flow
Try It Yourself
Create a button flow to send a predefined email that includes your full address (current location) to an Office 365 account.